GB ELIAN-FIX User manual

DE / EN / IT / FR / NL / PL / HU / CZ / SK / ES / PT
ELIAN-FIX
FUTURE PERFECT

2
DE – WARNUNG! Die folgende Kurzanleitung dient nur der Übersicht. Um maximale Sicherheit und maximalen Komfort für Ihr Kind zu
erreichen, ist es unbedingt notwendig, die gesamte Gebrauchsanleitung aufmerksam zu lesen.
EN – WARNING! The following brief instructions are intended to provide only an overview. In order to achieve maximum security and comfort
for your child it is absolutely imperative that you read the whole instruction manual carefully.
IT – ATTENZIONE! Le istruzioni a lato sono soltanto un sommario generale. Per garantire massima sicurezza e comfort al vostro bambino è
indispensabile leggere attentamente ed interamente il manuale d'uso.
FR – ATTENTION! Ces brèves instructions ne sont qu´un aperçu. Afin d’assurer la sécurité et le confort maximum pour votre enfant, il est
absolument impératif de lire la totalité du manuel d’instructions.
NL – BELANGRIJK! De volgende korte handleiding is uitsluitend bedoeld als overzicht. Voor optimale veiligheid en maximaal comfort voor het
kind is het absoluut noodzakelijk dat u de gehele handleiding zorgvuldig doorleest.
PL – OSTRZEŻENIE! Niniejsza skrócona instrukcja obsługi jest przeznaczona wyłącznie jako przypomnienie. Tylko zapoznanie się z całą
instrukcją daje pewność, że Twoje dziecko będzie podróżować bezpiecznie i komfortowo.
HU – FIGYELEM! Ez a rövid útmutató kizárólag tájékoztatási célt szolgál. Gyermeke maximális biztonsága és kényelme érdekében mindenképp
javasolt a teljes használati útmutató alapos átolvasása.
CZ – VAROVÁNÍ! Následující zkrácený návod slouží pouze pro náhled. Pro dosažení maximální ochrany a pohodlí pro vaše dítě je nezbytné
pozorně si přečíst celý návod k použití.
SK – VAROVANIE! Nasledujúci skrátený návod slúži len pre náhľad. Pre dosiahnutie maximálnej ochrany a pohodlie pre vaše dieťa je úplne
nevyhnutné si pozorne prečítať celý návod na použitie.
ES – ¡ADVERTENCIA! El siguiente manual de instrucciones es solo un breve resumen. Para obtener la máxima protección y la mejor seguridad
para su hijo es esencial que lea el manual de instrucciones al completo.
PT – AVISO! As seguintes instruções tem a intenção de fornecer uma visão geral. De maneira a garantir a máxima segurança e conforto para a
criança, é essencial que leia cuidadosamente o manual de instruções.

ESPT DEENITFRNLPLHUCZSK
3
6 | INHALT
7 | CONTENT
7 | ARGOMENTI
38 | CONTENU
39 | INHOUD
39 | SPIS TREŚCI
70 | TARTALOM
71 | OBSAH
71 | OBSAH
Kurzanleitung
Short instruction
Sommario
Instructions résumées
Korte handleiding
Instrukcja skrócona
Rövid tájékoztató
Zkrácený návod
Stručný návod
Resumen de instrucciones
Manual reduzido
102 | CONTENIDO
103 | CONTEÚDO
1
6
CLICK!
CLICK!
2
7
3
8
4
9
5
10
11 12 13 14
4
ZULASSUNG
gb Elian-Fix – Kindersitz
ECE R44/04 Gruppe 2/3
Gewicht: von 15 bis ca. 36 kg
Alter: ab ca. 3 bis 12 Jahre
Nur geeignet für Fahrzeugsitze
mit Dreipunkt-Automatik-Gurt,
zugelassen nach ECE Regelung
Nr. 16 oder gleichwertigem
Standard.
Vielen Dank, dass Sie sich bei der Wahl eines Kindersitzes für
den gb Elian-Fix entschieden haben. Bei der Entwicklung des
Kindersitzes gb Elian-Fix standen Sicherheit, Komfort und
Bedienfreundlichkeit im Vordergrund. Das Produkt wird unter
besonderer Qualitätsüberwachung hergestellt und erfüllt strengste
Sicherheitsanforderungen.
HINWEIS! Bewahren Sie die Anleitung immer gribereit in dem
dafür vorgesehenen Fach an der gekennzeichneten Stelle des gb
Elian-Fix auf.
HINWEIS! Durch länderspezifische Anforderungen (z.B.
Farbkennzeichnungen am Kindersitz) können Produktmerkmale
in ihrer äußeren Erscheinung variieren. Die korrekte
Funktionsweise des Produktes wird davon jedoch nicht
beeinflusst.
SEHR GEEHRTE KUNDIN, SEHR GEEHRTER KUNDE!
GB ELIAN-FIX
! WARNUNG! Damit Ihr Kind richtig geschützt werden
kann, ist es unbedingt notwendig, den gb Elian-Fix so zu
verwenden, wie es in dieser Anleitung beschrieben wird.
ELIAN-FIX
UNIVERSAL
SEMI-UNIVERSAL
15 - 36 kg
04301343
gb GmbH
Riedingerstr. 18, 95448 Bayreuth
Germany
ECE R 44/04
HOMOLOGATION
gb Elian-Fix – car seat
ECE R44/04 age group 2/3
Weight: from 15 approx. 36 kg
Age: from approx. 3 up to 12 years
Only suitable for vehicle seats
with a three-point automatic belt,
approved under ECE regulation
no. 16 or equivalent standard.
OMOLOGAZIONE
gb Elian-Fix – seggiolino auto
ECE R44/04 gruppo età 2/3
Peso: da 15 a 36 kg
Età: da 3 a 12 anni circa
Adatto soltanto per sedili di veicoli
dotati di cintura automatica a
tre punti omologata secondo la
normativa ECE n.16 o standard
equivalente.

DEENIT
5
Thank you for buying the gb Elian-Fix. We can assure you
that safety, comfort and ease of use were our highest
priorities when developing the gb Elian-Fix. This product is
manufactured under exceptional quality control and meets the
strictest safety requirements.
Grazie per avere acquistato gb Elian-Fix. Le assicuriamo che
nel progettare gb Elian-Fix i nostri principali obiettivi sono stati
la sicurezza, il comort e la maneggevolezza. Il prodotto è stato
elaborato sotto uno stretto controllo qualitativo e risponde ai più
severi standard di sicurezza.
NOTE! Always keep this Instruction Manual at hand in the
compartment that has been provided for that purpose at the
designated place on the gb Elian-Fix.
NOTA BENE! Tenere sempre il manuale a portata di mano, allo
scopo è stato previsto un apposito alloggiamento su gb Elian-Fix.
NOTE! Due to country-specific requirements (e.g. colour labelling
on the car seat), the product features may vary in their external
appearance. This, however, does not aect the correct functioning
of the product.
NOTA BENE! In base alle normative locali, alcune caratteristiche
del prodotto (es. i colori delle etichette sul seggiolino) potrebbero
differire. Naturamente, ciò non infuisce minimamente con il
corretto funzionamento del prodotto.
DEAR CUSTOMER! GENTILE CLIENTE!
! WARNING! In order to keep your child properly protected
it is absolutely essential that you use the gb Elian-Fix as
described in this manual.
! ATTENZIONE! Per garantire la massima protezione del
Vostro bambino è indispensabile che gb Elian-Fix venga
utilizzato seguendo scrupolosamente quanto indicato in
questo maunale.

6
INHALT
DE
KURZANLEITUNG......................................................................................................................................3
ZULASSUNG................................................................................................................................................. 4
ERSTMONTAGE...........................................................................................................................................8
ZUM SCHUTZ DES FAHRZEUGS...................................................................................................10
DER RICHTIGE PLATZ IM FAHRZEUG.......................................................................................10
SICHERHEIT IM FAHRZEUG..............................................................................................................14
EINBAU DES KINDERSITZES INS FAHRZEUG.....................................................................14
EINBAU DES KINDERSITZES MIT ISOFIX CONNECT SYSTEM.................................16
AUSBAU DES KINDERSITZES AUS DEM FAHRZEUG....................................................18
ANPASSEN AN DIE KÖRPERGRÖSSE...................................................................................... 18
ANSCHNALLEN MITTELS FAHRZEUGGURT ..................................................................... 20
EINSTELLEN DER NEIGUNGSVERSTELLBAREN KOPFSTÜTZE...........................22
RICHTIGES SICHERN DES KINDES.............................................................................................24
ENTFERNEN DES SITZBEZUGES................................................................................................26
REINIGUNG..................................................................................................................................................28
PFLEGE..........................................................................................................................................................28
VERHALTEN NACH EINEM UNFALL........................................................................................ 30
PRODUKTINFORMATION................................................................................................................. 30
PRODUKTLEBENSDAUER................................................................................................................32
ENTSORGUNG..........................................................................................................................................32
GARANTIEBESTIMMUNGEN...........................................................................................................34

DEENIT
7
CONTENT ARGOMENTI
IT
SOMMARIO ....................................................................................................................................................3
OMOLOGAZIONE..................................................................................................................................... 4
PRIMA INSTALLAZIONE........................................................................................................................9
PROTEZIONE DEL VEICOLO.............................................................................................................11
LA POSIZIONE PIÙ CORRETTA ALL’INTERNO DEL VEICOLO..................................11
SICUREZZA NELL’INSTALLAZIONE IN AUTO .....................................................................15
INSTALLAZIONE DEL SEGGIOLINO NEL VEICOLO........................................................15
INSTALLAZIONE DEL SEGGIOLINO CON IL SISTEMA ISOFIX - CONNECT... 17
RIMUOVERE IL SEGGIOLINO DALLA VETTURA...............................................................19
REGOLAZIONE IN BASE ALL’ALTEZZA DEL BAMBINO..............................................19
ALLACCIARE CON LA CINTURA DELL’AUTO ..................................................................... 21
REGOLAZIONE DEL POGGIATESTA RECLINABILE.......................................................23
ALLACCIARE IL BAMBINO IN MODO CORRETTO..........................................................25
TOGLIERE IL RIVESTIMENTO.........................................................................................................27
PULIZIA..........................................................................................................................................................29
MANUTENZIONE ....................................................................................................................................29
COSA FARE A SEGUITO DI UN INCIDENTE..........................................................................31
INFORMAZIONI SUL PRODOTTO................................................................................................. 31
DUREVOLEZZA DEL PRODOTTO...............................................................................................33
SMALTIMENTO..........................................................................................................................................33
GARANZIA...................................................................................................................................................35
EN
SHORT INSTRUCTION............................................................................................................................3
HOMOLOGATION ..................................................................................................................................... 4
FIRST INSTALLATION .............................................................................................................................9
PROTECTING THE VEHICLE ..............................................................................................................11
CORRECT POSITION IN THE VEHICLE.......................................................................................11
SAFETY IN THE VEHICLE...................................................................................................................15
INSTALLING THE CAR SEAT IN THE VEHICLE.................................................................... 15
INSTALLING THE CAR SEAT WITH ISOFIX CONNECT SYSTEM ............................ 17
REMOVING THE CAR SEAT FROM THE VEHICLE............................................................19
ADJUSTMENT TO THE CHILD`S HEIGHT ...............................................................................19
STRAPPING WITH VEHICLE SEAT BELT................................................................................. 21
ADJUSTING THE RECLINING HEADREST.............................................................................23
SECURING THE CHILD CORRECTLY.........................................................................................25
REMOVING THE SEAT COVER ......................................................................................................27
CLEANING ...................................................................................................................................................29
PRODUCT CARE .....................................................................................................................................29
WHAT TO DO AFTER AN ACCIDENT........................................................................................ 31
PRODUCT INFORMATION................................................................................................................. 31
PRODUCT DURABILITY .....................................................................................................................33
DISPOSAL.....................................................................................................................................................33
WARRANTY................................................................................................................................................35

8
ERSTMONTAGE
Der Kindersitz besteht aus einem Sitzkissen 1und einer
Rückenlehne 2mit verstellbarer Schulter-(Höhe & Breite) und
Kopfstütze (Höhe). Nur die Kombination der beiden Teile bietet
Ihrem Kind den bestmöglichen Schutz und Komfort.
Die Rückenlehne 2wird mit der Führungsnase 4auf der Achse 5
des Sitzkissens 1eingehakt. Schieben Sie die beiden mitgelieferten
Seitenprotektoren des „Linear Side-impact Protection“ Systems
(L.S.P.) in die dafür vorgesehenen Montageönungen 6, außen an
den Schulterstützen. Durch leichten Druck nach unten, rasten diese
mit einem hörbaren „KLICK“ ein.
! WARNUNG! Die Bestandteile des gb Elian-Fix dürfen weder
einzeln noch in Verbindung mit Sitzkissen, Rückenlehnen
oder Kopfstützen anderer Hersteller oder anderer Baureihen
verwendet werden. Die Zulassung würde in einem solchen
Fall sofort erlöschen. Eine Fehlanwendung kann zu
ernsthaften bis hin zu tödlichen Verletzungen des Kindes
führen. Bitte bewahren Sie diese Gebrauchsanweisung zur
zukünftigen Verwendung auf.
HINWEIS! Bitte bewahren Sie die Gebrauchsanleitung immer in der
dafür vorgesehenen Tasche 3auf der Vorderseite des Sitzes auf.
! WARNUNG! Stellen Sie sicher, dass Sie diese
Gebrauchsanweisung sorgfältig lesen, verstehen und befolgen.
! WARNUNG! Achten Sie immer darauf, dass die Einzelteile
des Kindersitzes niemals gestaucht oder eingeklemmt
werden (z.B. durch einklemmen in die Fahrzeugtür oder beim
einstellen des Rücksitzes).
1
2
4
5
1
2
LSP
6
3

DEENIT
9
FIRST INSTALLATION PRIMA INSTALLAZIONE
The car seat consists of a booster seat 1and a backrest 2with
adjustable shoulder parts (width & height) and headrest (height).
Only the combination of these two parts provides best protection
and comfort to your child.
Il seggiolino è composto da una base di seduta 1e di uno schienale
2con protezioni per le spalle regolabili (in ampiezza e altezza) e
poggiatesta (altezza). Soltanto la combinazione delle due parti insieme
può garantire la sicurezza ed il camfort ideali per il suo bambino.
Connect the backrest 2to the booster 1 by hooking the guide lug
4on the axis 5of the booster 1. Insert the “Linear Side-impact
Protection” pads (L.S.P.) on both sides of the shoulder rest into the
appropriate installation holes 6. Push the pads slightly downwards
until you hear them ,click‘ in.
Fissare lo schienale 2alla seduta 1 agganciando la guida 4sull’asse
5della seduta 1. Inserire i cuscinetti L.S.P (Ptotezione lineare
nell’impatto laterale) su ambo i lati delle protezioni spalle negli
appositi fori di installazione 6. Spingere i cuscinetti leggermente
verso il basso fino a sentire il “click”.
! WARNING! Make sure to read, understand and follow the
instruction manual. ! ATTENZIONE! Leggere attentamente e seguire
scrupolosamente le istruzioni contenute nel manuale.
NOTE! Please keep the instruction manual close by for future
reference by storing it in the pocket 3in the front of the seat.
NOTA BENE! Tenere il manuale di istruzioni a portata di mano per
la prossima volta e riporlo nella tasca 3del seggiolino.
! WARNING! The parts of the gb Elian-Fix must not be
used alone or in combination with boosters, backrests
or headrests from other manufacturers or from dierent
product series. In such instances, the certification expires
immediately. Misapplication can lead to serious injury or
death of your child. Please keep these instructions for
future reference.
! ATTENZIONE! Le parti componenti di gb Elian-Fix non
devono essere usate singolarmente o in combinazione
con sedute, schienali o poggiatesta di altri produttori o di
altre linee di produzione. In tali casi l’omologazione viene
invalidata immediatamente. Un uso errato può portare a
lesioni gravi anche letali del suo bambino. Conservare le
istruzioni per riferimento futuro.
! WARNING! Always ensure that the individual components
of the child seat are never compressed or jammed (e.g. by
jamming in the car door or when adjusting the back seat).
! ATTENZIONE! Verificare sempre che ogni singola
componente del seggiolino non venga compressa o
schiacciata (per esempio chiudendo la portiera o regolando
lo schienale dell’auto).

10
ZUM SCHUTZ DES FAHRZEUGS
An einigen Autositzen aus empfindlichem Material (z.B. Alcantara,
Leder, etc.) können durch die Benutzung von Kindersitzen mögliche
Gebrauchsspuren und/oder Abfärbungen auftreten.
Um das zu vermeiden, können Sie z.B. eine Decke oder ein
Handtuch unterlegen. Ferner weisen wir in diesem Zusammenhang
auf unsere Reinigungshinweise hin, die vor der ersten Verwendung
des Kindersitzes unbedingt beachtet werden sollten.
•Bei Fahrzeugen mit Airbag sollten Sie den Beifahrersitz so weit
wie möglich nach hinten schieben. Beachten Sie jedoch, dass der
obere Anlenkpunkt des Fahrzeuggurtes hinter der Gurtführung
des Kindersitzes bleibt.
•Die Empfehlungen des Fahrzeugherstellers sind unbedingt
zu befolgen.
DER RICHTIGE PLATZ IM FAHRZEUG
Der Kindersitz ist mit eingeklapptem ISOFIX Connect System auf
allen Fahrzeugplätzen mit Dreipunkt-Automatikgurt verwendbar,
die im Fahrzeughandbuch für die „universelle“ Verwendung
zugelassen sind.
Für die Befestigung mit den ISOFIX Connect Rastarmen besteht
eine „semi-universale“ Genehmigung. Aus diesem Grund kann
ISOFIX Connect nur in bestimmten Fahrzeugen eingesetzt
werden. Die zugelassenen Fahrzeuge entnehmen Sie bitte der
beigelegten Fahrzeugtypenliste. Die aktuelle Version erhalten Sie
auf www.gb-online.de.
In Ausnahmefällen kann der Kindersitz auch vorne auf dem
Beifahrersitz verwendet werden. Beachten Sie dabei die folgenden
Punkte:
! WARNUNG! Der Sitz ist nicht für die Verwendung mit einem
2-Punkt- oder Beckengurt geeignet. Wird der Sitz mit einem
2-Punkt-Gurt gesichert, kann es bei einem Unfall zu schweren
oder gar tödlichen Verletzungen des Kindes kommen.
DEENIT
11
PROTECTING THE VEHICLE PROTEZIONE DEL VEICOLO
Traces of use and/or discoloration can appear on some vehicle
seats made from delicate materials (e.g. alcantara, leather, etc.) if
car seats are used. You can avoid this by putting, e.g. a blanket or a
towel underneath the car seat. In this context also see our cleaning
directions. It is essential that these are followed before the first use
of the car seat.
Possono presentarsi su sedili auto realizzati con materiali delicati
(ad es. alcantara, pelle, etc.) tracce di utilizzo e/o decolorazione se
si utilizza il seggiolino auto. Questo può essere evitato ponendo ad
esempio un lenzuolo o un asciugamano sotto al seggiolino auto. In
questo opuscolo potete trovate le nostre linee guida per la pulizia.
E’ essenziale che queste linee guida siano seguite prima della prima
installazione del seggiolino auto.
•In cars with airbags, you should push the passenger seat back as
far as possible. When doing so, however, ensure that the upper
pivot point of the safety belt is behind the belt feed point of the
car seat.
•Always comply with the recommendations of the vehicle
manufacturer.
•Nelle autovetture dotate di airbag, raccomandiamo di arretrare
al massimo il sedile passeggero. Assicuratevi che il punto di
attacco superiore delle cinture si trovi sempre dietro alla guida
superiore del seggiolino.
•E’ indispensabile seguire sempre le raccomandazioni del
costruttore del veicolo.
CORRECT POSITION IN THE VEHICLE LA POSIZIONE PIÙ CORRETTA ALL’INTERNO DEL VEICOLO
The car seat with retracted ISOFIX Connect system can be used on
all vehicle seats with automatic three-point safety belts approved
in the vehicle manual for ,universal‘ use.
A ‘semi-universal’ certification is given to restraint systems that
are connected to the car through ISOFIX Connect. For this reason,
ISOFIX Connect can only be used in certain vehicles. Please refer
to the enclosed vehicle type list for approved vehicles. You can
obtain the most up-to-date version from www.gb-online.com.
In exceptional cases, the car seat may also be used on the front
passenger seat. Please note the following in this case:
Il seggiolino può essere utilizzato senza utilizzare il sistema ISOFIX-
CONNECT su qualsiasi sedile di autoveicolo, approvato per al seduta
di adulti, dotato di sistema di cinture di sicurezza retraibili a tre punti
di ancoraggio.
I sistemi di ritenuta che vengono installati nel veicolo tramite il sistema
ISOFIX CONNECT possiedono un certificato di omologazione “semi-
universale”. Per questa ragione, il sistema ISOFIX CONNECT può
essere utilizzato solo per certe categorie di veicoli. Vi preghiamo di
verificare l’elenco dei veicoli approvati per verificare la compatibilità
con la Vostra auto. L’elenco è aggiornato regolarmente, l’ultima
versione è consultabile online nel nostro sito www.gb-online.com.
Preghiamo di notare le seguenti eccezoni, nei casi in cui il seggiolino
può essere usato sul sedile del passeggero:
! WARNING! The car seat is not suitable for use with a two-
point or lap belt. If the seat is secured using a two-point
belt, an accident may result in severe or even fatal injuries
to the child.
! ATTENZIONE! Il seggiolino non può essere utilizzato con
cinture di sicurezza a due punti di ancoraggio o soltanto
con quella addominale.Perchè in tal caso il bambino sarebbe
esposto a lesioni letali in caso di incidente.

12
! WARNUNG! Auf Fahrzeugplätzen, die quer zur
Fahrtrichtung angeordnet sind, ist die Verwendung
des Sitzes nicht zulässig. Auf rückwärtsgerichteten
Fahrzeugsitzen, wie z.B. in einem Van oder Minibus, ist
die Verwendung zulässig, sofern der Fahrzeugsitz für
die Beförderung eines Erwachsenen zugelassen ist. Zu
beachten ist, dass die Kopfstütze bei rückwärtsgerichtetem
Einbau nicht entfernt werden darf!
! WARNUNG! Bitte lassen Sie Ihr Kind nie unbeaufsichtigt im
Fahrzeug zurück. Die Kunststoteile des Kindersitzes heizen
sich in der Sonne auf. Ihr Kind kann sich daran verbrennen.
Schützen Sie Ihr Kind und den Kindersitz vor intensiver
Sonneneinstrahlung (z.B. indem Sie ein helles Tuch über den
Sitz legen).
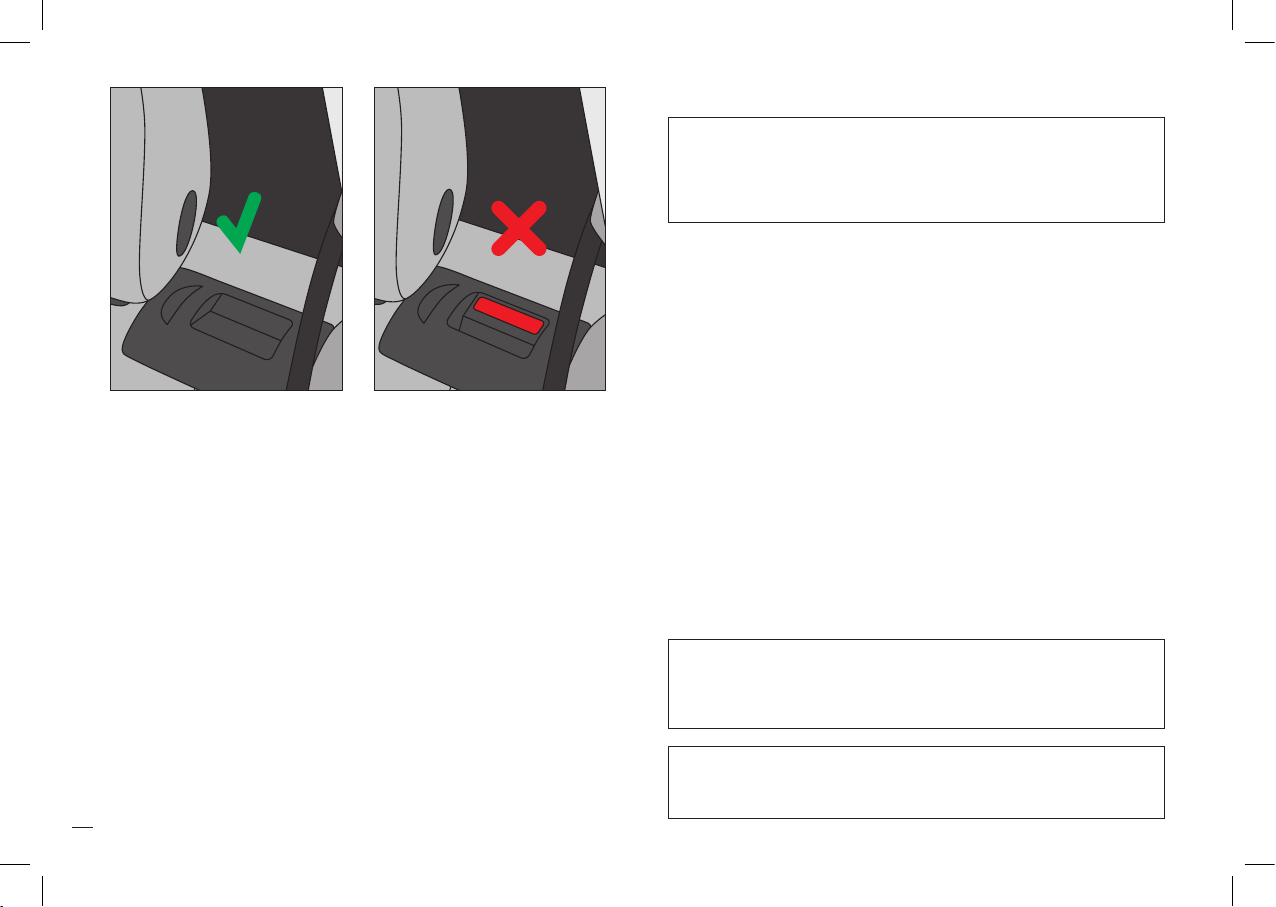
! WARNUNG! Der Diagonalgurt 7muss schräg nach hinten
verlaufen und darf nie nach vorn zum oberen Gurtpunkt in
Ihrem Fahrzeug führen. Sollte dies nicht einzustellen sein
z.B. durch Vorschieben des Autositzes oder Verwendung
auf einem anderen Sitzplatz, so ist der Kindersitz für
dieses Fahrzeug nicht geeignet. Im Zweifelsfall wenden
Sie sich an den Kindersitzhersteller. Gepäckstücke oder
andere Gegenstände im Fahrzeug, welche bei einem Unfall
Verletzungen verursachen können, müssen immer gut
befestigt werden. Sie können zu tödlichen Geschossen im
Fahrzeug werden.
7
7
DEENIT
13
! WARNING! The car seat may not be used on vehicle
seats facing to the side of the direction of travel. Use of
the car seat is permitted on rearfacing seats, e.g. in a
van or minibus, provided that the seat is permitted for
transporting an adult. It is essential to ensure that the
headrest is not removed when the vehicle seat is installed in
a rearwardfacing direction.
! ATTENZIONE! Seggiolino NON utilizzabile su sedili orientati
lateralmente. Per sedili orientati contro il senso di marcia,
ad es. nel van o minibus, purchè siano omologati per il
trasporto di un adulto, l’uso è consentito. Nei sedili orientati
contro il senso di marcia NON togliere l’appoggiatesta
quando viene montato il seggiolino!
! WARNING! Never leave your child unattended in the car.
The plastic parts in the child restraint system heat up in sun
and the child may sustain burns. Protect your child and the
car seat from direct sun exposure (e.g. by covering it with a
light colored cloth).
! ATTENZIONE! Non lasciare MAI il bambino incustodito
nell’autovettura. Le parti in plastica presenti nel sistema di
ritenuta possono scaldarsi con il sole e il bambino potrebbe
subire delle ustioni. Proteggi il tuo bambino e il seggiolino
auto dall’esposizione diretta del sole (ad es. comprendo il
seggiolino con un telo dal colore chiaro).
! WARNING! The diagonal belt 7must run back at a recline
and must never run forward to the upper belt point in your
vehicle. If it is not possible to adjust the seat in this way, e.g.
by pushing the car seat forward or using it on another seat,
this car seat is not suitable for your vehicle. Contact the
car seat manufacturer if in doubt Luggage or other objects
present in the vehicle that may cause injury in the event of
an accident must always be firmly secured. Otherwise, they
may be thrown, causing fatal injuries.
! ATTENZIONE! La cintura di sicurezza 7deve scorrere
diagonalmente da dietro ed il punto più alto deve trovarsi
sempre dietro aal seggiolino. Se, per esempio, nell’arretrare al
massimo il sedile anteriore o sistemandolo in altra posizione
nell’auto, il punto più alto della cintura non si trovasse dietro
al seggiolino, quest’ultimo non potrà essere utilizzato in tale
veicolo. Contatta il produttore della tua auto se hai dubbi.
Bagagli o altri oggetti presenti nell’abitacolo dovranno essere
ben fissati e disposti in modo da non costituire pericolo in caso
di incidente. Parti mobili possono trasformarsi in pericolosi
proiettili durante un impatto!
14
•die umklappbaren Rückenlehnen der Fahrzeugsitze eingerastet
sind und sich in einer aufrechten Position befinden.
•bei Einbau des Kindersitzes auf dem Beifahrersitz, dieser in der
hintersten Position steht.
•im Fahrzeug alle beweglichen Gegenstände gesichert sind.
•alle Personen im Fahrzeug angeschnallt sind.
SICHERHEIT IM FAHRZEUG
Achten Sie zum Schutz aller Fahrzeuginsassen stets darauf, dass...
! WARNUNG! Der Kindersitz muss, auch dann
wenn er nicht benutzt wird, immer korrekt mit dem
Fahrzeuggurt im Fahrzeug befestigt sein. Bereits bei
einer Notbremsung oder einem geringen Aufprall können
unbefestigte Teile andere Mitfahrer und Sie selbst verletzen.
•Achten Sie unbedingt darauf, dass die Rückenlehne des
Kindersitzes vollflächig an der Rückenlehne des Fahrzeugsitzes
anliegt. Gegebenenfalls können Sie den Abstand mit dem
Verstellgri am Rahmen des Kindersitzes einstellen.
•Falls die Kopfstütze des Fahrzeugs im Weg ist, stellen Sie diese
bitte auf die höchste Stufe oder entfernen Sie sie komplett. Die
Rückenlehne passt sich optimal stufenlos nahezu jeder Neigung
des Fahrzeugsitzes an.
EINBAU DES KINDERSITZES INS FAHRZEUG
Stellen Sie den Kindersitz auf den entsprechenden Fahrzeugsitz im Auto.
! WARNUNG! Die Rückenlehne des Kindersitzes muss an
der Lehne des Fahrzeuges flächig aufliegen. Um den
größtmöglichen Schutz für das Kind zu gewährleisten, muss
sich der Sitz in einer normalen aufrechten Position befinden!
! WARNUNG! Benutzen Sie niemals andere als die in der
Bedienungsanleitung beschriebenen und am Sitz markierten
Punkte, um diesen zu befestigen.

DEENIT
15
•foldable backrests in the vehicle are locked in their upright position.
•when installing the car seat on the front passenger seat, adjust
the vehcile seat in rearmost position.
•you properly secure all objects likely to cause injury in the case
of an accident.
•all passengers in the vehicle are buckled up.
•gli schienali regolabili dei sedili del veicolo sono bloccati in
posizione eretta.
•quando il seggiolino viene installato sul sedile anteriore, regolare il
sedile nella posizione più arretrata possibile.
•assicurate adeguatamente tutti gli oggetti presenti nel veicolo in
quanto possono diventare proiettili pericolosi in caso di incidente.
•assicuratevi che tutti i passeggieri abbiano le cinture allacciate.
SAFETY IN THE VEHICLE SICUREZZA NELL’INSTALLAZIONE IN AUTO
In order to guarantee the best possible safety for all passengers
make sure that...
Per garantire la miglior sicurezza per tutti i passeggeri assicuratevi che:
! WARNING! The car seat must always be secured correctly
with the vehicle belt in the vehicle even when not in use. In
case of an emergency brake or accident, an unsecured car
seat may injure other passengers or your.
! ATTENZIONE! Il seggiolino deve sempre assicurato
correttamente con la cintura presente nel veicolo anche
quando il veicolo non è in uso. Nel caso di una frenata di
emergenza o di un uno scontro, un seggiolino assicurato
male può ferire voi o altri passeggeri
•Always ensure that the entire surface of the backrest of the
car seat is placed fully against the backrest of the vehicle seat.
If necessary, you can adjust the distance using the adjustment
lever on the frame of the car seat.
•If the headrest of the vehicle is in the way, pull it out all the way
or remove it completely. The backrest will perfectly adapt to
practically any recline of the vehicle seat.
•Assicurarsi sempre che l’intera superficie dello schienale del
seggiolino sia posizionato completamente contro lo schienale del
sedile del veicolo. Se necessario, è possibile regolare la distanza
utilizzando la leva di regolazione sul telaio del seggiolino.
•Se il poggiatesta del sedile interferisce con il posizionamento
del seggiolino sarà bene rialzarlo completamente o rimuoverlo.
Lo schienale del seggiolino si adatta perfettamente a qualsiasi
reclinazione del sedile dell’autoveicolo.
INSTALLING THE CAR SEAT IN THE VEHICLE INSTALLAZIONE DEL SEGGIOLINO NEL VEICOLO
Place the car seat on the appropriate seat in the vehicle. Posizionate il seggiolino nel sedile appropriato all’interno del veicolo.
! WARNING! The full surface of the backrest of the car seat
must be against the backrest of the vehicle. To ensure
maximum protection for your child, the car seat must be in a
normal upright position!
! ATTENZIONE! L’intera superficie dello schienale del seggiolino
deve essere appoggiata contro lo schienale del veicolo. Per
garantire la massima protezione per il vostro bambino, il
seggiolino deve trovarsi nella normale posizione eretta!
! WARNING! Do not use any load bearing contact points
other than those described in the instructions and marked
in the child restraint.
! ATTENZIONE! NON utilizzare punti di contatto portanti
diversi da quelli descritti nelle istruzioni e contrassegnati sul
sistema di ritenuta.
16
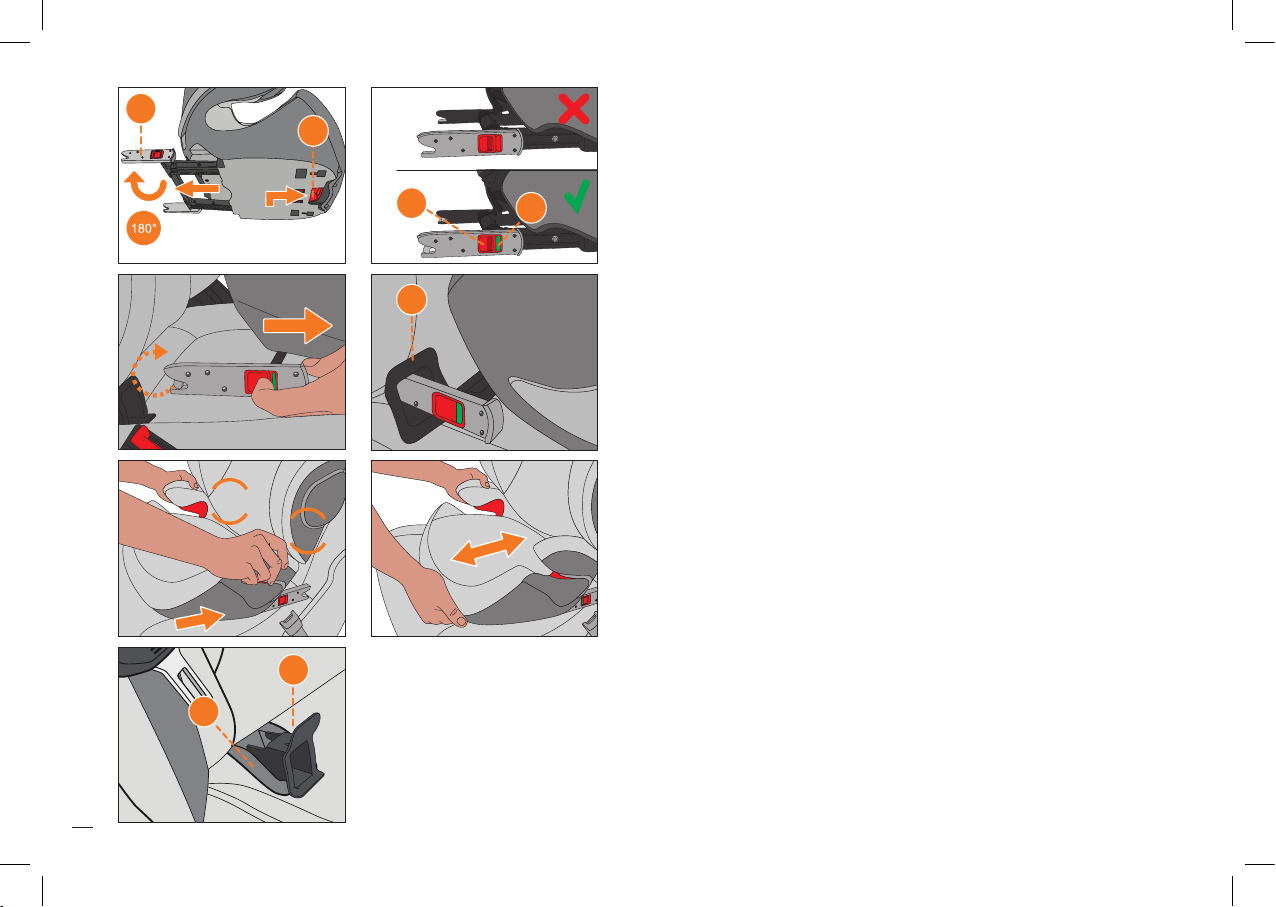
HINWEIS! Überprüfen Sie vor dem Verbinden der ISOFIX
Connect Rastarme 10 mit den ISOFIX Befestigungspunkten 8
deren Entriegelungstasten 11.
Sind die grünen Sicherheitsindikatoren 12 zu sehen, müssen Sie vor
dem Verbinden zunächst die ISOFIX Connect Rastarme entriegeln,
indem Sie die Entriegelungstaste 11 drücken und zurückziehen.
HINWEIS! Die ISOFIX Befestigungspunkte 8sind zwei
Metalllaschen pro Sitzplatz und befinden sich zwischen
Rückenlehne und Sitzfläche des Fahrzeugsitzes. Im Zweifelsfall
nehmen Sie die Bedienungsanleitung Ihres Fahrzeuges zu Hilfe.
•Betätigen Sie den Verstellgri 9unter dem Sitzkissen 2,
am
Rahmen des Kindersitzes.
•Ziehen Sie die beiden ISOFIX Connect Rastarme
10
bis zum
Endanschlag aus.
•Drehen Sie nun die ISOFIX Connect Rastarme
10
um 180°, damit
diese in Richtung der ISOFIX Befestigungspunkte
8
zeigen.
EINBAU DES KINDERSITZES MIT ISOFIX CONNECT SYSTEM
Mit den ISOFIX Connect System können Sie den Kindersitz mit
dem Fahrzeug verbinden und so die Sicherheit Ihres Kindes
erhöhen. Ihr Kind muss weiterhin mit dem 3-Punkt-Gurt Ihres
Fahrzeuges angeschnallt werden.
HINWEIS! Sind die ISOFIX Befestigungspunkte in Ihrem Fahrzeug
schwer zu erreichen, können die mitgelieferten ISOFIX Einführhilfen
verwendet werden.
•Schieben Sie die beiden Rastarme 10 in die ISOFIX
Befestigungspunkte 8bis diese mit einem hörbaren „KLICK“ einrasten.
•Vergewissern Sie sich, dass der Sitz gut hält, indem Sie versuchen ihn
herauszuziehen.
•Der grüne Sicherheitsindikator 12 muss nun an den beiden roten
Entriegelungstasten 11 gut sichtbar sein.
•Mit dem Verstellgri 9am Rahmen des Kindersitzes können Sie nun
die Position des Sitzes einstellen.
•Hängen Sie die mitgelieferten ISOFIX Einführhilfen 13 mit der
längeren Lasche nach oben in die beiden ISOFIX Befestigungspunkte
8ein. In manchen Fahrzeugen eignet sich eine entgegengesetzte
Einbaurichtung der ISOFIX Einführhilfen 13 besser.
8
9
10
12
11
CLICK!
CLICK!
13
8

DEENIT
17
NOTE! Before clicking the ISOFIX connect locking arms 10 into
the ISOFIX anchorage points 8, check the release buttons 11. If
the green safety indicator 12 is visible, you must first release the
ISOFIX connect locking arms before joining by pressing and pulling
back the release button 11.
NOTA BENE! Prima di agganciare i connettori ISOFIX 10 ai punti
di ancoraggio ISOFIX 8, controllare i pulsanti di rilascio 11. Se è
visibile l’indicatore verde di sicurezza 12, è necessario sganciare
i connettori ISOFIX premendo e tirando all’indierto il pulsante di
rilascio 11.
NOTE! The ISOFIX anchorage points 8are two metallic clips
for each seat and are positioned between the backrest and the
seating surface of the vehicle seat. In case of doubt, please refer
to the driver’s manual of your vehicle.
NOTA BENE! I punti di ancoraggio ISOFIX 8 della vettura sono
rappresentati da due anelli metallici posti tra lo schienale e la
seduta di ogni sedile. In caso di dubbi fare riferimento al manuale
dell’autovettura.
•Use the adjustment button 9under the seat cushion 2on the frame
of the car seat.
•Pull the two ISOFIX connect locking arms 10 as far as they will go.
•Now twist the ISOFIX connect locking arms 10 180° so that they
are facing the direction of the ISOFIX anchorage points 8.
•Tirare la maniglia di regolazione 9posta nella parte frontale
sotto la seduta 2sulla base del seggiolino.
•Estrarre al massimo i connettori ISOFIX 10
•Ora ruotare i connettori 10 di 180° dirigendo le punte verso le
guide ISOFIX-CONNECT 8.
INSTALLING THE CAR SEAT WITH ISOFIX CONNECT SYSTEM INSTALLAZIONE DEL SEGGIOLINO CON IL SISTEMA ISOFIX -
CONNECT
Using the ISOFIX Connect system, you can fix the car seat to the
vehicle, thereby increasing your child’s safety. The child still needs
to be secured with the three-point belt of your vehicle.
Con l’uso del sistema ISOFIX-CONNECT che fissa saldamente
il seggiolino alla vettura, la sicurezza del bambino viene
ulteriormente aumentata. Il bambino sarà comunque sempre
allacciato utilizzando la cintura a 3 punti.
NOTE! If the ISOFIX anchorage points are hard to reach in your
vehicle, you can use the supplied ISOFIX guides. NOTA BENE! Se i punti di ancoraggio ISOFIX della sua vettura
sono dicili da raggiungere, utilizzare le guide ISOFIX in dotazione.
•Push the two ISOFIX connectors 10 into the ISOFIX anchorage
points 8until these lock into place with an audible ‘CLICK’.
•Ensure that the car seat is secure by trying to pull it out.
•The green safety indicator 12 must now be clearly visible on the
two red release buttons 11.
•You can now use the adjustment button 9on the frame of the
car seat to position it.
•Spingere i due connettori ISOFIX 10 verso i punti di ancoraggio
ISOFIX 8fino a sentire che si agganciano con un sonoro ‘CLICK’.
•Verificare che il seggiolino sia fissamente agganciato provando a
tirarlo in avanti.
•L’indicatore di sicurezza di colore verde 12 dev’essere ora
chiaramente visibile sui due pulsanti di rilascio rossi 11.
•Ora è possibile utilizzare il pulsante di regolazione 9sulla scocca
del seggiolino per regolare la posizione.
•Insert the supplied ISOFIX guides 13 with the longer strap
upwards into the two ISOFIX anchorage points 8. In some
vehicles, it is better to mount the ISOFIX guides 13 in the
opposite direction.
•Inserire le guide ISOFIX 13 in dotazione, con la linguetta più
lunga rivolta verso l’alto, nei due punti di ancoraggio ISOFIX 8.
In alcune vetture risulta preferibile inserire le guide ISOFIX 13 nel
senso opposto.
18
HINWEIS! Durch das Einklappen der ISOFIX Connect Rastarme 10
schonen Sie nicht nur den Fahrzeugsitz, sondern schützen auch
die ISOFIX Connect Rastarme des ISOFIX Connect Systems vor
Verunreinigung und Beschädigung.
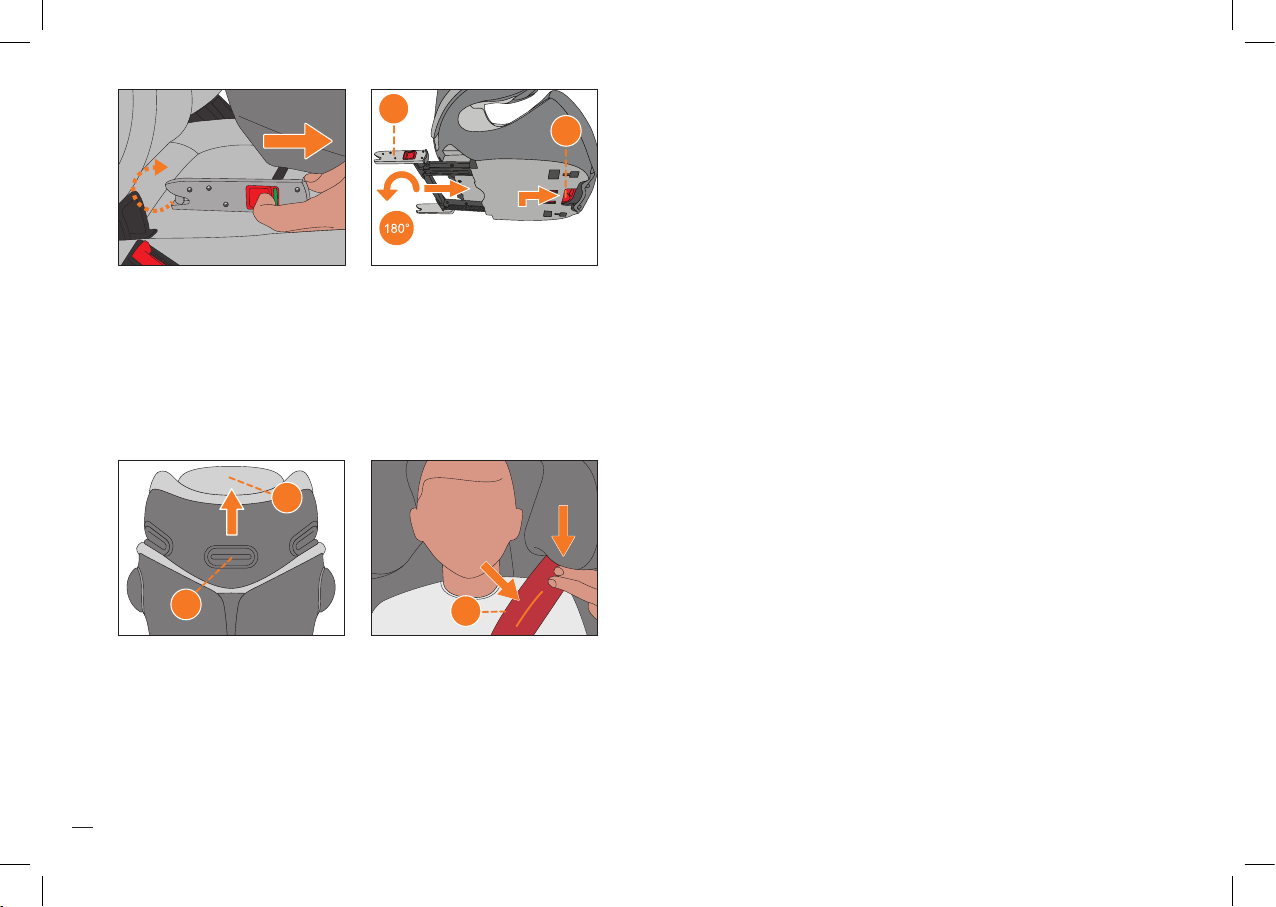
AUSBAU DES KINDERSITZES AUS DEM FAHRZEUG
Führen Sie die Einbauschritte in umgekehrter Reihenfolge durch:
•Entriegeln Sie die ISOFIX Connect Rastarme 10 beidseitig, indem
Sie die roten Entriegelungstasten 11 drücken und gleichzeitig
zurückziehen.
•Ziehen Sie den Sitz aus den ISOFIX Befestigungspunkten 8.
•Drehen Sie die Rastarme 10 um 180°.
•Betätigen Sie den Verstellgri 9am Rahmen des Kindersitzes
und schieben Sie die Rastarme 10 bis zum Anschlag hinein.
HINWEIS! Die Schulterstütze ist fest mit der Kopfstütze verbunden
und muss nicht separat eingestellt werden. Die Kopfstütze muss so
eingestellt werden, dass der Abstand zwischen den Schultern des
Kindes und der Kopfstütze 2 cm (ca. 2 Finger) nicht überschreitet.
ANPASSEN AN DIE KÖRPERGRÖSSE
Nur eine in optimaler Höhe eingestellte Kopfstütze 14 bietet
größtmöglichen Schutz und Komfort für Ihr Kind und gewährleistet
außerdem den optimalen Verlauf des Diagonalgurtes 7. Die
kombinierte Höhen-/Breitenverstellung kann in 12 Positionen
erfolgen.
•Setzen Sie Ihr Kind in den Kindersitz.
•Ziehen Sie den Verstellgri 15 nach oben, um die Kopfstütze 14
zu entriegeln.
•Nun können Sie die Kopfstütze 14 in die gewünschte
Position bringen.
•Sobald Sie den Verstellgri 15 loslassen, rastet die Kopfstütze 14
automatisch ein.
10
9
7
14
15

DEENIT
19
NOTE! By folding in the ISOFIX Connect locking arms 10, you are
not just protecting the vehicle seat but also the ISOFIX Connect
locking arms of the ISOFIX Connect system from dirt and damage.
NOTA BENE! Ripiegare e riporre i connettori ISOFIX 10 vi aiuta sia
a preservare i sedili dell’auto che a proteggere i connettori stessi
dallo sporco dal rischio di danneggiamenti.
REMOVING THE CAR SEAT FROM THE VEHICLE RIMUOVERE IL SEGGIOLINO DALLA VETTURA
Perform the installation steps in the reverse order: Eseguire i passaggi dell’installazione nell’ordine inverso:
•Unlock the ISOFIX Connect locking arms 10 on both sides
by pushing the red release buttons 11 and pulling them back
simultaneously.
•Pull the car seat out of the ISOFIX anchorage points 8.
•Rotate the connectors 10 180°.
•Operate the adjustment button 9on the frame of the car seat
and push the connectors in as far as they will go.
•Sganciare i connettori ISOFIX 10 su ambo i lati premendo e
tirando all’indietro simultaneamente i pulsanti di rilascio di
colore rosso 11.
•Estrarre il seggiolino dai punti di ancoraggio ISOFIX 8.
•Rupotare i connettori 10 di 180°.
•Premere il pulsante di regolazione 9sulla scocca e spingere i
connettori fino a fine corsa.
NOTE! The shoulder wings of the gb Elian-Fix are connected
with the headrest and do not have to be moved separately. The
headrest has to be adjusted in a way that the distance between
the child‘s shoulders and the headrest doesn‘t exceed 2 cm
(approx. 2 fingers width).
NOTA BENE! Le protezioni per le spalle di gb Elian-Fix sono collegate
al poggiatesta e non devono essere regolate separatamente. L’altezza
del poggiatesta dev’essere regolata in modo che la distanza tra le
spalle del bamino e la parte inferiore del poggiatesta non superi i
2 cm (circa 2 dita).
ADJUSTMENT TO THE CHILD`S HEIGHT REGOLAZIONE IN BASE ALL’ALTEZZA DEL BAMBINO
A headrest 14 can only provide the best protection and comfort for
your child if optimally adjusted.
Only then it can guarantee that the diagonal belt 7is positioned
optimally. The height of the headrest and the width of the shoulder
wings can be adjusted in 12 possible positions.
Il poggiatesta 14 può fornire la massima protezione ed il massimo
comfort soltanto se regolato correttamente.
Solo in quel caso può garantire che la cintura diagonale 7si trovi
nella posizione ottimale. L’altezza del poggiatesta e la larghezza
delle protezioni per le spalle si possono regolare in 12 posizioni.
•Place your child in the car seat.
•Pull the adjustment handle 15 up in order to unlock the headrest 14.
•Push the headrest 14 into the desired position.
•As soon as you release the adjustment handle 15, the headrest
14 locks automatically.
•Sedere il bambino sul seggiolino.
•Tirare verso l’alto la maniglia di regolazione 15 per sbloccare il
poggiatesta 14.
•Spostare il poggiatesta 14 nella posizione desiderata.
•Rilasciando la maniglia di regolazione 15, i poggiatesta 14 si
blocca automaticamente in posizione.
20
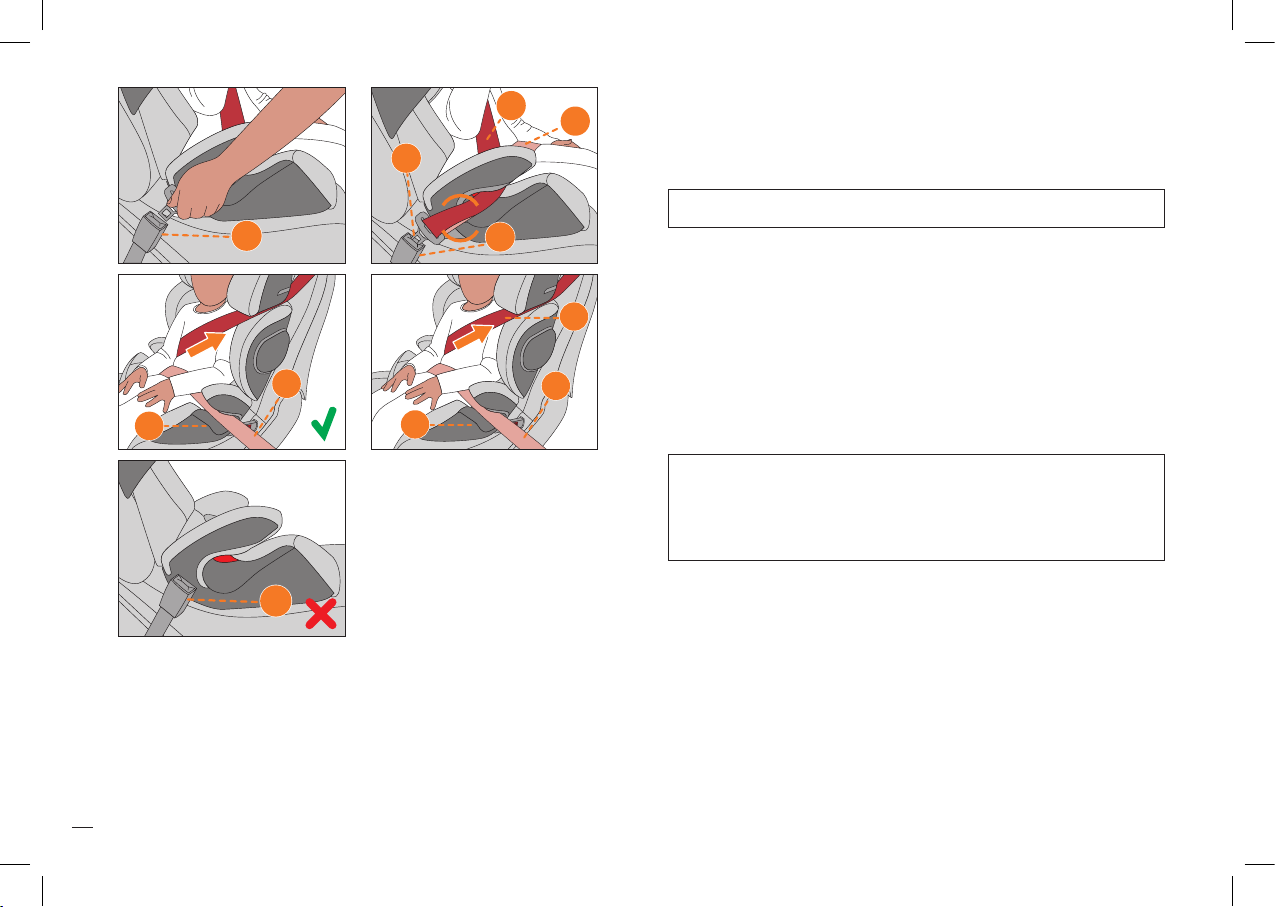
1. Setzen Sie ihr Kind in den Kindersitz. Ziehen Sie den
Dreipunktgurt weit heraus und führen Sie diesen vor Ihrem Kind
entlang zum Gurtschloss 16.
2. Stecken Sie die Gurtschlosszunge 17 in das Gurtschloss 16.
Dieses muss mit einem hörbaren „KLICK“ einrasten.
3. Als nächstes legen Sie den Beckengurt 18 in die unteren
Gurtführungen 19 des Kindersitzes ein.
4. Ziehen Sie nun kräftig am Diagonalgurt 7, um den Beckengurt
18 zu straen. Je enger der Gurt anliegt, desto besser kann er
vor Verletzungen schützen. Auf der Seite des Gurtschlosses 16
müssen der Diagonalgurt 7und der Beckengurt 18 zusammen in
die untere Gurtführung 19 eingelegt sein.
5. Der Beckengurt 18 sollte auf beiden Seiten des Sitzkissens in
den unteren Gurtführungen 19 liegen.
! WARNUNG! Verdrehen Sie nie den Gurt.
! WARNUNG! Das Fahrzeuggurtschloss 16 darf keinesfalls
über die Armlehne reichen. Ist die Gurtpeitsche zu lang,
ist der Kindersitz für eine Verwendung auf dieser Position
im Fahrzeug nicht geeignet. Bitte wenden Sie sich im
Zweifelsfall an den Hersteller Ihres Kindersitzes.
HINWEIS! Bringen Sie Ihrem Kind von Anfang an bei, immer auf
eine strae Gurtführung zu achten und bei Bedarf selbst den Gurt
festzuziehen.
ANSCHNALLEN MITTELS FAHRZEUGGURT
16
17
18
7
16
CLICK!
7
18
19
16
18
19
Other manuals for ELIAN-FIX
3
Table of contents
Other GB Car Seat manuals


