GE Druck DPI 620 User manual

Druck DPI 620
advanced modular calibrator
safety and quick reference guide - K0454
GE
Sensing & Inspection Technologies A1.1 DPI 620: Channel 1 (CH1)
Measure (M) / Source (S) / Power (P)
a±30 V (M)
b0 to 12 V (S)
c±2000 mV (M)
0 to 2000 mV (S) Figure C1
Note: = See figure or
table.
d0 to 4000 Ω(M/S)
e0 to 50 kHz (M/S)
fSwitch (M)
g±55 mA (M) Figure C2
h0 to 24 mA (S)
i11 RTDs (M/S) Figure C3 (2, 3, 4-wire)
j12 TCs (M/S) Figure C4
k ±300 Vac: AC probe Figure C5 (Part: IO620-AC)
A1.2 DPI 620: Channel 2 (CH2)
l±30 V (M)
m±2000 mV (M)
n±55 mA (M) Figure D1
o0 to 24 mA (S)
p24 V loop (P)
qSwitch (M)
A1.3 DPI 620 + MC 620 + PM 620
Pressure* (M) Figure E1
Gauge: 25 mbar to 200 bar (0.36 to 3000 psi)
Absolute: 350 mbar to 1000 bar (5 to 15000 psi)
Note: Maximum pneumatic pressure: 500 bar (7250 psi)
*Caution: To prevent damage to the PM 620 module, only
use it within the specified pressure limit on the label.
© 2008 General Electric Company. All rights reserved.
Trademarks
All product names are trademarks of their respective companies.

K0454 Issue 1
A2.1 DPI 620 A2.2 DPI 620
A3 DPI 620 B1 MC 620 + PM 620
B2
1
8
A2.2
5
6
7
42 3
9
10
12
f
c
e
11
ba
d
b
2
a
1
a
2 2
1 1
3 3
5
4
a
b
2
4
31
C1 DPI 620: CH1 C2 DPI 620: CH1
C3 DPI 620: CH1 C4 DPI 620: CH1
C5 DPI 620: CH1 E1 DPI 620 + MC 620 + PM 620
C
4
D1 DPI 620: CH2
A1.1 ( a, b, c, d, e, f )
V, mV, Ω, Hz,
A1.1 ( g, h )
mA
A1.1 ( i)
A1.1 ( j)
A1.1 ( k)
A1.3
P1
P2
A1.2 ( l, m, n, o, p, q )
V, mV, mA, 24 Vo,
Customer service
Visit our web site: www.gesensing.com
DPI 620 + MC 620
+ PM 620

[EN] English - K0454 Issue 1 Quick Reference 1
Quick Reference
WARNING: Before you use this instrument, read and understand the “Safety”
section. It is dangerous to ignore the specified warnings.
Start operations (S1 to S4)
S1: Install the battery. Refer to Section 5.
S2: Power on/off sequence
S3: Example change of function (Voltage to Current)
ON ➀First display Normal output OFF ➀
Press and hold Press
TAP
Channel Settings
1
3
2
4
Task Settings
6 8
Task Settings
5
Select Function Channel Settings
7

2Quick Reference K0454 Issue 1 - [EN] English
S4: Touch-screen operations (maximise, minimise, set voltage)
Menu sequence
Task*
Settings
CH1
CH2
Channel
Settings
Function
Units
Utility
Caption
Select
“Function”
None
Current
Voltage
* A channel can only have one function at a time.
TAP
Set voltageMaximise
12
1
3
4
Minimise
*
*
*Alternative options for step ➀
TAP

[EN] English - K0454 Issue 1 3
1Overview The advanced modular calibrator (AMC) is part of a set of
hand-held modules that you can quickly put together to include
a wide range of calibrator functions.
Advanced modular calibrator, DPI 620: This is a
battery-powered instrument for electrical measure and source
operations and HART® communications; see table A1(front
cover). It also supplies the power and user interface functions
for all the add-on modules. You can use the touch-screen to
display up to six different parameters.
Pressure module carrier, MC 620: Optional item. This
attaches to the DPI 620 calibrator to make a fully integrated
pressure indicator instrument. To measure and display
pneumatic or hydraulic pressures, you can have up to two
interchangeable pressure transducers at a time.
Pressure modules, PM 620: Optional item. These modules
attach to the pressure module carrier (MC 620) or to a pressure
station (PV 62x) to give the DPI 620 calibrator the necessary
pressure measurement functionality. They are fully
interchangeable “plug and play” modules with no initial set-up
or user calibration.
Pressure stations, PV 62x: Optional item. To make a fully
integrated pressure calibrator, you can attach the DPI 620
calibrator to one of the three pressure stations. Refer to user
manual - K0457.
2 Standard
equipment
These items are part of the standard equipment with the
DPI 620 calibrator:
• DC power supply/battery charger unit
• Li-Polymer battery
• Set of six electrical test leads
• Safety and quick reference guide
• CD with the user manual
DPI 620
MC 620
PM 620
PV 62x
Overview/Standard equipment

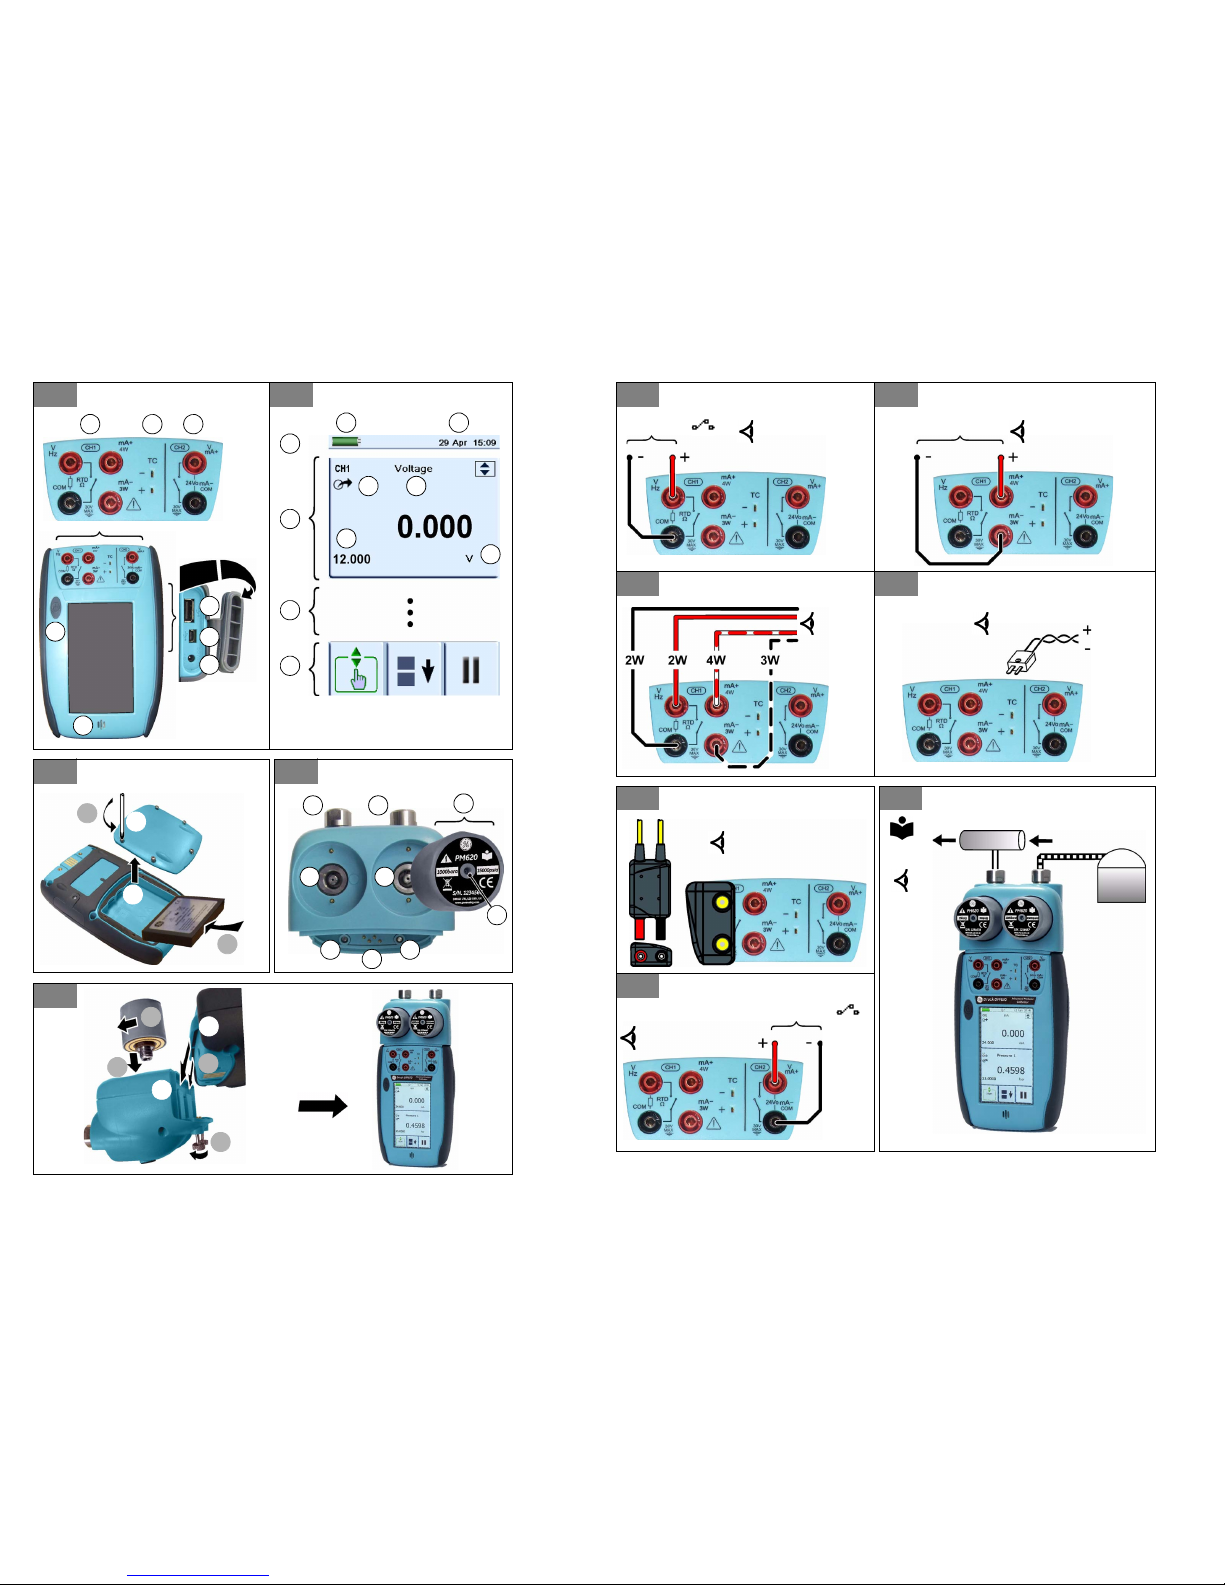
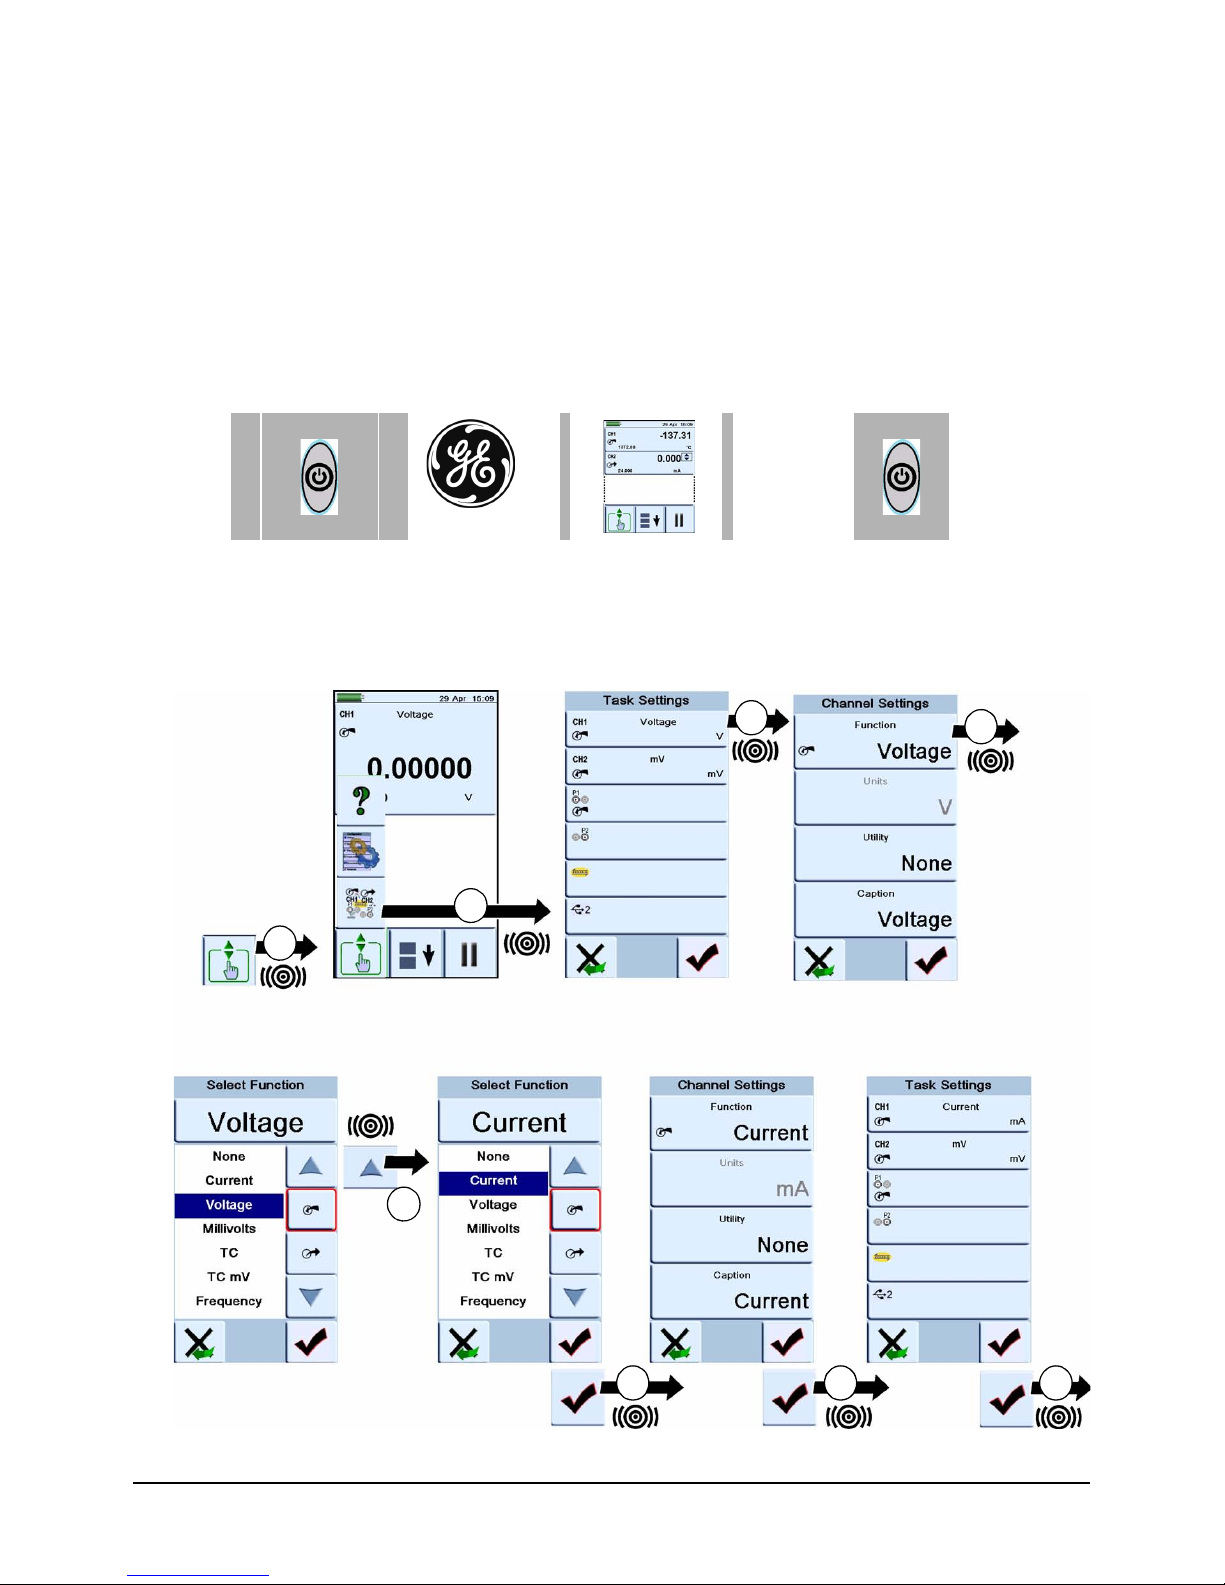
4Safety K0454 Issue 1 - [EN] English
3Safety Before you use the instrument, make sure that you read and
understand all the related data. This includes: the applicable
local safety procedures, the user manual (K0449), and the
instructions for the accessories/options/equipment you are
using it with.
General
warnings WARNING
• It is dangerous to ignore the specified limits for the
instrument or to use the instrument when it is not in its
normal condition. Use the applicable protection and
obey all safety precautions.
• Do not use the instrument in locations with explosive
gas, vapour or dust. There is a risk of an explosion.
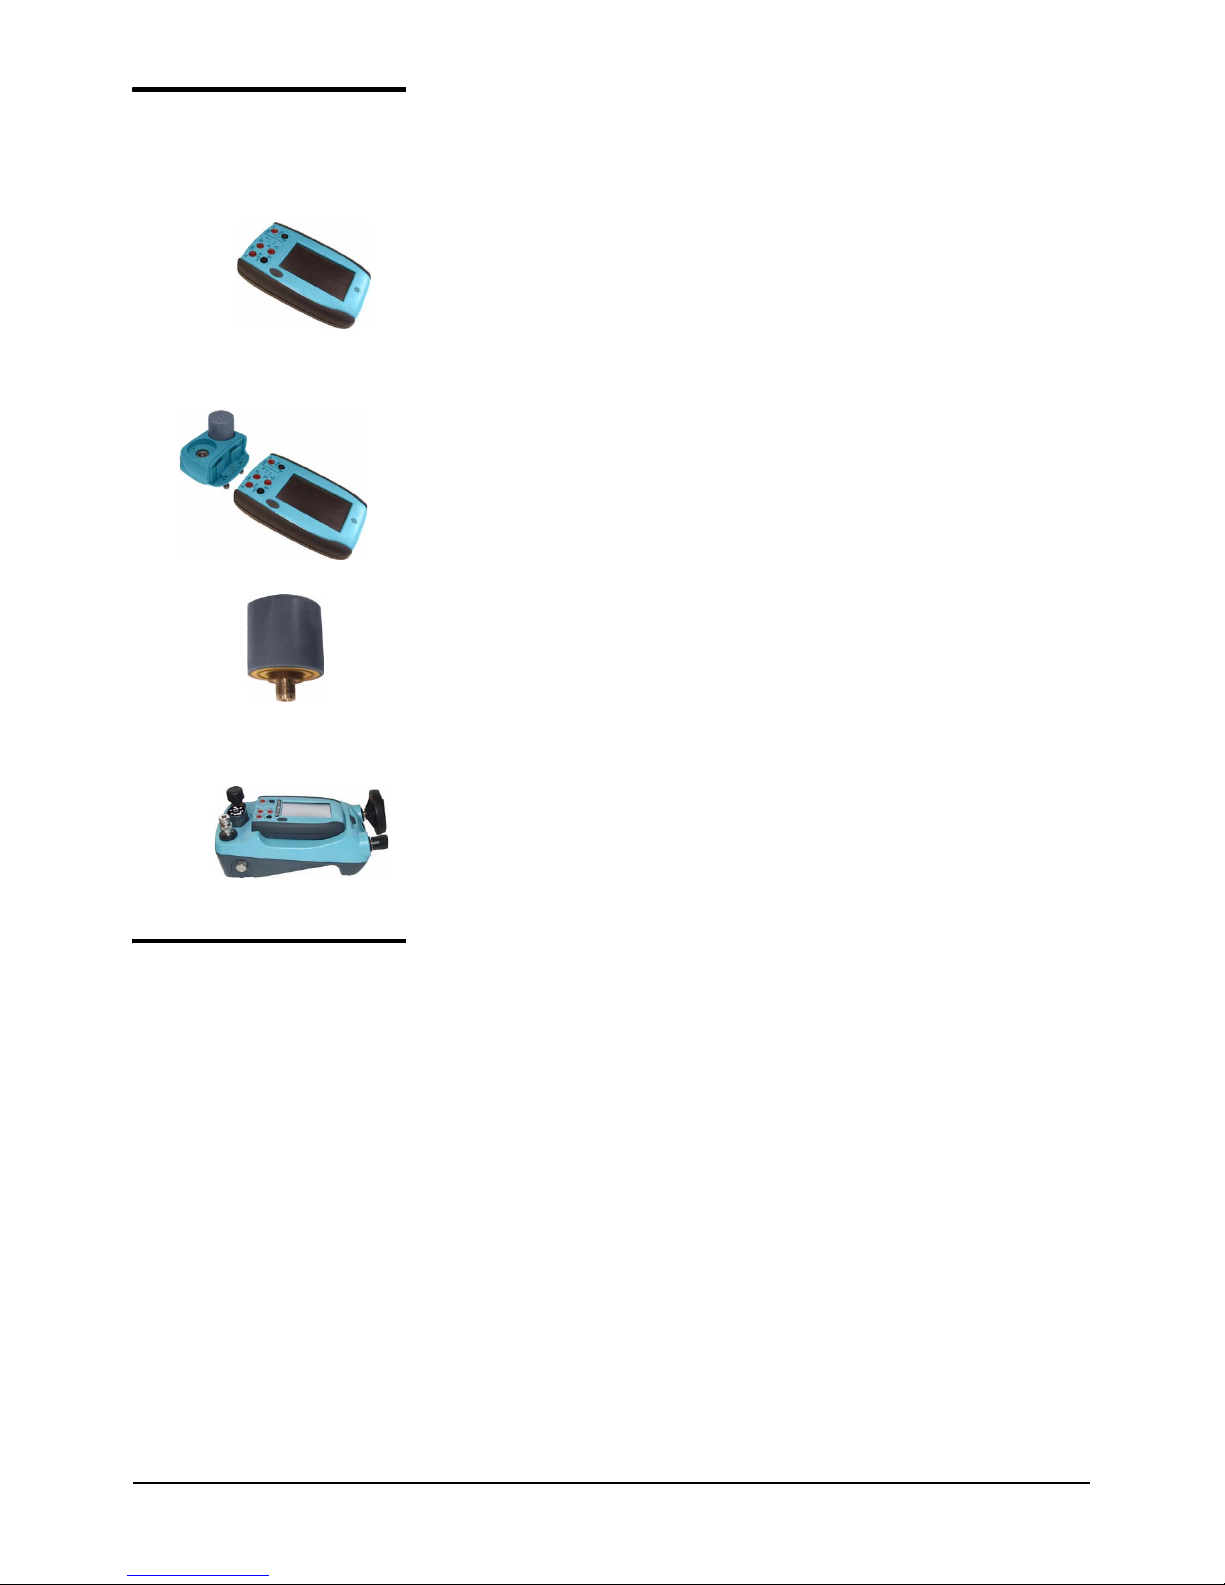
Electrical
warnings
• To prevent electrical shocks or damage to the
instrument, do not connect more than 30V between the
terminals, or between the terminals and the ground
(earth).
• To prevent electrical shocks, use only the GE specified
AC probe (Part: IO620-AC) to measure AC voltages
(maximum: 300 Vac).
• This instrument uses a Lithium-Polymer (Li-Polymer)
battery pack. To prevent an explosion or fire, do not
short circuit, do not disassemble, keep it safe from
damage. For operating conditions, see Table 1.
• To prevent an explosion or fire, use only the GE
specified battery, power supply and battery charger.
• To prevent battery leakage or heat generation, only use
the battery charger and power supply in the
temperature range 0 to 40°C (32 to 104°F). For
operating conditions, see Table 1.
Pressure
warnings
• Some liquid and gas mixtures are dangerous. This
includes mixtures that occur because of
contamination. Make sure that the equipment is safe to
use with the necessary media.
• To prevent a dangerous release of pressure, isolate and
bleed the system before you disconnect a pressure
connection.
Continued

[EN] English - K0454 Issue 1 Parts 5
• To prevent a dangerous release of pressure, make sure
that all the related pipes, hoses and equipment have
the correct pressure rating, are safe to use and are
correctly attached.
Cautions To prevent damage to the display, do not use sharp
objects on the touch-screen.
To prevent damage to the PM 620 module, only use it
within the specified pressure limit on the label.
Before you start an operation or procedure in this publication,
make sure that you have the necessary skills (if necessary, with
qualifications from an approved training establishment). Follow
good engineering practice at all times.
Marks and
symbols on the
instrument
4Parts Refer to the figures on the front cover (A2, B1).
4.1 Key to figure A2 (DPI 620 calibrator)
Complies with European
Union directives Warning - refer to the
manual
Read the manual USB ports: Type A;
Mini-type B connector
Ground (Earth) ON/OFF
Do not dispose of this product as household waste.
Refer to “Maintenance” (Section 5.5).
More marks and symbols are specified in the user manual
(K0449 - Druck DPI 620 Advanced modular calibrator)
A2 1. On or off button. Refer to “Quick Reference”.
2. CH1 Channel 1 connectors for: voltage (V); frequency (Hz);
resistance (Ω); resistance temperature detectors (RTD):
3W, 4W = 3-wire, 4-wire RTD input; switch operation;
current (mA+, mA-): COM = Common connector
You can also use the GE specified AC probe (Part: IO620-AC)
to measure AC voltages (maximum: 300 Vac).
3. TC Channel 1 connectors for thermocouples.
4. CH2 Isolated channel 2 connectors for: voltage (V); current (mA+,
mA-); 24V loop power supply (24Vo); switch operation

6Parts K0454 Issue 1 - [EN] English
4.2 Key to figure B1 (MC 620 module carrier/PM 620 module) - Optional item
A2 5. USB type A connector for connections to external peripherals
(USB flash memory or optional external modules).
6. USB mini-type B connector for communication with a
computer.
7. +5V DC power input socket. This supply also charges the
battery.
8. Sealed speaker unit.
9. Liquid crystal display (LCD): Colour display with touch-screen.
To make a selection, lightly tap on the applicable display area.
a. Battery indicator b. Date and time
10. CH1: Window for the channel 1 settings and values.
c. Measure or source
indication d. Function
e. Full scale (FS) range f. Function units
11. Other windows: The number of windows you see on the display
is set by the number of task selections and external modules
you are working with (maximum: 6).
12. Tap this button to set up the Task, set up the instrument
(Configure) and to access Help (?). Refer to “Quick
Reference”.
Tap this button to maximise each of the available windows in
sequence. Refer to “Quick Reference”.
Pause (II) or Play (X): Tap (II) to hold (freeze) all the data on
the display. To release the display and continue, tap (X).
B1 1. Pressure connection (G1/8 or 1/8NPT) to attach external
pressure equipment.
2. Pressure and electrical connections for a pressure module
(PM 620). These are self-seal pressure connections.
3. Two screws to attach the calibrator (DPI 620).
4. Electrical connections for the calibrator (DPI 620).
5. Pressure module (PM 620) with a pressure connection,
reference port (a) and a label. The label includes:
Pressure range. Example: 20 bar g (g: gauge; a: absolute);
serial number (S/N); manufacturer: name, address, website

[EN] English - K0454 Issue 1 Installation 7
5 Installation Before you start:
• Read and understand the “Safety” section.
• Do not use damaged equipment.
Note: Use only original parts supplied by the manufacturer.
5.1 AMC battery See figure A3 (front cover).
5.2 Indicator
assembly
Optional item (MC 620/PM 620). See figure B2 (front cover).
5.3 Electrical
connections
See figure C1 to C5, and D1 (front cover).
5.4 Externalpressure
connections
See figure B1/E1 (front cover). Use an applicable method to
seal the external pressure connections, and then tighten to the
applicable torque. Maximum torque:
1/8 NPT: 35 Nm (26 lbf.ft)
G1/8: 25 Nm (18.4 lbf.ft)
A3 Step Procedure
1. When the power is off, loosen the five screws (a) and remove
the cover (b).
If necessary, turn the instrument over and let the discharged
battery drop into your hand.
2. Install the new battery correctly until it is flat in the
compartment.
3. Re-attach the cover.
B2 Step Procedure
1. Align the two slots (a) on the calibrator with the two posts (b) on
the module carrier.
2. When the posts are fully engaged in the slots, tighten the two
screws until they are hand tight.
3. Attach one or two PM 620 modules with the correct range and
type.
4. Tighten each one until it is hand tight only.

8K0454 Issue 1 - [EN] English
5.5 Maintenance Clean the case with a moist, lint-free cloth and a weak
detergent. Do not use solvents or abrasive materials.
Return the instrument to the manufacturer or an approved
service agent for all repairs. Refer to the user manual.
Do not dispose of this product as household waste. Use an
approved organisation that collects and/or recycles waste
electrical and electronic equipment. For more information,
contact one of these:
• our customer service department:
(Contact us at www.gesensing.com)
• your local government office.
6 Specification Table 1: General specification
Display LCD: Colour display with touch-screen
Operating temperature -10 to 50°C (14 to 122°F)
Storage
temperature -20 to 70°C (-4 to 158°F)
Ingress Protection IP65 (DPI 620 calibrator only)
Humidity 0 to 90% relative humidity (RH) non-condensing
Shock/Vibration Def Stan 66-31, 8.4 cat III
EMC Electromagnetic compatibility: BS EN 61326-1:2006
Electrical safety Electrical - BS EN 61010:2001
Pressure safety Pressure Equipment Directive - Class: Sound Engineering
Practice (SEP)
Approved CE Marked
Battery power Lithium-Polymer battery (GE Part number: 191-356)
Capacity: 5040 mAh (minimum), 5280 mAh (typical);
Nominal voltage: 3.7 V.
Charge temperature: 0 to 40°C (32 to 104°F)
Note: When the instrument senses the temperature is outside
this range, it stops charging.
Discharge temperature: -10 to 50°C (14 to 122°F).
Charge/discharge cycles: > 500 > 70% capacity
Maintenance/Specification

Customer service
Visit our web site: www.gesensing.com
Other manuals for Druck DPI 620
1
Table of contents
Other GE Test Equipment manuals