Gima OXY 9 Instruction Manual

PULSOXIMETRO OXY 9 - wireless
OXY 9 OXIMETER - wireless
OXYMÈTRE OXY 9 - sans l
OXY 9 OXÍMETRO - inalámbrico
OXY 9 OXYMETER - kabellos
OXY 9 OXÍMETRO - sem o
M35078-M-Rev.0.04.21
PROFESSIONAL MEDICAL PRODUCTS
Importato da / Imported by / Importé par /
Importado por / Importado por / Eingeführt von:
Gima S.p.A.
Via Marconi, 1 - 20060 Gessate (MI) Italy
gima@gimaitaly.com - export@gimaitaly.com
www.gimaitaly.com
CMS50D-BT (35078)
0123
CONTEC MEDICAL SYSTEMS CO., LTD
No.112 Qinhuang West Street,
Economic & Technical Development Zone,
Qinhuangdao, Hebei Province,
PEOPLE’S REPUBLIC OF CHINA
Made in China
Shanghai International
Holding Corp. GmbH (Europe)
Eiffestrasse 80, 20537,
Hamburg, Germany
IP22
95%
0%
1060 hPa
500 hPa
60°C
-40°C

32ENGLISH
Instructions to User
Dear users, thank you very much for purchasing the Pulse
Oximeter.
In case of modications and software upgrades, the informa-
tion contained in this document is subject to change without
notice.
The Manual describes, in accordance with the Pulse Oxime-
ter’s features and requirements, main structure, functions,
specications, correct methods for transportation, installa-
tion, usage, operation, repair, maintenance and storage, etc.
as well as the safety procedures to protect both the user
and equipment. Refer to the respective chapters for details.
Please read the User Manual carefully before using this
product. The User Manual which describes the operating
procedures should be followed strictly. Failure to follow the
User Manual may cause measuring abnormality, equipment
damage and human injury. The manufacturer is NOT re-
sponsible for the safety, reliability and performance issues
and any monitoring abnormality, human injury and equip-
ment damage due to users’ negligence of the operation
instructions. The manufacturer’s warranty service does not
cover such faults.
Owing to the forthcoming renovation, the specic products
you received may not be totally in accordance with the de-
scription of this User Manual. We would sincerely regret for
that.
This product is medical device, which can be used repeat-
edly.
WARNING:
Uncomfortable or painful feeling may appear if using
the device ceaselessly, especially for the microcircula-
tion barrier patients. It is recommended that the sensor
should not be applied to the same nger for over 2 hours.
For the special patients, there should be a more prudent
inspecting in the placing process. The device can not be
clipped on the edema and tender tissue.

33 ENGLISH
The light (the infrared is invisible) emitted from the device
is harmful to the eyes, so the user and the maintenance
man should not stare at the light.
Testee can not use enamel or other makeup.
Testee’s ngernail can not be too long.
Please refer to the correlative literature about the clinical
restrictions and caution.
This device is not intended for treatment.
The User Manual is published by our company. All rights
reserved.
1 SAFETY
1.1 Instructions for Safe Operations
Check the main unit and all accessories periodically to
make sure that there is no visible damage that may affect
patient’s safety and monitoring performance about cables
and transducers. It is recommended that the device should
be inspected once a week at least. When there is obvious
damage, stop using the device. In addition ,the overall check
of monitor, including the safety check such as the leakage
current, should be performed only by qualied personnel
once every 12 months.
• Necessary maintenance must be performed by qualied
service engineers ONLY. There are no user serviceable
parts and users are not permitted to maintain it by them-
selves.
• The oximeter cannot be used together with devices not
specied in User’s Manual. Only the accessory that ap-
pointed or recommendatory by manufacture can be used
with this device.
• This product is calibrated before leaving factory.
1.2 Warning
Explosive hazard—DO NOT use the oximeter in envi-
ronment with inammable gas such as some ignitable
anesthetic agents.
Ensure that the environment in which the device is op-

34
erated is not subject to any sources of strong electro-
magnetic interference, such as radio transmitters, mobile
telephones, etc. Keep them far away High level electro-
magnetic radiation emitted from such devices may great-
ly affect the monitor performance.
DO NOT use the oximeter while the testee measured by
MRI and CT.
Be careful with the use of the lanyard cord. Improper use
of the lanyard cord will cause device damage not cov-
ered under the manufacturer’s warranty. Swinging the
device by the lanyard cord will void the warranty. Please
do not use lanyard cord if allergic to lanyard cord.
The person who is allergic to rubber can not use this de-
vice.
The disposal of scrap instrument and its accessories and
packings(including battery, plastic bags, foams and pa-
per boxes) should follow the local laws and regulations.
Please check the packing before use to make sure the
device and accessories are totally in accordance with the
packing list, or else the device may have the possibility of
working abnormally.
Please choose the accessories and probe which are ap-
proved or manufactured by the manufacturer, or else it
may damage the device.
Please don’t measure this device with functional tester
for the device’s related information.
When uploading, do keep the patient form touching the
USB port. The computer used when uploading must be
in accordance with EN60950. In addition, when the data
line connected to a computer, the medical electrical sys-
tems should be in accordance with IEC60601-1-1.
1.3 Attention
Keep the oximeter away from dust, vibration, corrosive
substances, explosive materials, high temperature and
moisture.
If the oximeter gets wet, please stop operating it.
When it is carried from cold environment to warm or hu-
ENGLISH

35
mid environment, please do not use it immediately.
DO NOT operate keys on front panel with sharp materi-
als.
High temperature or high pressure steam disinfection of
the oximeter is not permitted. Refer to User Manual in
the relative chapter (7.1)for instructions of cleaning and
disinfection.
Do not have the oximeter immerged in liquid. When it
needs cleaning, please wipe its surface with medical al-
cohol by soft material. Do not spray any liquid on the
device directly.
When cleaning the device with water, the temperature
should be lower than 60℃.
As to the ngers which are too thin or too cold, it would
probably affect the normal measure of the patients’ SpO2
and pulse rate, please clip the thick nger such as thumb
and middle nger deeply enough into the probe.
The update period of data is less than 5 seconds, which
is changeable according to different individual pulse rate.
The waveform is normalized. Please read the measured
value when the waveform on screen is equably and
steady-going. Here this measured value is optimal value,
and the waveform at the moment is the standard one.
If some abnormal conditions appear on the screen during
test process, pull out the nger and reinsert to restore
normal use.
The device has normal useful life for three years since
the rst electried use.
The hanging rope attached to the device is made from
Non- allergy material, if particular group are sensitive to
the hanging rope, stop using it. In addition, pay attention
to the use of the hanging rope , do not wear it around the
neck on the purpose of avoiding harm to the patient.
This device has the function of alarming, users can
check on this function according to chapter 6.2 as a ref-
erence.
The device has the function of limits alarming, when the
ENGLISH

36
measured data is beyond the highest or lowest limit, the
device would start alarming automatically on the premise
of the alarming function is on.
The device has the function of alarming, this function can
either be paused, or closed (default setting) for good.
This function could be turned on through menu operation
if you need. Please check the chapter 6.2 as a reference.
The device may not work for all patients. If you are una-
ble to achieve stable readings, discontinue use.
A exible circuit connects the two parts of the device. Do
not twist or pull on the connection.
2 OVERVIEW
The pulse oxygen saturation is the percentage of HbO2in
the total Hb in the blood, so-called the O2concentration in
the blood. It is an important bio-parameter for the respira-
tion. A number of diseases relating to respiratory system
may cause the decrease of SpO2in the blood, furthermore,
some other causes such as the malfunction of human body’s
self-adjustment, damages during surgery, and the injuries
caused by some medical checkup would also lead to the
difculty of oxygen supply in human body, and the corre-
sponding symptoms would appear as a consequence, such
as vertigo, impotence, vomit etc. Serious symptoms might
bring danger to human’s life. Therefore, prompt information
of patients’ SpO2is of great help for the doctor to discover
the potential danger, and is of great importance in the clinical
medical eld.
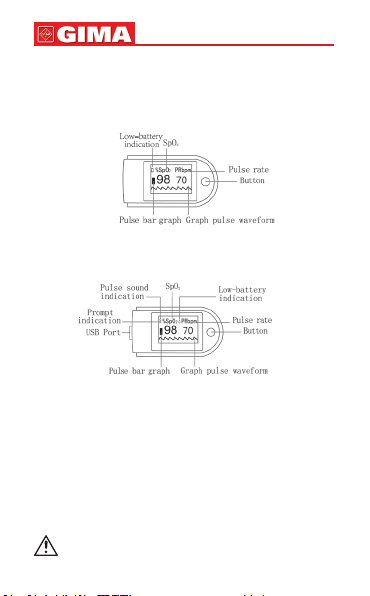
The Pulse Oximeter features in small volume, low power
consumption, convenient operation and being portable. It is
only necessary for patients to put one of his ngers into a
probe for diagnosis, and a display screen will directly show
the measured value of pulse oxygen saturation with the high
veracity and repetition.
2.1 Classication:
Class II b(MDD93/42/EEC IX Rule 10)
ENGLISH

37
2.2 Features
A. Operation of the product is simple and convenient.
B. The product is small in volume, light in weight and con-
venient in carrying.
C. Low power consumption
2.3 Major Applications and Scope of Application
The Pulse Oximeter can be used in measuring the pulse ox-
ygen saturation and pulse rate through nger. The product is
suitable for being used in family, hospital, oxygen bar, com-
munity healthcare, physical care in sports (It can be used
before or after doing sports, and it is not recommended to
use the device during the process of having sport) and etc.
The problem of overrating would emerge when
the patient is suffering from toxicosis which caused by
carbon monoxide, the device is not recommended to be
used under this circumstance.
2.4 Environment Requirements
Storage Environment
a) Temperature : -40℃ ~ +60℃
b) Relative humidity : ≤ 95%
c) Atmospheric pressure: 500 hPa ~ 1060 hPa
Operating Environment
a) Temperature: 10℃ ~ 40℃
b) Relative Humidity: ≤ 75%
c) Atmospheric pressure: 700 hPa ~ 1060 hPa
3 PRINCIPLE
Principle of the Oximeter is as follows: An experience for-
mula of data process is established taking use of Lambert
Beer Law according to Spectrum Absorption Characteristics
of Reductive Hemoglobin (Hb) and Oxyhemoglobin (HbO2)
in glow & near-infrared zones. Operation principle of the de-
vice is: Photoelectric Oxyhemoglobin Inspection Technology
is adopted in accordance with Capacity Pulse Scanning &
Recording Technology, so that two beams of different wave-
ENGLISH

38
length of lights can be focused onto human nail tip through
perspective clamp nger-type sensor. Then measured sig-
nal can be obtained by a photosensitive element, informa-
tion acquired through which will be shown on screen through
treatment in electronic circuits and microprocessor.
Figure 1.
4 TECHNICAL SPECIFICATIONS
4.1 Main Performance
A. SpO2value display
B. Pulse rate value display, bar graph display
C. Pulse waveform display
D. Low-voltage indication: low-voltage indicator appears
before working abnormally which is due to low-voltage
E. Display direction can be changed automatically.
F. Enter standby mode automatically.
G. PR sound indication; sound prompt for over-limit, n-
ger-out and low battery
H. Memory function.
I. The data can be uploaded to the terminal equipment by
wired mode(Wire or Bluetooth wired equipment)
J. The data can be uploaded to the terminal equipment by
wireless mode (Bluetooth or Bluetooth wired equipment)
K. Time display(Wire or Bluetooth wired equipment)
4.2 Main Parameters
A. Measurement of SpO2
Measuring range: 0% ~ 100%
Glow and infrared ray
emission tube
Glow and infrared ray
receipt tube
ENGLISH

39
Accuracy: When the SpO2measuring range is 70%~
100%, the permission of absolute error is ±2%; below
70% unspecied
B. Measurement of pulse rate
Measuring range: 30 bpm ~ 250 bpm
Accuracy: ±2 bpm or ±2% (select larger)
C. Resolution
SpO2: 1%, Pulse rate: 1bpm.
D. Measurement Performance in Weak Filling
Condition
SpO2 and pulse rate can be shown correctly when
pulse-lling ratio is 0.4%. SpO2 error is ±4%, pulse rate
error is ±2 bpm or ±2% (select larger).
E. Resistance to surrounding light
The deviation between the value measured in the condi-
tion of man-made light or indoor natural light and that of
darkroom is less than ±1%.
F. Power supply requirement:
2.6 V DC ~ 3.6V DC.
G. Optical Sensor
Red light (wavelength is 660 nm, 6.65 mW)
Infrared (wavelength is 905 nm, 6.75 mW)
H. Adjustable prompt range:
SpO2: 0% ~ 100%
Pulse Rate: 0 bpm ~ 254 bpm
I. Bluetooth specications
Bluetooth protocol: Bluetooth Low Energy
USB protocol: None
Operating frequency: 2.4 GHz ISM band
Modulation: GFSK (Gaussian Frequency Shift Keying)
Transmitting power: 0 dBm, -6 dBm, -23 dBm
Sensitivity: ≤-84 dBm @ 0.1% BER
Transfer rate: 1 Mbps
Safety features: Authentication and encryption
Support Services: Bluetooth Data Transfer
J. FCC ID:2ABOGCMS50D-BT
ENGLISH

40
5 INSTALLATION
5.1 View of the Front Panel
Figure 2
Front view - Bluetooth equipment
Front view - Wire or Bluetooth wired equipment
USB interface: connect with USB cable (Wire or Bluetooth
wired equipment)
Button: exit standby; pause sound prompt, enter menu,
menu operation (Wire or Bluetooth wired equipment).
5.2 Battery Installation
A. Refer to Figure 3 open the battery compartment cover
on the back of the device,and insert the two AAA size
batteries properly in the right direction.
B. Replace the cover.
Please take care when you insert the batteries for
ENGLISH

41
the improper insertion may damage the device.
When you don’t use the device for more than 2
hours, please take out the dry batteries.
Figure 3
Figure 4
5 3 Accessories
A. Put the thinner side of the rope through the hole (see
Figure4 ).
B. Put the wider side of the rope through the thinner side
which has been put through the hole, then tighten it.
5.4 USB port
(Wire or Bluetooth wired equipment)
USB port :It is used to connect a personal computer to ex-
port the trend data (see Figure 4 ).
5.5 Accessories
A. Structure: main unit, USB cable. (Wire or Bluetooth wired
equipment)
B. Accessories: one hanging, one USB cable, one CD disk
(including PC software, optional) .
Please check the device and accessories accord-
ing to the list to avoid that the device can not work nor-
mally.
ENGLISH

42
6 OPERATING GUIDE
6.1.1 Application Method
A.
a) Insert the two batteries properly to the direction, and then
replace the cover.
b) Open the clip as shown in Figure 5.
c) Let the user’s nger put into the rubber cushions of the
clip (make sure the nger is in the right position), and
then clip the nger.
d) Do not shake the nger and keep the user in a stable
state during the process.
e) Press “Button” to exit from the standby mode. The data
can be read directly from the screen on the measuring
interface.
.
Figure 5 Put nger in position
Figure 6-1 Synchronous time interface Figure 6-2 Time interface
1) Enter to “Synchronous Time...” interface(as Figure 6-1).
(Bluetooth equipment)
2) Three methods to exit from “Synchronous Time...” inter-
face.(Bluetooth equipment)
ENGLISH

43
The rst method:
Don’t perform sync time, press the button, then the device
will enter to measurement interface from “Synchronous
Time...” interface.
The second method:
Don’t perform sync time, wait for several minutes, then the
device will enter to measurement interface from “Synchro-
nous Time...” interface.
The third method:
Perform sync time, connect to power, then the device
will turn on automatically, when it enters to “Synchronous
Time...” interface, connect it with App, then it will automat-
ically adjust time.
Fingernails and the luminescent tube should be on
the same side.
If the prompt function is on, the device will pro-
vide medium-priority prompt signal when nger is out.
Intermittent prompt will occur and the user interface
presents “FINGER OUT”.
Medium priority indicating that prompt operator re-
sponse is required.
Please synchronize the time with the master de-
vice when using it for the rst time or after replacing
batteries, refer to chapter 6.1.1.e or 6.1.3.c for relative
operations.
B. The device could change display direction according to
the handing direction.
C. Under measurement interface and non-prompt state,
short press the button to enter the clock interface (as
Figure 6-2). (Wire or Bluetooth wired equipment)
D. Under non-measurement state, it will enter standby
mode automatically when there is no operation within 5s.
(Wire or Bluetooth wired equipment)
ENGLISH

44
6.1.2 Pause sound prompt
(Wire or Bluetooth wired equipment)
A. Sound prompt, including: over-limit, low-battery and n-
ger out.
B. Under the measurement interface, turn on the sound
prompt, when the sound prompt occurs, short press the
button to pause the sound prompt, and it will resume au-
tomatically after about 60s.
C. If you want to turn off the sound prompt permanently,
please set it in menu.
6.1.3 Menu operation
(Wire or Bluetooth wired equipment)
Under the measurement interface, long press the button to
enter the main menu interface as shown in Figure 7, prompt,
record,system, clock etc. can be set, methods are as fol-
lowings:
Figure 7 Main menu Figure 8 Setting interface
for sound prompt
Figure 9 Record menu
ENGLISH

45
A. Prompt setting
Under main menu, short press the button to select “Prompt”,
then long press the button to enter its setting interface
shown in Figure 8.
Short press the button to select the option to be adjusted,
then long press the button to change the value.
“Direction”: direction, “+”: increase the value, “-”: de-
crease the value
“SpO2HI (%)”: upper limit prompt for SpO2over-limit
“SpO2LO (%)”: lower limit prompt for SpO2over-limit
“PR HI (bpm)”: upper limit prompt for PR over-limit
“PR LO (bpm)”: lower limit prompt for PR over-limit
“Prompt Sound”: prompt for over-limit, “off”: close, “on”:
open.
“Pulse Sound”: PR sound, “off”: close, “on”: open.
Lower limit can not exceed the upper limit, and the upper
limit can not be lower than the lower limit when adjusting the
values. SpO2 range: 0% ~ 100%, PR range: 0 ~ 254 bpm
The values displayed in Figure 8 are the initial values of
over-limit prompt.
After setting, short press the button to select “Exit”, then long
press the button to exit sound setting interface, and return to
“Main Menu” interface.
B. Data storage
Under the main menu, short press the button to select “Re-
cord”, then long press the button to enter the “Record Menu”
interface as shown in Figure 9. It indicates that the device
is storing when the red dot “●” in measurement interface
ickers.
Short press the button to select the option to be adjusted,
then long press the button to change the value.
“Mode”: record mode selection, including: “Auto” and “Manu-
al” mode. Under “Manual” mode, select to turn on / off mem-
ory by “Record”.
Auto record: start recording after stable data appear, pull out
the nger to nish recording a group of data (99 group of
data at most), the total duration does not exceed 72 hours.
ENGLISH

46
Manual record: store up to 24-hour data.
When the memory is full, it will display “Memory is full!”, then
it will enter the standby mode after several seconds. When
exiting the standby mode next time, it will display “Memory is
full!” to prompt user that the memory has been full, press the
button again to enter the measurement interface.
Under manual mode, when “Record” is “ON”, the
device will prompt to clear the data stored last time.
It will display “Recording...” when there is no operation under
record state for 15s, then it will enter energy saving mode af-
ter several seconds, long press the button to exit this mode;
short press the button, it will display “Recording”.
Under data recording state, after the display
screen turns off automatically, in order to save power,
pulse sound indication will turn off automatically.
“Seg”: data segment.
After setting, short press the button to select “Exit”, long
press the button to exit record menu and return to main
menu.
“Delete All”: delete all records (auto record mode is
shown as Figure 9).
Please upload data in time after recording, other-
wise the data may be covered when the storage space
is full.
The historical data will be deleted once switching
the mode. Under record state, the record mode can not
be switched; under manual mode, the record mode can
be switched only when turning off recording rstly.
ENGLISH

47
Figure 10 Time menu Figure 11 System menu
C. Time setting
a. Connect the master device to synchronize device time
Under the PC software interface, after search for the device
(refer to relative chapter (6.1.4) for the connection method),
then can synchronize the device time.
b. Set device time manually
Under main menu, short press the button to select “Clock”,
long press the button to enter its sub-menu as shown in
Figure 10.
Short press the button to select the option to be adjusted,
then long press the button to change the value.
“Set Time”: set the time, “yes”: allow, “no”: prohibit
“Set Year”: set the year
“Set Month”: set the month
“Set Day”: set the day
“Set Hour”: set the hour
“Set Minute”: set the minute
Adjustable range for year: 2015 ~ 2045, month: 1 ~ 12, day:
1 ~ 30 (when there are 31 days in a month, it is 1 ~ 31), hour:
1 ~ 23, minute: 1 ~ 59.
After setting, short press the button to select “Exit”, then long
press the button to exit time setting interface and return to
main menu.
D. System setting and other options introduction
Under main menu, short press the button to select “System”,
ENGLISH

48
then long press the button to enter the interface as shown
in Figure 11.
Short press the button to select the option to be adjusted,
then long press the button to change the value.
“Hard.Ver.”: hardware version
“Soft.Ver.”: software version
“ID”: user name
“Demo”: set the Demo mode, “on”: turn on the Demo
mode, “off”: turn off the Demo mode.
“Sound Volume”: set the sound volume, adjustable
range: 1 ~ 3
After setting, short press the button to select “Exit”, then
long press the button to exit the system menu and return
to main menu.
E. Exit main menu
Under main menu, short press the button to select “Exit”,
then long press the button to exit the main menu and return
to the measurement interface.
6.1.4 Data upload
A. Wired transmission (Wire or Bluetooth wired equip-
ment)
Connect the device to the computer by the USB ca-
ble,upload the data after connecting the PC software
properly, refer to “Software operating instruction” for de-
tails.
The PC software can be downloaded from our of-
cial website.
B. Bluetooth transmission (Bluetooth or Bluetooth wired
equipment)
Turn on the device Bluetooth and the PC software to
upload data, refer to “Software operating instruction” for
details.
6.2 Attention for Operation
A. Please check the device before using, and conrm that it
can work normally.
ENGLISH

49
B. The nger should be in a proper position (see
C. the attached illustration of Figure 4 for reference), or else
it may result in inaccurate measure.
D. The SpO2sensor and photoelectric receiving tube
should be arranged in a way with the subject’s arteriole
in a position there between.
E. The SpO2sensor should not be used at a location or limb
tied with arterial canal or blood pressure cuff or receiving
intravenous injection.
F. Do not x the SpO2 sensor with adhesive or else it may
result in venous pulsation and inaccurate measure of
SpO2and pulse rate.
G. Excessive ambient light may affect the measuring result.
It includes uorescent lamp, dual ruby light, infrared
heater, direct sunlight and etc.
H. Strenuous action of the subject or extreme electrosurgi-
cal interference may also affect the accuracy.
I. Testee can not use enamel or other makeup.
J. Please clean and disinfect the device after operating ac-
cording to the User Manual(7.1).
6.3 Clinical Restrictions
A. As the measure is taken on the basis of arteriole pulse,
substantial pulsating blood ow of subject is required.
For a subject with weak pulse due to shock, low ambi-
ent/body temperature, major bleeding, or use of vascu-
lar contracting drug, the SpO2 waveform (PLETH) will
decrease. In this case, the measurement will be more
sensitive to interference.
B. For those with a substantial amount of staining dilution
drug (such as methylene blue, indigo green and acid
indigo blue), or carbon monoxide hemoglobin (COHb),
or methionine (Me+Hb) or thiosalicylic hemoglobin, and
some with icterus problem, the SpO2determination by
this monitor may be inaccurate.
C. The drugs like dopamine, procaine, prilocaine, lidocaine
and butacaine may also be a major factor blamed for se-
ENGLISH

50
rious error of SpO2measure.
D. As the SpO2value serves as a reference value for judge-
ment of anemic anoxia and toxic anoxia, some patients
with serious anemia may also report good SpO2meas-
urement.
7 MAINTAIN, TRANSPORTATION
AND STORAGE
7.1 Cleaning and Disinfecting
Using medical alcohol to disinfect the device, nature dry or
clean it with clean soft cloth.
7.2 Maintain
A. Please clean and disinfect the device before using ac-
cording to the User Manual (7.1).
B. Please change the battery when the screen shows .
C. Take out the battery if leave the equipment unused for
long time.
D. Users are advised to calibrate the device termly (or ac-
cording to the calibrating program of hospital). It also can
be performed at the state-appointed agent or just contact
us for calibration.
7.3 Transportation and Storage
A. The packed device can be transported by ordinary con-
veyance or according to transport contract. The device
can not be transported mixed with toxic, harmful, corro-
sive material .
B. The packed device should be stored in room with no cor-
rosive gases and good ventilation. Temperature: -40°C ~
60°C; Humidity: ≤ 95%
ENGLISH
This manual suits for next models
2
Table of contents
Other Gima Medical Equipment manuals

Gima
Gima 28190 User manual

Gima
Gima 45560 User manual

Gima
Gima 31170 Parts list manual

Gima
Gima GIMAled81 User manual

Gima
Gima LANG-STEREOTEST I Parts list manual

Gima
Gima 34257 User manual

Gima
Gima 31204/501 User manual

Gima
Gima CONTEC08A-VET User manual

Gima
Gima OXY-200 User manual

Gima
Gima PC-900PLUS SNET User manual
Popular Medical Equipment manuals by other brands

Proactive Medical
Proactive Medical Protekt Aire 6500 Operation manual

Reison
Reison 10-387 manual

Mizuho
Mizuho MOT-3602X Operator's manual

St. Jude Medical
St. Jude Medical Amplatzer Instructions for use

COOK Medical
COOK Medical Zenith TX2 Instructions for use

Fresenius Kabi
Fresenius Kabi CompoSeal Universal operating instructions