Gima OXY-PED Parts list manual

M34266-M-Rev.4.05.19
Gima S.p.A.
Via Marconi, 1 - 20060 Gessate (MI) Italy
www.gimaitaly.com
ATTENZIONE: Gli operatori devono leggere e capire
completamente questo manuale prima di utilizzare il prodotto.
ATTENTION: The operators must carefully read and completely
understand the present manual before using the product.
AVIS: Les opérateurs doivent lire et bien comprendre ce manuel avant d’utiliser le produit.
ACHTUNG: Diese Anleitung muss vor dem Einsatz des Produkts aufmerksam gelesen
und vollständig verstanden werden.
ATENCIÓN: Los operadores tienen que leer y entender completamente este manual
antes de utilizar el producto.
ATENÇÃO: Os operadores devem ler e entender completamente este manual
antes de usar o produto.
ΠΡΟΣΟΧΗ: Οι χειριστές αυτού του προϊόντος πρέπει να διαβάσουν και να
καταλάβουν πλήρως τις οδηγίες του εγχειριδίου πριν από την χρήση του.
Manuale d’uso e manutenzione
Use and maintenance book
Instructions de foncionnement et entretien
Betriebs und wartungs anweisungen
Manual de uso y mantenimiento
Manual de uso e manutenção
Εγχειριδιο χρησης και συντηρησης
Gima S.p.A.
Via Marconi, 1
20060 Gessate (MI) Italy
Made in China
34266 0476
PROFESSIONAL MEDICAL PRODUCTS
SATURIMETRO PEDIATRICO OXY-PED
OXY-PED PEDIATRIC FINGERTIP OXIMETER
OXYMÈTRE PÉDIATRIQUE OXY-PED
PULSOXIMETER FÜR KINDER OXY-PED
SATURÓMETRO PEDIÁTRICO OXY-PED
MEDIDOR DE SATURAÇÃO PEDIÁTRICO OXY-PED
ΠAIΔIATPIKO KOPEΣTOMETPO
OXY-PED

17
Instructions to User
Read these instructions carefully before using this equipment. These
instructions describe the operating procedures to be followed strictly.
Failure to follow these instructions can cause measuring abnormity,
equipment damage and personal injury. The manufacturer is NOT re-
sponsible for the safety, reliability and performance issues and any mon-
itoring abnormality, personal injury and equipment damage due to user’s
negligence of the operation instructions. The manufacturer’s warranty
service does not cover such faults.
Please peruse the relative content about the clinical restrictions and
caution.
1. SAFETY
1.1 Instructions for Safe Operations
- Check the main unit and all accessories periodically to make sure
that there is no visible damage that may affect patient’s safety and
monitoring performance. It is recommended that the device should be
inspected once a week at least. When there is obvious damage, stop
using the oximeter.
- Necessary maintenance must be performed by qualied service engi-
neers ONLY. Users are not permitted to maintain it by themselves.
- The oximeter cannot be used together with the devices not specied
in User’s Manual.
1.2 Warnings
- Explosive hazard—DO NOT use the oximeter in environment
with inammable gas such as some ignitable anesthetic agents.
-
DO NOT use the oximeter while the testee measured by MRI and CT.
- To dispose the device, the local law must be followed.
1.3 Attentions
- Keep the oximeter away from dust, vibration, corrosive sub-
stances, explosive materials, high temperature and moisture.
- If the oximeter gets wet, please stop operating it. When it is
carried from cold environment to warm and humid environment,
please do not use it immediately.
ENGLISH

18
- DO NOT press the keys on front panel with sharp materials.
- High temperature or high pressure steam disinfection to the oxi-
meter is not permitted. Refer to User’s Manual for instructions of
cleaning and disinfection.
- DO NOT have the oximeter immerged in liquid. When it needs
cleaning, please wipe its surface with disinfect solution by soft
material. Do not spray any liquid on the device directly.
- The device should be kept out of the reach of children
2. OVERVIEW
The pulse oxygen saturation is the percentage of HbO2 in the total Hb of
the blood, so-called the O2 concentration in the blood. It is an important
bio-parameter to the respiration. Many of the respiration disease will
cause hypoxemia, even endanger the patient’s health. As a result, mon-
itoring the
SpO2
is indispensable in the clinical rescuing. The traditional
method to measure
SpO2
is to analyze the sample of the patient’s blood,
so can get the partial pressure of oxygen and calculate the
SpO2
by use
the bloodgas analyzer. This method can not be used to monitor continu-
ously. For the purpose of measuring the
SpO2
more easily and accurate-
ly, GIMA developed the Fingertip Oximeter. The device can measure the
pulse rate and blood perfusion index simultaneously.
The Fingertip Oximeter is compact, convenient to use and carry and with
low power consumption. You just need to put the ngertip into the sensor
of the device, the
SpO2
value will appear on the screen immediately.
2.1 Features
- Small in size and lightweight;
- Color OLED, various display modes, display directions adjustable;
-
The device can accurately measure SpO2value, pulse rate value and
perfusion index;
- The device will automatically start measuring after putting nger into
rubber cushions;
- The device will power off automatically without signal for about 8 se-
conds;
- Audible & visual alarm function;
- Low voltage indication;
ENGLISH

19
2.2 Major Applications and Scope
This device is applicable to home, hospital (including internal medicine,
surgery, anesthesia, pediatrics, emergency room etc.), oxygen bar, the
community medical center, alpine area and it also can be used before or
after sports, and the like. The Fingertip Oximeter can detect
SpO2
, pulse
rate and blood perfusion index.
This device is not appropriate to be used for continuous mon-
itoring.
2.3 Environment Requirements
Operating Temperature: 5°C~40°C
Operating Humidity: 30%~80%
Atmospheric pressure: 70kPa~106kPa
2.4 SpO2Common Knowledge
1. Meaning of SpO2
SpO2
is the saturation percentage of oxygen in the blood, so called O2
concentration in the blood; it is dened by the percentage of oxyhemo-
globin (HbO2) in the total hemoglobin of the arterial blood.
SpO2
is an
important phy¬siological parameter to reect the respiration function; it
is calculated by the following method:
SpO2= HbO2/ (HbO2+Hb)×100%
HbO2are the oxyhemoglobins (oxygenized hemoglobin), Hb are those
hemoglobins which release oxygen
2. Principle of Measurement
Based on Lamber-Beer law, the light absorbance of a given substance
is directly proportional with its density or concentration. When the light
with certain wavelength emits on human tissue, the measured intensity
of light after absorption, reecting and attenuation in tissue can reect
the structure character of the tissue by which the light passes. Due to
that oxygenated hemoglobin (HbO2) and deoxygenated hemoglobin
(Hb) have different absorption character in the spectrum range from red
to infrared light (600nm~1000nm wavelength), by using these charac-
teristics,
SpO2
can be determined.
SpO2
measured by this oximeter is
the functional oxygen saturation - a percentage of the hemoglobin that
ENGLISH

20
can transport oxygen.
In contrast, hemoximeters report fractional oxygen saturation - a per-
centage of all measured hemoglobin, including dysfunctional hemoglo-
bin, such as carboxyhemoglobin or metahemoglobin.
Clinical application of pulse oximeters:
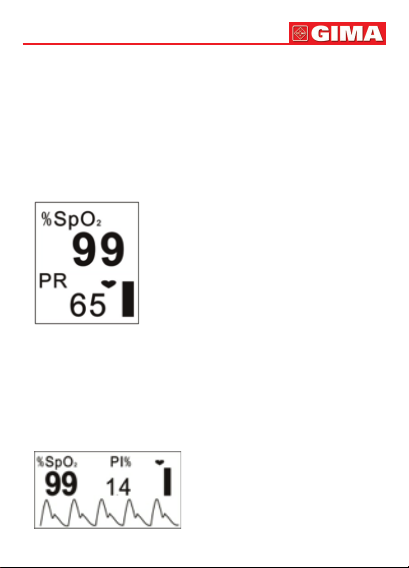
SpO2
is an important physiologi-
cal parameter to reect the respiration and ventilation function, so
SpO2
monitoring used in treatment has become more popular. (For example,
such as monitoring patients with serious respiratory disease, patients
under anesthesia during operation and premature and neonatal infants)
The status of
SpO2
can be determined in timely manner by measure-
ment and will allow nding the hypoxemia patient earlier, thereby pre-
venting or reducing accidental death caused by hypoxia effectively.
3. Factors affecting SpO2measuring accuracy (interference reason)
• Intravascular dyes such as indocyanine green or methylene blue.
• Exposure to excessive illumination, such as surgical lamps, bilirubin
lamps, uorescent lights, infrared heating lamps, or direct sunlight.
• Vascular dyes or external used color-up product such as nail enamel
or color skin care.
• Excessive patient movement.
• Placement of a sensor on an extremity with a blood pressure cuff,
arterial catheter, or intravascular line.
• Exposure to the chamber with High pressure oxygen.
• There is an arterial occlusion proximal to the sensor.
• Blood vessel contraction caused by peripheral vessel hyperkinesias
or body temperature decreasing.
4. Factors causing low SpO2Measuring value (pathology reason)
• Hypoxemia disease, functional lack of HbO2.
• Pigmentation or abnormal oxyhemoglobin level.
• Abnormal oxyhemoglobin variation.
• Methemoglobin disease.
• Sulfhemoglobinemia or arterial occlusion exists near sensor.
• Obvious venous pulsations.
• Peripheral arterial pulsation becomes weak.
• Peripheral blood supply is not enough.
ENGLISH

21
2.5 Caution
A. The uncomfortable or painful feeling may appear if using the device
ceaselessly, especially for the microcirculation barrier patients. It is
recommended that the sensor should not be applied to the same
nger for over 2 hours.
B. For the individual patients, there should be a more prudent inspecting
in the placing process. The device can not be clipped on the edema
and tender tissue.
C. The light (the infrared is invisible) emitted from the device is harmful to
the eyes, so the user and the maintenance man, can not stare at the
light.
D. Testee can not use enamel or other makeup on the nger.
E. Testee’s ngernail can not be too long.
F. The nger should be placed properly, or else it may cause inaccurate
measurement.
G. Do not shake the nger and keep at ease during using.
H. Do not put wet nger directly into oximeter.
I. The
SpO2
sensor should not be used at a location or limb tied with
arterial canal or blood pressure cuff or receiving intravenous injection.
L. Do not x the
SpO2
sensor with adhesive or else it may result in ve-
nous pulsation and inaccurate measure of
SpO2
.
M.Make sure the optical path is free from any optical obstacles like rub-
berized fabric.
N. Excessive ambient light may affect the measuring result. It includes
uorescent lamp, dual ruby light, infrared heater, direct sunlight and
etc.
O. Strenuous action of the subject or extreme electrosurgical interfer-
ence may also affect the accuracy.
3. TECHNICAL SPECIFICATIONS
A. Display mode:
OLED Display
B. Power supply requirement:
3.6V LiR2450 rechargeable cell×1
Supply voltage: 3.3V~4.2V
Continues working time: 4hours
ENGLISH

22
C. Operating current: <=40mA
D. SpO2Parameter Specications:
Measuring range: 35% - 100%
Accuracy: ≤3% (during 70% - 100%)
E. Pulse Rate Parameter Specications:
Measuring range: 30bpm-240bpm
Accuracy: ±2bpm or ±2% (which ever is greater)
F. Blood Perfusion Parameter Specications:
Measuring range: 0%~20%
G. The performance under low perfusion condition
The accuracy of
SpO2
and PR measurement still meets the speci-
cation described above when the modulation amplitude is as low as
0.6%.
H. Resistance to ambient light interference:
The accuracy of
SpO2
and PR measurement still meets the speci-
cation described above when the device is tested by
SpO2
simulator
(Fluke Biomedical Index 2 series) while setting the emulating interfer-
ence of sun light and 50Hz/60Hz uorescent light.
I. Dimensions: 56 mm (L) x 47 mm (W) x 32 mm (H)
Net Weight: 45g (including batteries)
4. ACCESSORI
A. A hanging cord B. Two batteries
C. A charger D. A power adapter
E. A charger cable F. A pouch
G. A User Manual H. Quality Certicate
ENGLISH

23
5. INSTALLATION
5.1. Front view
Figure 1
5.2. Battery
1. Insert the coin cell into the battery compartment properly in the right
direction (as shown in Figure 2).
Figure 2
2. Replace the cover.
- Please take care when you insert the coin cell, improper insertion may
make the oximeter not work.
Rubber cushion
Display key
Display
ENGLISH

24
6. OPERATION
1. Open the clip as shown in Figure 3.
Figure 3 Put Finger into the Oximeter
2. Put nger into the rubber cushions of the clip (make sure the nger is
in the right position), and then clip the nger.
3. The device will power on automatically in 2 seconds, and start to dis-
play software version number.
4. Next enter into data display screen (as shown in Figure 4). User can
read the values and view the waveform from display screen.
“%SpO2”:
SpO2
symbol; “99”:
SpO2
value;
“PR”: Pulse rate icon; “65”: Pulse rate value;
“ ”: Pulse beat symbol;
“ ”: Pulse intensity histogram.
Figure 4
5. When the display is shown as Figure 4, press Display Key to switch
display screen.
ENGLISH

25
• Press Display Key once, display screen (as shown in Figure 4) will
be ipped 180°.
• Press Display Key twice, display screen will be changed as Figure 5.
• Press Display Key three times, display screen (as shown in Figure 5)
will be ipped 180°.
• Press Display Key four times, display screen will back to the screen
as shown in Figure 4.
• Press Display Key circularly, display screen will be switched be-
tween the two screens (as shown in Figure 4 and Figure 5), and four
directions display alternately.
Figure 5
6. Longtime press Display Key (about 2 seconds), display screen will be
shown as Figure 6. Differences between Figure 6 and Figure 4 are as
follows
• In Figure 4,
SpO2
and pulse rate are being monitored and displayed
on the screen.
• In Figure 6,
SpO2
and perfusion index are being monitored and dis-
played on the screen.
Figure 6
ENGLISH

26
7.
When the screen displays as shown in Figure 6, press Display Key
circularly, the display screen will be switched between the two screens
(as shown in Figure 6 and Figure 7), and four directions display alter-
nately.
8. Display screen (as shown in Figure 6 or Figure 7) will return to the
screen as shown in Figure 4 or Figure 5 if without operation in 10 sec-
onds
Figure 7
9. Alarm Indicator
When measuring, if
SpO2
value and pulse rate value exceeds the pre-
set alarm limits, the device will alarm automatically and the value on
the screen exceeding limit will blink; at this time press Display Key to
shut down the alarm. Exceeding pulse rate alarm limit: sound twice as
an interval.
Preset alarm range:
SpO2
alarm: Low limit: 90%
Pulse Rate alarm: High limit 120bpm - Low limit: 50bpm
ENGLISH

27
7. INSTRUCTIONS FOR CHARGING THE CELL
The rechargeable coin cell is used to supply power for the oximeter.
When it is run out, you need to use the provided charger to charge it,
details is as follows:
1. Insert the cell into charger; pay attention to its polarity (as shown in
the following gure).
2. Connect the charger and power adapter by charger cable in the fol-
lowing way.
Charger
Charging indicator
Polarity
Charger
Charging indicator
Charger cable
Power adapter
ENGLISH

28
3. The power adapter should be plugged into the AC mains with
100~250VAC, 50/60Hz.
4. Status of charging indicator
Green: full
Orange: no cell
Red: charging
Note:
- The charger will stop charging automatically when the coin cell is full
(the indicator becomes green). Moreover, it has over heat protection
function, when the coin cell temperature is higher than 45°C, it will
also stop charging automatically.
- The charger can be connected to the USB port of a computer by the
charger cable for charging.
8. REPAIR AND MAINTENANCE
A. Please charge the battery when the low-voltage indicator lightens.
B. Please clean the surface of the device before using. Wipe the device
with alcohol rst, and then let it dry in air or wipe it dry.
C. Please take out the battery if the oximeter will not be used for a long
time.
D. The best storage environment of the device is -20ºC to 60ºC ambient
temperature, 10% to 95% relative humidity and 50kPa to 107.4kPa
atmospheric pressure. Necessary servicing must be performed by
qualied service engineers ONLY. Users are not permitted to maintain
it by themselves
The expected useful life (not guaranteed) of this device is 5 years.
High-pressure sterilization cannot be used on the device.
Do not immerse the device in liquid.
It is recommended that the device should be kept in a dry en-
vironment. Humidity may reduce the useful life of the device, or
even damage it.
ENGLISH

29
8.1 Battery Maintenance
Keep the both sides of coin cell clean.
- Low temperature may decrease the performance of coin cell, and low
battery indicator may appear early. In such case, please put coin cell
into pocket for warm before use, thus bring it back to normal condi-
tion.
- Do not let any conductive metal (such as tweezers) contact both sides
of coin cell simultaneously to avoid short circuit.
- Charge the coin cell for 8~10 hours each time; ambient temperature
should be 5°C~40°C.
- If the coin cell is full after charging, but its performance decreases
apparently, it means the coin cell is exhausted, please change a new
one.
9. TROUBLESHOOTING
Trouble Possible reason Solution
The SpO2
and Pulse Rate
display instable.
1. The nger is not
placed inside enough.
2. The nger is shaking
or the patient is
moving.
1. Place the nger
properly and try again.
2. Let the patient keep
calm.
The device
can not turn on.
1. The coin cell is
drained or almost
drained.
2. The coin cell is not
inserted properly.
3. The device’s
malfunction.
1. Charge the coin cell.
2. Reinstall coin cell.
3. Please contact the
local service center.
The indicator
light is off
suddenly.
1. The device will
power off automatically
when it gets no signal
for 8 secs.
2. The coin cell is
almost drained.
1. Normal.
2. Charge the coin cell.
ENGLISH

30
Declaration of Conformity:
The manufacturer hereby declares that this device complies with the
following standards:
- IEC 60601-1:2005+A1: 2012,
- IEC60601-1-2:2014,
- IEC60601-1-11:2010, ISO 80601-2-61:2011 and follows the provisions
of the council directive MDD93/42/EEC.
10. KEY OF SYMBOLS
Keep in a cool, dry
place
Medical Device complies
with Directive 93/42/EEC
Follow instructions
for use Manufacturer
Serial number Date of manufacture
Product code Type BF applied part
Lot number Keep away from sunlight
WEEE disposal Caution: read instructions
(warnings) carefully
%SpO2Pulse oxygen
saturation PI Perfusion Index
bpm Pulse rate
(beats per minute) Low battery voltage
ENGLISH

31
Disposal: The product must not be disposed of along with oth-
er domestic waste. The users must dispose of this equipment by
bringing it to a specic recycling point for electric and electronic
equipment. For further information on recycling points contact the
local authorities, the local recycling center or the shop where the
product was purchased. If the equipment is not disposed of cor-
rectly, nes or penalties may be applied in accordance with the
national legislation and regulations.
GIMA WARRANTY CONDITIONS
Congratulations for purchasing a GIMA product. This product meets high
qualitative standards both as regards the material and the production.
The warranty is valid for 12 months from the date of supply of GIMA.
During the period of validity of the warranty, GIMA will repair and/or replace
free of charge all the defected parts due to production reasons.
Labor costs and personnel traveling expenses and packaging not includ-
ed.
All components subject to wear are not included in the warranty.
The repair or replacement performed during the warranty period shall not
extend the warranty. The warranty is void in the following cases: repairs
performed by unauthorized personnel or with non-original spare parts,
defects caused by negligence or incorrect use. GIMA cannot be held
responsible for malfunctioning on electronic devices or software due to
outside agents such as: voltage changes, electro-magnetic elds, radio
interferences, etc. The warranty is void if the above regulations are not
observed and if the serial code (if available) has been removed, cancelled
or changed.
The defected products must be returned only to the dealer the product was
purchased from. Products sent to GIMA will be rejected.
ENGLISH

32
FRANÇAIS
Instructions pour l’utilisateur
Lisez attentivement ces instructions avant d’utiliser le produit. Ces ins-
tructions décrivent les procédures opérationnelles à suivre rigoureuse-
ment. Le non respect de ces instructions peut entraîner des erreurs de
mesure ou de dommages à l’appareil ainsi que des blessures à l’utilisa-
teur. Le fabricant n’est pas responsable en cas de manque de sécurité,
de abilité et de performances ainsi que de toute erreur de contrôle, des
blessures et des dommages au produit dus à la négligence de l’utilisa-
teur face a ces instructions. La garantie du fabricant ne couvre pas une
telle éventualité.
Lisez attentivement les contenus liés aux restrictions cliniques et aux
dangers.
1. SÉCURITÉ
1.1 Instructions pour une utilisation sûre
- Vériez l’unité principale et tous les accessoires périodiquement pour
s’assurer de l’absence de tout dommage ou usure pouvant affecter la
sécurité du patient et la précision de mesure. Il est recommandé de
vérier le produit, au moins une fois par semaine. En cas de n’importe
quel type de dommages, cesser d’utiliser l’oxymètre.
- L’entretien doit être effectué SEULEMENT par du personnel qualié.
L’utilisateur n’a pas le droit à la maintenance.
- L’oxymètre ne peut pas être utilisé avec des dispositifs non spéciés
dans ce manuel
.
1.2 Dangers
- Explosif - NE PAS utiliser l’oxymètre en la présence de gaz in-
ammables tels que certains agents anesthésiques.
- NE PAS utiliser l’oxymètre lorsque le patient est en cours d’ana-
lyse IRM et CT.
- Pour le traitement du produit il faut respecter les lois locales.
1.3 Points importants
- Protéger l’oxymètre de la poussière, les vibrations, les corrosifs,
les explosifs, les températures élevées et l’humidité.
- Si l’oxymètre se trempe, arrêter de l’utiliser. Quand on le déplacé

33 FRANÇAIS
d’un endroit froid à un endroit chaud et humide, ne pas l’utiliser
immédiatement.
- NE PAS appuyer sur les boutons du panneau avant avec des
objets pointus.
- Il est INTERDIT de désinfecter l’oxymètre à la vapeur à haute
température et pression. Reportez-vous à ce manuel pour les
instructions de nettoyage et de désinfection.
NE PAS immerger l’oxymètre dans un liquide. Quand il faut le
nettoyer, essuyer sa surface avec un chiffon doux humidié avec
une solution désinfectante. Ne pas appliquer de spray ou de li-
quide directement sur le produit.
- L
’
appareil doit être tenu hors de la portée des enfants.
2. DESCRIPTION GÉNÉRALE
La saturation en oxygène de la pulsation est le pourcentage de HbO2
dans le Hb total du sang, et est appelée concentration d’O2 dans le
sang. Il s’agit d’un paramètre biologique important pour la respiration.
Beaucoup de troubles de la respiration peuvent entraîner une hypoxé-
mie, pouvant même mettre en danger la santé du patient. Il est donc
indispensable dans les procédures cliniques de contrôler l’
SpO2
. La mé-
thode traditionnelle pour mesurer l’
SpO2
est celle d’analyser un échantil-
lon de sang du patient, an d’obtenir la pression partielle d’oxygène et de
calculer l’
SpO2
par le biais d’un détecteur approprié. Cette méthode peut
être utilisée pour le suivi continu. An de mesurer l’
SpO2
plus facilement
et précisément, il a été développé l’oxymètre de doigt. Le produit peut
également mesurer simultanément la fréquence cardiaque et l’indice de
perfusion.
L’oxymètre de doigt est un appareil compact, facile à utiliser et à trans-
porter et à faible consommation d’énergie. Il suft d’insérer l’extrémité du
doigt dans le capteur de l’appareil, la valeur de
SpO2
et la fréquence des
pulsations apparaissent immédiatement sur l’écran
.
2.1 Caractéristiques
- Très léger et compact
- Afchage en couleur OLED avec sélection de différents modes et
choix d
’
orientation.

34
- Mesure avec précision l
’
SpO2
, la fréquence cardiaque et l
’
indice de
perfusion.
- Démarrage automatique de mesure après l
’
introduction du doigt.
- Arrêt automatique après 8 secondes sans signal.
- Alarmes visuelles et audio.
- Indicateur de batterie faible.
2.2 Principales applications et but du produit
L
’
oxymètre de doigt est adapté tant pour l
’
usage domestique que pour
l
’
usage hospitalier. Il peut surveiller l
’
SpO2
, la fréquence cardiaque et
l
’
indice de perfusion.
Ce dispositif n
’
est pas adapté à la surveillance continue.
2.3 Caractéristiques environnementales
Température de service : 5°C~40°C
Humidité de service : 30%~80%
Pression de service : 70 kPa~106 kPa
2.4 Connaissances communes sur la SpO2
1. Signication de SpO2
La
SpO2
est le pourcentage de saturation de l
’
oxygène dans le sang,
appelé également concentration d’O2dans le sang; il est déni par le
pourcentage en oxyhémoglobine (HbO2) dans l’hémoglobine totale du
sang des artères.
La
SpO2
est un paramètre physiologique important qui reète la fonction
respiratoire ; il est calculé selon la formule suivante:
SpO2= HbO2/ (HbO2+Hb)×100%
Les HbO2sont les oxyhémoglobines (hémoglobines oxygénées), les Hb
sont les hémoglobines qui relâchent l’oxygène.
2. Principe de la mesure
Fondée sur la loi de Beer-Lambert, l’absorption de lumière d’une subs-
tance donnée est directement proportionnelle à sa densité ou concen-
tration. Lorsque la lumière est émise avec une certaine longueur d’onde
sur le tissu humain, l’intensité mesurée de cette lumière après réexion,
absorption et atténuation sur un tissu permet de déterminer les caracté-
FRANÇAIS

35
ristiques de la structure du tissu à travers lequel la lumière passe. L’hé-
moglobine oxygénée (HbO2) et l’hémoglobine désoxygénée (Hb) ayant
des taux d’absorption différents de plage de lumière spectrale rouge et
infrarouge (600 nm~1000 nm de longueur d’onde) on peut, en utilisant
cette méthode, déterminer le taux de
SpO2
. La
SpO2
mesurée par cet
oxymètre est la saturation en oxygène fonctionnel-- un pourcentage de
l’hémoglobine qui peut transporter l’oxygène. En revanche, l’hémoxy-
mètre indique la saturation fractionnelle en oxygène – un pourcentage
de toutes les hémoglobines mesurées, y compris les hémoglobines dys-
fonctionnelles, comme les carboxyhémoglobines ou méthémoglobines.
Application clinique des oxymètres de pouls: la
SpO2
est un paramètre
physiologique important pour reéter la fonction de respiration et de
ventilation, c’est pourquoi la surveillance de la
SpO2
utilisée dans les
traitements a de plus en plus de succès. (comme par exemple, la sur-
veillance de patients avec des troubles respiratoires graves, patients
sous anesthésie durant une opération, nouveau-nés ou bébés préma-
turés). La mesure de la
SpO2
permet de déterminer rapidement l’état
de celle-ci et de trouver ainsi l’éventuelle hypoxémie du patient, tout en
évitant ou en réduisant le risque
de mort accidentelle provoquée par l’hypoxie.
3. Facteurs affectant la précision de la mesure de la SpO2(inter-
férences)
• Les colorants intravasculaires comme le vert d’indocyanine ou le bleu
de méthylène.
• L’exposition à un éclairage excessif, comme les lampes chirurgicales,
les lampes à bilirubine, les lampes uorescentes, à infrarouges ou la
lumière directe du soleil.
• Les colorants intravasculaires ou les agents colorants externes
comme les vernis à ongle ou les crèmes tintées.
• Les mouvements excessifs du patient.
• Le placement d’un capteur à une extrémité où est présent un brassard
pour la prise de pression, un cathéter artériel, ou un dispositif intra-
vasculaire.
• L’exposition dans une pièce avec de l’oxygène à haute pression.
• L’occlusion artérielle à proximité du capteur.
• La contraction d’un vaisseau sanguin provoquée par l’hyperkinésie
FRANÇAIS
Other manuals for OXY-PED
2
Table of contents
Languages:
Other Gima Medical Equipment manuals
Popular Medical Equipment manuals by other brands

Planmeca
Planmeca ProOne manual

Unihoist Ltd
Unihoist Ltd Graduate 150 instruction manual

Ossur
Ossur DVTCare CA5 Healthcare Provider Instructions

Baywater Healthcare
Baywater Healthcare Freedom 600 user guide

ADC
ADC DIAGNOSTIX 952 Use, care & maintenance

VQ OrthoCare
VQ OrthoCare BIONICARE OACTIVE Application Instructions