Hama DR350 User manual

Digital Radio
Digitalradio
Operating Instructions /Bedienungsanleitung /Mode d‘emploi /Instrucciones de uso /
Руководство по эксплуатации /Istruzioni per l‘uso /Gebruiksaanwijzing / Οδηγίες χρήσης /Instrukcja obsługi /
Használati útmutató /Návod kpoužití /Návod na použitie /Manual de instruções /Kullanma kılavuzu /
Manual de utilizare/Bruksanvisning /Käyttöohje / Работна инструкция /Betjeningsvejledning /Manuelt stasjonssøk
OK
00054862
00054864
(DR350)

GOperating instructions
Technical Data
Radio Receiver DAB
ü
DAB+
ü
FM
ü
Internet
-
Spotify
-
Display 2.4“ (6.1 cm Colour TFT)
Speaker 3“ 5WRMS
Acoustic Material Plastic
Power input 12 V 1Aswitch mode power supply
Power Consumption Operation max. 12 W Standby <1W
Input &Output DC Socket, Aux in, 3.5 mm Earphone Jack, USB (Update port)
Presets DAB: 30 FM: 30
Codec DAB:
MP2, AAC
UI Languages English, German, Danish, Dutch, Finnish, French, Italian, Norwegian, Polish, Swedish,
Turkish, Czech, Slovak
Package Content DR350, Power Supply,Short Manual, exible mounting clip, mounting plate
Dimension (WxHxD) 210 x72x215 mm
Weight 1100 g

A
15
1
8
2
9
3
10
4
11
5
12
6
13
7 16
14
OK
2019181721
AUXINUPDATEPORTDCIN

B
C
1
2
1
2
Installation with holding clip / Montage mit Halteklammer
Mounting with connector system / Montage mit Stecksystem

1
Controls and Displays (Pic.1)
A: Radio Front
1[POWER] button
2[MENU] button
3[PRESET] button
4[INFO] button
5[MODE] button
6[HOME] button
7[BACK] button
8-14
[PRESET 1-7] buttons
15 Display
16 [VOLUME] /[ENTER] /
[NAVIGATE]
B: Radio Back
17 UPDATEPORT Update port
18 AUXIN AUX-In socket
19 Headphone socket
20 DC IN Mains power supply
21 Antenna

2
1. Explanation of Warning Symbols and Notes ...........3
2. Package Contents ................................3
3. Safety Notes ....................................3
4. Installation ....................................3
4.1 Installation with holding clip ..........................3
4.2 Mounting with connector system/mounting plate ...........4
5. General notes on use..............................4
5.1 Navigation and controls..............................4
5.2 Additional Information...............................4
5.4 Switching on/off/standby .............................4
6. Getting started ..................................5
6.1 Radio –Connecting and starting up.....................5
Initial setup/language settings ............................5
7. Operation modes (FM/DAB&DAB+/AUX IN) ............5
8. Digital radio (DAB/DAB+) ..........................5
8.1 Display mode......................................5
8.2 Station list ........................................6
8.3 Station search / nd all stations ........................6
8.4 Inactive stations/cleaning up the station list ...............6
8.5 Adjusting the volume/dynamic range control (DRC) .........6
9. Analogue radio (FM/VHF) ..........................7
9.1 Setting the station manually...........................7
9.2 Automatic station search .............................7
9.3 Audio settings .....................................7
10. Aux in.........................................8
11. Managing favourites (FM/DAB&DAB+)...............8
11.1 Assigning the favourites quick-select buttons (8 to 14) ......8
11.2 Recalling favourites ................................8
11.3 Filling the favourites list (1 to 30)......................8
11.4 Recalling stations from the favourites list (1 to 30) .........8
12. Sleep timer ....................................8
13. Alarm clock ....................................8
13.1 Settings.........................................9
13.2 Activate/deactivate alarm clock .......................9
13.3 Stop alarm/snooze .................................9
14. System Settings .................................9
14.1 Equaliser ........................................9
14.2 Time settings .....................................9
14.3 Lighting........................................10
14.4 Language ......................................10
14.5 Factory settings ..................................10
14.6 Softwareversion .................................11
15. Careand Maintenance ..........................11
16. Warranty Disclaimer ............................11
17. Service and Support ............................11
18. Recycling Information ...........................12
19. Declaration of Conformity........................12
Content

3
Thank you for choosing aHama product.
Take your time and read the following instructions and
information completely.Please keep these instructions in a
safe place for futurereference. If you sellthe device, please
pass these operating instructions on to the new owner.
1. Explanation of Warning Symbols and Notes
Risk of electric shock
This symbol indicates product parts energized with a
dangerous voltage of sucient magnitude to constitute
arisk of electric shock.
Warning
This symbol is used to indicate safety instructions or to
draw your attention to specichazards and risks.
Note
This symbol is used to indicate additional information or
important notes.
2. Package Contents
•“DR350” Digital Radio
•Power Supply Unit
•Clamp Connection
•Screw Connection
•White Antenna Guide
•Black Antenna Guide
•Quick Guide
3. Safety Notes
•The product is intended for private, non-commercial use
only.
•Protect the product from dirt, moistureand overheating
and use it in dry rooms only.
•As with all electrical devices, this device should be kept
out of the reach of children.
•Children arenot permitted to play with the device.
Children may not clean the product or perform user
maintenance without supervision.
•Do not drop the product and do not expose it to any
major shocks.
•Do not operate the product outside the power limits
given in the specications.
•Keep the packaging material out of the reach of children
due to the risk of suffocation.
•Dispose of packaging material immediately according to
locally applicable regulations.
•Do not modify the device in any way.Doing so voids the
warranty.
Risk of electric shock
•Do not open the device or continue to operate it if it
becomes damaged.
•Do not use the product if the AC adapter,adapter
cable or power cable is damaged.
•Do not attempt to service or repair the device yourself.
Leave any service work to qualied experts.
4. Installation
Note –Installation location
Choose asuitable position for this purpose. The radio
must not be exposed to heat sources or moisture(not
above or near astove/dishwasher/sink).
4.1 Installation with holding clip (Clamp Connection)
•Attach the holding clip to the top of the radio using the
four screws provided. Youhave the choice between three
mounting positions. (Fig. B)
•Simply clip the radio with the mounted holding clip onto
the bottom of your wall cupboards. Youcan change the
mounting position of the radio this way at any time.
•The installation position of the radio may be adjusted at
any time by changing the position of the holding clip.
•Check whether the radio is securely attached.

4
4.2 Mounting with connector system/mounting
plate (Screw Connection)
•Attach the included mounting plate to the bottom of
your wall cupboards using all 5wood screws. (C)
•Mount the radio on the mounting plate so that the 4pins
click rmly into place (g. C, 1and 2)
•Check whether the radio is securely attached.
5. General notes on use
Notes on use
•When aselection is to be made between different
buttons (such as YES or NO), the selected button is
highlighted.
•In menus offering avariety of different options
(such as Equalizer,Update, and so on), the currently
selected option is marked [ ü].
5.1 Navigation and controls
[VOLUME/SELECT/NAVIGATE]has two different
functions:
A) Menu
•Turn [VOLUME/SELECT/NAVIGATE]toselect among
menu items.
•Conrm the selection by pressing [VOLUME/SELECT/
NAVIGATE].
B) Playback screen
•Turn [VOLUME/SELECT/NAVIGATE] in the playback screen
to adjust the volume of the radio.
•Turn [VOLUME/SELECT/NAVIGATE] to the left to reduce
the volume and to the right to increase it.
Note
•In the playback screen, use [ ]toswitch between
volume control and the station selection list.
•Press [ ]toshow the current input mode. If the
station list is active, the info icon and the description
‘station list’ appears in the display.Turn [VOLUME/
SELECT/NAVIGATE]tonavigate through all the
stations found.
From the menu, return to the playback screen by pressing
[].
Press [ ]toreturn to the previous menu level.
5.2 Additional Information
Press [ ]todisplay context-dependent additional
information. The information shown depends on the
operating mode as well as the current station. Keep
pressing [ ]tocycle through the information available.
•Description
Indicates the radio station, the current program,
contents, subjects, etc.
•Program genre/country
•Reliability/signal strength
•Bit rate
The current digital bit rate of the station currently being
received.
•Station’swebsite
•Station information
•Today’sdate
•Artist
•Album
•Author
Note
•The amount of information shown depends on the
current display mode of the playback screen.
Display mode of the playback screen
•Split screen (miniatureslideshow,large display of station
information)
•Slideshow with subtitles (station information on asingle
line)
•Slideshow in full-screen –noinformation displayed
5.4 Switching on/off/standby
•Press [ ]toturn the radio on or off (standby).
Note
•To switch off the radio completely,disconnect it from
the power supply.
5.5 Volume adjustment
Turn [NAVIGATE/ENTER/VOLUME] (16) to increase/reduce
the volume.

5
6. Getting started
6.1 Radio –Connecting and starting up
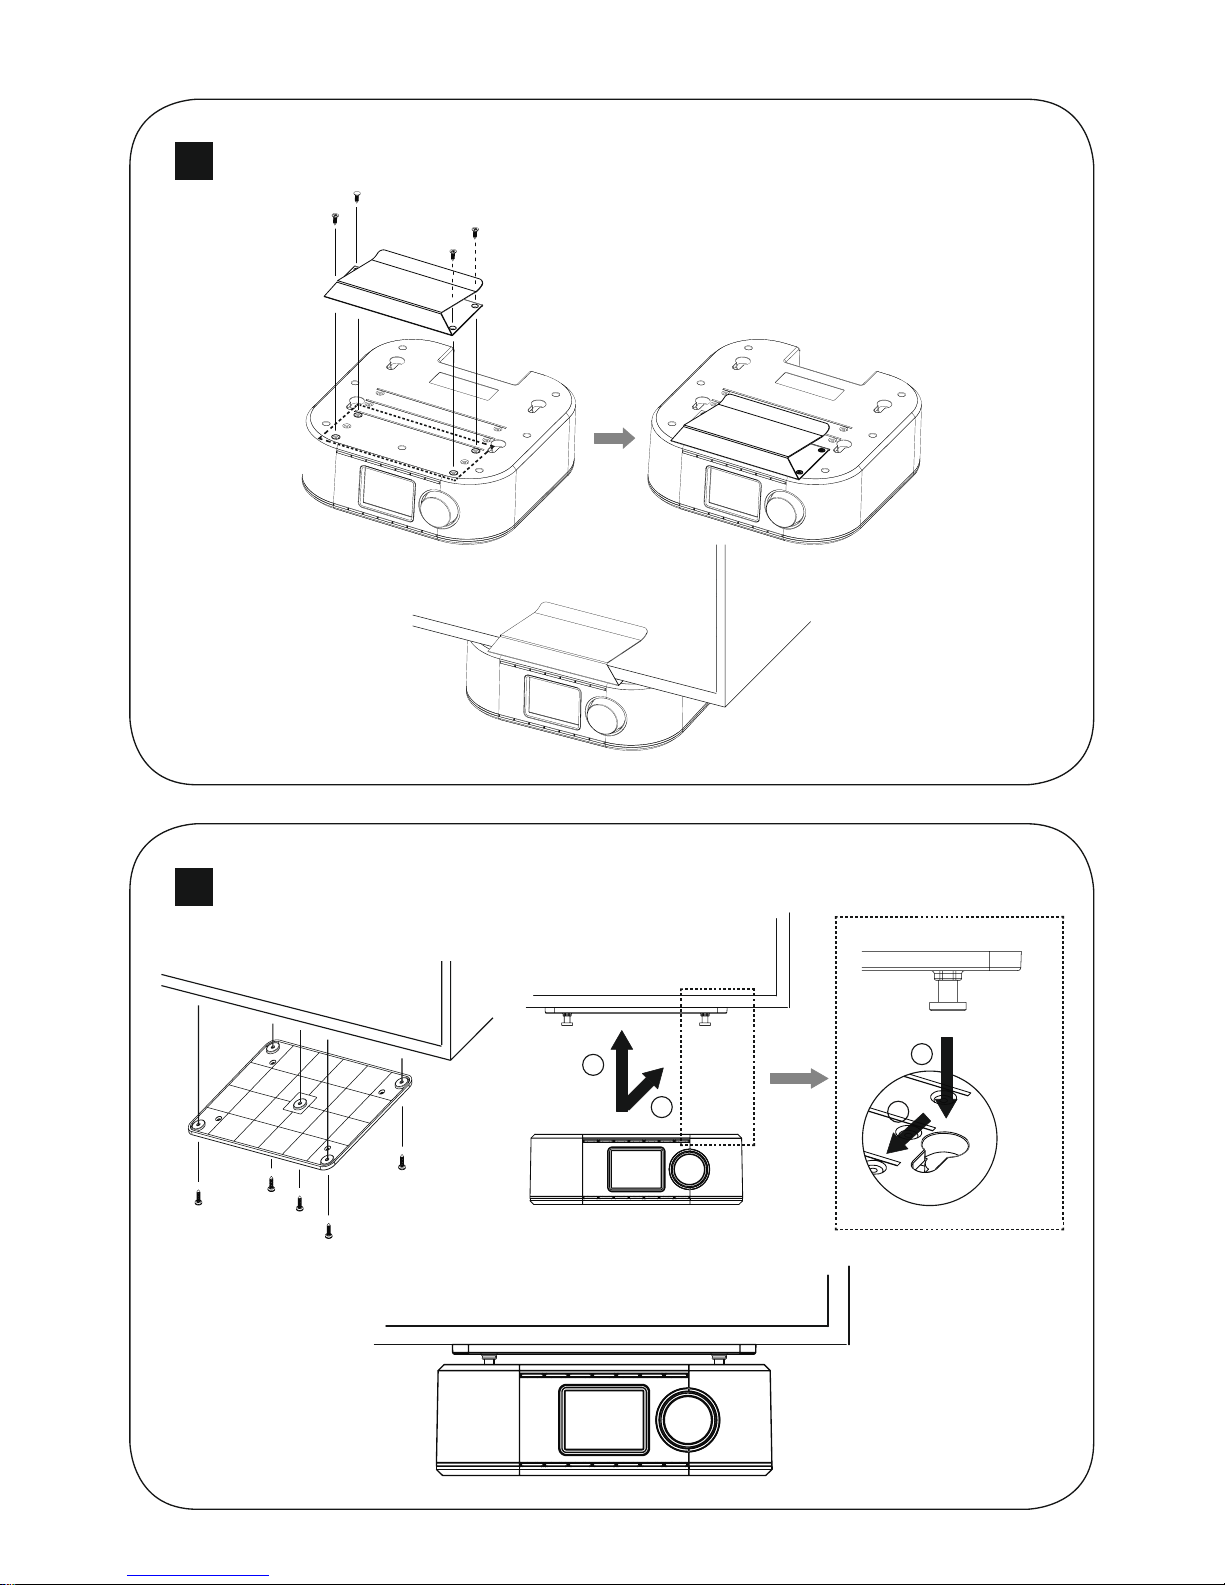
•Beforeswitching on the radio for the rst time, make
surethat the receiver antenna (21) on the back of the
radio is unpacked and that the exible cable antenna
is unwound. The package contents include two cable
guides for xing the antenna.
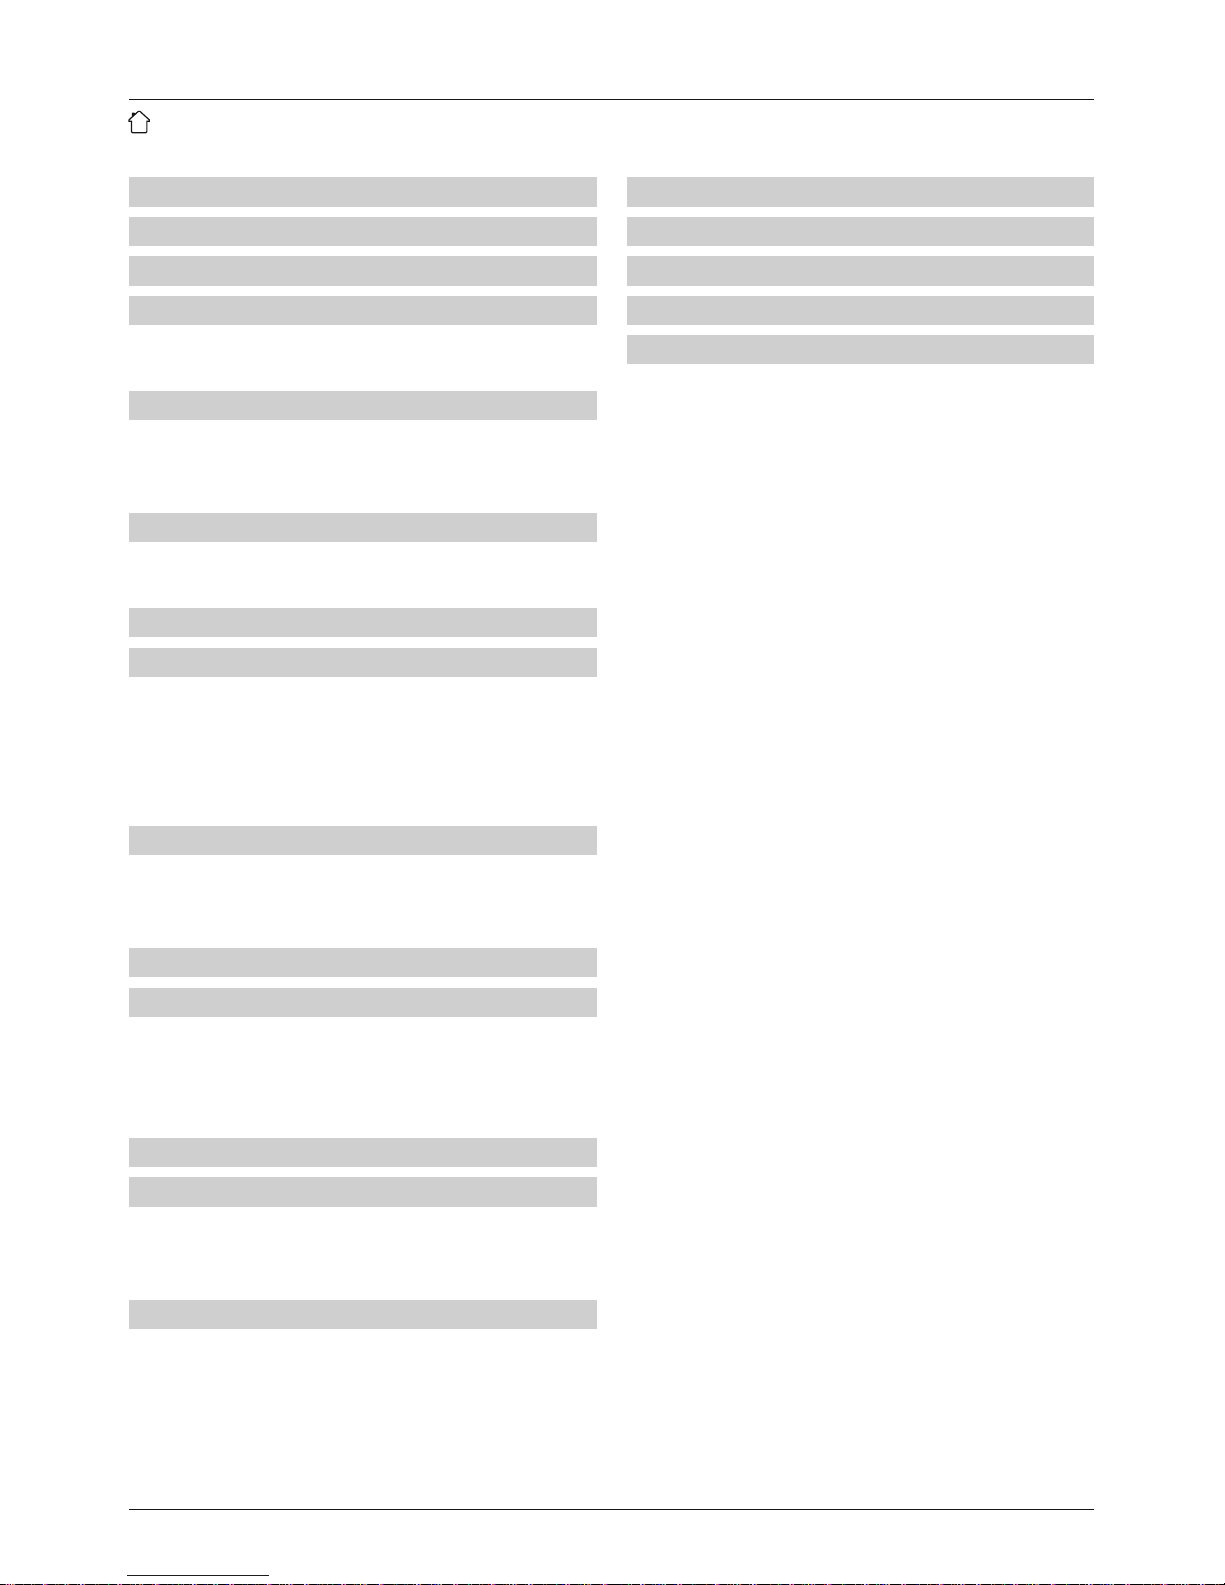
•Attach the cable guides to astraight, clean surface and
then clip the antenna cable into the guides.
Connect the network cable to aproperly installed and
easily accessible network socket. The power supply unit is
suitable for mains voltages between 100 and 240 V, and
is thus operable on almost any AC power grid. Please note
that acountry-specicadapter may be necessary.You can
nd aselection of compatible products at www.hama.com.
Note
•Connect the product to asocket that has been
approved for the device.
•When using amulti-socket power strip, make sure
that the sum power draw of all the connected devices
does not exceed its maximum throughput rating.
•The electrical socket must always be easily accessible.
•If you will not be usingthe product for along period
of time, disconnect it from mains power.
Once the product has been connected to mains power,
initialisation takes place. The radio starts.
After startup, the radio is in standby mode and can be
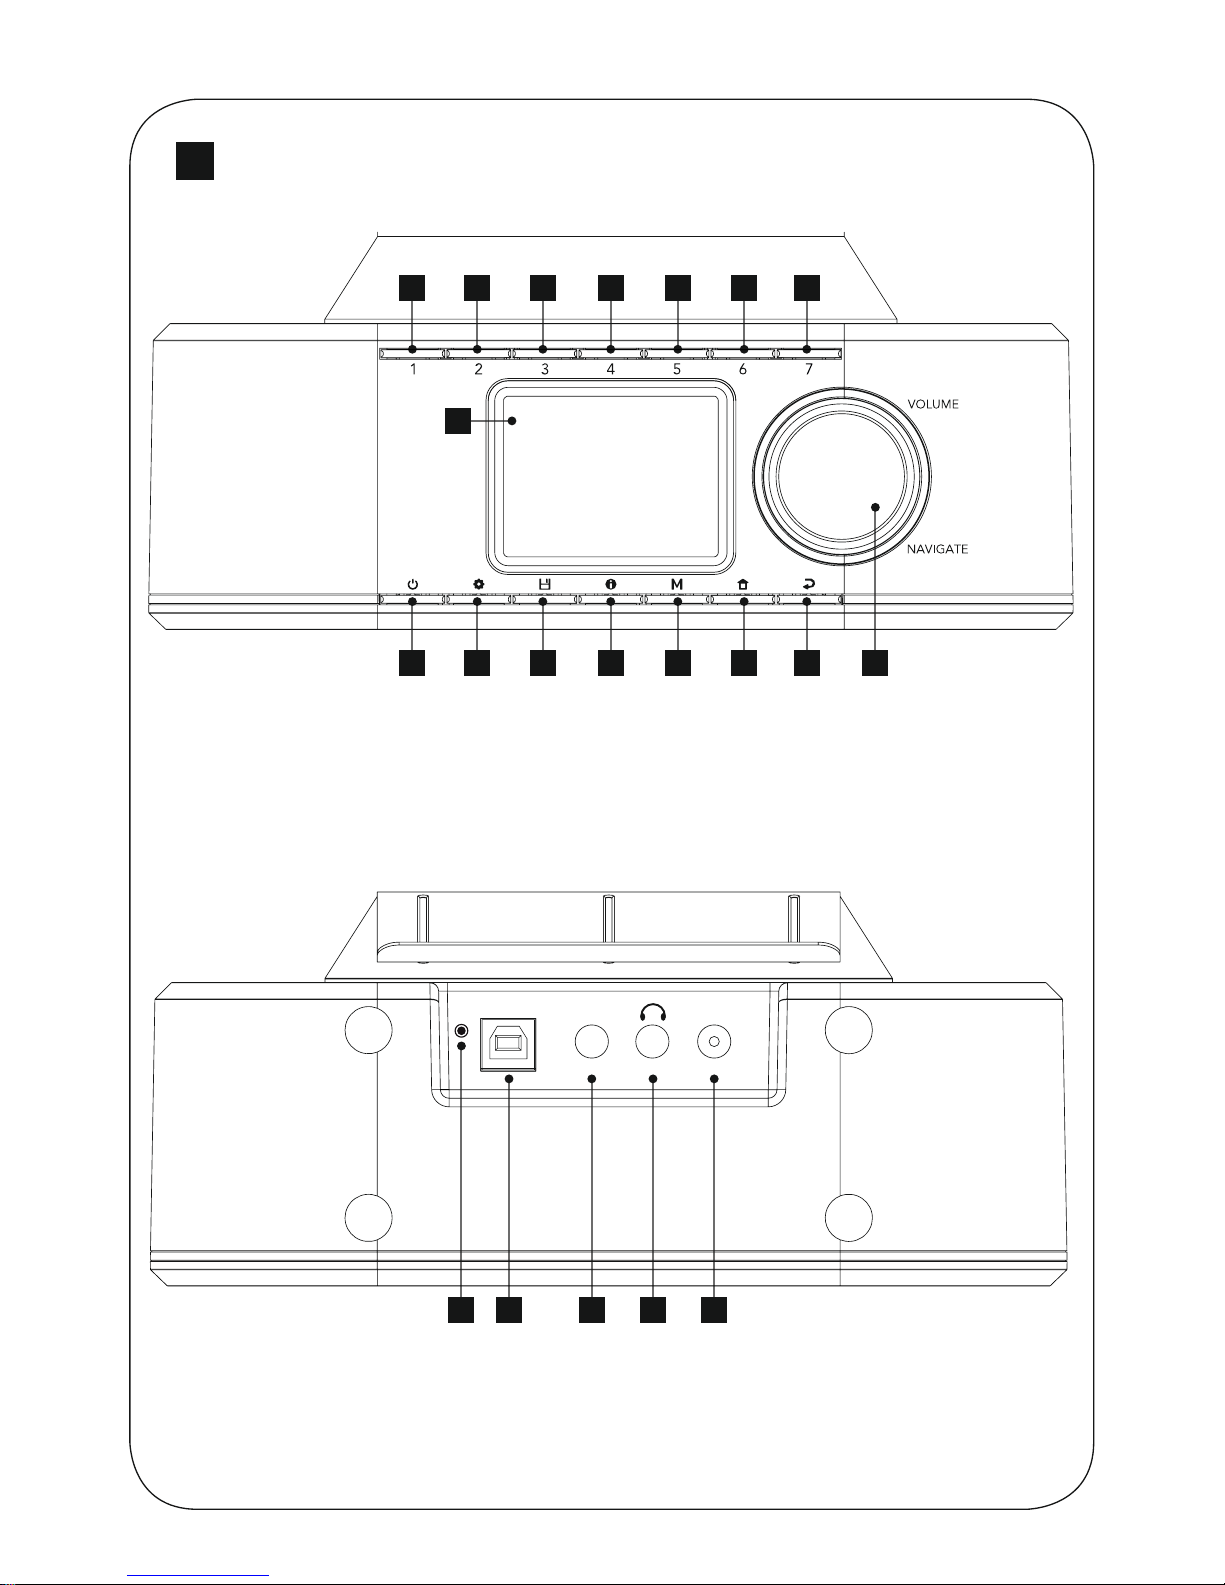
switched on with the [ ]button.
Note
When the radio is switched on, it immediately begins
searching for any receivable DABstations. Please wait
until this search is completed.
Once the search is completed, playback begins of the
rst station in the list.
Initial setup/language settings
At initial startup, the language of the radio defaults
to English. To change the language, please proceed
as follows:
•Press [ ]toaccess the settings menu.
•Turn [VOLUME/SELECT/NAVIGATE]tonavigate to the
“System Settings” menu item.
•Conrm the selection by pressing [VOLUME/SELECT/
NAVIGATE].
•Turn [VOLUME/SELECT/NAVIGATE] to get to the
“Language” menu item. Conrm the selection by
pressing [VOLUME/SELECT/NAVIGATE].
•Turn [VOLUME/SELECT/NAVIGATE]toselect your
desired system language.
•Conrm the selection by pressing [VOLUME/SELECT/
NAVIGATE].
7. Operation modes (FM/DAB&DAB+/AUX IN)
This device is equipped with amodule for receiving
analogue radio via VHF/FM and digital radio via DAB/
DAB+. Alternatively,itcan play back audio received at its
3.5-mm audio jack.
Press [ ]repeatedly to select the desired audio source.
8. Digital radio (DAB/DAB+)
8.1 Display mode
Note
The display mode can be changed only from the
playback screen.
If astation broadcasts image content (slideshow content/
SLS) in addition to general information (RDS), you can
choose between three different display modes during
playback. Press [VOLUME/SELECT/NAVIGATE]tochange
the display mode.

6
8.2 Station list
Note
The station list contains all of the stations found during
the most recent station search run. The reception quality
of astation depends on various factors, including the
weather conditions, the location of the radio and the
orientation of the antenna. If astation in the station list
cannot be received, try changing the orientation of the
antenna or moving the radio to adifferent location.
If astation cannot be received, consult section 8.4 to
nd out how to remove it from the station list.
If the automatic station search run was completed upon
initial startup of the radio, it is not necessary to search for
any further stations.
•Press [ ]and choose the “Station list” menu item.
•Press [VOLUME/SELECT/NAVIGATE]toget to the
current station list (sorted alphabetically).
•Turn [VOLUME/SELECT/NAVIGATE]tonavigate
through the list.
•Press [VOLUME/SELECT/NAVIGATE]toselect the
desired station and begin playback.
8.3 Station search /find all stations
•Press [ ]and navigate to the “Find all stations” menu
item to initiate anew station search.
•Conrm the selection by pressing [VOLUME/SELECT/
NAVIGATE]. Please wait until this search is completed.
8.4 Inactive stations/cleaning up the station list
Inactive stations that can no longer be received may be
removed from the list.
•To do this, press [ ]and navigate to the “Inactive
stations” menu item.
•Conrm the selection by pressing [VOLUME/SELECT/
NAVIGATE].
•At the safety check that follows, select “Yes” and conrm
by pressing [VOLUME/SELECT/NAVIGATE].
•Press [ ]orselect “No” at the safety check to cancel
removing the station.
Note
To keep the station list current, we recommend regularly
updating the list by nding all stations (see section 8.3).
8.5 Adjusting the volume/dynamic range control
(DRC)
Some DABnetwork radio stations support avolume control
featurethat actively takes effect during playback. If the
volume suddenly increases, DRC automatically lowers it. If
the volume suddenly becomes quieter,DRC automatically
raises it. The same happens when playback is suddenly
quiet. The radio then increases the volume again.
DRC high:total equalisation of different volumes. Strong
compression can audibly reduce the dynamics of apiece
of music.
DRC low: partial equalisation of different volumes. More
subtle compression, without too much loss of dynamics.
DRC off: no equalisation.
To change the setting, proceed as follows:
Note
By default, DRC volume adjustment is disabled.
•Press [ ]and navigate to the “Volume adjustment”
menu item.
•Conrm the selection by pressing [VOLUME/SELECT/
NAVIGATE].
•Select the desired option and conrm the selection by
pressing [VOLUME/SELECT/NAVIGATE].

7
9. Analogue radio (FM/VHF)
9.1 Setting the station manually
When you make station settings manually,you can dene
the desired frequency yourself and tune into stations that
wereignored during automatic station search because
their signals weretoo weak.
•In FM mode, press [ ]toswitch back and forth
between volume control and station selection.
•Select the “Select station” menu item and conrm the
selection by pressing [VOLUME/SELECT/NAVIGATE].
•Turn [VOLUME/SELECT/NAVIGATE](left: –0.05 MHz
/right: +0.05 MHz) until you see the desired frequency.
Wait for amoment until
•playback of the received signal commences.
Note
After afew seconds, the radio automatically returns to
volume control mode. If you do not make any changes
to the frequency setting, you may have to press the [ ]
button again to return to setting the station.
9.2 Automatic station search
The radio can automatically search for stations. This
process searches the entirefrequency range of the
analogue radio receiver.The radio stops the search and
starts playback when it nds astation.
•In FM mode, press [ ]toswitch back and forth
between volume control and station selection.
•Select the “Select station” menu item and conrm the
selection by pressing [VOLUME/SELECT/NAVIGATE].
•Turn [VOLUME/SELECT/NAVIGATE](left: -0.05 MHz/
right: +0.05 MHz), to set the desired direction of the
scan and then press [VOLUME/SELECT/NAVIGATE]to
start the automatic station search.
Station search setting
The search run setting allows you to determine whether
stations with low signal strength aretobeconsidered
during the automatic search run.
Proceed as follows:
•Repeatedly press [ ]toget to the “Station search
settings” menu item.
•Conrm the selection by pressing [VOLUME/SELECT/
NAVIGATE].
•To have the search stop only at stations with astrong
signal, select “Only strong stations”. Otherwise, the
search run will stop at every station for which asignal is
received.
Note
By default, “Only strong stations” is enabled.
9.3 Audio settings
Some radio stations broadcast their signals in stereo
quality.This radio uses stereo signals as standardand
optimises playback for them.
Forsome stations with aweak signal, quality can be
improved slightly by playing them in mono. You
can enable this function in the menu, and the radio will
automatically switch to mono reception when signal
quality is poor.Tochange this option, proceed as follows:
•Press [ ]and navigate to the “Audio settings” menu
item.
•Select “Mono only” and conrm the selection by pressing
[VOLUME/SELECT/NAVIGATE].

8
10. Aux in
Youcan use the analogue audio input (AUX IN socket) to
connect mobile devices (for example, smartphone, tablet
PC, MP3 player,etc.) to the radio and play your audio les
using the radio.
•Repeatedly press [ ]toactivate the Aux in operating
mode.
•Connect your mobile device to the audio input (the AUX
IN socket [18]) of the radio using a3.5-mm audio cable
(jack cable).
•Start and control audio playback using the controls of the
connected terminal device.
Note
•If playback remains quiet even when the volume
setting on the radio is very high, try increasing the
volume setting on the terminal device.
•Beforeswitching modes, remember to turn the
volume setting of the radio back down again, since
the volume setting for Aux mode is persistent.
11. Managing favourites (FM/DAB&DAB+)
The radio has seven freely congurable slots for saving
favourite stations (8 to 14) and afreely denable memory
list with 30 memory slots. The favourites lists of the
analogue and digital radios areindependent of each
other.Both the favourite quick-select buttons as well as
the favourites list areeach separately available for FM and
DAB/DAB+.
Note
The quick-select buttons 1to7(8to14) correspond to
slots 1to7in the large favourites list.
11.1 Assigning the favourites quick-select buttons
(8 to 14)
•Set the station that you would like to save as afavourite
station preset.
•While the station is playing, press and hold down the
quick-select button for the slot to which you wish to
assign it until [ü]appears in the display.
•The display shows “Program [1 to 7] saved” to conrm
the assignment.
Note
It is not possible to delete apreset station. Youcan
only replace apreset station with another station and
overwrite the previous favourite.
11.2 Recalling favourites
To call up apreset station, press the corresponding quick-
select button (8 to 14).
11.3 Filling the favourites list (1 to 30)
•Set the station that you would like to save as afavourite
station preset.
•While the station is playing, press and hold [] until the
favourites list opens.
•Navigate to the slot you wish to use and conrm the
selection by pressing [VOLUME/SELECT/NAVIGATE].
•The display shows [ ]and “Program [1 to 7] saved” to
conrm the assignment.
Note
It is not possible to delete apreset station. Youcan
only replace apreset station with another station and
overwrite the previous favourite.
11.4 Recalling stations from the favourites list (1
to 30)
•Press [ ]toaccess the favourites list.
•Navigate to the slot you wish to recall and conrm the
selection by pressing [VOLUME/SELECT/NAVIGATE].
12. Sleep timer
The radio has atimer function, which switches the radio to
standby mode after apre-dened length of time.
•Press [ ]and open “System settings”.
•Select the “Sleep timer” menu item and conrm the
selection by pressing [VOLUME/SELECT/NAVIGATE].
•Turn [VOLUME/SELECT/NAVIGATE]toset the timer
duration.
•Conrm the setting by pressing [VOLUME/SELECT/
NAVIGATE].
13. Alarm clock
The radio allows you to set two different alarm times.

9
13.1 Settings
•Press [ ]and open “System settings”.
•Select the “Alarm clock” menu item and conrm the
selection by pressing [VOLUME/SELECT/NAVIGATE].
•Conguration of alarm 1and alarm 2isidentical. They
allow two alarm times to be saved independently.Select
alarm 1or2and then make the following settings by
means of [VOLUME/SELECT/NAVIGATE]:
Repeat
•Choose when the alarm is to activate:
Off –Daily –Once –Onweekdays –Onweekends
Alarm time
•Turn [VOLUME/SELECT/NAVIGATE]toset the alarm
time digit by digit.
•Press [VOLUME/SELECT/NAVIGATE]toconrm the
setting of each digit and move to the next.
Source
•Set whether you wish to be woken by an alarm tone
(buzzer), DABorFM.
Duration
•Set the duration for which the alarm is to sound once the
alarm time has been reached.
•If the alarm is not stopped, then the radio automatically
switches to standby mode after the selected duration.
Volume
•Set the volume of the alarm tone.
Note
The alarm tone does not immediately reach the set
volume. Rather,itstarts quiet and then gets louder until
it reaches the set volume.
13.2 Activate/deactivate alarm clock
•Press [VOLUME/SELECT/NAVIGATE]toenable or
disable the alarm clock.
13.3 Stop alarm/snooze
•When the alarm activates, press [ ]once to stop the
alarm.
•Press [VOLUME/SELECT/NAVIGATE]toactivate snooze
mode.
•The alarm turns off for the selected time interval
(5/10/15/30 minutes) beforebeing triggered once again.
13.4 Timer
The radio is equipped with an egg timer,which emits an
alarm tone after apre-dened length of time has elapsed.
•Press [ ]/[ ], select [Egg Timer]inthe main menu and
conrm your selection by pressing [ENTER/NAVIGATE].
Press and hold
[ ]
Main menu
Timer
Turn [ENTER/NAVIGATE]toselect the desired
count-down time (0–99 minutes).
•Press [ENTER/NAVIGATE]todisplay the time remaining.
•Once the time interval has elapsed, press [ENTER/
NAVIGATE]tostop the alarm tone. Otherwise, the
alarm willstop automatically after 30 minutes.
•Set the time interval to 0minutes to turn off the egg
timer.
14. System Settings
14.1 Equaliser
The equaliser allows you to adjust the sound of the radio
to suit your preferences by amplifying or reducing the
amount of bass or treble in the audio.
Youcan choose from precongured proles, adjusted to
suit avariety of music genres, or create your own custom
prole.

10
To change the equaliser settings, proceed as follows:
•Press [ ]and open “System settings”.
•Select the “Equaliser” menu item and conrm the
selection by pressing [VOLUME/SELECT/NAVIGATE].
•Turn [VOLUME/SELECT/NAVIGATE]toselect one of
the precongured proles. If playback is already started
when you modify these settings, you can hear the
changes in the audio immediately.
•Conrm the setting by pressing [VOLUME/SELECT/
NAVIGATE].
My EQ
•Press [ ]and open “System settings”.
•Select the “My EQ setting” menu item and conrm the
selection by pressing [VOLUME/SELECT/NAVIGATE].
•Hereyou can congurethe settings for the bass and
treble frequencies of the audio.
•Turn [VOLUME/SELECT/NAVIGATE]tothe left or right
to change avalue. If music is playing while you modify
these settings, you will hear the changes in the audio
immediately.
•When you have nished conguring the settings, press
[VOLUME/SELECT/NAVIGATE].
•Press [ ]tosave the settings for the “My EQ” prole.
•To use the newly created prole, select the “My EQ”
option and conrm by pressing [VOLUME/SELECT/
NAVIGATE].
14.2 Time settings
•Press [ ]and open “System settings”.
•Select the “Clock” menu item and conrm the selection
by pressing [VOLUME/SELECT/NAVIGATE].
Time and date settings
•Turn [VOLUME/SELECT/NAVIGATE]toset the time and
date digit by digit.
•Press [VOLUME/SELECT/NAVIGATE]toconrm the
setting of each digit and move to the next.
•Press [ ]tosave the settings.
Updating
If automatic time and date adjustment is activated, the
device receives time and date information from the station
over the FM/DAB/DAB+ radio network. This is the best way
to ensurethat the clock will run accurately and the alarm
will trigger at the correct time, even after power outages.
From ALL –Time information is retrieved from all
available sources.
From digital radio –Timeinformation is retrieved only
from DABstations.
From FM –Timeinformation is retrieved only from the
analogue radio network.
No updating –Notime information is retrieved (manual
updating).
Format
Choose between 12-hour and 24-hour time formats.
Date format
Choose between DD-MM-YYYY and MM-DD-YYYY date
formats.
14.3 Lighting
The backlight can be congured separately for each
operating mode (playback mode, standby mode and
snooze mode).
Proceed as follows:
•Press [ ]and open “System settings”.
•Select the “Lighting” menu item and conrm the
selection by pressing [VOLUME/SELECT/NAVIGATE].

11
“Dimming”
Set whether the display should be switched off or dimmed
during operation once acertain length of time has passed
with no input. The value used is that set for standby mode.
“Operation”
Set the brightness level of the display during playback.
“Standby”
Set the brightness level of the display in standby mode.
14.4 Language
To change the menu language of the radio, proceed as
follows:
•Press [ ]and open “System settings”.
•Select the “Language” menu item and conrm the
selection by pressing [VOLUME/SELECT/NAVIGATE].
•Select the desired language and conrm the selection by
pressing [VOLUME/SELECT/NAVIGATE].
14.5 Factory settings
To reset the radio to the factory default settings, proceed
as follows:
•Press [ ]and open “System settings”.
•Select the “Factory settings” menu item and conrm the
selection by pressing [VOLUME/SELECT/NAVIGATE].
•Conrm the next prompt with YES to reset the radio to
the factory default settings. All settings made previously
aredeleted.
Note
•Resetting to the factory default settings can solve
some problems and malfunctions.
•However,all settings made previously,such as custom
equaliser presets and favourites, arepermanently
deleted.
14.6 Software version
To check the version of the softwarecurrently installed on
your radio, please proceed as follows:
•Press [ ]and open “System settings”.
•Select the “SW version” menu item and conrm the
selection by pressing [VOLUME/SELECT/NAVIGATE].
Note
•Should requirehelp from customer support, please
tell us the version of the softwarecurrently installed.
Many problems can be solved by updating the
software, so comparing your softwareversion with the
latest available version is the rst step in addressing
your query.
•Youcan nd out whether updates areavailable
at www.hama.com using the item number or
designation of your radio.
•Instructions on updating may be available in the
downloads section for the item.

12
15. Care and Maintenance
•Only clean this product with aslightly damp, lint-free
cloth and do not use aggressive cleaning agents.
•If you do not use the product for along time, turn off the
device and disconnect it from the power supply.Storeit
in aclean, dry place out of direct sunlight.
16. Warranty Disclaimer
Hama GmbH &Co. KG assumes no liability and provides no
warranty for damage resulting from improper installation/
mounting, improper use of the product or from failureto
observe the operating instructions and/ or safety notes.
17. Service and Support
Please contact Hama Product Consulting if you have any
questions about this product
Hotline: +49 9091 502-115 (German/English)
Further support information can be found here:
www.hama.com
18. Recycling Information
Note on environmental protection:
After the implementation of the European Directive
2012/19/EU and 2006/66/EU in the national legal
system, the following applies: Electric and
electronic devices as well as batteries must not be
disposed of with household waste. Consumers areobliged
by law to return electrical and electronic devices as well as
batteries at the end of their service lives to the public
collecting points set up for this purpose or point of sale.
Details to this aredened by the national law of the
respective country.This symbol on the product, the
instruction manual or the package indicates that aproduct
is subject to these regulations. By recycling, reusing the
materials or other forms of utilising old devices/batteries,
you aremaking an important contribution to protecting our
environment.
19. Declaration of Conformity
Hereby,Hama GmbH &CoKGdeclares that the
radio equipment type [00054862, 00054864] sin
compliance with Directive 2014/53/EU.The full
text of the EU declaration of conformity is available at the
following internet address:
www.hama.com ->00054862, 00054864 ->Downloads.

Alllistedbrands are trademarks of thecorrespondingcompanies.Errorsand omissionsexcepted,
andsubjecttotechnical changes. Ourgeneralterms of deliveryand paymentare applied.
00054862_64/02.18
Hama GmbH &CoKG
86652 Monheim/Germany
www.hama.com
The Spotify softwareissubject to thirdparty licenses found here:
www.spotify.com/connect/third-party-licenses
Other manuals for DR350
2
This manual suits for next models
2
Table of contents
Other Hama Radio manuals