manuals.online logo
Brands
  1. Home
  2. •
  3. Brands
  4. •
  5. HEIDENHAIN
  6. •
  7. Media Converter
  8. •
  9. HEIDENHAIN ECN 1313 User manual

HEIDENHAIN ECN 1313 User manual

This manual suits for next models

1

Other HEIDENHAIN Media Converter manuals

HEIDENHAIN LIF 481R User manual

HEIDENHAIN

HEIDENHAIN LIF 481R User manual

HEIDENHAIN Ron 705 User manual

HEIDENHAIN

HEIDENHAIN Ron 705 User manual

HEIDENHAIN LS 106 Series User manual

HEIDENHAIN

HEIDENHAIN LS 106 Series User manual

HEIDENHAIN ROD 431.025 User manual

HEIDENHAIN

HEIDENHAIN ROD 431.025 User manual

HEIDENHAIN LIP 372 User manual

HEIDENHAIN

HEIDENHAIN LIP 372 User manual

HEIDENHAIN LC 2 1 Series User manual

HEIDENHAIN

HEIDENHAIN LC 2 1 Series User manual

HEIDENHAIN EIB 741 User manual

HEIDENHAIN

HEIDENHAIN EIB 741 User manual

HEIDENHAIN LS 4 7 Series User manual

HEIDENHAIN

HEIDENHAIN LS 4 7 Series User manual

HEIDENHAIN MSL 41 User manual

HEIDENHAIN

HEIDENHAIN MSL 41 User manual

HEIDENHAIN ERO 6070 User manual

HEIDENHAIN

HEIDENHAIN ERO 6070 User manual

HEIDENHAIN LP 111 User manual

HEIDENHAIN

HEIDENHAIN LP 111 User manual

HEIDENHAIN EIB 749 User manual

HEIDENHAIN

HEIDENHAIN EIB 749 User manual

HEIDENHAIN ECN 1325 EnDat22 User manual

HEIDENHAIN

HEIDENHAIN ECN 1325 EnDat22 User manual

HEIDENHAIN LIP 401R User manual

HEIDENHAIN

HEIDENHAIN LIP 401R User manual

HEIDENHAIN ERN 1321 User manual

HEIDENHAIN

HEIDENHAIN ERN 1321 User manual

HEIDENHAIN EnDat 2.2 Manual

HEIDENHAIN

HEIDENHAIN EnDat 2.2 Manual

HEIDENHAIN ACU-RITE SENC 125 T User manual

HEIDENHAIN

HEIDENHAIN ACU-RITE SENC 125 T User manual

HEIDENHAIN ECI 11 Series User manual

HEIDENHAIN

HEIDENHAIN ECI 11 Series User manual

HEIDENHAIN LIDA 277 User manual

HEIDENHAIN

HEIDENHAIN LIDA 277 User manual

HEIDENHAIN LIC 4113 User manual

HEIDENHAIN

HEIDENHAIN LIC 4113 User manual

HEIDENHAIN LIDA 477 User manual

HEIDENHAIN

HEIDENHAIN LIDA 477 User manual

HEIDENHAIN KCI 120 Dplus User manual

HEIDENHAIN

HEIDENHAIN KCI 120 Dplus User manual

HEIDENHAIN EQN 1325.049 User manual

HEIDENHAIN

HEIDENHAIN EQN 1325.049 User manual

HEIDENHAIN SRP 5000 User manual

HEIDENHAIN

HEIDENHAIN SRP 5000 User manual

Popular Media Converter manuals by other brands

SoundTraxx Blunami BLU-2200 user guide

SoundTraxx

SoundTraxx Blunami BLU-2200 user guide

SPROLINK VA1 user manual

SPROLINK

SPROLINK VA1 user manual

Acclaim Lighting DDC-1-AC user guide

Acclaim Lighting

Acclaim Lighting DDC-1-AC user guide

Nikon AF-S TC-20E III user manual

Nikon

Nikon AF-S TC-20E III user manual

Axis AXIS Q7406 user manual

Axis

Axis AXIS Q7406 user manual

Omega TAC80B-J instruction sheet

Omega

Omega TAC80B-J instruction sheet

Zoom Thunderbolt TAC-2R Operation manual

Zoom

Zoom Thunderbolt TAC-2R Operation manual

OST iConverter 10/100M quick start guide

OST

OST iConverter 10/100M quick start guide

Vertiv Netsure user manual

Vertiv

Vertiv Netsure user manual

birddog MINI user guide

birddog

birddog MINI user guide

Roland GI-10 owner's manual

Roland

Roland GI-10 owner's manual

Wallenstein WX310 Operator's manual

Wallenstein

Wallenstein WX310 Operator's manual

Pace MSS 200-1 Service manual

Pace

Pace MSS 200-1 Service manual

Solar Converters EQ 12/24-50 manual

Solar Converters

Solar Converters EQ 12/24-50 manual

CYP EL-7400V Operation manual

CYP

CYP EL-7400V Operation manual

TIE MIDI 1i1o user manual

TIE

TIE MIDI 1i1o user manual

DCS Vivaldi Upsampler user manual

DCS

DCS Vivaldi Upsampler user manual

Westermo MCW-211 SERIES user guide

Westermo

Westermo MCW-211 SERIES user guide

manuals.online logo
manuals.online logoBrands
  • About & Mission
  • Contact us
  • Privacy Policy
  • Terms and Conditions

Copyright 2025 Manuals.Online. All Rights Reserved.

DR. JOHANNES HEIDENHAIN GmbH
Technical support, measuring systems { +49 8669 31-3104 . E-mail [email protected]
1158490-90 · Ver00 · Printed in Germany · 5/2016 · H
ECN 1313 EnDat01
EQN 1325 EnDat01
WELLA1 67B, 67M, 67E, 67C
KUPPA1 06
FOKAA1 37A, 37D
ANELA1 62S12
BELEA1 78
Inkrementaler Drehgeber mit Eigenlagerung zum
Einbau in Motoren.
Incremental rotary encoders with integral bearing
forintegration in motors.
Capteur rotatif incrémental avec roulement pour
intégration dans moteurs.
Trasduttore rotativo incrementale con cuscinetto
proprio per il montaggio nei motori.
Generador de impulsos rotativo incremental para
instalación en motores.
Lieferumfang
Items supplied:
Objet de la fourniture
Standard di fornitura:
Suministro
Selbstsichernde Schraube
Self-locking screw
Vis de freinage interne
Vite autofilettante
Tornillo autofijante
5/2016
Montageanleitung
Mounting Instructions
Instructions de montage
Istru ioni di montaggio
Instrucciones de montaje
*I1158490-90*
Allgemeine Hinweise
General Information
Informations générales
Informazioni generali
Información general
Drehgeber mit Wellensachmerkmal
Rotary encoder with shaft attribute:
Capteur rotatif avec type darbre
Encoder con esecuzione albero:
Captador rotativo con características del eje
Störquellen
Noise sources
Sources parasites
Sorgenti didisturbo
Fuentes de interferencias
M
> 100 mm > 200 mm
> 100 mm
Separat bestellen Montagezubehör
Order separately: Mounting accessories
Commander séparément Accessoires de montage
Ordinare separatamente: Accessori per il montaggio
Pedir por separado Accesorios de montaje
SW4
ID 350378-14
SW2
ID 350378-03
WELLA1 67B
DIN 6912

M5x16

8.8;
ID 202264-34
WELLA1 67M
DIN 6912

M5x25

8.8;
ID 202264-46
WELLA1 67E, 67C
DIN 6912

M5x20

8.8;
ID 202264-35
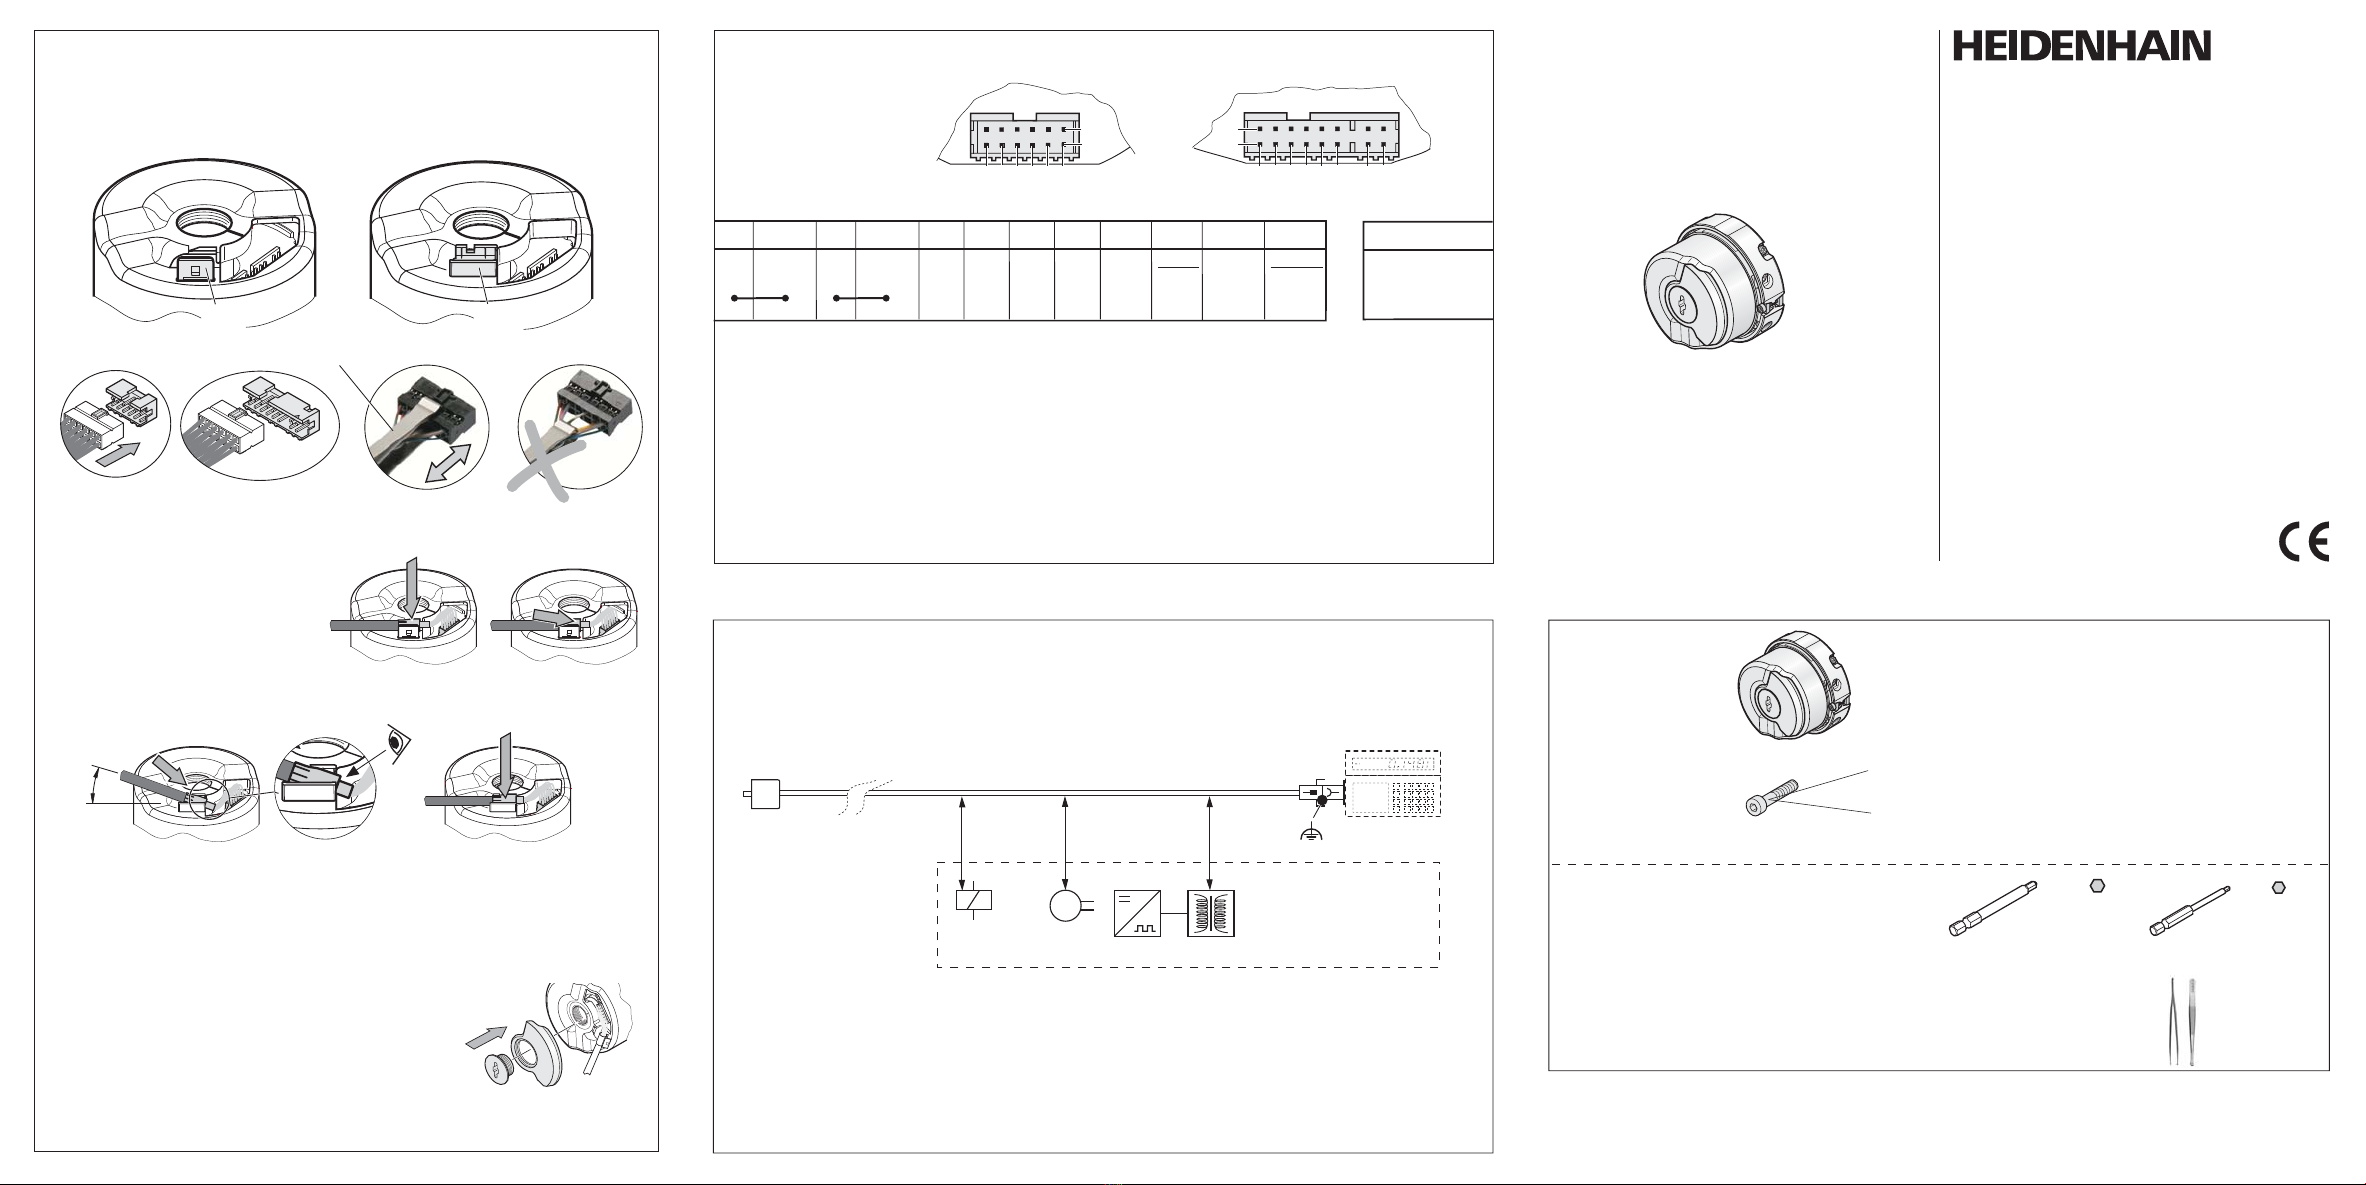
Montagehilfe zum Anstecken und Abziehen des Platinensteckers
Mounting aid for engaging and disengaging the PCB connector
Outil de montage pour connecter/déconnecter le connecteur de platine
Attre o di montaggio per inserimento e disinserimento del connettore della scheda
Ayuda de montaje para enchufar y desenchufar el conector de la pletina
ID 1075573-01
2.
1.
2.
b)
20°...30°
Crimphülse einschieben
Insert the crimp sleeve
Intercaler la douille à sertir
Far scorrere la bussola crimpare
Encajar el casquillo de engarzar
Kabel mit leichter Kraft eindrücken
Gently press in the cable
Enfoncer légèrement le câble
Inserire il cavo con delicate a
¡Apretar el cable sin forzar
Eindrücken und auf Anschlag schieben
Press in and slide to the fixed stop
Enfoncer et pousser jusquà la butée
Premere e far scivolare fino alla battuta
Romper y desplazar hasta el tope
Zwei Varianten für elektrischen Anschluss
Two variants for electrical connection
Deux variantes pour la connexion électrique
ue varianti per collegamento elettrico
Dos variantes para la conexión eléctrica
a)
3.
Md = 5+0.5 Nm
a), b)
*)
a) b)
*)
*)
Außenschirm auf Gehäuse
External shield on housing
Blindage externe sur boîtìer
Schermo esterno sulla carcassa
Blindaje externo a carcasa
Auf die Lage der Kabeladern achten (nicht einklemmen)!
Make sure not to pinch the cable wires!
Attention à la position des fils du câble (ne pas coincer)!
Prestare atten ione alla posi ione dei fili (non serrare)!
Tener en cuenta la posición de los hilos (no aprisionar)!
Anschlussbelegung
Pin Layout
Raccordements
Piedinatura
Distribución del conector
oder
or
ou
o
o
Die Sensorleitung ist intern im Messgerät mit der Versorgungsleitung verbunden.
The sensor line is connected inside the encoder to the supply line.
La ligne de palpeur est reliée de manière interne dans le système de mesure à la ligne d'alimentation.
La linea del sensore è collegata internamente allo strumento di misura con la linea di alimenta ione.
La línea de sensor está unida internamente en el aparato de medida con la línea de alimentación.
2b 5a
6a
1b
U
P
Sensor
0 V
0 V
6b 1a
Sensor
U
P
4b
2a
4a
5b 3b
A+ B+ DATA DATA CLOCK CLOCK
A B
3a
X1 X2
1a, 1b, 2a, 2b
/
123456
a
d
12
X1 X2
123456
a
b
X1
Nichtverwendete Pins oder Adern dürfen nicht belegt werden!
Vacant pins or wires must not be used!
Les plots ou fils non utilisés ne doivent pas être raccordés!
I pin o i fili inutili ati non devono essere occupati!
¡No conectar los pins o hilos no utilizados!
ID 1075573-01
Kundenseitige Anschlussmaße (mm)
Required mating dimensions (mm)
Conditions requises pour le montage (mm)
Quote per il montaggio (mm)
Cotas de montaje requeridas (mm)
A =Lagerung
Bearing
Roulement
Cuscinetto
Rodamiento
21

L

31

¬ 17

1.7
13
1
¬ 65 +0.1
e
0
¬ 12.7h5
e
X
M5
30°
±0.5
X
3 1

14

4
¬ 5.5
90°
Montage
Assembly
Montage
Montaggio
Montaje
Demontage in umgekehrter Reihenfolge
isassembly in reverse order
Demontage dans l'ordre inverse
Smontaggio in sequenza inversa
Desmontaje en orden contrario
4.
Md = 1.25 Nm

0.2 Nm
SW2
ID 350378-03
SW4
ID 350378-14
2.
1.
SW3/SW4
3.
Schraubensicherung nicht entfernen
Do not remove threadlocker
Ne
pas
retirer
le
blocage
des
vis
Non rimuovere il frenafiletto
No retirar el seguro tornillo
Warnhinweise
Warnings
Recommandtions
Avvertenze
Advertencias
Achtung Die Montage und Inbetriebnahme ist von einer qualifizierten Fachkraft
unter Beachtung der örtlichen Sicherheitsvorschriften vorzunehmen.
Zusätzlich muss der Maschinenhersteller/-konstrukteur die erforderlichen weiteren
Angaben zur Endmontage (z.B. Anzugsmomente, Losdrehsicherung für Schrauben
ja/nein) für die jeweilige Anwendung selbst festlegen.
Montageflächen und Schrauben müssen sauber und fettfrei sein.
Die Steckverbindung darf nur spannungsfrei verbunden oder gelöst werden.
Die Anlage muss spannungsfrei geschaltet sein!
Note: Mounting and commissioning is to be conducted by a qualified specialist
under compliance with local safety regulations.
In addition to this, the machine manufacturer or designer himself must define the
other data required for final assembly (e.g. tightening torque, anti-rotation lock for
screws required or not) for the respective application.
Mounting surfaces and screws must be clean and free of grease.
Do not engage or disengage any connections while under power.
The system must be disconnected from power.
Attention Le montage et la mise en service doivent être assurés par un personnel
qualifié dans le respect des consignes de sécurité locales.
Dautre part, le fabricant/constructeur de la machine doit définir dautres données
nécessaires au montage final (p.ex. couples de serrage, sécurité frein de vis oui/non)
pour l´application concernée.
Les surfaces de montage et les vis doivent être propres et exemptes de graisse.
Le connecteur ne doit être connecté ou déconnecté quhors potentiel.
Léquipement doit être connecté hors potentiel!
Attenzione: Il montaggio e la messa in fun ione devono essere eseguite da
personale qualificato nel rispetto delle norme di sicure a locali.
Inoltre, il costruttore della macchina deve definire le ulteriori procedure necessarie
per completare il montaggio (ad esempio: coppia di serraggio, sicure a
allentamento viti sì/no) di ogni specifica applica ione.
Superfici di montaggio e vite devono essere pulite e libere da grasso.
I cavi possono essere collegati o scollegati solo in assen a di tensione.
Limpianto deve essere spento!
Atención El montaje y la puesta en marcha deben ser realizados por un
especialista cualificado, observando las prescripciones locales de seguridad.
Adicionalmente, el fabricante/constructor de la máquina debe determinar él mismo
el resto de indicaciones requeridas para el montaje final para cada aplicación en
particular (p.ej., par de apriete, seguro antigiro para tornillos sí/no).
Las superficies de montaje y los tornillos deben estar limpios y sin grasa.
Conectar o desconectar el conector sólo en ausencia de tensión.
¡La instalación debe ser conectada en ausencia de tensión!
WELLA1 67B
WELLA1 67M
e
1
30°
±0.5
M5
¬ 12.7h6 e
¬ 17

D

¬ 25
¬ 65 +0.1
0
>6
15.5

x

25.5
16.5 0
1
15
 0.02 A
 ¬ 0.1 A
5.
Elektrischen Widerstand zwischen Flanschdose und Rotor prüfen. Sollwert < 1 Ohm.
Check the resistance between the flange socket and rotor. Nominal value: < 1 ohm
Vérifier la résistance électrique entre lembase et le rotor. Valeur nominale < 1 ohm.
Verificare resisten a elettrica tra flangia e rotore. Valore nominale: < 1 Ohm.
Comprobar la resistencia eléctrica entre el conector base y rotor. Valor nominal: < 1 Ohm
< 1 W
WELLA1 67B DIN 6912

M5x16

8.8
WELLA1 67M DIN 6912

M5x25

8.8
WELLA1 67E/C DIN 6912

M5x20
8.8
WELLA1 67E
¬ 65
+0.1
0
M5
 ¬ 17
30°
1
<4
18
e
¬ 12.695
0
0.008
22.5

L

32.5
 0.02 A
e
12
±0.5
M5
¬ 17
20
¬ 15h6
e
19 0
0.5
WELLA1 67C
 0.02 A
 0.02 A
¬ 65 +0.1
e
0
 ¬ 0.1 A
 ¬ 0.1 A  ¬ 0.1 A
20
±0.5
Md = 5.25 Nm
±
0.32 Nm