manuals.online logo
Brands
  1. Home
  2. •
  3. Brands
  4. •
  5. Helvex
  6. •
  7. Plumbing Product
  8. •
  9. Helvex ATE User manual

Helvex ATE User manual

Hola soy Fluxy, te
ayudaré a instalar
tu producto.
Hi I'm Fluxy, I'll
help you to install
your product.
Especificaciones Técnicas / Technical Specifications
Unidad Principal
• Voltaje: 110-120V, 50/60Hz.
• Potencia: 1050-1240W.
• Presión mínima de operación 0,7 kg/cm² (68,64 kPa) / Caudal: (20L / min).
• Presión máxima de operación: 8,0 kg/cm² (784,53 kPa) (presión hidrostática).
• Cable eléctrico: 1,8 m. de longitud aproximada. Calibre 16 AWG.
Dispositivo de Limpieza
• Capacidad del contenedor: 600 ml.
• Potencia de calentamiento: 1000W.
• Temperatura del agua: 5 ajustes.
• Volumen de agua: 5 nivel.
• Tipos de limpieza: limpieza trasera / masaje posterior, limpieza frontal para damas.
• Tipos de spray: 5 ajustes.
• Protector de presión de agua: estabilización de presión, descarga de presión automática.
• Dispositivo anti-incrustaciones: dispositivo de descarga de agua rápida, limpieza automática
de boquillas, dispositivo anti-sifón, dispositivo anti-incendios.
• Dispositivos de seguridad: controlador de temperatura, fusible térmico, protección de tierra,
dispositivo de protección de fuga, prevención de combustión de aire.
Dispositivo de Secado
• Velocidad del aire caliente: más de 4 m/s.
• Temperatura del viento: 5 ajustes de nivel diferentes.
• Potencia de calentamiento: 250W.
• Dispositivo de seguridad: sensor de temperatura, controlador de temperatura, fusible
térmico.
Asiento con Calefacción
• Temperatura de la superficie: 5 niveles.
• Potencia de calentamiento: 50W.
• Dispositivo de apertura y cierre: Cierre lento y silencioso.
• Protección del sistema de calefacción: la temperatura del asiento bajará automáticamente al
nivel 1 en 10 minutos después de su uso.
• Dispositivos de seguridad: sensor de asiento, sensor de temperatura, controlador de
temperatura, fusible térmico.
Sistema Inteligente
• Conjunto de luz nocturna: inteligente, a menudo en estado apagado.
• Configuración de silencio: Silencioso durante la noche.
• Configuración del ID por usuario: Por control remoto para evitar molestias por usuarios
múltiples.
INSTALLATION GUIDE INSTALLATION GUIDE
GUÍA DE INSTALACIÓN
[email protected]
Original Spare Parts:
Consultancy and Technical
01(55)53339431
01800 909 2020 01 (55) 53 33 94 00
Refacciones Originales:
Asesoría y Servicio Técnico:
Ext. 5068, 5815 y 5913
Service:
53 33 94 21
01 800 890 0594
[email protected]
Asiento Electrónico para Inodoro
Elongado con Funciones de Limpieza,
Secado y Calefacción / Electronic Seat for
Elongated Toilet with Cleaning, Drying and
Heating Functions.
Para disminuir el riesgo de lesiones o daños a la propiedad, lea todas las instrucciones antes de instalar el
producto. Utilice gafas de seguridad. En obras de construcción, instalación, modificación, ampliación y
reparación deben cumplir con el reglamento de construcción y obras de su localidad. El producto ilustrado
puede sufrir cambios de aspecto como resultado de la mejora continua a la que está sujeto.
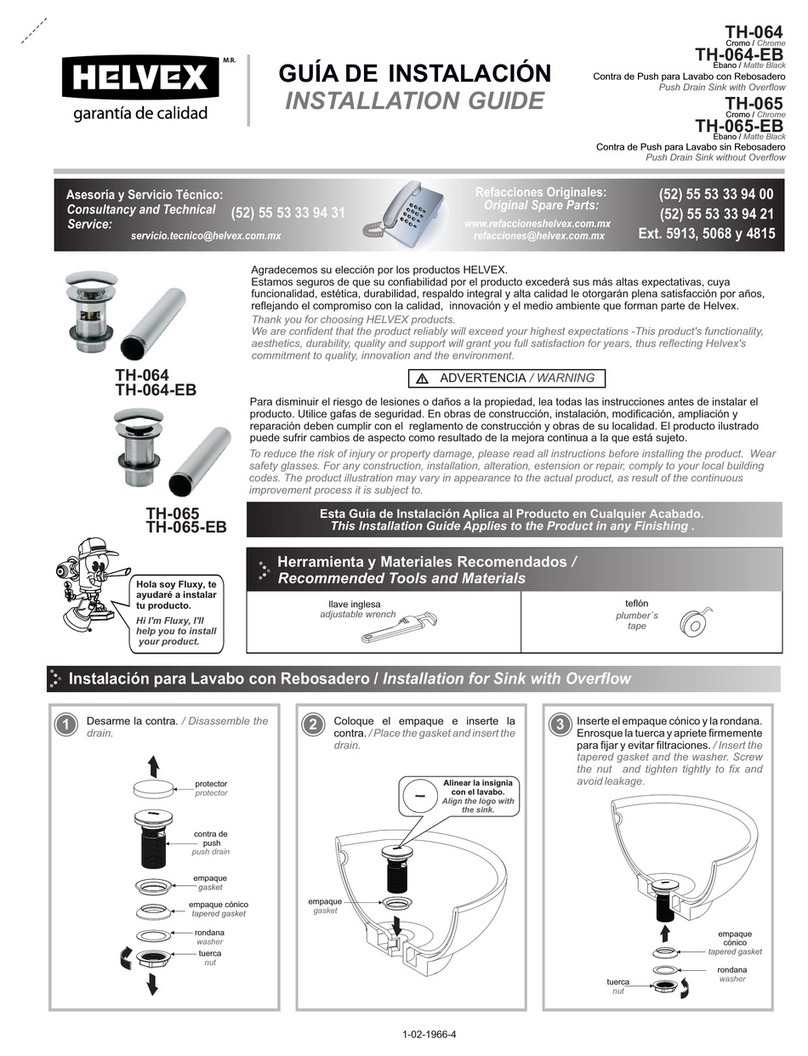
Agradecemos su elección por los productos HELVEX.
Estamos seguros de que su confiabilidad por el producto excederá sus más altas expectativas, cuya
funcionalidad, estética, durabilidad, respaldo integral y alta calidad le otorgarán plena satisfacción por años,
reflejando el compromiso con la calidad, innovación y el medio ambiente que forman parte de Helvex.
To reduce the risk of injury or property damage, read all instructions before installing the product. Please
remember to use safety glasses. In construction, installation, alteration, extension and repair, the rules of
constructions must be applied. As result of continuous improvement, the illustration product may change in
appearance.
ADVERTENCIA / WARNING
Esta guía de instalación aplica al producto en cualquier acabado. / This installation
guide applies to the product in any finish.
Thank you for choosing HELVEX products.
We are confident that the product reliability will exceed your maximum expectations. The functionality,
aesthetics, durability, quality and support will grant you full satisfaction for years, it is Helvex commitment to
the quality, innovation and the environment.
Main Unit
• Voltage: 110-120V, 50/60Hz.
• Power: 1050-1240W.
• Water pressure range: Min. 0,7 kg/cm² (20L/min).(68,64 kPa)
Max. 8,0 kg/cm² (Hydrostatic pressure).(784,53 kPa)
• Electrical wire: Length is about 1,8m. 16 AWG gauge.
Cleaning Device
• Container capacity: 600ml.
• Heating power: 1000W.
• Water temperature: 5 different level adjustment.
• Water volume: 5 different levels.
• Cleansing mode: Rear cleaning/Rear massage, front cleaning for ladies.
• Spray cleansing location: 5 different level adjustment.
• Water pressure protector: Pressure stabilize, automatic pressure discharging.
• Anti-fouling device: Speedy water discharge device, automatic nozzle cleaning, anti-syphon device, air
burning preventer.
• Safety device: Temperature controller, thermal fuse, Ground protection, leakage protection device, air
burning preventer.
Drying Device
• Warm wind speed: Over 4 m/s.
• Wind temperature: 5 different level adjustment.
• Heating power: 250W.
• Safety device: Temperature sensor, temperature controller, thermal fuse.
Heated Seat
• Surface temperature: different levels.
• Heating power: 50W
• Open and close device: Quiet soft-closing device.
• Heated burning protection: The seat temperature will automatically lower to level 1 in 10 minutes after
using.
• Safety device: Seat sensor, tempreature sensor, temperature controller, thermal fuse.
Intelligent
• Night light assembly: Intelligent, often in the off state.
• Mute setting: Buzzeroff during night.
• User ID setting: To avoid disturbance from remote controls by multi-user.
3
El aparato no debe utilizarse por personas
(incluyendo niños) con capacidades físicas
sensoriales o mentales reducidas, o carezcan
de experiencia o conocimiento, a menos que
reciban supervisión o capacitación.
Los niños deben supervisarse para que no
jueguen con el aparato.
The device should not be used by persons
(including children) with reduced physical
sensory or mental capabilities, or lack of
experience and knowledge, unless they
r e c e i v e s u p e r v i s i o n o r t r a i n i n g .
Children should be supervised to not play with
the appliance.
ATE
Installation
desarmador
plano
flat
screwdriver
Relación
Herramienta Requerida
/ Required Tools
guide applies to the product in any finish.
Accesorios Incluidos
Accessories Included
control
remoto
remote
control
manguera
water supply
pipe
conector
de 3 vías
3 way
connector
plantilla de
instalación
installation
paperboard
Producto No Incluidos
Product Not Included
2 Baterias AAA
2 AAA Batteries
1
385mm
15,1"
130mm - 165mm
5,1" - 6,4"
450mm - 495mm
17,7" - 19,4"
515mm
20,2"
Dimensiones Generales. / Overall Dimensions
Verifique que las dimensiones de instalación coincidan con el
baño del usuario. / Please check if the installation dimension
matches the user’s toilet.
2Inserte la tuerca de expansión en los barrenos del inodoro, instale
la placa base, las placas plásticas y las rondanas y enrosque los
tornillos para fijar. / Press the expansion nut into the installation
holes of the toilet, install the base plate, plastic plates, flat washers
and tighten the bolts.
Instalación General / General Installation
Nota: Despliegue la plantilla de instalación, alinee la plantilla en el
RIM del inodoro desde el frente y después inserte la placa base en la
ranura del cartón asegurándose que coincida. / Unfold the
installation paperboard,align the paperboard well fit ceramic bowl
from the tip, and then insert base plate to the paperboard breach to
make sure the base plate is allign with paperboard breach.
tornillo
bolt
rondana
washer
placas plásticas
plastic plates
placa base
base plate
tuerca de expansión
expansion nut
plantilla de instalación
installation paperboard
ranura del carton
paperboard breach
La espiga negra hacia adelante
y las ranuras hacia arriba
The black pin frontward and
groove upwards
3Empuje el asiento hacia atrás sobre la placa base hasta que
escuche un "clic". / Push the seat back onto the base plate until a
“click” is heard.
4Instale el conector de 3 vías en la válvula angular, luego enrosque la manguera de suministro de agua y la manguera de entrada a el conector de 3
vías. Enrosque el extremo en forma de L de la manguera de suministro de agua al conector de entrada. / Install the 3-way connector onto the angle
valve, then attach the water supply hose and the washlet inlet hose into the 3-way connector. Connect L-shaped end of water supply hose to the
washlet inlet connector.
Nota: No tuerza ni dañe la manguera de suministro para
evitar fugas. No use mangueras de suministro de agua ni
otros accesorios de otras marcas. No se recomienda utilizar
mangueras ni accesorios usados, ya que son causa de
riesgo. / Note: Do not distort or damage the supply hose to
avoid any leakage. Do not use water supply hose and other
accessories of other brands. It is not recommend to use
hoses or used accessories, as they are a cause os risk.
manguera de suministro
de agua
water supply hose
conector de 3 vías
3 way connector
2
manguera de
entrada
washlet inlet
hose
conector de
entrada
washlet inlet
connector
Verificación de la Alimentación y Suministro de Agua / Checking the Power and Water Supply
5Conecte las mangueras y el conector de 3 vías como se muestra
en el diagrama y gire para abrir la válvula angular. Compruebe si
hay alguna fuga. / Connect the hoses and the 3-way connector as
shown in the diagram and turn on the angle valve.Check if any
leakage.
6Inserte el enchufe de alimentación en la toma de corriente. / Insert
power plug into power socket.
gire para abrir
turn on
Nota: Si se trata de un tapón de protección contra fugas eléctricas, presione el interruptor de
protección, la luz indicadora está encendida, lo que significa que hay electricidad. Presione
el botón de prueba de fugas eléctricas antes de usarlo, el interruptor de protección rebota
para mostrar que la función de protección funciona normalmente. / Note: If it’s an electric
leakage protection plug, press protection switch, indicator light is on which means there is
electricity. Press electric leakage test button prior to usage, protection switch bounces to
show that protection function works normally.
7El timbre sonará un primer “clic”, la luz de encendido y la luz de
ahorro de energía destellarán. La luz de encendido y la luz de
ahorro de energía apagadas significan auto inspección. / The
main unit buzzer rings first “click”, the power light and energy saver
light will flash. Power light on and energy saver light off means self-
inspection.
8El timbre sonará un segundo “clic” para mostrar que la
autoinspección ha finalizado. / The buzzer rings second "click" to
show that self-inspection is finished.
9El agua comienza a fluir hacia el tanque y la calefacción tomará 3
minutos. / The water starts to flow into the tank and heating will
take 3 minutes.
calefacción
heating
entrada de agua
water inlet espere 3 minutos
wait for 3 minutes
Desmontaje / Disassembly
10 Presione el "botón de extracción", hasta que escuche un "clic",
extráigalo. / Press the “removal button” on washlet, until a “click” is
heard, and pull it out.
Nota: Antes de sacar el asiento, suelte el "botón de extracción". /
Note: Before pulling out the washlet, release hand from “removal
button”.
3
conecte a la válvula de
admisión 15/16"-14 NS-1 de
su mueble cerámico
connect to the inlet valve
15/16"-14 NS-1 of your
ceramic cabinet
manguera con
conexión al
suministro de
agua 15/16"-14
NS-1 (no inluida)
hose with
connection to
water supply
15/16"-14 NS-1
(not included)
válvula angular de
suministro de agua
angle válve to water
supply (not included)
manguera
(incluida) / hose
(included)
conector de 3 vías
3 way connector
presione el
interruptor de
protección / press
protection switch
luz indicadora /
indicator light
interruptor de
protección /
protection switch
botón de prueba de
fugas eléctricas /
electric leakage test
button
Ilustración de las Funciones de las Teclas en Unidad Principal y Actuador /
Function Illustration of Keys in Main Unit and Actuator
1. Mantenga presionado el botón "Power" para ingresar al modo de espera; y
luego presione rápidamente el botón "Encendido" para restaurar el modo
funcional.
2. Al estar sentado, presione el botón "Power" para detener la función de
limpieza trasera, frontal o secado. Cuando nadie esté sentado, presione el
botón "Power" para cambiar del modo de función al modo de ahorro de
energía.
1. Long press “Power” button to enter standby mode; and then quick press
“Power” button to restore functional mode.
2. When sitting, press “Power” button to stop the function of rear, front cleaning
or drying. When nobody is sitting, press “Power” button to switch between
function mode and power save mode.
Al estar sentado, presione el botón "Front cleaning", se limpiará la parte frontal
del cuerpo; si vuelve a presionar el botón "Front cleaning" o el botón "Power", la
función finalizara. Después de un ciclo, esta función finalizará
automáticamente, si continúa sentado cambiará a la función de secado y se
detendrá al terminar el ciclo.
When sitting, press “Front cleaning” button, the front part of the body will be
cleaned; press the “Front cleaning” button or “Power” button, the function will
be finished. After a cycle, this function will be finished automatically, if you
continue sitting, it will switch to drying function, and will stop after a cycle.
1. Al estar sentado, presione el botón "Rear cleaning", se limpiará la parte
trasera del cuerpo; si vuelve a presionar el botón "Front cleaning" o el botón
"Power", la función habrá finalizado. Después de un ciclo, esta función
finalizará automáticamente, si continua sentado cambiara a la función de
secado y se detendrá al terminar el ciclo.
2. Cuando nadie esté sentado, presione el botón "Rear cleaning", después el
tubo se extenderá y se limpiará junto con la boquilla de rociado.
1.When sitting, press “Rear cleaning” button, the rear portion of the body will be
cleaned; press “Front cleaning” button or “Power” button, the function will be
finished. After a cycle, this function will be finished automatically, if you continue
sitting, it will switch to drying function, and will stop after a cycle.
2.When nobody is sitting,press “Rear cleaning” button, then the tube will
stretch out to clean the nozzle and spray tube.
Botón de limpieza trasera
Rear cleaning button
Botón de limpieza frontal
Front cleaning button
Power
Encendido
Observación: 1. Cuando la unidad principal está en modo funcional, la luz de “Power” se enciende y la luz de ahorro de energía se mantiene apagada;
Cuando está en la función de ahorro de energía, la luz de “Power” se apaga y la luz del ahorro de energía se enciende; Cuando está en modo de espera,
ambas luces estaran apagadas. 2. Por default todas las funciones están configuradas a medio nivel, los niveles se pueden ajustar en el control remoto. 3. Si
el producto no se usa durante 72 horas continuas, el agua en el tanque se descargará automáticamente durante 90 segundos y se reemplazará por agua
limpia para evitar las bacterias. / Remark: 1. When main unit is in functional mode, the power light goes on and the energy saver light will be off; When in
energy save function, the power light will go off, and energy saver light will be on; When in standby mode, both lights will be off. 2. The default setting of all
functions will be on middle level, the levels can be adjusted on the remote control. 3. If the product is not used for 72 continuous hours, the water in the tank will
automatically discharge for 90 seconds and replaced by fresh water to avoid bacteria.
Mantenimiento Diario / Daily Maintenance
12 1. Desconecte la fuente de alimentación al dar
mantenimiento.
2. Levante el asiento y limpie con un paño suave y
húmedo. También puede presionar el botón ubicado a la
derecha para extraer el asiento.
3. Después de la limpieza, vuelva a instalar el asiento.
1. Disconnect the power supply when doing maintenance.
2. Lift the seat, you can press the button located on the
right to extract the seat
3. After cleaning, re-install the seat back to main unit.
11
Nota: No vierta agua en el producto durante el
mantenimiento. / Note: Do not pour water on the
product at maintenance.
4
Realice lo siguiente para limpiar el tubo.
1.Presione o el botón " " por un moment nozzle cleaning
o " " y saldrá . Limpie la vara con un rear cleaning el tubo
paño suave y húmedo.
2. Mantenga presionado el botón de " " nozzle cleaning
y el tubo no saldrá. boquilla rociará El tubo
automáticamente para auto-limpiarse.
3. Presione de nuevo botón " " o el nozzle cleaning
" " o " " la limpieza parará.stop rear cleaning y
Do the following to clean the tube.
1.Press “nozzle cleaning” or “rear cleaning” button for
a while and the tube will come out. Wipe the tube clean
with a soft damp cloth.
2.Hold “nozzle cleaning” button and the tube doesn’t
come out.The nozzle will automatically spray to self-
clean.
3.Press again “nozzle cleaning” or “stop” or “rear
cleaning” button, to stop the cleaning.
1. Desconecte el enchufe eléctrico, luego cierre
la válvula de suministro de agua y desenrosque
la manguera de suministro de agua.
2. Retire el filtro. Utilice un cepillo para limpiarlo.
3. Coloque el filtro nuevamente en la entrada
después de la limpieza. Después enrosque la
manguera de suministro de agua.
1.Pull out electrical plug, then shut off water
supply valve and remove water supply hose.
2.Remove the filter. Use a brush to clean the
filter.
3.Put the filter back in the entrance after
cleaning. Then connect the water supply pipe.
Nota: No aplique fuerza al empujar o jalar el tubo, ya que esto puede dañar
el mecanismo. / Note: Do not apply force when pushing or pulling the
tube, as this may damage the mechanism.
Use un cepillo para
limpiar el filtro.
Use a brush to
clean the filter.
Retire el filtro.
Remove the filter.
Cuando la temperatura ambiente esté bajo cero, o
la electricidad este desconectada, o el usuario esté
ausente por un tiempo prolongado. El agua
contenida dentro del tanque deberá descargarse.
1) Abra la tapa del tanque, presione el botón de
descarga.
2) Presione levemente la parte saliente del botón de
descarga para obstruir la válvula de descarga y
cierre la cubierta.
When room temperature is under zero, or electricity
is disconnected, or user is away for a long time. The
water inside the tank should be discharged.
1) Open the tank cover, press the discharge button.
2) Slightly press the discharge button protruding
part to turn off discharging valve and cover.
1
2
Abra la tapa.
Turn on cover.
Presione hacia abajo la parte que sobresale.
Press downward the protruding part.
Presione hacia adentro el botón de descarga.
Press inward the discharging button.
Nota: ¡Antes de la descarga de
agua, la energía debe cortarse!
Note: Before water discharging,
the power must be cut off!
5
Mantenimiento de la Boquilla de Rociado Spray Nozzle Maintenance /
13
Limpieza del Filtro de Entrada Inlet Filter Cleaning
/
14
Mantenimiento del Almacenamiento de Agua del Tanque del Asiento
15
/ Maintenance of Water Storage Tank Seat
1
2
3

Other Helvex Plumbing Product manuals

Helvex TV-121 User manual

Helvex

Helvex TV-121 User manual

Helvex E-937 User manual

Helvex

Helvex E-937 User manual

Helvex Piura PIU-101 User manual

Helvex

Helvex Piura PIU-101 User manual

Helvex TZF NAO User manual

Helvex

Helvex TZF NAO User manual

Helvex Nautilia E-924 User manual

Helvex

Helvex Nautilia E-924 User manual

Helvex MAGNA DX User manual

Helvex

Helvex MAGNA DX User manual

Helvex 27 User manual

Helvex

Helvex 27 User manual

Helvex ADARA E-312 User manual

Helvex

Helvex ADARA E-312 User manual

Helvex TV-305 User manual

Helvex

Helvex TV-305 User manual

Helvex URM-22 User manual

Helvex

Helvex URM-22 User manual

Helvex Konos M-1004 User manual

Helvex

Helvex Konos M-1004 User manual

Helvex Forza TV-304 Instruction Manual

Helvex

Helvex Forza TV-304 Instruction Manual

Helvex Nuva TV-061-S User manual

Helvex

Helvex Nuva TV-061-S User manual

Helvex 5424 User manual

Helvex

Helvex 5424 User manual

Helvex WHIP RM-30 User manual

Helvex

Helvex WHIP RM-30 User manual

Helvex 110-38-3.5 User manual

Helvex

Helvex 110-38-3.5 User manual

Helvex 185-19 User manual

Helvex

Helvex 185-19 User manual

Helvex UH-105-WOA User manual

Helvex

Helvex UH-105-WOA User manual

Helvex H-8801 User manual

Helvex

Helvex H-8801 User manual

Helvex Explora HOT-106 User manual

Helvex

Helvex Explora HOT-106 User manual

Helvex FB-110-38 User manual

Helvex

Helvex FB-110-38 User manual

Helvex TV-030 User manual

Helvex

Helvex TV-030 User manual

Helvex ME-2122 User manual

Helvex

Helvex ME-2122 User manual

Helvex IG-20-PTM User manual

Helvex

Helvex IG-20-PTM User manual

Popular Plumbing Product manuals by other brands

Moen SANI-STREAM 8797 manual

Moen

Moen SANI-STREAM 8797 manual

Grohe Allure Brilliant 19 784 manual

Grohe

Grohe Allure Brilliant 19 784 manual

Cistermiser Easyflush EVO 1.5 manual

Cistermiser

Cistermiser Easyflush EVO 1.5 manual

Kohler Triton Rite-Temp K-T6910-2A installation guide

Kohler

Kohler Triton Rite-Temp K-T6910-2A installation guide

BEMIS FNOTAB100 Installation instruction

BEMIS

BEMIS FNOTAB100 Installation instruction

Hans Grohe ShowerTablet Select 700 13184000 Instructions for use/assembly instructions

Hans Grohe

Hans Grohe ShowerTablet Select 700 13184000 Instructions for use/assembly instructions

Akw Stone Wash Basin Installation instructions manual

Akw

Akw Stone Wash Basin Installation instructions manual

Enlighten Sauna Rustic-4 user manual

Enlighten Sauna

Enlighten Sauna Rustic-4 user manual

Moen ShowHouse S244 Series quick start guide
Moen

Moen ShowHouse S244 Series quick start guide
Sanela SLWN 08 Mounting instructions

Sanela

Sanela SLWN 08 Mounting instructions

Franke 7612982239618 operating instructions

Franke

Franke 7612982239618 operating instructions

Heritage Bathrooms Granley Deco PGDW02 Fitting Instructions & Contents List

Heritage Bathrooms

Heritage Bathrooms Granley Deco PGDW02 Fitting Instructions & Contents List

Tres TOUCH-TRES 1.61.445 instructions

Tres

Tres TOUCH-TRES 1.61.445 instructions

STIEBEL ELTRON WS-1 Operation and installation

STIEBEL ELTRON

STIEBEL ELTRON WS-1 Operation and installation

Miomare HG00383A manual

Miomare

Miomare HG00383A manual

BELLOSTA revivre 6521/CR1 quick start guide

BELLOSTA

BELLOSTA revivre 6521/CR1 quick start guide

American Standard Heritage Amarilis 7298.229 parts list

American Standard

American Standard Heritage Amarilis 7298.229 parts list

BorMann Elite BTW5024 quick start guide

BorMann

BorMann Elite BTW5024 quick start guide

manuals.online logo
manuals.online logoBrands
  • About & Mission
  • Contact us
  • Privacy Policy
  • Terms and Conditions

Copyright 2025 Manuals.Online. All Rights Reserved.