manuals.online logo
Brands
  1. Home
  2. •
  3. Brands
  4. •
  5. Himolla
  6. •
  7. Indoor Furnishing
  8. •
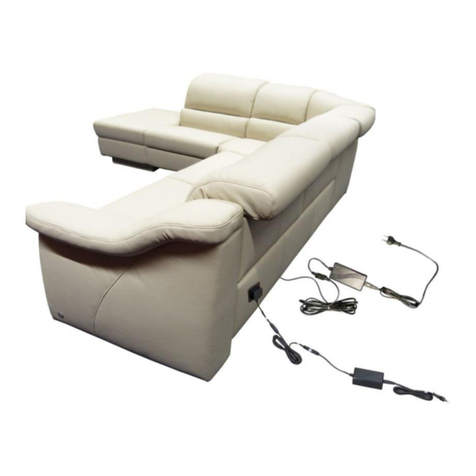
  9. Himolla 29000 20 80 User manual

Himolla 29000 20 80 User manual

04.10.2022_Ver.1.2_HR
LM: 29000 20
Auspacken, Unpacking, Déballage
Inhaltsverzeichnis / Table of Contents / Contenu
LM
29000 20
Montagezeit ca. --- Min.
Assembly time / Temps de montage 21.1.19
letzte Änderung Version Kürzel Seite
1.0 HR 2/17
Modellart / model type / Type de modèle Seite / Side / Page
3
Seite / Side / Page
Modellart / model type / Type de modèle
Montage,Assembly, Montage
4 - 680, 81, 82,
7 -1080, 81, 82, Z87, Z89,
Seite / Side / PageModellart / model type / Type de modèle
Funktionskontrolle, Functional check, Contrôle du fonctionnement
11
•Bei nicht vorschriftsgemäßer und/oder fachgerechter Montage sowie unsachgemäßer Nutzung wird bei Personen-
oder Sachschaden keinerlei Haftung übernommen!
•Wir empfehlen die Montage nur durch fachkundiges Personal.
•Die Montageanleitung und demontierte Bauteile sollten aufbewahrt werden.
•Bei veränderter Zusammenstellung kann sich die Montagezeit verändern.
•Am Aufstellort muss für eine geeignete Unterlage gesorgt werden, damit bei der Montage der Bodenbelag nicht
beschädigt wird.
•Achten Sie bei der Montage darauf, dass Sie das Bezugsmaterial des Möbels nicht beschädigen.
•No liability can be assumed for personal injury or material damage in the event of incorrect and/or unprofessional
assembly or improper use.
•We recommend that the assembly only be carried out by competent personnel.
•The assembly instructions and disassembled components should be kept for future reference.
•The assembly time may differ with a different configuration.
•A suitable underlay must be provided at the installation site so that the floor covering is not damaged during
installation.
•During assembly, make sure that you do not damage the cover material of the furniture.
• Aucune responsabilité n’est assumée pour les dommages corporels ou matériels éventuels en cas de montage non
conforme aux instructions et/ou inapproprié ainsi qu’en cas d’utilisation abusive.
•Nous recommandons de faire réaliser le montage par du personnel qualifié.
•Le manuel de montage et les pièces démontées doivent être conservés.
• Le temps de montage peut varier en cas d’assemblage différent.
•Merci de placer une protection de sol adaptée afin de ne pas endommager le sol pendant le montage.
•Faire attention de ne pas endommager le revêtement du meuble pendant le montage.
Seite / Side / Page
Datum
04.10.22
Version Kürzel Seite
1.2 HR 2/11
•Verpackung mit einem nicht spitzen
Gegenstand öffnen z.B. Folienschneider
•Open packaging with a device that is not
pointed or sharp, e.g. a foil cutter
• Ouvrir l’emballage à l’aide d’un outil non-
pointu (p.e. un découpe plastique)
Montageanleitung
Assembly instructions / Manuel de montage
LM
29000 20
Montagezeit ca. 10 Min.
Assembly time / Temps de montage
Datum
04.10.22
Version Kürzel Seite
1.2 HR 3/11
Auspacken, Unpacking, Déballage
•Wenn vorhanden, Kabelbinder lösen und
Transportplatte nach unten schieben.
•Schutzfolie entfernen
•Loosen cable ties, where present, and push
transport plate down.
•Remove protective film
•Le cas échéant, retirer les serre-câbles et
déplacer la plaque de transport vers le bas.
•Retirer le film de protection
•Element auf den Rücken drehen.
•Place the element on its back.
• Tourner l‘élément sur le dos.
Montagezubehör,
mounting accessories
Matériel de montages
Nr. / No / N°Größe / Size / Taille
18133 00
M7 x 60
85000 55
mitgeliefertes Material / Material included / Matériel fourni
L u. P Schraube
Montageanleitung
Assembly instructions / Manuel de montage
80, 81, 82,
LM
29000 20
Montagezeit ca. 25 Min.
Assembly time / Temps de montage
Datum
04.10.22
Version Kürzel Seite
1.2 HR 4/11
•Führungsbolzen auf beiden Seiten in die
vorgesehene Öffnung einführen.
•Mitgelieferte Schrauben durch das Chassis
mit der Sitz-Rückeneinheit auf beiden
Seiten verschrauben.
•Insert guide bolts into the designated holes
on both sides.
•Screw enclosed bolts through the chassis
into the seat back unit on both sides.
•Insérer les boulons de guidage des deux
côtés dans l’ouverture prévue.
•Visser les vis fournies dans le châssis avec
l’unité assise-dossier des deux côtés.
•Sitzeinheit mit 2 Personen einhängen.
•Assemble seat element with 2 people.
• Accrocher l’élément d’assise à 2
personnes.
•Wenn vorhanden, die gleichen Aufkleber
zum richtigen montieren beachten.
•If present, observe the related stickers for
correct mounting.
•S'il y a lieu, observer les mêmes
autocollants pour un montage correct.
80, 81, 82,,
LM
29000 20
Montagezeit ca. 25 Min.
Assembly time / Temps de montage
Datum
04.10.22
Version Kürzel Seite
1.2 HR 5/11
Montageanleitung
Assembly instructions / Manuel de montage
•Kabel vom Rücken mit dem offenen
Kabelbinder ca. mittig verbinden und
festziehen.
•Rest von Kabelbinder entfernen.
•Attach the open cable tie around half way
along the backrest cable and tighten.
•Remove the remainder of the cable tie.
•Attacher le câble du dossier avec le serre-
câbles libre à peu près au milieu puis
serrer.
•Couper le reste du serre-câbles.
•Stecker im Rücken verbinden und den
Reißverschluss schließen.
•Stecker am Motor verbinden.
•Stützfuß eindrehen.
•Connect the plug to the backrest and close
the zip.
•Connect the plug to the motor.
•Screw in the support foot.
•Brancher la fiche du dossier et fermer la
fermeture éclair.
•Brancher la fiche au moteur.
•Visser le pied.
80, 81, 82,
LM
29000 20
Montagezeit ca. 25 Min.
Assembly time / Temps de montage
Datum
04.10.22
Version Kürzel Seite
1.2 HR 6/11
Montageanleitung
Assembly instructions / Manuel de montage
•Styroporklötze unterlegen und Element auf
den Rücken drehen.
•Für Montagevideo QR –Code Scannen.
•Place polystyrene blocks beneath the
element and turn it onto its back.
•Scan the QR code for an assembly video.
•Placer les blocs de polystyrène et tourner
l’élément sur le dos.
•Scanner le code QR pour voir la vidéo de
montage.
Stück / Piece / PièceNr. / No / N°Größe / Size / Taille
12080 02
85 mm
14083 00
240x160x110
mitgeliefertes Material / Material included / Matériel fourni
Styroporklotz
Stütz Fuß
ab einer Chassis breite
von 1,2m
Montagezubehör,
mounting accessories
Matériel de montages
Nr. / No / N°Größe / Size / Taille
11529 00
M10
11957 00
M8 85003 55
29822 00M10
mitgeliefertes Material / Material included / Matériel fourni
Ansatzschraube
Motorbolzen
Sicherung Motorbolzen
Montageanleitung
Assembly instructions / Manuel de montage
80, 81, 82, Z87, Z89,
LM
29000 20
Montagezeit ca. 35 Min.
Assembly time / Temps de montage
Datum
04.10.22
Version Kürzel Seite
1.2 HR 7/11
Montage,Assembly, Montage,
•Sitzeinheit mit 2 Personen einhängen.
•Assemble seat element with 2 people.
• Accrocher l’élément d’assise à 2
personnes.
•Wenn vorhanden, die gleichen Aufkleber
zum richtigen montieren beachten.
•If present, observe the related stickers for
correct mounting.
•S'il y a lieu, observer les mêmes
autocollants pour un montage correct.
•Wenn vorhanden, Kabelbinder lösen und
Transportplatte nach unten schieben.
•Schutzfolie entfernen
•Loosen cable ties, where present, and push
transport plate down.
•Remove protective film
•Le cas échéant, retirer les serre-câbles et
déplacer la plaque de transport vers le bas.
•Retirer le film de protection
Montageanleitung
Assembly instructions / Manuel de montage
81, 82, Z87, Z89,
LM
29000 20
Montagezeit ca. 35 Min.
Assembly time / Temps de montage 21.1.19
letzte Änderung Version Kürzel Seite
4.0 HR 5/19
Datum
04.10.22
Version Kürzel Seite
1.2 HR 8/11
•Stecker im Rücken verbinden und den
Reißverschluss schließen.
•Stecker am Motor verbinden.
•Stützfuß eindrehen.
•Connect the plug to the backrest and close
the zip.
•Connect the plug to the motor.
•Screw in the support foot.
•Brancher la fiche du dossier et fermer la
fermeture éclair.
•Brancher la fiche au moteur.
•Visser le pied.
•Beim Vierkanteisen die Schraube von innen
nach außen schrauben.
•Beim Rundeisen die Schraube von außen
nach innen schrauben.
•Fit the screws from the inside outwards on
the square bars.
•Fit the screws from the outside inwards on
the round bars.
•Sur les fers carrés, visser la vis de
l’intérieur vers l’extérieur.
•Sur les fers ronds, visser la vis de
l’extérieur vers l’intérieur.
•Kabelbinder entfernen.
•Zur besseren Montage, Beschlag an der
markierten Strebe anfassen.
•Remove the cable ties.
•Grasp the mechanism by the strut for
easier assembly.
• Retirer l’attache de câble.
•Pour simplifier le montage, saisir la ferrure
au niveau de l’entretoise marquée en
rouge.
Montageanleitung
Assembly instructions / Manuel de montage
80, 81, 82, Z87, Z89,
LM
29000 20
Montagezeit ca. 35 Min.
Assembly time / Temps de montage 21.1.19
letzte Änderung Version Kürzel Seite
4.0 HR 6/19
Datum
04.10.22
Version Kürzel Seite
1.2 HR 9/11
•Den Absenkmotor an der markierten Strebe
fahren bis Bohrung von Motor und
Beschlag in gleicher Position ist.
•Bolzen durchstecken und anschließend
Stecksicherung aufstecken.
•Move the lowering motor by the marked
strut, until the holes on the motor and the
fitting are aligned.
•Insert the bolt and then fit the fastener.
• Déplacer le moteur d’abaissement sur
l’entretoise marquée jusqu’à ce que les
perçages du moteur et de la ferrure soient
dans la même position.
•Enficher les boulons puis insérer la fixation.
•Absenkmotor mit der mittleren
Tastenfunktion in Position fahren.
•Vorsicht Verletzungsgefahr
•Move lowering motor into position using the
middle button.
•Caution: Risk of injury
• Placer le moteur d’abaissement en position
à l’aide du bouton central.
•Prudence : risque de blessure
•Kabel vom Rücken mit dem offenen
Kabelbinder ca. mittig verbinden und
festziehen.
•Rest von Kabelbinder entfernen.
•Attach the open cable tie around half way
along the backrest cable and tighten.
•Remove the remainder of the cable tie.
•Attacher le câble du dossier avec le serre-
câbles libre à peu près au milieu puis
serrer.
•Couper le reste du serre-câbles.
Montageanleitung
Assembly instructions / Manuel de montage
80, 81, 82, Z87, Z89,
LM
29000 20
Montagezeit ca. 35 Min.
Assembly time / Temps de montage 21.1.19
letzte Änderung Version Kürzel Seite
4.0 HR 6/19
Datum
04.10.22
Kürzel
Version Seite
1.2 HR 10/11
•Funktionskontrolle bei allen Elementen
ohne Belastung durchführen
•Überlastungen auf der Beinauflage führen
zu Beschädigungen
•Please conduct the function control for all
elements without load
•Overloading on the footrest will result in
damages
•Tester tous les éléments sans pression
•Une surcharge sur le repose-pieds peut
entrainer des dommages
•Netzverbindung herstellen
•Connect to the mains
•Brancher le raccordement secteur
•Alle Stützfüße nachstellen bis
Bodenkontakt vorhanden ist, bzw.
Spaltmaße anpassen.
•Adjust all support feet until they make
contact with the floor and/or adjust the
clearances.
• Régler tous les pieds de support jusqu’à ce
qu’ils soient en contact avec le sol ou
ajuster l’écartement.
Montageanleitung
Assembly instructions / Manuel de montage
LM
29000 20
Montagezeit ca. 10 Min.
Assembly time / Temps de montage 21.1.19
letzte Änderung Version Kürzel Seite
4.0 HR 13/19
Funktionskontrolle, Functional check, Contrôle du fonctionnement
Datum
04.10.22
Version Kürzel Seite
1.2 HR 11/11

This manual suits for next models

5

Other Himolla Indoor Furnishing manuals

Himolla 29000 33 User manual

Himolla

Himolla 29000 33 User manual

Himolla Cumuly Comfort 29111 43 User manual

Himolla

Himolla Cumuly Comfort 29111 43 User manual

Himolla Easy Comfort Series User manual

Himolla

Himolla Easy Comfort Series User manual

Himolla LM 29111 46 User manual

Himolla

Himolla LM 29111 46 User manual

Himolla 29111 35 User manual

Himolla

Himolla 29111 35 User manual

Himolla CUMULY 4928 User manual

Himolla

Himolla CUMULY 4928 User manual

Himolla 29000 25 User manual

Himolla

Himolla 29000 25 User manual

Himolla AZURE 4080 User manual

Himolla

Himolla AZURE 4080 User manual

Himolla TANGRAM SOFA 9065 User manual

Himolla

Himolla TANGRAM SOFA 9065 User manual

Himolla 7568 User manual

Himolla

Himolla 7568 User manual

Himolla Planopoly Motion User manual

Himolla

Himolla Planopoly Motion User manual

Himolla 29111 48 User manual

Himolla

Himolla 29111 48 User manual

Himolla LM 29111 48 User manual

Himolla

Himolla LM 29111 48 User manual

Himolla LM 29000 01 User manual

Himolla

Himolla LM 29000 01 User manual

Himolla Z87 User manual

Himolla

Himolla Z87 User manual

Himolla 29000 34 User manual

Himolla

Himolla 29000 34 User manual

Himolla SIGNA 1051 User manual

Himolla

Himolla SIGNA 1051 User manual

Himolla 29000 38 User manual

Himolla

Himolla 29000 38 User manual

Himolla Tangram Motion Series User manual

Himolla

Himolla Tangram Motion Series User manual

Himolla LM 29111 25 User manual

Himolla

Himolla LM 29111 25 User manual

Himolla Lounger Series User manual

Himolla

Himolla Lounger Series User manual

Himolla SIGNA 1052 User manual

Himolla

Himolla SIGNA 1052 User manual

Popular Indoor Furnishing manuals by other brands

Universal Furniture 988-920 instruction sheet

Universal Furniture

Universal Furniture 988-920 instruction sheet

IKEA SKYAR AA-180832-1 Assembly instructions

IKEA

IKEA SKYAR AA-180832-1 Assembly instructions

Ronbow Signature series Installation and care guide

Ronbow

Ronbow Signature series Installation and care guide

Riverside Furniture 36552 Assembly instructions

Riverside Furniture

Riverside Furniture 36552 Assembly instructions

Furinno FNBJ-22033 Assembly instruction

Furinno

Furinno FNBJ-22033 Assembly instruction

STRUCTUBE Toledo Assembly instructions

STRUCTUBE

STRUCTUBE Toledo Assembly instructions

Astonica 50105015 instruction manual

Astonica

Astonica 50105015 instruction manual

Office Depot zeplin RS To-Go 413-170 Po Assembly instructions and warranty information

Office Depot

Office Depot zeplin RS To-Go 413-170 Po Assembly instructions and warranty information

Aqua One Vogue 135 Assembly instructions

Aqua One

Aqua One Vogue 135 Assembly instructions

Bestway 67287 owner's manual

Bestway

Bestway 67287 owner's manual

modway EEI-5150 Assembly instructions

modway

modway EEI-5150 Assembly instructions

E-MORE 1M2S Assembly instructions

E-MORE

E-MORE 1M2S Assembly instructions

Cooper Lighting 417 specification

Cooper Lighting

Cooper Lighting 417 specification

Stellar Works SI-T110.US instruction manual

Stellar Works

Stellar Works SI-T110.US instruction manual

Wolf VS24 Quick reference guide

Wolf

Wolf VS24 Quick reference guide

DURAVIT Zencha ZE 7055 Mounting instructions

DURAVIT

DURAVIT Zencha ZE 7055 Mounting instructions

Invacare H407 Omega user manual

Invacare

Invacare H407 Omega user manual

Ethnicraft 50256-U Assembly instructions

Ethnicraft

Ethnicraft 50256-U Assembly instructions

manuals.online logo
manuals.online logoBrands
  • About & Mission
  • Contact us
  • Privacy Policy
  • Terms and Conditions

Copyright 2025 Manuals.Online. All Rights Reserved.