manuals.online logo
Brands
  1. Home
  2. •
  3. Brands
  4. •
  5. IHP
  6. •
  7. Fireplace Accessories
  8. •
  9. IHP EPIC-TRIM-B User manual

IHP EPIC-TRIM-B User manual

This manual suits for next models

7

Other IHP Fireplace Accessories manuals
IHP PCBM-325 User manual

IHP

IHP PCBM-325 User manual

IHP BWBK User manual

IHP

IHP BWBK User manual

IHP Montebello Series User manual

IHP

IHP Montebello Series User manual

IHP GCKSMS557051NP User manual

IHP

IHP GCKSMS557051NP User manual

IHP 900935-00 User manual

IHP

IHP 900935-00 User manual

IHP VF F3784 User manual

IHP

IHP VF F3784 User manual

IHP LPDBK User manual

IHP

IHP LPDBK User manual

IHP 36LBFOD-BS User manual

IHP

IHP 36LBFOD-BS User manual

IHP FP6820-4S-DVFP User manual

IHP

IHP FP6820-4S-DVFP User manual

IHP FBK-LIN User manual

IHP

IHP FBK-LIN User manual

IHP PCBE-325 User manual

IHP

IHP PCBE-325 User manual

IHP AK4 User manual

IHP

IHP AK4 User manual

IHP PCBE-36 User manual

IHP

IHP PCBE-36 User manual

IHP Envy AKC-CLS-DLSCNV User manual

IHP

IHP Envy AKC-CLS-DLSCNV User manual

IHP STK-LIN60-B KIT User manual

IHP

IHP STK-LIN60-B KIT User manual

IHP WINSLOW PS40 User manual

IHP

IHP WINSLOW PS40 User manual

IHP H5872 User manual

IHP

IHP H5872 User manual

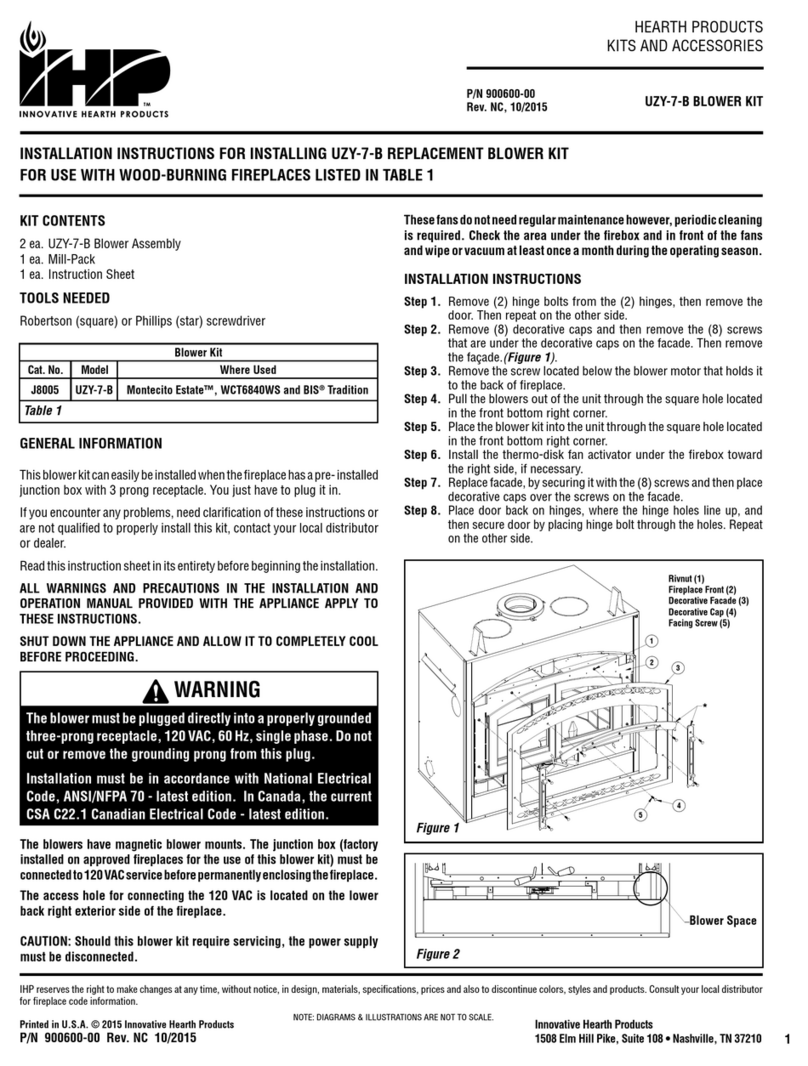
IHP UZY-7-B User manual

IHP

IHP UZY-7-B User manual

IHP 900077-07 User manual

IHP

IHP 900077-07 User manual

IHP SF-HTSS Series User manual

IHP

IHP SF-HTSS Series User manual

IHP RDV-CONTF-BLK User manual

IHP

IHP RDV-CONTF-BLK User manual

IHP SEREFINA CI1500 GCK LP User manual

IHP

IHP SEREFINA CI1500 GCK LP User manual

IHP GAB Series User manual

IHP

IHP GAB Series User manual

IHP BLB36SF Series User manual

IHP

IHP BLB36SF Series User manual

Popular Fireplace Accessories manuals by other brands

Valor L2 1700K quick start guide

Valor

Valor L2 1700K quick start guide

Exodraft Xzense manual

Exodraft

Exodraft Xzense manual

Whalen Ruso MNFP62BF23-6 manual

Whalen

Whalen Ruso MNFP62BF23-6 manual

Woodstock Soapstone Fireview 201 manual

Woodstock Soapstone

Woodstock Soapstone Fireview 201 manual

EdilKamin SERBATOIO 250 Installation, use and maintenance

EdilKamin

EdilKamin SERBATOIO 250 Installation, use and maintenance

Bronpi KIT-1 instructions

Bronpi

Bronpi KIT-1 instructions

Town & Country Fireplaces 22150051 instructions

Town & Country Fireplaces

Town & Country Fireplaces 22150051 instructions

Travis Industries 33 DVI installation instructions
Travis Industries

Travis Industries 33 DVI installation instructions

Lopi Hearthview 864 user manual

Lopi

Lopi Hearthview 864 user manual

Lennox Hearth Products LENNOX MPE-33R installation instructions

Lennox Hearth Products

Lennox Hearth Products LENNOX MPE-33R installation instructions

Dimplex DFP6776C install guide

Dimplex

Dimplex DFP6776C install guide

Napoleon W175-0689 instruction manual

Napoleon

Napoleon W175-0689 instruction manual

Travis Industries 95400424 installation instructions

Travis Industries

Travis Industries 95400424 installation instructions

Osburn ZERO CLEARANCE KIT installation instructions

Osburn

Osburn ZERO CLEARANCE KIT installation instructions

Majestic QUARTZPLA36IN installation instructions

Majestic

Majestic QUARTZPLA36IN installation instructions

Napoleon DBPO36 installation instructions

Napoleon

Napoleon DBPO36 installation instructions

Dimplex SMP-130-E install guide

Dimplex

Dimplex SMP-130-E install guide

Empire Comfort Systems LS50TINF installation instructions

Empire Comfort Systems

Empire Comfort Systems LS50TINF installation instructions

manuals.online logo
manuals.online logoBrands
  • About & Mission
  • Contact us
  • Privacy Policy
  • Terms and Conditions

Copyright 2025 Manuals.Online. All Rights Reserved.

DOOR TRIM KITS
MODEL EPIC™
INSTALLATION INSTRUCTIONS FOR INSTALLING DOOR TRIM KITS
FOR USE WITH EPIC™ DIRECT-VENT GAS STOVES
775291M
Rev. B, 11/2013
HEARTH PRODUCTS
KITS AND ACCESSORIES
KIT CONTENTS
Please ensure that all these parts are included
2 ea. Trim Pieces
6 ea. Nuts
6 ea. #6 Washers
1 ea. Instruction Sheet
TOOLS NEEDED:
5/16” nut driver or socket wrench
CAUTION: Always ensure that plated surfaces are clean and free of
fingerprints before lighting stove. Fingerprints will leave permanent
blemishes if left on plated surface when lit. When installation is
complete, the trim should be gently cleaned with a soft cloth and
either alcohol or a household glass cleaner. Do not overtighten nuts,
overtightening can create visible dimples on the plated surface.
INSTALLATION INSTRUCTIONS
Step 1. Remove the trim pieces and hardware from its packaging and
ensure that all pieces are present before beginning installation.
Take care not to scratch finished surfaces.
Step 2. Facing the stove pull open the left side door.
Step 3. Unlatch the front door and swing it open (See Figure 1).
GENERAL INFORMATION
If you encounter any problems, need clarification of these instructions
or are not qualified to properly install this kit, contact you local distribu-
tor or dealer.
Read this instruction sheet in its entirety before beginning the installa-
tion.
All of these parts may scratch and bend, great care should be used
in handling them.
ALL WARNINGS AND PRECAUTIONS IN THE INSTALLATION AND
OPERATION MANUAL PROVIDED WITH THE APPLIANCE APPLY TO
THESE INSTRUCTIONS.
TURN OFF THE STOVE AND ALLOW IT TO COMPLETELY COOL BEFORE
PROCEEDING.
1
Cat. No. Model Description
75348 EPIC-TRIM-B Black Trim Kit
75349 EPIC-TRIM-G Gold Trim Kit
75350 EPIC-TRIM-BN Brushed Nickel Trim Kit
75351 EPIC-TRIM-BKN Black Nickel Trim Kit
NOTE: DIAGRAMS AND ILLUSTRATIONS ARE NOT TO SCALE.
Figure 1 - Front Door Latches
The front door latchesare located behind the
left side door panel (indicated by arrows)
2
Printed in U.S.A. © 2008 IHP LLC
P/N 775291M REV. B 11/2013
NOTE: DIAGRAMS AND ILLUSTRATIONS ARE NOT TO SCALE.
IHP reserves the right to make changes at any time, without notice, in design, materials,
specifications, prices and also to discontinue colors, styles and products. Consult your local
distributor for fireplace code information.
1508 Elm Hill Pike, Suite 108 • Nashville, TN 37210
Figure 3
Step 4. Put trim in place by inserting trim studs into the corresponding
holes in the door (see Figure 2). The top piece of trim will only fit
in one direction, but the bottom piece can be installed incorrectly.
When placing the bottom piece of trim make sure there is a small
gap between the bottom of the trim piece and the bottom of the
door, if the trim extends below the bottom of the door the trim is
on upside down.
Step 5. Place one washer on each stud (see Figure 2). Using a 5/16”
nut driver, snug up the nuts on each piece of trim. Do not finish
tightening nuts.
Step 6. There should be approximately a 1/8” gap between the edge of
the trim and the top and bottom of edges of the door. Visually
inspect the alignment of the trim and adjust if necessary.
Step 7. Finish tightening nuts. CAUTION - DO NOT OVERTIGHTEN
NUTS.
Figure 2
COMPLETED
INSTALLATION
Step 8. Close the front door and secure latches (see Figure 1). Close left
side panel door. Use a household glass cleaner or alcohol and
a soft cloth to remove any fingerprints from all plated surfaces
prior to firing the stove. Read Caution on Page 1.