IKEA NUMRERAD User manual

NUMRERAD EN
FR
ES

ENGLISH
Please refer to the last page of this manual for the full list of IKEA
appointed After Sales Service Provider and relative national phone
numbers.
Please record your model and serial numbers
below for reference.
Purchase Date
Model Number
Serial Number
Please attach sales receipt here for future
reference.
Installation checklist
Door
Door seals completely to cabinet on all sides
Door is level
Levelling
Refrigerator is level, side-to-side and
tilted ¼ in. (6mm) front-to-back
Cabinet is setting solid on all corners
Distance holder (anti-tip bracket) set
Electrical power
House power turned on
Refrigerator plugged in
Final Checks
Shipping material removed
Refrigerator temperature set

FRANÇAIS
Veuillez vous reporter à la dernière page du présent manuel pour la liste
complète des prestataires de service après-vente désignés par IKEA et les
numéros de téléphone nationaux correspondants.
Veuillez enregistrer vos numéros de modèle et
de série ci-dessous à titre informatif.
Date d’achat
Numéro de modèle
Numéro de série
Veuillez brocher votre reçu ici pour vous y
référer ultérieurement.
Vérications avant installation
Porte
La porte se ferme complètement sur
l’armoire de tous les côtés
La porte est de niveau
Mise à niveau
Le réfrigérateur est de niveau d’un côté à
l’autre et incliné de 6 mm (¼ po) de l’avant à
l’arrière
L’armoire a un appui solide aux quatre coins
Le support de distanciation (anti-
basculement) est installé
Alimentation électrique
L’alimentation électrique de la maison est
sous tension
Le réfrigérateur est branché
Vérications nales
Matériel d’expédition retiré
Température du réfrigérateur réglée

ESPAÑOL
Por favor, consulte la última página de este manual donde encontrará la
lista completa de los proveedores de servicios posventa designados por
IKEA y sus respectivos números de teléfono.
Por favor, registre su modelo y los números de
serie que aparecen debajo para referencia.
Fecha de compra
Número del modelo
Número de serie
Por favor, adjunte su recibo de compra
aquí para futura referencia.
Lista de control de la instalación
Puerta
La puerta sella por completo el gabinete
La puerta está nivelada
Nivelador
El refrigerador está nivelado, de lado a lado,
y tiene una inclinación de ¼ de pulgada
(6 mm) hacia atrás.
El gabinete descansa sólidamente en las
cuatro esquinas.
Dispositivo distanciador (soporte anti-vuelco)
jado
Corriente eléctrica
Corriente doméstica encendida
Refrigerador enchufado
Revisiones nales
Material de embalaje retirado
Temperatura del refrigerador jada

ENGLISH 6
FRANÇAIS 20
ESPAÑOL 36

6ENGLISH
Contents
Important safety information 6
Installation 9
First use 10
Product description 11
Operation 12
Daily use 13
Hints and tips 14
Care and cleaning 14
Troubleshooting 15
Technical information 17
Environmental concerns 18
IKEA limited guarantee 18
Subject to change without notice.
Important safety information
•Read these instructions.
•Keep these instructions.
•Heed all warnings.
•Follow all instructions.
•Retain all documents for subsequent use
or for the next owner.
•The manufacturer is not liable if you
disregard the instructions and warnings
in the operating and installation
instructions.
•Know these safety symbols.
This is the attention symbol, pertaining to
safety, which alerts users to potential risks
to themselves and others.
All safety warnings are preceded by the
attention symbol and the following terms:
Warning: indicates a potentially hazardous
situation which, if not avoided, could result
in death or serious injury.
Caution: indicates a potentially hazardous
situation which, if not avoided, may result in
minor or moderate injury.
Child safety
• Keep children away from packaging and its
parts. Danger of suocation from folding
cartons and cling wrap!
• This appliance is not intended for use by
persons (including children) with reduced
physical, sensory or mental capabilities,
or lack of experience and knowledge,
unless they have been given supervision or
instruction concerning use of the appliance
by a person responsible for their safety.
• Do not allow children to play with the
appliance!
• Destroy or recycle the carton, plastic
bags, and any exterior wrapping material
immediately after the refrigerator is
unpacked. Children should never use
these items to play. Cartons covered with
rugs,bedspreads, plastic sheets or stretch
wrap may become airtight chambers, and
can quickly cause suocation.
General Safety
• The appliance is designed exclusively for the
storage of wine.
• This appliance is intended to be used in
household and similar applications such as:
- Farm houses; sta kitchen areas in
shops, oces and other working
environments;
- By clients in hotels, motels, bed and
breakfast and other residential type
environments;
• If the power cord is damaged, it must be
replaced by the manufacturer, its Authorised
Service Centre or similarly qualied persons
in order to avoid a hazard.
• Only original parts supplied by the
manufacturer should be used. Only original
parts satisfy safety requirements.
• Do not use electrical appliances inside the
appliance (e.g. heater, electric ice maker,
etc.). Risk of explosion!
• Do not use water spray and steam to clean
the appliance. The steam may penetrate
electrical parts and cause a short–circuit.
Risk of electric shock!
• Do not use pointed and sharp–edged
implements to remove frost or layers of
ice. You could damage sensitive internal

7ENGLISH
components, including the refrigerant
tubes. Leaking refrigerant may ignite or
cause eye injuries.
• Do not use other means to accelerate
the defrosting process other than those
recommended by the manufacturer.
• Do not damage the refrigerant circuit.
• Do not store products which contain
ammable propellants (e.g. spray cans) or
explosive substances in the appliance. Risk
of explosion!
• Only store high-proof alcohol tightly closed
and standing up.
• Keep ventilation openings, in the appliance
enclosure or in the built-in structure, clear of
obstruction.
• Never cover or block the ventilation
openings for the appliance.
• Switch the appliance o prior to cleaning.
• Clean the appliance with a moist soft cloth.
Only use neutral detergents. Do not use
abrasive products, abrasive cleaning pads,
solvents or metal objects.
• Keep plastic parts and the refrigerator seal
free of oil and grease. Otherwise, parts and
the refrigerator seal will become porous.
• Do not stand on or lean heavily against the
base of the appliance, door, shelves etc.
Transportation
The appliance is heavy and must be handled
with caution during transportation and
installation. Because of the weight and
dimensions of the appliance, at least two
persons are necessary to move the appliance
into position securely and avoid injuries to
people or damage to the appliance.
Installation
Warning! Only a qualied person can
install this appliance.
• Remove all the packaging and the transit
bolts.
• Do not install or use a damaged appliance.
• Follow the installation instruction supplied
with the appliance.
• Always take care when moving the
appliance as it is heavy. Always use safety
gloves and enclosed footwear.
• Make sure the air can circulate around the
appliance.
• Do not tilt the refrigerator for more than 45°
form upright during moving it.
• At rst installation or after reversing the
door wait at least 4 hours before connecting
the appliance to the power supply. This is to
allow the oil to ow back in the compressor.
• Before carrying out any operations on the
appliance (e.g. reversing the door), remove
the plug from the power socket.
• Do not install the appliance close to
radiators or cookers, oven or hobs.
• The rear of the appliance must stand
against the wall.
• Do not install the appliance where there is
direct sunlight.
• Do not install this appliance in areas that
are too humid or too colds, such as the
construction appendices, garages or wine
cellars.
• When you move the appliance, lift it by the
front edge to avoid scratching the oor.
Electrical connection
Warning! Risk of re and electrical shock.
Warning! When positioning the appliance,
ensure the power cord is not trapped or
damaged.
Warning! Do not use multi-plug adapters
and extension cords.
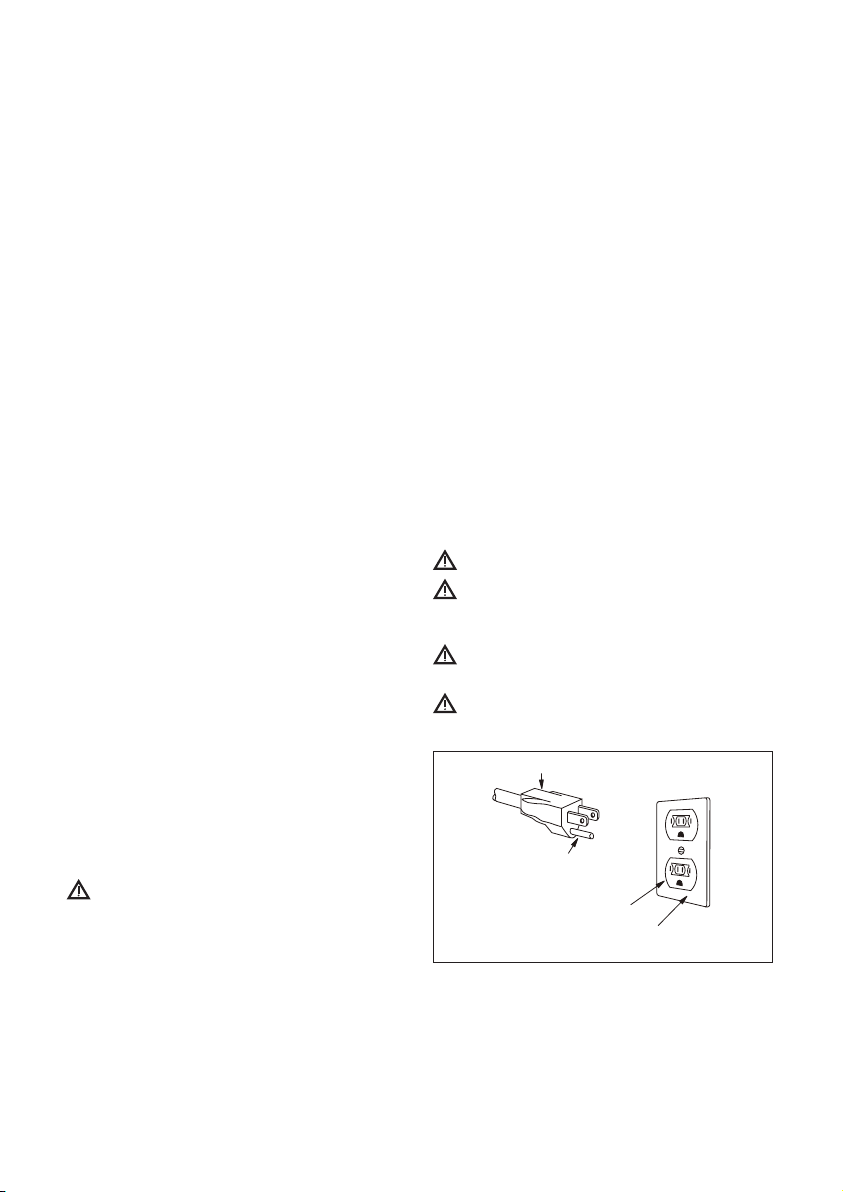
Warning! Do not, under any
circumstances, cut, remove, or bypass the
grounding prong.
3-prong plug
3-prong receptacle
Grounding pin
Ground receptacle box
• The appliance must be earthed. The
appliance must be plugged into its own
dedicated 115 Volt, 60 Hz.,15 Amp, AC
only electrical outlet. The power cord of
the appliance is equipped with a 3-prong
grounding plug for your protection
against electrical shock hazards. It must be
plugged directly into a properly grounded
3-prong receptacle. The receptacle must be

8ENGLISH
installed in accordance with local codes and
ordinances. Consult a qualied electrician.
Avoid connecting refrigerator to a Ground
Fault Interrupter (GFI) circuit.
• If there is a 2-prong standard wall socket,
it is the responsibility of the customer to
have this socket replaced with a correctly
grounded 3-prong wall socket.
• Never unplug the appliance by pulling on
the power cord. Always grip the plug rmly,
and pull straight out from the receptacle to
prevent damaging the power cord.
• Performance may be aected if the
voltage varies by 10% or more. Operating
the appliance with insucient power can
damage the compressor. Such damage is
not covered under your warranty.
• Do not plug the appliance into an electrical
outlet controlled by a wall switch or pull
cord to prevent the appliance from being
turned o accidentally.
• Make sure that the parameters on the rating
plate are compatible with the electrical
ratings of the mains power supply.
• Always use a correctly installed shockproof
socket.
• Make sure not to cause damage to the
electrical components (e.g. mains plug, power
cord, compressor). Contact the Authorised
Service Centre or an electrician to change the
electrical components.
• The power cord must stay below the level of
the mains plug.
• Connect the mains plug to the mains socket
only at the end of the installation. Make sure
that there is access to the mains plug after
the installation.
Use
Warning! Risk of injury, burns, electrical
shock or re.
The appliance contains ammable gas,
isobutane (R600a), a natural gas with a high
level of environmental compatibility. Be careful
not to cause damage to the refrigerant circuit
containing isobutane.
• The surface of the compressor becomes hot:
The surface of the compressor may become
hot under normal operation. Do not touch it
with hands.
• Do not change the specication of this
appliance.
• Do not put electrical appliances (e.g. ice
cream makers) in the appliance unless they
are stated applicable by the manufacturer.
• If damage occurs to the refrigerant circuit,
make sure that there are no ames and
sources of ignition in the room. Ventilate the
room.
• Do not let hot items to touch the plastic
parts of the appliance.
• Do not store ammable gas and liquid in the
appliance.Do not put ammable products
or items that are wet with ammable
products in, near or on the appliance.
• Do not touch the compressor or the
condenser. They are hot.
Internal lighting
Warning! Risk of electric shock.
• The lamp is only for interior lighting of the
appliance. Do not use it for house lighting.
Care and cleaning
Warning! Risk of injury or damage to the
appliance.
• Before maintenance, deactivate the
appliance and disconnect the mains plug
from the mains socket.
• This appliance contains hydrocarbons in the
cooling unit. Only a qualied person can do
the maintenance and the recharging of the
unit.
• Regularly examine the drain of the
appliance and if necessary, clean it. If the
drain is blocked, defrosted water collects in
the bottom of the appliance.
Service
• To repair the appliance contact the
Authorised Service Centre listed at the end
of this manual.
• Use original spare parts only.
• Please note that self-repair or non-
professional repair can have safety
consequences and might void the
guarantee.
Proper disposal of your appliance
Warning! Risk of child entrapment.

9ENGLISH
problems of the past. Junked or abandoned
appliances are still dangerous – even if they will
sit for “just a few days”. If you are getting rid of
your old, please follow the instructions below to
help prevent accidents.
• Disconnect the appliance from the mains
supply.
•
• Remove the door to prevent children and
pets to be closed inside of the appliance.
• The refrigerant circuit and the insulation
materials of this appliance are ozone-
friendly.
• gas. Contact your municipal authority for
information on how to discard the appliance
correctly.
• Do not cause damage to the part of the
cooling unit that is near the heat exchanger.
• We strongly encourage responsible
appliance recycling/disposal methods.
Check with your utility company or visit
www.energystar.gov/recycle for more
information on recycling your old unit.
CFC/HCFC Disposal
Your old refrigerator may have a cooling system
are believed to harm stratospheric ozone if
released to the atmosphere. Other refrigerants
may also cause harm to the environment if
released to the atmosphere.
If you are throwing away your old refrigerator,
make sure the refrigerant is removed for
you intentionally release refrigerant, you may
provisions of environmental legislation.
State of California Proposition 65 Warnings
Warning! This product can expose you
to chemicals including vinyl chloride,
which is known to the State of California
to cause cancer and birth defects or other
reproductive harm. For more information
go to www.P65Warnings.ca.gov.
Installation
Warning! Refer to Safety chapters.
Positioning
• Follow the separate Assembly Instructions to
install this appliance.
• This appliance should be installed in a dry,
well ventilated indoor.
• Do not install this appliance:
- Outdoors;
- In an environment with dripping water;
- In rooms where there is a risk of frost. Scenario1 Scenario2
Location
• To ensure best performance, install the
appliance well away from sources of heat
such as radiators, boilers, direct sunlight
etc. Make sure that air can circulate freely
around the back of the cabinet.
• Scene 1: Leave a space of at least 3/16"
between the appliance and the wall, and
at least 3/8“ between the top of the
appliance and the ceiling.
• Scene 2: Leave enough space to place the
appliance (W x D ≥ 25 1/4"×49 5/8"),
this is the minimum distance to open the
door and remove shelves easily.
Levelling feet
If the appliance tilts in some way, adjust the
height of the left/right foot of the appliance to
be in a horizontal level. Refer to the separate
Assembly Instructions for detailed installation.
1. Disconnect the mains plug of the appliance
from the power socket.
2. Turn the foot clockwise to raise the
appliance; turn the foot counter clockwise to
lower the appliance.
W
D
W
D

10ENGLISH
A suitable screwdriver and/or wrench is needed
for door re-installation.
Refer to the separate Assembly Instructions for
detailed installation.
Installing distance holder
Warning! Serious or fatal crushing injuries
can occur from appliance tip-over. ALWAYS
secure this appliance to the wall using tip-
over restraints.
the appliance to the wall for the following
advantages. You must follow the separate
Assembly Instructions to correctly install this
distance holder/anti-tip bracket.
• Allow enough space for air circulation
between the appliance and the walls.
• Secure the appliance to the wall for tip-over
prevention.
Electrical connection
Caution! Any electrical work required to
install this appliance should be carried
person.
Warning! This appliance must be earthed.
Failure to follow these instructions can
The manufacturer declines any liability should
these safety measures not be observed.
First use
Cleaning the interior
time,wash the interior and all internal
accessories with lukewarm water and same
neutral soap so as to remove the typical smell of
a brand new product, then dry thoroughly.
Important! Do not use detergents or abrasive
Reversing doors (optional)
Based on the location of the appliance, you
may need to reverse the doors to allow for easy
access to the appliance contents.

11ENGLISH
Product description
Product overview
12
3
4
5
1Control panel
2Door gaskets
3Door handle
4Single row shelves
5Double row shelves

12ENGLISH
Operation
Control panel
1 2 3 4 5 6
1 On/O button
2Lamp button
3Display
4Temperature warmer button
5Temperature colder button
6°F/°C button
Switching on
Warning! Refer to "Electrical connection"
section of the Safety chapter.
1. Connect the mains plug to the power socket.
2. Press and hold the 1 On/O button for ve
seconds. The display turns on and shows
the set default temperature.
3. To change temperature, refer to the section
for temperature regulation.
When operating the appliance for the rst
time, set the appliance at a colder temperature
and run it without loading any wine bottle
until it auto stops at the set temperature.
Usually it takes 2 or 3 hours, then set a desired
temperature and put wine bottles in the
appliance
Switching o
Press and hold
the 1 On/O button for ve
seconds. The display turns o.
To disconnect the appliance from the power
supply, disconnect the mains plug from the
power socket.
Switching temperature unit
Press the 6°F/°C button to change between
Celsius and Fahrenheit display.
Temperature regulation
• Press the 4or 5temperature button to
set the temperature. The display shows the
set temperature.
• The temperature ranges from 41°F to 64°F
(5°C to 18°C).
Lighting control
• Press the 2lamp button to turn the
internal lamp on or o.
• When you turn the lamp on, the lamp is
always on regardless of the door opened or
closed.
• When you turn the lamp o, the lamp is
automatically on upon opening of the door
and the lamp is automatically o upon
closing of the door.
Door opening sound control
When opening the door, the buzzer will sound at
the same time as a reminder.
Press and hold the 4Temperature warmer
button and 6°F/°C button at the same time for
ve seconds to deactivate or activate the door
opening sound function.
When the appliance is reconnected to the power
supply, the door opening sound will always be
activated.
Important note on control panel
The control panel is a glass touch screen. Keep
the control panel from scratches and sharp
objects, and keep it from strong magnetic eld
and high humidity. Otherwise the function of
the control panel can be aected.

13ENGLISH
Daily use
Removal of shelves
The storage shelves have a limit stop to prevent
their accidental removal or falling out.
• To remove a shelf, pull the shelf towards
yourself and remove it by tilting its front
upwards.
• To put a shelf back, lift the front of the shelf
and insert it into the slide of the appliance
then push it back in the position.
• To take a wine bottle out, pull the shelf
towards yourself lightly till hitting the stop.
Pay attention to avoid hitting the gasket.
Take the bottle out, then push the shelf
back.
Storage of wine bottles
• Position wine bottles so that air can circulate
freely around it
• The temperature range (41°F to 64°F, or 5°C
to 18°C) for the appliance can keep bottled
wine at ideal temperatures.
• The open-type bottle shelves are helpful for
air circulation. This can make air moisture
formed on the bottles dry out quickly.
• The number of the wine bottle stored in the
appliance is determined by shape and size
of the wine bottles.
• The illustration below shows the storage
capacity of the appliance according to a
particular size given.
1.18”
2.95” 8.46”
11.81”
• Do not let wine bottles touch the back side
of the appliance for good air circulation
inside the appliance.
• Do not store wine bottles by box or case
inside the appliance.
• When storing in the appliance, the cork of
an old wine bottle should always be soaked
in the wine to ensure airtightness.
• The wine temperature will rise a few
degrees after removing from the appliance.
• The taste of wine depends on the wine
temperature when pouring into a glass. The
following information shows the ideal wine
temperatures for serving a particular wine.
Type of wine Serving
temperature
Bordeaux red 64°F (18°C)
Louis Family dry red wine/
Barolo 63°F (17°C)
Burgundy red/Bordeaux red 61°F (16°C)
Port 59°F (15°C)
Young Burgundy red 57°F (14°C)
Young red wine 54°F (12°C)
Young Beaujolais/all white
wines with little residual sugar 52°F (11°C)
Old white wines/Chardonnay 50°F (10°C)
Sherry 48°F (9°C)
Young white wines from late
vintage 46°F (8°C)
White wines Loire/Entre-deux-
Mers 45°F (7°C)

14ENGLISH
Hints and tips
Normal operating sounds
The following sounds are normal during
operation:
• A faint gurgling and bubbling sound from
coils sound when refrigerant is pumped.
• A whirring and pulsating sound from the
compressor when refrigerant is pumped.
• A sudden cracking noise from inside
appliance caused by thermic dilatation
(a natural and not dangerous physical
phenomenon).
Hints for energy saving
• Do not open the door frequently or leave it
open longer than absolutely necessary.
Cautions for Use
• The more wine bottles put in or the more
and the longer for once the door is opened,
the more it needs electric consumption,
which even leads malfunction.
• Re-plug in the power plug at the interval of
over ten minutes.
• Open the door as less as possible during
power-cut.
• When defrosting, never use any sharp or
metallic objects to remove the frost on the
surface of the evaporator as it will damage
the evaporator.
Care and cleaning
Warning! Refer to Safety chapters.
General warnings
Caution! Unplug the appliance before
carrying out any maintenance operation.
This appliance contains hydrocarbons in its
cooling unit; maintenance and recharging
must therefore only be carried out by
authorized technicians.
The accessories and parts of the
appliance are not suitable for washing in a
dishwasher.
Cleaning the interior
Before using the appliance for the rst time, the
interior and all internal accessories should be
washed with lukewarm water and some neutral
soap to remove the typical smell of a brand-new
product, then dried thoroughly.
Caution! Do not use detergents or
abrasive powders, as these will damage
the nish.
Initial power on
Caution! Before inserting the power
plug in to the outlet and switching on
the cabinet for the rst time, leave the
appliance standing upright for at least
4 hours. This will assure a sucient
amount of time for the oil to return to the
compressor. Otherwise the compressor
or electronic components may sustain
damage.
Periodic cleaning
Caution! Do not pull, move or damage any
pipes and/or cables inside the cabinet.
Caution! Do not damage the cooling
system.
Caution! When moving the cabinet, lift it
by the front edge to avoid scratching the
oor.
The equipment has to be cleaned regularly:
1. Clean the inside and accessories with
lukewarm water and some neutral soap.
2. Regularly check the door seals and wipe
clean to ensure they are clean and free from
debris.
3. Rinse and dry thoroughly.
4. If accessible, clean the condenser and the
compressor at the back of the appliance
with a brush. This operation will improve
the performance of the appliance and save
electricity consumption.
Periods of non-operation
When the appliance is not in use for long
periods, take the following precautions:

15ENGLISH
1. Disconnect the appliance from electricity
supply.
2. Remove all wine bottles.
3. Defrost (if necessary) and clean the
appliance and all accessories.
4. Clean the appliance and all accessories.
5. Leave the door/doors open to prevent
unpleasant smells.
Caution! If you want to keep the appliance
switched on, ask somebody to check it
once in a while to prevent the wine bottles
inside from spoiling in case of a power
failure.
Defrosting refrigerator compartment
The defrosted water automatically drains
out through the drain hole at the back of the
refrigerator compartment and evaporates.
It is important to periodically clean the defrost
water drain hole at the back of the refrigerator
compartment to prevent the water overowing
inside.
Troubleshooting
Warning! Refer to Safety chapters.
What to do if...
Problem Possible Cause Solution
The appliance does not operate.
The appliance is switched o. Switch on the appliance.
The mains plug is not connected to the
mains socket correctly.
Connect the mains plug to the
mains socket correctly. Refer to
"Electrical connection" section of
the safety chapter.
There is no voltage in the mains socket.
Connect a dierent electrical
appliance to the mains socket.
Contact a qualied electrician.
The appliance is noisy. The appliance is not placed stably.
Check if the appliance stands
stable. Refer to "Levelling feet",
or the separate Assembly
Instructions.
The lamp does not work. The lamp is defective. Refer to “Replacing the lamp”.
The compressor operates
continually.
Temperature is set incorrectly. Refer to “Operation” chapter.
Many wine bottles were inserted at the
same time.
Wait some hours and then check
the temperature again.
The room temperature is too high. Refer to climate class chart on the
rating plate.
Wine bottles placed in the appliance
were too warm.
Allow wine bottles to cool to room
temperature before storing.
The door is not closed correctly. Refer to “Closing the door”.

16ENGLISH
Problem Possible Cause Solution
The temperature in the appliance
is too low/too high.
The temperature is not set correctly. Set a higher/lower temperature.
The door is not closed correctly. Refer to “Closing the door”.
The wine bottles temperature is too
high.
Let the wine bottles temperature
decrease to room temperature
before storage.
Many wine bottles are inserted at the
same time.
Insert fewer wine bottles at the
same time.
The door has been opened often. Open the door only if necessary.
There is no cold air circulation in the
appliance.
Make sure that there is cold air
circulation in the appliance.
There is too much condensed
water on the rear wall of the
refrigerator.
Door was opened too frequently. Open the door only when
necessary.
Door was not closed completely. Make sure the door is closed
completely.
Water ows inside the
refrigerator.
The drain hole at the back of the
appliance is clogged.
Clean the drain hole with a piece
of wire.
Wine bottles prevent water from owing
to the drain hole at the back of the
appliance.
Make sure that wine bottles do not
touch the rear plate.
Water ows on the oor.
The door is not closed well.
Refer to "Closing the door", or
refer to the troubleshooting item
below ("The door does not close
completely").
The appliance tilts forward.
Tilt the appliance slightly backward
(a quarter-inch lower in the back).
Refer to the separate Assembly
Instructions for appliance level
adjustment.
The drip pan cracks. Contact Authorised Service Centre
listed at the end of this manual.
The defrost water drain is clogged. Clean the drain hole with a piece
of wire.
The door does not close
completely.
The shelves are out of position.
Make sure the shelves are in
correct position. Refer to "Movable
shelves".
The door gaskets are dirty. Clean the door gaskets. Refer to
"Care and cleaning".
The appliance is not level.
Make sure the appliances
is installed in level. Refer to
"Levelling feet", or the separate
Assembly Instructions.
If your appliance still is not working
properly after making the above checks,
contact the Authorised Service Centre. You
can nd the list at the end of this manual.
Closing the door
1. Clean the door gaskets.
2. If necessary, adjust the door. Refer to the
separate Assembly Instructions.
3. If necessary, replace the defective door
gaskets. Contact the After Sales Service.

17ENGLISH
Replacing the lamp
The appliance is equipped with a lamp for
interior lighting.
Only service is allowed to replace the lighting
device. Contact your Authorised Service Centre.
For quick solution, always refer to the full list
of Authorised Service Centre located at the
end of this manual and call your relative phone
number.
Technical information
Product category
Product type Wine cooler
Installation type Freestanding
Product dimensions
Height 34 1/4-35 1/16"(870-890mm)
Width 23 7/16"(595mm)
Depth 23 7/16"(595mm)
Net volume
Fridge 5.3 cu.ft.
Others
Fridge auto
Energy consumption 190 kWh/y
Noise level 42 dB (A)
Energy class DOE
Voltage 115 V
Frequency 60 Hz
Picture for reference only
XXX.XXX.XX
Article Number
(8-digitcode)
Serial Number (start
with SN, 22-digit code)
The article number and the serial number
are situated in the rating plate on the
internal left side of the appliance.

18ENGLISH
Environmental concerns
Recycle materials with the symbol . Put the
packaging in relevant containers to recycle it.
Help protect the environment and human health
by recycling waste of electrical and electronic
appliances. Do not dispose of this product with
the household waste. Return the product to
your local recycling facility or contact your
municipal oce.
IKEA limited guarantee
How long is the IKEA guarantee valid?
This guarantee is valid for ve (5) years from
the original date of purchase of Your appliance
at IKEA, unless the appliance is named LAGAN
or TILLREDA in which case two (2) years of
guarantee apply. The original sales receipt is
required as proof of purchase. If service work is
carried out under guarantee, this will not extend
the guarantee period for the appliance.
Who will execute the service?
IKEA “Service Provider” will provide the
service through its own service operations or
authorized service partner network.
What does this guarantee cover?
The guarantee covers faults of the appliance
which have been caused by faulty construction
or material faults from the date of purchase
from IKEA. This guarantee applies to domestic
use only. Some exceptions not guaranteed
are specied under the headline “What is not
covered under this guarantee?” Within the
guarantee period, the costs to remedy the
fault (e.g., repairs, parts, labour and travel)
will be covered, provided that the appliance
is accessible for repair without special
expenditure. On these conditions the local
regulations are applicable. Replaced parts
become the property of IKEA.
What will IKEA do to correct the problem?
IKEA appointed Service Provider will examine
the product and decide, at its sole discretion, if
it is covered under this guarantee. If considered
covered, IKEA Service Provider or its authorized
service partner through its own service
operations, will then, at its sole discretion, either
repair the defective product or replace it with
the same or a comparable product.
What is not covered under this guarantee?
• Normal wear and tear.
• Deliberate or negligent damage, damage
caused by failure to observe operating
instructions, incorrect installation or by
connection to the wrong voltage, damage
caused by chemical or electro-chemical
reaction, rust, corrosion or water damage
including but not limited to damage
caused by excessive lime in the water
supply, damage caused by abnormal
environmental conditions.
• Consumable parts including batteries and
lamps.
• Non-functional and decorative parts which
do not aect normal use of the appliance,
including any scratches and possible colour
dierences.
• Accidental damage caused by foreign
objects or substances and cleaning or
unblocking of lters, drainage systems or
soap drawers.
• Damage to the following parts: ceramic
glass, accessories, crockery and cutlery
baskets, feed and drainage pipes, seals,
lamps and lamp covers, screens, knobs,
casings and parts of casings. Unless such
damages can be proved to have been
caused by production faults.
• Cases where no fault could be found during
a technician’s visit.
• Repairs not carried out by our appointed
service providers and/or an authorized
service contractual partner or where non-
original parts have been used.
• Repairs caused by installation which is faulty
or not according to specication.
• The use of the appliance in a non-domestic
environment i.e. professional use.
• Transportation damages. If a customer
transports the product to his home or
another address, IKEA is not liable for any
damage that may occur during transport.

19ENGLISH
However, if IKEA delivers the product to the
customer’s delivery address, then damage
to the product that occurs during this
delivery will be covered by IKEA.
• Cost for carrying out the initial installation
of the IKEA appliance. However, if an
IKEA appointed Service Provider or its
authorized service partner repairs or
replaces the appliance under the terms
of this guarantee, the appointed Service
Provider or its authorized service partner
will reinstall the repaired appliance or install
the replacement, if necessary.
How country law applies
The IKEA guarantee gives you specic legal
rights, and you may also have other rights
which vary from state to state or jurisdiction to
jurisdiction. However these conditions do not
limit in any way consumer rights described in
the local legislation.
Area of validity
For appliances which are purchased in United
States or Canada, or moved to one of the
mentioned countries,the services will be
provided in the framework of the guarantee
conditions normal in the specied country.
An obligation to carry out services in the
framework of the guarantee exists only if
the appliance complies and is installed in
accordance with:
- the technical specications of the country in
which the guarantee claim is made;
- the Assembly Instructions and User Manual
Safety Information.
The dedicated AFTER SALES for IKEA
appliances
Please don’t hesitate to contact IKEA appointed
After Sales Service Provider to:
• make a service request under this
guarantee;
• ask for clarications on installation of the
IKEA appliance in the dedicated IKEA kitchen
furniture;
• ask for clarication on functions of IKEA
appliances.
Phone number:
(833) 337 - 4006
Opening Hours:
Monday - Friday
8:30am - 8:00 pm EST
Phone number:
(833) 427 - 4532
Opening Hours:
Mon. – Fri.
8:00 am - 6:00 pm EST
Sat.
9:00 am - 4:00 pm EST
To ensure that we provide you with the best
assistance, please read carefully the Assembly
Instructions and/or the User Manual before
contacting us.
How to reach us if you need our service
In order to provide you a quicker service, we
recommend to use the specic phone numbers
listed on this manual. Always refer to the
numbers listed in the booklet of the specic
appliance you need an assistance for.
Please also always refer to the IKEA article
number (8 digit code) placed on the rating plate
of your appliance.
SAVE THE SALES RECEIPT!
It is your proof of purchase and required for
the guarantee to apply. The sales receipt also
reports the IKEA name and article number
(8 digit code) for each of the appliances you
have purchased.
Do you need extra help?
For any additional questions not related to After
Sales of your appliances, please contact our
nearest IKEA store call centre. We recommend
you read the appliance documentation carefully
before contacting us.

20FRANÇAIS
Sommaire
Renseignements de sécurité importants 20
Installation 24
Première utilisation 25
Description du produit 26
Fonctionnement 27
Utilisation quotidienne 28
Trucs et astuces 29
Entretien et nettoyage 29
Dépannage 30
Données techniques 33
Préoccupations environnementales 34
Garantie limitée IKEA 34
Sujet à modications sans préavis.
Renseignements de sécurité importants
•Lisez ces instructions.
•Conservez ces instructions.
•Tenez compte de tous les avertissements.
•Suivez toutes les instructions.
•Conservez tous les documents pour
usage ultérieur ou pour le prochain
propriétaire.
•Le fabricant n’est pas responsable si
vous ne respectez pas les instructions et
avertissements de fonctionnement et
d’installation.
•Sachez reconnaître ces symboles de
sécurité.
Ceci est le symbole de mise en garde,
relatif à la sécurité, qui avertit les
utilisateurs des risques potentiels pour
eux-mêmes et pour les autres.
Tous les avertissements de sécurité sont
précédés du symbole de mise en garde et
des mots suivants :
Avertissement : indique une situation
potentiellement dangereuse qui, si elle
n’est pas évitée, pourrait entraîner la mort
ou des blessures graves.
Attention : indique une situation
potentiellement dangereuse qui, si elle
n’est pas évitée, pourrait entraîner des
blessures mineures ou modérées.
Sécurité des enfants
• Tenez les enfants à l’écart de l’emballage
et des pièces. Risque d’étouement dû aux
cartons pliants et à la pellicule plastique !
• Cet appareil n’est pas destiné à être
utilisé par des personnes (y compris des
enfants) ayant des capacités physiques,
sensorielles ou mentales réduites, ou un
manque d’expérience et de connaissances,
sauf si elles ont reçu une supervision ou
des instructions concernant l’utilisation de
l’appareil par une personne responsable de
leur sécurité.
• Ne laissez pas les enfants jouer avec l’appareil !
• Détruisez ou recyclez le carton, les sacs
en plastique et tout matériau d’emballage
extérieur immédiatement après le déballage
du réfrigérateur. Les enfants ne devraient
jamais utiliser ces articles pour jouer. Les
cartons recouverts de tapis, de couvre-lits,
de draps en plastique ou de lm étirable
peuvent devenir des chambres hermétiques
et peuvent rapidement provoquer la
suocation.
Consignes de sécurité générales
• L’appareil est conçu exclusivement pour y
ranger du vin.
• Cet appareil est destiné à servir en contexte
domestique comme :
- dans une maison de campagne ; dans
les salles du personnel des magasins,
les bureaux et autres milieux de travail ;
- Par des clients à l’hôtel, au motel, dans
des chambres d’hôtes et autres milieux
de type résidentiel ;
• Si le cordon d’alimentation est endommagé,
il doit être remplacé par le fabricant, un
de ses centres de service autorisés ou
une personnes qualiée en la matière an
d’éviter tout danger.
Other manuals for NUMRERAD
1
Table of contents
Languages:
Other IKEA Kitchen Appliance manuals
Popular Kitchen Appliance manuals by other brands

Presto
Presto SlowCook'nMore 6001 instructions

Kalamera
Kalamera KRC-18SZB instruction manual

anko
anko KP2818-FP user manual

Van Berkel International
Van Berkel International RM 22E user manual

Omega
Omega NEIL PERRY NPW46 Installation and maintenance instructions

Zelmotor Professional
Zelmotor Professional 489.8 user manual