Ikra ESN 1000 User manual

73701854-03
ESN 1000 Elektro-Sense
Electric lawn trimmer
Débroussailleuse électrique
Decespugliatore elettrico
Guadaña eléctrica
El-trimmer
Ηλεκτρικό χορτοκοπτικό
DE
GB
FR
IT
ES
DK
GR
Vor Inbetriebnahme Gebrauchsanweisung lesen !
Gebrauchsanweisung - Originalbetriebsanleitung
Operating Instructions - Translation of the original Operating Instructions
Read operating instructions before use!
Lire attentivement le mode d‘emploi avant chaquemise en service !
Mode d‘emploi - Traduction du mode d’emploi d’origine
Prima della messa in funzione leggere le istruzioni per l‘utilizzo!
Istruzioni per l’uso - Traduzione delle istruzioni per l‘uso originali.
Instrucciones de Manejo - Traducción de las instrucciones de servicio originales
¡Lea las instrucciones de manejo antes de efectuar la puesta en marcha!
Brugsanvisning - Oversættelse af den originale driftsvejledning
Læs instruktionerne, inden maskinen tages i brug!
ΟΔΗΓΙΕΣ ΧΡΗΣΕΩΣ - Μετάφραση των αυθεντικών οδηγιών λειτουργίας
Πριν από την έναρξη λειτουργίας διαβάζετε τις οδηγίες χειρισμού!


DE - Beschreibung der Teile
1. Griff 5. Ein-/Ausschalter
2. Schaft 6. Stecker
3. Nylonfaden -Schneidkopf 7. Elektromotor
4. Schutzabdeckung 8. Faden-Schneidklinge
9. Schaltersperre
2
4
3
1
57
6
GB - Brush cutter components
1. Handle 5. On-Off Switch
2. Shaft 6. Plug
3. Nylon Thread Cutting Head 7. Electric Motor
4. Protection Cap 8. Thread Cutting Blade
9. Stopping button
1
8
9

2
DK - Delenes betegnelse
1. Håndtag 5. Tænd/sluk-kontakt
2. Skaft 6. Stik
3. Skærehoved til nylontråd 7. Elmotor
4. Afskærmning 8. Knivblad til tråd
9. Spærrekontakt
IT - Descrizione dei pezzi
1. Impugnatura 5. Interruttore d’accensione/spegnimento
2. Asta 6. Spina
3. Testina di taglio con filo di nylon 7. Motore elettrico
4. Copertura protettiva 8. Lama tranciatrice filo
9. Pulsante di bloccaggio
ES - Designación de las piezas
1. Asa 5. Interruptor de conexión/desconexión
2. Mango 6. Enchufe
3. Cabezal cortante con hilo de nylon 7. Electromotor
4. Cubierta protectora 8. Hoja cortante del hilo
9. Botón de bloqueo
GR - Ονομασία των εξαρτημάτων
1. Λαβή 5. Διακόπτης ON/OFF
2. Στέλεχος 6. Πρίζα
3. Κοπτική κεφαλή νάιλον νήματος 7. Ηλεκτροκινητήρας
4. Προφυλακτήρας 8. Λεπίδα κοπής νήματος
9. Κουμπί ασφάλισης
FR - Composants de la debroussailleuse
1. Poignée 5. Interrupteur marche/arrêt
2. Manche 6. Fiche
3. Fil de nylon- tête coupante 7. Moteur électrique
4. Couvercle de protection 8. Fil - lame de coupe
9. Bouton d‘arrêt

3
4
56
3
2
4x
7 8
1
X
1526
12
3
3

4
11
10
9A
B
12
13 14
1615

5
A
B
18
1 2 3 4
DE
1 Augen- und Gehörschutz tragen!
2 Warnung!
3 Gebrauchsanweisung lesen!
4 Dritte aus dem Gefahrenbereich halten
5 Werkzeug läuft nach!
6 Dieses Elektrowerkzeug nicht dem Regen aussetzen
7 Bei Beschädigung oder Durchschneiden der An-
schlussleitung sofort Stecker ziehen!
8 Achtung Umweltschutz ! Dieses Gerät darf nicht mit
dem Hausmüll/Restmüll entsorgt werden. Das Altge-
rät nur in einer öffentlichen Sammelstelle abgeben.
GB
1 Wear eye and ear protection!
2 Warning!
3 Read the instructions manual !
4 Do not use near animals or other people !
5 Caution! Run-on after power off!
6 Do not use the tool under wet weather conditions!
7 Unplug immediately if the power cord or plug
becomes damaged !
8 Attention: Environmental Protection! This device may
not be disposed of with general/household waste. Dis-
poseof only at a designated collection point.
5 6 7 8
Abbildung und Erklärung der Piktogramme Illustration and explanation of pictograms
Représentation et explication des pictogrammes Illustrazione e spiegazione dei simboli
Símbolos y su significado Piktogramillustration og forklaring
Áπεικόνιση κaι επεξÞãηση των σõμâόλων
17

6
FR
1 Porter des protections des yeux et des oreilles!
2 Attention!
3 Lisez l’instruction de service!
4 Ecarter des tiers personnes de la zone dangereuse!
5 Outil avec marche à vide!
6 Ne pas laisser cet outil électrique sous la pluie!
7 En cas de détérioration ou section du câble retirer
immédiatement la prise!
8 Attention ! Protection de l’environnement! Le présent
appareil ne peut en aucun cas être éliminé avec les
ordures ménagères/déchets. Toujours déposer les ap-
pareils usagés dans un centre de collection.
IT
1 Portare dispositivos per proteggere l’udito e gli occhi!
2 Avvertimento!
3 Leggere le istruzioni sull’uso!
4 Tenere lontano terze persone dall’area di lavoro!
5 L’attrezzo prosegue il movimento anche dopo l’inter-
ruzzione!
6 Non esporre questo utensile elettrico alla pioggia!
7 In caso di danneggiamento o taglio del cordone di
allacciamento, tirare immediatamente la spina!
8 Attenzione protezione dell’ambiente! Questo appa-
recchio non può essere smaltito con la spazzatura
domestica/con riuti non riciclabili. Consegnare
l’apparecchio vecchio esclusivamente in un punto di
raccolta pubblico.
ES
1 Lleve protecciones del oído y de los ojos!
2 Cuidado!
3 Lea las instrucciones de manejo!
4 Mantener alejado terceros de la zona peligrosa!
5 Hilo no se para inmediatamente despuésde parar el
motor!
6 No exponga esta herramienta eléctrica a la lluvia!
7 Al dañarse o cortarse el cable de red desenchufe
inmediatamente el aparato!
8 Atención: protección del medio ambiente. Este apa-
rato no debe evacuarse junto a la basura doméstica
ni el rechazo. El aparato, una vez desechado, deberá
entregarse en un puesto de recolección colectivo.
DK
1 Brug altid beskyttelsesbriller og høreværn !
2 Advarsel!
3 Læs instruktionerne, inden maskinen tages i brug!
4 Hold øje med andre personer i klippe-zonen!
5 Efter-løb på maskinen!
6 Brug ikke dette elektriske apparat i fugtigt vejr !
7 Tag stikket ud, hvis ledningen bliver beskadiget eller
klippet over!
8 NB! Miljøbeskyttelse! Dette apparat må ikke bort-
skaffes sammen med husholdningsaffald/restaffald.
Aflever det gamle apparat kun på en kommunal mod-
tagestation.
GR
1 Φοράτε προστατευτικά γυαλιά και ωτοασπίδες
2 Προσορή
3 Πριν την χρησιμοποίηση διαβάστε τις οδηγίες χρήσεως
4 Κρατάτε μακριά τα σΪρματα από την επκίνδυνη
περιοχή
5 Δειτουργια και μετά τηυ αποσύνδεση απ το ρεύμα
6 Αυτό το μηχάνημα να μην εκτείθετε στην βροχή
7 Σε περίπτωση βλάβης του καλωδίου βγάλτε το φις
από την πρίζα
8 Προσοχή προστασία περιβάλλοντος! Αυτή η
συσκευή δεν επιτρέπεται να πεταχτεί στα οικιακά
απορρίμματα. Την παλιά συσκευή την παραδίδετε
μόνο σε ένα δημόσιο κέντρο περισυλλογής.

1. Technische Daten
Modell ESN 1000
Nennspannung V~ 230
Nennfrequenz Hz 50
Nennleistung W 1000
Leerlaufdrehzahl min-1 7500
Schnittbreite cm 38
Fadenstärke mm 1,6
Fadenvorrat m 2 x 5
Fadenverlängerung Automatik
Gewicht kg 4,6
Schalldruckpegel LpA dB(A) 85,6 (nach prEN ISO 10518) [K 3,0 dB(A)]
Vibration m/s² 10,2 (nach prEN ISO 10518) [K 1,5 m/s²]
Technische Änderungen bleiben vorbehalten.
Schutzklasse II
Die Geräte sind nach den Vorschriften gemäß EN 60335-2-91 und prEN ISO 10518 gebaut und entsprechen voll den
Vorschriften des Geräte- und Produktsicherheitsgesetzes.
DEUTSCH
Elektro-Sense
2. Allgemeiner Sicherheitshinweis
Angaben zur Geräuschemission gemäß Geräte - und
Produktsicherheitsgesetz GPSG bzw. EG-Maschi-
nenrichtlinie: Der Schalldruckpegel am Arbeitsplatz
kann 80 dB (A) überschreiten. In dem Fall sind
Schallschutzmaßnahmen für den Bediener erforder-
lich (z.B. Tragen eines Gehörschutzes).
Bitte beachten Sie: Dieses Gerät darf in Wohnge-
bieten nach der deutschen Maschinenlärmschutz-
verordnung vom September 2002 an Sonn- und
Feiertagen sowie an Werktagen von 20:00 Uhr
bis 7:00 Uhr nicht in Betrieb genommen werden.
Achtung Lärmschutz! Achten Sie bei Inbetrieb-
nahme auf die regionalen Vorschriften
Achtung: Beim Gebrauch von Elektrowerkzeugen
sind zum Schutz gegen elektrischen Schlag, Ver-
letzungs- und Brandgefahr folgende grundsätz-
lichen Sicherheitsmaßnahmen zu beachten. Le-
sen und beachten Sie alle diese Hinweise, bevor
Sie dieses Elektrowerkzeug benutzen. Bewahren
Sie die Sicherheitshinweise gut auf.
Die Geräte sind nach dem neuesten Stand der Tech-
nik und den anerkannten sicherheitstechnischen Re-
geln gebaut. Dennoch können bei ihrer Verwendung
Gefahren für Leib und Leben des Benutzers oder
Dritter bzw. Beeinträchtigungen der Maschine und
anderer Sachwerte entstehen.
Elektrosensen nur in technisch einwandfreiem Zu-
stand sowie bestimmungsgemäß, sicherheits und
gefahrenbewußt unter Beachtung der Gebrauchs-
anweisung benutzen! Insbesondere Störungen, die
die Sicherheit beeinträchtigen, umgehend beseitigen
(lassen)!
Gebrauchsanweisung sorgfältig lesen. Gefahren-
und Sicherheitshinweise unbedingt beachten. Nicht-
beachten dieser Hinweise kann lebensgefährlich
sein. Unfallverhütungsvorschriften unbedingt be-
folgen. Bitte machen Sie sich vor Gebrauch mit der
Handhabung des Gerätes vertraut.
3. Verwendungszweck
Diese Geräte sind ausschließlich zum Schneiden von
Gras und Unkraut bestimmt. Eine andere oder darüber
hinausgehende Benutzung, wie z.B. das Schneiden von
Gestrüpp und Hecken oder großächigem Rasen gilt
als nicht bestimmungsgemäß. Für hieraus resultierende
Schäden haftet der Hersteller / Lieferer nicht. Das Risiko
trägt allein der Anwender. Zur bestimmungsgemäßen
Anwendung gehört auch das Beachten der Gebrauchs-
anweisung und die Einhaltung der Inspektions- und
Wartungsbedingungen.
Die Gebrauchsanweisung ständig am Einsatzort der
Maschine aufbewahren.
DE-1
Originalbetriebsanleitung

DE-2
4. Sicherheitshinweise
A. Allgemeine Hinweise
1. Die hohe Drehzahl des Schneidwerkzeuges und
der Stromanschluss bringen besondere Gefah-
ren mit sich. Deshalb sind beim Arbeiten mit der
Elektrosense besondere Sicherheitsmaßnahmen
nötig.
2. Ziehen Sie vor sämtlichen Arbeiten, die Sie am
Gerät vornehmen, vor dem Säubern und zum
Transport den Stecker aus der Steckdose. Die
Elektrosense immer vom Netz trennen, wenn sie
unbeaufsichtigt gelassen wird. Vor dem Einstel-
len oder Säubern das Gerät ausschalten und den
Netzstecker ziehen.
3. Sicheren Umgang mit der Elektrosense vom Ver-
käufer oder einem Fachmann zeigen lassen.
4. Minderjährige dürfen die Elektrosense nicht be-
dienen. Gerät nur an Personen weitergeben (aus-
leihen), die mit seiner Handhabung grundsätzlich
vertraut sind. Auf jeden Fall Bedienungsanwei-
sung mitgeben! Jugendliche unter 16 Jahren
dürfen die Geräte nicht bedienen.
5. Der Benutzer ist verantwortlich gegenüber Drit-
ten im Arbeitsbereich des Gerätes.
6. Erlauben Sie niemals Kindern oder anderen Per-
sonen den Umgang mit der Maschine, die mit der
Gebrauchsanweisung nicht vertraut sind.
7. Benutzen Sie die Maschine nur in Tageslicht oder
gutem künstlichem Licht
8. Vor Verwendung der Maschine und nach Ge-
brauch, überprüfen sie diese auf Schäden und
lassen Sie diese reparieren wenn notwendig.
9. Benutzen Sie die Maschine niemals mit beschä-
digten oder fehlenden Teilen.
10. Wer mit der Elektrosense arbeitet, muss gesund,
ausgeruht und in guter Verfassung sein. Recht-
zeitig Arbeitspausen einlegen! - Nicht unter Ein-
uss von Alkohol oder Drogen arbeiten.
11. Keine Änderungen am Gerät vornehmen, Kunst-
stoffschnur nicht durch z.B. Stahldraht ersetzen,
Ihre Sicherheit kann dadurch gefährdet werden.
Für Schäden, die als Folge bestimmungswidrigen
Gebrauchs oder unzulässiger Änderungen auftre-
ten, schließt der Hersteller jede Haftung aus.
12. Die Elektrosense nicht verwenden, wenn Perso-
nen, vor allem Kinder, oder Haustiere in der Nähe
sind.
13. Im Umkreis von 15 m dürfen sich weder weitere
Personen / Kinder noch Tiere aufhalten, da Steine
u.ä. vom rotierenden Schneidkopf weggeschleu-
dert werden können.
B. Anwendungshinweise
14. Elektrosense nur zum Schneiden von Gras und
Unkraut an Mauern, unter Zäunen, an Bäumen
und Stangen, an Treppen, Plattenwegen und
Terrassen, unter Büschen und Hecken, an Steil-
hängen, in Plattenfugen u.ä. einsetzen.
C. Hinweise zum sicheren Gebrauch
15. Wir empfehlen, die Steckdose durch einen Feh-
lerstromschutzschalter mit einem Fehlerstrom
von nicht mehr als 30 mA abzusichern oder
bei Anschluss der Elektrosense einen solchen
zwischenzuschalten. Nähere Auskünfte gibt der
Elektroinstallateur.
16. Vor jedem Arbeitsbeginn Elektrosense auf ein-
wandfreie Funktion und vorschriftsmäßigen, be-
triebssicheren Zustand prüfen. Besonders wich-
tig sind Anschluss- und Verlängerungsleitung,
Netzstecker, Schalter und Schneidkopf.
17. Vor Gebrauch muss die Anschluss- und Verlän-
gerungsleitung auf Anzeichen einer Beschädi-
gung oder Alterung untersucht werden. Die Elek-
trosense nicht verwenden, wenn die Leitungen
beschädigt oder abgenutzt sind.
18. Wenn die Leitung während des Gebrauchs be-
schädigt wird, muss die Leitung sofort vom Netz
getrennt werden. LEITUNG NICHT BERÜHREN,
BEVOR SIE VOM NETZ GETRENNT IST.
19. Achtung! Gefahr! Schneidelemente laufen nach,
nachdem der Motor abgeschaltet wurde. Gefahr
von Finger- und Fußverletzungen!
20. Nur den Vorschriften entsprechende Leitungen
verwenden. Stecker und Kupplungen von Ver-
längerungsleitungen müssen spritzwasserge-
schützt sein. Elektrosense nur mit einwandfreier
Schutzvorrichtung betreiben, auf festen Sitz des
Schneidkopfes achten.
21. Beschädigte Leitungen, Kupplungen, Netzste-
cker und Schneidköpfe nicht verwenden.
22. Motor nur anschalten, wenn Hände und Füße von
den Schneidwerkzeugen entfernt sind.
23. Schutzbrille oder Augenschutz, geschlossene
Schuhe mit grifger Sohle, eng anliegende Ar-
beitskleidung, Handschuhe und Gehörschutz tra-
gen.
24. Unachtsame Benutzung kann durch die rotieren-
den Schneidelemente Verletzungen an Füßen
und Händen verursachen.
25. Elektrosense immer gut festhalten - immer auf
festen und sicheren Stand achten.
26. Ruhig, überlegt und nur bei guten Licht - und
Sichtverhältnissen arbeiten - andere nicht ge-
fährden! Umsichtig arbeiten!
27. Verlängerungsleitung so verlegen, dass sie nicht
beschädigt wird und keine Stolperfallen schafft.
28. Verlängerungsleitung nicht an Kanten, spitzen
oder scharfen Gegenständen scheuern lassen
und nicht quetschen, z.B. in Türritzen oder Fens-
terspalten.
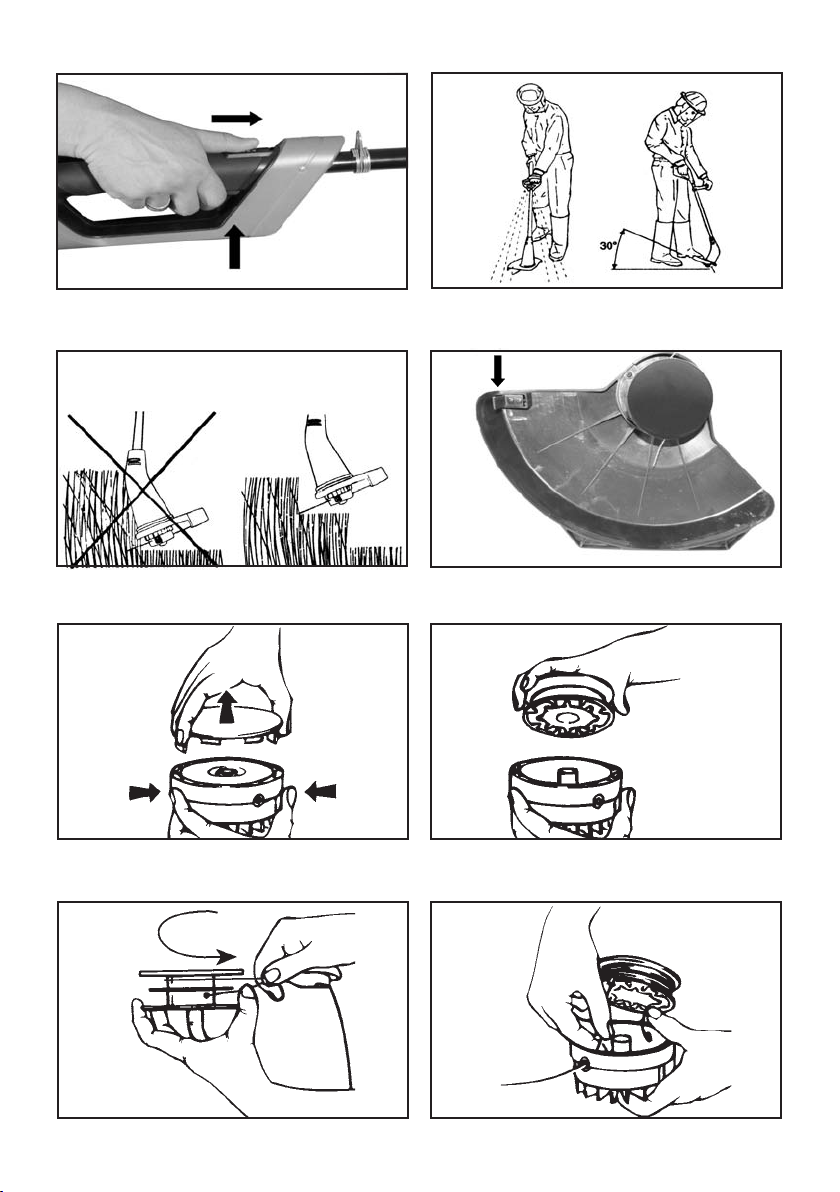
29. Die Schutzabdeckung muss beim Einschalten
des Trimmers dem Körper zugewandt sein.
30. Netzstecker nicht durch Ziehen an der Leitung
aus der Steckdose ziehen, sondern am Netzstecker
anfassen.
31. In unübersichtlichem, dicht bewachsenem Ge-
lände besonders vorsichtig arbeiten!
32. Elektrosense nicht bei Regen im Freien stehen
lassen.
33. Kein nasses Gras schneiden! Nicht bei Regen
benutzen!
34. Verlängerungsleitung so halten, dass sie nicht

DE-3
von dem rotierenden Kunststoffaden berührt
werden kann.
35. Zum kurzzeitigen Transport des Gerätes (z.B. zu
einer anderen Arbeitsstelle) Schalter loslassen,
Netzstecker ziehen.
36. Vorsicht an Abhängen oder in unebenem Gelände,
Rutschgefahr!
37. Auf Abhängen nur quer zur Neigung trimmen
- Vorsicht beim Wenden!
38. Auf Baumstümpfe und Wurzeln achten, Stolper-
gefahr!
39. Schneidkopf regelmäßig von Gras reinigen.
40. Schneidkopf regelmäßig in kurzen Abständen
überprüfen. Bei wahrnehmbaren Veränderungen
(Vibration, Geräusche) sofort Gerät abschalten
und sicher festhalten. Schneidkopf auf den Bo-
den drücken, um Schneidkopf abzubremsen,
dann Netzstecker ziehen. Schneidkopf überprü-
fen - auf Anrisse achten.
41. Seien Sie vorsichtig gegen Verletzungen durch
die Vorrichtung, die zum Abschneiden des Fa-
dens dient. Nach dem Auswechseln der Faden-
spule oder nach Verlängern des Fadens halten
Sie die Elektrosense immer erst in die normale
Arbeitsposition, bevor Sie einschalten.
42. Schadhaften Schneidkopf sofort auswechseln
lassen - auch bei scheinbar geringfügigen Haar-
rissen. Beschädigten Schneidkopf nicht reparie-
ren.
43. Nach Unterbrechung und Beendigung der Ar-
beit: Netzstecker ziehen! Elektrosense warten
(Netzstecker gezogen!): Nur Wartungsarbeiten
ausführen, die in der Gebrauchsanweisung be-
schrieben sind. Mit allen anderen Arbeiten zum
Kundendienst gehen.
44. Kühlluftschlitze im Motorgehäuse bei Bedarf rei-
nigen.
45. Nur Original-Ersatzteile verwenden.
46. Nur Original-Schneidköpfe und - Ersatzspulen
verwenden. Niemals metallische Schneidelemen-
te einsetzen.
47. Kunststoffteile mit feuchtem Tuch reinigen.
Scharfe Reinigungsmittel können den Kunststoff
beschädigen.
48. Elektrosense nicht mit Wasser abspritzen!
49. Elektrosense sicher in einem trockenen Raum
aufbewahren.
Wichtige Hinweise, damit Sie Ihren Garantieanspruch
nicht verlieren:
• Halten Sie die Lufteintrittsschlitze sauber, da sonst
der Motor nicht gekühlt wird.
• Arbeiten Sie nicht mit längerem Faden als mit der
durch die Abschneidklinge vorgegebenen Länge .
• Verwenden Sie nur Spezialschneidfaden mit max.
1,6 mm ø (am besten unseren Originalfaden) und
Originalspulen
• Drücken Sie den Schneidkopf nicht auf die Erde,
dadurch bremsen Sie den eingeschalteten Motor.
• Schlagen Sie den Schneidkopf nicht auf harten
Untergrund, da sonst die Motorwelle Unwucht
bekommen kann.
5. Montage
Montage der Schutzabdeckung (Abb. 1 + 2)
1. Schieben Sie die Schutzabdeckung so über die an-
gebrachte Halterung, dass die Schraubenöffnungen
deckungsgleich übereinanderstehen (Abb.1).
2. Befestigen Sie die Schutzabdeckung mit den 4 mit-
gelieferten Schrauben an der Halterung (Abb. 2).
3. Ziehen Sie den aufgesteckten Kunststoffschutz (X)
von der Fadenklinke ab. Dieser dient nur zum Trans-
port und soll Sie vor Verletzungen schützen.
Griffmontage (Abb. 3 + 4)
Drehen Sie die 4 Schrauben aus dem Griff. Setzen Sie
die Griffhalterung auf die Unterseite des Rohres. Achten
Sie darauf, dass der Fixierstift, der sich in der Griffhalte-
rung bendet, in einer der 4 Bohrungen auf dem Schaft
sitzt. Die 4 Bohrungen dienen zur variablen Einstellung
des Griffes auf Ihre persönliche Wunschposition.
Setzen Sie den Griff passgenau auf die Griffhalterung
auf und befestigen Sie diesen mit den 4 Schrauben und
Muttern an der Griffhalterung.
Schaftmontage (Abb. 5 - 7)
1. Halten Sie den Auslöseknopf (2) gedrückt, und
schieben Sie den unteren Schaft (6) in die Schaft-
kupplung (1), bis der Auslöseknopf in die Öffnung (5)
der Schaftkupplung einrastet (Abb.5).
2. Ziehen Sie die Sterngriffschraube (3) im Uhrzei-
gersinn fest an, bevor Sie mit dem Gerät arbeiten
(Abb.6).
Achtung: Wenn sich oberer und unterer Schaft
nicht vollständig zusammenfügen lassen, drehen
Sie den Schneidkopf von Hand etwas hin und her.
Die Antriebswellen im inneren des Schaftes werden
dadurch in die korrekte Position gebracht und die
Schaftkupplung kann ordnungsgemäß mit einem
deutlichen „Click“ einrasten.
Abnehmen des unteren Schafts
1. Lösen Sie die Sterngriffschraube (3) gegen den Uhr-
zeigersinn.
2. Drücken Sie den Auslöseknopf (2) hinein (Abb.7).
3. Ziehen Sie den unteren Schaft (6) in gerader Rich-
tung aus der Schaftkupplung. (Abb.5).
6. Anschluss des Gerätes
Die Maschinen können nur an Einphasen-Wechsel-
strom betrieben werden. Sie sind schutzisoliert nach
Klasse II VDE 0700 und CEE 20. Achten Sie vor Inbe-
triebnahme darauf, dass die Netzspannung mit der auf
dem Leistungsschild angegebenen Betriebsspannung
übereinstimmt!
Mindestquerschnitt der Verlängerungsleitung: 1,5 mm²
Das Verlängerungskabel soll nicht länger als 40 m sein.
Alle Bestandteile müssen Ihren Landesbestimmungen,
den IEC oder EN-Bestimmungen entsprechen.
Das Gerät ist mit einer Kabelzugentlastung ausgestattet,
die sich auf der Geräterückseite bendet. Verbinden Sie
die Steckverbindung von Elektrosense und Verlänge-
rungsleitung. Bilden Sie mit Ihrer Verlängerungsleitung

DE-4
eine Schlaufe und legen Sie diese über den Zugent-
lastungshaken (Abb. 8). Die Steckverbindung ist somit
wirkungsvoll geschützt gegen Zugbelastung sowie unbe-
absichtigtes Trennen.
7. Ein-, Ausschalten (Abb. 9)
Zur Inbetriebnahme Ihres Gerätes:
• Sicheren Stand einnehmen.
• Gerät in beide Hände nehmen.
• Aufrecht stehen, Gerät entspannt halten.
• Schneidkopf nicht auf dem Boden aufsetzen!
• Schaltersperre A nach vorne schieben. Danach Schal-
ter B drücken. Die Schaltersperre A braucht nach dem
Einschalten nicht mehr gedrückt zu werden.
• Zum Ausschalten Schalter B wieder loslassen.
8. Rasen trimmen (Abb. 10 + 11)
• Auf kleinen Rasenächen Gerät gleichmäßig hin und
her schwingen - zum Mähen großer Flächen ist die
Elektrosense nicht geeignet.
• Möglichst mit der linken Seite schneiden, gemähtes
Gras, Staub und aufgewirbelte Steine o.ä. werden
dann nach vorne geschleudert, weg vom Bediener.
• Ideale Arbeitsbedingungen erreichen Sie, wenn Sie
das Gerät mit einer Schrägneigung von ca. 30 Grad
nach links halten (Abb. 10).
Höheres Gras schneiden Sie am besten stufenweise,
von oben beginnend, - nicht die ganze Höhe auf einmal
(Abb. 11).
9. Schneidfaden verlängern
Dieses Gerät ist mit einer automatischen Fadenverlän-
gerung ausgestattet. Sie wird mit jedem Einschalten der
Elektrosense ausgelöst. Dabei treten je 1 cm Faden aus.
Sollte der Faden länger sein als die vorgegebene Länge,
wird er bei Anlauf automatisch auf die richtige Länge
abgeschnitten.
Nicht auf Beton oder Steinboden auftippen. Dies kann zu
Beschädigungen führen.
Achtung: Schneidklinge von Grasresten befreien, da-
mit Schneideffekt nicht beeinträchtigt wird. Achten Sie
darauf, dass die Schneidklinge (Abb. 12) stets scharf
ist. Stumpfe Klinge austauschen. Kontrollieren Sie den
Schneidfaden regelmäßig auf Beschädigung und ob er
noch die durch die Abschneidklinge vorgegebene Län-
ge aufweist. Wenn nicht: Fadenspule erneuern (siehe
Punkt 11)
10. Auswechseln des Schneidfadens
Halten Sie den Schneidkopf mit einer Hand, drücken
Sie die beiden seitlichen Verschlusslaschen und ziehen
Sie den Spulendeckel mit der anderen ab (Abb. 13).
Spule herausnehmen und alte Fadenreste entfernen
(Abb. 14). Der neue Nylonfaden darf nicht länger als 10
Meter sein und muss den Spezikationen des Produktes
entsprechen. Verwenden Sie nur Original-Schneidfaden.
Den neuen Faden in der Mitte falten, so dass zwei glei-
che Längen entstehen und durchschneiden. Die Enden
beider Fäden in die gegenüberliegenden Löcher in der
Spule einfädeln (Abb. 15).
Wickeln Sie die 2 Fäden im Uhrzeigersinn auf die Spule
(je einer pro Spulenabteilung). Die Aufwickelrichtung ist
auch durch einen Pfeil auf der Spule ersichtlich. Wenn
beide Fäden aufgewickelt sind, sollten noch ungefähr 2
mm der Trennkante in der Mitte der Spule sichtbar sein.
Achtung: Vergewissern Sie sich, dass die Fäden fest
und gleichmäßig aufgewickelt sind. Ziehen Sie die Fade-
nenden durch die Ösen im Spulengehäuse und legen Sie
die Spule in den Schneidkopf (Abb. 16). Spulendeckel
wieder befestigen und sicherstellen, dass die Verschlüs-
se richtig eingeschnappt sind (Abb. 17).
11. Fadenspule erneuern (Abb. 13 + 16)
Halten Sie den Schneidkopf mit einer Hand, drücken Sie
die beiden seitlichen Verschlusslaschen und ziehen Sie
den Spulendeckel mit der anderen Hand ab. Nehmen
Sie die leere Spule heraus. Ziehen Sie die Fadenenden
der neuen Spule durch die Ösen im Spulengehäuse und
legen Sie die neue Spule in das Spulengehäuse ein.
Befestigen Sie den Spulendeckel wieder. Bitte beachten
Sie, dass die Verschlüsse richtig einschnappen.
O
ptional:
12. Mon
tage des Schultergurts (Abb. 18)
1. Legen Sie den Tragegurt so an, dass der Gurt über
der linken Schulter liegt.
2. Befestigen Sie den Haken (A) an der Öse (B) am
Schaft.
3. Stellen Sie die Gurtlänge so ein, dass sich das
Schneidwerkzeug im eingehängten Zustand parallel
zum Boden bendet. Ermitteln Sie den für das mon-
tierte Schneidwerkzeug richtigen Einhängepunkt,
indem Sie ein paar Übungsschwünge bei nicht lau-
fendem Motor durchführen.
13. Störungen
• Gerät läuft nicht: Prüfen, ob Strom vorhanden ist (z.B.
durch Versuch an einer anderen Steckdose oder mittels
Spannungsprüfer). Falls das Gerät an einer Steckdose
mit Strom nicht läuft, senden Sie es unzerlegt an unse-
ren Zentralservice oder eine autorisierte Fachwerkstatt.
• Schneidfaden verschwindet in der Fadenspule:
Fadenspule (nach Anweisung unter Punkt 11) ausbau-
en, Fadenenden durch Ösen führen und Spule wieder
einsetzen. Falls der Nylonfaden aufgebraucht ist, bitte
neue Spule einsetzen.
Andere Störungen am Gerät nicht selbst beheben,
sondern nur von autorisiertem Fachpersonal reparieren
lassen.
14. Aufbewahrung
• Gerät gründlich säubern, besonders die Kühlluftschlitze.
• Verwenden Sie zum säubern kein Wasser.
• Gerät an einem trockenen und sicheren Ort aufbe-
wahren. Vor unbefugter Benutzung (z.B. durch Kinder)
schützen.

15. Entsorgung und Umweltschutz
Wenn Ihr Gerät eines Tages unbrauchbar wird oder Sie
es nicht mehr benötigen, geben Sie das Gerät bitte auf
keinen Fall in den Hausmüll, sondern entsorgen Sie es
umweltgerecht. Geben Sie das Gerät bitte in einer Ver-
wertungsstelle ab. Kunststoff- und Metallteile können hier
getrennt und der Wiederverwertung zugeführt werden.
Auskunft hierzu erhalten Sie auch in Ihrer Gemeinde-
oder Stadtverwaltung.
16. Reparaturdienst
Reparaturen an Elektrowerkzeugen dürfen nur durch
eine Elektro-Fachkraft ausgeführt werden. Bitte beschrei-
ben Sie bei der Einsendung zur Reparatur den von Ihnen
festgestellten Fehler.
17. Ersatzteile
Ersatzfadenspule Art.-Nr. 78200001
Schutzabdeckung Art.-Nr. 78011253
Zusatzgriff Art.-Nr. 78011251
Schultergurt Art.-Nr. 78011252
DE-5

GB-1
1. Technical Details
Model ESN 1000
Rated Voltage V~ 230
Nominal Frequency Hz 50
Nominal Consumption W 1000
No-load Speed min-1 7500
Cutting Width cm 38
Line Diameter mm 1,6
Line Length m 2 x 5
Line Feed automatic
Weight kg 4,6
Sound Pressure Level dB (A) 85,6 (acc. to prEN ISO 10518) [K 3,0 dB(A)]
Vibration m/s2 10,2 (acc. to prEN ISO 10518) [K 1,5 m/s²]
We reserve the right to make changes to the technical specications.
Protection class II
The electric lawn trimmer is constructed in line with the regulations with EN 60335-2-91 and prEN ISO 10518 and fully
comply with the provisions of the German Equipment and Product Safety Act.
ENGLISH
Electric Lawn Trimmer
2. General Safety Instructions
Machine noise Information regulation 3, GPSGV the
noise pressure level at the place of work can exceed
80 dB(A). In such cases the operator will require
noise protection (e.g. wearing of ear protectors).
Attention: Noise protection ! Please observe the
local regulations when operating your device.
Attention: Using electric power tools, you must
observe following fundamental safety instruc-
tions to protect yourself against electric shock,
against danger of injuries and danger of re.
Read all these instructions before using the tool
and observe them. Keep these safety instructions
at a safe place.
The machine has been constructed according to the
latest technology and in accordance with the recog-
nised technical safety regulations. Nevertheless, use
of the machine can involve risks to the user or third
persons, and can cause damage to the machine or
other objects.
Use the machine in a safety conscious manner for
suitable applications and in technically perfect con-
dition only and according to the operating instruc-
tions! Immediately rectify or have any faults rectied
which could adversely affect safety!
Read the instruction manual carefully. It is important
that you fully understand and observe the safety
precautions and warnings before starting and using
your tool for the rst time. Careless or improper use
of any lawn trimmermay cause serious or fatal injury.
Observe all applicable safety regulations, standards
and ordinances. Please familiarise yourself with the
machine before the rst use.
3. Application
The machine is exclusively intended for cutting grass,
weed and decorative lawn, i.e. lawn edges. Any other
use or use going beyond that, such as the cutting of
brushwood and hedges or large areas of lawn, is con-
sidered improper use. The manufacturer / supplier is not
liable for damages resulting from such use. The risk is
borne by the user alone. A proper utilisation also includes
the observance of the operating manual and the compli-
ance with the conditions of control and maintenance.
Keep the operating manual always at hand near the
place the machine is used!
4. Safety Instructions
A. General Instructions
1. Your electric tool is a high-speed, fast-cutting
power tool. The electrical connection and cutting
tool are potential sources of danger. Therefore,
special safety precautions must be observed to
reduce the risk of personal injury.
2. Always switch off the tool and disconnect the
plug from the power supply before carrying out
any maintenance or repair work on the unit.
Always unplug the tool if you leave it without
supervision.
Translation of the original Operating Instructions

3. Have your dealer or a specialist show you how to
operate your tool.
4. Minors should never be allowed to use an elec-
tric lawn trimmer. Never lend or rent your electric
lawn trimmer without these operating instruc-
tions. Be sure that anyone using your tool un-
derstands the information contained in these
operating instructions.
5. The user is responsible for safety for all persons
in the working area of the device.
6. Never allow children or people unfamiliar with
the instruction to use the machine
7. Only use the machine in daylight or good arti-
cial light.
8. Before use the machine and after any impact,
check for signs of wear or damage and repair as
necessary
9. Never operate the machine with damaged guards
or without the guards in place.
10. You must be t to operate an electric lawn trim-
mer- rested, healthy and in good physical condi-
tion. If you get tired while operating your scythe,
take a break. Never work with an electric lawn
trimmerwhile under the inuence of alcohol or
drugs.
11. Never attempt to modify your tool in any way
since it may increase the risk of personal injury.
Do not use wire or metal reinforced line. This ex-
cludes all liability for personal injury or damage
to property caused by improper use or impermis-
sible modication.
12. Do not use the tool if other persons, above all
children, or animals are near the working area.
13. The high-speed cutting head may catch and
ing stones and other foreign objects a great
distance. To reduce the risk of injury, ensure that
bystanders / children and animals are at least 15
m (50 ft) away from your own position.
B. Operational Precautions
14. Only use your lawn trimmerfor cutting grass and
weeds next to walls, under fences, around trees
and posts, on steps, garden paths and patios,
under bushes and hedges, on steep slopes, in
gaps between paving stones, etc.
C. Instructions regarding to safe handling
15. A power circuit breaker must be installed in the
power outlet to which the tool is connected or on
the electric cord to the tool. Contact an electri-
cian for further information. For a safe operation,
it is recommended to supply the machine over
a fault current safety breaker (RCD) with a fault
current not over 30 mA.
16. Before starting work check that your electric tool
is in good condition and that it is operating prop-
erly. Pay special attention to the power supply
cord, extension cord, power outlet, switch and
cutting head.
17. Before using the machine, the line and extension
cords have to be checked for signs of damage or
ageing. Do not use the tool when the cords are
damaged or worn.
18. If the cord is damaged during utilisation, it must
be disconnected immediately from the mains. DO
NOT TOUCH THE CORD BEFORE IT IS DISCON-
NECTED FROM THE MAINS.
19. Attention! Danger. The cutting head continues
to rotate after switch-off (ywheel effect). Keep
your ngers and feet well clear to avoid injury.
20. Use only extension cords that are approved
for outdoor applications and that comply with
specications. Couplings and plugs must be
splashwater-proof. Never operate your tool with-
out a properly mounted and secured safety
cover. Check tightness of cutting head.
21. Do not use damaged power supply cords, exten-
sion cords, couplings, plugs or cutting heads.
22. Do not switch on the unit when hands or
feet are near the cutting elements.
23. Wear goggles or properly tted safety glasses,
sturdy closed shoes with non-slip soles, snug-
tting work clothes, gloves and ear protectors
(ear plugs or ear mufers).
24. Careless use can cause injuries to hand and feet
by the rotating cutting elements.
25. Always hold your tool rmly, if possible with both
hands - make sure you always maintain a good
balance and secure footing.
26. Work calmly and stay alert. Operate the tool un-
der good visibility and daylight conditions only.
27. Arrange the extension cord so that it cannot be
damaged and does not cause a hindrance.
28. Be careful not to chafe the extension cord on cor-
ners, pointed or sharp objects. Do not squeeze
extension cord, e.g. through narrow gaps in
doors or windows.
29. Make sure the open side of the protection guard
is pointing away from yourself before you switch
on the tool.
30. Never tug the extension cord to disconnect the
plug. Always grip the plug.
31. Use particular caution while working in dense
growth areas where your view of the ground is
obscured.
32. Never leave your tool outdoors in rain.
33. Do not cut wet grass or other growth. Never use
in rain.
34. Hold the extension cord so that it is always away
from the rotating nylon line.
35. Transporting the electric tool, e.g. carrying it to
another site: Switch of the unit, disconnect the
plug.
36. Take special care in slippery conditions - on
slopes and uneven ground.
37. Work in a line across the slope and take special
care when turning around.
38. Watch for hidden obstacles such as tree stumps
and roots to avoid stumbling.
39. Clean the cutting head at regular intervals.
40. Check the condition of the cutting head at fre-
quent intervals. If the behaviour of the cutting
head changes (vibration, noise), check immedi-
ately as follows: Switch off the tool, hold it rmly
GB-2

and bring the cutting head to a standstill by
pressing it against the ground. Then disconnect
plug from power supply. Check condition of cut-
ting head - look for cracks.
41. Warning ! Danger of injury by the line cutting
device. After replacing a spool or lengthening the
cutting line, be sure to bring the unit onto normal
working position before turning it on again.
42. Have a damaged cutting head replaced immedi-
ately - even if it only has supercial cracks. Never
attempt to repair a damaged cutting head.
43. Always switch off your tool and disconnect it
from the power supply before taking a break and
after nishing work. Do not forget maintenance.
(Plug disconnected!) Only carry out maintenance
and repairs described in these operating instruc-
tions. Any other work should be performed by
your dealer. Do not grease - this is unnecessary,
as this unit has been pregreased at the factory.
44. Inspect cooling air slots on the motor housing at
regular intervals for clog-ups and clean as neces-
sary.
45. Only use original spare parts.
46. Only use original cutting heads and replacement
spools. Never use metal cutting devices.
47. Clean plastic parts with a damp cloth. Do not use
aggressive cleaning chemicals.
48. Never hose down the electric tool!
49. Store tool indoors in a dry, high or locked place
and always keep out of reach of children.
Important notice - so your guarantee does not expire:
• Always keep the air-intake clean.
• Never use a longer line than the blade-retainer
allows to use.
• Only use original monolaments with 1,6 mm ø
and original spools.
• Never press the cutting head on the ground,
when doing this you brake the turned-on motor.
• Never hit the cutting head on a hard under-
ground, otherwise you will unbalance and dam-
age the motor shaft.
5. Assembly
Mounting the protective cover (g. 1 + 2)
1. Move the protective cover over the mounted holder
so that the screw holes are exactly aligned with each
other (Fig. 1).
2. Fix the protective cover to the holder using the 4 screws
and washers included (Fig. 2).
3. Remove the plastic cover (X) from the line cutter by
simply pulling it off. The plastic cover is only used during
transport and should protect you from injury.
How to Assemble the Handle (g. 3 + 4)
Remove the 4 screws from the handle. Put the handle
holder onto the underside of the tube. Make sure that the
locking pin located in the handle holder is seated in one
of the 4 bores on the shaft. The 4 bores serve to variably
adjust the handle to the operator’s individually desired
position.
Put the handle onto the holder (the holes must t exactly)
and screw it to the handle holder using the 4 screws and
nuts.
How to Assemble the Shaft (g. 5 - 7)
1. Keep the release button (2) pressed and put the bottom
shaft (6) into the shaft coupling (1) until the release
button clicks into place in the opening (5) of the shaft
coupling (g. 5).
2. Turn the star grip screw (3) tight clockwise before
operating the tool (g. 6).
Note: If the upper and bottom shaft cannot be
completely put together, turn the cutting head manually
back and forth. The drive shafts inside of the shaft are
thus put into correct position and thus the shaft coupling
can click into place properly.
How to Detach the Bottom Shaft
1. Unscrew the star grip screw (3) anticlockwise.
2. Press the release button (2) into it (g. 7).
3. Pull the bottom shaft (6) straightly out of the shaft
coupling. (g. 5).
6. Connection of the Tool
The machines can only be operated on single phase
alternating current. They are double-insulated according
to class II VDE 0700 and CEE 20. Before taking the
machine into operation please make sure that the line
supply is in compliance with the operating voltage shown
on the output plate.
The minimum cross-section of the extension chord is
1.5 mm²
The extension chord should not exceed 40m. All
components should be designed according to the local
regulations, the IEC or EN regulations.
The tool is equipped with a cable strain relief located at
the rear of it. Connect the plug connection of the electric
lawn trimmer and the extension chord. Make a loop with
the extension chord and place it above the hook of the
strain relief (g. 10). Thus, the plug connection is effec-
tively protected against tensile load and can also not be
cut off unintentionally.
7. Switching on / off (g. 9)
To operate your tool:
• Make sure you have a secure footing.
• Hold the tool rmly (with both hands
)
.
• Stand upright - hold tool in relaxed position.
• Do not rest the cutting head on the ground.
• Push the switch lock A forward. Then push the switch
B. Once the tool has been switched on, the switch lock
A does not have to be pushed forward any longer.
• The tool is switched off when you release the switch.
8. Trimming Grass and Weeds (g. 10 + 11)
• Sweep lawn trimmer back and forth uniformly to cut
small patches of grass or weeds. The tool is not con-
structed and suitable for cutting large areas.
• Wherever possible, cut with left-hand side so that cut-
tings, dust and stones are thrown forwards, away from
the user.
GB-3

• Ideal working conditions are achieved if the tool is
tilted to the left at an angle approx. of 30° (g. 10).
You should cut tall grass gradually from top to bottom,
and not all at once. (g. 11)
9. How to Extend the Cutting Line
This tool is equipped with an automatic thread extension
which is set off every time the electric lawn trimmer is
switched on. In this process line of 1 cm in length always
comes out. If the line is longer than the set length, it will
be cut off to the appropriate length when the machine
starts running. Do not let the machine touch concrete or
stone pavement. This may lead to damage. Note: Remove
grass from cutting blade so that the tool can continue to cut
effectively. Make sure that the cutting blade (g. 12) always
remains sharp. Exchange blunt blades. Check the cutting
thread regularly for damage and nd out whether it still has
the appropriate length according to the cutting blade. If this
is not the case, replace the line spool (see point 11)
10. How to Replace the Cutting Thread
Hold the cutting head with one hand, push the two brackets
at the sides and detach the cap of the spool with the other
hand (g. 13). Take the spool out and remove remnants
of old line (g. 14). The new nylon line must not exceed
10 meters and must comply with the specications of the
product. Use only 1,6mm cutting line. Fold the new line in
the middle and cut it into two pieces of the same lengths.
Line the ends of both line into the opposite holes of the
spool (g. 15). Wrap the 2 lines onto the coil clockwise
(each one per spool section). An arrow on the spool
indicates the direction to wrap. After the two lines have
been wrapped, about 2mm of the dividing edge should
still be visible in the middle of the spool.
Note: Make sure that the lines are wrapped tightly and
evenly. Thread the ends of the lines through the eyes of
the casing of the spool and put the spool into the cutting
head (g. 16). Remount the spool cap and make sure that
the locks have clicked into place properly (g. 17).
11. How to Replace the Line Spool (g. 13 + 16)
Hold the cutting head with one hand, push the two brackets
at the sides and detach the cap of the spool with the other
hand. Take the empty spool out. Thread the ends of the
lines of the new coil through the eyes in the casing of the
spool and put the new spool into the casing of the spool.
Remount the cap of the spool. Please make sure that the
locks click into place properly.
Optional:
12. Assembly of the shoulder strap (Fig. 18)
1. Put the strap on; the strap must lead over your left
shoulder.
2. Attach the hook (A) to the eyelet (B) on the shaft.
3. Adjust the length of the strap such that the cutting
tool is positioned parallel to the ground, when the
strap is put over the shoulder. Determine the cor-
rect adjustment for the respectively installed cutting
tool by performing some test swings with the engine
switched off.
13. Trouble Shooting
• Tool does not work: Check power supply (e.g. by
testing on another socket or by means of a voltage
tester). Should it still not work, although the socket
is o.k., send it undismantled to an authorised service
station for repair.
• Cutting line disappears into spool: Remove spool
(acc. to point 10), pull end of line through the metal
outlet and reinsert spool. In case nylon line is used up
insert a new spool with line.
Do not make any other repairs on your own; have your
tool checked and repaired by an authorised service
station.
14. Storing
• Clean the unit thoroughly, especially the cooling air
slots on the motor housing.
• Do not use water to clean the device.
• Store trimmer indoors in a dry, high or locked place and
keep out of reach of children.
15. Waste disposal and environmental protec-
tion
If your device should become useless somewhere in the
future or you do not need it any longer, do not dispose
of the device together with your domestic refuse, but dis-
pose of it in an environmentally friendly manner. Please
dispose of the device itself at an according collecting/re-
cycling point. By doing so, plastic and metal parts can
be separated and recycled. Information concerning the
disposal of materials and devices are available from your
local administration.
16. Repair service
Repairs to electric power tools should only be carried out
by a specialised electrician.
17. Spare parts
Replacement spool Art.-No. 78200001
Protection cover Art.-No. 78011253
Handle Art.-No. 78011251
Shoulder strap Art.-No. 78011252
GB-4

Faux électrique FRANÇAIS
1. Caractéristiques Techniques
Modèle ESN 1000
Tension nominale V~ 230
Fréquence nominale Hz 50
Puissance W 1000
Vitesse à vide min-1 7500
Largeur de coupe cm 38
Epaisseur de fil mm 1,6
Réserve de fil m 2 x 5
Système avance fil automatique
Poids kg 4,6
Niveau de pression acoustique dB(A) 85,6 (selon prEN 10518) [K 3,0 dB(A)]
Vibration m/s2 10,2 (selon prEN 10518) [K 1,5 m/s²]
Nous nous réservons le droit de procéder à des modifications techniques dans le cadre du perfectionnement perma-
nent de nos produits.
Catégorie de protection: II
Les appareils sont construits selon les prescriptions conformément à EN 60335-2-91 et prEN ISO 10518 et sont
entièrement conformes aux prescriptions de la loi sur les machines et la sécurité de la production.
2. Conseil général de sécurité
Données sur les émissions sonores conformément
au règlement d’information sur le bruit des ma-
chines 3ème loi sur la sécurité des appareils et des
produits (GPSGV) ou des prescriptions en matière
de machines: le niveau de pression acoustique au
lieu de travail peut dépasser 80 dB (A). Dans ce cas
il convient de prévoir des mesures de protection
acoustique pour l’opérateur(par ex. port de protè-
georeilles).
Attention: protection contre le bruit ! Avant la
mise en marche, informez-vous des prescriptions
locales.
Attention: En utilisant des outils électriques il faut
observer les règles fondamentales de sécurité sui-
vants pour vous protéger contre l’électrocution,
d’éventuelles blessures et tous risques d’incen-
die. Veuillez lire et observer tous ces instructions
avant d’utiliser cet outil électrique. Conservez les
règles de sécurité à une place sûre.
Les machines sont construites suivant de technique
et selon les règles de sécurité en vigueur. Cepen-
dant, leur emploi peut représenter un danger pour
l’utilisateur ou des tiers et entraîner un préjudice
pour la machine ou d’autres valeurs matérielles.
Employer uniquement la machine en état technique
impeccable, conformément à son objet en ayant
conscience de la sécurité et des dangers et en respec-
tant l’instruction d’emploi! Eliminer (ou faire éliminer)
notamment toute panne pouvant nuire à la sécurité.
Il est indispensable de lire et d’étudier la notice d’em-
ploi avant la première mise en service. Respecter
impérativement les prescriptions et les avertisse-
ments de sécurité. La non-observation des règles
de sécurité énumérées ci-après peut entraîner des
conséquences graves, voire même fatales. Respec-
ter impérativement les directives de sécurité établies
pour prévenir les accidents. Avant la première utili-
sation familiarisez-vous avec la machine.
3. Objet d’emploi
Les machines sont exclusivement prévues pour couper
les bordures de pelouses. Un autre emploi ou un déro-
gatif, comme par ex. la coupe de buissons ou haies ou
la tonte de pelouses en surface importante n’est pas con-
sidéré comme conforme. Le fabricant/fournisseur décline
toute responsabilité pour les dommages qui en résultent.
L’utilisateur en portera tous les risques et périls.
Font également partie d’un emploi conforme le respect
des instructions d’utilisation et le respect des conditions
d’inspection, de maintenance et de sécurité.
Conserver en permanence les instructions d’utilisation
sur le lieu d’emploi de la machine.
FR-1
Traduction du mode d’emploi d’origine

4. Avis de sécurité
A. Conseils généraux de sécurité
1. La grande vitesse de l’outil de coupe et l’alimen-
tation électrique comportent des risques particu-
liers. Le travail avec le coupe-bordures nécessite
donc des précautions de sécurité particulières.
2. Retirez le connecteur de la prise avant d’effectuer
tous travaux sur la machine (nettoyage, transport
...). Toujours débrancher le coupe-bordures avant
de le laisser sans surveillance. Toujours éteindre
l‘appareil et retirer la fiche avant le réglage ou le
nettoyage ou avant de contrôler si le câble est
noué ou endommagé.
3. Se faire montrer le maniement sûr du coupe-
bordures par le vendeur ou par une personne
compétente.
4. Les mineurs ne sont pas autorisés à manier le
coupe-bordures. Ne confier (prêter) le coupe-
bordures qu’à des personnes qui se sont déjà
familiarisées avec son utilisation. Dans tous les
cas, toujours y joindre la notice d’emploi! Les
adolescents de moins de 16 ans ne sont pas
autorisés à utiliser l‘appareil.
5. L‘utilisateur est responsable vis-à-vis de tiers
dans le rayon d‘utilisation de l‘appareil.
6. Ne permettez jamais aux enfants de se servir de
l’appareil électrique.
7. N’utilisez l’appareil qu’à la lumière du jour ou
sous une lumière artificielle fournissant une clar-
té suffisante.
8. Avant chaque utilisation, vérifiez que toutes les
pièces de l’appareil sont bien fixées et en parfait
état. Ne commencez votre travail qu’après avoir
procédé aux réparations ou à tous les réglages
correspondants.
9. N’essayez jamais d’utiliser une machine incom-
plète ou ayant subi une transformation non auto-
risée.
10. Pour travailler avec un coupe-bordures, il est
indispensable d’être bien reposé et en bonne
santé, c’est-à-dire en bonne condition physique
et mentale. Faire des pauses à temps! Ne pas
travailler sous l’influence de l’alcool ou des dro-
gues.
11. Ne modifier votre coupe-bordures en aucune
manière, ne pas remplacer le cordon en matière
plastique, par exemple, par un fil d’acier, vous
risquez de compromettre votre sécurité. En cas
de dommages causés par l’utilisation non con-
forme aux prescriptions ou par des modifications
techniques, la Société décline toute responsabi-
lité.
12. Ne pas utiliser le coupe-bordures si des person-
nes, notamment des enfants ou des animaux
domestiques se trouvent à proximité.
13. A part l’utilisateur, ni les personnes (enfants !) ni
les animaux ne doivent se trouver dans un rayon
de 15 m autour de l’appareil étant donné que la
tête de coupe rotative peut projeter des pierres,
objets, ... etc.
B. Conseils pour l2tilisation
14. Utiliser le coupe-bordures exclusivement pour
couper l’herbe et la mauvaise herbe près des
murs, sous les clôtures, autour des arbres et des
poteaux, le long des escaliers, des chemins de
dalles et des terrasses, sous les buissons et les
haies, sur les pentes escarpées, entre les dalles
ou travaux similaires.
C. Conseils pour le maniement sûr
15. La prise électrique doit être pourvue d’un disjonc-
teur à courant de défaut ou il faut intercaler un tel
disjoncteur lors du branchement électrique. Pour
tous renseignements complémentaires, contacter
un électricien. Pour un empli sûr il est conseillé
d’alimenter la machine par l’intermédiaire d’un
dispositif protecteur à courant de défaut (RCD)
de moins de 30 mA.
16. Avant chaque utilisation, vérifier que le coupe-
bordures soit en partait état de fonctionnement
et conforme aux prescriptions et aux règles de
sécurité. Le cordon d’alimentation, la rallonge
électrique, la fiche électrique, le commutateur et
la tête de coupe doivent notamment faire l’objet
d’un contrôle
17. Avant l’emploi, vérifiez si le câble de branche-
ment et la rallonge présentent des dommages ou
des signes de vieillissement. Ne pas employer le
coupe-bordures si les câbles sont endommagés
ou usés.
18. Si le câble est endommagé durant l’emploi, il faut
retirer immédiatement le câble du secteur. NE
PAS TOUCHER AU CABLE AVANT DE L’AVOIR
RETIRE de la prise.
19. Attention ! Danger ! L’outil de coupe continue à
tourner pendant un certain temps, après l’arrêt
du moteur. Risque de blessures aux doigts et aux
pieds !
20. N’utiliser que des cordons d’alimentation et des
rallonges électriques qui sont conformes aux
prescriptions. Les fiches électriques et les prises
des rallonges électriques doivent être étanches
aux projections d’eau. N’utiliser le coupe-bor-
dures qu’avec un capot protecteur en parfait état
et veiller à ce que la tête de coupe soit bien fixée
et serrée.
21. Ne pas utiliser des cordons d’alimentation, des
rallonges électriques, des prises, des fiches élec-
triques et des têtes de coupe endommagés.
22. Mettez uniquement le moteur en marche lorsque
les mains et les pieds sont éloignés de l’outil de
coupe.
23. Porter des lunettes de protection ou une autre
protection pour les yeux, des chaussures com-
pactes avec semelle antidérapante, des vête-
ments près du corps et des protège-oreilles
insonorisants.
24. Toute négligence d’emploi peut provoquer des
blessures aux pieds et aux mains en raison des
éléments rotatifs de coupe.
25. Toujours maintenir fermement le coupe-bordu-
res, toujours veiller à avoir une position confor-
table et stable.
FR-2

26. Travailler calmement, de manière bien réfléchie et
seulement dans de bonnes conditions de visibi-
lité et d’éclairage; veiller à ne mettre personne en
danger! Travailler avec prudence !
27. Poser la rallonge électrique de telle sorte qu’elle
ne soit pas endommagée et ne présente pas de
risque de trébuchement.
28. Laisser la rallonge électrique à l’écart des bords
coupants, des objets pointus ou effilés et veiller
à ne pas l’écraser, par exemple, dans des fentes
de portes ou des ouvertures de fenêtres.
29. Lors de la mise en marche du coupe-herbe, le
capot protecteur doit être orienté en direction du
corps de l’opérateur.
30. Ne pas tirer sur le cordon pour déconnecter la
fiche de la prise électrique, mais saisir la fiche
électrique.
31. Prendre des précautions particulières dans des
terrains difficiles, à végétation dense !
32. Ne pas laisser le coupe-bordures en plein air
sous la pluie.
33. Ne pas couper de l’herbe mouillée! Ne pas utiliser
le coupe-bordures sous la pluie.
34. Tenir la rallonge électrique de telle sorte que le
cordon de coupe rotatif ne puisse pas la toucher.
35. Pour un transport du coupe-bordures de courte
durée, par exemple à un autre emplacement de
travail : Relâcher le commutateur, tirer la prise!
36. Attention, on risque de glisser sur terrains en
pente ou irréguliers !
37. Sur terrains en pente, ne faucher qu’en direction
oblique par rapport à la pente, attention en tour-
nant !
38. Se méfier des souches d’arbres et des racines, ils
risquent de vous faire trébucher!
39. Dégager l’herbe de la tête de coupe à des inter-
valles réguliers.
40. Vérifier l’état de la tête de coupe à intervalles ré-
guliers et immédiatement si son comporte-ment
change (vibrations, bruits) : Couper le moteur,
maintenir très fermement le coupe-bordures.
Freiner la tête de coupe jusqu’à ce qu’elle soit à
l’arrêt en appuyant le coupe-bordures contre le
sol, puis débrancher la fiche électrique. Vérifier la
tête de coupe, faire attention aux fissures superfi-
cielles.
41. Attention ! La lame destinée à couper le fil pro-
voque une risque de blessures ! Après échange
de la bobine, mettez l’appareil à la position nor-
male de travail avant de la mise in marche.
42. Remplacer immédiatement la tête de coupe en-
dommagée, même en cas de fissures superfi-
cielles minimes. Ne pas réparer une tète de coupe
endommagée.
43. Avant l’interruption ou la fin du travail: Décon-
necter la fiche électrique! Maintenance du coupe-
bordures (la fiche électrique étant déconnectée!):
N’effectuer que les interventions de maintenance
décrites dans la notice d’emploi. Pour toute in-
tervention sortant de ce cadre, s’adresser à un
service après-vente.
44. Nettoyer les orifices de refroidissement du carter
moteur, si nécessaire.
45. Employer exclusivement les pièces détachées
d’origine.
46. N’utiliser que des bobines de remplacement et
des têtes de coupe d’origine. Jamais utiliser des
dispositifs de coupe métalliques où adaptables.
47. Nettoyer les pièces en matière plastique au
moyen d’un torchon humide. Les détergents
puissants peuvent attaquer la matière plastique.
48. Ne pas pulvériser d’eau sur le coupe-bordures !
49. Ranger le coupe-bordures en toute sécurité dans
un emplacement sec.
Instructions importantes pour ne pas perdre le droit
à la garantie :
• Gardez les orifices de refroidissement moteur tou-
jours propre.
• Ne travaillez pas avec un fil de coupe d’une lon-
gueur supérieure.
• N’utilisez que les bobines et les fils de rechange
d’origine de 1,6 mm Ø.
• N’appuyez pas la tête de coupe tournante sur le sol
afin d’éviter la surchauffe du moteur.
• Ne frappez pas la tête tournante par terre pour ne
pas courir le risque de déséquilibrer l’axe du mo-
teur.
5. Montage
Montage de l’écran de protection (Ill. 1 + 2)
1. Glissez l’écran de protection sur le support mis en
place de façon à ce que les orifices pour vis coïncident
(Ill.1).
2. Fixez le couvercle de protection au support à l’aide
des 4 vis livrées avec l’appareil (Ill. 2).
3. Retirez la protection en matière plastique attachée
(X) de la lame de coupe. Cette protection ne sert
qu’au transport et doit vous protéger d’éventuelles
blessures.
Montage de la poignée (ill. 3 + 4)
Dévissez les 4 vis de la poignée. Positionnez la fixation de
la poignée sur la face inférieure du manche. Veillez à ce
que la goupille d’ajustage, qui se trouve dans la fixation
de la poignée, soit correctement insérée dans l’un des 4
orifices de la hampe. Les 4 orifices servent au réglage
variable de la hauteur de la poignée sur la position idéale
pour vous.
Ajustez la poignée sur son support et fixez-la au support
à l’aide des 4 vis et écrous.
Montage du manche (ill. 5 - 7)
1. Maintenez le bouton de déclenchement (2) appuyé
et glissez le manche inférieur (6) dans le dispositif
d’accouplement du manche (1), jusqu’à ce que le
bouton de mise en service s’enclenche dans l’ouverture
(5) du dispositif d’accouplement du manche. (ill.5).
2. Serrez fermement les vis stellaires (3) dans le sens
des aiguilles d’une montre avant de commencer tout
travail avec l’appareil (ill. 6).
Attention: Si le manche supérieur et le manche
inférieur ne se laissent pas parfaitement assembler,
FR-3
Table of contents
Other Ikra Trimmer manuals

Ikra
Ikra IAT 20-1M User manual

Ikra
Ikra RT 2008 DV GT 5530 Gardol User manual

Ikra
Ikra RT 2003 DA User manual

Ikra
Ikra HTI 3525 User manual

Ikra
Ikra HBTI 75 User manual

Ikra
Ikra Ultralight FHS 1555 User manual

Ikra
Ikra ESN 1000 C User manual

Ikra
Ikra BHT 60 User manual

Ikra
Ikra GM 6050 Pro User manual

Ikra
Ikra AHS 2051 PowerTec User manual

Ikra
Ikra HTMN 520 User manual

Ikra
Ikra HTI 5230 User manual

Ikra
Ikra IHT 550 User manual

Ikra
Ikra IAT 20-1 User manual

Ikra
Ikra HS 6070 Pro User manual

Ikra
Ikra IPHT2660 User manual

Ikra
Ikra BHSN 602 User manual

Ikra
Ikra Ultralight FHS 1545 User manual

Ikra
Ikra THS 500 Pro User manual

Ikra
Ikra IAT 40-3025 LI User manual