J&M 6018 User manual

J&M Manufacturing Co, Inc
284 Railroad Street - P.O. Box 547 | Fort Recovery, OH 45846 | Ph: (419) 375-2376 | Fax: (419) 375-2708
www.jm-inc.com
Rev. 1.13.2023
OPERATOR’S MANUAL
MODEL
Operator’s Manual

2

3
To The Dealer .....................................................................................4
Serial Number ....................................................................................5
General Information ..............................................................................5
Safety Rules.......................................................................................6
Bolt Torque Chart .................................................................................7
Stud and Wheel Nut Torque Specications .........................................................7
6018 Specications ...............................................................................8
6026 Specications ...............................................................................9
Pre-Operation Checklist ......................................................................... 10
NitroGro Components .......................................................................... 12
Flow Monitors .................................................................................. 13
Adjusting the Field Depth ....................................................................... 13
Down Pressure Relief Valve and Gauge........................................................... 13
Strainer......................................................................................... 13
Hydraulic PWM Pump ........................................................................... 14
Hand Wash Tank ................................................................................ 14
Agitation Valve.................................................................................. 14
Coulter ......................................................................................... 15
Counterbalance Valve ........................................................................... 15
Connecting the Hydraulic Hoses................................................................. 15
Hitching and Unhitching the Applicator ......................................................... 16
Initial Operation ................................................................................ 16
Folding & Unfolding............................................................................. 17
Operation ...................................................................................... 19
Raven 450 Controller Set Up..................................................................... 20
Raven ISOBUS Rate Controller Set Up ............................................................ 21
John Deere Greenstar Rate Controller PWM Setup................................................ 22
Transporting.................................................................................... 24
Service ......................................................................................... 24
Storage......................................................................................... 25
Removing Pump Safety Plugs ................................................................... 25
Troubleshooting ................................................................................ 26
Adapter Harnesses for Various Controller Options ................................................ 27
Flow Monitor Set Up ............................................................................ 28
Changing from 60’to 40’Wing Span ............................................................. 29
Injectors - 20”Row Spacing...................................................................... 30
Injectors - 22”Row Spacing...................................................................... 32
Injectors - 30”Row Spacing...................................................................... 34
Knife - 20”Row Spacing ......................................................................... 36
Knife - 22”Row Spacing ......................................................................... 38
Knife - 30”Row Spacing ......................................................................... 40
Table Of Contents

4
TO THE DEALER
Read manual instructions and safety rules. Make sure all items on the Dealer’s Pre-Delivery and Delivery Check Lists are completed
before releasing equipment to the owner.
The dealer must complete the Warranty Registration found on the Dealer Portal website located at dealer.jm-inc.com and return it to J&M
Mfg. Co., Inc. at the address indicated on the form. Warranty claims will be denied if the Warranty Registration has not been submitted.
EXPRESS WARRANTY:
J&M Mfg. Co., Inc. warrants against defects in construction or materials for a period of ONE year. We reserve the right to inspect and
decide whether material or construction was faulty or whether abuse or accident voids our guarantee.
Warranty service must be performed by a dealer or service center authorized by J&M Mfg. Co., Inc. to sell and/or service the type of
product involved, which will use only new or remanufactured parts or components furnished by J&M Mfg. Co., Inc. Warranty service will
be performed without charge to the purchaser for parts or labor based on the Warranty Labor Times schedule. Under no circumstance
will allowable labor times extend beyond the maximum hours indicated in the Warranty Labor Times schedule for each warranty
procedure. The purchaser will be responsible, however, for any service call and/or transportation of the product to and from the dealer
or service center’s place of business, for any premium charged for overtime labor requested by the purchaser, and for any service and/or
maintenance not directly related to any defect covered under the warranty. Costs associated with equipment rental, product down time,
or product disposal are not warrantable and will not be accepted under any circumstance.
Each warranty term begins on the date of product delivery to the purchaser. Under no circumstance will warranty be approved unless (i)
the product warranty registration card has been properly completed and submitted to the equipment manufacturer, and (ii) a warranty
authorization number has been issued by the equipment manufacturer. This Warranty is eective only if the warranty registration card is
returned within 30 days of purchase.
This warranty does not cover a component which fails, malfunctions or is damaged as a result of (i) improper modication or repair, (ii)
accident, abuse or improper use, (iii) improper or insucient maintenance, or (iv) normal wear or tear. This warranty does not cover
products that are previously owned and extends solely to the original purchaser of the product. Should the original purchaser sell or
otherwise transfer this product to a third party, this warranty does not transfer to the third party purchaser in any way. J&M Mfg. Co.,
Inc. makes no Warranty, express or implied, with respect to tires or other parts or accessories not manufactured by J&M Mfg. Co., Inc.
Warranties for these items, if any, are provided separately by their respective manufacturers.
THIS WARRANTY IS EXPRESSLY IN LIEU OF ALL OTHER WARRANTIES OR CONDITIONS, EXPRESS, IMPLIED OR STATUTORY, INCLUDING ANY
IMPLIED WARRANTY OF MERCHANTABILITY OR FITNESS FOR PARTICULAR PURPOSE.
In no event shall J&M Mfg. Co., Inc. be liable for special, direct, incidental or consequential damages of any kind. The exclusive remedy
under this Warranty shall be repair or replacement of the defective component at J&M Mfg. Co., Inc’s. option. This is the entire agreement
between J&M Mfg. Co., Inc. and the Owner about warranty and no J&M Mfg. Co., Inc. employee or dealer is authorized to make any
additional warranty on behalf of J&M Mfg. Co., Inc.
The manufacturer reserves the right to make product design and material changes at any time without notice. They shall not incur any
obligation or liability to incorporate such changes and improvements in products previously sold to any customer, nor shall they be
obligated or liable for the replacement of previously sold products with products or parts incorporating such changes.
SERVICE:
The equipment you have purchased has been carefully manufactured to provide dependable and satisfactory use. Like all mechanical
products, it will require cleaning and maintenance. Lubricate the unit as specied. Observe all safety information in this manual and
safety signs on the equipment.
For service, your authorized J&M dealer has trained mechanics, genuine J&M service parts, and the necessary tools and equipment to
handle all your needs.
Use only genuine J&M service parts. Substitute parts may void warranty and may not meet standards required for safety and satisfactory
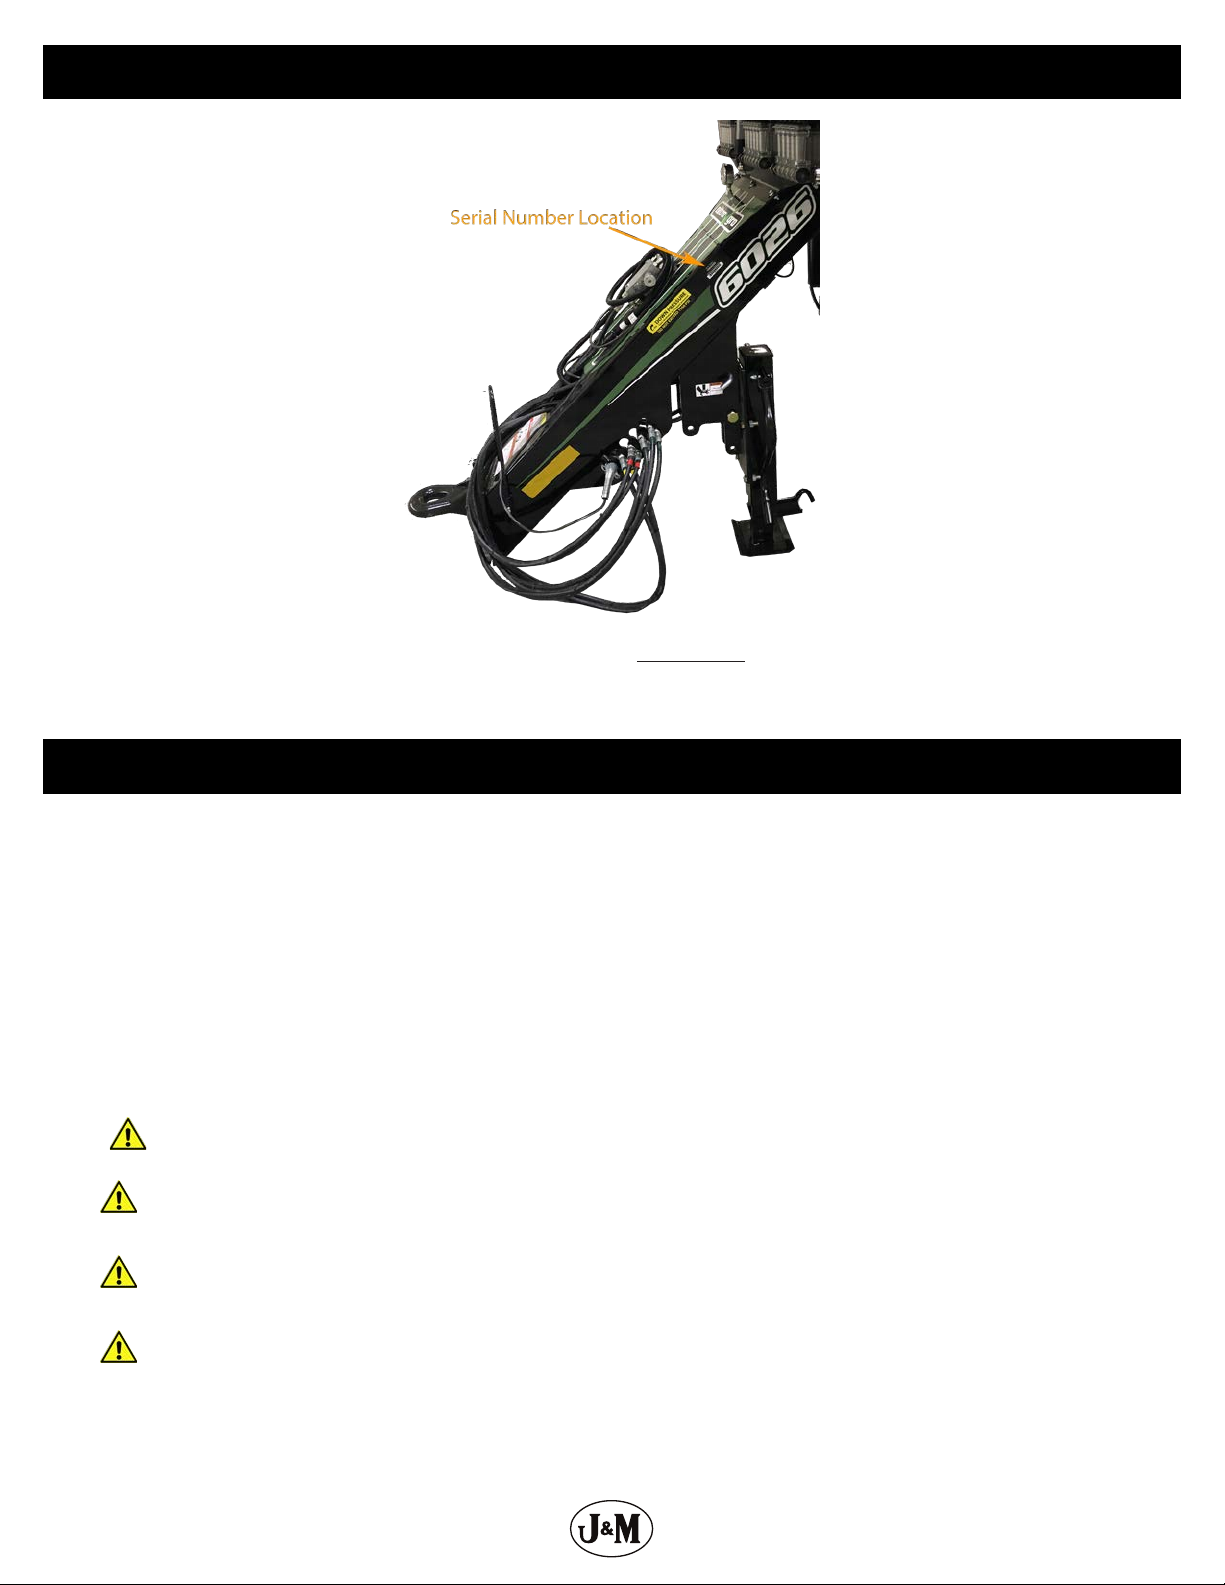
operation. Record the model number and serial number of your equipment in the spaces provided:
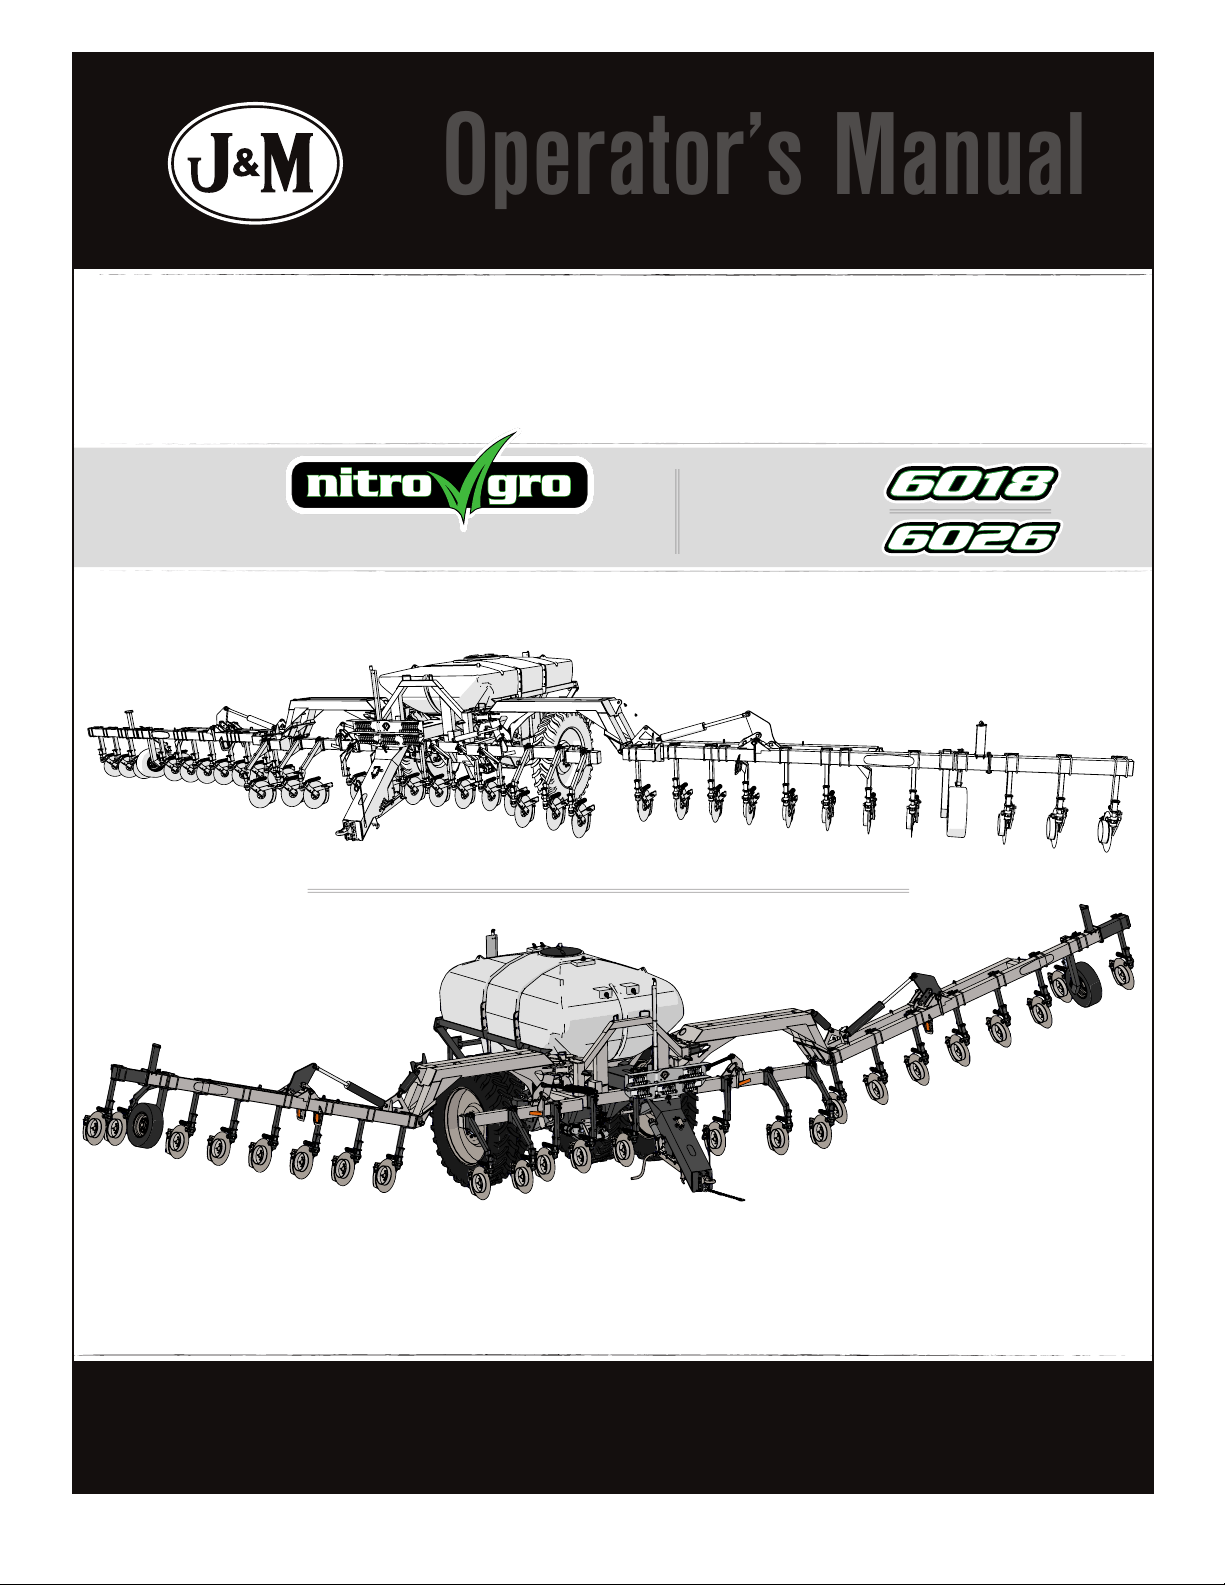
Model No: 6018 or 6026 NitroGro Applicator Serial No: ________________________ Date of Purchase: ____________
Purchased From: ________________________________________________________________________________
Provide this information to your dealer to obtain correct repair parts.
To The Dealer

5
Serial Number______________________
Model Number_______6018 or 6026____
Standard practice when ordering parts or obtaining information from your dealer requires the serial number and model number. Have
numbers available before making contact.
Serial Number
TO THE OWNER:
The purpose of this manual is to assist you in operating and maintaining your applicator in a safe manner. Read it carefully. It furnishes
information and instructions that will help you achieve years of dependable performance and help maintain safe operating conditions. If
this machine is used by an employee or is loaned or rented, make certain that the operator(s), prior to operating:
1. Is instructed in safe and proper use.
2. Reviews and understands the manual(s) pertaining to this machine.
Throughout this manual, the term IMPORTANT is used to indicate that failure to observe can cause damage to equipment. The terms
CAUTION, WARNING and DANGER are used in conjunction with the Safety-Alert Symbol, (a triangle with an exclamation mark), to indicate
the degree of hazard for items of personal safety. When you see this symbol, carefully read the message that follows and be alert to the
possibility of personal injury or death.
DANGER
WARNING
CAUTION
This Safety-Alert symbol indicates a hazard and means
ATTENTION! BECOME ALERT! YOUR SAFETY IS INVOLVED!
Indicates an imminently hazardous situation that, if not avoided, will result in death or serious injury.
Indicates a potentially hazardous situation that, if not avoided, could result in death or serious injury,
and includes hazards that are exposed when guards are removed.
Indicates a potentially hazardous situation that, if not avoided, may result in minor or moderate injury.
Indicates that failure to observe can cause damage to equipment.
Indicates helpful information.
IMPORTANT
NOTE
General Information

6
ATTENTION! BECOME ALERT! YOUR SAFETY IS INVOLVED!
Safety is a primary concern in the design and manufacture of our products. Unfortunately, our eorts to provide safe equipment can
be erased by an operator’s single careless act. In addition, hazard control and accident prevention are dependent upon the awareness,
concern, judgment, and proper training of personnel involved in the operation, transport, maintenance and storage of equipment.
Make certain that the operator(s), prior to operating is instructed in safe and proper use and reviews and understands the manual(s)
pertaining to this machine. Also make certain that the operator(s) reviews and understands the operator’s manual of the tow vehicle
prior to hooking up or operating the NitroGro Applicator.
Read this manual before you operate this machine. If you do not understand any part of this manual, or need more information, contact
the manufacturer or your authorized dealer.
Note: The right and the left hand sides of the implement are determined by facing the same direction that the applicator will travel when
moving forward.
SAFETY
Understand that your safety and the safety of other persons is measured by how you service, and operate this machine. Know the positions
and functions of all controls before you try to operate them. Make sure to check all controls in a safe area before starting your work.
The safety information given in this manual does not replace safety codes, federal, state or local laws. Make certain your machine has the
proper equipment as designated by local laws and regulations.
A frequent cause of personal injury or death is from persons falling o equipment and being run over. Do not permit persons to ride on
this machine.
Travel speeds should be such that complete control and machine stability is maintained at all times. Where possible, avoid operating near
ditches, embankments and holes. Reduce speed when turning, crossing slopes and rough, slick or muddy surfaces.
Collision of high speed road trac and slow moving machines can cause personal injury or death. On roads, use asher lights according
to local laws. Keep slow-moving-vehicle emblem visible. Pull over to let faster trac pass.
Keep all safety shields in place.
Keep hands, feet, hair and clothing away from moving parts while unit is in operation.
Ensure that everyone is clear of equipment before applying power or moving the machine.
Fasten the implement securely to the tractor by using the proper hitch pin, clip and safety chains.
Do NOT exceed speeds in excess of 20 MPH. Also be sure slow moving vehicle emblem is attached to rear of transport.
Do not transport applicator with contents in the tank.
Before unhooking the implement from the towing unit, be sure to properly block the wheels to prevent the implement from moving. Be
sure the jack assembly is positioned in the park position and the weight has been transferred to the jack assembly before unhooking the
implement. Do not unhook with contents in tank or toolbar in operating position.
Avoid high pressure uids. Escaping uid under pressure can penetrate the skin causing serious injury. Always relieve pressure before
disconnecting hydraulic lines. Wear proper hand and eye protection when searching for leaks. Use wood or cardboard instead of hands.
Keep all components in good repair.
Safety Rules

7
Bolt Torque Chart
TIGHTENING WHEEL NUTS: During initial operation of the NitroGro applicator, tighten standard 3/4” wheel studs and nuts to torque
400 ft-lbs and tighten 1/2”-20 gauge wheel studs and nuts to torque 80 ft-lbs. Check for proper torque after every 10 hours of use.
Failure to do so may damage wheel nut seats. Once seats are damaged, it will become impossible to keep nuts tight.
SAE Fasteners
Always tighten hardware to these values unless a dierent torque or tightening procedure is listed for specic application. Fasteners must
always be replaced with the same grade as specied in the manual parts list. Always use the proper tool for tightening hardware. Make
sure fastener threads are clean and you start thread engagement properly. Use these values when tightening all bolts and nuts with
the exception of wheel nuts.
Stud and Wheel Nut Torque Specications
Stud Tightening Torque
1/2”-20 80 ft-lbs
9/16”-18 170 ft-lbs
5/8”-18 350 ft-lbs
3/4”-16 400 ft-lbs
20mm 475 ft-lbs
22mm 640 ft-lbs
Always tighten hardware to these values unless a dierent torque or tightening procedure is listed for specic application. Fasteners must
always be replaced with the same grade as specied in the manual parts list. Always use the proper tool for tightening hardware. Make
sure fastener threads are clean and you start thread engagement properly. Use these values when tightening all studs and wheel
nuts.
Coarse Thread Series
Grade 5 Grade 8
Diameter and Pitch (Inches) Dry Oiled Dry Oiled
1/4”-20 8 ft-lbs 6 ft-lbs 12 ft-lbs 9 ft-lbs
5/16”-18 17 13 25 18
3/8”-16 31 23 44 33
7/16”-14 49 37 70 52
1/2”-13 75 57 106 80
9/16”-12 109 82 154 115
5/8”-11 150 113 212 159
3/4”-10 267 200 376 282
7/8”-9 429 322 606 455
1”-8 644 483 909 681
Fine Thread Series
Diameter and Pitch (Inches) Dry Oiled Dry Oiled
1/4”-28 10 ft-lbs 7 ft-lbs 14 ft-lbs 10 ft-lbs
5/16”-24 19 15 27 20
3/8”-24 35 26 49 37
7/16”-20 55 41 78 58
1/2”-20 85 64 120 90
9/16”-18 121 91 171 128
5/8”-18 170 127 240 180
3/4”-16 297 223 420 315
7/8”-14 474 355 669 502

8
6018 Specications
SPECIFICATIONS
6000 Series Applicators
Tank Size 1,850 Gallon
Base Width 60’
Ground Clearance 40”
Row Spacing* 20”, 22”, 30”
Number of Coulters 23, 25, 35, 37
Coulter Style Grove Engineered Products (GEP) or J&M Para-Linkage
Fertilizer Delivery Knife or Injection
Wing Flex Standard 15° Flex Up - 10° Flex Down
Wing Kick Standard
Coulter Frame Tubing 5” x 7” Double Toolbar
Hydraulic Down Pressure Standard
Standard PWM Hydraulic Driven Pump Ace 155 or 750 Pump
Wheels VF 380/90R46 Alliance 354 or
VF320/105R46 Alliance 354
Transport Width 11’-9”
Transport Height 11’-10”
Transport Length 25’-0”
Pin To Axle 14’-0”
Flow Monitors Standard - Wilger
Depth Control Spools Optional
Quick Fill 3”Fill Standard
Wash Tank Standard 9 Gallon Wash Tank
Empty Weight 16,000 lbs.
* Other Row Spacing Available Upon Request
Tires Ground Compaction
VF320/105R46 (Alliance) (172D) - Single Wheels 71 psi
VF380/90R46 (Alliance) (173D) - Single Wheels 57 psi
VF320/105R46 (Alliance) (172D) - Dual Wheels 20 psi
VF380/90R46 (Alliance) (173D) - Dual Wheels 17 psi
Total Weight Weight on Axle Tongue Weight
Tank Empty 16,000 lbs 11,229 lbs 4,771 lbs
Tank Full 37,000 lbs 31,245 lbs 5,755 lbs
With toolbar unfolded and raised (knives not in ground):
Total Weight Weight on Axle* Tongue Weight*
Tank Empty 16,000 lbs 6,215 lbs 1,034 lbs
Tank Full 37,000 lbs 26,231 lbs 2,018 lbs
With toolbar unfolded and down (knives in ground):
*These values are estimates assuming moderate soil hardness
and 25 coulters.
Total Weight Weight on Axle Tongue Weight
Tank Empty 16,000 lbs 15,350 lbs 650 lbs
Tank Full 37,000 lbs 34,800 lbs 2,200 lbs
With toolbar folded:

9
6026 Specications
SPECIFICATIONS
6000 Series Applicators
Tank Size 2,600 Gallon
Base Width 60’
Ground Clearance 40”
Row Spacing* 20”, 22”, 30”
Number of Coulters 23, 25, 35, 37
Coulter Style Grove Engineered Products (GEP) or J&M Para-Linkage
Fertilizer Delivery Knife or Injection
Wing Flex Standard 15° Flex Up - 10° Flex Down
Wing Kick Standard
Coulter Frame Tubing 5” x 7” Double Toolbar
Hydraulic Down Pressure Standard
Standard PWM Hydraulic Driven Pump Ace 155 or 750 Pump
Tires
VF320/105R46 Alliance or
VF 380/90R46 Alliance
Transport Width 11’-9”
Transport Height 12’-6”
Transport Length 25’-0”
Pin To Axle 14’-0”
Flow Monitors Standard - Wilger
Depth Control Spools Optional
Quick Fill 3”Fill Standard
Wash Tank Standard 9 Gallon Wash Tank
Empty Weight 18,000 lbs.
* Other Row Spacing Available Upon Request
Total Weight Weight on Axle Tongue Weight
Tank Empty 18,000 lbs 13,436 lbs 4,563 lbs
Tank Full 47,000 lbs 40,773 lbs 6,226 lbs
With toolbar unfolded and raised (knives not in ground):
Total Weight Weight on Axle Tongue Weight
Tank Empty 18,000 lbs 17,300 lbs 700 lbs
Tank Full 47,000 lbs 44,200 lbs 2,800 lbs
With toolbar folded:
Total Weight Weight on Axle* Tongue Weight*
Tank Empty 18,000 lbs 8,422 lbs 827 lbs
Tank Full 47,000 lbs 35,759 lbs 2,490 lbs
With toolbar unfolded and down (knives in ground):
*These values are estimates assuming moderate soil hardness
and 25 coulters.
Tires Ground Compaction
VF320/105R46 (Alliance) (172D) - Dual Wheels 29 psi
VF380/90R46 (Alliance) (173D) - Dual Wheels 25 psi

10
Pre-Operation Checklist
IMPORTANT - Before putting the applicator into operation, check the machine for damaged or worn parts and
replace as necessary.
Wheel Nuts Tightened
During initial operation, tighten standard 3/4”wheel studs and nuts to torque 400 ft-lbs and tighten 1/2”-20 studs and nuts on gauge
wheels to torque 80 ft-lbs. Re-check wheel nut torque settings during initial break in period (10, 20, 50 acres), then every 10 hours of use
for the rst 40 hours. Continue checking wheel nut settings until nuts do not loosen. If wheel nuts loosen, they may damage wheel nut
seats. Once seats are damaged, it will become impossible to keep nuts tight.
Failure to keep the wheel nuts tight could cause considerable damage to the applicator and surrounding. It is the dealer’s
responsibility to torque the wheel nuts to specication before delivery. Damage caused by failure to keep wheel nuts tight is not
warrantied.
Wheels and Tires
Check the tire pressure in the transport and gauge wheel tires and make sure the tire pressure is equal for each tire. Refer to “Operation”
on page 19 for tire pressure recomendations. Tighten standard 3/4” wheel studs and nuts on transport tires to torque 400 ft-lbs and
tighten 1/2”-20 studs and nuts on gauge wheels to torque 80 ft-lbs. Check the wheel lug nuts before initial operation and after the unit
has been operated for several hours to ensure the lug nuts remain tight.
Hardware
Ensure all hardware is properly fastened according to the “Bolt Torque Chart” on page 7. Recheck all hardware for tightness after the
unit has been operated for several hours. Check that all pins and retaining rings are in good condition. Replace any pins or retaining
rings that are worn, damaged or missing.
Grease Points
Check all bearings and grease ttings for proper lubrication, outlined in “Service”on page 24.
Hydraulic Hoses
Ensure hydraulic hoses are not kinked, twisted, or rubbing against sharp edges. Secure hoses to the applicator with nylon tie straps.
Unfold and fold the applicator according to the fold instructions decal on the tongue of the applicator or in the operator’s manual. Check
for leaks on hydraulic cylinders, ttings, and hose ends (Use cardboard or wood to safely check for leaks) and tighten where necessary.
Clean Tank
Check tank for debris (like plastic shavings from assembly) and clean if necessary. Use a vacuum to remove tank debris.
Indicator Balls
Remove all indicator balls from ow monitors and install the correct indicator ball in each ow monitor for the customer’s desired gallons
per acre and speed. Refer to pages 30–41 to determine which indicator ball to select.
Water Test
Fill tank with 100 gallons of water and water test before use. Most rate controllers have a“self-test” mode that for this purpose. Tighten
any leaking hose or tting connections. Do not run the fertilizer pump dry. This could cause permanent failure to the fertilizer
pump and is not warrantied.
Winterization
If applicator has ever had uid in the tank, winterize the applicator before the temperature drops below freezing. See the operator’s
manual for winterizing instructions. Failing to winterize applicator can cause severe damage to fertilizer distribution components
and is not warrantied.

11
Pre-Operation Checklist
Defects & Scratches
Examine paint and poly tank for scratches, cracks, gouges, and defects.
Filling the Tank
Warning: Ensure the applicator is pinned to the tractor before lling tank. The applicator must be pinned to a tractor when any
uid is present in the tank.
Make sure the area is clear of bystanders when lling the tank. Always wear protective clothing, gloves, and masks when handling
fertilizer/chemicals. Follow the fertilizer/chemical manufacturer’s instructions when lling the tank. Keep the tank lid on at all times to
keep out debris.
Fertilizer Pump
Raise the toolbar with wings unfolded and turn on the fertilizer pump. Check if liquid is coming out of each knife/injector. Clean or
replace knives/injectors if necessary.
Unfolding the Wings
It is recommended to unfold the side wings in the eld. Keep all bystanders away while unfolding the wings. See “Folding & Unfolding”
on page 17.
Safety Decals & Lights
Check that safety decals, reective decals, and lights are properly located. Refer to“Decals”page of the Parts Manual for proper
placement. Ensure all lights function properly.
SMV
Position the SMV emblem with one point of the triangle upward and as near to the rear and centered or as near to the left of center of
the unit as practicable. Secure the SMV emblem two to ten feet above the ground measured from the lower edge of the emblem. Before
transporting, ensure that SMV emblem is clean and visible.

12
NitroGro Components

13
Flow monitors allow the operator to check for blockages at each
coulter with a oating ball inside the transparent inspection tube.
Each coulter is connected with a separate supply hose.
The down pressure relief valve provides adjustable hydraulic pressure to force the coulters on the wings into the ground and keep the
coulters at the correct depth. While allowing the wing to ex up and down as needed to follow the contour of the ground.
• Turn clockwise to increase down pressure.
• Turn counter clockwise to decrease down pressure.
IMPORTANT - It is VERY IMPORTANT NOT TO EXCEED 1,350 psi of pressure on the down pressure gauge. Excessive pressure can
cause premature wear on wing pivots and gauge wheels.
Flow Monitors
Down Pressure Relief Valve and Gauge
• Set the center section of coulters rst. Spacers are included with the toolbar cylinders. Add or remove spacers until the center
section is positioned at the appropriate depth. Lower the unit until the lift cylinders bottom out on the stroke control spacers. Add or
remove stroke control spacers until the center toolbar section reaches desired application depth. For best results, move forward while
lowering the toolbar.
• After the center toolbar is set with the cylinder spacers, adjust the wing gauge wheel setting until the wings are level with the base
section and the entire toolbar is at and even. Once the toolbar is set and leveled, further adjustment is typically not necessary.
Adjusting the Field Depth
The NitroGro applicator is equipped with a strainer designed to remove dirt and debris from the
fertilizer to prevent downstream clogs. Should be cleaned daily.
Strainer

14
Hydraulic PWM Pump
The standard pump for your NitroGro applicator is the Ace FMC-155-HYD-206 with PWM control. The maximum
hydraulic uid input for this pump is 7 gallons per minute. The optional, larger pump available for your applicator
is the Ace FMC-750-HYD pump with PWM control. The maximum hydraulic uid input pump for this pump is 18
gallons per minute.
IMPORTANT - Do not exceed 7 gallons per minute hydraulic uid input when using the Ace FMC-155-HYD-206
pump or 18 gallons per minute when using the Ace FMC-750-HYD pump. Refer to the pump’s operating manual
to regulate the hydraulic ow to the pump.
WARNING- Failure to regulate oil ow will cause motor failure.
The hydraulic pump is located below the tank and near the tank outlet to prevent cavitation and provide faster
pump priming.
Attach the pump hydraulic hoses to the tractor so the pump operates in the lower/retract position. The pump can then be turned o
in the forward ”oat” position. Turning the pump o in“oat” instead of “neutral”allows the hydraulic system pressure to equalize and
prevents the occurrence of damaging pressure spikes.
Connect the return line to a low pressure return port, if available. The low pressure return port routes oil directly to the reservoir,
minimizing return line pressure. Low return line pressure extends the motor seal life and increases operating eciency.
Turn the hydraulic ow of the tractor all the way down before you put the hydraulic fertilizer pump into use. The applicator pump only
requires 7 GPM of hydraulic ow to make 120 GPM of fertilizer ow. If you don’t turn down the tractor hydraulic ow to the pump,
damage will occur. (See Set-Up Instructions in the pump manual.)
The PWM valve controls the hydraulic ow to the pump, which creates a variable rate pump. With the PWM valve, the pump controls the
rate of fertilizer ow.
WARNING - Not a suitable pump for ammable liquids.
Nine gallon capacity hand wash tank, which includes built in toolbox, makes cleaning hands
after chemical spills quick and easy.
Hand Wash Tank
If priming becomes an issue, the agitation valve may be opened to allow air
to escape from the pump so it can easily primed.
The agitation valve can also be used to evenly mix additives by running the
pump with the electronic control valves closed.
With PWM, the agitation valve may be closed during operation for full pump
eciency.
Agitation Valve

15
Counterbalance Valve
The counterbalance valve keeps the outside wings from creeping
up. To tighten the counterbalance valve, turn the allen-head on the
counterbalance valve closest to the bottom end of the hydraulic
cylinder (as shown in the picture to the right) counter-clockwise in
1/2 turn increments until the wings remain locked in place during
operation.
Connecting the Hydraulic Hoses
The number of coulters is determined by the number of rows (usually one less or one
more). So the number of rows will be even, and the number of coulters will be odd, since
you are placing the nitrogen between the rows. For example, a 24 row unit will have either
23 or 25 coulters. A 24 row applicator with 23 coulters is considered a “one-down” unit.
Similarly, a 24 row applicator with 25 coulters is considered a“one-up”unit.
Coulter
40”Toolbar
Clearance
Connect the hoses so the toolbar raises when the tractor control lever is pulled back and lowered when the control is pushed forward.
Hook up hydraulic lines as follows:
Set #1 - Green Hoses - Raise & Lower/ Wing Kick/ Down-pressure
Set #2 - Black Hoses (No Tape) - Main Fold
Set #3 - Red Hoses - Outside Wing and Stub Wing Fold
Set #4 - Yellow Hoses - Hydraulic Pump
IMPORTANT - For the yellow hoses, hook the 3/4”return hose (pump
hose without yellow tape) to a low pressure return port on the tractor.
If you have a 750 pump, hoses with have high ow pioneer ends.
Be sure to use the hose without the yellow tape to the low pressure
return port on the tractor.
150 Pump Setup
Return Pressure
High Flow
Regular Flow
750 Pump Setup
Return Pressure
High Flow High Flow

16
Connect the applicator to the tow vehicle using a hitch pin and make sure a retaining pin is secured in the
hitch pin. Always attach the safety chains to the applicator and the tow vehicle.
WARNING – Before unhooking the applicator, empty contents from tank, block wheels, unpin
the jack from storage position, and lock it in the usage position. Lower the jack stand to the ground
until the weight of the applicator is transferred to the jack. Keep hands and feet away from the jack
stand when lowering.
Remove the hitch pin and unhook the safety chains.
WARNING – Always relieve hydraulic system pressure before disconnecting hoses from tractor
or servicing hydraulic system. See the tractor’s operating manual for proper procedures. Disconnect the hydraulic hoses. Install
dust covers over the hose plugs and outlets.
When not in use, the jack handle is stored under the tongue, as
pictured to the right.
When not in use, lock the stub wing in place with the keeper pin
provided. This will keep the stub wings from unfolding when
temperatures uctuate and cause thermal expansion in the
hydraulic system.
Hitching and Unhitching the Applicator
Follow these maintenance guidelines during the initial operation of your NitroGro applicator.
First 30 minutes of operation:
1. Ensure all coulters and nozzles are clean and working properly. Clean and adjust accordingly.
2. Check all hydraulic and chemical lines. Be sure none of them are kinked, pinched or leaking. Adjust lines accordingly.
3. Re-torque all of the wheel bolts.
4. Check all other fasteners and hardware. Adjust accordingly.
5. Lubricate all grease ttings.
6. Ensure that outside wings are not creeping up. If needed, adjust the counterbalance valves. Refer to “Counterbalance Valve”on page
15 for instructions.
After 4 hours of operation:
1. Ensure all coulters and nozzles are clean and working properly. Clean and adjust accordingly.
2. Check all hydraulic and chemical lines. Be sure none of them are kinked, pinched or leaking. Adjust lines accordingly.
3. Re-torque all of the wheel bolts.
4. Check all other fasteners and hardware. Adjust accordingly.
After 10 hours of operation:
1. Ensure all coulters and nozzles are clean and working properly. Clean and adjust accordingly.
2. Check all hydraulic and chemical lines. Be sure none of them are kinked, pinched or leaking. Adjust lines accordingly.
3. Re-torque all of the wheel bolts.
4. Check all other fasteners and hardware, especially the U-bolts that secure the coulters to the toolbar. Tighten if needed.
Upon completing the initial break-in period, begin the standard maintenance schedule as described in “Service” on page 24.
Initial Operation
Shut-o valve on Stub wing

17
Unfolding
1. Toolbar Completely Up
(Down Pressure Circuit - Green Taped Hoses)
2. Main Toolbar Forward and Allow Locks to Fully Engage. Hold
hydraulics for 5 seconds once wings fold completely forward.
(Toolbar Fold Circuit - Non-Taped Hoses) To be sure locks are
fully engaged, and make sure the arrow are aligned for the
latches on both sides before eld use.
WARNING: Failure to allow locks to fully engage, as pictured
below, can cause severe damage to the applicator. Look at
the align arrows decal before eld use.
3. Flip Toolbars Out
(Toolbar Flip Circuit - Red Taped Hoses)
Folding & Unfolding
Folding
1. Toolbar Completely Up
(Down Pressure Circuit - Green Taped Hoses)
2. Flip Toolbar In
(Toolbar Flip Circuit - Red Taped Hoses)
3. Main Toolbar Backwards
(Main Toolbar Fold Circuit - Non-Taped Hoses)
4. Main Toolbar Down
(Down Pressure Circuit - Green Taped Hoses)
WARNING: Ensure wings are resting in wing
saddles before transport (as pictured below).
Scan to watch
the video

18
Electric Switches
Momentary push button switch for
raise lower circuit. The height of this
switch should be set so that it gets
pressed when the toolbar lowers in the
rest position when folded. It should
be plugged into the side of the dual
solenoid valve with number 1 and 2
ports (side A). The wire leads coming
from side A should be wired to the
switch in the normally closed position.
Momentary whisker switch for fertilizer
ow on/o. The height of this switch
should be set so that it gets pressed by
the parallel arm at the toolbar height
that you want the fertilizer pump to shut
o. It should be wired in the normally
closed position.
Momentary whisker switch for latch/
folding circuit. The height of this switch
should be set so that it gets pressed
by the parallel arm when the toolbar
is completely raised up. It should be
plugged into the side of the dual
solenoid axle with number 3 and 4 ports
(side B). The wire leads coming from side
B should be wired to the switch in the
normally open position.
1
23
4
Dual Solenoid Valve

19
1. Hook tractor to NitroGro and adjust hitch so that frame on applicator is level or tilting forward slightly.
2. Connect hydraulic lines. See “Connecting the Hydraulic Hoses” on page 15.
3. Unfold the unit. See “Folding & Unfolding”on page 17.
4. Lower the unit until the lift cylinders bottom out on the stroke control spacers. Add or remove stroke control spacers until the center toolbar
section reaches desired application depth. For best results, move forward while lowering the toolbar.
5. Adjust the wing gauge wheels so the coulters on the wings are the same depth and the toolbar is level when lowered.
6. Using the desired rate of application (GPA) and speed of application (MPH), reference the supplied sizing charts beginning on page
30 of this manual to determine which orices or injectors will provide optimal application pressure. Install the orices or injectors
in the check valve unit above each row unit that is mounted on the coulter shaft.
NOTE – The unit will be either be set up to skip a row (“1 Down”), or re-apply the outside row (“1 Up”).
• If the unit is set up as “1 Down” (23 or 35 coulters), then the outside coulters on each end of the unit will be 1.5x the rate
of the other coulters.
• If the unit is set up as “1 Up” (25 or 37 coulters), then the outside coulters on each end of the unit will be 0.5x the rate of
the other coulters.
7. Check to make sure tank is clean of all debris inside (shavings from assembly).
8. Put water in the tank and check for leaks.
IMPORTANT - Before proceeding to the next step, ensure that both the maintenance valve under the tank and the agitation
valve is open to allow the pump to prime. NEVER run the pump dry.
9. With the maintenance valve open, perform initial setup of the pump as outlined in the pump operator’s manual. After pump set up,
recheck the applicator for leaks. For pump setup see “Hydraulic PWM Pump”on page 14.
10. In-eld adjustment of hydraulic down-pressure: Adjust so that the coulters stay at desired depth with the least amount of hydraulic
pressure necessary.
IMPORTANT - DO NOT exceed 1,350 psi.
11. Adjust hydraulic ow on the raise and lower/wing kick/down-pressure circuit with the least amount of hydraulic pressure necessary
while maintaining a reasonable speed to raise and lower the toolbar. This will prevent excess heat in the hydraulic system as this circuit
provides continuous toolbar down-pressure.
12. Fold the wings up for transport. See “Folding & Unfolding”on page 17.
IMPORTANT - Be sure to fully raise the toolbar before folding the wings up! Failure to do so will result in damage to the unit.
13. TIRE PRESSURE: The following is to be used as a general guide for tire ination for cyclic use. Figures can vary depending on
specic brand of tire used. It is important that tires are inspected before and after operation. The tire should stand up with no
side wall buckling or distress as the tire rolls. Do not exceed the tire pressure indicated below:
Operation
Tires for Gauge Wheels psi
ST215-75D14 Carlisle Sport Trail Tire 45
6018 Tires for Single Wheel Applicators psi
VF320/105R46 (Alliance) (172D) 71
VF380/90R46 (Alliance) (173D) 57
6018 Tires for Walking Tandem Dual Wheel Applicators psi
VF320/105R46 (Alliance) (172D) 20
VF380/90R46 (Alliance) (173D) 17
6026 Tires for Walking Tandem Dual Wheel Applicators psi
VF320/105R46 (Alliance) (172D) 29
VF380/90R46 (Alliance) (173D) 25

20
Initial Console Programming
HINT: If you enter the wrong value when entering your data press “ENTER” then press “ENTER” again and re-enter your value again.
• Select the unit of measurement by pressing the CE button until the desired selection appears in the display and press“ENTER”
NOTE - The unit of measurement for the United States is Volume per Acre.
• Select the type of sensor by pressing the CE button until the desired sensor type appears in the display and press“ENTER”.
For Phoenix 10, select SP2.
For wheel drive sensor, select SP1.
• The message“CAL C-SD STANDARD VALVE” will appear in the console’s display.
For PWM pump, press CE until C-P-C PWM appears. Press “ENTER”.
• The message“CAL SELF TEST 00” will appear in the console’s display. Press the“BOOM CAL 1”button and enter the value shown in the
table below. To store the values, press“ENTER” (the enter button will light up), input the value and then press “ENTER” to store your
value. Repeat for Boom 2 through 5. Press the arrow keys to advance to the remaining booms.
• Press the “SPEED CAL” button and input the appropriate speed calibration value for the type of sensor being used and press“ENTER”.
For Phoenix 10, the speed calibration is 785.
For wheel drive sensor, refer to the speed calibration steps in the Raven SCS 450 operator’s manual.
• Press the “METER CAL” button and enter the meter calibration value stamped on the ow meter’s identication tag.
The meter calibration value is approximately 1,340 gallons. Check the stamped valve to be sure.
• Press the“VALVE CAL”button and input the calibration number that corresponds with the control valve being used and press“ENTER”.
For PWM Pump, the valve calibration is 0043 or 43. If the pump does not react fast enough to the desired rate, 33 can be
entered here to speed up the controller’s reaction time.
• Press the “RATE 1 CAL” button and “ENTER” the Rate 1 value. Refer to the “Calculate the Rate 1 and Rate 2 Cal Values”section of the
Raven SCS 450 manual and press“ENTER”.
• Press the “RATE 2 CAL” button and “ENTER” the Rate 2 value. Refer to the “Calculate the Rate 1 and Rate 2 Cal Values”section of the
Raven SCS 450 manual and press“ENTER”.
• The initial console programming is now complete, and the ashing “CAL” in the console’s display should turn o. If it does not, repeat
the procedure starting from the rst step above.
• These settings will be stored and the previous steps do not need to be repeated after powering o or on.
• Adjust the PWM osets by selecting “Data Menu”and use the arrows to nd the high PWM and Lowe PWM osets. Set the high PWM
oset to 220 and the low PWM oset to 50. Next, nd the PWM frequency and set it to 122.
RESET: If an entry or selection error is made during any steps of this procedure, turn the POWER switch to the OFF position, press and
hold CE while turning the POWER switch to the ON position to reset the console.
Boom # Value
Boom 1 135
Boom 2 150
Boom 3 150
Boom 4 150
Boom 5 135
Raven 450 Controller Set Up
Scan to watch
the video
This manual suits for next models
1
Table of contents
Other J&M Farm Equipment manuals

J&M
J&M 32 Series User manual

J&M
J&M 510-ST User manual

J&M
J&M 275-ST User manual

J&M
J&M Trail-Blazer TB-6000 User manual

J&M
J&M NITRO-GRO 5010 User manual

J&M
J&M Speed Tender 535-ST User manual

J&M
J&M GC31t-1 User manual

J&M
J&M Torsion Flex User manual

J&M
J&M 1522 User manual

J&M
J&M NITRO-GRO 5010 User manual
Popular Farm Equipment manuals by other brands

Redexim
Redexim DS800 Operating and parts manual

Hi-Way
Hi-Way SA-9 manual

Kverneland
Kverneland ACPND 65929 Series Technical & service manual

Smithco
Smithco Super Star 42-000-E Operator's manual

APV
APV ZS 200 M4 Original operating instructions

IntelligentAg
IntelligentAg Engage Zone Control Maintenance manual