jbc CP-D Series User manual

www.jbctools.com
Español 15
English 3
Page
Compact
Micro Tweezers Station
Ref. CP-D

2

www.jbctools.com
3
Manual
Packing List
The following items should be included:
CP Control Unit
Ref. CP-1D (120V)
CP-2D (230V)
CP-9D (100V)
Brass Wool
Ref. CL6210
CP Control Unit ........................................ 1 unit
Micro Tweezers ......................................... 1 unit
Cartridges ................................................. 2 units
Brass wool .................................................. 1 unit
Sponge ......................................................... 1 unit
Power Cord ................................................. 1 unit
ww w.j bc too ls.c om
Sponge
Ref. S0354
Micro Tweezers
Ref. PA120-A Cartrdiges (x2)
Ref. C120002
Compact
Micro Tweezers Station
Ref. CD-SD
Power Cord
Ref. 0009417 (100V/120V)
0009401 (230V)

4
Power Cord Socket
Main switch
Fuse
Cable Collector
Tip Cleaning System
Process Control
Adjustable Stand:
Intelligent Heat
Management
Equipotential connection
USB-B connector
Features
CP Control Unit
Ref. CP-1D (120V)
CP-2D (230V)
CP-9D (100V)
Micro
Tweezers
Ref. PA120-A

www.jbctools.com
5
Adjustable stand
Cable collector
Adjust the tool stand to suit your work position.
Place the cable on the collector and adjust its position to maintain working area free of cable.

6
Wiping:
Use the slots to wipe off any remaining
particles.
Tip Cleaning System
Tapping:
Tap gently to eliminate excess solder.
Sponge
Ref. S0354
The least harmful cleaning method.
Keep the sponge damp with distilled water when
working to avoid tip wear.
Brass Wool
Ref. CL6210
Very effective cleaning method.
Leaves a small layer of solder on the tip preventing
oxidation between cleaning and rewetting.
Select the option that best suits your tip cleaning needs.
More options for the splashguard (not supplied):
Inox Wool
Ref. CL6205
Provides a superior
cleaning on the tip.
Metal Brush
Ref. CL6220
When used carefully,
it provides a more
thorough cleaning.
Splashguard
Tip Wipe

www.jbctools.com
7
Changing cartridge
Compatible cartridges
CP station works with C120 cartridge range. Find the model that best suits your soldering needs
in www.jbctools.com
Turn the station off and follow these guidelines for a safe cartridge change:
Important: Insert the cartridge as far as
the mark for a correct connection.
Mark
1. Removing 2. Inserting
Loosen the screw and remove the cartridge.
Use a flat plier if the cartridge is still hot.
ø0,7 1,5mm
ø 0,2
5mm
6mm
C120-009 C120-010
C120-004 C120-001C120-005 C120-009 C120-010
3. Aligning
Use a flat plier for a safe tip alignment.
Do not over-tighten the cartridge.
Alignment
Important: Tighten the screw. This is
necessary for the tool to function.
4. Fixing

JBC
Manager
8
USB Connector
Download the latest softwares from our website to improve your soldering station.
JBC Updater
www.jbctools.com/software.html
Update the station software via USB connection:
JBC Manager
www.jbctools.com/manager.html
Manage and monitor as many stations as your Windows PC supports by using the JBC Manager.
You can export data to another PCs.
Cable USB AB
Register Settings
Create graphs of the
soldering process in real time
with power and temperature
data.
Manager Settings
Change settings for a group
of JBC stations at the same
time.
any JBC
station
USB
Hub
Cable
USB AB

www.jbctools.com
· Change temperature
(from 200 to 400ºC)
· Select temperature levels
· Fix one temperature
· Change Sleep temperature
· Set Sleep delay
(from 0 to 9 min or no Sleep)
· Change Hibernation delay
(from 0 to 35 min)
9
Operation
The JBC Exclusive Heating System
This revolutionary technology is able to recover the tip temperature extremely quickly.
This allows the user to work at a lower temperature.
As a result, the tip life increases x5 times.
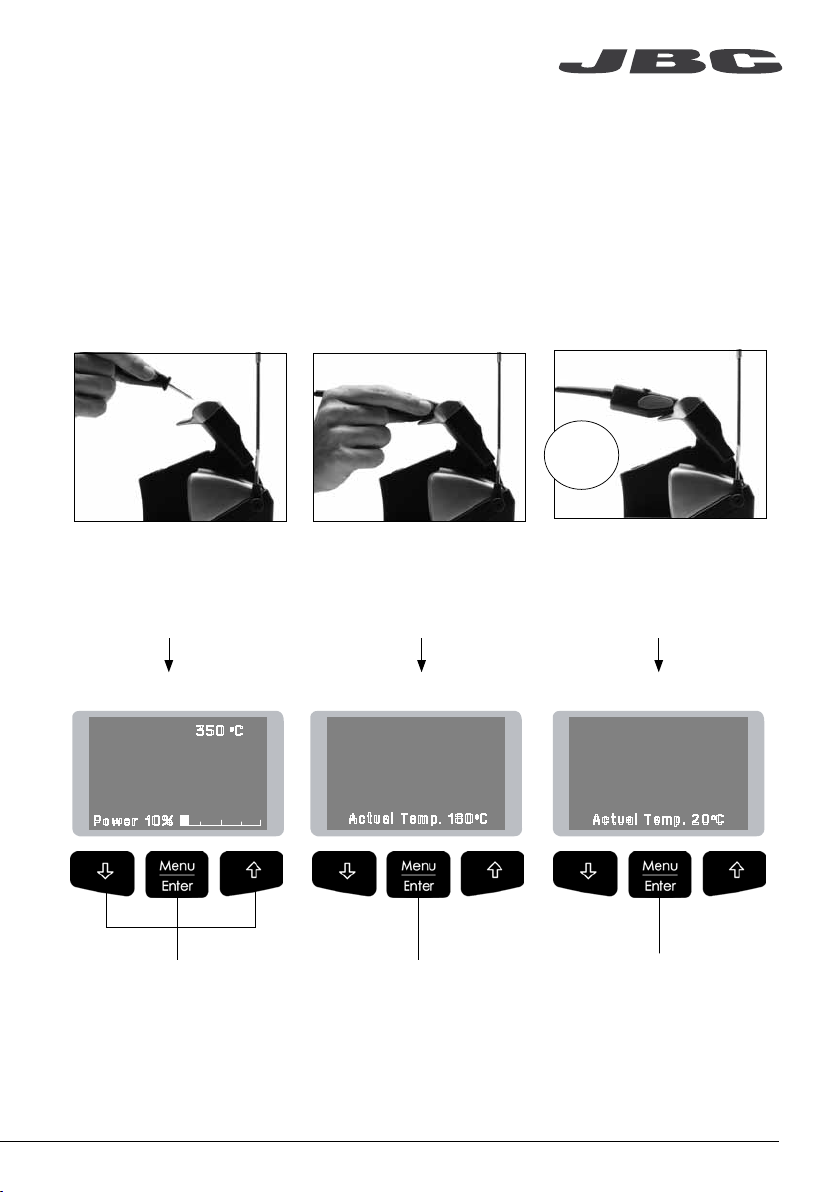
1. Work
Lift tool from the stand and
the tool tip will heat up to the
selected temperature.
2. Sleep
When the tool is in the stand,
the temperature reduces to
180ºC / 360ºF (preset sleep
temperature).
Tool in the stand
Actual Temp. 180
o
C
Sleep
Tool in the stand after sleep
No heat
Actual Temp. 20
o
C
Hibernation
0
c
Selected temp.
350
o
C
Power 10%
350
After
30’
3. Hibernation
After longer periods of inactivity
(pre-set to 30 minutes), the
power is cut off and the tool
cools down to room temperature.

10
Menu Screen
Main menu
Counters
Tool settings
4 Counters
5
Program version
4
Hibernation hours 0
5
No tool hours 0
6 Sleep cycles
0
4
Sleep temp 180
0
C
5
Hibernationdelay
3
0 min
6
Temp adjust + O
O
C
Tool 245
Tool 245
BackBack
Station settings
Back
Original PIN: 0105
The work screen provides
useful information of tool
status in real time.
0
c
Selected temp.
350
o
C
Power 10%
Fixed temp.
350
o
C
Displays a specific fixed temp.
Shown when you have
selected temp. levels.
Work Screen
Process Control
1
Fix one temp -----
2
Temp levels set OFF
3
Sleep delay 0 min
5 Beep ON
6
Change PIN
1 Temp unit
Celsius
2
Maximum temp 400
0
C
3
Minimum temp 200
0
C
4
Help text OFF
Levels ºC
270 350 400
1
Plugged hours 0
2
Working hours 0
3
Sleep hours 0
350
Exit
1 Reset settings
2
Station settings
3
Tool settings

www.jbctools.com
11
Before carrying out maintenance or storage, always allow the equipment to cool.
- Clean the station’s screen with a glass cleaner
or a damp cloth.
Remove the fuse by pulling the black cap.
If necessary use a tool to lever it off.
Press the new fuse into the holder and
replace it in the station.
Clean
periodically
- Use a damp cloth to clean the casing and
the tool. Alcohol can only be used to clean
the metal parts.
- Check periodically that the metal parts of
the tool/stand are clean so that the station
can detect when the tool is in the stand.
- Maintain tip surface clean and tinned prior
to storage in order to avoid tip oxidation.
Rusty and dirty surfaces reduce heat
transfer to the solder joint.
- Periodically check all cable connections.
Maintenance
- Replace the fuse if it is blown according to the following guidelines:
- Replace any defective or damaged pieces. Use original JBC spare parts only.
- Repairs should only be performed by a JBC authorized technical service.

12
It is imperative to follow safety guidelines to prevent electric
shock, injury, fire or explosion.
- Do not use the units for any purpose other than soldering or rework. Incorrect use may cause
fire.
- The power cord must be plugged into approved bases. Be sure that it is properly grounded
before use. When removing it, hold the plug, not the wire.
- Do not work on electrically live parts. Antistatic handle of soldering irons is electrically
conductive.
- The tool should be placed in the stand when not in use in order to activate the sleep mode.
The soldering tip, the metal part of the tool and the stand may still be hot even when the station is
turned off. Handle with care, including when adjusting the stand position.
- Do not leave the appliance unattended when it is on.
- Do not cover the ventilation grills. Heat can cause inflamable products to ignite even when
out of sight.
- Use a “non residue” classified flux and avoid contact with skin or eyes to prevent irritation.
- Be careful with the fumes produced when soldering.
- Keep your workplace clean and tidy. Wear appropriate protection glasses and gloves when
working to avoid personal harm.
- Utmost care must be taken with liquid tin waste which can cause burns.
- This appliance can be used by children over the age of eight and also persons with reduced
physical, sensory or mental capabilities or lack of experience provided that they have been given
adequate supervision or instruction concerning use of the appliance and understand the hazards
involved. Children must not play with the appliance. Maintenance shall not be carried out by
children unless supervised.
Safety

- Total unit weight: 2.7 Kg (6 lb)
- Size: 150 x 175 x 145 mm
- Temperature range: 90 to 450°C / 190 to 840°F (±5%).
- Output Peak Power: 80W.
- CP-1D 120V 50/60Hz. Input fuse: 2A. Output: 23,5V.
- CP-2D 230V 50/60Hz. Input fuse: 1A. Output: 23,5V.
- CP-9D 100V 50/60Hz. Input fuse: 2A. Output: 23,5V.
- Tip to ground resistance <2 ohms
- Tip to ground voltage <2mV RMS
- Ambient operating temp: 10-40 ºC / 50-104 ºF
- USB connection station-PC
- Complies with CE standards
- ESD protected housing “skin effect”
www.jbctools.com
13
Specifications

14

www.jbctools.com
15
Power Cord
Cable de red
Manual
Composición
Los siguientes artículos deberían estar incluidos:
CP Control Unit
Unidad de Control CP
Ref. CP-1D (120V)
CP-2D (230V)
CP-9D (100V)
Brass Wool
Lana de latón
Ref. CL6210
CP Control Unit
Unidad de Control CP ......................... 1 unidad
Micro Tweezers
Micro pinzas ........................................... 1 unidad
Cartridges
Cartuchos .......................................... 2 unidades
Brass wool
Lana de latón ......................................... 1 unidad
Sponge
Esponja .................................................... 1 unidad
Power Cord
Cable de red .......................................... 1 unidad
ww w.j bc too ls.c om
Sponge
Esponja
Ref. S0354
Micro Tweezers
Micro pinzas
Ref. PA120-A
Cartridges (x2)
Cartuchos
Ref. C120002
Compact
Micro Tweezers Station
Ref. CP-D

16
Toma de corriente
Interruptor de red
Fusible
Recogecable
Sistema de limpieza
de puntas
Control del proceso
Soporte ajustable:
Gestión inteligente
del calor
Conexión equipotencial
Conector USB-B
Características
CP Control Unit
Unidad de Control CP
Ref. CP-1D (120V)
CP-2D (230V)
CP-9D (100V)
Micro
Tweezers
Micro pinzas
Ref. PA120-A

www.jbctools.com
17
Soporte Ajustable
Recogecable
Ajuste el soporte de la herramienta para adaptarlo a su posición de trabajo.
Coloque el cable en el recogedor y ajuste su posición para evitar molestias en la zona de trabajo.

18
Limpiar:
Utilice las ranuras para eliminar posibles
partículas adheridas a las puntas.
Sistema de limpieza de puntas
Golpetear:
Golpee ligeramente los cartuchos para
eliminar el exceso de estaño.
Sponge
Esponja
Ref. S0354
El método más suave y menos dañino. Mantenga la
esponja húmeda (no mojada) con agua detilada para
evitar el deterioro de la punta.
Brass Wool
Lana de latón
Ref. CL6210
El método más efectivo. La lana de latón deja una fina
capa de estaño en la punta que previene la oxidación
entre la limpieza y la rehumectación.
Elija la opción que se ajuste mejor a sus necesidades de limpieza.
More options for the splashguard (not supplied):
Inox Wool
Lana inoxidable
Ref. CL6205
Proporciona una
limpieza superior
de la punta.
Metal Brush
Cepillos de metal
Ref. CL6220
Si se utiliza con prudencia,
proporciona una limpieza
más profunda.
Protector antisalpicaduras
Limpiador de puntas

www.jbctools.com
19
Cambio de cartucho
Cartuchos compatibles
La estación CP funciona con la gama de cartuchos C120. Encuentre el modelo que se ajuste mejor a
sus necesidades de soldadura en www.jbctools.com
Desenchufe la estación o la herramienta y siga estas instrucciones para un cambio seguro:
Importante: Inserte el cartucho hasta la
marca para una correcta conexión.
Marca
1. Retirar 2. Insertar
Afloje el tornillo y retire el cartucho.
Utilice alicates de punta plana si el
cartucho está caliente.
ø0,7 1,5mm
ø 0,2
5mm
C120-007 C120-008
3,5mm
C120-004 C120-001C120-005 C120-009 C120-010
3. Alinear
Utilice alicates de punta plana para alinear
las puntas de forma segura.
No apriete en exceso el cartucho.
Alineamiento
Atornille de nuevo. Es necesario para que la
herramienta funcione.
4. Fijar

20
cualquier
estación JBC
JBC
Manager
USB
Hub
Cable
USB AB
www.jbctools.com/manager.html
Gestione y monitorice tantas estaciones como soporte su ordenador Windows (PC) a través de USB.
Puede exportar los datos a otros PCs.
JBC Manager · Gestor
Conector USB
Descargue los últimos softwares de nuestra web para mejorar su estación soldadora.
JBC Updater · Actualizador
www.jbctools.com/software.html
Actualice el programa de la estación a través de la siguiente conexión USB:
Cable USB AB
Register Settings
Configuración de registros
Cree gráficos de los proce-
sos de soldadura en tiempo
real con datos de tempera-
tura y potencia.
Manager Settings
Configuración del Manager
Edite parámetros para un
grupo de estaciones al
mismo tiempo.
This manual suits for next models
3
Table of contents
Languages:
Other jbc Soldering Gun manuals