Kaabo SKYWALKER 8 36V/10.4A User manual

USER MANUAL
Skywalker
Ningbo Kaabo Technology Co., Ltd.
Add: 3rd Floor, Building B3, Shanshan New Energy Base, NO. 238 Yunlin Middle
Road, Haishu District, Ningbo Zhejiang,China
Tel: 0086-0574-88321118
Email: [email protected]
Web: www.kaabo.com

CONTENTS
Product Introductions...................................................................................1
Safety Instructions........................................................................................15
Opening & Folding...................................................................................... 16
Basic Operation.............................................................................................18
Taking the First Ride.....................................................................................21
Daily Maintenance........................................................................................23
FAQS.............................................................................................................. 24
Warran..t..y.........................................................................................................25
Memo............................................................................................................ 26

1
2
Configuration
36V / 10.4A
36V / 21A
48V / 13A
Max. Range
28-32 km
65-70 km
45-50 km
Max. Speed
25 km/h
Charging
3-5 h
6-8 h
4-6 h
Motor
350 w
500 w
N.W
16 kg
18 kg
19.3 kg
Brake
Rear Drum Brake + Electronic Brake
Shock Absorber
Front Shock Absorber
Tire
8.0 x 2.0 Tires 175Kpa
Open Size
1050 x 560 x 1150 mm
Folding Size
1100 x 190 x 320 mm
Package Size
1070 x 260 x 430 mm
Product category
EN 17128 CLASS 2
PRODUCT INTRODUCE
PRODUCT DIAGRAM 8 SPECIFICATION 8
*The specification can be changed by the manufacturer to meet the requirements and laws of
different countries and regions.
*The distance can be aff ected by loaded weight, wind direction, wind speed, riding surface
density, slope, and tire condition.
01
[1] Handle
[2] Light & Horn Switch
[3] Display
[4] Folding Lever
[5] T Bar
[6] Lock Nut
[7] Main Tube
[8] Light & Horn
[9] Protection Pin
[10] Shock Absorber
[11] Pedal
[12] Rear Light
[13] 8” Tire
[14] Kickstand
[15] Motor

PRODUCT DIAGRAM 8H
SPECIFICATION 8H
3
4
Configuration
36V / 10.4A
36V / 21A
48V / 13A
Max. Range
28-32 km
65-70 km
45-50 km
Max. Speed
25 km/h
25 km/h
Charging
3-5 h
6-8 h
4-6 h
Motor
350 w
500 w
N.W
17.3 kg
19.4 kg
18.6 kg
Brake
Rear Drum Brake + Electronic Brake
Shock Absorber
Front and Rear Shock Absorber
Tire
8.0 x 2.0 Tires 175Kpa
Open Size
1050 x 560 x 1150 mm
Folding Size
1100 x 190 x 320 mm
Package Size
1070 x 260 x 430 mm
Product category
EN 17128 CLASS 2
*The specification can be changed by the manufacturer to meet the requirements and laws of
diff erent countries and regions.
*The distance can be aff ected by loaded weight, wind direction, wind speed, riding surface
density, slope and tire condition.
[1] Handle
[2] Light & Horn Switch
[3] Display
[4] Folding Lever
[5] T Bar
[6] Lock Nut
[7] Main Tube
[8] Light & Horn
[9] Protection Pin
[10] Shock Absorber
[11] Pedal
[12] Rear Light
[13] 8” Tire
[14] Kickstand
[15] Motor

PRODUCT DIAGRAM 8S
SPECIFICATION 8S
5
6
Configuration
48V / 13A
Max. Range
40 - 45 km
Max. Speed
25 km/h
Charging
4 - 6 h
Motor
800 w
N.W
22 kg
Brake
Rear Disc Brake + EABS Electronic Brake
Shock Absorber
C Shock Absorption
Tire
85mm Solid Tire 175Kpa
Open Size
1100 x (520 ~560) x 1150 mm
Folding Size
1080 x 190 x 350 mm
Package Size
1120 x 260 x 430 mm
Product category
EN 17128 CLASS 2
*The specification can be changed by the manufacturer to meet the requirements and laws of
diff erent countries and regions.
*The distance can be aff ected by loaded weight, wind direct, wind speed, riding surface density,
slope and tire condition.
[1] Handle
[2] Light & Horn Switch
[3] Display
[4] Folding Lever
[5] T Bar
[6] Lock Nut
[7] Main Tube
[8] Light & Horn
[9] Protection Pin
[10] Shock Absorber
[11] Pedal
[12] Rear Light
[13] 8” Tire
[14] Kickstand
[15] Motor

PRODUCT DIAGRAM 10
SPECIFICATION 10
7
8
Configuration
36V / 10.4A
36V / 21A
48V / 13A
Max. Range
28-32 km
65-70 km
50 - 55 km
Max. Speed
25 km/h
25 km/h
Charging
3-5 h
6-8 h
4-6 h
Motor
400 w
500 w
N.W
17.3 kg
19.4 kg
18.6 kg
Brake
Front and Rear Disc Brake + Electronic Brake
Shock Absorber
No
Tire
10.0 x 2.25 / 10.0 x 2.5 tires 250Kpa/310Kpa
Open Size
1135 x 560 x 1200 mm
Folding Size
1120 x 240 x 360 mm
Package Size
1200 x 300 x 450 mm
Product category
EN 17128 CLASS 2
*The specification can be changed by the manufacturer to meet the requirements and laws of
diff erent countries and regions.
*The distance can be aff ected by loaded weight, wind direction, wind speed, riding surface
density, slope and tire condition.
[1] Handle
[2] Light & Horn Switch
[3] Display
[4] Folding Lever
[5] T Bar
[6] Lock Nut
[7] Main Tube
[8] Light & Horn
[9] Protection Pin
[10] Shock Absorber
[11] Pedal
[12] Rear Light
[13] 8” Tire
[14] Kickstand
[15] Motor

PRODUCT DIAGRAM 10H
PRODUCT DIAGRAM 10H
9
10
Configuration
36V / 10.4A
36V / 21A
48V / 15.6A
Max. Range
28-32 km
65-70 km
50 - 55 km
Max. Speed
25 km/h
25 km/h
Charging
3-5 h
6-8 h
4-6 h
Motor
400 w
800 w
N.W
19.6 kg
21.7 kg
21.4 kg
Brake
Front and Rear Disc Brake + Electronic Brake
Shock Absorber
Front and Rear Shock Absorber
Tire
10.0 x 2.25 / 10.0 x 2.5 tires 250Kpa/310Kpa
Open Size
1186 x 560 x 1200 mm
Folding Size
1170 x 240 x 360 mm
Package Size
1240 x 300 x 430 mm
Product category
EN 17128 CLASS 2
*The specification can be changed by the manufacturer to meet the requirements and laws of
diff erent countries and regions.
*The distance can be aff ected by loaded weight, wind direction, wind speed, riding surface
density, slope and tire condition.
[1] Handle
[2] Light & Horn Switch
[3] Display
[4] Folding Lever
[5] T Bar
[6] Lock Nut
[7] Main Tube
[8] Light & Horn
[9] Protection Pin
[10] Shock Absorber
[11] Pedal
[12] Rear Light
[13] 8” Tire
[14] Kickstand
[15] Motor

PRODUCT DIAGRAM 10C
PRODUCT DIAGRAM 10C
13
14
Configuration
48V / 15.6A
60V / 13A
Max. Range
55km
45km
Max. Speed
25km/h
25km/h
Charging
8h (2A charging)
7h (2A charging)
Motor
800w
1000w
N.W
23.7kg
24kg
Brake
Front and Rear Disc Brake + Electronic Brake
Shock Absorber
Front Type C Shock Absorber Rear Common Shock Absorber
Tire
10.0 x 2.25 / 10.0 x 2.5 tires 250Kpa/310Kpa
Open Size
1208 x 560 x 1200 mm
Folding Size
1220 x 230 x 380 mm
Product category
EN 17128 CLASS 2
*The specification can be changed by the manufacturer to meet the requirements and laws of
different countries and regions.
*The distance can be aff ected by loaded weight, wind direction, wind speed, riding surface
density, slope and tire condition.
[1] Handle
[2] Light & Horn Switch
[3] Display
[4] Folding Lever
[5] T Bar
[6] Lock Nut
[7] Main Tube
[8] Light & Horn
[9] Protection Pin
[10] Shock Absorber
[11] Pedal
[12] Rear Light
[13] 8” Tire
[14] Kickstand
[15] Motor

15
16
03
Please do not exceed maximum speed for local
traffic requirements when riding this equipment,
otherwise there may be danger.
IMPORTANT: Before driving, please make sure the
folding lock is locked.
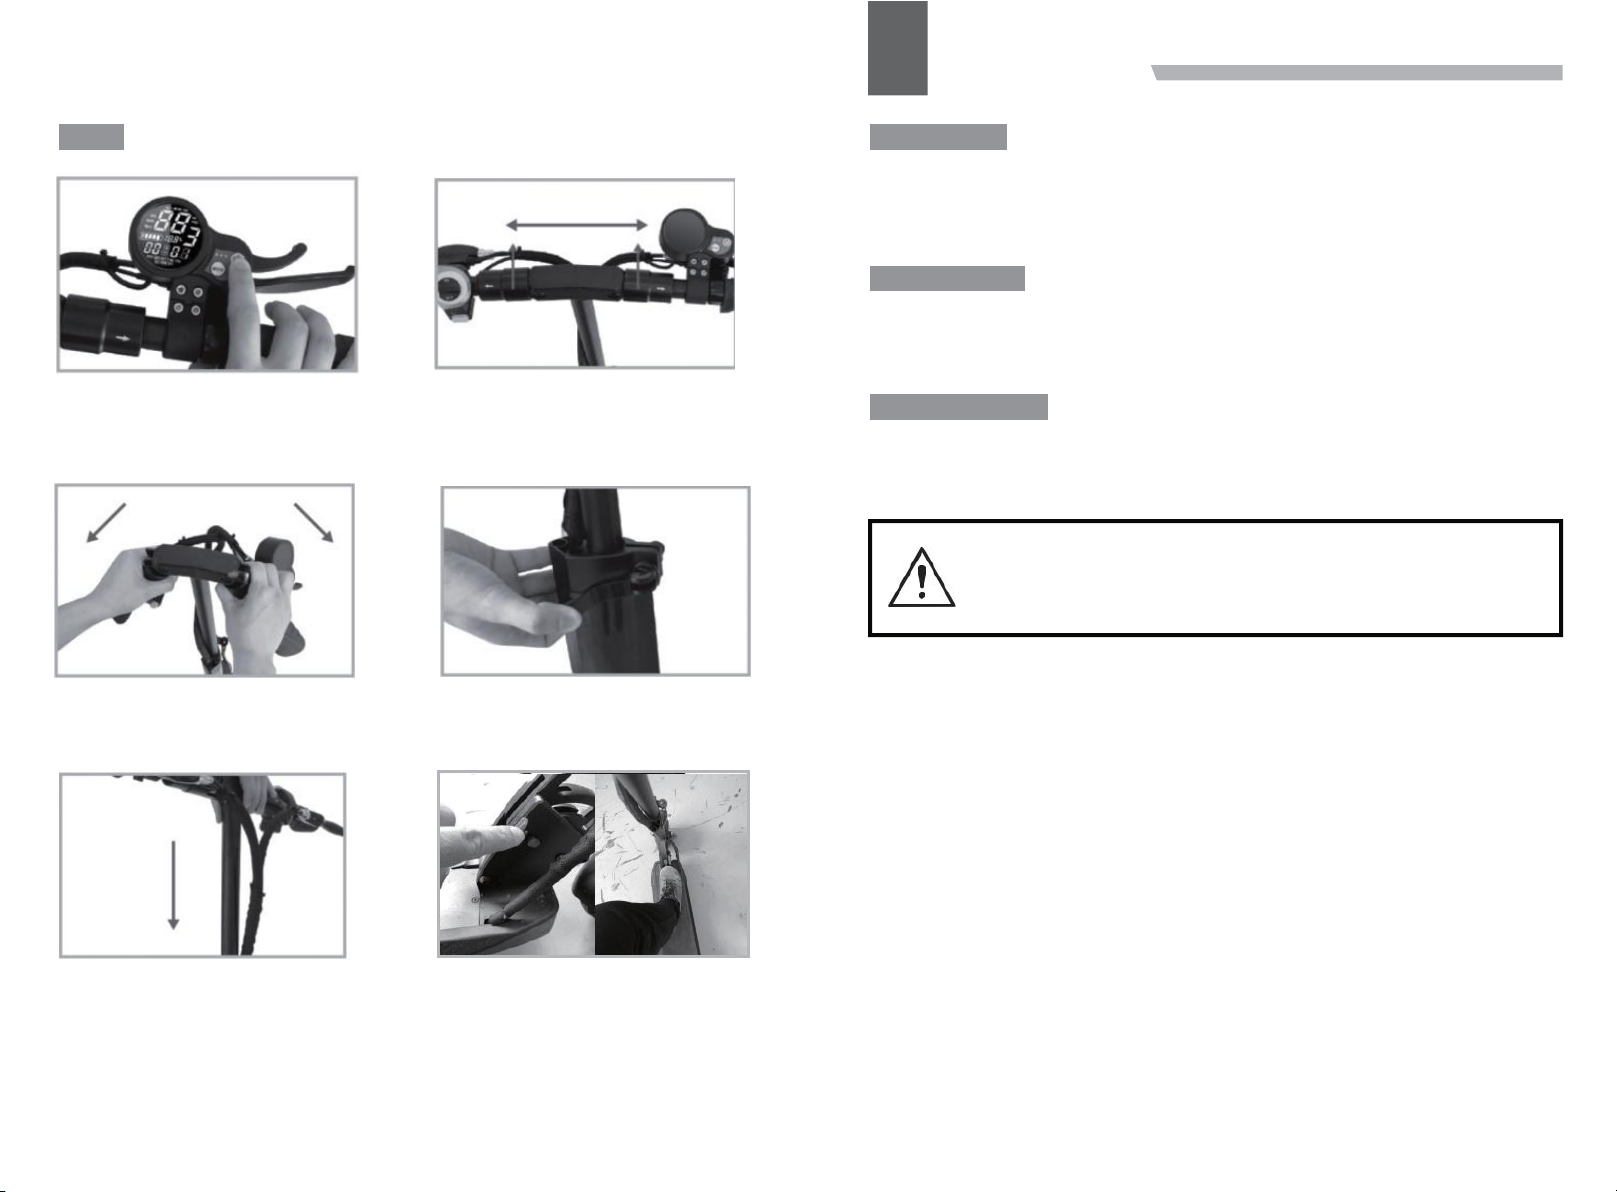
SAFETY INSTRUCTIONS OPENING & FOLDING
Tips Open
This chapter is very important. Please read carefully and understand all the instructions. We will
not be responsible for any property loss, casualties, accidents, legal disputes caused by violation of
the safety instructions in this chapter.
Safety Instruction
1. Do not drive on rainy days.
2. Do not repair by yourself, electric shocks can occur.
3.Please abide by the local road traffic laws.
4.Do not attempt acrobatics while on the scooter.
5.Only one person can drive the scooter at a time.
6. It is best to wear safety protective equipment such as a helmet, gloves, elbow pads and knee
pads when riding.
7. Please practice on the open ground first before riding on the road.
8. Adjust the scooter to a suitable height to avoid injury.
9.Charge six hours before the first time to ride the scooter.
10.Do not cut off the power when the scooter is running.
11.Do not ride over a step or bump higher than 3cm to avoid rolling over and possible injury.
12.The scooter temperature range for use and storage should be -5℃to 50℃.
13. If the scooter is not in use for a long time, charge it once every month to maintain the longevity
if the battery.
14. Do not ride in puddles deeper than 5cm and avoid splashing water on the scooter in case of
motor or electrical faults.
15. Keep feet on the pedal when the scooter is running.
Step1:
Kick down the lever to unfold the scooter.
Turn the safety pin to the right position to
lock it
Step3:
Adjust the height by opening the locking
nut and moving the main tube up or down.
Step2:
Pull the T-tubes to the left and right side.
Step4:
Lock the nut.
02

Do not wait until the battery has completely run out to
charge the battery. Charge the scooter timely when there is
only one or two rectangles left to avoid damage of battery.
BASIC OPERATION
Fold Speed Control
When the power is on, press the power switch and then the MODE button. The screen will show
the level of speed. press Mode to change the Level (L1,L2,L3).
Step1:
Switch off
Step3:
Fold the handles.
Step5:
Withdraw the extension
17
Step2:
Pull T-tubes to the left and right sides
respectively.
Step4:
Open the locking nut.
Step6:
Unlock the protection pin. Kick down the
folding lever and push the handlebar
forward to fold the scooter.
Always keep protection pin in position
when the scooter is unfolded.
Power Switch
Press the power switch for 3 seconds and the LCD panel will light up, turning the scooter on. If the
scooter is left 90 second unmoved, the power will be off automatically.
Power Indicator
The small rectangles indicate battery power levels.
18
04

04 DISPLAY & KEY SETTINGS
19
20
Driving Mode Selection
Located underneath the main display on the right side of the handle bar you
can find two switches to control driving modes:
The ECO/TURBO switch regulates the power of your scooter. By pressing down the button, ECO
mode is activated which will reduce torque and top speed to maximize range. When the button is
not pressed, TURBO mode is activated and there is no restriction of power.
The SINGLE/DUAL switch toggles between single or dual motor drive. By pressing down the
button, DUAL motor drive is activated. When the button is not pressed, SINGLE (rear) motor drive
is activated.
For Maximum range, select ECO mode and SINGLE motor drive. For maximum power and speed,
select TURBO mode and DUAL motor drive.
Display Settings
Scooter is equipped with the following display:
Gear change. To change the gear (1=slow, 2=medium, 3=fast), while the scooter is powered ON,
press the POWER button to enter gear setting mode. Press MODE to switch between gears. To
return to operating mode either press POWER or wait for 2 seconds.
1. Speedometer. Shows the speed at which you are travelling.
2. Battery Indicator. Shows battery levels. Charge your scooter frequently, do not let it run out of
battery compeltely. As a rough guideline, charge at or below 2 bars.
3.Power Button. To turn the scooter on or off, press button for 2 seconds.
4. Accelerator. Pull to accelerate. The stronger you pull, the faster it accelerates. The scooter is
delivered in “Non-Zero Start” setting (Kick-And-Go is ON). The accelerator only works if the
scooter is already in motion.
5. Mode Button. Press to select various display options:
Detailed P-settings mode. To access P-settings to make various advanced changes, press
POWER [3] and MODE [5] simultaneously for 2 seconds.
Scan through the P-settings using the MODE button. To select a P-setting in order to make
changes, press the POWER button. Change the value (up or down) using the MODE (Up) and
POWER (Down) buttons. To return to the P-settings menu after changing a value, wait 2 seconds.
To return to operating mode, wait a further 2 seconds.
MODE
COMMENT
TIME
Time since powering on the scooter.
TRIP
Distance travelled since powering on the scooter.
ODO
Total distance travelled.
VOL
Current battery voltage.
CH2:00
Charging mode. Time (2 hours) scooter stays ON (overrides auto
-switch off) so you can use the display’s USB port to also charge
things e.g. your phone.
P-SETTINGS
P0
Tire diameter (8 for skywalker 8, 10 for skywalker 10). Do not change.
P1
Controller shut-down voltage. Default set to 52V (minimum is 48V – we recommend 52V to preserve battery life).
P2
Motor magnetic pole setting. Default is 30. Do not change.
P3
Speed signal selection. Default is 0. Do not change.
P4
Distance / speed unit. 0=km, 1=miles
P5
Start setting. 1=non-zero start (Kick-and-Go), accelerator won’t work if scooter is not in motion; 0
=immediate start (CAUTION while using this)
P6
Cruise control. 0=cruise control OFF, 1=cruise control ON.
P7
Initial acceleration. 0=strong, 1=soft.
P8
Electric (regenerative) braking (E-ABS). 0=E-ABS off, 1=E-ABS on
PA
Clear total distance travelled (ODO).
PB
Scooter auto-turn off time in minutes.
PC
Display brightness (1=low, 2=medium, 3=high)

05 TAKING THE FIRST RIDE
21
22
Start
You should choose a right place when riding for the first time, which is outdoors and should be
flat, smooth, without obstacles or slipperiness. Spread the scooter and adjust the T-tube to the
appropriate height.
Driving
1. Press power switch to start.
2. Put one foot on the front section of the pedal and other foot on the ground. Boost yourself
forward by the foot on the ground to start riding. Slightly pull the accelerator and tilt your body
forwards.
3. When the scooter starts to go forward, place both feet on pedals. The harder you press the
accelerator, the faster you will ride.
Parking
Slightly and gradually brake to cut power and slow down.
Do not brake hard, otherwise it may lead to tire attrition, or the scooter suffering a sudden loss of
power and falling down.
Matters needing attention:
1. The braking distance will be extended in wet weather
2. Different materials and components may react differently to wear or
fatigue. If the intended life of a component has been exceeded, it may
suddenly break, thus potentially causing harm to the user. Cracks,
scratches and discoloration in areas susceptible to high stress indicate
that the component has outlived its service life and should be
replaced."
3. Please check the light and road conditions when using at night.
Battery & Charger
Every scooter is equipped with a specialized lithium battery and intelligent charger, so do not
adopt other brand’s chargers. Other types of batteries are not suitable to the scooter’s charger.
Lithium Battery
It is time to charge the scooter when the battery meter flickers or there is only one bar of power
left. If left the scooter is not used for a long time, please charge it once a month at least,
otherwise the battery may become damaged.
Charger
After scooter is fully charged, please unplug power supply in time.
Instruction of Charging
1. Insert the charging plug into the charging port of the scooter first and then plug the other end
into the AC supply.
2. The scooter is charging when the indicator light of the charger shows red. When the red light
turns to green, it means the scooter is fully charged.
Note* It is suggested that to charge one more hour to guarantee the range and endurance
Rated Capacity: 48V 18.2AH Input: 54.6V 2A
WARNING! Please turn off the vehicle when charging
WARNING! Don't charge the flooded scooter and check with a professional
WARNING! Don't charge the scooter when no one is present or while sleeping
Don't charge the WARNING! Don't charge the scooter when you find an
electric shock and check with a Professional
WARNING! Don't charge or leave the battery storage under a high-
temperature above 45 degree
WARNING! Don't touch the charging port with the wet hands
WARNING! Do not charge near fire

06 DAILY MAINTENANCE
07 FAQS
23
24
Scooter T-tubes
Re-lubricate the T-tubes once every six months.
Do not use WD-40 to lubricate the product components.
Tire
Skywalker 10s tires are both pneumatic tire.
Brake
When braking performance degradation occurs, adjust the regulator (nut) in the rear wheel in
order to achieve the required sensitivity.
Battery
The lithium battery of the scooter is able to recharge up to 1000 times.
The battery needs changing when range per full charge shortens sharply.
Checking List
When the scooter is not working normally, please check the following list.
-The power is on.
-There is surplus electricity.
-The brake is unstuck.
-All the hubs and connectors are clean and in accurate link.
Note* If all the above are correct and the scooter still does not work, please consult the vendor’s
after-sales department.

08 WARRANTY
09 MEMO
25
26
g
When the following issues occur, please consult with the vendor (after-sales department).
Accessory
Quality issue
Guarantee Period
Service
Motor
Out of Service
One Year
Free Repair
Controller
Break down
under normal use
One Year
Free Repair
Charger
Break down under
normal use
One Year
Free Repair
Battery
Unable to recharge
under normal use
One Year
Free Repair
Body Structure
Deformation under
normal use or breaka
eOne Year
Free Repair
The following terms are beyond the scope of warranty: 1.Malfunction due
to misuse
2.
Malfunction caused by unauthorized modifications, disassembling ,or
repair.
3.
Accidental damage or malfunction due to unsuitable storage.
4.Unmatched warranty/proof of purchase and product. 5.Surface damages
6.Disassembling parts unspecified in this manual. 7.Damage or
malfunction caused by riding under the rain
or soaking in water.
This manual suits for next models
14
Table of contents
Other Kaabo Scooter manuals

Kaabo
Kaabo MANTIS KING GT Product information sheet

Kaabo
Kaabo Skywalker 8 User manual

Kaabo
Kaabo Wolf Warrior 11 User manual

Kaabo
Kaabo Wolf Warrior 25Ah User manual

Kaabo
Kaabo Mantis User manual

Kaabo
Kaabo Wolf Warrior GT Series User manual

Kaabo
Kaabo Mantis 48V 13Ah User manual

Kaabo
Kaabo WOLF WARRIOR X User manual