manuals.online logo
Brands
  1. Home
  2. •
  3. Brands
  4. •
  5. Kramer
  6. •
  7. Projector Accessories
  8. •
  9. Kramer VIA Campus2 PLUS User manual

Kramer VIA Campus2 PLUS User manual

VIA Campus² PLUS Quick Start
P/N:
2900- 301213QS
Rev:
1
Scan for full
manual
VIA Campus² PLUS Quick Start Guide
For Installer
Thisguide helps you installand configure your VIA Campus² PLUS for the first time.
Go to www.kramerav.com/downloads/VIA Campus2 PLUS to download the latest user
manual and check if firmware upgrades are available.
Step 1: Check what’s in the box
VIA Campus² PLUS Collaboration Device
HDMI cable extender (M to F)
2Wi-Fi antennas
1 Power adapter (19V DC)
1 Quick start guide
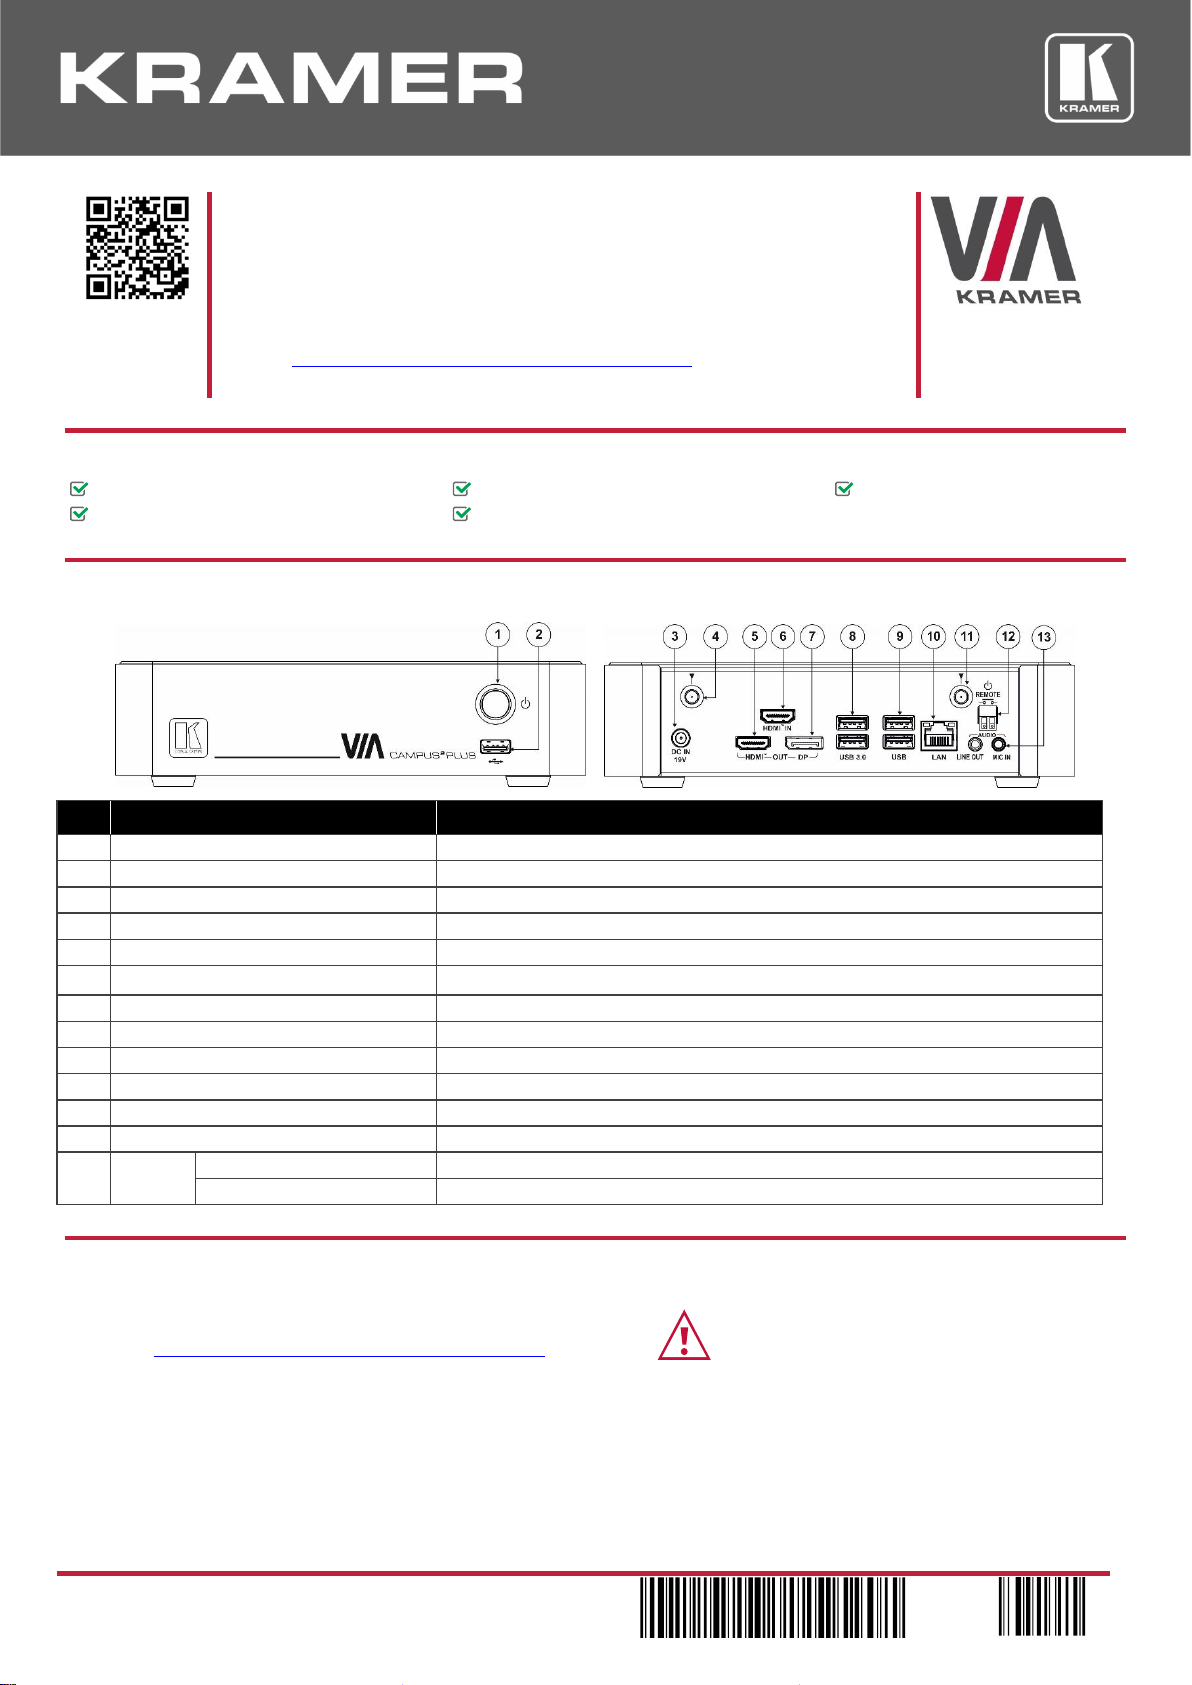
Step 2: Get to know your VIA Campus² PLUS
#
Feature
Function
1
Power Button
For turning the unit on and off.
2
USB 2.0 Connector
For upgrading firmware or connecting a USB device.
3
DC IN 19V Connector
Connects to the 19V DC power adapter.
4
Wi-Fi Antenna Port (1 of 2)
Connect one of theWi-Fi antennas for collaborating via the built-in Wi-Fi.
5
HDMI OUT Connector
Connect to an HDMI display.
6
HDMI IN Connector
Connect to an HDMI source (for example, a laptop).
7
DP OUT Connector
Connect to a DisplayPort display.
8
USB 3.0 connectors
Connect to up to 2 USB devices.
9
USB 2.0 connectors
Connect to up to 2 USB devices.
10
LAN RJ-45 Connector
Connect a Local Area Network (LAN) cable.
11
Wi-Fi Antenna Port (2 of 2)
Connect one of theWi-Fi antennas for collaborating via the built-in Wi-Fi.
12
REMOTE 2-pin Terminal Block
Connect to a toggle switch to remotely turn the device on and off.
13
AUDIO
LINE OUT 3.5mm Mini Jack
Connect to an unbalanced stereo audio acceptor.
MIC IN 3.5mm Mini Jack
Connect to a microphone.
Step 3: Install VIA Campus² PLUS
Install VIA Campus² PLUS using one of the following methods:
•Mount the unit in a rack using the recommended rack adapter
(see www.kramerav.com/product/VIA Campus2 PLUS).
•Place the device on a flat surface.
•Ensure that the environment (e.g., maximum ambient temperature &
air flow) is compatible for the device.
•Avoid uneven mechanical loading.
•Appropriate consideration of equipment nameplate ratings should
be used for avoiding overloading of the circuits.
•Reliable earthing of rack-mounted equipment should be maintained.
Step 4: Connect the inputs and outputs
Always switch OFF the power on each device before connecting it to your VIA Campus² PLUS. For best results, we
recommend that you always use Kramer high-performance cables to connect AV equipment to VIA Campus² PLUS.
1. Connect the keyboard and mouse.
2. Connect an HDMI display and/or a DisplayPort display.
3. Connect a laptop or other HDMI source.
4. Connect a Local Area Network (LAN) cable for connection to your network.
5. Connect the Wi-Fi antennas for using the built-in wireless capability.
6. Connect powered speakers and a microphone.
Step 5: Connect the power
Connect the 19V DC power adapter to VIA Campus² PLUS and plug it into the mains electricity.
Safety Instructions (See www.kramerav.com for updated safety information)
Caution:
•For products with relay terminals and GPI\O ports, please refer to the permitted rating for an external connection, located next to the terminal or in the User Manual.
•There are no operator serviceable parts inside the unit.
Warning:
•Use only the power cord that is supplied with the unit.
•Disconnect the power and unplug the unit from the wall before installing.
Step 6: Configure VIA Campus² PLUS
A wizard guides you through configuration. If you choose to skip the wizard, follow these steps for configuration:
1. On the Kramer VIA dashboard, click Features > Settings.
2. Enter the User Name (default = su) and Password (default = supass) and
click Login.
The VIA Settings window appears.
3. Define the relevant VIA settings:
▪LAN Settings –Configure your network parameters and apply
settings (DHCP is enabled by default).
▪System Controls –Manage your display and audio settings, run
control panel, select your language, etc.
▪Third Party Apps –Install/remove third party software applications.
4. Click Apply and then click Reboot to apply all settings. For more details,
see the VIA Campus² PLUS User Manual.
Scan for full
manual
VIA Campus² PLUS Quick Start Guide
For User
This guide helps you participate in a meeting using VIA Campus² PLUS.
Go to www.kramerav.com/downloads/VIA Campus2 PLUS to download the latest user
manual.
Step 1: Connect your personal device to the built-in Wi-Fi or proper network
Connect your personal device to the built-in VIA Campus² PLUS Wi-Fi network or to the same LAN / Wi-Fi network used by
the specific VIA Campus² PLUS device in your meeting room.
Step 2: Run or download the Kramer VIA app
For MAC or PC computer:
1. Enter the Room Name of the VIA Campus² PLUS device into your computer’s browser.
The Welcome page of VIA Campus² PLUS appears.
2. Select Run VIA to execute the Kramer VIA app without downloading it. (Intended for guests who are using VIA only
temporarily.)
OR
Select Install VIA to download the Kramer VIA app onto your computer. (Intended for regular users of the VIA.)
For iOS or Android devices:
•Download and install the free Kramer VIA app from Apple App Store or Google Play or scan the QR code
above.
For Chromebook or Chrome Browser:
•Click Join through browser on the Welcome page.
Step 3: Join the meeting
Wirelessly, using the Kramer VIA app:
1. Open the Kramer VIA app and, on the Welcome to VIA window, start typing the name of
the VIA device you want to connect to.
If the broadcast feature is enabled, the name of the meeting space appears.
2. Click Join.
The Login window appears.
3. In the Nickname field, enter a name for your device. This name appears on the main
display when you present content.
4. In the Room Code field, enter the 4-digit code as it appears on the main display (if
enabled).
5. Click Join.
You are logged into the VIA meeting.
The VIA Dashboard (and taskbar icon for laptops) appears on your device screen.
Using the HDMI IN socket:
•Connect your device directly to VIA Campus² PLUS using an HDMI cable.
Step 4: Using the VIA dashboard menu
•Click Features to access VIA Campus² PLUS features.
•Click Present to present your screen to the meeting participants on the main display.
•Click Participants to see who else is connected.
Step 5: VIA Campus² PLUS Features
For a complete, updated list of available features go to: www.true-collaboration.com/products.html.
Wireless Connection
Recording
Whiteboard
Powerful Content Security
Native ePolling
Chat
Mobile Mirroring
Web Browser
Enable Control
Full HD Video Streaming
Third-Party Apps
HDMI Input
Integrated YouTube Player
Digital Signage
Windows PC Operating Platform
Do Not Disturb (DND)
View Main Display
4K Output
Customizable Features
Streaming Output
Unified Communications
File Sharing
File Storage
Customizable Screen Layout
VIA Site Management (VSM)
VIA Pad Compatible

This manual suits for next models

3

Other Kramer Projector Accessories manuals

Kramer VIA-GO User manual

Kramer

Kramer VIA-GO User manual

Kramer VIA GO User manual

Kramer

Kramer VIA GO User manual

Kramer VIA Campus2 User manual

Kramer

Kramer VIA Campus2 User manual

Kramer VIA GO User manual

Kramer

Kramer VIA GO User manual

Kramer VIA GO User manual

Kramer

Kramer VIA GO User manual

Kramer VIA CONNECT PRO User manual

Kramer

Kramer VIA CONNECT PRO User manual

Kramer VIA Campus PLUS User manual

Kramer

Kramer VIA Campus PLUS User manual

Kramer VIA GO2 User manual

Kramer

Kramer VIA GO2 User manual

Kramer VIA Collage User manual

Kramer

Kramer VIA Collage User manual

Kramer VIA Connect2 User manual

Kramer

Kramer VIA Connect2 User manual

Kramer VIA CONNECT PRO User manual

Kramer

Kramer VIA CONNECT PRO User manual

Kramer VIA Connect2 User manual

Kramer

Kramer VIA Connect2 User manual

Kramer SMP Series Parts list manual

Kramer

Kramer SMP Series Parts list manual

Kramer K-Bar User manual

Kramer

Kramer K-Bar User manual

Kramer VP-796 User manual

Kramer

Kramer VP-796 User manual

Kramer VP-554X User manual

Kramer

Kramer VP-554X User manual

Kramer VIA Campus 2 User manual

Kramer

Kramer VIA Campus 2 User manual

Kramer VIA CONNECT PRO User manual

Kramer

Kramer VIA CONNECT PRO User manual

Kramer VIA CONNECT PRO User manual

Kramer

Kramer VIA CONNECT PRO User manual

Kramer VIA Campus2 User manual

Kramer

Kramer VIA Campus2 User manual

Kramer VIA Campus User manual

Kramer

Kramer VIA Campus User manual

Kramer VIA Collage User manual

Kramer

Kramer VIA Collage User manual

Kramer VP-770 User manual

Kramer

Kramer VP-770 User manual

Popular Projector Accessories manuals by other brands

Premier Mounts PDS-URPM installation guide

Premier Mounts

Premier Mounts PDS-URPM installation guide

NOBOCOOL Kapture manual

NOBOCOOL

NOBOCOOL Kapture manual

Navitar HDSSW08 Dimensional drawing

Navitar

Navitar HDSSW08 Dimensional drawing

Analog way LivePremier Aquilon RS alpha user manual

Analog way

Analog way LivePremier Aquilon RS alpha user manual

Grandview GPCN-E200 instruction manual

Grandview

Grandview GPCN-E200 instruction manual

CHIEF SL220 Service manual

CHIEF

CHIEF SL220 Service manual

NEC MP10RX Quick setup guide

NEC

NEC MP10RX Quick setup guide

Sanyo POA-MD18DVI Replacement guide

Sanyo

Sanyo POA-MD18DVI Replacement guide

Navitar EXW-J brochure

Navitar

Navitar EXW-J brochure

Epson CHF 4000 Installation instruction

Epson

Epson CHF 4000 Installation instruction

Sony LMP-P200 operating instructions

Sony

Sony LMP-P200 operating instructions

MTC MTC-5000 user guide

MTC

MTC MTC-5000 user guide

RGBlink ASK nano quick start

RGBlink

RGBlink ASK nano quick start

GPX PJSI900 user guide

GPX

GPX PJSI900 user guide

Da-Lite Dual Masking Electrol Instruction book

Da-Lite

Da-Lite Dual Masking Electrol Instruction book

Christie DPS Series Product safety guide

Christie

Christie DPS Series Product safety guide

Eiki AH-45201 installation manual

Eiki

Eiki AH-45201 installation manual

RGBlink ASK nano 4K user manual

RGBlink

RGBlink ASK nano 4K user manual

manuals.online logo
manuals.online logoBrands
  • About & Mission
  • Contact us
  • Privacy Policy
  • Terms and Conditions

Copyright 2025 Manuals.Online. All Rights Reserved.