manuals.online logo
Brands
  1. Home
  2. •
  3. Brands
  4. •
  5. LCN
  6. •
  7. Door Opening System
  8. •
  9. LCN 3130-SEL Sentronic User manual

LCN 3130-SEL Sentronic User manual

*18782*
18782
Instructions
1a Closer is handed at factory and must match hand of
door. hand of closer shown on mounting channel.
Voltage shown on SENTRONIC cover plate must
match voltage supplied to door frame.
1b If door & frame are not prepared for closer & track
then prepare in accordance with details on opposite
side.
1c Remove cover plate from track. Assemble exible
conduit connector to tapped hole provided in top of
track. Connect power supply wires to track terminal
strip. See wiring diagram below. Insert track roller
into track. Make sure roller stud is inserted into hole
in track slide. Insert track into frame and secure with
proper screws as shown on opposite side. Replace
cover plate.
1d Insert closer in cut out in door & secure with proper
screws.
1e Place arm on closer shaft and secure with shaft screw.
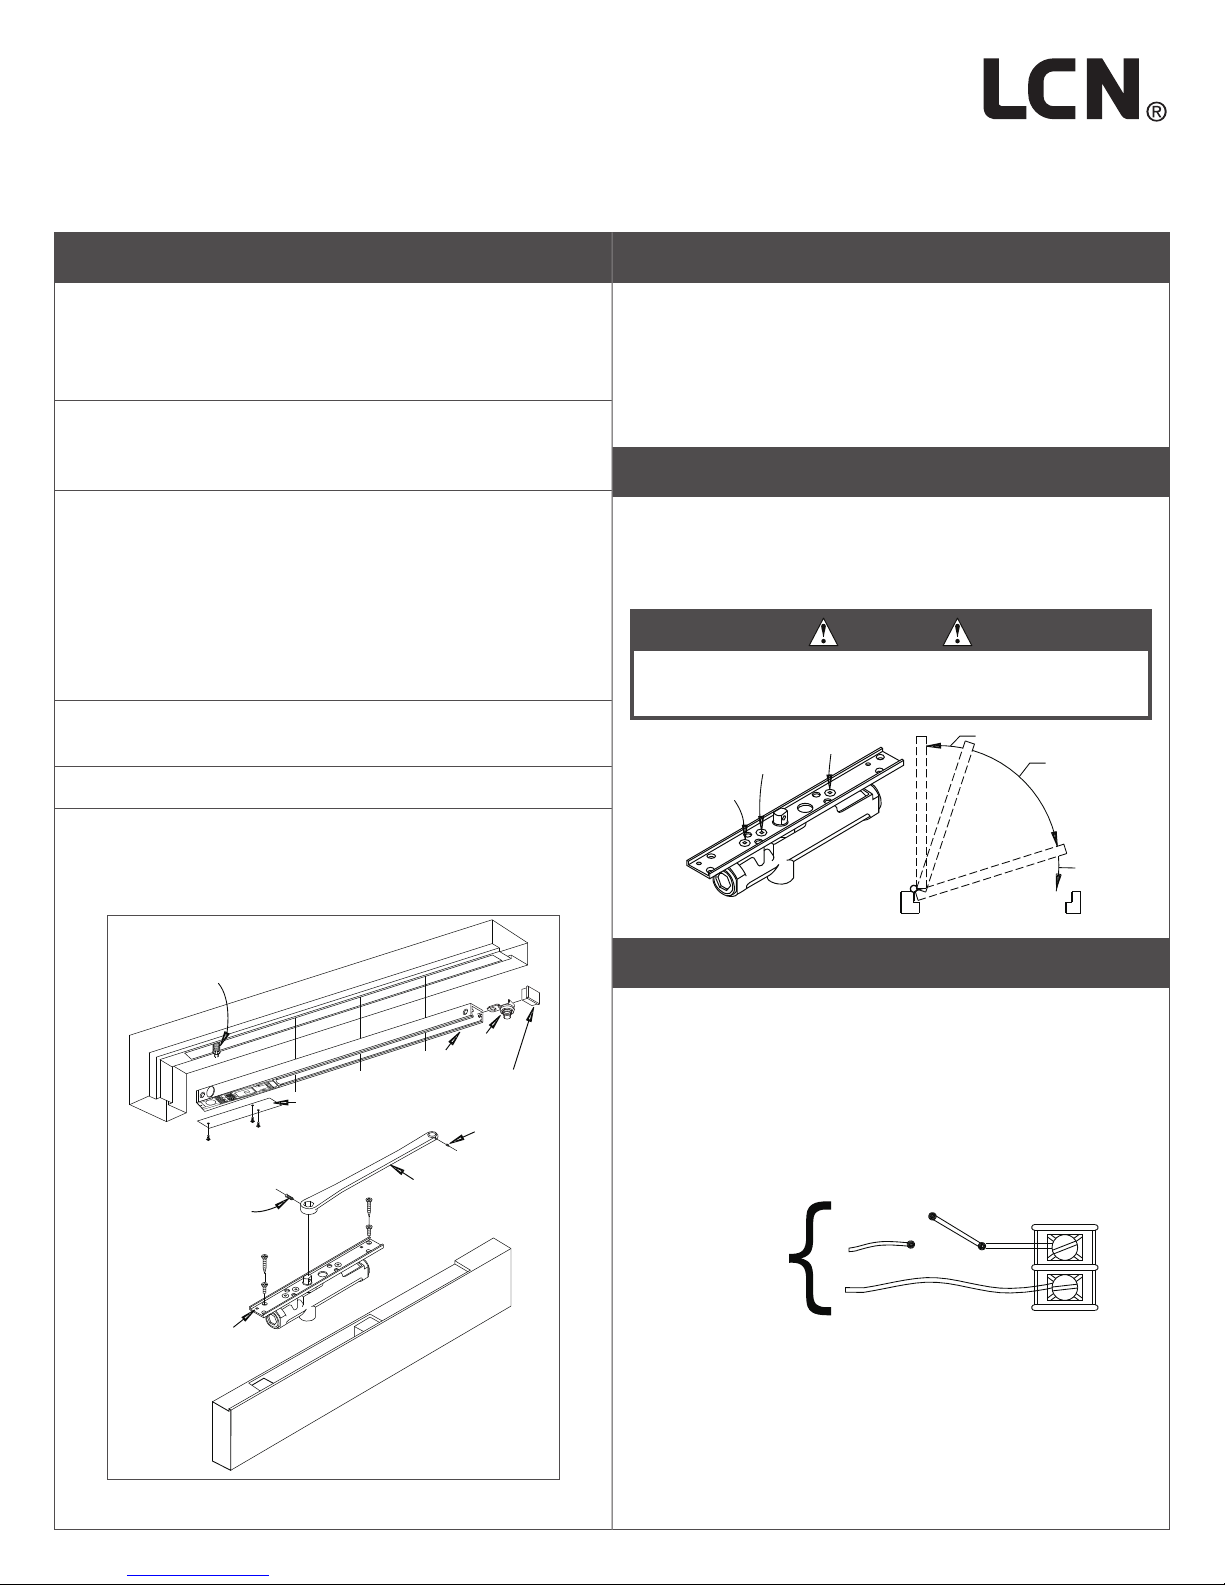
1f Loosen set screw in end of arm, open door part way
(about 30°), pull arm away from top of door and
connect to track roller. Tighten set screw rmly. Open
door to hold open position.
Backcheck
Main
Speed
Latch
Speed
Backcheck
Main Speed
Latch Speed
Door
Closer
Shaft Screw
Arm
Set Screw
Cover
Plate
Track
Optional Concealed Flexible
1/2” Conduit Or 12V Or 24V
Concealed Wiring
To Either Terminal
To Either Terminal
Optional Switch
Input Voltage
12V AC/DC
24V AC/DC
or
115V AC/DC
(Usually from
alarm panel
or detector) Polarity Not Important
Roller
End Cap
Regulation
LImportant
Do not allow door to slam into frame. A “normal” closing time
from 90° open position is 5 to 7 seconds, evenly divided between
main swing speed and latch swing speed. Use socket screw key
furnished. To slow MAIN SPEED of door, turn regulating screw
(nearest arm) clockwise. To slow LATCH SPEED of door, turn
regulating screw (nearest hinge) clockwise.
Backcheck
To increase BACKCHECK, turn regulating screw (nearest latch)
clockwise. Use lightest BACKCHECK that will retard door opening
sufciently.
DO NOT ABRUPT BACKCHECK NOR EXPECT DOOR CLOSER
TO ACT AS A STOP
CAUTION
Improperly installed or regulated closers can cause
property damage or personal injury. Please follow these
instructions carefully.
Backcheck
Main
Speed
Latch
Speed
Backcheck
Main Speed
Latch Speed
Door
Closer
Shaft Screw
Arm
Set Screw
Cover
Plate
Track
Optional Concealed Flexible
1/2” Conduit Or 12V Or 24V
Concealed Wiring
To Either Terminal
To Either Terminal
Optional Switch
Input Voltage
12V AC/DC
24V AC/DC
or
115V AC/DC
(Usually from
alarm panel
or detector) Polarity Not Important
Roller
End Cap
Electrical Checkout
1. With power on, open door fully. Door should remain in open
position. If door does not stay open check electrical input.
2. Turn power off. Door should close immediately. Turn power on
and leave door in the open position.
3. System should be checked at frequent intervals. It is
suggested that steps 1 & 2 be repeated every 90 days.
LNote: If door does not close when power is off, consult
LCN Representative or factory.
Backcheck
Main
Speed
Latch
Speed
Backcheck
Main Speed
Latch Speed
Door
Closer
Shaft Screw
Arm
Set Screw
Cover
Plate
Track
Optional Concealed Flexible
1/2” Conduit Or 12V Or 24V
Concealed Wiring
To Either Terminal
To Either Terminal
Optional Switch
Input Voltage
12V AC/DC
24V AC/DC
or
115V AC/DC
(Usually from
alarm panel
or detector) Polarity Not Important
Roller
End Cap
LNOTE: Not for installation on Ul rated 20 minute wood core doors per can/ulc-s104-10
3130-SEL Sentronic
Installation Instructions
Conduit Quick Connector
Fig. 1
Fig. 2
Fig. 3
Conduit Connector
Conduit Plug
Conduit Plug shown
in Conduit Connector
Installation Instructions
1a The Conduit Quick Connector and Plug can be found in the closer screwpack.
1b The Conduit Quick Connector should be fastened to the 1/2” concealed conduit prior to step 3 on the closer
installation instructions.
1c During step 3 on the closer installation instructions, make sure that the Conduit Connector is secured ush against
the track surface. See option in Fig. 1 below that matches the mounting option selected for track surface. With the
track mounted, take the Conduit Plug and slide it through the 1/2” hole in the track. (see Fig.2) Tighten the Plug into
the Conduit Connector using a 5/8” wrench, until completely secure, as shown in Fig.3.
© Allegion 2017
Printed in U.S.A.
18782 Rev. 08/17-f
DOOR HOLDER SOLENOID
12 VAC - DC Nominal + 10% - 15% @ .180 Amp. Max.
3133-SE 85° to 110° HOLD OPEN
3130 SEL
THIS TEMPLATE APPLIES TO
3134-SE
24 VAC - DC Nominal + 10% - 15% @ .090 Amp. Max.
120 VAC - DC Nominal + 10% - 15% @ .030 Amp. Max.
110˚ HO - 4
120˚ HO -
130˚ HO - 2
EDGE OF DOOR
DIMENSION FOR
DEGREE OF HOLD
OPEN REQUIRED
MINIMUM DOOR WIDTH 2’ 6”
SE-L MEANS EXTRA LONG
ARM AND TRACK
DOOR
C
L
C
L
C
L
C
L
- OF DOOR,
CLOSER, & TRACK
1³⁄₈ MAX. WIDTH
OF CLOSER
¹⁄₈ MIN.
1¹⁄₄ DRILL
1¹⁄₂ 8³⁄₄
3³⁄₈
11³⁄₄ LENGTH OF CHANNEL
25 ³⁄₄ LENGTH OF TRACK
6”6”
24³⁄₄ CUTOUT AT TOP OF DOOR ON STOP SIDE ONLY
3-NO. ¹⁄₄- 20 x ¹⁄₂ P.H.M.S.
TOP OF
DOOR
HEADER
LOCATE
HEADER ON
3.2 6.4 8.7 9.5 12.7 15.9 17.4 19.1 25.4 27.0 28.6 29.4 31.8 34.9 38.1 66.7 73.0 84.1 85.7 88.9 98.4 200 222.3 269.9 288.9 298.4 609.6 577.9
7Revised Template Replaces 2/13/73
PRINCETON, ILLINOIS
By 6-19-90 RJS
APPR 6-19-90 CZ
3130 SE FULLY CONCEALED
DOOR CLOSER/HOLDER
WITH ELECTRONIC RELEASE
& Track Mounting Holes Relocated DRM
DO NOT SCALE 3130 SEL
REVISION
DO NOT SCALE
BY D AT E
6/19/90
OF CLOSER VIEW DOOR & CLOSER OMITTED FOR CLARITY
OF TRACK IN
JAMB
LINE
¹⁄₂ FLEXIBLE CONDUIT
1¹⁄₈ DIA. HOLE IN
REINFORCEMENT
FOR CONDUIT
CONNECTOR
CLEARANCE
AUXILIARY STOP RECOMMENDED
NOTES —
1 - VOLTAGE SHOWN ON SENTRONIC® LABEL MUST MATCH
VOLTAGE SUPPLIED.
2 - IF DOOR IS HUNG ON PIVOTS OR SWING CLEAR HINGES
CONSULT FACTORY.
4 - REINFORCING PER. ANSI/SDI-100 RECOMMENDED FOR HOLLOW
METAL DOOR & FRAMES.
3 - FLOOR OR WALL STOP MUST BE USED.
LEFT HAND DOOR AND CLOSER SHOWN
RIGHT HAND OPPOSITE
4 - NO. 10 x 1” P.H.W.S. OR
4 - NO. 10-24 x ³⁄₈ UNDERCUT P.H.M.S.
IF DOOR IS
HUNG ON PIVOTS,
CONSULT FACTORY
JAMB LINE
EDGE
OF
DOOR
JAMB LINE
3⁵⁄₁₆
1³⁄₈ ¹¹⁄₁₆
2 ⁷⁄₈
¹¹⁄₃₂ 1¹⁄₈
³⁄₈
10 ⁵⁄₈
11 ³⁄₈
1 ¹⁄₁₆
⁵⁄₈
³⁄₈
1¹⁄₄
8 ⁹⁄₁₆
¹⁄₈ ¹⁄₄ ¹¹⁄₃₂ ³⁄₈ 1³⁄₈ 1¹⁄₂ 2⁵⁄₈ 2⁷⁄₈ 3⁵⁄₁₈ 3³⁄₈ 3¹⁄₂ 3⁷⁄₈ 7⁷⁄₈ 8³⁄₄ 10⁵⁄₈ 11³⁄₈ 11³⁄₄ 24 22³⁄₄
¹⁄₂ ⁵⁄₈ ¹¹⁄₁₈ ³⁄₄ 11¹⁄₁₆ 1¹⁄₈ 1⁵⁄₃₂ 1¹⁄₄
1¹¹⁄₃₂
⁵⁄₈
2⁷⁄₈
2⁵⁄₈
¹⁄₄
®
Customer Service
1-877-671-7011 www.allegion.com/us

Other LCN Door Opening System manuals

LCN 4050AT User manual

LCN

LCN 4050AT User manual

LCN 4410ME Series User manual

LCN

LCN 4410ME Series User manual

LCN 4031 CUSH User manual

LCN

LCN 4031 CUSH User manual

LCN 4040XP User manual

LCN

LCN 4040XP User manual

LCN 1450 Series User manual

LCN

LCN 1450 Series User manual

LCN Benchmark III 9130 User manual

LCN

LCN Benchmark III 9130 User manual

LCN COMPACT 6400 Series User manual

LCN

LCN COMPACT 6400 Series User manual

LCN 1450 Track Series User manual

LCN

LCN 1450 Track Series User manual

LCN 1261 CUSH User manual

LCN

LCN 1261 CUSH User manual

LCN 8310-2420 User manual

LCN

LCN 8310-2420 User manual

LCN 4050 Series User manual

LCN

LCN 4050 Series User manual

LCN ST-2701 User manual

LCN

LCN ST-2701 User manual

LCN 4050 Track Series User manual

LCN

LCN 4050 Track Series User manual

LCN 4310ME Series User manual

LCN

LCN 4310ME Series User manual

LCN ELECTRIC AUTO-EQUALIZER 4630 User manual

LCN

LCN ELECTRIC AUTO-EQUALIZER 4630 User manual

LCN Benchmark III 9140 User manual

LCN

LCN Benchmark III 9140 User manual

LCN 8310-2410 User manual

LCN

LCN 8310-2410 User manual

LCN 4630CS User manual

LCN

LCN 4630CS User manual

LCN 1461 CUSH User manual

LCN

LCN 1461 CUSH User manual

LCN 3130 Series User manual

LCN

LCN 3130 Series User manual

LCN 2010 SERIES User manual

LCN

LCN 2010 SERIES User manual

LCN 4040XP User manual

LCN

LCN 4040XP User manual

LCN 3030 Series User manual

LCN

LCN 3030 Series User manual

LCN Sentronic 2310-ME User manual

LCN

LCN Sentronic 2310-ME User manual

Popular Door Opening System manuals by other brands

Portalp SW10 installation guide

Portalp

Portalp SW10 installation guide

Dictator DIREKT 200 Installation instruction

Dictator

Dictator DIREKT 200 Installation instruction

Woelm HELM GT-L 80 installation instructions

Woelm

Woelm HELM GT-L 80 installation instructions

Assa Abloy Norton 6300 Series quick start guide

Assa Abloy

Assa Abloy Norton 6300 Series quick start guide

DoorHan DH1500 user manual

DoorHan

DoorHan DH1500 user manual

Optex ELITE PRO instruction manual

Optex

Optex ELITE PRO instruction manual

Bosch 8750000003 instruction manual

Bosch

Bosch 8750000003 instruction manual

Tormax Automatic iMotion 1302.KI Instructions for use

Tormax Automatic

Tormax Automatic iMotion 1302.KI Instructions for use

PDQ 3100 instruction sheet

PDQ

PDQ 3100 instruction sheet

Beninca VN.M20 operating instructions

Beninca

Beninca VN.M20 operating instructions

DITEC VALOR HH-HS Technical manual

DITEC

DITEC VALOR HH-HS Technical manual

Henderson HUSKY 50 Fitting instructions

Henderson

Henderson HUSKY 50 Fitting instructions

Lamp SLUN-N quick start guide

Lamp

Lamp SLUN-N quick start guide

G-Fittings 45.100x.090.12 quick start guide

G-Fittings

G-Fittings 45.100x.090.12 quick start guide

Briton 2130B quick start guide

Briton

Briton 2130B quick start guide

Yale UniTrol UNI-50BC Series installation instructions

Yale

Yale UniTrol UNI-50BC Series installation instructions

GEZE TS 5000 E-ISM BG manual

GEZE

GEZE TS 5000 E-ISM BG manual

Dynasty DYN-4401 installation instructions

Dynasty

Dynasty DYN-4401 installation instructions

manuals.online logo
manuals.online logoBrands
  • About & Mission
  • Contact us
  • Privacy Policy
  • Terms and Conditions

Copyright 2025 Manuals.Online. All Rights Reserved.