4. With closer shaft now stationary, move the end of the arm
to shaft of closer. Slowly move door so hole in arm lines up
correctly with closer shaft. Push arm up into position and insert
arm shaft screw, as shown in Fig.5.
Fig. 5
Latch
Speed
Main
Speed
Back
Check
Fig. 6
Latch
Speed
Main Speed
Backcheck
Signal Adjustment
(No. 3 Phillips Screwdriver)
Fig. 7
1h To Regulate Closing Speed & Backcheck: See Fig.
6 below Use a 3/32” hex wrench to re-adjust MAIN
& LATCH speed screws (closed in step 7A). Turn
both MAIN & LATCH speed screws 2 full turns
counterclockwise. Open door and observe closing
cycle. A normal closing time from a 90° position is
5 to 7 seconds, equally divided between MAIN &
LATCH speeds. If further adjustment is required,
turn regulating screws clockwise to SLOW door
speed / counterclockwise to INCREASE door speed.
BACKCHECK is a feature that slows the speed of
door at approximately 70°. To INCREASE force turn
BACKCHECK screw clockwise. To REDUCE force turn
BACKCHECK screw counterclockwise. Do not use an
abrupt BACKCHECK setting, nor expect closer to
act as a door stop!
Latch
Speed
Main
Speed
Back
Check
Fig. 6
Latch
Speed
Main Speed
Backcheck
Signal Adjustment
(No. 3 Phillips Screwdriver)
Fig. 7
Fig. 5
Latch
Speed
Main
Speed
Back
Check
Fig. 6
Latch
Speed
Main Speed
Backcheck
Signal Adjustment
(No. 3 Phillips Screwdriver)
Fig. 7
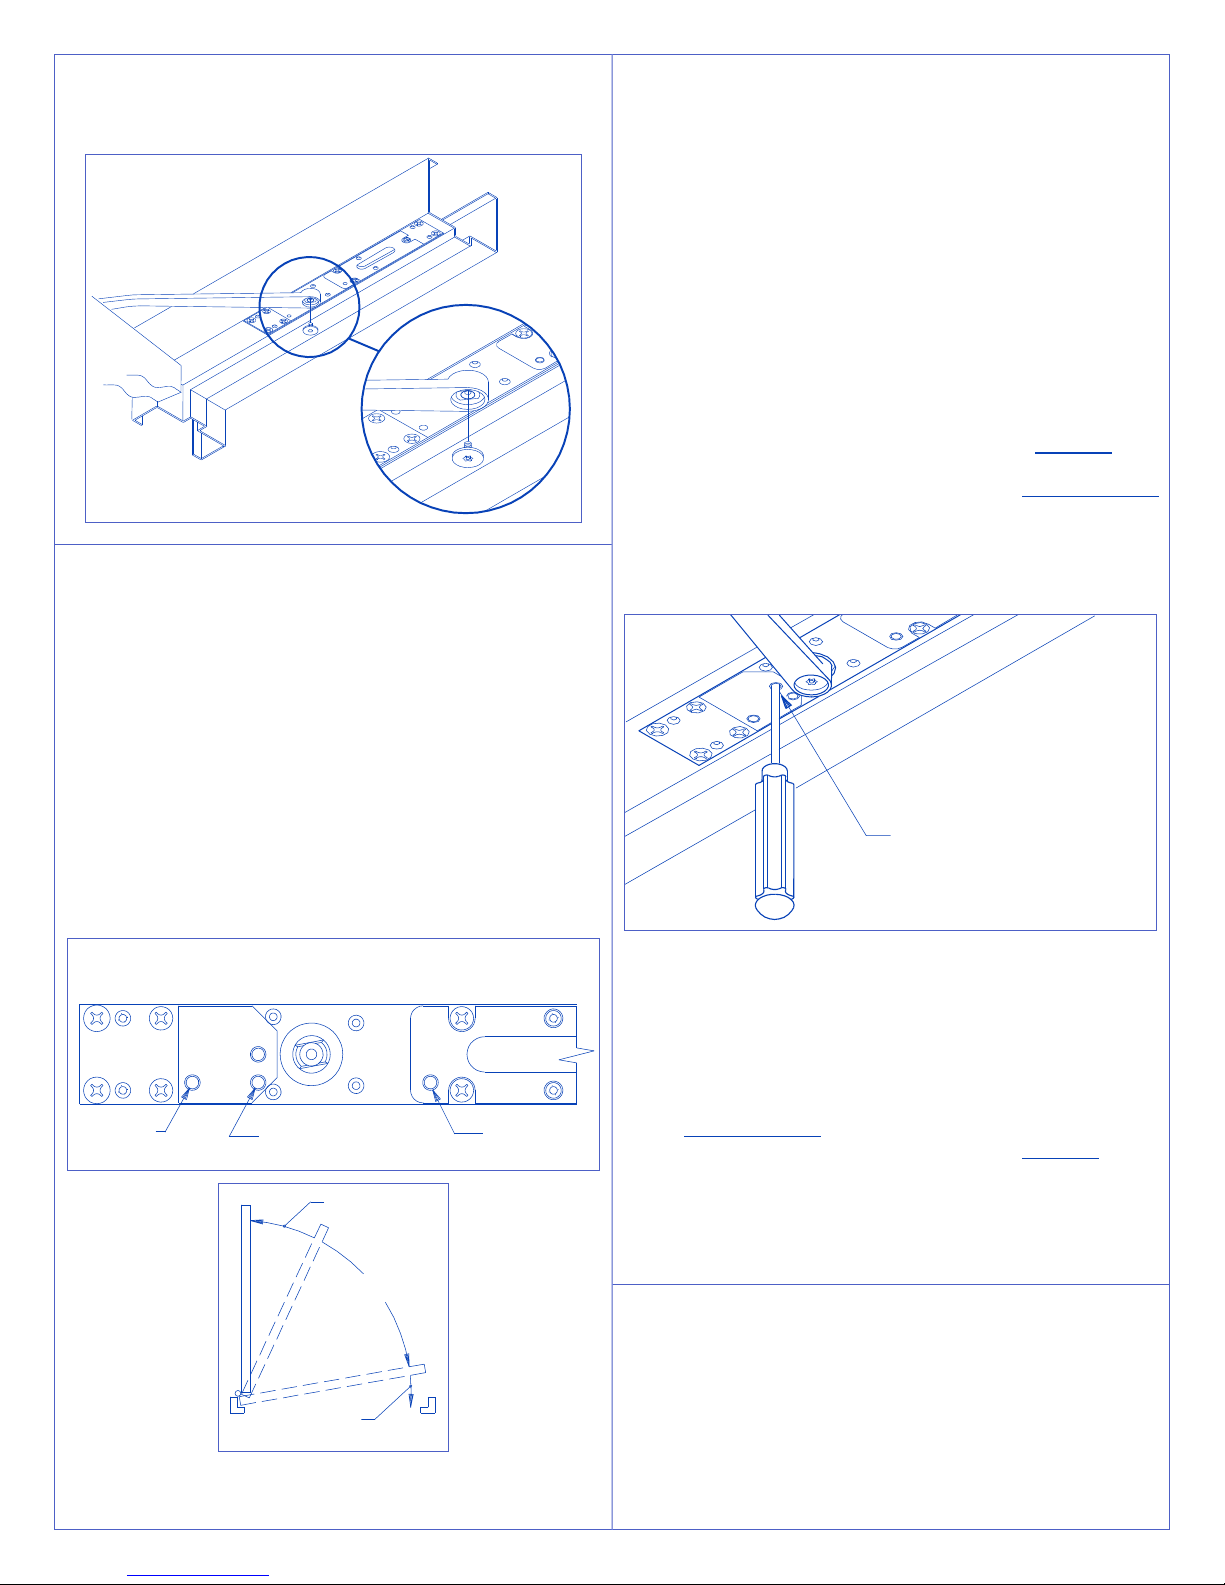
1i For 2210DPS: Signal Response Point Verication
If door silencers are to be used, they should be installed prior
to this step. Close the door slowly and note where the switch
response signal occurs. The factory setting should provide a
signal response between 1/4” & 3/4” off the stop for a 36” door.
Only if a different signaling point is necessary, perform steps a - c
using a No. 3 Phillips screwdriver (5/16” shank). If the switch is
giving an “open” signal when the door is fully closed, follow
steps 9D through 9F.
To adjust the signaling point for the door nearer to the closed
position:
a. Open the door approximately 20°, or enough to access
the signal adjustment hole in mounting plate (See Fig. 7,
below). Prevent door from moving during the adjustment.
Insert the No. 3 Phillips screwdriver into the signal
adjustment hole to engage the trigger gear.
b. For Right Hand Door: turn the screwdriver clockwise
VERY SLIGHTLY
For Left Hand Door: turn the screwdriver counterclockwise
VERY SLIGHTLY
c. REMOVE SCREWDRIVER BEFORE ALLOWING DOOR
TO MOVE. Allow the door to close completely. Check the
signal activation point. If still too far from the “door closed”
position, repeat steps a, b & c.
Fig. 5
Latch
Speed
Main
Speed
Back
Check
Fig. 6
Latch
Speed
Main Speed
Backcheck
Signal Adjustment
(No. 3 Phillips Screwdriver)
Fig. 7
To adjust the signaling point for the door farther from the closed
position:
d. Open the door approximately 20°, or enough to access
the signal adjustment hole in mounting plate (See Fig. 7,
on previous page). Prevent door from moving during the
adjustment. Insert the No. 3 Phillips screwdriver into the
signal adjustment hole to engage the trigger gear.
e. For Right Hand Door: turn the screwdriver
counterclockwise VERY SLIGHTLY
For Left Hand Door: turn the screwdriver clockwise VERY
SLIGHTLY
f. REMOVE SCREWDRIVER BEFORE ALLOWING DOOR
TO MOVE. Allow the door to close completely. Check the
signal activation point. If still too close to the “door closed”
position, repeat steps d, e & f.
1j CLOSING POWER ADJUSTMENT:
Depending on width of door, the 2210DPS has been ordered as
one of three sizes: 2213, 2214 or 2215. Determine closer size
from either label on box or UL label on mounting plate.
Adjustment can be made with a at head screwdriver (see Fig. 8).
Adjustment range for each size is as follows:
• 2213: Closer is shipped at minimum closing power. If
MORE closing power is required, turn adjusting screw
counterclockwise, but not more than 36 full turns. DO NOT turn
adjusting screw clockwise.


