Leica GLOW800 User manual

MEDICAL DIVISION
User Manual
10 747 241 - Version 04
GLOW

II GLOW800 / Ref. 10 747 241 / Version 04
Thank you for purchasing a Leica surgical microscope system.
In developing our systems, we have placed great emphasis on simple, self-
explanatory operation. Nevertheless, we suggest studying this user manual in
detail in order to utilize all the benefits of your new surgical microscope.
For valuable information about Leica Microsystems products and services, and the
address of your nearest Leica representative, please visit our website:
www.leica-microsystems.com
Thank you for choosing our products. We hope that you will enjoy the quality and
performance of your Leica Microsystems surgical microscope.
Leica Microsystems (Schweiz) AG Medical Division
Max-Schmidheiny-Strasse 201 CH-9435 Heerbrugg
Phone: +41 71 726 3333
Fax: +41 71 726 3334
Legal disclaimer
All specifications are subject to change without notice.
The information provided by this manual is directly related to the operation of the
equipment. Medical decision remains the responsibility of the clinician.
Leica Microsystems has made every effort to provide a complete and clear user
manual highlighting the key areas of product use. Should additional information
regarding the use of the product be required, please contact your local Leica
representative.
You should never use a medical product of Leica Microsystems without the full
understanding of the use and the performance of the product.
Liability
For our liability, please see our standard sales terms and conditions. Nothing in this
disclaimer will limit any of our liabilities in any way that is not permitted under
applicable law, or exclude any of our liabilities that may not be excluded under
applicable law.

GLOW800 / Ref. 10 747 241 / Version 04 1
Contents
1 Introduction 2
1.1 About this user manual 2
1.2 Symbols in this user manual 2
2 Safety notes 2
2.1 Intended use 2
2.2 Dangers of use 2
2.3 Information for the person responsible for the
instrument 3
2.4 Signs and labels 3
3 Description 3
3.1 Function 3
3.2 Design 3
4 GLOW800 System Components - Signal overview 6
5 Description 7
5.1 Function 7
6 Controls 10
6.1 Handles 10
6.2 Status LEDs and Display 10
7 Preparation before surgery 11
7.1 Adjustments on the M530 control unit for
GLOW800 11
7.2 Fluorescence visibility 13
7.3 GLOW800 User Setting Menu 14
7.4 User settings camera 18
7.5 Video settings 21
7.6 GLOW800 image injection 22
7.7 Image injection of GLOW into the eyepiece(s)
(User Settings) 23
7.8 Video Fine Focus 23
8 Check the illumination and function and adjustment
24
8.1 Pre-operation checklist (GLOW800) 24
8.2 Test card 24
8.3 Preparation 25
8.4 Test card functional areas 26
9 Operation 27
9.1 Using the GLOW800 27
9.2 Controlling the GLOW800 functions 27
10 GLOW Autofocus (optional) 28
10.1 Description 28
10.2 Design 28
10.3 Installation 28
10.4 Working with the GLOW Autofocus system 29
11 Care and maintenance 31
12 Disposal 31
13 What to do if...? 32
13.1 General 32
13.2 GLOW800 32
13.3 GLOW Autofocus system 35
14 Technical data 36
14.1 Technical data GLOW800 36
14.2 Compatability 36
14.3 Ambient conditions 36
14.4 Standards fulfilled 36
15 Manufacturer's declaration of electromagnetic
compatibility (EMC) 36

Introduction
2 GLOW800 / Ref. 10 747 241 / Version 04
1 Introduction
1.1 About this user manual
The GLOW800 is an accessory for Leica surgical microscopes.
In this user manual the functions of the GLOW800 are described.
For information and description of the Leica surgical microscope,
please refer to the user manual of the particular surgical
microscope.
In addition to notes on the use of the instruments
this user manual gives important safety information
(see chapter "Safety notes")
Read this user manual carefully before operating the
product.
1.2 Symbols in this user manual
The symbols used in this user manual have the following meaning:
Symbol Warning
word
Meaning
Warning
Indicates a potentially hazardous situation
or improper use that could result in serious
personal injuries or death.
Caution
Indicates a potentially hazardous situation
or improper use which, if not avoided, may
result in minor or moderate injury.
Note
Indicates a potentially hazardous situation
or improper use which, if not avoided, may
result in appreciable material, financial
and environmental damage
Information about use that helps the user
to employ the product in a technically
correct and efficient way.
Action required; this symbol indicates that
you need to perform a specific action or
series of actions.
2 Safety notes
A Leica surgical microscope with GLOW800 is state-of-the-art
technology. Nevertheless, hazards can arise during operation.
Always follow the instructions in this user manual and in the
user manual of the Leica surgical microscope, and in particular
the safety notes.
Federal Law restricts this device to sale by or on the order of a
licensed medical practitioner.
2.1 Intended use
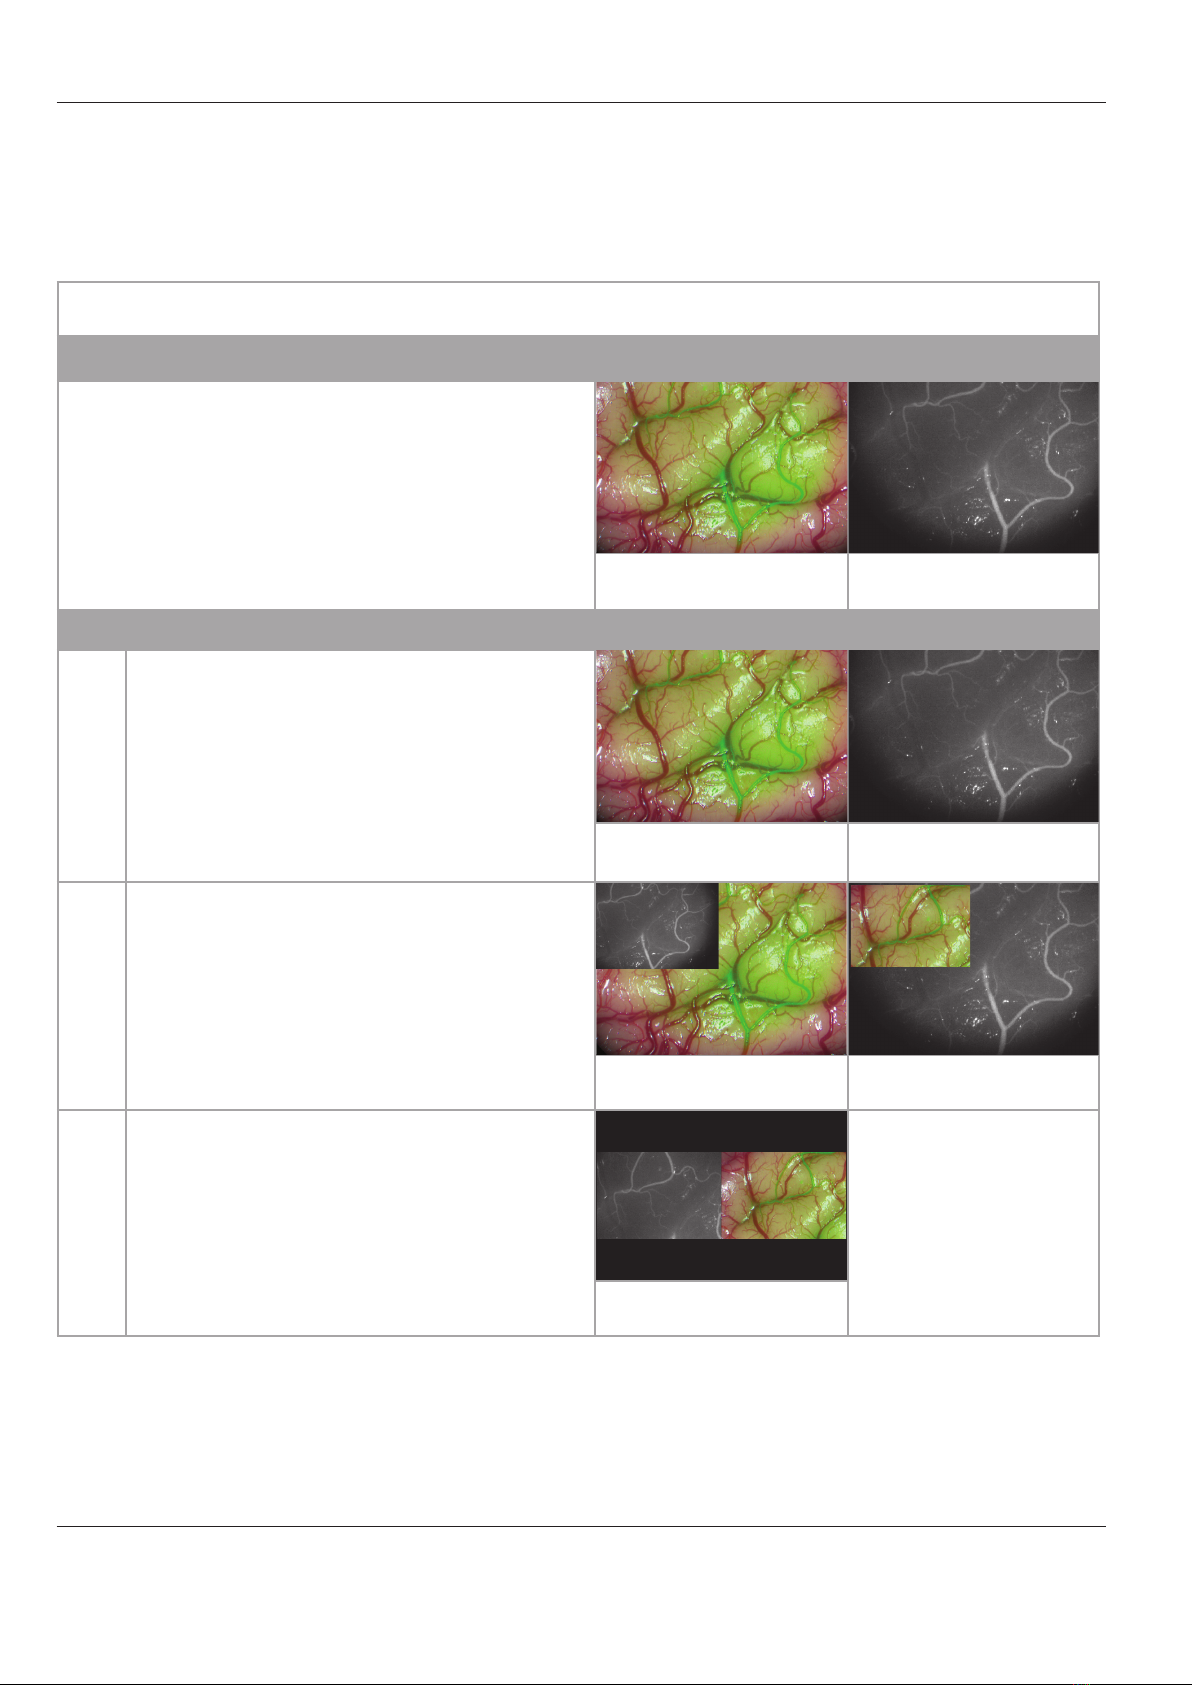
• The GLOW800 is a Leica surgical microscope accessory used in
viewing intra-operative blood flow in the cerebral vascular area
and bypass grafts during coronary artery bypass (CABG)
surgery, as well as blood flow during plastic and reconstructive
surgery.
Contraindication
• The medical contraindications applicable to the use of the
Leicasurgical microscope with GLOW800 in combination with a
fluorescence medium are those to be taken into account when
using suitable brand substances and state-of-the-art
examination techniques.
WARNING
Danger of injury to the eyes.
Do not use GLOW800 in ophthalmology.
2.2 Dangers of use
WARNING
Risk of infection due to insterile GLOW800 test card.
Do not use the GLOW800 test card in the sterile eld.
Use only in non-sterile environment.
Check the microscope illumination in non-sterile
environment only.
Take care to ensure the precise parfocal setting of the
Leica surgical microscope. Follow the instructions on
parfocal setup.
WARNING
User selected with a programmed uorescence function.
Correct user is activated.
Preparational check is performed.
Microscope illumination lamp is within tolerances (see
user manual of the Leica surgical microscope).

Description
GLOW800 / Ref. 10 747 241 / Version 04 3
WARNING
Danger of injury to the patient due to not approved
uorescence media.
Only use fluorescence media approved for the planned
application.
WARNING
Danger of injury to the patient due to excessive GLOW800
radiation.
Avoid extended and/or excessively frequent use of
GLOW800 radiation.
GLOW800 mode is disabled automatically no later than
after 180 seconds to prevent excessive exposure of the
patient to GLOW800 radiation.
2.3 Information for the person
responsible for the instrument
When using GLOW800 please ensure to have a Doppler
Ultrasound or similar in place, in case of none or insufficient
blood flow visualization out of the ICG/GLOW800 procedure is
given.
2.4 Signs and labels
Type label
3 Description
3.1 Function
The illumination for the GLOW800 is a xenon lamp and is located in
the Leica surgical microscope. This lamp provides visible and near
infrared light. The NIR light cannot be observed through the
surgical microscope, but it is recorded using a special camera and
visualized on the monitor mounted on the Leica surgical
microscope.
Using the handles/buttons defined in the user settings you can
switch between visible and GLOW800 light.
Please refer to the user manual of the corresponding Leica
surgical microscope.
3.2 Design
The GLOW800 is an accessory to a M530 optics carrier.
GLOW800 is composed of the following components:
A GLOW800 ULT, see chapter 3.2.1, position (1)
B GLOW800 VPU, see chapter 3.2.3, position (3)
C GLOW800 filters, see chapter 3.2.3, in position (4)
3.2.1 M530 optics carrier with GLOW800 ULT
1 GLOW800 ULT
2 Image Injection module Leica CaptiView (optional)
3 Fluorescence module Leica FL400, FL560 or FL400/560 (optional)
4 M530 Optics Carrier

Description
4 GLOW800 / Ref. 10 747 241 / Version 04
1 Interface for lateral left and right assistant
2 Interface for back/opposite assistant, 360° rotatable
3 Back assistant fine focus
4 Switch lateral or back assistant
5 Interface main surgeon, 360° rotatable
6 GLOW800 ULT
• GLOW800 is built into the housing of the ULT530
• Integrated cameras for visible light and for NIR light
(fluorescence), one common remote controlled fine focus for
both
3.2.2 GLOW800 VPU
SDI LEFT
SDI RIGHT
SDI IGS
GLOW RESET
1
2
3
4
5
1 Video signal SDI left
2 Video signal SDI right
3 Video signal IGS
4 Reset button to reboot/reset of the system
5 Documentation system (optional)
3.2.3 Leica OHX surgical microscope with
GLOW800 components
2
1
3
4
5
1 Monitor (optional)
2 GUI screen
3 GLOW800 VPU (see chapter 3.2.2)
4 Illumination unit with GLOW800 filters
5 Surgeon panel

Description
GLOW800 / Ref. 10 747 241 / Version 04 5
3.2.4 Leica OH6 surgical microscope with
GLOW800 components
1
5
2
3
4
1 Monitor (optional)
2 GUI screen
3 GLOW800 VPU (see chapter 3.2.2)
4 Illumination unit
5 Status LED
3.2.5 ARveo surgical microscope with GLOW800
components
1
5
2
3
4
1 Monitor (optional)
2 GUI screen
3 GLOW800 VPU (see chapter 3.2.2)
4 Illumination unit
5 Status LED

GLOW800 System Components - Signal overview
6 GLOW800 / Ref. 10 747 241 / Version 04
4 GLOW800 System Components - Signal overview
2 video streams
2×WL or WL/pc-FL+B/W-FL or
WL+B/W-FL
2 video streams
2×WL or WL/pc-FL+B/W-FL or
WL+B/W-FL
1 video stream
pc-FL or WL/pc-FL
2 video streams
2×WL or 1×WL/FL or 1×B/W-FL
GLOW800
ULT530
3 HD
cameras
to acquire right,
leftWL and
leftFL
WL
left beampath
WL
right beampath
FL
left beampath
GLOW800
VPU
GLOW
Autofocus
Software
(optional)
Leica Microscope
Monitor
displays 1 signal full screen
or 2 signals side-by-side or
as picture-in-picture
2D/3D Recording Unit
(optional)
records two video streams
Leica CaptiView
(optional)
displays the FL signal in the
eyepiece(s) as an overlay or
non-overlay
Leica HuD (optional)
displays WL 2D/3D or FL 2D
GUI
Explanation:
pc-FL = pseudo color fluorescence
B/W-FL = black & white fluorescence
WL/pc-FL = White light object image & pseudo color fluorescence
3D visualization is only for teaching purposes not intended
for heads-up surgery.

Description
GLOW800 / Ref. 10 747 241 / Version 04 7
5 Description
5.1 Function
The optional accessory GLOW800 enables the surgeon to excite and
observe Near Infrared (NIR) fluorescence (FL) of the fluorophore
(ICG) with the surgical microscopes M530 OH6, M530OHX or ARveo.
When activating the GLOW800 mode, the white light illumination of
the Leica microscope stand (Leica OH6, Leica OHX or ARveo) is
extended to InfraRed (IR) to excite the fluorophore (ICG).
The filtered NIR fluorescence signal of the fluorophore (ICG) is
acquired by a NIR sensitive video camera in the GLOW800 ULT and
processed in the GLOW800 VPU.
5.1.1 Fluorescence observation on the microscope
video monitor
GLOW800 offers two different types to observe the fluorescence
video signal on the optional microscope video monitor:
Type A: Pseudocolor mode (Pseudocolor ON)
White light object view with the embedded fluorescence signal in
pseudocolor, Video #1A
Black&White fluorescence view Video#2A
Type B: Black&White Mode (Pseudocolor OFF)
White light object view #1B
Black&White fluorescence view Video#2B

Description
8 GLOW800 / Ref. 10 747 241 / Version 04
5.1.2 Fluorescence observation and recording with a documentation system
The GLOW800 VPU generates two videos which can be recorded by an optional documentation system, e. g. HDMDPRO, if integrated into
the surgical microscope.
The following recording and visualization settings can be predefined on an optional documentation system. The records and displays are
done in the following way:
White light fluorescence type A: Pseudocolor mode (Pseudocolor On – WL/FL) and b/w fluorescence observation (B/W-FL)
GLOW800 Image processing
Two videos are provided for visualization and recording
Main video #1A 2nd video #2A
Viewing and Recording
Setting 1
One video view on the video monitor, either the main or the
2nd video. Both videos are recorded
Main video #1A 2nd video #2A
Setting 2
Picture-in-Picture view on the video monitor, either the main
or the 2nd video is at full screen. Both videos are recorded
Main video #1A= full screen,
2nd video #2A = window
Main video #2A= full screen,
2nd video #1A = window
Setting 3
Side-by-Side view on the video monitor. Both videos are
recorded
Left = video #2A,
right = video #1A

Description
GLOW800 / Ref. 10 747 241 / Version 04 9
Black & White fluorescence type B: Black & White Mode (Pseudocolor OFF) (B/W-FL) and white light observation (WL)
GLOW800 Image processing
Two videos are provided for visualization and recording
Main video #2B 2nd video #1B
Viewing and Recording
Setting 1
One video view on the video monitor, either the main or the
2nd video. Both videos are recorded
Main video #2B Video #1B
Setting 2
Picture-in-Picture view on the video monitor, either the main
or the 2nd video is at full screen. Both videos are recorded
Main video #2B = full screen,
2nd video #1B = window
Main video #1B = full screen,
2nd video #2B = window
Setting 3
Side-by-Side view on the video monitor. Both videos are
recorded
Left = video #2B,
Right = video #1B
With the optional HDMD Pro recording system activating and deactivating the GLOW800 will automatically start and stop the recording of
the two predefined video streams. If the recording of the white light mode is already running, the recording will switch to record the two
predefined video streams ("Loop WL and "Loop NIR"). Several "Loop" recordings and WL recordings (segments) can be differentiated by an
index in the video review page. If the GLOW800 mode is ended, both records will end as well.
Note
If the white light record should proceed after the GLOW mode it has to be started again.
The play back function of the optional HDMD PRO documentation system allows to display again any of the "loops" on the screen, once or
steadily, in normal, slow or frame-by-frame motion. The second recorded video can be selected for play back as well, either as the main
video source or as a picture-in-picture (PiP) or side-by-side (SbS).
Please refer to the documentation device manuals for further information.

Controls
10 GLOW800 / Ref. 10 747 241 / Version 04
6 Controls
6.1 Handles
1
2
4
3
5
4
1
2
Assignment in the factory setting
1 Magnification
2 4-function joystick
3 Working distance
4 Release all brakes
5 Release preselected brakes
You can assign switches (1), (2), (3) and (5) of the handles
individually for each user in the configuration menu.
In all presets, key (4) releases all brakes. This key cannot be
configured. For the joystick and the other keys presets are
available according to your task.
Handle presets for GLOW800
Step Loop
left handle right handle
GLOW800
On/O
Play-
back
Y+
Y–
X– X+
It is recommended to use the 4-function joystick (2) to control the
GLOW800 as it is defined in the GLOW800 preset, although you can
assign the switches (1), (2), (3) and (5) of the handles individually in
the configuration menu to fit the needs of each user.
In all presets, switch (4) releases all brakes. This switch cannot be
configured differently.
6.2 Status LEDs and Display
The LEDs located on the C-arm of the stand are in the near sight of
the surgeon and inform about the fluorescence and recording
status of the microscope:
6.2.1 Leica OH6 - Status LED
1
2
1 Status LED for fluorescence
2 Status LED for recording
The fluorescence status LED (1) indicates the fluorescence activity
white: no fluorescence,
white light mode
blue : FL400 is on
cyan: FL560 is on
yellow: FL800 is on
magenta: GLOW800 is on
The status LED for recording (2) light up in
red: GLOW800 loop recording in progress
green: GLOW800 replay mode

Preparation before surgery
GLOW800 / Ref. 10 747 241 / Version 04 11
6.2.2 Leica OHX surgeon panel
The surgeon panel indicates the status of the fluorescence.
4
3
12
5
1 Fluorescence icon
2 Fluorescence status color bar
3 Documentation icon
4 Replay icon
5 Recording icon
The fluorescence status color bar (4) indicates the fluorescence
activity.
white light: no fluorescence,
white light mode
blue: FL400 is on
cyan: FL560 is on
yellow: FL800 is on
magenta: GLOW800 is on
If the optional recording system is integrated into the
microscope system, the recording icon (5) will change from
black to red if the GLOW800 NIR video sequence (loop) is
recorded.
The replay icon (4) stays black.
In replay mode the replay icon (4) becomes green and the
recording icon (5) stays black (see below).
7 Preparation before surgery
7.1 Adjustments on the M530 control
unit for GLOW800
Ensure that the GLOW800 accessories are enabled.
Please contact your Leica representative for further
assistance.
Using the "Fluorescence Vascular GLOW800" user preset
1
In the Main menu click on the "Preset" button (1).
The availbale presets are displayed.
2
Select the "Fluorescence Vascular GLOW800" user preset (2).
Click on the "Select" button.
The selected user preset is displayed in the status line.

Preparation before surgery
12 GLOW800 / Ref. 10 747 241 / Version 04
Handle assignment
In the Main menu click on the "Show Settings" button (3).
3
Select the "Handle Left" or "Handle Right" tab (4).
4
You see an overview with which buttons of the left handle the
GLOW800 functions can be operated.
Modifying the "Fluorescence Vascular GLOW800" user preset
If you adjusted the settings of the "Fluorescence Vascular
GLOW800" user preset to your needs during the application,
you can adopt and save them under a new user name.
In the "User settings" menu click on "Save" and then on
"Saveas".
Select an empty position in the user list.
Enter the desired user name via the keyboard.
Click on the "Save" button to save your settings under the user
name entered at the desired location.
These settings can later be edited at any time via the User
Settings menu.
Creating your own GLOW800 user
Click on the "Menu" quick access button (5).
5
Select "UserSettings".
Select "New User".
Open the "Handle Left" or "Handle Right" tab (6) to assign
GLOW800 functions to the handle.
6
7
8
9
In the left selection field, select the "Fluorescence" function
group (7) by clicking on it.
Assign the function "GLOW800 Mode On/Off" (8) to any button
by selecting the desired function.
Afterwards, click on the label field of the desired button to
assign the desired function.
– or –
Press the desired button on the handle to be assigned.
Repeat this process for all functions to be added.
Click on "Save".
Select an empty position in the user list.
Enter the desired user name via the keyboard, e.g. "ICG Glow
User".

Preparation before surgery
GLOW800 / Ref. 10 747 241 / Version 04 13
Click on the "Save" button (9) to save your settings under the
user name entered at the desired location.
In the service menu, a value for the maximum duration of
the GLOW800 mode from 10 to 180seconds can be adjusted
by service.
Note
We recommend to put just the GLOW functions to the
handle which are known thoroughly. Typical commands are
"On/Off" and "Playback".
7.2 Fluorescence visibility
The GLOW800 function optimizes automatically the fluorescence
visibility to receive the best possible image for a broad working
range of microscope parameters and ICG dosage.
However, these parameters still have an impact to the fluorescence
visibility as the following description explains for further
optimizations.
FL Visibility = Illumination × Dosage
Mag2× WD2
FL Visibility: Fluorescence brightness/perceptibility on the
screen
Illumination: Microscope Excitation intensity
Dosage: Injected ICG amount in mg/kg
Mag.: Magnification
WD: Working Distance
The ICG Dosage is the anesthetist's and/or surgeon's
decision.
• Less excitation intensity “Brightness GLOW800” and/or a lower
ICG dosage reduces the fluorescence visibility, especially at high
magnification and/or long working distance. Less fluorescence
visibility or fluorescence brightness might be observed already
at a lower magnification and WDs.
• Higher excitation intensity “Brightness GLOW800” and/or a
higher ICG dosage increases the fluorescence visibility,
especially at high magnification and/or long working distance
and can compensate the reduction of these two optical
parameters.
The fluorescence visibility can decrease even with standard
conditions, if the efficiency of the illumination system is
reduced or the Xenon bulb life time reaches its end.
In this case a message is displayed on the graphical user interface
(GUI) with a request to change the illumination bulb.
7.2.1 GLOW800 Brightness (Illumination/
Excitation intensity)
Open the "FL" tab to set the GLOW800 brightness to the
required level with bar (1).
1
Recommended Brightness settings
The default and recommended "Brightness GLOW800" setting is
100% to achieve good fluorescence visibility in higher
magnifications and working distances.
7.2.2 Working distance limitation
10
Decide if the working distance limitation in white light mode
should be switched on (default) or off (10).
When the working distance limitation in white light mode is
switched off and the working distance is above the limit
when switching to GLOW800 mode, the working distance
will be reduced and the picture will get out of focus.

Preparation before surgery
14 GLOW800 / Ref. 10 747 241 / Version 04
7.2.3 GLOW800 Limits
The "GLOW800 Limits" define Magnification and Working Distance
ranges for good fluorescence visibility.
To extend the Magnification and/or Working Distance range(s) you
have to confirm that you may have to adjust the ICG dosage to get
optimal fluorescence visualization.
7.3 GLOW800 User Setting Menu
The tab offers specific GLOW800 settings for each user:
1
2
3
4
5
6
7
7.3.1 Pseudocolor
Pseudocolor defines one of two types of fluorescence observation.
Pseudocolor can be switched On or Off with button (1).
Default is on.
Pseudocolor on (Observation type A-1 to A-4)
• White light object view with the embedded fluorescence signal
in pseudocolor (white light fluorescence observation = WL/FL)
Pseudocolor off (Observation type B-5)
• Standard Black&White fluorescence view = B/W-FL on the
microscope monitor.
See as well Chapter 5.1.1.

Preparation before surgery
GLOW800 / Ref. 10 747 241 / Version 04 15
7.3.2 Threshold
With the «Threshold» bar (2, page 14) the fluorescence intensity range to be displayed in the white light fluorescence view can be
defined. Low intensity signals (e.g. noise) and/or high intensity signals can be filtered out by defining a lower and an upper threshold with
the two red bars.
The default value and recommended setting for the lower threshold is 0%, for the upper threshold 100% to observe the full range of
fluorescence signals. Using the test card demonstrates how the «Threshold» function influences the fluorescence signal.
Lower Threshold at 0% and and upper Threshold at 100%- all fluorescence intensities are displayed
Leica GLOW800
!
10 746 513-xx
01 2 3 4 5 6 7 8 9
Please read the Leica
GLOW800 user manual!
Black&White fluorescence observation
(Video monitor)
White light + fluorescence observation
(Video monitor)
Lower Threshold at 60% and upper Threshold at 100% - middle to high intensity is displayed only
!
10 746 513-xx
Please read the Leica
GLOW800 user manual!
01 2 3 4 5 6 7 8 9
Leica GLOW800
Black&White fluorescence observation
(Video monitor)
White light + fluorescence observation
(Video monitor)
LowerThreshold at 40% and upper Treshold at 70% - middle to high intensity is displayed only
Leica GLOW800
!
10 746 513-xx
A A
Please read the Leica
GLOW800 user manual!
01 2 3 4 5 6 7 8 9
Black&White fluorescence observation
(Video monitor)
White light fluorescence observation
(Video monitor)

Preparation before surgery
16 GLOW800 / Ref. 10 747 241 / Version 04
Threshold settings
1 2 3 4 3 5 6
78
Threshold defines the indicated fluorescence range by the lowest indicated fluorescence intensity (1= Down, 2=Up) and the highest
fluorescence intensity (5= Down, 6=Up). The red bars (3) indicate the stored values, the grey bars (4) the displayed fluorescence range. The
percentages of the lower and upper limit of the range are given by the values (7) and (8).
Default is the display of the full fluorescence range with a lower limit = 0% and upper limit = 100%.
In case of adaptation of the range by the buttons (1), (2), (5) and (6) the bar will indicate the adjusted range. The new range can be
activated by the «Apply» button (7, page 14) to observe the results on the screen and eyepieces (with optional CaptiView). If the new
range is saved the red bars will move to the appriate positions in the graphics; example: 32–72% range.

Preparation before surgery
GLOW800 / Ref. 10 747 241 / Version 04 17
7.3.3 Color
With «Color» button (3, page 14) the pseudocolor of the fluorescence signal can be chosen.
Selectable color values are from 1=magenta to 7=chartreuse, if the FL image is not injected into the eyepiece(s). The chosen color defines
the appearance of the fluorescence on top of the white light image to optimize the color contrast between the colors of the object in white
light and the fluorescence signal.
If the GLOW800 image is injected in the left or both eyepieces by use of the optional CaptiView module (chapter 7.7), the choice of
colors is reduced to blue #3 and green #6.
Without image injection With image injection
color color name RGB value
color
1magenta 255-000-255 3
2violet 127-000-255 6
3 blue 000-000-255
4azure 000-127-255
5dark cyan 000-221-221
6green 000-255-000
7chartreuse 127-255-000
Displaying the fluorescence with color #6 Green in white light
fluorescence observation. Color #6 is the default color in the
GLOW800 preset (Video monitor)
Displaying the fluorescence with color #1 – magenta in white light
fluorescence observation (Video monitor)
Leica GLOW800
!
10 746 513-01
01 2 3 4 5 6 7 8 9
A A
Please read the Leica
GLOW800 user manual!
Leica GLOW800
Please read the Leica
GLOW800 user manual!
!
10 746 513-01
01 2 3 4 5 6 7 8 9
A A

Preparation before surgery
18 GLOW800 / Ref. 10 747 241 / Version 04
7.3.4 Intensity
«Intensity» bar (4, page 14) adjusts the fluorescence contrast,
brightness and transparency in relation to the object details.
The intensity values range from 0% to 100%, default is 50%.
Fluorescence is visible across the full percentage range.
E.g. at 0% intensity fluorescence is just visible with the object
dominant, at 100% intensity fluorescence is intensively visible and
dominant.
Minimum intensity setting – 0%
Medium intensity setting – 50%
Maximum intensity setting – 100%
7.3.5 WL Saturation and WL Brightness
To increase the contrast of the fluorescence information in relation
to the anatomical video image the characteristics of the white light
anatomical image can be adapted by:
• Reduction of the white light anatomical image color saturation
with the WL Saturation bar (5, page 14)
• Reduction of the white light anatomical image brightness with
the WL Brightness bar (6, page 14)
7.3.6 Apply button
By pressing the "Apply" button (7, page 14) on the GLOW800
page of the user settings changes of one or more of the different
GLOW800 settings become active in the GLOW800 system.
The result of the changed settings can be observed after a few
seconds on the GLOW800 screen.
7.4 User settings camera
2
1
3
7.4.1 Digital zoom
With «Digital Zoom» the display format is adjusted to the needs of
each GLOW user. There are four formats available which can be
changed with the Digital Zoom button (3).
Default setting is "Max. Height Centered".
Max. Height
Fits the maximum detected field of view in the centre of the screen
of the documentation monitor.
• Nearly round image format – full video resolution
Other manuals for GLOW800
2
Table of contents
Other Leica Medical Equipment manuals

Leica
Leica CM1100 User manual

Leica
Leica FL400 User manual

Leica
Leica M530 OHX User manual

Leica
Leica CM1860 User manual

Leica
Leica Keratoscope Operating manual

Leica
Leica M320 User manual

Leica
Leica CM3050 S User manual

Leica
Leica M620 F18 User manual

Leica
Leica M822 User manual

Leica
Leica CM1100 User manual
Popular Medical Equipment manuals by other brands

SAM MEDICAL
SAM MEDICAL SAM XT Instructions for use

Invacare
Invacare Aquatec BELUGA Assembly instructions

Bayer HealthCare
Bayer HealthCare MEDRAD MRXperion Operation manual

TransMedics
TransMedics OCS Lung System Clinical User Guide

Juzo
Juzo JuzoFlex Manu Xtra manual

Curlin Medical
Curlin Medical PainSmart IOD Addendum to user's manual