Mitel MiVoice 6900 Series User manual

2Handset & Hosted Software User Guide 6900 Series
Thank you for choosing to buy your new phone
system from FutureTel. We hope that you are
already enjoying the benefits of your new system.
We want to make sure you have all of the information
you may need moving forward and know how to get in
touch with us should you have any questions.
This document contains instructions on how to use
some of the most commonly used features of your new
handsets and the accompanying PC software.
Should you still have any questions, our team of service
desk engineers are here to help Monday to Thursday
08:30 -17:00 and 08:30 -16:30 on Fridays;
We welcome any feedback on your experience working
with us, so please do get in touch.
Thank you for choosing FutureTel, we are extremely
happy to have you on-board as a valued customer.
The FutureTel Team

3
Handset & Hosted Software User Guide 6900 Series
Types of 6900 handsets
3.5” QVGA (320 x 240 pixel) colour display
Speech optimised corded handset
Programmable soft keys
Native DHSG/EHS analogue headset support
USB port for headsets and accessories
Designed for users who require an
exceptional HD audio experience via
its unique voice optimised handset.
6920
4.3” (480 x 272 pixel) colour display
Bluetooth
Mobile Integration and USB charging point
Programmable soft keys
Speech optimised corded handset
Support for optional cordless handset
Enhanced full-duplex speakerphone
Highly customisable via optional accessories
7” (800 x 480 pixel) colour LCD touch display
Bluetooth 4.1
Mobile Integration and charging point
Cordless BT speech optimised handset
Enhanced full-duplex speakerphone
Programmable soft keys
Highly customisable via optional add-on accessories
Ideal for users who require a phone
that can be tailored to their specific
communication needs.
Designed for executive users who
demand a lot from their phone, the
power of touch is combined with flagship
functionality.
6930
6940

4Handset & Hosted Software User Guide 6900 Series
Using your new handset
(Note, only 6940 handsets have touchscreen functionality)
Pairing the handset with the Mitel® MiVoice 6940 IP Phone
1. Ensure the Mitel® Cordless Bluetooth Handset is powered on.
NOTE: To check if the Mitel® Cordless Bluetooth Handset is in pairing mode, take the handset off
the IP phone’s cradle and check the LED indicator. The handset’s blue LED blinks when it is in pairing
mode.
2. Press the ‘Settings’ key on the phone to enter the Static Settings menu.
3. Tap the Bluetooth icon.
4. Ensure Bluetooth functionality is enabled. If it is not enabled, swipe the Bluetooth toggle switch to
the right to enable Bluetooth functionality.
5. If required, tap Available Devices to view to view the list of discoverable Bluetooth devices.
6. Tap Cordless Handset to start the pairing process. The phone attempts to pair the Bluetooth
handset and if successful, automatically attempts to connect.
NOTE: If pairing or connecting fails, a failed error message displays on screen. Tap Retry to attempt
to pair or connect again, or Cancel to cancel the attempt.
7. Tap OK to acknowledge toe successful connection. The MWI indicator on the phone flashes blue
when successfully connected and the handset LED starts to wink. The connected Bluetooth handset
is added to the list of Paired Devices and is ready to use.

5
Handset & Hosted Software User Guide 6900 Series
MAKING A CALL
Calls can be made with the receiver lifted or left in the cradle
(speakerphone mode);
For external calls, dial 9 followed by the external number.
For internal calls, dial the internal user’s extension number.
ANSWERING A CALL
Lift the receiver or press the speakerphone key.
ENDING A CALL
Place the receiver back in the cradle, or press the red hang up key (Goodbye key).
TRANSFERRING A CALL
While on a call, press a user speed dial key. You will be presented with immediate and
announced transfer options.
PICKUP ANOTHER RINGING CALL
When you see a call coming in, press the extension that’s ringing and you will be given
the option to pickup the call.
FORWARD CALLS
Press the Forward key, choose a forward type, then enter the forward destination. To
disable, press the forward button again.
MUTE MICROPHONE
Press the Mute key. Callers will hear silence until the button is pressed again.
HOLD CALL
Press the Hold key. Callers will hear the system music on hold (if programmed). To
retrieve the call press the relevant Line key.
CALL HISTORY
Press the call history key. Choose from Missed, Outgoing, or Received call lists. Select
entry and press Dial.
3-WAY CONFERENCE
Whilst on a call, press Conf key, dial next party or use a speed dial.
Press Conf again to start conference.

6Handset & Hosted Software User Guide 6900 Series
VOICEMAIL
To access your mailbox press the voicemail key, enter your passcode and follow
prompts to listen to any new messages.
When in your mailbox, choose option 4 to enter the greetings menu and record your
personal greeting. (Remember to make active by pressing # after recording).
DIRECTORY
Press the Directory key, choose a Local, Intercom (internal users), System Speed Dial
(Stored on Phone System) or Mobile contact, then press Dial or lift the receiver.
ADD/EDIT A DIRECTORY CONTACT
To add a new Local contact press Directory key, press ‘Add New’ and enter Name,
Number and Ringtone selection.
ADD A SPEED DIAL KEY
Press and hold a spare (blank) key on one of the 4 pages of keys. Enter
name and number, then click Save.
PAIR A MOBILE DEVICE
Press the Settings key, select Bluetooth, then select an Available or
Paired device.
Once paired, mobile calls can be answered on the desk phone by pressing
the Mobile key.

7
Handset & Hosted Software User Guide 6900 Series
Mobile and iPad Guide
My mobile app lets you use all my features on the go through your iPad or mobile phone. Search your
contacts, see who’s available, talk to and even instant message your colleagues using my smart easy to
use interface. Control where your calls ring, set your availability status for now or schedule for the future
all through my app!
The user interface of this app can be different depending on whether or not the user also has a
Collaboration licence:
User doesn’t have a Collaboration licence:
The Chat feature is shown and you are able to create a new Chat by searching for a contact in search bar.
User has a Collaboration licence:
The user will be able to see the ‘MiTeam’ tab. This allows you to create interactive Streams, schedule
Meets and instant message your colleagues. If you upgrade to a Collaboration licence, any existing Chats
are deleted.
To get started with a mobile or iPad choose an option below:
Activate using your mobile number
1. You will receive a welcome SMS from ‘iameve’ which will contain a link to download the application.
2. Click the link and download the application.
3. Once downloaded, open the application and populate your mobile number, including the country
code.
4. Press the ‘Get activation code’ button to activate a code which will be sent to you via SMS and email.
5. Use this code to validate the app by populating the box and pressing the ‘Activate’ button.
6. Now you’re ready to start using my app!
Activate using your eve password
1. After installing the app, select the link to login with username and password method
2. Fill in your username and your password
3. Press ‘Login’
4. If provided credentials are correct, your app is activated and should present you the main view
eve calls
eve for Mobile supports eve calls. This is a valuable feature if you are in an area with poor mobile phone
coverage but a good internet connection, or if you are using the eve Mobile app in the office. eve calls
are made available based on user agreements, network availability and operator restrictions. When VoIP
calls are available, the user must enter the credentials necessary to authenticate with the eve server and
choose the type of network it can use when placing eve calls.
To enter the credentials:
1. Select ‘Settings’ from the menu to the left.
2. Type your username
3. Type your password
4. Click ‘Login’

8Handset & Hosted Software User Guide 6900 Series
NOTE:
• Use the same user ID and password that you used to login to the eve portal.
• If VoIP calls has initialised successfully, a ‘Logout’ button will be displayed. The
‘Logout’ button may be used to stop receiving VoIP calls on your mobile. In case
the log in is not successful, the user will get an information message.
• The user can configure the type of mobile network that may be used to make
VoIP calls. For example, if the user only wants to enable VoIP calls, when a WiFi
network is connected.
Settings
To set network preferences:
1. Select ‘Settings’ from the menu to the left.
2. Select ‘Networks’
eve calls are like traditional mobile calls, you can answer an incoming eve call, hang up
or reject a call. You can also send touch tones* which will allow you to select options
on an auto-attendant.
The phone user should be aware that a situation may arise where the user will
receive a mobile call during an eve call. In this case, the mobile call will always have
precedence and the eve call will be put on hold. There are some important distinctions
between eve calls and traditional mobile calls:
• eve calls require an internet connection for example WiFi or 3G/4G. It will not be
possible to make eve call without a working internet connection.
• eve calls received during an ongoing mobile call will be rejected.
• A busy signal is played if one of your eve contacts declines an eve call from you.
DTMF tones
*Dual Tone Multiple-Frequency (DTMF), also known as Touch Tones or Tone dialling,
are supported while in a VoIP (eve) conversation. A DTMF keypad can be accessed
while in an ongoing VoIP call and minimised when no longer required.
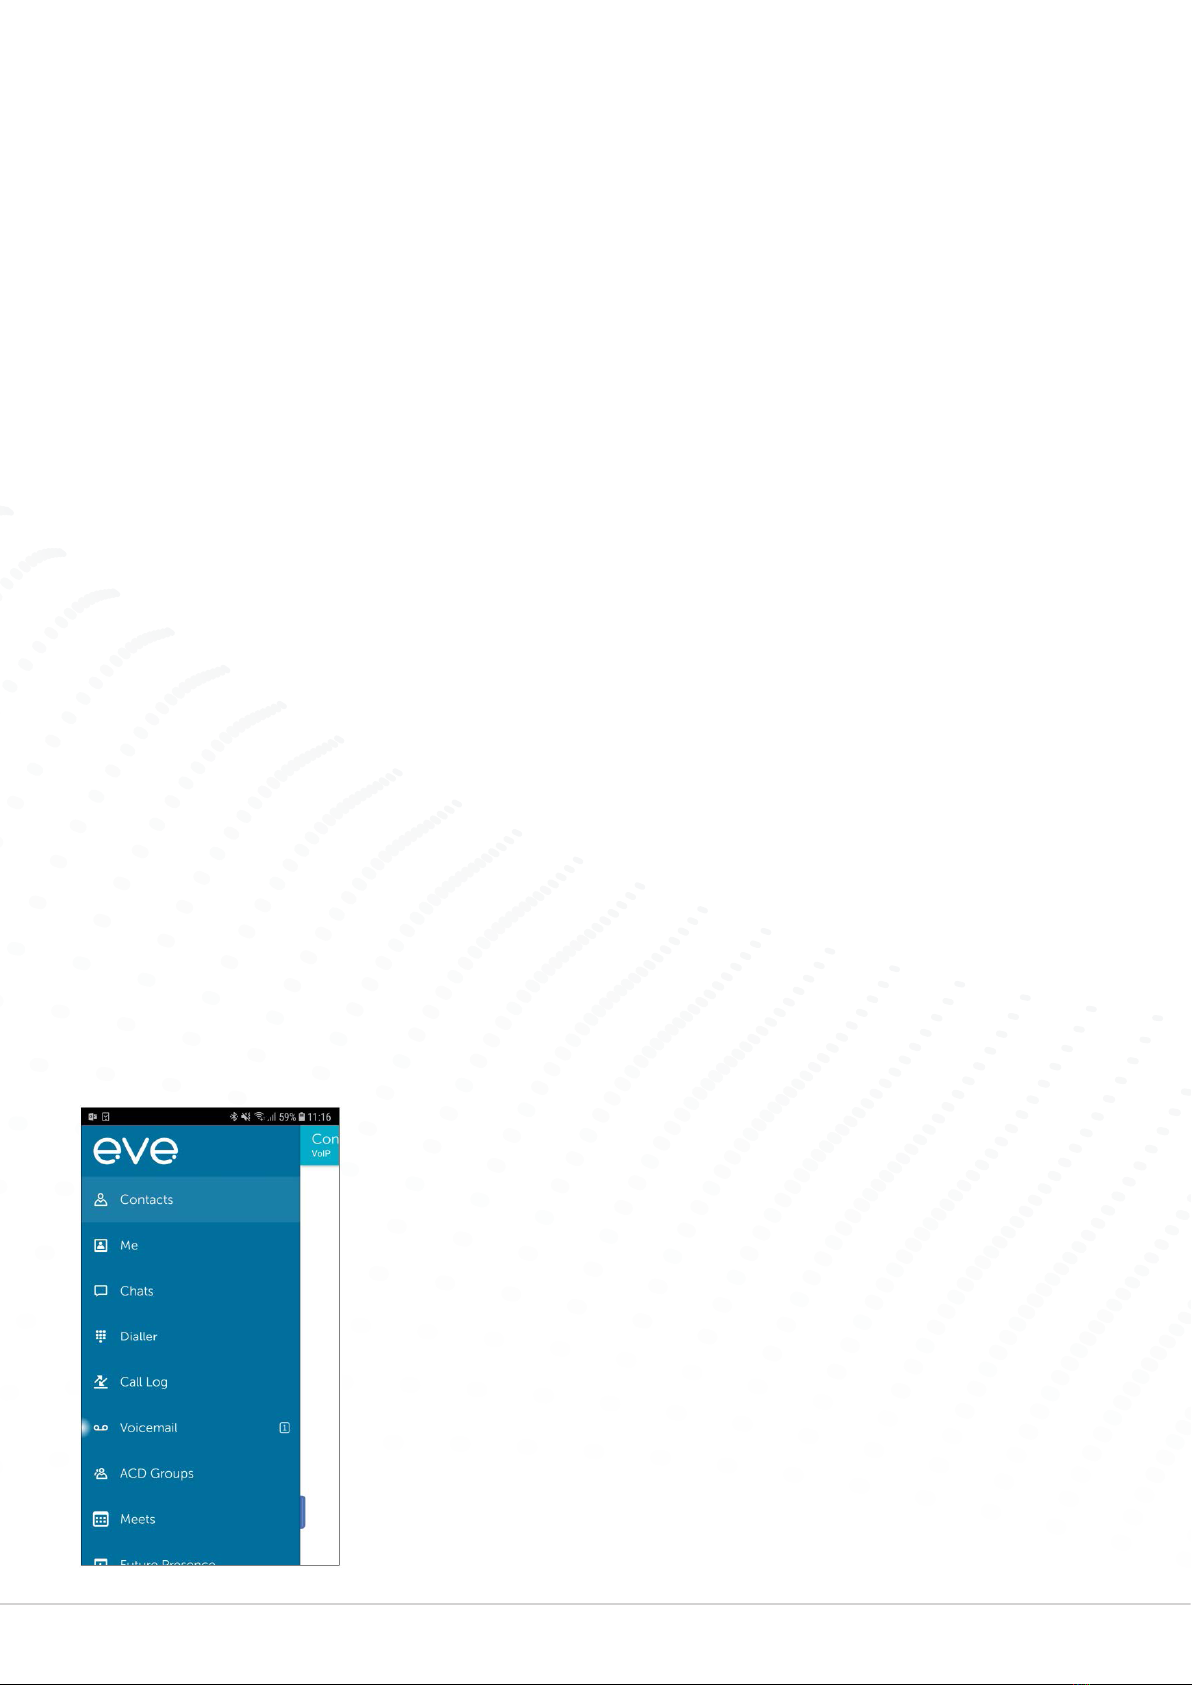
Starting the app
When starting the application, the user will arrive at the ‘Contacts’ view, the main view
of the application. Sliding using the handle on the right reveals the quick presence view
where users can set, access and add presence shortcuts, as well as set diversions.
Sliding using the handle on the left reveals the navigation menu where the user can
pick between different views and see notifications regarding, for instance, unread Chat
messages or recently added log items.
Navigation
When using the handle to the left in your view you will see the navigation menu.
The items present in the menu are: Contacts, Me, Chats, Dialler, Call log, Groups,
MiTeam, Future presence, Activity diversion, Settings and About. You may also have
some web views.
Depending on the settings for your system you can have a different list and order of
the menu items. The starting view is the first of the navigation views.

9
Handset & Hosted Software User Guide 6900 Series
To close the menu simply slide the view back or pick one of the views in the menu.
Activity view
The ‘Activity’ view is accessed by dragging handle to the right. In the activity view you
can view and set your current presence state.
Shortcuts
Use shortcuts to set your presence easily. To add a new shortcut, press ‘Add a new
shortcut’. Then set the name, activity, availability, duration, diversion number and an
icon can be specified while creating a shortcut.
When setting a shortcut or setting a custom activity the active diversion may be
changed.
The following applies:
• Use default diversion - The active diversion is automatically set to the diversion
created within ‘Activity Diversion’. If this has not been set your phone will not
automatically divert.
• Ignore default diversion - This will clear any previous set diversions.
• Override default diversion – This will override the current divert number and will
allow you to replace it with a new one.
Availability
Availability for an activity can be overridden from the ‘Custom activity’ view that can
be opened by pressing on the more icon. Possible override options are:
• Available sets green icon with the activity.
• Do not disturb sets red icon with the activity.
Call routing rules can be added based on the availability.
Contacts
In the ‘Contacts’ view the presence state, call status and notes of all your contacts
can be seen. Your favourites list is displayed by default and you can search for other
directory contacts.
You can tap and hold on a contact to display a pop-up dialogue with all communication
options for that contact. If you tap and hold on a local contact you will get the option to
add them to your ‘Contacts’ or share the contact to another user. Tapping on a contact
will open up the detailed view of the contact.
How to enable yourself to add your favourites to ‘Contacts’:
1. In the home screen, press Settings
2. Select eve for ‘Mobile’
3. In the ‘Contacts’ section, enable ‘Add your favourites to Contacts’
NOTE:
• You can add favourites in your contact list by tapping the star at the upper right
corner in the ‘Contacts’ view.
• The app will not delete the group or added contact when uninstalled.
• Everything Licence is required for Presence view

10 Handset & Hosted Software User Guide 6900 Series
Me
The ‘Me’ view lets you see and manage your presence state, caller ID and your
information. Presence is used to show and manage if you are available for calls or
not. You can also change your presence information. Caller ID is the number which is
presented on outbound calls that you make. You can change this number from your
primary number so that you call from another number, for example, the switchboard
or an attendant group.
To change your Activity
1. Select ‘Me’
2. Select ‘Set Activity’
3. Select the new activity – the activity is changed immediately
To change the Activity End Time
1. Select ‘Me’
2. Select ‘Set Activity End Time’
3. Set your end time and select ‘OK’
The Activity will go back to the default activity when the time expires. When the end
time is the next working day it will go back to the default activity based on the working
hours configured by your administrator.
To change your Caller ID
1. Select ‘Me’
2. Select ‘Caller ID’
3. Choose your new outbound caller ID – if you want to call anonymously, unmark
‘Show my caller ID’
4. Select ‘Done’
To set your Note
1. Select ‘Me’
2. Select ‘Set Note’
3. Enter your note – press the text field to bring up a keyboard if required
4. Select ‘OK’
If you are authorised, you can also change the information in the extra fields
To edit your extra information
1. Select ‘Me’
2. Select the edit icon next to the field you want to edit
3. Enter your new information and click ‘OK’
Change user photo
From the ‘Me’ view you can change your user photo.
Click the photo with a small camera icon. A camera view will open. In this view you
can take a photo or open your photo gallery to select a photo. You can also modify
your photo by applying a filter or zoom in and out using a pinch gesture on the photo
preview.

11
Handset & Hosted Software User Guide 6900 Series
Take a new photo
You can take a new photo using front or back camera. Select camera by pressing the
switch button. When the back camera is used you are also able to select flash mode in
the top right corner and change focus by pressing on the photo preview.
1. Select ‘Camera’
2. Press the camera icon in the middle
Import a photo
1. Press the folder icon in the bottom right, the photo gallery will open
2. Select a photo
Apply a filter:
After a photo is taken or imported, a toolbar with filters will appear and you may apply
a filter to the photo.
1. Scroll the toolbar horizontally to find a suitable filter
2. Press the filter preview image
The filter will now be applied to your photo. You can switch through the filters by
selecting them or remove the filter by pressing the ‘ORIG’ button.
Upload the photo
After a photo is taken or imported a check button will replace the camera icon. By
pressing this the photo will be scaled to the supported format and uploaded.
1. Press the ‘Check’ button
Chats
The ‘Chats’ tab is not displayed when the user has a Collaboration licence.
You can send Chat messages to your colleagues with the application. Based on your
user profile, you may also have access to more advanced Collaboration features.
Collaboration gives much more capabilities and replaces the basic Chat as soon as the
other party is also enabled for Collaboration.
In ‘Chats’ you can view and manage all of your ongoing conversations plus all ongoing
Collaboration sessions. Find more information about the Collaboration features in the
‘Collaboration’ section of this document.
To send a Chat message to, or start a Collaboration session with a contact:
1. From the ‘Contacts’ view or ‘Call log’, select the contact you want to start a
Chat or collaborate with
2. Tap ‘Chat’
3. In the ‘Chats’ view, enter your message and send it
An Individual ‘Chat’ is started in the ‘Contact’s view. Hold down a contact, then
select ‘Chat’, or start it in the contact details view. Whenever the other user has a
Collaboration licence, a new Collaboration Chat will start. If the other user does not
have a Collaboration licence, a basic Chat will start. If a Collaboration session with the
other user already exists, it will be continued in the same Chat.

12 Handset & Hosted Software User Guide 6900 Series
Group chat
A group Chat is always started from the ‘Chats’ view:
1. Navigate to ‘Chats’
2. Tap the ‘Group Chat’ button on top of the view
3. Set a title for the Chat
4. Select which participants you want to invite
5. Tap ‘Start’
NOTE: When starting a group Chat from an existing individual Chat, a new Chat is
created (no history is included). The original individual Chat remains as it was.
Remove chat
1. In ‘Chats’, tap ‘Edit’
2. Select the Chats you want to remove
3. Tap the trash icon
Dialler
You can use the dialler to make calls from your desk phone as well as call by Call Back
and transfer calls.
Call log
The call log presents your log history in chronological order with latest item on top.
Here you can see information such as date, user, phone number, including your
missed, incoming and outgoing calls, associated call recordings as well as voicemail if
available.
Logs are gathered from all your devices connected to the system. Each log entry
shows the current presence status of the user, if available and has a quick link to their
contact details about the user, where you can see history and add the user to your
‘Contacts’, either as a standard contact, a favourite, a VIP, or a blocked contact.
You can filter to view all your calls or just missed calls. The inbox shows you your
adhoc call recordings. For the filtered result you can do a batch delete or delete single
log items. The menu option for log history will hold a badge that reflects the number
of unseen (new) missed calls or voicemail items, this will also be propagated to the
application icon badge.
NOTE: Update of the missed calls log can be delayed if the eve app is running in the
background.
To view your log history
1. Select Call log
To delete a log item
1. Select Call log
2. Press and hold on the log item you want to delete and press ‘Delete’. A confirmation
pop-up will make sure you do not delete items by accident.

13
Handset & Hosted Software User Guide 6900 Series
To filter on all, missed or inbox items
1. Select ‘Call log’
2. Select the filter option ‘All’ to view all your communication log items
3. Select the filter option ‘Missed’ to view your missed calls items
4. Select the filter option ‘Inbox’ to view voicemail and recordings
To view log history for a specific contact
1. Select ‘Call log’
2. Press the info icon on the right to see details about the related contact. In this view
you will also be able to see your log history for this specific user.
To call back
1. Select ‘Call log’
2. Press the call icon to the right of the contact you want to call
To listen to voicemail
1. Select ‘Call log’
2. Press a given voicemail item. An info view will show up and tell you to answer the
incoming call from your voicemail.
3. Answer the call from your voicemail
To listen to a recording
1. Select ‘Call log’
2. Press the play button on the item you want to listen to
To perform more actions
1. Select ‘Call log’
2. Hold down a log item to pop up a menu with call, SMS, delete and view details
actions
ACD Groups
The groups view lists the ACD groups that you are a member of.
NOTE: This view is only available if you are a member of an ACD group.
To login or logout of an ACD or Attendant group
1. Select ‘Groups’
2. Select the toggle next to the group you want to login or logout from. You can scroll
down see more groups if all are not visible on the screen.
MiTeam
The MiTeam view is where you can create Collaboration sessions with your team
called Streams. Streams provide advanced tools for team interaction as well as
possibilities to schedule ‘Meets’, which is either a voice or a web meeting.
Streams are intended for long-term Collaboration, compared to Chat sessions that are
used for quick communication.

14 Handset & Hosted Software User Guide 6900 Series
The MiTeam view will list your current Streams and Meets. Both the one you have
created yourself, accepted to be participants in, or you are invited to join. A Meet that
is about to start soon will appear at the top of the list.
To create a new Stream
1. Click the Stream icon and select ‘Create a Stream’
2. Enter a title
3. Select participants by searching your contacts
4. Press ‘Start’
The other participants will now automatically be invited to your Stream
To delete or leave a Stream
1. In the time line of ‘Streams’, click on the icon in the upper right corner
2. Click on either ‘Delete’ or Leave (depending on Stream ownership)
3. Confirm or cancel
NOTE:
• A Stream can only be deleted by the owner (the user who created it).
• Only participants (not the owner) of a Stream have the option to leave.
• When deleting or leaving a Stream, all Meets that the user has scheduled in the
Stream will be cancelled.
• A Meet can be pre-arranged or created on demand. When a Meet is scheduled
inside a Stream, the scheduler opens. As the first participant calls in to the
scheduled conference, the Web Meet will be automatically initiated, and all
participants are invited.
To schedule a Meet for a Stream
1. Click the ‘MiTeam’ icon to view the list of your Streams
2. Select the Stream you want to schedule a Meet to and click the calendar icon on
the right
3. Click +
4. Insert the name of the Meet
5. Select the from and to date and time.
6. Set a repeat sequence if applicable
7. Search and select participants, including any guests – you can add email
addresses or phone numbers
8. Set the preferred meeting reminder time to the calendar invitation
9. Set the preferred time for SMS text message reminder
10. Write an invitation note – the text will be displayed in the invitation email and
calendar event
11. Select the time zone
12. Click the menu in the top right of the screen to create the new Meet
To create a Meet live inside a Stream:
1. Click the ‘MiTeam’ icon to view the list of your Streams
2. Click on your Stream
3. Click ‘Meet’
4. Edit the participants so that only those that you want to be invited are set an
invite
5. Click ‘Start Meet’

15
Handset & Hosted Software User Guide 6900 Series
A Collaboration user without the Collaboration + licence will have a limited feature
set displayed. A user without the Collaboration + licence, your Meets are limited to 10
minutes, file upload is limited to 5MB per file and it’s restricted to two participants.
A Collaboration user with Collaboration + will have a 24-hour max length on Meets,
file upload limit size at 300MB per file and maximum 50 participants.
To join an ongoing or within ten minutes upcoming Meet do as below in the
MiTeam timeline:
1. Click the handset icon in the ‘Meet’ icon to join the voice conference
2. Within short the invitation to the Web Meet will be visible. Click on the ‘Web Meet’
button to join.
If it is a voice only conference initiated from a user without MiTeam capabilities, the
option with Web Meet does not apply.
To delete a scheduled Meet
1. In the main list of scheduled Meets, click on the info icon of the Meet to be deleted
2. Click ‘Delete’
3. Confirm delete
To edit a scheduled Meet
1. In the main list of scheduled Meets, click on the info icon of the Meet to be edited
2. Click ‘Edit’
3. Edit the Meet
4. Confirm the changes
Future Presence
The menu item Future Presence adds the possibility to schedule future presence
changes. User Activity and Role can be set to change at any point in time at least 10
minutes into the future and it must be a minimum of 5 minutes duration.
When adding a Scheduled Presence, you must also set the time zone for the start
and end time. Your default time zone will be suggested automatically, however, you
are able to set another if you please. You can edit the time zone for the Scheduled
Presence item just like any other information.
The menu item to schedule Future Presence changes requires a licence for the
functionality to be present. When chosen, the user will see a page where all scheduled
presence changes are listed for easy access and editing. Presence changes triggered
by scheduled events can be ended or altered at any time. Times and dates of the
scheduled presence changes will be listed month by month in order of occurrence and
date. Presence changes may be edited or even deleted. ‘Edit’ and ‘Delete’ buttons will
be present in the expanded view of the list item if available.
It is possible to synchronize Future Presence changes with external sources. Currently,
only synchronizing with Microsoft Exchange servers are possible. Synchronization with
external sources is one-way only. A presence change set through Microsoft Exchange
and synchronized to eve for Mobile will show up in the app, but changes to it in the
mobile application will not affect presence settings on the exchange server.

16 Handset & Hosted Software User Guide 6900 Series
To set a future presence change
1. Press the Add Scheduled Change icon to display the ‘Schedule settings’ page
2. Specify a change in ‘Activity’, ‘Role’ or both.
3. Set the duration of the change in ‘Presence’. The duration must be set at least 10
minutes into the future and last for a minimum of 5 minutes.
4. The suggested time zone for the start and end time of the event will be your
default time zone, however, you can set any time zone you wish.
5. If desired, the change can be set to recur every day or on specific days of the
week, monthly or yearly. A repeating presence change isn’t allowed to overlap
with its next occurrence. Every day and per week occurrences can’t span more
than 24 hours, while single occurrences and every month or every year may last
longer.
6. The repeating of the presence change will be indefinite unless an end date is set.
NOTE: Please note that because events may span several days, and the End date
defines the last occurrence of this event.
7. Save the scheduled presence change to close the view and to return to the
Scheduled presence changes view, where the newly created event will have been
added to the list.
To edit a future presence item
1. Enter the Future Presence view where all future presence changes are listed.
2. Press and hold an event for 2 seconds to bring up the Edit or delete menu.
Alternatively, press the Edit presence item icon in the list.
3. Choose to ‘Edit’ or click ‘Cancel’ to abort and return to the ‘Future Presence’ view.
4. The Edit scheduled presence view will be displayed. You can edit the Name,
Activity, Role, Note, Start, End and Time zone data by clicking on the
corresponding fields.
5. Click on the ‘Accept changes’ button to perform the edit or the ‘Cancel changes’
button to abort the edited data.
6. The ‘Future Presence’ view will be updated and displayed with the edited presence
item.
To delete a future presence item
1. Enter the ‘Future Presence’ view where all future presence changes are listed.
2. Press and hold an event for 2 seconds to bring up the ‘Edit or delete’ menu.
Alternatively, press the ‘Edit presence’ item icon in the list.
3. Choose to ‘Delete’ the scheduled presence item. Alternatively, click ‘Cancel’ to
abort and go back to the ‘Future Presence’ view.
4. If you choose to delete a scheduled presence you will be asked to confirm your
decision. Regardless of whether you confirm or cancel the delete operation, you
will be brought back to the ‘Future Presence’ view.
5. Deleted scheduled future presence changes will be removed from the ‘Future
Presence’ view.
Activity Diversion
Activity diversion is a feature to enable call diversions based on your activity. You
set which activities should have a call diversion and the number the calls should be
diverted to.

17
Handset & Hosted Software User Guide 6900 Series
For example, if you are on annual leave you can set your activity to ‘Holiday’ and set up
a divert to the main office number. That will automatically divert all your calls to that
number when you set your activity as ‘Holiday’.
Selecting an activity to a mapped diversion number will divert your incoming calls to
that number.
Existing diversion numbers set to activities are presented in a list. You can add a new
diversion number and can also edit or delete an existing one.
To add a new diversion number
1. Press + icon
2. Select activity
3. Enter number where you want your incoming calls to be diverted
4. Select ‘Done’
To edit or delete a diversion number
1. Hold down the desired item
2. Select ‘Edit’ or ‘Delete’
Calls
To call a contact
1. Select the contact you want to call. Search for the contact if necessary. The
presence icon provides information if the contact is available or not.
2. To call a native address book contact, search for the contact using the app. Open
the detail view by clicking on the contact. By clicking the phone icon for a number,
a native GSM call will be initiated, or by clicking the number row the app will start
a call based on the dialling settings.
The user can configure either to call direct or to make a Call back call. This is where the
system calls the user and connects the call. When calling via call back you need to call
via the office phone dialler.
To set call type
From your main view, select ‘Settings’ > ‘eve for Mobile’, then enable Call back. Direct
calls are used if this is not enabled.
Transfer calls
The Transfer functionality allows you to transfer an ongoing call to a third party. You
can set your preferred (default) transfer type in your phone settings to be attended,
blind, or ask per call.
A Blind transfer is where a user transfers a call by dialling their number and putting
the phone down, rather than waiting for the other user to answer and introducing the
call. If the call is not answered it will bounce back to that original user.
Once initiated, Blind transfers cannot be cancelled.

18 Handset & Hosted Software User Guide 6900 Series
An Attended transfer makes it possible to transfer a call and speak to the user it’s
being transferred to, to introduce the call before transferring. For Attended
transfers, a banner is shown at the top of the app from where you can cancel the
transfer.
If you cancel the transfer, you will be connected to the calling party again. Once
initiated, the transferring party loses the link to the call and it is not possible to get the
call back.
To set the default transfer type for calls
1. Go to your phone settings
2. Scroll down to the eve app
3. Go to ‘Call transfer’ and tap ‘Transfer type’
4. Choose one of the following:
• ‘Always blind transfer’ – A Blind transfer is initiated every time a call is transferred
• ‘Always attended transfer’ – An Attended transfer is initiated every time a call is
transferred
• ‘Always ask’ – A pop-up is shown every time asking whether the transfer should
be Attended or Blind
To transfer a call to a contact
1. During an ongoing call that you want to transfer, go to the ‘Contacts’ view in the
eve Mobile app
2. Choose the desired contact from the favourites list by searching for the contact
3. Tap the ‘Transfer’ button on the contact card
NOTE: The app behaviour varies depending on the transfer type selected in the
phone settings. This procedure assumes that transfer type is set to ‘Ask for each
call’.
4. Select the desired transfer type in the pop-up: Attended or Blind
NOTE: Clicking ‘Cancel’ in the pop-up aborts the transfer process.
5. For Attended transfer: Put the phone down to transfer the call
NOTE: Clicking ‘Cancel Transfer’ in the app banner cancels the transfer and the
caller is reconnected with the initial user.
6. For Blind transfer, Call transfer is automatically initiated. The app shows a
message ‘Transfer initiated’
To transfer a call to a new number
1. During an ongoing call that you want to transfer, go to transfer Dialler and add the
number you wish to transfer to
2. Enter the number in the dialler and tap the transfer icon

19
Handset & Hosted Software User Guide 6900 Series
Get in touch with a member of the FutureTel team today and we will be
more than happy to help resolve your problem.
Call us on: 0330 838 4000
OR
Use our online ticketing system: futuretel.co.uk/support-ticket
Still experiencing issues?
Important Notice
From time to time Microsoft release Windows updates and these occasionally have a temporary
negative effect on the stability of the Phone Manager software, both on PC’s and on 6900 handsets that
have Phone Manager features built in.
Should all users receive a “Loading Contacts” or “Failed Creating Session” error in the PC application, or
a “Server Offline” message on a 6900 handset please contact us and we will restart the Phone Manager
server to resolve.
Please note that these issues are out of our control, for security reasons we allow all critical windows
updates to install automatically on the server and we cannot control the effect these updates have on
installed software.
Single handset
Should a single handset stop behaving normally please remove the
network cable from the rear of the handset (screen will go off) and
then re-insert after 10 seconds. Should the handset not be working
within 5 minutes please call our service desk.
Troubleshooting
How to ‘Re-pair’ a 69XX handset
1. Press settings cog, and select the Bluetooth option.
2. Turn the Bluetooth off in the top right corner.
3. Turn the handset off by pressing the red side of the button on
the side of the receiver.
4. Put the receiver back in the cradle to turn back on.
5. Go back into the Bluetooth section and re-enable Bluetooth.
6. After a few seconds the receiver should show in paired devices.

Glasgow
Suite 23, Ellismuir House,
Ellismuir Way,
Tannochside Park,
Uddingston,
South Lanarkshire,
G71 5PW
0141 484 8400
Aberdeen
Cirrus Building,
6 International Avenue,
ABZ Business Park,
Dyce Drive, Aberdeen,
Aberdeenshire,
AB21 0BH
0122 495 9555
Head Office
Unit 9 Westlink,
Belbins Business Park,
Romsey,
Hampshire,
SO51 7AA
0330 838 4000
Registered Company Number: 12445536 VAT Number: 350 4283 22
Want peace
of mind when
your property
is left unattended?
Benefits of CCTV
Security
Loss Prevention
Health & Safety in the Workplace
Monitoring Activities
Decision Making
Insurance Savings
CCTV cameras help to prevent theft and
vandalism to your property by acting as a
deterrent to potential offenders.
Installing CCTV could help to prevent
substantial financial loss for your business
from fraudulent insurance claims & more.
CCTV can help to identify instances of
violence or abuse towards staff, or identify
the cause of an accident which causes injury.
CCTV systems are able to keep track of
what is happening at the premises where
they are installed.
Easily settle disputes, whether it’s between
family, employee feuds or staff and
customers by referring to CCTV footage.
When evaluating your insurance policy, the
security of your property plays a huge impact
on the amount of money you will pay.
Commercial surveillance cameras are renowned as being one of
the most effective deterrents a business can deploy to keep crime,
intrusion and vandalism away from your business.
Other manuals for MiVoice 6900 Series
4
This manual suits for next models
3
Table of contents
Other Mitel Handset manuals

Mitel
Mitel 5604 User manual

Mitel
Mitel OpenPhone OpenPhone 27 User manual

Mitel
Mitel 5613 Instruction Manual

Mitel
Mitel 5603 User manual

Mitel
Mitel 5610 User manual

Mitel
Mitel OpenPhone OpenPhone 27 User manual

Mitel
Mitel 5505H User manual

Mitel
Mitel 5602 User manual

Mitel
Mitel 5634 User manual

Mitel
Mitel 5604 User manual