manuals.online logo
Brands
  1. Home
  2. •
  3. Brands
  4. •
  5. Monacor
  6. •
  7. Power Supply
  8. •
  9. Monacor PS-362 ST User manual

Monacor PS-362 ST User manual

®
PS-362 ST
Best.-Nr. 27.1030
PS-1615 ST
Best.-Nr. 27.1020
D Stabilisiertes Netzgerät
Verwendungsmöglichkeiten
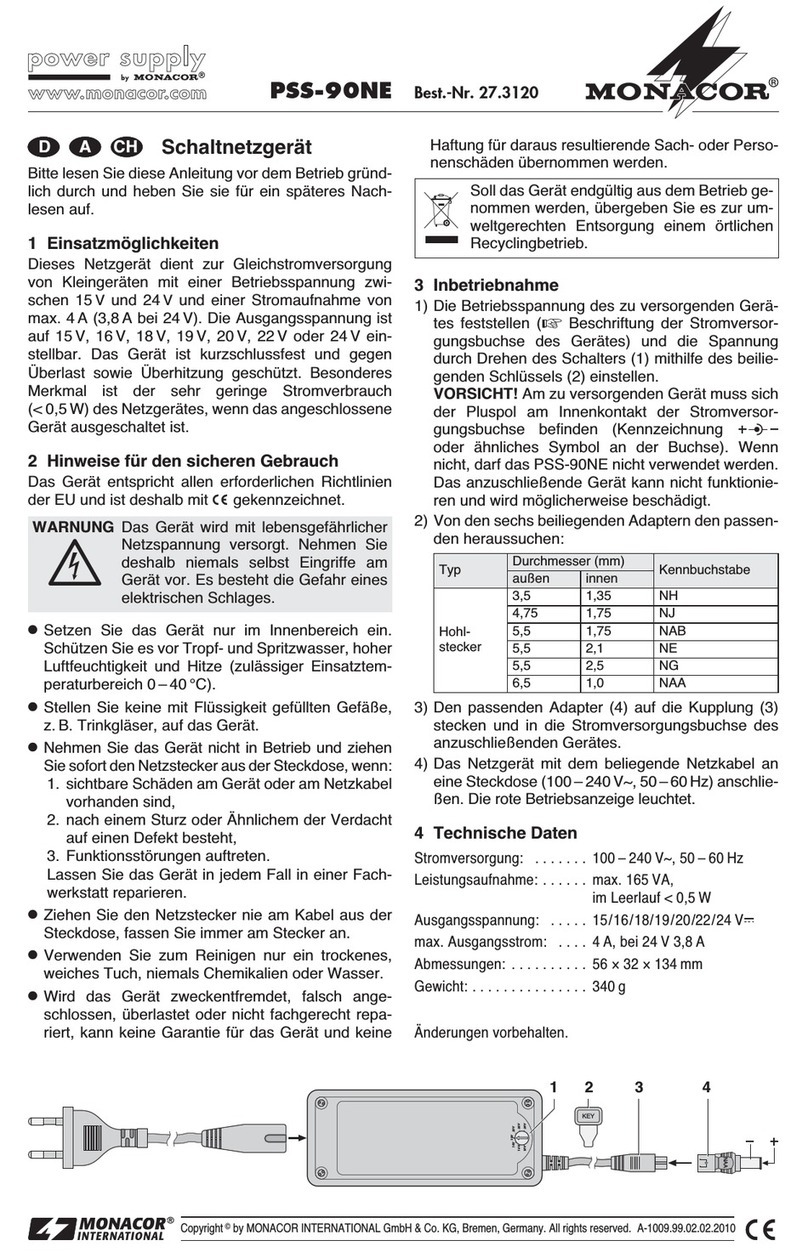
Das elektronisch stabilisierte Netzgerät mit sehr geringer Brumm-
spannung ist für die meisten batteriebetriebenen Kleingeräte
geeignet. Die Ausgangsspannung ist kurzzeitig gegen Kurzschluß
geschützt und kann umgeschaltet werden:
PS-1615ST 6/9/12V
PS-362ST 3/4,5/6/7,5/9/12V
Dem Netzgerät kann ein maximaler Dauerstrom von 0,5 A(PS-362 ST)
bzw. 1A (PS-1615ST) entnommen werden.
Hinweise für den sicheren Gebrauch
Das Gerät wird mit lebensgefährlicher Netzspannung (230V~) ver-
sorgt. Nehmen Sie deshalb niemals selbst Eingriffe im Gerät vor.
Durch unsachgemäßes Vorgehen besteht die Gefahr eines elek-
trischen Schlages. Überlassen Sie den Service autorisiertem
Fachpersonal.
Beachten Sie für den Betrieb auch unbedingt die folgenden Punkte:
•Das Gerät ist nur zur Verwendung in Räumen geeignet.
•Schützen Sie das Gerät vor Hitze und Feuchtigkeit.
•Eine beschädigte Netzanschlußleitung darf nur durch den Her-
steller oder durch eine autorisierte Fachwerkstatt ersetzt werden.
•Dem Netzgerät darf nur der angegebene Strom entnommen
werden. Eine größere Belastung läßt die eingebaute Thermo-
sicherung durchschmelzen. Damit erlischt jeglicher Garantie-
anspruch. Die Sicherung ist nicht auswechselbar, d.h. bei durch-
geschmolzener Sicherung ist das Gerät unbrauchbar geworden.
•Für die Reinigung nur ein trockenes Staubtuch verwenden, auf
keinen Fall Chemikalien oder Wasser.
Anschluß
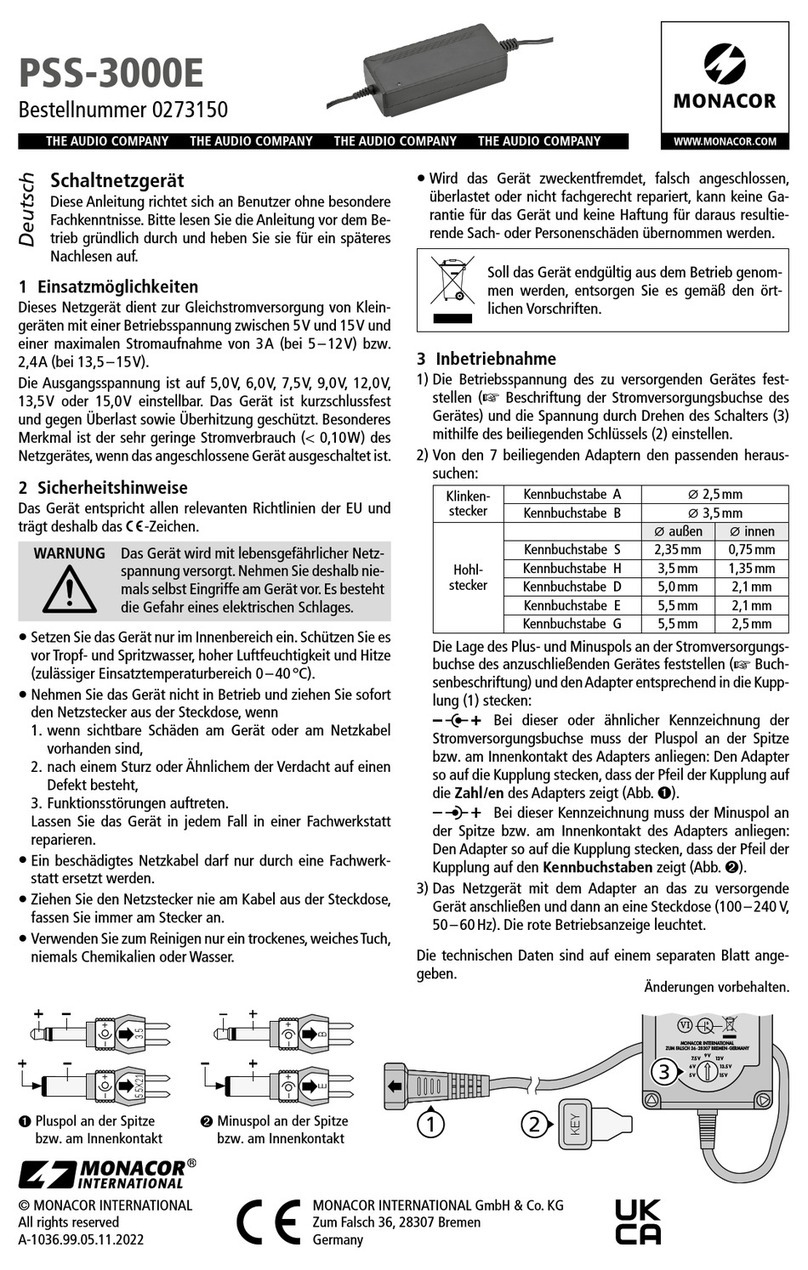
1)Aus den Unterlagen des anzuschließenden Gerätes die Betriebs-
spannung feststellen und diese mit dem Drehschalter am Netz-
gerät einstellen.
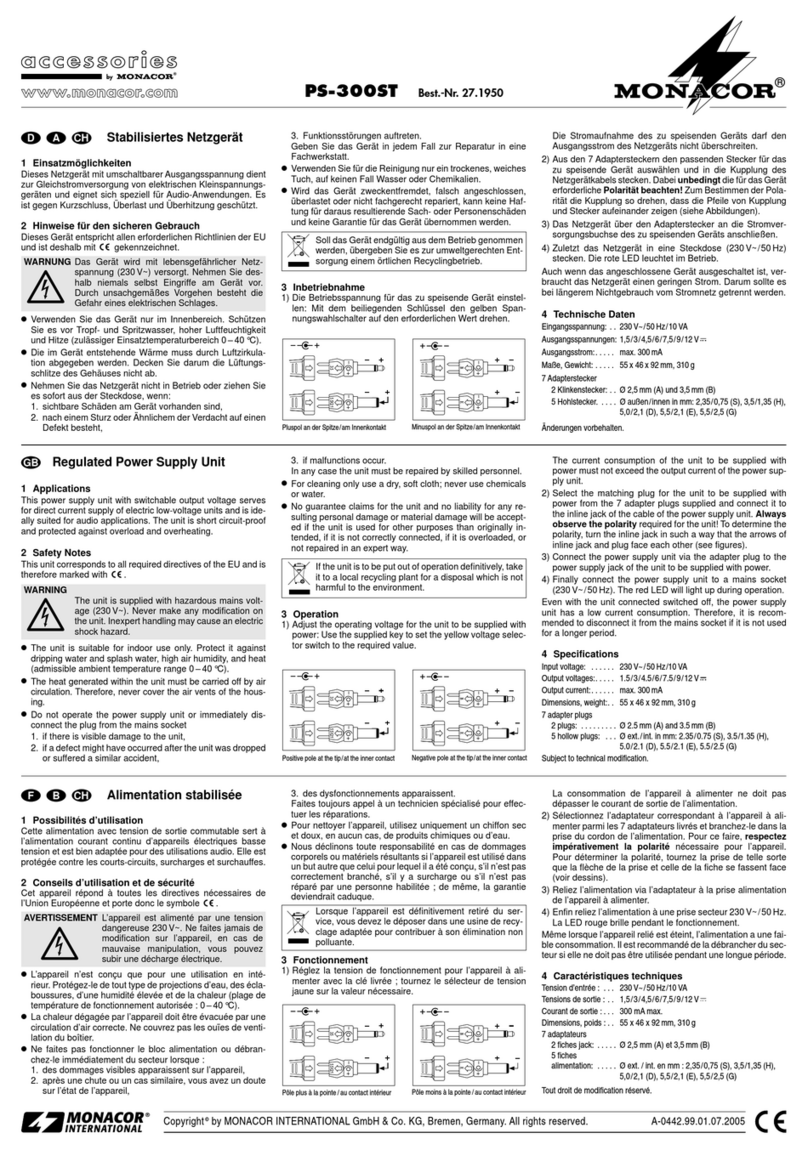
2)Den passenden Adapterstecker durch Ausprobieren oder mit Hilfe
der untenstehenden Tabelle auswählen. DieAdapterstecker haben
zur Kennzeichnung einen Farbpunkt.
3)Besonders wichtig ist auch die richtige Wahl der Polarität, d.h. wo
der Pluspol und der Minuspol am Stecker liegen muß. Aus der un-
tenstehenden Abbildung ist zu sehen, wie der Adapterstecker in
die Adapterbuchse gesteckt werden muß, um die entsprechende
Polarität zu erhalten. Dazu dieAdapterbuchse so drehen, daß ent-
weder der Aufdruck +
-
oder
-
+zu sehen ist. Den Adapterstecker
dabei so halten, daß das Steckersymbol zu sehen ist.
4)Bei falscher Wahl der Spannung oder Polarität kann das ange-
schlossene Gerät beschädigt werden. Erst nach richtiger Wahl
der Spannung, des Adaptersteckers und der Polarität den Netz-
stecker in die Steckdose (230V~/50Hz) stecken.
Technische Daten
Modell PS-362ST PS-1615ST
Eingangsspannung:. . . . 230V~
/
50Hz/16VA 230V~/50Hz/23VA
Ausgangsspannung: . . . 3/4,5/6/7,5/9/12V 6/9/12V
Ausgangsstrom:. . . . . . . 0,5 A max. 1A max.
Brummspannung: . . . . . ca. 10mV ca. 10mV
Abmessungen (Bx HxT): 65 x 59x 140 mm 65 x59 x 140mm
Gewicht: . . . . . . . . . . . . 765g 825g
Laut Angaben des Herstellers. Änderungen vorbehalten.
GB Regulated Power Supply
Use
The electronically regulated power supply with very low ripple voltage
is suitable for most battery-operated small units. The output voltage
is protected against short-circuit for a short time and can be switched
over:
PS-1615ST 6/9/12V
PS-362ST 3/4.5/6/7.5/9/12V
A max. continuous current of 0.5A (PS-362 ST) resp.
1A (PS-1615ST) can be taken off.
Safety Notes
This unit uses lethally high voltage (230V~). To prevent a shock
hazard do not open the unit. Servicing should be done by author-
ized personnel only.
For the operation watch in any case the following items:
•The unit is only suitable for the use in rooms.
•Protect the unit from heat and humidity.
•A damaged mains connecting cable must only be replaced by the
manufacturer or authorized skilled technicians.
•Only the current indicated must be taken off from the power supply.
With a greater load the built-in thermo fuse burns. By this any
guarantee expires. The fuse cannot be replaced, i.e. with burnt
fuse the unit does not work any more.
•For the cleaning use a dry cloth for dust removing, by no means
chemicals or water.
Connection
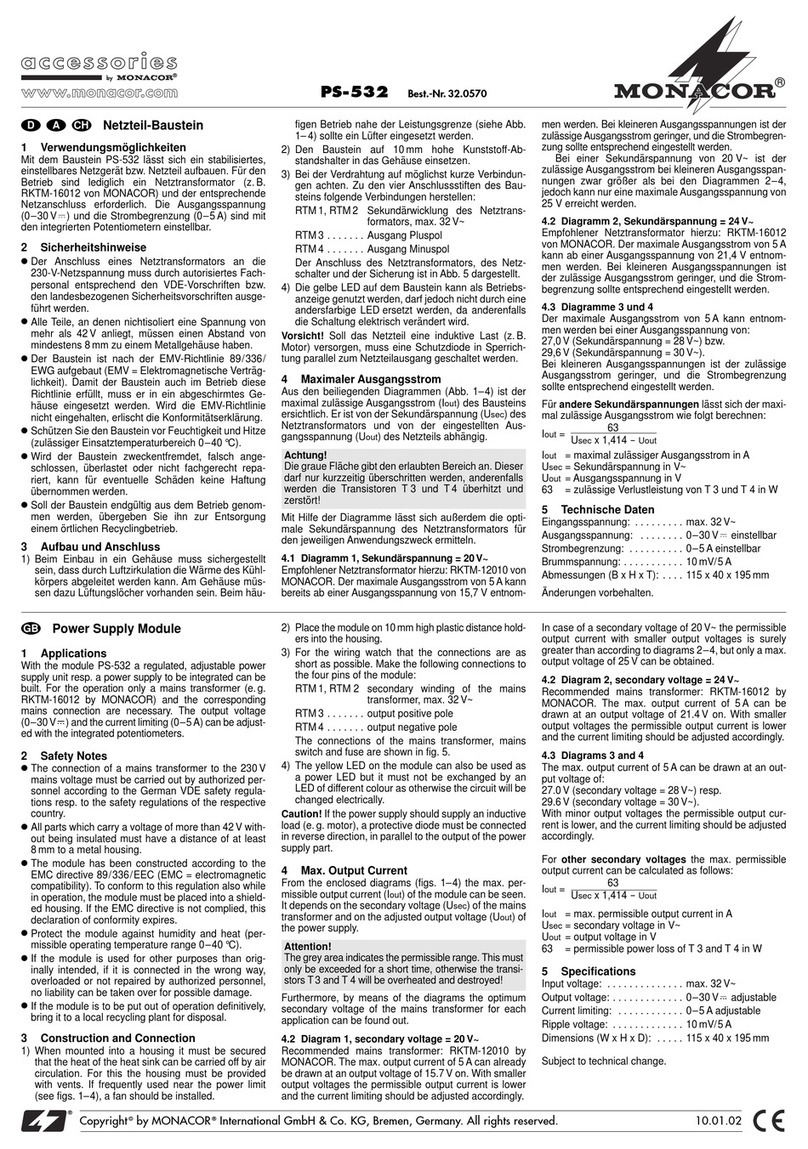
1)From the documentation of the unit to be connected the operating
voltage can be seen which is adjusted with the rotary switch at the
power supply.
2)Choose the suitable adapter plug by trying out or by means of the
below table. The adapter plugs are colour-coded.
3)The correct polarity is of special importance, i. e. where the positive
and the negative poles must be at the plug. From the below figure
it can be seen how the adapter plug must be plugged into the
adapter jack to obtain the corresponding polarity. Turn the adapter
jack so that either the print +
-
or
-
+can be seen. Hold the adapter
plug so that the plug symbol can be seen.
4)With wrong selection of the voltage or polarity the connected unit
may be damaged. Only after the correct selection of the voltage,
the adapter plug, and the polarity connect the mains plug into the
socket (230V~/50Hz).
Specifications
Model PS-362ST PS-1615ST
Input voltage . . . . . . . . . 230V~
/
50Hz/16VA 230V~/50Hz/23VA
Output voltage. . . . . . . . 3/4.5/6/7.5/9/12V 6/9/12V
Output current . . . . . . . . 0.5A max. 1A max.
Ripple voltage . . . . . . . . approx. 10mV approx. 10mV
Dimensions (WxHxD) . 65 x 59 x 140mm 65 x 59 x 140mm
Weight. . . . . . . . . . . . . . 765g 825 g
According to the manufacturer.
Subject to technical change.
Farbe Innendurchmesser Außendurchmesser Länge
Colour Inner Diameter Outer Diameter Length
schwarz black
-
2,5mm 12,5mm
weiß white
-
3,5mm 14,0mm
rot red 1,3mm 3,5mm 10,5mm
gelb yellow 1,5mm 5,0mm 14,0mm
blau blue 2,1mm 5,0mm 14,0mm
grün green 2,5mm 5,0mm 14,0mm
braun brown 2,1mm 5,5mm 14,0mm
®
PS-362 ST
Best.-Nr. 27.1030
PS-1615 ST
Best.-Nr. 27.1020
F Alimentations stabilisées
Utilisations
L’alimentation stabilisée électronique avec une faible tension de ron-
flement convient très bien pour une majorité de petits appareils
nécessitant une alimentation externe. La tension de sortie est
protégée contre les court-circuits et est commutable:
PS-1615ST 6/9/12V
PS-362ST 3/4,5/6/7,5/9/12V
Le courant maximal est de 0,5A(PS-362 ST) et de 1A(PS-1615 ST).
Conseils de sécurité
L’appareil est alimenté par une tension en 230V~. Ne touchez
jamais l’intérieur car, en cas de mauvaise manipulation, vous
pourriez subir une décharge électrique mortelle. Faites plutôt
appel à un spécialiste.
Respectez scrupuleusement les points suivants:
•Cet appareil est conçu pour une utilisation en intérieur uni-
quement.
•Protégez-le de la chaleur et de l’humidité.
•Si un câble d’alimentation était endommagé, seul le fabricant ou
un technicien spécialisé est habilité à le remplacer.
•En aucun cas, le courant ne doit dépasser les valeurs données.
Une surcharge pourrait faire fondre le thermo-fusible intégré. La
garantie ne serait alors plus valable. Il n’est pas possible de rem-
placer le fusible; si ce dernier fond, l’appareil est inutilisable.
•Pour le nettoyage, utilisez un tissu sec, en aucun cas de produits
chimiques ou d’eau.
Branchements
1)Vérifiez bien dans la notice de l’appareil qui sera relié à l’alimen-
tation la tension de fonctionnement, effectuez le réglage avec le
potentiomètre rotatif sur l’alimentation.
2)Sélectionnez l’adaptateur correspondant en vous reportant au ta-
bleau ci-après. Chaque adaptateur est repéré.
3)De même, le choix de la polarité de l’adaptateur, pôle plus et pôle
moins, est capital. Le schéma ci-dessous indique comment
brancher l’adaptateur dans la fiche pour obtenir la polarité corres-
pondante. Pour cela tournez la fiche de sorte que les repères +
-
et
-
+soient visibles. Tenez l’adaptateur de sorte que le symbole
de la prise soit visible.
4)En cas d’erreur de sélection de polarité ou de tension, vous
risquez d’endommager votre appareil. Ne reliez l’appareil au
secteur (230V~/50Hz) que lorsque vous être sûr du choix de la
tension, de l’adaptateur et de la polarité.
Caractéristiques techniques
Modèle . . . . . . . . . . . . . PS-362 ST PS-1615ST
Tension d’entrée . . . . . . 230V~
/
50Hz/16VA 230V~/50Hz/23VA
Tension de sortie . . . . . . 3/4,5/6/7,5/9/12V 6/9/12V
Courant de sortie. . . . . . 0,5 A max. 1A max.
Tension de ronflement . . 10mV env. 10mV env.
Dimensions (LxHxP) . . 65 x 59 x 140 mm 65 x 59 x 140mm
Poids. . . . . . . . . . . . . . . 765 g 825g
D’après les données du constructeur.
Tout droit de modification réservé.
I Alimentatore stabilizzato
Possibilità d’impiego
L’alimentatore stabilizzato elettronicamente con ridottissimo ripple è
ideale per la maggior parte di apparecchi piccoli con alimentazione a
pile. La tensione di uscita è protetta per breve tempo contro i corto-
circuiti e può essere commutata fra i seguenti valori:
PS-1615ST 6/9/12V
PS-362ST 3/4,5/6/7,5/9/12V
L’alimentatore fornisce una corrente continua massima rispettiva-
mente di 0,5A (PS-362ST) e di 1A (PS-1615 ST).
Avvisi di sicurezza
Questo apparecchio funziona con tensione di rete di 230V~. Non
intervenire mai al suo interno; la manipolazione scorretta può pro-
vocare delle scariche pericolose. Per l’assistenza, rivolgersi all’es-
perto.
Per un funzionamento corretto osservare assolutamente i seguenti
punti:
•Lo strumento è adatto solo per l’uso all’interno di locali.
•Proteggere lo strumento dal calore e dall’umidità.
•Il cavo rete danneggiato può essere sostituito solo dal produttore
o da un laboratorio autorizzato.
•Si deve prelevare solo la corrente indicata. Nel caso di preleva-
mento di potenze superiore, il fusibile interno si fonde e ogni diritto
di garanzia viene annullato. Il fusibile non può essere rimosso: se
il fusibile è fuso, l’intero strumento è inutilizzabile.
•Per la pulizia usare solo un panno asciutto; non usare in nessun
caso prodotti chimici o acqua.
Collegamento
1)Individuare la tensione d’esercizio dell’apparecchio da collegare
(ved. le relative istruzioni) e impostarla con il selettore dell’alimen-
tatore.
2)Scegliere l’adattatore giusto, provandolo semplicemente o consul-
tando la tabella sottostante. Gli adattatori sono contrassegnati con
un punto colorato.
3)Di particolare importanza è la scelta della polarità. La figura
dimostra come la spina dell’adattatore va inserita nella presa ris-
pettando la corretta posizione del polo positivo e di quello ne-
gativo. Girare la presa in modo da poter vedere i segni +
-
oppure
-
+. Anche la spina va tenuta in modo da poter vedere il simbolo
della spina .
4)Nel caso di tensione o polarità errata, l’apparecchio collegato può
subire dei danni. Dopo aver scelto la tensione, l’adattatore e la po-
larità, inserire il cavo rete nella presa di rete (230V~/50Hz).
Dati tecnici
Modello . . . . . . . . . . . . PS-362 ST PS-1615ST
Tensione d’ingresso: . . . 230V~
/
50Hz/16VA 230V~/50Hz/23VA
Tensione d’uscita: . . . . . 3/4,5/6/7,5/9/12V 6/9/12V
Corrente d’uscita: . . . . . 0,5A max. 1A max.
Ripple:. . . . . . . . . . . . . . 10mV ca. 10 mV ca.
Dimensioni (LxHxP) . . 65 x 59 x 140mm 65 x 59 x 140mm
Peso:. . . . . . . . . . . . . . . 765 gr. 825gr.
Dati forniti dal costruttore.
Con riserva di modifiche tecniche.
Couleur Diamètre intérieur Diamètre extérieur Longueur
Colore Diametro interno Diametro esterno Lunghezza
noir nero
-
2,5mm 12,5mm
blanc bianco
-
3,5mm 14,0mm
rouge rosso 1,3mm 3,5mm 10,5mm
jaune giallo 1,5mm 5,0mm 14,0mm
bleu blu 2,1mm 5,0mm 14,0mm
vert verde 2,5mm 5,0mm 14,0mm
marron marron 2,1mm 5,5mm 14,0mm

This manual suits for next models

3

Other Monacor Power Supply manuals

Monacor IMG Stageline EMA-3 User manual

Monacor

Monacor IMG Stageline EMA-3 User manual

Monacor PSS-510DC User manual

Monacor

Monacor PSS-510DC User manual

Monacor PSS-510DC User manual

Monacor

Monacor PSS-510DC User manual

Monacor IMG STAGELINE EMA-3 User manual

Monacor

Monacor IMG STAGELINE EMA-3 User manual

Monacor NB-1000 User manual

Monacor

Monacor NB-1000 User manual

Monacor PSS-1206 User manual

Monacor

Monacor PSS-1206 User manual

Monacor IMG STAGELINE EMA-3 User manual

Monacor

Monacor IMG STAGELINE EMA-3 User manual

Monacor security PS-120WP User manual

Monacor

Monacor security PS-120WP User manual

Monacor PS-640DC User manual

Monacor

Monacor PS-640DC User manual

Monacor PS-500ST User manual

Monacor

Monacor PS-500ST User manual

Monacor PS-168 User manual

Monacor

Monacor PS-168 User manual

Monacor PSS-5000 User manual

Monacor

Monacor PSS-5000 User manual

Monacor PSS-1500SV User manual

Monacor

Monacor PSS-1500SV User manual

Monacor PSS-2405USB User manual

Monacor

Monacor PSS-2405USB User manual

Monacor IMG STAGELINE EMA-2 User manual

Monacor

Monacor IMG STAGELINE EMA-2 User manual

Monacor PSS-1260DC User manual

Monacor

Monacor PSS-1260DC User manual

Monacor PS-120WP User manual

Monacor

Monacor PS-120WP User manual

Monacor PSS-800 User manual

Monacor

Monacor PSS-800 User manual

Monacor PSS-1000USB User manual

Monacor

Monacor PSS-1000USB User manual

Monacor PSS-2500SV User manual

Monacor

Monacor PSS-2500SV User manual

Monacor PSS-3000E User manual

Monacor

Monacor PSS-3000E User manual

Monacor PSS-1000USB User manual

Monacor

Monacor PSS-1000USB User manual

Monacor IMG STAGELINE EMA-3 User manual

Monacor

Monacor IMG STAGELINE EMA-3 User manual

Monacor PS-532 User manual

Monacor

Monacor PS-532 User manual

Popular Power Supply manuals by other brands

Antec VP350 user manual

Antec

Antec VP350 user manual

COMPANION Rover Li 40 owner's manual

COMPANION

COMPANION Rover Li 40 owner's manual

ELCART VICTORY-e VIC-60-12UPS manual

ELCART

ELCART VICTORY-e VIC-60-12UPS manual

milleteknik EN54 manual

milleteknik

milleteknik EN54 manual

Unipower Aspiro 1U Enclosure instruction manual

Unipower

Unipower Aspiro 1U Enclosure instruction manual

Linak MJB user manual

Linak

Linak MJB user manual

WFCO WF-8935MBA Operator's manual

WFCO

WFCO WF-8935MBA Operator's manual

Kaboodle W-50562 installation guide

Kaboodle

Kaboodle W-50562 installation guide

Texas Instruments UCD3138PSFBEVM-027 user guide

Texas Instruments

Texas Instruments UCD3138PSFBEVM-027 user guide

Branson MPSG-500 user manual

Branson

Branson MPSG-500 user manual

Ampace ANDES 600 PRO user manual

Ampace

Ampace ANDES 600 PRO user manual

Powerfinn PAP3200 operating manual

Powerfinn

Powerfinn PAP3200 operating manual

Keysight Technologies 87421A Operating and service manual

Keysight Technologies

Keysight Technologies 87421A Operating and service manual

Nissindo RC-18 operating instructions

Nissindo

Nissindo RC-18 operating instructions

Telex Audiocom SPS2000A User instructions

Telex

Telex Audiocom SPS2000A User instructions

Rosewill Hercules-1600 user manual

Rosewill

Rosewill Hercules-1600 user manual

Agilent Technologies 729-0800 instruction manual

Agilent Technologies

Agilent Technologies 729-0800 instruction manual

TDK-Lambda Alpha 1500 Handbook

TDK-Lambda

TDK-Lambda Alpha 1500 Handbook

manuals.online logo
manuals.online logoBrands
  • About & Mission
  • Contact us
  • Privacy Policy
  • Terms and Conditions

Copyright 2025 Manuals.Online. All Rights Reserved.