manuals.online logo
Brands
  1. Home
  2. •
  3. Brands
  4. •
  5. National Cycle
  6. •
  7. Motorcycle Accessories
  8. •
  9. National Cycle N2594 Assembly instructions

National Cycle N2594 Assembly instructions

This manual suits for next models

5

Other National Cycle Motorcycle Accessories manuals

National Cycle VStream N20307 Sport Installation instructions

National Cycle

National Cycle VStream N20307 Sport Installation instructions

National Cycle VStream+ N20133 Service manual

National Cycle

National Cycle VStream+ N20133 Service manual

National Cycle Spartan N21202 User manual

National Cycle

National Cycle Spartan N21202 User manual

National Cycle N925 User manual

National Cycle

National Cycle N925 User manual

National Cycle Paladin P4008 Installation instructions

National Cycle

National Cycle Paladin P4008 Installation instructions

National Cycle N5113 Installation instructions

National Cycle

National Cycle N5113 Installation instructions

National Cycle Quantum hardcoated N30214-WK Quick start guide

National Cycle

National Cycle Quantum hardcoated N30214-WK Quick start guide

National Cycle KIT-JL User manual

National Cycle

National Cycle KIT-JL User manual

National Cycle Ztechnik Quantum Vstream Z2394 User manual

National Cycle

National Cycle Ztechnik Quantum Vstream Z2394 User manual

National Cycle ZTechnik VStream User manual

National Cycle

National Cycle ZTechnik VStream User manual

National Cycle Quantum VStream N20121 User manual

National Cycle

National Cycle Quantum VStream N20121 User manual

National Cycle Quantum VStream N20340 User manual

National Cycle

National Cycle Quantum VStream N20340 User manual

National Cycle ZTechnik Quantum Vstream Z2393 User manual

National Cycle

National Cycle ZTechnik Quantum Vstream Z2393 User manual

National Cycle N941 Installation instructions

National Cycle

National Cycle N941 Installation instructions

National Cycle N20019 User manual

National Cycle

National Cycle N20019 User manual

National Cycle N945 User manual

National Cycle

National Cycle N945 User manual

National Cycle ZTechnik VStream Z2497 Service manual

National Cycle

National Cycle ZTechnik VStream Z2497 Service manual

National Cycle ZTechnik VStream Z2348 User manual

National Cycle

National Cycle ZTechnik VStream Z2348 User manual

National Cycle N936 User manual

National Cycle

National Cycle N936 User manual

National Cycle ZTechnik Z2386 User manual

National Cycle

National Cycle ZTechnik Z2386 User manual

National Cycle Quantum N50001 Installation instructions

National Cycle

National Cycle Quantum N50001 Installation instructions

National Cycle SwitchBlade Deflector UQ01 User manual

National Cycle

National Cycle SwitchBlade Deflector UQ01 User manual

National Cycle Fly Boy N27410 User manual

National Cycle

National Cycle Fly Boy N27410 User manual

National Cycle ZTechnik VStream R1200RS User manual

National Cycle

National Cycle ZTechnik VStream R1200RS User manual

Popular Motorcycle Accessories manuals by other brands

SRC H-ADV150-04-01AL quick start guide

SRC

SRC H-ADV150-04-01AL quick start guide

DMD P1 owner's manual

DMD

DMD P1 owner's manual

GIVI Airflow AF1110 manual

GIVI

GIVI Airflow AF1110 manual

Suzuki 99143-00A1 000 Series installation instructions

Suzuki

Suzuki 99143-00A1 000 Series installation instructions

Cardo Systems FREECOM 4+ Pocket guide

Cardo Systems

Cardo Systems FREECOM 4+ Pocket guide

Shark S 700 user manual

Shark

Shark S 700 user manual

R&G CR0081 Fitting instructions

R&G

R&G CR0081 Fitting instructions

SRC B-TRK502-01-01-SL quick start guide

SRC

SRC B-TRK502-01-01-SL quick start guide

hepco & becker 6307520 00 01 manual

hepco & becker

hepco & becker 6307520 00 01 manual

HOMCOM AA0-077 user manual

HOMCOM

HOMCOM AA0-077 user manual

hepco & becker 6307558 00 01 manual

hepco & becker

hepco & becker 6307558 00 01 manual

SHOEI JO Instructions for use

SHOEI

SHOEI JO Instructions for use

Wunderkind Custom 106503-F15 Installation and safety

Wunderkind Custom

Wunderkind Custom 106503-F15 Installation and safety

Suzuki 57100-05881 installation instructions

Suzuki

Suzuki 57100-05881 installation instructions

SIKH HELMETS Y-61 quick start guide

SIKH HELMETS

SIKH HELMETS Y-61 quick start guide

Dräger HPS 3500 Instructions for use

Dräger

Dräger HPS 3500 Instructions for use

M-WAVE SKI manual

M-WAVE

M-WAVE SKI manual

Kuryakyn 6212 installation instructions

Kuryakyn

Kuryakyn 6212 installation instructions

manuals.online logo
manuals.online logoBrands
  • About & Mission
  • Contact us
  • Privacy Policy
  • Terms and Conditions

Copyright 2025 Manuals.Online. All Rights Reserved.

National Cycle, Inc. Maywood, IL 601533-0158 USA 708-343-0400 Fax: 708-343-0625
www.nationalcycle.com e-mail: inf[email protected]
Page 1 of 3 10-119950-000 05/06 Rev.B
N2594, N2594A, N2594B, N2595, N2595A, N2595B
DEFLECTOR SCREEN DX™ with RAKE ADJUST™
OWNERS MANUAL and ASSEMBLY INSTRUCTIONS
SPECIAL NOTE
Dealers – if installing this Deflector Screen DX for a customer, please give him or her this manual. It contains the instructional and ref-
erence material needed to properly maintain and use this product.
This manual is designed for complete product knowledge. Take the time to become familiar with your Deflector Screen DX and its
hardware to obtain the best results in use.
IMPORTANT
Please report any missing parts to your dealer or directly to National Cycle. The following information is necessary: bag number and
serial number located on the outside of the plastic bag, and place of purchase.
ATTENTION
Special notes and cautionary measures which
can prevent damage to the accessory or the
motorcycle
NOTE
Tips for facilitation of operation, control, adjust-
ment and maintenance
PARTS LIST
N2594/95 and Kit TT contains hardware for 7/8” (22mm) handlebars.
N2594A/95A and Kit AE contains hardware for 1” (25mm) handlebars.
N2594B/95B and Kit AH contains hardware for 1.25” (32mm) handlebars.
Complete kit cost: $49.50
Bag #51 (KIT TT) Complete bag cost: $23.00
QTY. PARTNO.DESCRIPTION
2 44-440100 Pivot Strap, 7/8” (22mm)
2 44-440200 Pivot Mount, 7/8” (22mm)
1 59-515100 3/16” Short Arm Hex Key
451-515200 1/4-20 x 5/8” Hex Cap Screw
2 44-446700 Double Stick Tape
Bag #77 (KIT AE) Complete bag cost: $23.00
QTY. PARTNO.DESCRIPTION
2 44-440110 Pivot Strap, 1” (25mm)
2 44-440210 Pivot Mount, 1” (25mm)
1 59-515100 3/16” Short Arm Hex Key
451-515200 1/4-20 x 5/8” Hex Cap Screw
2 44-446700 Double Stick Tape
Bag #78 (KIT AH) Complete bag cost: $23.00
QTY. PARTNO.DESCRIPTION
244-440120 Pivot Strap, 1.25” (25mm)
2 44-440220 Pivot Mount, 1.25” (25mm)
1 59-515100 3/16” Short Arm Hex Key
451-515200 1/4-20 x 5/8” Hex Cap Screw
2 44-446700 Double Stick Tape
Bag #52 (KIT TT and AE) Complete bag cost: $16.50
QTY. PARTNO.DESCRIPTION
144-440300 Telescope Bracket, Left
1 44-440600 Telescope Bracket, Right
2 44-440400 QuickSet Knob
Bag #59 (KIT TT and AE) Complete bag cost: $19.00
QTY. PARTNO.DESCRIPTION
144-440810 Ball End Rake Adjustment Arm, Left
1 44-440800 Ball End Rake Adjustment Arm, Right
1 44-440710 Rod Clamp, 5/16”, Left
144-440700 Rod Clamp, 5/16”, Right
4 51-515300 10-32 x 1/2” Hex Cap Screw
2 44-440900 Wing Knob
1 59-515110 5/32” Short Arm Hex Key
Bag #60 (KIT TT and AE) Complete bag cost: $11.00
QTY. PARTNO.DESCRIPTION
2 42-429000 Locking Nut, 3/4”
2 34-344400 Upright, 5/16”, 90º Bend
OPTIONAL BAGS #47 and #53
Needed for motorcycles with non-tubular handlebars.
Bag #47 Complete bag cost: $22.50
QTY. PARTNO.DESCRIPTION
241-410500 Flat Under Plate
237-370300 Right Angle Bracket
1 37-410400 Square Bar Clamp, Left
1 37-410300 Square Bar Clamp, Right
2 50-505710 5/16-18 x 5/8” Hex Cap Screw
249-492210 Internal Lock Washer, 5/16”
4 42-430010 WhizLok Nut, 1/4-20
Bag #53 Complete bag cost: $15.95
QTY. PARTNO.DESCRIPTION
2 44-440500 Pivot Bracket, Non-Tubular
2 42-432010 WhizLok Nut, 3/8-16
ORDERING PARTS AND ACCESSORIES
All National Cycle parts and accessories can be purchased or ordered
through your dealer. If direct ordering is necessary, send check or
money order with your parts order to National Cycle, Inc., 2200
Maywood Drive, P.O. Box 158, Maywood, IL 60153-0158 U.S.A. Illinois
residents please add 7.75% Cook County sales tax.
QuickSet Knob
Double Stick T
ape
Telescope Bracket,
Left
Pivot Mount
Pivot Strap
1/4-20 x 5/8”
Hex Cap Screws
DIAGRAM 1
DIAGRAM 2
Short Arm Hex Key
(Left Side Assembly)
Upright,
90° Bend
Wing Knob
Ball End Rake Adjustment Arm, Left
Rod Clamp,
Left
Short Arm Hex Key
National Cycle, Inc. Maywood, IL 601533-0158 USA 708-343-0400 Fax: 708-343-0625
www.nationalcycle.com e-mail: inf[email protected]
Page 2 of 3 10-119950-000 05/06 Rev.B
1. OPEN ALL HARDWARE BAGS: Check contents against Parts List
and Diagrams #1 and #2 below.
2. RAKE ADJUST ASSEMBLY: From Uprights and Bag #57, sort parts
into left and right Rake Adjustment Arm assemblies (see Diagram #1).
When left and right Rake Adjust hardware is properly assembled, the
Wing Knobs will face to the inside of the Rake Adjust hardware. This
will allow convenient access to the Rake Adjust feature when installed
on the motorcycle.
To assemble, insert the short ends of the Uprights into the pivot ends
of the Rod Clamps. Start the hex screws, but do not tighten. Attach
the Ball End Rake Adjustment Arms (left and right) to the Rod
Clamps at the pivot points, using the Wing Knobs. See Diagram #1 for
correct alignment. Tighten Wing Knobs securely.
3. INSTALL HARDWARE ONTO SCREEN: (The following steps must
be performed in an air temperature of at least 60-65ºF.) Place the
screen front down on a scratch-free, well-supported surface (a blanket
or towel on a tabletop or floor). Moisten the Ball Ends of the Rake
Adjustment Arms with water or saliva only - no oils or lubricants.
Firmly press the Ball Ends of the Rake Adjustment Arms into the
screen’s Ball Sockets until fully seated (see Diagram #3). It may be
necessary to slightly warm the Ball Sockets with a hair dryer to ease
assembly.Once assembled, the serrated pivots should be toward the
top of the screen, and both Wing Knobs facing toward the center of
the screen.
4. QUICKSET PIVOT MOUNT ASSEMBLY: (Installation and initial
alignment will be easier with the motorcycle on its centerstand.) Pick
appropriate spot on the vertical rise of the handlebars and attach
Pivot Mounts to the Pivot Straps with 1/4-20 hex cap screws until
snug, but not tight. Use hex key wrench supplied in hardware kit. Be
sure both sides are symmetrical (see Diagram #4).
5. INSTALLING TELESCOPE BRACKETS: Slide both Telescope
Brackets onto the Uprights of the Rake Adjust/screen assembly,
WITHOUT the Locking Nuts to avoid scuffing the Uprights.
6. SCREEN INSTALLATION AND BRACKET ALIGNMENT: Set the
Rake Adjust/screen assembly over the headlight and loosely attach
the Telescope Brackets to the QuickSet Pivot Mounts with QuickSet
Knobs (See Diagram #5).
For the most rigid installation:
(A) Set the screen on or close to the headlight at the desired rake
angle.(B) Minimize the Upright extension from the Telescope
Brackets. Slide the handlebar Pivot Mount assemblies further up the
bar to reduce extension. (C) Adjust the Upright/T
elescope Bracket
combination at about 45º angle or greater with respect to the ground.
More vertical angles are slightly less rigid. Mark the Uprights with
masking tape to note their extension. (D) T
o maintain maximum rigidity,
the screen should be “preloaded”. Refer to Step 9. FINAL ADJUST-
MENT.
7. LOCKING NUTS AND DOUBLE STICK TAPE: Now remove the
Rake Adjust/screen assembly, and then the Telescope Brackets. You
can now loosely screw the Locking Nuts onto the Telescope Brackets.
Mark the placement and rotational position of the Pivot Mounts on the
handlebars, then loosen the Pivot Mounts and slide them out of the
way. Place two strips of Double Stick Tape at the location on the han-
dlebars where the Pivot Mounts were placed. Carefully move the Pivot
Mounts back to their original position, over the Double Stick Tape, and
tighten the Hex Cap Screws.
8. COMPLETING ASSEMBLY: Slide the Telescope Brackets back
ATTENTION
Any oils, silicones, greases or lubricants will adversely
affect the impact release feature.
onto the Uprights of the Rake Adjust/screen assembly. Do not tighten
the Telescope Bracket Locking Nuts yet. Install the Deflector
Screen/Rake Adjust/T
elescope Bracket combination onto the motorcy-
cle, aligning the Telescope Brackets with the Pivot Mounts on the han-
dlebars.Install the QuickSet Knobs through the Telescope Brackets
into the Pivot Mounts and tighten securely.
Now slide the Uprights further down into the Telescope Brackets to
the position you marked in Step 6.C. above. Tighten the Telescope
DIAGRAM 3
No lubricants in
ball sockets!
Support screen on
non-abrasive surface.
PUSH
IMPORTANT
Make sure both balls of the
Adjustment Arm are fully seated
in the ball sockets on the shield.
The bottom perimeter edge of the
Adjustment Arm should be fully
inserted and evenly flush.
Wrap Locking Nut with a strip of paper to
avoid scratching surface finish.
Firmly hold Telescope
Bracket and Pivot
Mount/Pivot Strap assembly
in place while tightening
Locking Nut.
Place Pivot Mount/Pivot Strap
assembly as close to upper bend
of the handlebars as possible.
For now, leave Upright with as
short an extension as possible.
Snug, but not tight
(until Step 9).
No Locking Nut at this
step in the assembly.
DIAGRAM 4
DIAGRAM 5
DIAGRAM 6
IMPORTANT
Double Stick Tape placed under Pivot Mount/Pivot Strap assembly.
NOTE
The Double Stick Tape is necessary to avoid rotational
slippage on certain models.
The most rigid installations have
the Telescope Brackets at a 45°
angle to the road.
Bracket Locking Nuts finger-tight. Wrap Locking Nut with a strip of
paper before final tightening with a 3/4” wrench, to avoid scratches or
scuff marks (See Diagram #6). Tighten Locking Nuts securely.
9. CHECK ALL FASTENERS FOR TIGHTNESS: When the desired
height and rake of your Deflector Screen DX is achieved, check and
tighten (a) the four Hex Cap Screws in the Pivot Mounts, (b) the four
Hex Screws in the Rod Clamps, (c) the two Locking Nuts on the
Telescope Brackets, (d) the two QuickSet Knobs on the Telescope
Brackets, and (e) the two Wing Knobs on the Rake Adjustment Arms.
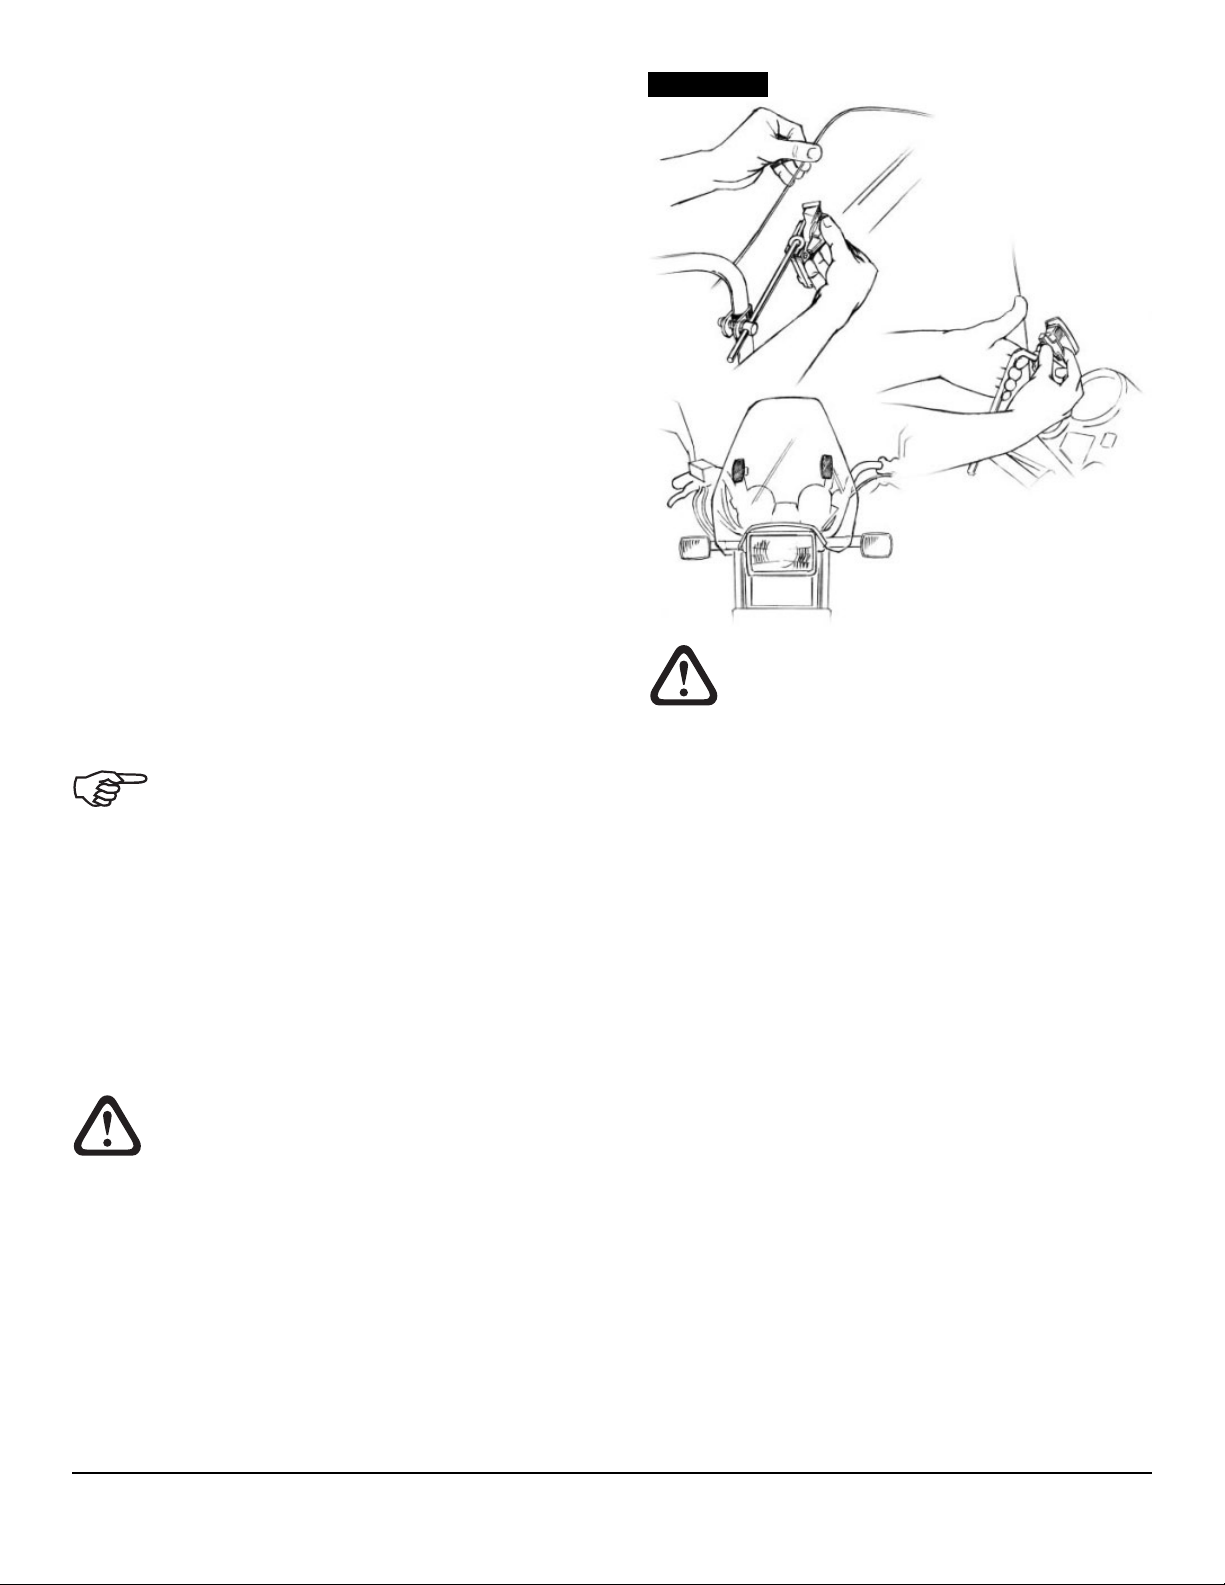
10. FURTHER ADJUSTMENTS: (See Diagram #7). The rake of your
Deflector Screen DX can now be changed at any time by simply loos-
ening the two Wing Knobs, pivoting the screen on its mounts, and
retightening the Wing Knobs.
To maintain absolute rigidity, the screen should be “preloaded”
against some point of the headlight shell. With both Wing Knobs
loose, lift on the left Upright with your left hand, and use your thumb to
push the screen more vertical at the Rake Adjustment Arm, one notch
at a time. This will force the gasket on the screen’s lower lip into con-
tact with the headlight shell. Tighten the left Wing Knob. Repeat this
procedure on the right side to balance the preload adjustment.
If the degree of rake is too great after preloading, repositioning of the
Uprights in the Telescope Brackets will realign the screen to your
desired angle. Loosen the Telescope Bracket Locking Nuts, move the
Uprights higher or lower, and then re-tighten the Locking Nuts.
SCREEN REMOVAL
To remove the screen, spin the QuickSet Knobs to release the
T
elescope Brackets and lift the windscreen assembly free from the
motorcycle. No tools are required! The Pivot Mounts stay secured to
your handlebars and in alignment for fast, tool-free reinstallation.
NOTE: The double Ball End Rake Adjustment Arms are not to be used
as a removal point, and should not be disassembled repeatedly. If you
need to remove the Uprights from the screen, detach at the Wing
Knobs.
CLEANING
Pre-rinse your screen with water to remove surface grit. Use mild, non-
abrasive liquid soap, warm water, and a clean, soft cloth/sponge or wet
chamois to wash the screen. Rinse again, as all residue must be
removed. Wipe dry with a chamois or soft sponge to prevent water
spots.
PAINT, GLUE OR GREASE REMOVAL
Moisten a ball of cotton or soft cloth with naphtha or turpentine and gen-
tly scrub to remove paint, glue or grease. Follow with a soap and water
wash as described above.
HAIRLINE SCRATCHES AND ABRASIONS
Small scratches can be removed or minimized with a mild automotive
glazing compound or a high quality plastic polisher. NOTE: Test on a
small sample area first. Recommended polishing products include
Novus 2 Fine Scratch Remover, McGuiar’s Mirror Glaze MGH-17, and
The Wax Shop’s Safe Cut Swirl & Haze Remover. Flannel or chamois
make good polishing cloths. We recommend hand buffing for best
results.Keep moving across the scratch while buffing. Try not to concen-
trate on a small area, which can distort the windscreen’s optics.
Today’s motorcycles are built with enough frame rigidity to withstand the
moderate loads placed on them by the foreseeable addition of a windshield.
National Cycle, Inc. Maywood, IL 601533-0158 USA 708-343-0400 Fax: 708-343-0625
www.nationalcycle.com e-mail: inf[email protected]
Page 3 of 3 10-119950-000 05/06 Rev.B
CAUTION
Never ride your motorcycle with loose windshield mount-
ing hardware. Check the hardware for tightness regularly.
WARNING
DO NOT USE ALCOHOL SOLUTIONS OR GLASS
CLEANERS to clean your screen. DO NOT use rain pro-
tective products on this screen. Alcohol solutions, brake
fluids, and strong solvents will permanently damage the
screen.
NOTE
The double Ball End Rake Adjustment Arms are not to be
used as a removal point, and should not be disassembled
repeatedly. If you need to remove the Uprights from the
screen, detach at the Wing Knobs.
DIAGRAM 7
T
o change the screen’s rake angle,
loosen Wing Knobs.
Tighten
Wing Knob.
“Preload” screen to contact headlight.
Push with thumb...
...and lift upright.
It is not necessary for the preloaded
screen to contact the headlight at all
points.
If the addition of an accessory(ies) adversely affects your motorcycle’s
stability, immediately remove the accessory(ies). Do not ride a motor-
cycle that exhibits unsafe handling characteristics. Have experi-
enced service personnel correct any problems before riding with the
accessory(ies) installed. For further questions concerning handling
problems associated with an accessory(ies), contact your dealer, motor-
cycle manufacturer, or accessory manufacturer.
Sunlight reflected off the inside curvature of a windshield can, at certain
times of the day, cause extreme heat buildup on the motorcycle’s instru-
ments and possibly even melt them. Exercise care in parking to avoid
this. Park facing the sun or place an opaque object over this area.
National Cycle windshields and fairings are designed to provide wind
protection and enhanced comfort, but not protection in the event of a
collision with another vehicle, the road, or any other object.
Some of our products use certain features, patented and otherwise, that
may minimize injury in certain accidents, but the possibility of injury
exists if the windscreen is broken.
The acrylic sheet that is used in our Deflector Screen™ is almost 30X
more impact resistant than glass. If it is subject to impact beyond its
resistance, it breaks into comparatively large pieces, and does not nor-
mally shatter into small slivers.
All of our products are made in conformance and exceed the require-
ments of D.O.T. SS205,Z26.1, classifications AS6 and AS7, which cover
all safety glazing for motorcycle applications.
Plexifairing GT, Plexifairing 3, Plexistar 2, Deflector Screen, Deflector
Screen DX, Streetshield, Streetshield EX, FlyScreen, QuickSet3, Rake
Adjust, and No-Hole Ballsocket are covered by one or more of the fol-
lowing patents: 4082345, 4168098, 4379584, 4489973, 5732965,
578833, 6254166, 6484914.
©2006 National Cycle, Inc., Maywood, IL U.S.A.