manuals.online logo
Brands
  1. Home
  2. •
  3. Brands
  4. •
  5. Nav TV
  6. •
  7. Automobile Accessories
  8. •
  9. Nav TV MOST-HUR31 User manual

Nav TV MOST-HUR31 User manual

MOST-H.U.R. 31
Head Unit Replacement interface for select ‘10-’16 Porsche CDR31 or PCM3.1 radio
NTV-KIT835
BHM
08/08/17
NTV-DOC300
3950 NW 120th Ave, Coral Springs, FL 33065 TEL 561-955-9770 FAX 561-955-9760
BHM
08/08/17
NTV-DOC300
Agreement: End user agrees to use this product in compliance with all State and Federal laws. NAV-TV Corp. would not be held liable for misuse of its product.
If you do not agree, please discontinue use immediately and return product to place of purchase. This product is intended for off-road use and passenger
entertainment only.
2 | P a g e
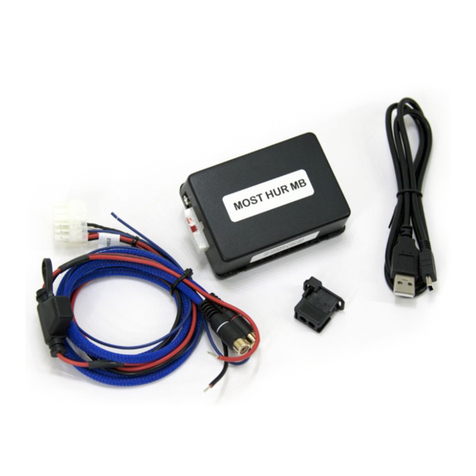
Fiber Optic extension
cable/connector
NTV-HAR067/NTV-CON002
USB Cable (updates)
NTV-CAB009
Wire side view
Antenna Adapter
NTV-CAB027
Overview
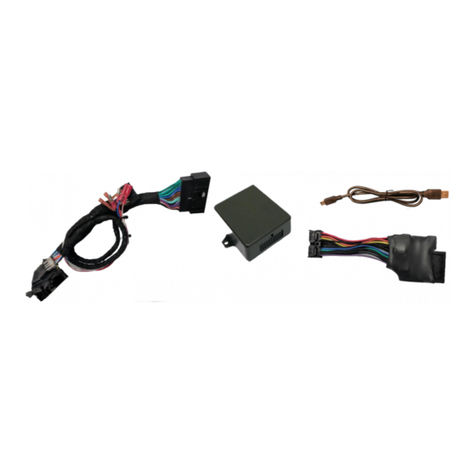
The MOST-HUR31 is a radio replacement interface for select Porsche vehicles equipped with PCM3.1 or CDR31
radio & external BOSE M.O.S.T. fiber optic amplifier. The module allows the factory amplifier, speakers and
sound quality to be retained when adding a modern aftermarket radio. Other components in the factory
system, such as a CD changer, satellite radio, telephone module, DVD player, or any other factory component
in the M.O.S.T loop will not need to removed, but will not function after the installation.
Kit Content
MOST-HUR31 Pinout
Pin #
Description
Color
Radio Connections:
1
Constant 12v (+)
Yellow
Radio, Constant Power
2
Left Front Audio IN
White RCA
Radio, Left Front RCA OUT
3
Rear Common Shield
Green/Purple RCA
Radio, Rear RCA Common
4
Left Rear Audio IN
Green RCA
Radio, Left Rear OUT
5
Remote IN
Yellow/Black
Radio, Remote OUT
6
--NOT USED--
Yellow/Blue
--
7
Reverse Signal OUT
Purple/White
Radio, Reverse IN
8
Illumination OUT
Orange
Radio, Illumination Control
9
CAN HI
Brown/Red
--
10
Ground
Black
Radio, Black (Ground)
11
Right Front Audio IN
Gray RCA
Radio, Right Front RCA
12
Front Common Shield
White/Gray RCA
Radio, Front RCA Common
13
Right Rear Audio IN
Purple RCA
Radio, Right Rear OUT
14
IR OUT
White
Radio, IR Control
15
Parking Brake OUT
Green
Radio, Parking Brake IN
16
--NOT USED--
Green/White
--
17
12 ACC OUT (1 amp)
Red
Radio, ACC Power
18
CAN LO
Brown
--
MOST-HUR31 interface
NTV-ASY265
Plug & Play T-Harness
NTV-HAR285
3.5mm plug for IR
NTV-CAB026
Wires highlighted green will
be connected to the vehicle
via the Plug & Play Harness.
BHM
08/08/17
NTV-DOC300
Agreement: End user agrees to use this product in compliance with all State and Federal laws. NAV-TV Corp. would not be held liable for misuse of its product.
If you do not agree, please discontinue use immediately and return product to place of purchase. This product is intended for off-road use and passenger
entertainment only.
3 | P a g e
*For off-road use and passenger entertainment only.
MOST-HUR31 Installation
1. Base-line the factory radio:
a. Source the radio to FM radio, adjust the volume to a comfortable listening setting
b. Center the balance and fade, center the bass and treble
c. Be certain there are no other problems with the factory stereo system before installing this
unit.
2. Remove the factory radio from the dash.
3. Connect the provided Plug & Play Harness to the main factory connector previously removed from
the OEM radio.
4. Remove the fiber optic plug from the OEM Harness (pry lock-tab).
a. Connect the provided fiber connector to the OEM fiber plug
b. Connect the new fiber assembly to the MOST-HUR31 interface at the fiber port.
5. Connect the RCAs among the Plug & Play Harness to the low-level pre-outs of the aftermarket
radio. NOTE: factory subwoofer (if equipped) is not adjustable through the amplifier, therefore will
not be adjustable with the aftermarket HU.
6. Make all remaining radio connections:
a. Ground (-) is provided from the HUR Black wire (PIN 10)
b. Constant Power (+) is provided from the HUR Yellow wire (PIN 1)
c. ACC 12v (+) power is provided from the HUR module RED wire (PIN 17). Connect the
vehicle’s Power Antenna wire (blue from T-Harness) to this ACC as well (often times, some
radios will not supply sufficient current to the vehicle power antenna. Power Antenna Note:
in some cars, the OEM power antenna wire location has moved 1 pin down (white, OEM
PIN12) –if so, either re-pin or jump around the connector to power from the Blue wire.
d. Reverse signal is provided from the HUR module Purple/White wire (PIN 7)
e. Remote from HUR (yellow/black) must connect to the remote OUT from the radio (typically
blue/white). This is used to UNMUTE the factory amplifier & to know that the radio is ready
to receive the video lock-out bypass.
f. IR signal is provided from the HUR module White wire (PIN 14). NOTE: If installing Kenwood
radio, connect white wire directly to remote-in wire from head unit. All other radios, connect
white wire to the red wire of the provided IR plug 3.5mm adapter cable and connect to
wired-remote in port on HU.
g. E-brake is provided from the HUR unit’s Green wire (PIN 15). Connecting this to the Parking
brake wire of the radio will bypass the video lock-out restriction until every key cycle* (if the
user desires –see menu settings).
7. Connect the RCAs from the HUR to the radio’s low-level RCA outputs. The high-level speaker leads
are not used with this unit. Connect the 18-pin plug from the Plug & Play Harness to the MOST-
HUR31 interface at the power port and proceed to MOST-HUR31 Menu Setup.
BHM
08/08/17
NTV-DOC300
Agreement: End user agrees to use this product in compliance with all State and Federal laws. NAV-TV Corp. would not be held liable for misuse of its product.
If you do not agree, please discontinue use immediately and return product to place of purchase. This product is intended for off-road use and passenger
entertainment only.
4 | P a g e
[Volume] (up/down): press for
mute
OR
While in menu:
Adjust value of current option
[Diamond]:
OEM functionality only
OR
While in menu:
Cycle (UP) through
available options
[Phone hang up]: ends BT
phone call
OR
HOLD 10 seconds to enter
HUR menu, press once
again to exit (See page 6 for
alternate method)
[Return]:
OEM functionality only
[Rotary knob]: preset
selection
Must enter Audio-Extras
first (press inwards)
ALSO
Scroll to display
NAVTV-HUR menu
[Phone pick-up]:
answers BT phone call
OR
While in menu:
Cycle (DOWN) through
available options
MOST-HUR31 SWC Menu and radio control overview (type 1)
•Once all connections are made, verify sound is heard through the system with the
key on. Verify balance and FM radio signal (via the aftermarket head unit).
•The following MOST-HUR31/OEM Amplifier adjustments can be made with the
OEM steering wheel controls, and feedback is shown through the cluster LCD
screen during the process. NOTE: for vehicles without SWC, see page 7.
To begin, the cluster LCD must be resting in ‘AUDIO’ display
mode (use right-side scroll knob until ‘NAVTV HUR’appears)
BALANCE
-5 - +5 Left/Right
Use Volume to
adjust
BASS
-5 - +5 Left/Right
Use Volume to
adjust
TREBLE
-5 - +5 Left/Right
Use Volume to
adjust
Input GAIN
0-100%
Use Volume
to adjust
FADER
-5 - +5 Rear/Front
Use Volume to
adjust
NOTE: FADE settings are only active through the cluster –they will NOT function through the aftermarket radio.
BHM
08/08/17
NTV-DOC300
Agreement: End user agrees to use this product in compliance with all State and Federal laws. NAV-TV Corp. would not be held liable for misuse of its product.
If you do not agree, please discontinue use immediately and return product to place of purchase. This product is intended for off-road use and passenger
entertainment only.
5 | P a g e
[Volume] (up/down):
press for mute
OR
While in menu:
Adjust value of
current option
[Diamond]:
OEM functionality only
OR
While in menu:
Cycle (UP) through
available options
[Phone hang up]: ends BT
phone call
OR
HOLD 10 seconds to enter
HUR menu, press once
again to exit (See page 6
for alternate method)
[Return]:
OEM functionality only
[Rotary knob]: preset
selection
Must enter Audio-Extras
first (press inwards)
ALSO
Scroll to display
NAVTV-HUR menu
[Phone pick-up]:
answers BT phone call
OR
While in menu:
Cycle (DOWN) through
available options
MOST-HUR31 SWC Menu and radio control overview (type 2)
•Once all connections are made, verify sound is heard through the system with the
key on. Verify balance and FM radio signal (via the aftermarket head unit).
•The following MOST-HUR31/OEM Amplifier adjustments can be made with the
OEM steering wheel controls, and feedback is shown through the cluster LCD
screen during the process. NOTE: for vehicles without SWC, see page 7.
To begin, the cluster LCD must be resting in ‘AUDIO’ display
mode (use right-side scroll knob until ‘NAVTV HUR’appears)
Input GAIN
0-100%
Use Volume
to adjust
FADER
-5 - +5 Rear/Front
Use Volume to
adjust
BALANCE
-5 - +5 Left/Right
Use Volume to
adjust
BASS
-5 - +5 Left/Right
Use Volume to
adjust
TREBLE
-5 - +5 Left/Right
Use Volume to
adjust
NOTE: FADE settings are only active through the cluster –they will NOT function through the aftermarket radio.
BHM
08/08/17
NTV-DOC300
Agreement: End user agrees to use this product in compliance with all State and Federal laws. NAV-TV Corp. would not be held liable for misuse of its product.
If you do not agree, please discontinue use immediately and return product to place of purchase. This product is intended for off-road use and passenger
entertainment only.
6 | P a g e
MOST-HUR31 SWC radio selection
•Before steering-wheel radio control will operate properly, you must select the proper radio type in the
HUR Cluster menu. Once inside NAVTV-HUR Menu:
MOST-HUR31 SWC Extras control overview
•When the cluster is resting on NAVTV HUR (Audio), the MOST-HUR31 offers a feature for track/preset
control. This feature is also available for vehicles not equipped with SWC:
MOST-HUR31 Surround / E-Brake setup
Vehicles with SWC: use
right-side knob
Cycle to next
step
Press Hang-up to exit
and save all settings
Rotate to display
desired radio type
Cycle through HUR
menu to ‘Radio’
Select whether or not
to enable OEM
Surround processing
NOTE: if this setting
does not retain when
choosing ‘ON’, then
the Porsche system is
not equipped with
Surround processing.
1
2
3
4
E-Brake options:
Bypass: sends a (-) pulse out
the E-Brake wire (green)
from the HUR, 5 seconds
after ignition.
OEM: Provides (-) pulse out
the E-Brake wire (green)
from the HUR, only when
E-Brake is active
(OEM similar)
Vehicles without SWC: use
multi-function display lever
BHM
08/08/17
NTV-DOC300
Agreement: End user agrees to use this product in compliance with all State and Federal laws. NAV-TV Corp. would not be held liable for misuse of its product.
If you do not agree, please discontinue use immediately and return product to place of purchase. This product is intended for off-road use and passenger
entertainment only.
7 | P a g e
Entering / Adjusting HUR Cluster menu without SWC
Once inside the HUR Menu, reference the
picture here (right). Use the OEM turn signal
stalk/headlight lever to control the menu and
adjust settings:
1. Left turn signal: decrease current setting
value (one detent/press)
2. Right turn signal: increase current
setting value (one detent/press)
3. High-beam toggle on: cycle menu up
4. High-beam flash: cycle menu down
For vehicles without steering wheel controls, press and hold the push button on the side of the HUR module
for 10 seconds to enter the menu (wait for complete countdown). Once inside the NAVTV-HUR Audio menu,
use the OEM controls shown below to adjust settings.
When finished, push button on
HUR module, cycle key or wait
for 15-second time out.
BHM
08/08/17
NTV-DOC300
Agreement: End user agrees to use this product in compliance with all State and Federal laws. NAV-TV Corp. would not be held liable for misuse of its product.
If you do not agree, please discontinue use immediately and return product to place of purchase. This product is intended for off-road use and passenger
entertainment only.
8 | P a g e
MOST-HUR31 Diagram
NOTE: Not all
connections are
shown in this
diagram. Some
optional connections
not shown.

This manual suits for next models

1

Other Nav TV Automobile Accessories manuals

Nav TV MOST-H.U.R. MB V2 User manual

Nav TV

Nav TV MOST-H.U.R. MB V2 User manual

Nav TV UCT84 F-CAM User manual

Nav TV

Nav TV UCT84 F-CAM User manual

Nav TV PCM3CAM Manual

Nav TV

Nav TV PCM3CAM Manual

Nav TV PCM41-CAM Manual

Nav TV

Nav TV PCM41-CAM Manual

Nav TV W204PGM User manual

Nav TV

Nav TV W204PGM User manual

Nav TV NTV-KIT422 User manual

Nav TV

Nav TV NTV-KIT422 User manual

Nav TV CHRY UNI-CAM User manual

Nav TV

Nav TV CHRY UNI-CAM User manual

Nav TV MY-CUE User manual

Nav TV

Nav TV MY-CUE User manual

Nav TV NAV-INREN User manual

Nav TV

Nav TV NAV-INREN User manual

Nav TV V2P-II User manual

Nav TV

Nav TV V2P-II User manual

Nav TV OPV-2BMW User manual

Nav TV

Nav TV OPV-2BMW User manual

Nav TV POR-iPOD User manual

Nav TV

Nav TV POR-iPOD User manual

Nav TV ZEN-A2B User manual

Nav TV

Nav TV ZEN-A2B User manual

Nav TV GVIF-CTS User manual

Nav TV

Nav TV GVIF-CTS User manual

Nav TV GVIF-JAG User manual

Nav TV

Nav TV GVIF-JAG User manual

Nav TV MyTouch VIM User manual

Nav TV

Nav TV MyTouch VIM User manual

Nav TV C.O.D-F50 User manual

Nav TV

Nav TV C.O.D-F50 User manual

Nav TV NTV-KIT899 User manual

Nav TV

Nav TV NTV-KIT899 User manual

Nav TV NTV-KIT724 User manual

Nav TV

Nav TV NTV-KIT724 User manual

Nav TV BMW12-DYNAMIC KIT Manual

Nav TV

Nav TV BMW12-DYNAMIC KIT Manual

Nav TV IOB-RVC User manual

Nav TV

Nav TV IOB-RVC User manual

Nav TV ZEN-25 User manual

Nav TV

Nav TV ZEN-25 User manual

Nav TV NTV-KIT041 User manual

Nav TV

Nav TV NTV-KIT041 User manual

Nav TV W205-RVC User manual

Nav TV

Nav TV W205-RVC User manual

Popular Automobile Accessories manuals by other brands

Fisher Minute Mount 2 system installation instructions

Fisher

Fisher Minute Mount 2 system installation instructions

AL-KO IQ7 instructions

AL-KO

AL-KO IQ7 instructions

Denali D3 instruction manual

Denali

Denali D3 instruction manual

Metra Electronics 95-9012 installation instructions

Metra Electronics

Metra Electronics 95-9012 installation instructions

Directed 403.CHRYSLER3 installation guide

Directed

Directed 403.CHRYSLER3 installation guide

Crux Sightline MRVBM-77Q quick start guide

Crux

Crux Sightline MRVBM-77Q quick start guide

Whispbar K572W Fitting instructions

Whispbar

Whispbar K572W Fitting instructions

Erickson BIG BED TAILGATE EXTENDER quick start guide

Erickson

Erickson BIG BED TAILGATE EXTENDER quick start guide

travall TDG 1479 Fitting instructions

travall

travall TDG 1479 Fitting instructions

travall TDG 1479D Fitting instructions

travall

travall TDG 1479D Fitting instructions

DoubleTake SENTRY quick start guide

DoubleTake

DoubleTake SENTRY quick start guide

JAKO-O 171-859 instructions

JAKO-O

JAKO-O 171-859 instructions

Westin 65-1395 instructions

Westin

Westin 65-1395 instructions

Rola PMX018 Fitting instructions

Rola

Rola PMX018 Fitting instructions

Westfalia 305 168 Installation and operating instructions

Westfalia

Westfalia 305 168 Installation and operating instructions

Belief 4W2002 12C21 Installation, operation and maintenance instructions

Belief

Belief 4W2002 12C21 Installation, operation and maintenance instructions

cam Walmec 40034 Al Mounting instructions

cam

cam Walmec 40034 Al Mounting instructions

Actron Global OBD II Scan Tool 9620 user manual

Actron

Actron Global OBD II Scan Tool 9620 user manual

manuals.online logo
manuals.online logoBrands
  • About & Mission
  • Contact us
  • Privacy Policy
  • Terms and Conditions

Copyright 2025 Manuals.Online. All Rights Reserved.