manuals.online logo
Brands
  1. Home
  2. •
  3. Brands
  4. •
  5. Nav TV
  6. •
  7. Car Video System
  8. •
  9. Nav TV UCTv 2 Series User manual

Nav TV UCTv 2 Series User manual

This manual suits for next models

3

Other Nav TV Car Video System manuals

Nav TV BMW12-SMART User manual

Nav TV

Nav TV BMW12-SMART User manual

Nav TV VTC-J User manual

Nav TV

Nav TV VTC-J User manual

Nav TV PCM3-997-Media User manual

Nav TV

Nav TV PCM3-997-Media User manual

Nav TV NTV-KIT486 User manual

Nav TV

Nav TV NTV-KIT486 User manual

Nav TV GVIF-CTS User manual

Nav TV

Nav TV GVIF-CTS User manual

Nav TV W222-VIM User manual

Nav TV

Nav TV W222-VIM User manual

Nav TV BMWVIM User manual

Nav TV

Nav TV BMWVIM User manual

Nav TV PCM4-VIM User manual

Nav TV

Nav TV PCM4-VIM User manual

Nav TV BENHUR User manual

Nav TV

Nav TV BENHUR User manual

Nav TV W166-VIM User manual

Nav TV

Nav TV W166-VIM User manual

Nav TV NTV-KIT393 User manual

Nav TV

Nav TV NTV-KIT393 User manual

Nav TV W221VIM User manual

Nav TV

Nav TV W221VIM User manual

Nav TV CHRY MULTI-CAM Manual

Nav TV

Nav TV CHRY MULTI-CAM Manual

Nav TV W204-12 DYNAMIC Kit User manual

Nav TV

Nav TV W204-12 DYNAMIC Kit User manual

Nav TV MAS-TV2 Manual

Nav TV

Nav TV MAS-TV2 Manual

Nav TV G80-VIM User manual

Nav TV

Nav TV G80-VIM User manual

Nav TV Barracuda Manual

Nav TV

Nav TV Barracuda Manual

Nav TV W204-N RVC User manual

Nav TV

Nav TV W204-N RVC User manual

Nav TV W212 VIM User manual

Nav TV

Nav TV W212 VIM User manual

Nav TV W204-N RVC User manual

Nav TV

Nav TV W204-N RVC User manual

Nav TV OPV-1R User manual

Nav TV

Nav TV OPV-1R User manual

Nav TV W221-10 Kit Manual

Nav TV

Nav TV W221-10 Kit Manual

Nav TV SYNC3-RVC User manual

Nav TV

Nav TV SYNC3-RVC User manual

Nav TV RGB-VWv2 User manual

Nav TV

Nav TV RGB-VWv2 User manual

Popular Car Video System manuals by other brands

Farenheit MD-1510CM instruction manual

Farenheit

Farenheit MD-1510CM instruction manual

Mazda Connect manual

Mazda

Mazda Connect manual

RCA DRC97983 Manual de usuario

RCA

RCA DRC97983 Manual de usuario

Panasonic CY-VHD9401U Service manual

Panasonic

Panasonic CY-VHD9401U Service manual

Stinger HEIGH10 RB10RAM13B installation manual

Stinger

Stinger HEIGH10 RB10RAM13B installation manual

Alpine IVA-W203 - 6.5" Touch Screen 2-DIN DVD In-Dash... owner's manual

Alpine

Alpine IVA-W203 - 6.5" Touch Screen 2-DIN DVD In-Dash... owner's manual

Eonon E1057 instructions

Eonon

Eonon E1057 instructions

Milion D2223 user manual

Milion

Milion D2223 user manual

Metra Electronics 99-8153 installation instructions

Metra Electronics

Metra Electronics 99-8153 installation instructions

Voxx Electronics HR8MA1 owner's manual

Voxx Electronics

Voxx Electronics HR8MA1 owner's manual

Axxera AV604Bi quick start guide

Axxera

Axxera AV604Bi quick start guide

Clarion NX706E owner's manual

Clarion

Clarion NX706E owner's manual

Pyle view PLDN74BTi owner's manual

Pyle view

Pyle view PLDN74BTi owner's manual

Clarion NX602 quick start guide

Clarion

Clarion NX602 quick start guide

RCA DRC6296 - Twin 9" Mobile DVD System Manual Del Usuario

RCA

RCA DRC6296 - Twin 9" Mobile DVD System Manual Del Usuario

Fiat Uconnect 5.0 manual

Fiat

Fiat Uconnect 5.0 manual

Lanzar SVDVD5 owner's manual

Lanzar

Lanzar SVDVD5 owner's manual

Eonon E1060 instructions

Eonon

Eonon E1060 instructions

manuals.online logo
manuals.online logoBrands
  • About & Mission
  • Contact us
  • Privacy Policy
  • Terms and Conditions

Copyright 2025 Manuals.Online. All Rights Reserved.

UCTv2 +
Dodge/Jeep uConnect (RA3/RA4) Dual Camera & A/V Interface
NTV-KIT763
3950 NW 120th Ave, Coral Springs, FL 33065 TEL 561-955-9770 FAX 561-955-9760
BHM
10/04/18
NTV-DOC265
BHM
10/04/18
NTV-DOC265
Agreement: End user agrees to use this product in compliance with all State and Federal laws. NAV-TV Corp. would not be held liable for misuse of its product.
If you do not agree, please discontinue use immediately and return product to place of purchase. This product is intended for off-road use and passenger
entertainment only.
2 | P a g e
Overview
The UCTv2 series Interface integrates multiple video inputs to the factory 8.4” touch screen in compatible
2013+ Dodge and Jeep vehicles, with additional expansion options for future upgrades.
UCTv2 (KIT762): Add up to 2 additional inputs (or 1 input while retaining OEM camera).
UCTv2+ (KIT763): Same functionality as the standard system but includes an AVSW for audio
integration (AV input).
UCTv2 MULTI-CAM (KIT764): Same functionality as the standard system but includes a data-controlled
SVS-6 switcher capable of adding 6 additional video inputs all while retaining any existing OEM cameras.
NOTE: The UCTv2 MULTI-CAM kit is required for RAMs that have an OEM Cargo Camera or to emulate the
Cargo Camera menu.
Kit Content
Plug & Play T-harness
NTV-HAR246/264
UCTv2+ Module (KT2)
NTV-ASY245
USB Cable (updates)
NTV-CAB009
AVSWv2 module
NTV-ASY255
Power/Trigger Harness
NTV-HAR293
BHM
10/04/18
NTV-DOC265
Agreement: End user agrees to use this product in compliance with all State and Federal laws. NAV-TV Corp. would not be held liable for misuse of its product.
If you do not agree, please discontinue use immediately and return product to place of purchase. This product is intended for off-road use and passenger
entertainment only.
3 | P a g e
UCTv2 + pin out
RA3/RA4 Radio LCD connector pin out
PIN #
Description
Color
1
12v (+) Constant
Yellow
2
INPUT 1: VIM Activation*
Red
3
--NOT USED--
Blue
4
INPUT 3: Front CAM/Cargo Cam
(selectable)
Pink
5
RX (not present)
--
6
RCA MALE
--
7
RCA Shield
--
8
CAN HI (Radio Side)
Brown/White
9
CAN HI (Car Side)
Blue/White
10
Ground (-)
Black
11
OUTPUT 1 Provides 12v (+) ACC OUT
White/Red
12
OUTPUT (2) when AUX is activated
(AVSW V1 Trigger)
Blue/White
13
OUTPUT (3) when Front CAM is
activated (AVSW V2 Trigger)
Purple
14
TX INPUT (UART control to SVS-6 RX)
White/Brown
15
RCA Female (Normally Open)
--
16
RCA Female (Normally Closed)
--
17
CAN LO (Radio Side)
Brown
18
CAN LO (Car Side)
Blue
Pin #
Description
Color
2
CAN HIGH
Dark Blue
12
CAN LOW
White
31
Diff Video (-)
Green/Brown
32
Diff Video (+)
Green/Orange
33
Shield
43
Ground
Black
44
Constant 12v
Red
OUTPUTs 2 & 3
send 12v (+) with
corresponding
button press
(force cam)
Wire Side
PIN Side
*Not supported on all models
BHM
10/04/18
NTV-DOC265
Agreement: End user agrees to use this product in compliance with all State and Federal laws. NAV-TV Corp. would not be held liable for misuse of its product.
If you do not agree, please discontinue use immediately and return product to place of purchase. This product is intended for off-road use and passenger
entertainment only.
4 | P a g e
Dash Disassembly (basic RAM)
1. Remove the Torx t20 screw at the right rear of the pocket on the right side of the
dash.
2. Remove (2x) Torx t20 at the top of the dash. They are hidden beneath a rubber mat.
3. The face should be free now, pull straight outwards (towards
you) with medium force. Use plastic panel tools if necessary.
4. Remove (4x) 7mm screws that secure the LCD
touchscreen.
BHM
10/04/18
NTV-DOC265
Agreement: End user agrees to use this product in compliance with all State and Federal laws. NAV-TV Corp. would not be held liable for misuse of its product.
If you do not agree, please discontinue use immediately and return product to place of purchase. This product is intended for off-road use and passenger
entertainment only.
5 | P a g e
UCTv2 + Module Installation
1. After removing the factory radio, grab the provided Plug & Play T-harness and connect the female
side to the factory 44-pin plug. Make certain the lock connects together securely.
2. Install A/V source and run signal/power leads into the front dash opening. Note: 12v ACC is
provided from output 1 (PIN 11, white/red). If connecting any device(s) which draw 1amp or more,
trigger a relay with this output instead powering directly!
3. Make all connections (RCAs & wired) as shown in diagram below (if adding A/V source only) OR page
6 (if adding A/V source AND Front camera).
4. Connect the male side of the Plug & Play T-Harness to the main radio display. Proceed to page 9
for programming.
UCTv2 + Install Diagram (adding A/V with OEM tailgate camera)
BHM
10/04/18
NTV-DOC265
Agreement: End user agrees to use this product in compliance with all State and Federal laws. NAV-TV Corp. would not be held liable for misuse of its product.
If you do not agree, please discontinue use immediately and return product to place of purchase. This product is intended for off-road use and passenger
entertainment only.
6 | P a g e
UCTv2 + Install Diagram (adding A/V & Front CAM with OEM tailgate camera)
BHM
10/04/18
NTV-DOC265
Agreement: End user agrees to use this product in compliance with all State and Federal laws. NAV-TV Corp. would not be held liable for misuse of its product.
If you do not agree, please discontinue use immediately and return product to place of purchase. This product is intended for off-road use and passenger
entertainment only.
7 | P a g e
UCTv2 + Programming
Programming the UCTv2 + is performed in the vehicle, through the factory dash MUTE button, TUNING KNOB, and
CLUSTER LCD for feedback.
1. Before attempting to program, after making connections, let the vehicle perform a CAN-reset: Close all
doors/trunk/hood, lock the vehicle and waiting 10 minutes before
proceeding to program.
2. Turn the vehicle’s ignition on. Be certain you’re resting in FM mode
(see an FM station frequency on the cluster), otherwise the cluster
information may not display.
3. Close all doors (door status may override NAV-TV settings cluster feedback).
4. View the chart on the next page for settings descriptions and the diagram above to begin programming.
5. NAV-TV programming mode will time out (back to factory) after 15 seconds. Scroll to the end of the settings
menu and select ‘EXIT’ to exit and save settings.
Press and HOLD
(15 seconds) to
enter NAV-TV
settings mode
While in NAV-TV
settings mode only:
Rotate clockwise
(slowly, one
detent/time) to
scroll through
options. Press ENTER
to change setting.
To show the FM source on the
cluster, first clear any messages
shown (door status, etc) with the UP
or DOWN arrows on the steering
wheel. Press the audio source button
until ‘FM’ is displayed.
Center button:
Change Audio Source
BHM
10/04/18
NTV-DOC265
Agreement: End user agrees to use this product in compliance with all State and Federal laws. NAV-TV Corp. would not be held liable for misuse of its product.
If you do not agree, please discontinue use immediately and return product to place of purchase. This product is intended for off-road use and passenger
entertainment only.
8 | P a g e
The SWITCH you choose
determines which
options will display on
the cluster, to reduce
confusion.
UCTv2 + Programming Parameters (OEM Cluster)
*Factory Rear camera is controlled via LIN. Forced OEM RVC is not supported with the UCTv2.
Parameter
(cluster)
Adjustment
Options
Description
NAV-TV
Settings
TUNE-Next Item /
Enter Change
Rotate TUNE knob to access different menus, press knob
inwards to enter/change setting
GEAR
AUTO / STICK
AUTO: Select this option if the vehicle has an automatic
transmission
STICK: Select this option if the vehicle has a manual
transmission
SWITCH
RELAY / AVSW /
SVS-6
RELAY: Uses RCA inputs on the UCTv2 module itself (UCTv2)
AVSW: Select when using AVSW board (UCTv2+)
SVS-6: Select when using SVS-6 switcher (UCTv2 MULTI-CAM)
OEM /
AFTERMARKET /
OFF
OEM: Vehicle has a manufacturer-installed reverse camera.
AFTERMARKET: Any aftermarket reverse camera.
OFF: Choose if not adding a reverse tailgate camera.
F. RVC
OFF / ON
ON: Enables option of forcing rear view camera.*
FRONT CAM
OFF / ON / <8
ON: Enables option of installed front camera.
<8: Front camera will display between 1-8 MPH.
AUX VID
OFF / ON
ON: Enables option of AUX VIDEO
TURNS
Cargo CAM**
INPUT3
EXIT
Option color
SWITCH chosen:
ANY
AVSW
---
RVC
AVAILABLE WITH ADDITIONAL HARDWARE.
See NTV-KIT764 (UCTv2 MULTI-CAM)
BHM
10/04/18
NTV-DOC265
Agreement: End user agrees to use this product in compliance with all State and Federal laws. NAV-TV Corp. would not be held liable for misuse of its product.
If you do not agree, please discontinue use immediately and return product to place of purchase. This product is intended for off-road use and passenger
entertainment only.
9 | P a g e
NOTE: this procedure is NOT required if the vehicle has an OEM reverse camera installed.
Programming for 2016+ Vehicles equipped with Panasonic Radios (CarPlay/Android Auto)
•For 2016+ vehicles equipped with the new Panasonic radio, if adding a rear camera, the method for
activating rear-camera has changed and requires additional (startup/shut down) steps. Follow the
procedure below after programming desired options in the NAV-TV cluster menu in these vehicles:
1. Open the driver’s door and leave it open until step 4.
2. After Installing the kit and adjusting the menu for desired options, shut down the vehicle with the key
(or push button). Wait for the LED on the module to go out –the CAN bus must remain undisturbed
for 2 minutes at this point (starting from after the LED is out).
3. Turn the vehicle on and wait for the radio to boot fully (able to control volume/adjust radio). Wait 1
minute with normal operation.
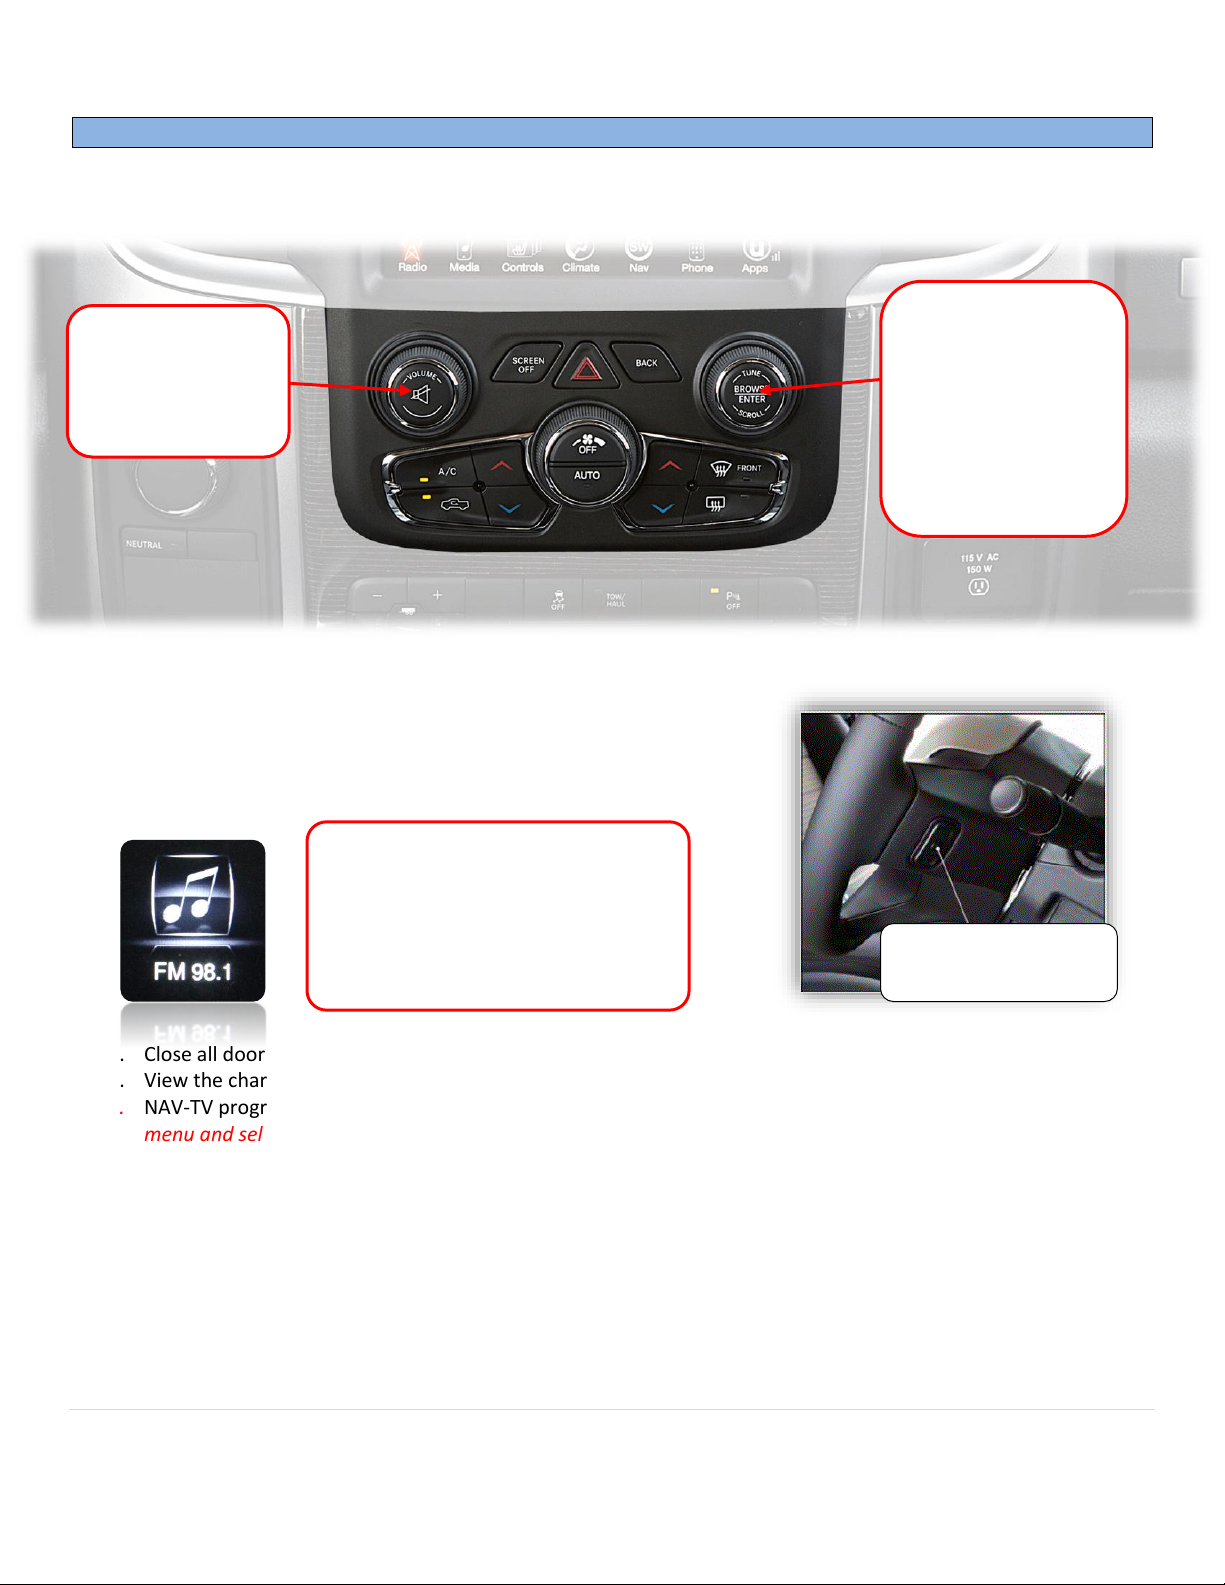
4. Turn the car off and perform a full CAN reset: Close all the doors, lock the car with the remote and
walk away for at least 10 minutes. Do not disturb the car whatsoever for 10 minutes.
5. Return to the vehicle and start the car (run), place the vehicle into reverse to verify that the system
received the programming.
For further information on this process and video reference, see our YouTube video here:
https://www.youtube.com/watch?v=XOtkOUCLXik
BHM
10/04/18
NTV-DOC265
Agreement: End user agrees to use this product in compliance with all State and Federal laws. NAV-TV Corp. would not be held liable for misuse of its product.
If you do not agree, please discontinue use immediately and return product to place of purchase. This product is intended for off-road use and passenger
entertainment only.
10 | P a g e
*Not supported on all models
UCTv2 + Force Buttons
CIM*: Hold (3
sec) to activate
(not supported
for 2016s)
Force rear camera:
Press & hold (2 sec)
’13-’17 RAM, Grand Cherokee, Viper
’15-‘16 SRT Charger, SRT Challenger, SRT 300
Force rear camera:
Press & hold (2 sec)
Force front camera: Press
& hold (2 sec) to activate
CIM*: Hold (3
sec) to activate
(not supported
for 2016s)
Force front camera:
Double-tap Front Defrost
AUX: Double-tap
Rear Defrost
AUX: Hold both ‘SCREEN
OFF’ & ‘BACK’ (2 sec)