NEC DB4000 User manual

General safety
lObserve ‘Turn off 2-way radio’ signs, such as those near stores of fuel, chemicals or explosives.
lDo not allow children to play with the phone, charger or batteries.
lA small rubber bung (for antenna socket protection) is included in the carton. Keep this out of reach of small children, for whom it could be hazard.
lThe operation of some medical electronic devices, such as hearing aids and pacemakers, may be affected if a cellphone is used next to them. Observe any warning signs and
manufacturer’s recommendations.
Road safety
lYou MUST exercise proper control of your vehicle at all times.
lThe handset or hand-held microphone should not be used while driving. Find a safe place to stop first or use the hands-free kit available.
lDo not speak into a hands-free microphone if it will take your mind off the road.
lYou MUST NOT stop on the hard shoulder of a motorway to answer or make a call, except in an emergency.
lSwitch off your cellphone at a refuelling point, such as a petrol station, even if you are not refuelling your own car.
lDo not store or carry flammable or explosive materials in the same compartment as a radio transmitter, such as a cellphone.
lYou must not use the phone’s car kit alert device to operate the lights or horn of your vehicle while on a public road.
lElectronic vehicle systems, such as anti-lock brakes, speed control and fuel injection systems are not normally affected by radio transmissions. The manufacturer of such equipment can
advise if it is adequately shielded from radio transmissions. If you suspect vehicle problems caused by radio transmissions consult your dealer and do not switch on your phone until it has
been checked by qualified approved installers.
Third party equipment
The use of third party equipment, cables or accessories, not made or authorised by NEC, may invalidate the warranty of your cellphone and also adversely affect the phone’s operation. For
example use only the NEC mains cable supplied with the AC charger.
Service
The cellphone, batteries and charger contain no user-serviceable parts. We recommend that your NEC cellphone is serviced or repaired by an NEC authorised service centre. Please contact
your Service Provider or NEC for advice.
Non-Ionising Radiations
The radio equipment shall be connected to the antenna via a non-radiating cable (e.g. coax).
The antenna shall be mounted in a position such that no part of the human body will normally rest close to any part of the antenna unless there is an intervening metallic screen, for example,
the metallic roof.

Before you start
Cellphone system structure
It is worth remembering that every time you use your phone, three different organisations are involved:
All the features described in this user guide are supported by your phone . However, for all these features to work, you must have a SIM card (supplied by your Service Provider) that also
supports these features. Even if you have a fully featured SIM card, any feature not supported by the Network transmitting your call will not work. This last point is especially important when you
are roaming networks (see page 10).
User guide conventions
The following markers are used throughout the user guide to attract your attention:
$This type of paragraph will contain details of where to find related information to the topic being explained.
OThis type of paragraph will contain information worth noting.
IThis type of paragraph will contain important information often regarding SIM cards, Service Providers and or Network facilities.
Thepeoplethat
make your phone The people that supply
your SIM card and bills Thepeoplethat
transmit your calls
Service
Provider Network

GETTING STARTED 1
BASIC CALLS & PHONE USE 4
CARING FOR BATTERIES 12
SELECTING FEATURES 14
SETTING UP YOUR PHONE 16
STORING & RETRIEVING NUMBERS 26
TEXT ENTRY & NUMBER EDITING 36
SECURITY 40
DIVERTING & CONTROLLING INCOMING CALLS 46
MESSAGES & VOICE MAIL 50

Getting Started
This cellphone is a dual band digital type designed for use on a Global System for Mobile Communications (GSM) network. GSM networks
are installed and planned for many countries throughout Europe and operate on two frequencies: 900MHz (known as GSM900 or just GSM)
and 1800MHz (known as GSM1800 or PCN - Personal Communications Network). Your cellphone is capable of working on both of these
systems.
This world standard allows you to roam and use your own phone in other countries. You can, if you wish, make and receive all calls as if you
were in your home country, with all billing being made via your normal Service Provider.
Preparing the phone
Before you try to use your phone check the following has been carried out.
lValid SIM card inserted (see below)
lBattery charged (see page 13)
lPIN 1 code entered (if necessary - see page 2)
SIM card
Before using your cellphone you must sign-up with one of the digital network Service Providers. In addition to your subscription details you
will receive a personal SIM (Subscriber Identity Module) which is inserted into your phone.
If the SIM card is removed then the phone becomes unusable until a valid SIM is fitted. It is possible to transfer your SIM to another
compatible phone and resume your network subscription.
There are two types of SIM, plug-in and full-size, and this phone uses the plug-in type. The screen on your phone will display appropriate
messages if no SIM is fitted.
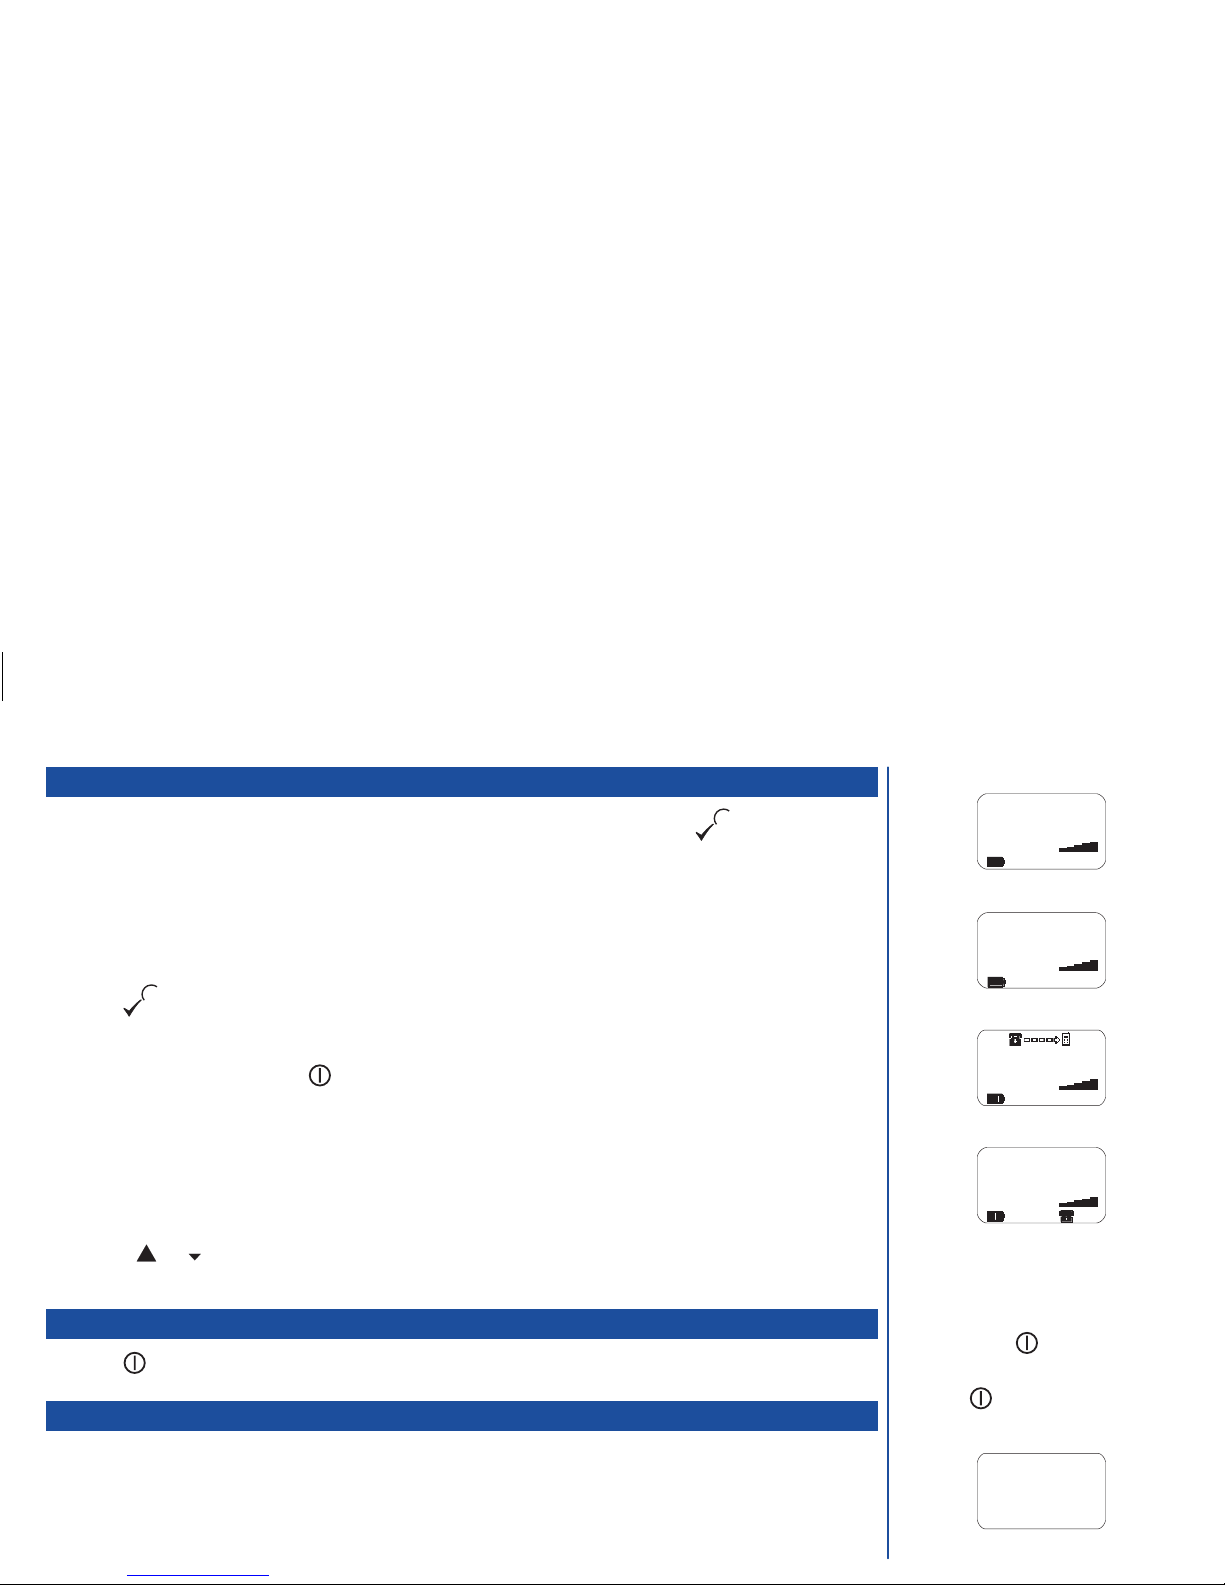
Inserting a SIM
lMake sure that the power is off and then remove the battery À&
Áto reveal the SIM location.
lSlide the catch Âin the direction of the open arrow.
lInsert the SIM Ã, ensuring the gold contacts are face down and
the notch on the card lines up with the SIM location recess.
lSlide the catch in the direction of the lock arrow and replace the
battery.
OThe phone supports a number of
languages and the keyboard symbols have
been chosen for world-wide operation.
OThe digital technology of your NEC GSM
phone helps to ensure that your
conversations are kept secure.
OIf the phone, or the SIM, is lost or stolen
then you should contact your Service
Provider immediately in order to bar it
from use.
OThe SIM card contains personal data such
as your electronic phonebook, messages
(see page 50) and also details of the
network services you have subscribed to.
The phone will not work (except for
emergency calls on some networks)
unless a valid SIM is fitted.
OIf the SIM is already fitted, see Start-up on
page 2.
OIf you insert a SIM card other than your
own, information such as call logs may be
lost.
1
1
2
3
SIM Card
Catch
4

Start-up
Switching the phone on
*Hold down the power key for about a second, to switch on. The screen usually displays the greeting
message (see page 24 to change this) and the phone is then in standby, see the Standby screen on page 5.
Switching the phone off
*Hold down the power key until the display shows power down message.
PIN 1 code
The SIM card issued by your service provider has a security feature called PIN 1 code protection. The PIN 1(Personal Identification Number)
is a number put onto the card by your Service Provider, and is 4 to 8 digits long. Some service providers supply SIM cards which will cause
your phone to prompt for a PIN 1 code when it is turned on. If this is the case, use the phone’s keypad to enter your code. You can disable
this prompt (see page 41).
Display information
LCD alphanumeric display
This display shows the current network, signal strength, status messages (e.g. Calling...), the current time, and whatever you
have keyed in on the phone’s keypad. In addition to this, it also displays the phone’s menu options. Many of the phone’s features are activated
using its powerful menu structure (see page 14 on selecting the phone’s features).
LCD Icons
Battery charge level
This icon indicates the amount of charge left in your battery; the more black
squares shown the higher the battery charge level (see page 12 for battery
care details). This icon will pulse when the battery is being charged.
Short message waiting
This icon indicates a short message is awaiting your attention (see
page 51 for details).
Call forwarding set to on
This icon indicates your phone is set up to divert incoming calls under
the conditions in menu 3 (divert). See page 47 for a full description of
call forwarding.
Call connected
This icon is displayed continuously during a call and will flash if
you have a call waiting or if you have a call on hold.
Voice mail waiting
This icon indicates a voice mail message is awaiting your attention (see
page 59 for details).
Key lock
This indicates the keypad is locked (see page 41 for details).
OYou may need to charge the battery before
using your cellphone. If the phone gives no
response when switched on, read the
information about batteries on page 12.
OThe greeting message may not be as
indicated if any locks have been set or the
wrong SIM has been inserted. Please
follow any instructions given, e.g. ‘Return
to Service Centre’.
ODo not remove the battery to switch your
phone off as this may cause loss of stored
information.
2
LCD icons
LCD
Alphanumeric
display
Greeting message
Powering
down
Please wait
Power down message
UK NETWORK
06:21
Display position of LCD
icons

Flip options
When the phone’s Flip is active (set to On) it will perform the following functions:
lAnswer a call when flipped open
lDisable Auto key lock when flipped open (if option set - see below)
lCancel or reject a call when flipped shut
lSet Auto key lock on when flipped shut (if option set - see below)
Activating the Flip for call control
The active Flip will answer an incoming call or end an active call. To activate the Flip, proceed as follows:
*Press 801. The Flip function menu will be displayed.
*Press 1to activate the Flip function or 2to turn it off.
Activating the Auto key lock function
The Auto key lock function will disable all your phone’s keys when the Flip is closed. To activate or deactivate the Auto key lock function,
proceed as follows:
*Press 802. The Auto key lock function menu will be displayed.
*Press 1to activate the Auto key lock function or 2to turn it off.
Setting the display to English
If the display is showing any other language than English, proceed as follows:
*Press 871.
OEven when the Flip function is active, you
can still use the and keys to start
or end a call when the Flip is closed
(unless the Auto key lock function is ‘on’
see below left).
OThe Flip function is disabled when a simple
hands free earpiece is plugged into your
phone. An incoming call can be answered
or diverted using the and keys
respectively. Alternatively, calls are
automatically answered after three rings if
the Autoanswer facility is activated (see
page 20).
OThe Flip function has no effect on the key
lock function (see page 41).
3
MENU
MENU
MENU
MENU

Basic calls & phone use
Connecting to the network 5
Receiving/Making/Ending/Unsuccessful calls 5 to 6
Stored numbers 7
Emergency calls 7
Last number redial 7
Earpiece & ringer volume 7
Muting the microphone during a call 8
Own phone number displaying/sending 8
Phone modes 8
International dialling codes 9
Roaming 10
Using your phone with a laptop computer 11
4

Connecting to the network
*Hold down the power key for about a second, to switch on.
After start-up, and correct PIN 1 code entry if necessary, the phone searches for a network. When found, the network name and country are
displayed. You also see the time, signal strength, battery strength and any area messages if this facility is enabled (see page 57).
The phone’s LCD display shows the strength of the radio signal that links your phone to the network. A maximum signal is shown by 5 shaded
blocks and a minimum signal by 1 block.
Receiving calls
When someone calls your number, the phone’s ringer will sound, if set (see page 19), and the incoming call screen is displayed (see right).
The phone number of the person calling may be displayed in the middle of the screen if the calling line identification (CLI) facility is available
and the caller has activated the feature. If the caller’s phone number has been stored in your phonebook along with a name (see page 30), that
name will be displayed. If the caller has withheld their identity then the screen will give a message that the incoming number is being
withheld.
Accepting a call
*Press the key or open the Flip (if the Flip option is active - see page 3).
Rejecting a call
*Press briefly or close the Flip (if the Flip was already open and the Flip option is active - see page 3).
You also have options for holding calls and diverting calls. These options depend upon your network and your subscription arrangements.
If your cellphone receives a call and you do not answer it, the screen will display the telephone number (or the name if a stored number) of
the caller (if available). This information is stored in the unanswered calls list. Up to 10 unanswered calls are stored in this list. The last 10
answered calls are stored in the answered calls list.
OIf the screen indicates Searching or
No Service you will not be able to
make or receive any normal calls. You may
be able to make emergency calls.
OYou can set your phone to answer a call
when any key except the key is
pressed - see 'Answer key' on page 20. If
you are making a call, the phone gives
priority to receiving a call unless you have
already pressed the key.
$See Also: Call waiting & holding
(page 48) and Call diverting (page 47).
$See Also: Viewing Answered and
Unanswered Calls on page 29.
5
Searching
Please wait
Linking to network
UK NETWORK
Tue 19 Jan 1999
06:21
Standby screen
01987654321
Answer ?
Incoming call

Making basic calls
You make a simple call in the same way as you would with a normal phone, except that you need to press the key after entering the
phone number and area STD code. To make international calls you must first enter the international dialling code (see page 9).
Starting a call
*Open the Flip (if necessary) and key in the phone number. Check the number on the display.
OUse the full STD area code even if you are in the same town. Long numbers will continue on a second line.
*Press to send the call.
OIf you do not wish your number to be displayed on the phone you are calling, turn the send own number feature off (see page 8).
*To abort the call at any time, press briefly or close the Flip (if the Flip option is active - see page 3). The Standby screen
will be displayed.
The display will show you that the system is trying to connect your call and changes as you hear the call established.
When the call is connected the screen displays the number called or your name for the number (if a name has been stored in memory along
with the number - see page 30), the duration of this call so far (if the in-call timer feature is enabled - see page 21), and the signal strength.
Correcting mistakes
*Use the or key to to scroll through the number then press Cto clear individual digits or hold down the Ckey to
completely clear a phone number.
Ending calls
*Press (Short press) or close the Flip (if the Flip option is active - see page 3). The phone returns to standby.
Unsuccessful calls
If the call cannot be connected, you will hear a tone. The display will give an appropriate message, and the phone will return to standby. If
your phone is set to Autoredial the number will be automatically called again after a short delay (see page 21).
If a connection is broken, such as by a poor radio signal, then the phone returns to standby. You may also get a warning tone.
$See also: Phone Number Editing on page
39.
OAlways press or close the Flip even if
the other person has ended the call first.
OIf the key is held down, the unit will
turn off.
6
UK NETWORK
Tue 19 Jan 1999
11:42
In standby ready for
use
UK NETWORK
0123456789
11:42
Phone number on
screen
0123456789
11:42
Trying to connect
Connected
0123456789
11:42
Connected
MENU
The other
user is
busy
Unsuccessful call

Stored numbers
You can store numbers and names on your phone, and recall these numbers to make calls. The numbers and names are stored on your SIM
card.
The following numbers are considered to be stored numbers:
lNumbers you have stored yourself
lThe last 10 outgoing call numbers (redial numbers)
lThe last 10 incoming answered calls (unless a number was withheld)
lThe last 10 unanswered calls (unless a number was withheld)
Emergency calls
The standard emergency number of 112 can be used.
*Key 112
*Press to connect the call to the local emergency services.
Last number redial
To redial the last number you called:
*Ensure the standby screen is displayed and no phone number is shown.
*Press the key twice. The last number you dialled will be called (unless the Auto key lock is on - see page 3).
Earpiece and ringer volume
To change the earpiece volume
*Use volume keys during a call. The settings remain at the level last set.
Whilst the phone is ringing, the volume keys on the side of your phone control the ringer volume. At other times the volume keys on the side
of your phone control the volume of keypad tones.
$See Also: Storing and retrieving numbers
on page 26.
OOn some networks emergency calls can be
made using the 112 number without a SIM
card inserted. In the UK, the number 999
can also be used for emergency services
but the phone must contain a valid SIM
card.
$See also: Redial facilities on page 28.
7
Volume up
Volume down

Muting the microphone during a call
*Press 7during a call to turn the mute on or off.
Displaying your own phone number
*Press with the phone switched on and in standby or in a call. This will display the first number stored on the
SIM.
*Press the or key to select from the list of your own numbers, if applicable.
Sending your own phone number
You can send your own phone number when you make a call so it will be displayed on the phone you are calling (CLI).
*Press 813. Then 1to turn CLI on or 2to turn it off.
Phone modes
Your phone can be set to operate in one of four modes.
lNormal
lMeeting
lIn-car
lPocket
These modes are selected from a menu displayed when the key is pressed from an empty standby screen, i.e. with no number
displayed (see the table on page 9 for selection details). When a mode is selected, some of your phone’s settings will be altered
automatically to suit the situation suggested by the respective mode name. The phone functions altered are as follows:
lRinger volume level
lKey volume
lSilent mode setting
lVibrator setting
lKeypad lock setting
lBacklight setting
lAutoanswer
OYou can enter a number of ‘own phone
numbers’ to allow for voice, data and FAX
calls etc. To enter and/or edit your own
phone numbers, see page 37.
8
MENU
MENU
MENU
MENU
Mute
01234567890
17:10
Mute during call

Mode selection & settings
The following table shows the selection keys and default settings for each mode.
Normal
(press p1)
Meeting
(press p2)
In-car
(press p3)
Pocket
(press p4)
Ringer Volume Medium Medium Medium High
Key volume Medium Medium Medium Medium
Silent mode As set in menu On Off Off
Vibrator As set in menu On Off On
Auto key lock Off Off Off On
Backlight Normal Normal On Normal
Autoanswer As set in menu Off On Off
International dialling codes
When you make an international call from any country, you must start by dialling a special international access code.
Your cellphone has the facility to prefix numbers with a '+' symbol, which saves you entering the access code for the country that you are
calling from.
Your phone will automatically dial the correct numbers for each country if you enter the '+' digit as follows:
Entering international dialling codes
With the phone in standby
*Hold down 0. The '0' character displayed changes to a '+' character.
You can then enter the country code, area code, and phone number that you wish to call.
The UK country code is always 44, no matter what country you are dialling from. For example, a typical UK number of 01189 123456 is entered as:
+ 44 1189 123456
International country area phone
access code code number
OTo select any other mode when in the
pocket mode the keypad lock will have to
be turned off ( 0).
IAny changes made to these settings
whilst in a mode will be stored and
used when that mode is selected
again.
OWhichever mode is selected when you turn
your phone off will still be selected when
you turn your phone on again.
OThe Autoanswer function will only work if
your phone is connected to a headset or
car kit.
9
MENU
UK NETWORK
+44118912345
6
11:42
International number
entry

Roaming
Roaming is a standard feature of the GSM network technology. Roaming allows you to use your phone in many parts of the world and pay all
charges through your normal Service Provider.
Your network operator usually has agreements with named networks in other countries. The SIM fitted in your phone can be supplied so that
automatic roaming can take place with these named networks. The phone also allows you to set network preferences of your own.
Before leaving your home country you should select any preferences such as call barring or call diverting. Note that you will be charged for
calls forwarded to you whilst roaming.
When dialling you will need to add the international access codes when required, so storing all numbers with the codes (such as +44 for the
UK) is helpful (see page 9).
Set automatic or manual network selection
*With the standby screen displayed, press 86. The automatic/manual menu will be displayed.
*Press 1to select automatic network selection or 2to set manual selection. A confirmation screen will be displayed
momentarily and then the standby screen will be displayed.
View/edit network list
OBefore editing your network list, please consult with your service provider.
*With the standby screen displayed, press 863.
*Use the or key as appropriate until the required network is displayed.
*Press the key.
*Press the appropriate key to select the required action (see table right).
OWhen your phone is set to manual mode,
you will have to wait while the phone is
searching for networks. If several network
options are found, use the or
key to scroll through the list.
IBefore you manually select a
network, ensure it is covered under
the agreement you have with your
service provider.
Action No.
Select 1
Delete 2
Edit code 3
OIf you select a network to be added to your
network list (option 1) but the list is full,
you will have to use the or key
to select the network to be replaced and
then press the key.
10
MENU
MENU
MENU
MENU
MENU

Using your phone with a laptop computer
You can use your phone with a laptop computer and a suitable modem to make both FAX and data transmissions. Connect the laptop, modem
and your phone as shown below. Consult your IT department or the relevant software documentation to set-up and carry out the following:
lYour computer has the correct driver for your modem
lThe laptop has the relevant fax and data applications loaded
lThe fax transmission print screen points to the fax driver and not a printer
lMake a fax and a data transmission using a standard land line
lWhen both types of transmission have been successful, connect your phone to the output of the modem, turn the phone on and with
the standby screen displayed, use your computer to send either a fax or data
lWhen a fax is sent, the number being called will be displayed on the 2nd line of the phone’s LCD display. The top line will display
Fax then Calling...then Connected alternating with Fax call. When the transmission is complete, the
phone’s screen will return to standby.
lWhen data is sent, the number being called will be displayed on the 2nd line of the phone’s LCD display. The top line will display
Data then Calling...then Connected alternating with Data call. When the transmission is complete, the
phone’s screen will return to standby.
OYou can set your phone’s ringer style so
you can distinguish between incoming
speech, FAX and data calls (see page 19).
11
PCMCIA
Land Line
Direct to cellphone or
optionally via
car kit
Software Modem

Caring for batteries
Checking the battery 13
Low battery alarm 13
Changing the battery 13
Charging a battery 13
STANDBY AND TALK TIMES
Your cellphone works closely with the network you are using to provide the services you need, and the standby and talk times achieved will depend on how you use
the phone and choices made by the network operator.
In particular, your location within the network, the frequency at which this location is updated, the type of SIM you have, your reception of area or ‘cell broadcast’
messages and the use of Full Rate or Enhanced Full Rate speech, as well as other factors, will affect both standby and talk times.
If you need to maximise the standby time of your cellphone, you may choose to switch on ‘Area Messages Power Save Option’ (see page 57).
IMPORTANT BATTERY CHARGING INFORMATION
Charging a very low battery
The battery’s charge continues to drop after the Recharge Battery warning is displayed. In extreme cases where the battery is left uncharged for some
considerable time after this warning is displayed a trickle charge is used to slowly top-up the battery to the safe level at which ‘fast charging’ can begin. During this
time the battery icon will pulse but you will not be able to make or receive a call, or fully power up the phone. Normal operation is resumed once fast charging
begins. The phone can be in trickle charge for a few hours before fast charging starts if the battery is left uncharged for some days after the Recharge
Battery warning is displayed.
12

Checking the battery
*Check icon at the bottom of the screen
The blocks on the display show the charge of your battery pack.
Full battery power Low battery power
Low battery alarm
When the battery voltage falls below the working level, Recharge Battery is displayed on screen along with a flashing empty battery
icon and a warning tone. The phone will automatically power down shortly afterwards.
Changing the battery
Make sure the phone is switched off. Some settings may be lost if the battery is removed while the power is on.
*Slide the battery catch towards the top of the phone Àand lift the battery out Á.
*Put the new battery pack in base first then lower it into place Â.
Charging a battery
The charger unit begins to restore the battery power when it is connected to the phone.
*Connect the charger plug into the connector at the base of the phone. Check the battery icon is pulsing.
When charging is complete, the battery icon will stop pulsing and trickle charging continues. During charging the battery icon pulses and
shows as a solid block when charging is complete. This is also shown when the phone is switched off.
If you need to receive calls, the cellphone can be switched on and left in standby while it is charging, although the total time taken to charge
is then increased.
The cellphone is designed to be charged with the NEC equipment listed with the specifications of your phone.
IDO NOT connect a charger or any
other external DC source if the
phone's battery is not inserted.
OTo cancel the battery alarm, press any key
except . The low battery alarm will
repeat until the phone automatically
switches off.
OIt may take a few seconds for the indication
to start.
IUsing the wrong type of charger
can be dangerous and
may invalidate any
warranty and approval
given to the cellphone.
Do not connect more
than one charger at
any time. Do not
leave the charger
connected to the
mains supply when
it is not in use.
13 Charger
connector
1
2
3

Selecting features
This section describes how you select and alter the features provided by your phone and the network it is connected to.
Selection overview 15
Menu selection 15
Fastkey selection 15
14

Menu selection
When using the menu method to select a feature, you just need to scroll through the options on screen and confirm your choice with the
key which is also the ‘send’ key.
AÕat the base of the options indicates there are more to choose from. Use the or keys to scroll through the menu options.
OThe choice of options available depends on whether the phone is on a call or in standby.
The currently selected option is normally marked by a >whilst the highlighted option will be selected if you press the key.
OPressing the key will return you to the standby screen.
Fastkey selection
The alternative ‘fastkey’ method of selection lets you jump straight to a menu or function without scrolling through the intermediate menu
options. The selections are made by pressing numbers on the keypad which relate to the displayed menus options. This means the required
option does not have to be on the screen to be selected.
If you lose track or make a mistake, just press Cto return to the previous menu. If you keep pressing Cyou will return to the standby display.
Fastkey selection example
Using the fastkey selection method, setting the Autoanswer facility on or off can be carried out as follows:
*Press 82. The Autoanswer on/off menu will be displayed. The currently selected option will have a >next to it.
*Press 1to set Autoanswer to on or 2to set Autoanswer to off. The appropriate Autoanswer confirmation screen will be
displayed momentarily and then the standby screen will be displayed.
At the start of the section which contains the Autoanswer facility procedure (page 16) an abbreviated form of the fastkey method will be shown
as follows:
Autoanswer 8 2 20
OThe instructions in this user guide usually
make use of the fastkey method and,
where applicable, the fastkey selection for
a function is shown at the beginning of
each section.
15
Redial
1On
2>Off
select
Redial Off current
option
1 Messages
2 View calls
3 Divert
Õ select
Menu with extra options
MENU
MENU
MENU

Setting up your phone
Clock/alarm set 6 17
Ringer volume 7 3 19
Ringer style 7 4 19
Silent mode 7 1 19
Vibration alert (option) 7 6 19
Send tones 7 5 20
Answer key 8 3 20
Autoanswer 8 2 20
Autoredial 8 4 21
Call timer/Advice of Charge (AoC) 5 21/23
Greeting message 8 8 24
Language setting 8 7 24
Backlight functions 8 25
16
MENU
MENU
MENU
MENU
MENU
MENU
MENU
MENU
MENU
MENU
MENU
MENU
MENU

Clock/alarm set
Clock set
Your phone has the ability to store the time and date. This information is displayed, in 12 or 24 hour format (see below), on the standby
screen and can be used to trigger an alarm (see page 18 for alarm set-up). To set the time and date, proceed as follows:
*Press 61. The clock set screen will be displayed.
*When the clock set screen is entered, the first hour digit can be altered by pressing either the or key. Alternatively,
the required digit on the keypad can be pressed. If the digit does not need to be altered, press the key so the second hour
digit can be altered.
*Alter the digit if necessary, and then use the or key as appropriate to move to the next value to be altered.
OThe following values can ONLY be altered by pressing either the or key.
lam/pm indicator (where applicable)
lMonth name
lYear
*When you have set the clock to the required time and date, press the key. The clock set message will be displayed
momentarily and then the standby screen will be displayed.
12/24 hour set
To set the phone’s clock display to either 12 or 24 hour format, proceed as follows:
*Press 63. The 12/24 hour menu screen will be displayed. The currently selected option will have a >next to it.
*Press 1for 12 hour or 2for 24 hour. The appropriate confirmation screen will then be displayed momentarily before the
standby screen is displayed.
17
MENU
MENU
MENU
12:34
Mar 10 1999
ÑmoveÒ
Õset Done
Clock set screen
Clock set message
MENU
12/24 hour
1>12 hour
2 24 hour
select
12/24 hour selection
screen
Table of contents
Other NEC Cell Phone manuals