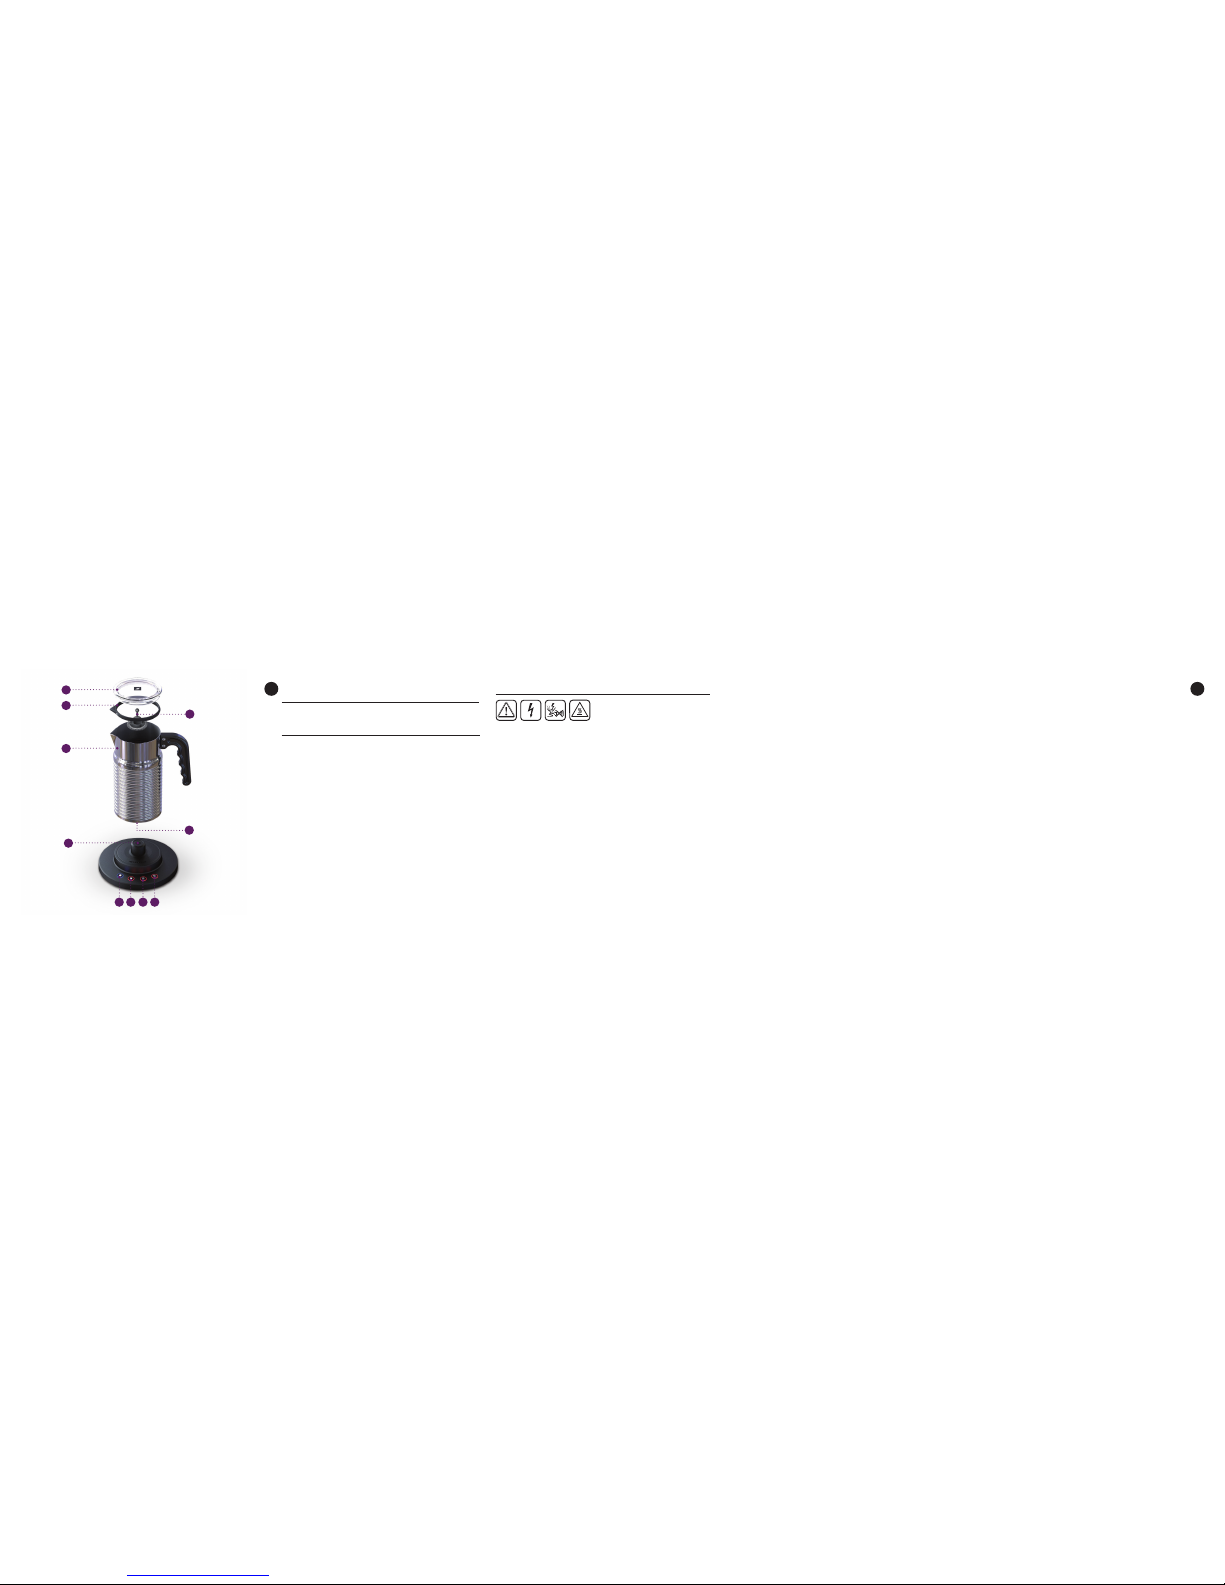
Nespresso AEROCCINO4 User manual

http://www.nespresso.com/ultimate-coffee-creations
EN - FR 2-17
HR - SLO 18-33

32
AEROCCINO4
CONTENT
SAFETY PRECAUTIONS �����������������������������������������������������������������������������������
OVERVIEW ����������������������������������������������������������������������������������������������������
PREPARATION�����������������������������������������������������������������������������������������������
CLEAN DIRECTLY AFTER EVERY USE�����������������������������������������������������������������
TROUBLESHOOTING���������������������������������������������������������������������������������������
SPECIFICATIONS��������������������������������������������������������������������������������������������
WARRANTY ���������������������������������������������������������������������������������������������������
02
05
06
07
08
08
09
SAFETY PRECAUTIONS this may damage the cable.
• Do not pull the cable over sharp edges, clamp it or allow it to hang
down. Keep the cable away from heat and moisture.
• To avoid hazards, never place the appliance on or beside hot surfaces,
for example, radiators, stove tops, gas burners or similar.
• Do not operate appliance with a damaged cord or plug or if it has
malfunctioned, been dropped or is damaged in any manner.
A damaged cord, plug or appliance can cause electric shocks, burns
and fire. Return appliance to the nearest authorized service facility for
examination, repair, or electrical or mechanical adjustment.
• Short power-supply cords reduce risks resulting from becoming
entangled in or tripping over a long cord.
• Longer (or detachable) cords may be used if care is exercised in their
use, and:
1) the marked electrical rating is at least as great as the electrical
rating of the appliance
2) a grounding-type 3- wire cord is used
3) cord (s) is arranged so that it will not drape over the counter top or
table top, where it can be pulled on or tripped over by anyone.
• If an extension lead is required, use only an earthed cable with a
conductor cross-section of at least 1.5 mm2/0.06 in2.
Avoid possible harm when operating the appliance
• Do not touch hot surfaces. Use handles, protected surfaces or knobs.
• Always keep the lid closed during preparation.
• Scalding may occur if the lid is removed during the brewing cycles.
• Extreme caution must be used when moving an appliance
containing hot liquids.
Cleaning
• Unplug appliance when not in use for a long period and before
cleaning. Allow to cool down before putting on or taking off parts,
and before cleaning the appliance. Remove the appliance from the
base before cleaning.
These instructions are part of
the appliance� Read all
instructions and all safety instructions before operating
the appliance� Save these instructions and pass them on
to any subsequent owner�
Avoid risk of fatal electrical shock and fire
• Only plug the base into a suitable, earthed power socket. Make sure
that the voltage of the power source is the same as that specified on
the rating plate.
• The appliance is only to be used with the base provided.
• The use of accessory attachments not recommended for the appliance
may result in fire, electric shock or injury to persons.
• To disconnect the appliance, stop any preparation, then remove plug
from power socket.
• Disconnect by pulling out the plug and not pulling the cable itself, as
1
2
4
6
3
5
7 8 9 10
EN EN

78910
1
2
4
6
3
5
54
• Please make sure the bottom of the Aeroccino and
area underneath the base is dry, especially the
connector area, prior to use. Electricity and water
together can cause a fatal electric shock.
• Never immerse the base neither the Aeroccino in water. Electricity
and water together can cause a fatal electric shock.
• The Aeroccino 4 jug is dishwasher safe, but cannot be washed at a
temperature higher than 70° C/158° F.
• Never leave the appliance unattended during operation. Keep it out
of the reach of children.The appliance is only for use by persons
who have sufficient experience and knowledge and are physically,
sensory, and mentally able to operate the machine safely in
accordance with these instructions.
• This appliance is intended to be used in households and similar
applications only such as: staff kitchen areas in shops, offices and
other working environments, farm houses.
• This appliance can be used by children 8 years old and older, as
well as persons with reduced physical, sensory, mental capabilities
or lack of experience, only if they have been given supervision and
instruction concerning the use of the appliance in a safe way and
understand the hazards involved. Children shall not play with the
appliance.
• Cleaning and user maintenance shall not be made by children unless
they are older than 8 and supervised. Keep the appliance and its cord
out of reach of children under the age of 8 years old.
• Do not use outdoors.
• Do not use the appliance for anything other than its intended use.
• The appliance is intended to prepare beverages according to these
instructions. No liability is accepted for other purposes, faulty
operation or non-professional repairs. Guaranteed services are also
excluded in such cases.
• Do not open the appliance. Hazardous voltage inside.
Disposal
Your appliance contains materials which can be recovered
or recycled. Separation of the remaining waste products into
different types facilitates the recycling of raw materials.You can obtain
information on disposal from your local authority.
SAVETHESE INSTRUCTIONS
OVERVIEW
1Lid
2Seal
3Whisk for all preparations
4Jug or Aeroccino
5Bottom connector
6Base connector
7Cold macchiato (Cold and soft milk foam)
8Hot milk
9Cappuccino (Warm and airy milk foam)
10 Latte macchiato (Warm and dense milk foam)
EN EN

1 2 3 4 a 4 b
76
Maximum milk
Maximum foam
PREPARATION
1� Clean before the rst use and af ter
each use according to the cleaning
instructions. Place the whisk in the jug.
NOTE: The milk froth volume depends
on the kind of milk that is used and its
temperature.
2� Fill milk frother up to one of the two «Max» level indicators:
Lowest «Max foam» level indicator (120 ml) is for milk froth
preparations. Highest «Max milk» level indicator (240 ml) is for hot milk
preparations.
3� Put the lid on the Aeroccino. Make sure
the connector is dry before you plug the
Aeroccino to the base. The 4 buttons are
steady on.
4� Choose your milk preparation by
pressing the dedicated button to
start. Button pressed blinks during
preparation and become steady on
when the preparation is ready.
5� Pour the milk preparation in the cup. Use only a non-metal spoon
to collect the foam in the jug. For hot and cold milk froth, preparation
takes approx. 80 sec. For hot milk, preparation takes approx. 150 sec.
Preparation can be stopped at any time by pressing the button or
removing the Aeroccino from the base.
6� Aeroccino turns o automatically after
9 minutes of non-use. Press any of the 4
buttons to switch ON the Aeroccino. CAUTION: Only use non-abrasive
cleaning materials. Do not use abrasives,
sharp objects, brushes: risk of scratches and
harm to the jug coating.
TIPS: For optimal milk froth, use cold semi skimmed milk at refrigerated temperature (about 4-6 °C). To guarantee hygiene conditions, use heat treated milk (pasteurized), refrigerated &
freshly opened only. Milk which has been frozen will not froth. To ensure hygienic conditions and proper maintenance of the equipment, it is highly recommended to not use special enriched
milks, powdered reconstituted milks nor avoured milks.
CAUTION: Make
sure the frothing
spring is not removed
from the whisk. Risk of
burning the coating.
CAUTION: Syrup,
sugar, chocolate
powder or any other
additives should not be
added directly in the
jug. This may damage
the coating during the
preparation.
WARNING:Risk of electrical shock and fire! Make sure the under side of the milk frother and area underneath the base is dry.
1� Remove the jug from the base.
2� Remove seal from lid.
3� Remove the whisk, and the spring from the whisk.
4 a� Hand washing: wash inner jug, seal, lid, whisk
and spring with detergent and rinse with warm/hot
water. Do not use abrasive material that might damage
the surface of the equipment. Don’t immerse in water.
4b�Dishwashing: put all parts except the base in
the dishwasher at maximum 70°C/158°F.
5� Dry all Aeroccino parts
with a fresh and clean
towel, cloth or paper and
reassemble all parts.
CLEAN DIRECTLY AFTER EVERY USE
CAUTION: Ensure the jug is cold before removing it from the base. Or, if removing with care, rinse with cold water immediately to
cool down the jug and avoid burning risks.
CAUTION: Do not
immerse neither the jug
nor the base in the water.
CAUTION: Do not
place directly over the
dishwasher pin as it may
cause damage to inner
coating.
CAUTION: If the
bottom part of the jug is
wet, dry it before putting
it back in contact with
the base connector.
CAUTION: In case the base needs to be cleaned unplug it rst and use only a damp cloth. Make sure the connector is dry before
operation. Do not immerse the base in water neither put in the dishwasher.
ENEN

98
TROUBLESHOOTING
Aeroccino does not start.
➔Be sure to position the jug correctly on the base and the whisk is attached
correctly in the jug.
The Aeroccino will start only if the connectors are dried.
Quality milk froth not up to standard or milk burnt.
➔For optimal milk froth, use cold milk or semi skimmed milk at refrigerated
temperature (about 4-6° C). To guarantee hygiene conditions, use heat
treated milk (pasteurized), refrigerated & freshly opened only.
Milk which has been frozen will not froth.
Syrup, sugar, chocolate powder or any other additives should not be added
directly in the jug. This may damage the coating during the preparation.
➔Be sure the jug and the whisk are clean.
➔It is highly recommended to not use special enriched milks, powdered
reconstituted milks nor avoured milks.
Fast red lights blinking on the 4 buttons (Aeroccino error).
➔a) The appliance is too hot: clean the jug under cool water. Be sure the whisk
is attached correctly in the jug.
➔b) Not enough milk: ll milk frother up to one of the two «max» level. All the
4 buttons blink rapidly (3 red and 1 blue).
➔c) Clean Aeroccino and check that there is no water on the base.
➔d) If no change, then please call the Nespresso Club.
Milk overows. ➔Check the corresponding indicator level.
AEROCCINO4
4192
EUR: 220-240 V, 50-60 Hz, 410-490 W
AUS/NZ: 220-240 V, 50-60 Hz, 380-450 W
SPECIFICATIONS
EN
Other manuals for AEROCCINO4
2
Table of contents
Languages:
Other Nespresso Kitchen Appliance manuals

Nespresso
Nespresso CREATISTA PRO User manual

Nespresso
Nespresso AEROCCINO XL User manual

Nespresso
Nespresso Cappuccinatore CS 20 User manual

Nespresso
Nespresso AEROCCINO 4 User manual

Nespresso
Nespresso Gemini 200 User manual

Nespresso
Nespresso AEROCCINO4 User manual

Nespresso
Nespresso AEROCCINO+ 3192 User manual

Nespresso
Nespresso AEROCCINO4 User manual

Nespresso
Nespresso AEROCCINO 4 User manual

Nespresso
Nespresso Breville PRODIGIO&MILK User manual