NSK Ti-Max X Series User manual

OM-C0404E 002
Contra Angle Handpiece Titanium Body
X35L,X35,
X70L,X70,X75L,X75
X55L,X55,X57L,X57
Ring and
attaching screw

1
ENGLISH
CAUTION
• When operating the handpiece always consider the safety of the patient.
• The handpiece is designed only for dental clinical use by licensed person.
• Do not attempt to disassemble the handpiece nor tamper with the mechanism.
• Do not allow any impact on the shank. Do not drop the handpiece.
• Check the vibration, noise and overheating outside the patient's oral cavity before use. If any abnormalities are found, stop using immediately and contact your dealer.
• Should the handpiece function abnormally, cease operation immediately and return the handpiece to the dealer for repair.
• Supply PANA SPRAY Plus after each use or before autoclaving.
• Do not wipe with, or clean or immerse in, high acid water or sterilizing.
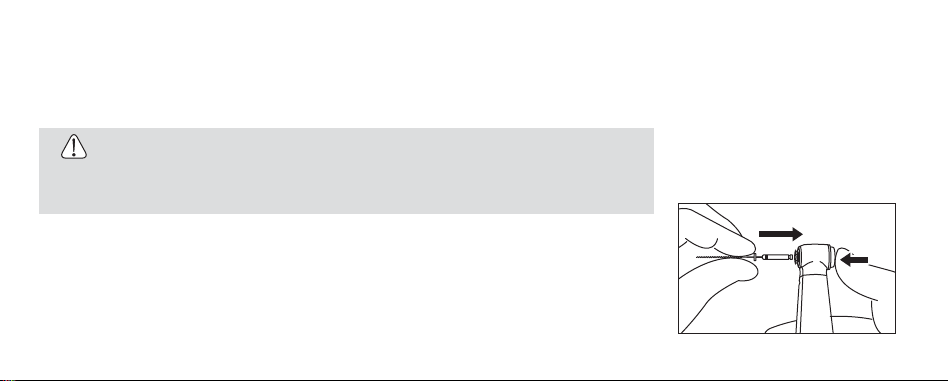
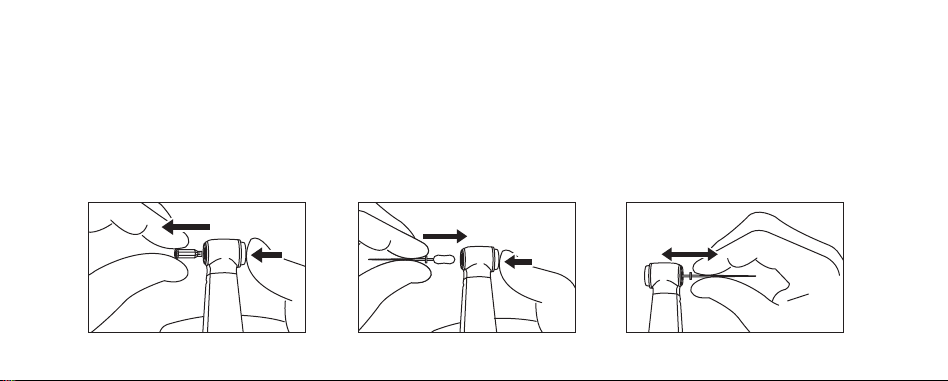
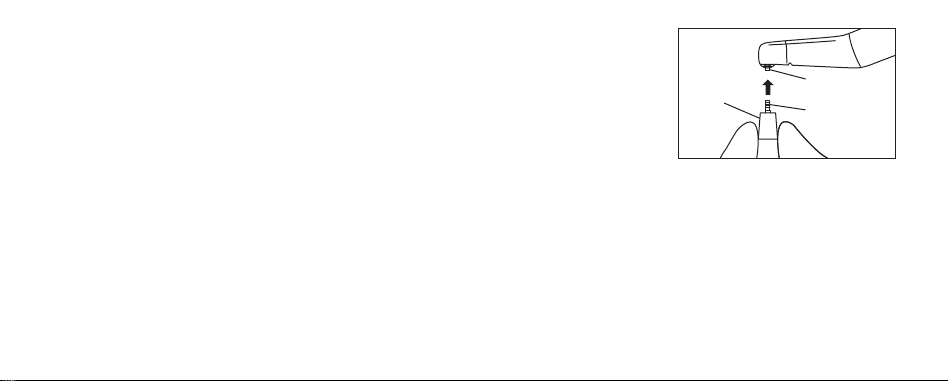
• Connecting /disconnecting handpiece or file/reamer/rubber cup have to perform when the handpiece stopped.
• Do not connect or disconnect the file or reamer until the drive motor has completely stopped.
FOR X35L,X35,X70L,X70,X75L,X75
• When you work on root canal expansion, DO NOT set the drive source (Motor) speed other than the values that written on the “ SPECIFICATION”. Follow the
maximum rotation speed that file or reamer manufacture recommends.
• Follow the package insert that file/reamer manufacture.
• Do not use bent, damaged, or sub-standard file or reamer. The shank could bent or broke even within the recommended speed.
Ring and
attaching screw

2
• Always keep the file, reamer shank clean, Entry of debris into the chuck cause file or reamer run-out and the file or reamer could not be mounted inmost.
• DO NOT exceed the maximum permissible rotation speed that manufactor recomend.
• Connect micro motor for X35 series and X75 series, Air motor for X70 series.
• Do not use the file, reamer or shake shape other than ISO 1797-1 Type1 standards.(Except Hand file)
• File may change (throwaway) every patient or several times. If it used several time, it may cause a fracture by metal fatigue.
FOR X57L,X57
• Wash the handpiece immediately after use. If you do not perform it, abrasive paste may fix inside and it may cause a failure.
• Check the ring before you use. If the ring loosen, tighten it by the wrench.
• When mounting the rubber cup, check it correctly attached.
• DO NOT use the rubber cap which the screw does not match.
• Do not use above the specified rotational speed. This could cause in injury or accident by flying paste or broken cup and brush.
• Do not use in the reverse rotation. The cup and brush could fly out of the head
Ring and
attaching screw

3
ENGLISH FRENCH GERMAN SPANISH ITALIAN
2. Mounting and Removing File(X35L,X35,X70L,X70,X75L,X75)
Mounting
(1) Enging type file
A) X35 Series (Quick-fit Adapter in head.)
Push the push-button to open the chuck.
Insert the instrument shank into the chuck, and release the push-button. (Fig. 1)
1.Connecting / Disconnecting the motor and the handpiece
To connect the motor and the handpiece, align the positioning marks of the motor and the handpiece, and insert straightly. This procedure will also
align the light receptacle and allow you to use illumination if your handpiece and motor are equipped for illumination. (X35L,X70L,X75L,X55L,X57L)
To disconnect, hold the front part of the motor and the back part of the handpiece, and pull out straightly.
Quick-fit
Adapter
Fig. 1
Ring and
attaching screw
CAUTION
• Mount X35, X75 Series with a micro motor and mount X70 Series with an air motor.
• Do not connect or disconnect the handpiece until the motor has completely stopped.

4Fig. 2 Fig. 3 Fig. 4
B) X70 Series or X75 Series
Push the push-button to open the chuck.
Insert the instrument shank into the chuck and lightly turn the file with light push. When the file engages with the latch mechanism, where the
file sinks, and release the push-button.
(2) Hand file (X35 Series)
Push the push-button to open the chuck, and remove the Quick-fit Adapter. (Fig. 2)
Again push the push-button to open the chuck. Insert the instrument handle into the chuck and release the button. (Fig. 3)
Make sure that the handle is securely held in the chuck. (Fig. 4)
Ring and
attaching screw

5
ENGLISH FRENCH GERMAN SPANISH ITALIAN
CAUTION
Make sure that the motion is completely stopped when to depress the push-button and disengage the latch mechanism. Avoid accidental
depression of the push-button during rotation. It would heat the push-button and could cause a burn.
Ring and
attaching screw
* Accepts handle diameters Ø3.8-4.1mm
Typical applicable hand instruments: Union Broach, Zipperer, Mani, Meisinger, Komet, Kerr.
Removing
Push the push-button with a thumb, and the file is removed.

6
Tip Remover
Hole
Fig. 6
Fig. 5
Ring and
attaching screw
CAUTION
Tip possibly protrudes. Remove it on the tray.
3. Insertion and Removal of the Eva Tip or Profin Tip (X55L,X55)
(1) Tip Insertion
A) Eva Tip
Insert an Eva Tip into the head.
B) Profin Tip
Insert a Profin Tip into the head. After adjusting the direction of the tip to the desired angle, push it
firmly into the slit at the plunger of the head. (Fig.5)
(2) Removal of Tip
Insert a TIP REMOVER in the hole of the handpiece back head and begin to thrust a tip. (Fig.6).

7
ENGLISH FRENCH GERMAN SPANISH ITALIAN
Fig. 7
Rubber Cup
or Brush Cup or brush
screw stem
Screw
in the head
Ring and
attaching screw
4. Mounting and Removal of the Rubber Cup or Brush (X57L,X57)
(1) Mounting
Touch lightly the rubber cup or brush screw stem into the screw hole of the handpiece head. Start the
motor at a lower speed. The cup or the brush is screwed into the head. When the cup or the brush starts
to turn, release the fingers. (Fig. 7)
(2) Removal
Hold the cup or the brush firmly, and rotate the handpiece in the reverse direction at a low speed. The
cup or the brush disengages from the handpiece head.
5. Check before treatment
Check that the Head Cap (or ring) is firmly tightened. Also check for handpiece vibration, noise and overheating. If any abnormalities are found do not
use the handpiece and contact your Authorised NSK Dealer.

8
PANA SPRAY Plus
1. Push E-type spray nozzle attachment over the PANA SPRAY Plus
nozzle until it firmly seats.
2. Remove the file from handpiece.
3. Shake the can 3-4 times to well mix lubricant and propellant.
4. Insert the E-type spray nozzle in the rear of the handpiece and spray
for approximately 2-3 seconds until the oil comes out of the
handpiece head.
CAUTION
Supply PANA SPRAY Plus or/and Care3 Plus after each use and/or before autoclaving.
PANA SPRAY PlusPANA SPRAY Plus
E-Type Spray Nozzle Handpiece
Fig. 8
Ring and
attaching screw
6. Lubrication

9
ENGLISH FRENCH GERMAN SPANISH ITALIAN
7. Sterilization
This product can be washed via Thermo·Disinfector.
NSK recommends autoclaving.
Sterilization is required first time you use and after each patient as noted below.
Care3 Plus
NSK Care3 Plus automatic handpiece cleaning and lubrication system
After connecting the handpiece to the correct adaptor, activate the Care3 System per the Care3 System instructions.
Ring and
attaching screw
CAUTION
• Be sure to hold the handpiece firmly to prevent the handpiece from slipping out by the spray pressure when lubricating.
• Supply lubricant until it comes out of the handpiece head (for approx. 2 seconds).
• Keep the PANA SPRAY Plus can upright.

10
Ring and
attaching screw
Autoclave Procedure:
1. Scrub dirt and debris from the handpiece, and wipe clean with alcohol-immersed cotton swab or cloth. Do not use a wire brush.
2. Lubricate with PANA SPRAY Plus. Refer to 5. Lubrication.
3. Insert into an autoclave pouch. Seal the pouch.
4. Autoclavable up to a max. 135˚C.
ex.) Autoclave for 20 min. at 121˚C, or 15 min. at 132˚C.
5. Keep the handpiece in the autoclave pouch to keep it clean until you use it.
* Sterilization at 121˚C for more than 15 minutes is recommended by EN13060 or EN ISO17665-1.
CAUTION
• Do not heat or cool the handpiece quickly. Rapid change in temperature could break the glass rod give abnormal strain to other metals.
• Do not wipe with, or clean or immerse in, high acid water or sterilizing solutions.

11
ENGLISH FRENCH GERMAN SPANISH ITALIAN
Fig. 9
Cotton Swab
Glass Rod Optic End
Ring and
attaching screw
CAUTION
Do not use a pointed tool or sharp edges to clean the glass rod optic end. They may damage the mirror finish and reduce the light transmission
efficiency. If the glass rod optic end has become damaged, send the handpiece to the NSK dealer for repair.
8. Cleaning Glass Rod Optic End (X35L,X70L,X75L,X55L,X57L)
In case the light had become dim, clean the glass rod optic end with an alcohol-soaked cotton swab. (Fig.9)

12
Wrench
Fig. 10
Tighten
Loosen
Ring and
Ring and
attaching screw
attaching screw
Ring and
attaching screw
9. Utrasonic cleaning (X57L,X57)
To remove the paste that against into the Handpiece, perform ultrasonic cleaning day by day.
1) Loosen the ring and take off the ring and attaching screw.(Fig.10)
2) Perform the ultrasonic cleaning for 5 minutes ONLY for the attaching screw.
3) Air blow and remove the water of the head. Than lubricate it by PANA SPRAY Plus after the opposite
procedure of 1.
4) Autoclave the handpiece. (6. Sterilization)
CAUTION
• DO NOT use ethanol or cleansing fluid for the cleaning. It may cause tarnish or fret.
• Repeat this lubrication until you see no paste into the handpiece comes out.

61
Endodontic
SPECIFICATION
Model
Intended to use
Allowable Max. Speed
Motor
File
Motion
Gear Ratio
Spray Type
Optics
X35L
40,000min-1
Micro Motor
EngineFiles
( Against titanium file )
/Hand Files
60°Twist
10:1 Reduction
Single Spray
Glass Rod Optic
X35
40,000min-1
Micro Motor
EngineFiles
( Against titanium file )
/Hand Files
60°Twist
10:1 Reduction
Single Spray
-
X70L
22,000min-1
Air Motor
EngineFiles
360°rotation
64:1 Reduction
Single Spray
Glass Rod Optic
X70
22,000min-1
Air Motor
EngineFiles
360°rotation
64:1 Reduction
Single Spray
-
X75L
40,000min-1
Micro Motor
EngineFiles
360°rotation
128:1 Reduction
Single Spray
Glass Rod Optic
X75
40,000min-1
Micro Motor
EngineFiles
360°rotation
128:1 Reduction
Single Spray
-

62
Interdentium polishing
Model
Intended to use
Tip
Motion
Allowable Max. Speed
Gear Ratio
Spray Type
Optics
X55L
EVA/Profin Tip
Vertical Reciprocating
(Stroke Length1.4 mm)
40,000min-1
4 : 1 Reduction
Single Spray
Glass Rod Optic
X55
EVA/Profin Tip
Vertical Reciprocating
(Stroke Length1.4 mm)
40,000min-1
4 : 1 Reduction
Single Spray
-

63
Tooth polishing
Model
Intended to use
Gear Ratio
Rotation Speed
Optics
X57L
16:1 Reduction
40,000min-1
Glass Rod
X57
16:1 Reduction
40,000min-1
-

Ring and
attaching screw
The EU directive 93/42/EEC was applied in the design and production of this medical device.
2013.00.20 00 S
Other manuals for Ti-Max X Series
2
This manual suits for next models
10
Table of contents
Other NSK Dental Equipment manuals
Popular Dental Equipment manuals by other brands

DMG
DMG DentaMile Cure MC user manual

Donaldson
Donaldson BOFA DentalPRO Xtract 200 user manual

Straumann
Straumann 049.810V4 Instructions for use

Amanngirrbach
Amanngirrbach Artex Facebow user manual

Amanngirrbach
Amanngirrbach Ceramill Base Important note on upgrading

Amanngirrbach
Amanngirrbach ceramill multi-x operating instructions