Bandage bei Luxation des Acromioclaviculargelenks
KONFORMITÄTSERKLÄRUNG
Die ORTHOSERVICE AG erklärt, in seiner Funktion als Hersteller, in alleiniger Verantwortung, dass dieses vorliegende
Medizinprodukt der Klasse I angehört und gemäß den Anforderungen der EU-Verordnung 2017/745 (MDR) hergestellt wurde. Die
vorliegende Anleitung wurde unter Anwendung der vorgenannten Verordnung erstellt. Sie dient dazu, den ordnungsgemäßen und
sicheren Gebrauch des Medizinprodukts zu gewährleisten.
WARENMARKEN DER MATERIALIEN
Velcro® ist eine eingetragene Warenmarke von Velcro Industries B.V.
VORSICHTSMASSNAHMEN
Es wird empfohlen, dass der vom Produkt ausgeübte Druck nicht auf die Teile des Körpers einwirkt, die Verletzungen,
Schwellungen oder Tumeszenzen aufweisen. Es ist ratsam, das Produkt nicht zu fest anzuziehen, um keine übermäßigen,
lokalen Druckstellen zu erzeugen und keine Kompression der darunterliegenden Nerven und/oder Blutgefäße auszulösen.
Es ist ratsam, ein Kleidungsstück zu tragen, das den direkten Kontakt mit der Haut vermeidet. Bei Bedenken zur Anwendung
des Produkts bitte an einen Arzt, Physiotherapeuten oder Orthopädietechniker wenden. Bitte sorgfältig das Innenetikett
mit der Material-Zusammensetzung des Produkts lesen. Es ist ratsam, das Produkt nicht in der Nähe von offenen Flammen
oder starken elektromagnetischen Feldern verwendet werden. Nicht bei direktem Kontakt mit offenen Wunden auftragen.
HINWEISE
Es ist ratsam, dass das Produkt, das für die unten aufgeführten spezischen Indikationen bestimmt ist, von einem Arzt oder
Physiotherapeuten verschrieben und von einem Orthopädietechniker entsprechend den individuellen Bedürfnissen angepasst
wird. Um die Wirksamkeit, Verträglichkeit und korrekte Funktionalität zu gewährleisten, muss die Applikation mit größter Sorgfalt
durchgeführt werden. Keinesfalls darf die vom Arzt/Physiotherapeuten/Orthopädietechniker vorgenommene Einstellung
verändert werden. Bei nicht bestimmungsgemäßer Anwendung oder Einstellung erlischt die Haftung des Herstellers. Die Orthese
ist nur für den Gebrauch durch einen einzigen Patienten bestimmt, andernfalls übernimmt der Hersteller keine Haftung gemäß
der Verordnung für Medizinprodukte. Bei überempndlichen Personen kann es bei direktem Hautkontakt zu Rötungen oder
Reizungen kommen. Bei Auftreten von Schmerzen, Schwellungen, Tumeszenzen oder anderen anormalen Reaktionen bitte sofort
an den eigenen Arzt wenden und, in besonders schwerwiegenden Fällen, die Tatsache dem Hersteller und der zuständige Behörde
in eigenen Land melden. Die orthopädische Wirksamkeit des Produktes ist nur dann gewährleistet, wenn alle seine Komponenten
verwendet werden.
AUSWAHL/GRÖSSEN
ENTRETIEN
Nicht bleichen Keine chemische Reinigung
Nicht bügeln Nicht im Trockner trocknen
Waschanweisung: Handwäsche bis 30° C mit neutraler Seife. Nicht direkt an Hitzequellen trocknen
lassen.
Das Produkt und seine Bestandteile nach dem Gebrauch sachgerecht entsorgen.
ZWECKBESTIMMUNG
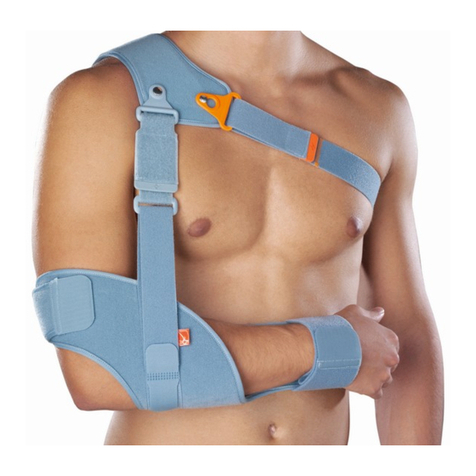
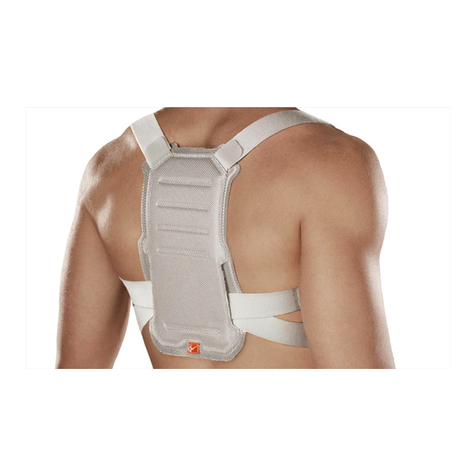
Die Orthese Acromion für Luxation des AC-Gelenks ist ausschließlich für die orthetische Versorgung des
Schultergelenkes einzusetzen. Einsatzbereich ist die Schulter, in rechter und linker Version verfügbar
INDIKATIONEN
• Konservative Behandlung zur Stabilisierung des Acromioclaviculargelenks nach einer Luxation Grad 1, 2 und 3
(gemäß ärztlicher Beurteilung)
• Konservative Behandlung bei Frakturen des distalen Endes der Clavicula (gemäß ärztlicher Beurteilung)
KONTRAINDIKATIONEN
Zur Zeit keine bekannt
EIGENSCHAFTEN
• System aus Trage- und Spanngurten konzipiert für ein Herabdrücken der Clavicula und des Anhebens des Armes, um
Acromion und Clavicula wieder aufeinander auszurichten
• Flexible anatomisch geformte claviculare Schulterkappe mit Polster aus Polyethylenschaumstoff, mit Drehgelenken
• Kontralateralgurt mit Schnalle (orange), der sich über einen Einhakverschluß schnell an- und abnehmen lässt
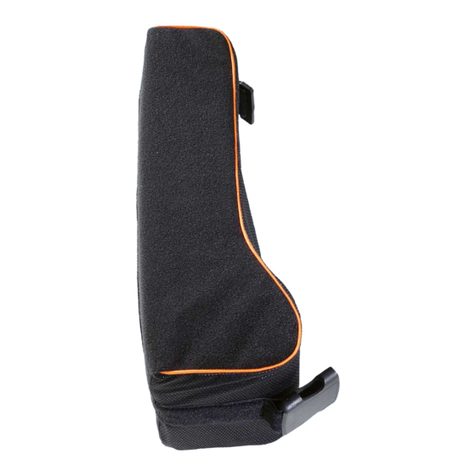
• Regulierbare, komfortable Ellenbogentasche mit Unterarmauage, gepolstert mit Polyethylenschaumstoff; das Polster
ist halbsteif ausgeführt, um das Anlegen zu erleichtern
• Bauchgurt mit Steckschnallenverschluss (weiß), längenverstellbar über Klettverschluss
• Zugbänder an der Vorderseite mit konstanter, voreingestellter Spannung
• Gurte und Brustgurt aus Velour, auf die benötigte Größe anpassbar
ANPASSEN / ANLEGEN
ERSTMALIGES ANLEGEN DURCH DEN ARZT/ORTHOPÄDIETECHNIKER
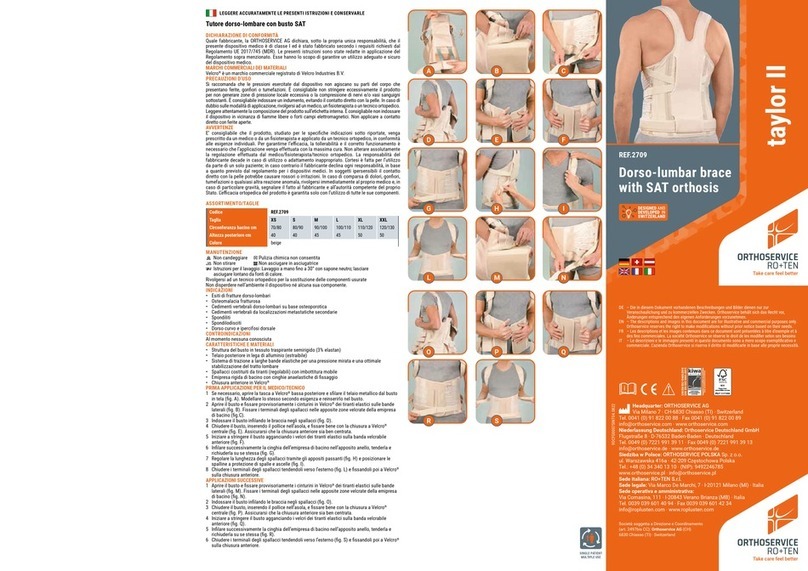
1 Sicherstellen, dass alle Gurte auf ihre maximale Länge eingestellt sind; nur den weißen Steckschnallenverschluss (Abb.
A) und den orangefarbenen Hakenverschluss (Gurt Nummer [3]) öffnen (Abb. B).
2 Die Ellenbogentasche mit Unterarmauage auf Ellenbogenhöhe positionieren (darauf achten, dass sie nicht zu tief
liegt). Die Armtasche muss außen mit dem Klettverschluss nach oben liegen.
3 Den Taillengurt mit dem weißen Steckschnallenverschluss schließen (Abb. C) und mit dem entsprechenden
Klettverschluss festziehen (Abb. D). Ist der Gurt zu lang, den Y-förmigen Klettverschluss entfernen, den Gurt auf die
richtige Länge zuschneiden und den Y-förmigen Klettverschluss wieder anbringen.
4 Die Armtasche an der luxierten Clavicula ausrichten, sodass sie mit ihr eine Linie bildet, und den Ellenbogen in die Ellenbogentasche
einführen (Abb. E). Den Umfang der Ellenbogentasche mit dem entsprechenden Klettverschluss regulieren (Abb. F).
5 Das Handgelenkband (Nummer [2]) um die Unterarmstütze anbringen und mit dem Klettverschluss um das Handgelenk
schließen (Abb. G). Das Handgelenkband kann bei Bedarf gekürzt werden; dazu den überstehenden Teil abschneiden.
Falls erforderlich, kann das Gurtband vom Handgelenk zur Hand geführt werden.
6 Die Schulterkappe greifen und auf die luxierte Clavicula legen (darauf achten, dass sie sich nicht zu weit lateral
bendet) (Abb. H).
7 Den Gurt mit dem orangefarbenen Hakenverschluss unter der kontralateralen Achsel durchführen und in den Stift
auf der Schulterkappe einhaken (Abb. I). Den entsprechenden Klettverschluss schließen; (Abb. K); das gummiartige
Endstück muss genau über der orangefarbenen Markierung liegen (dies dient als Referenz für den Patienten).
8 Die kontralateralen Gurte mit den Y-förmigen Klettverschlüssen festziehen (Abb. L,M,N). Sind die Gurte zu lang, den Y-förmigen
Klettverschluss entfernen, die Gurte auf die richtige Länge zuschneiden und den Y-förmigen Klettverschluss wieder anbringen.
9 Den vertikal verlaufenden Gurt auf der Rückseite spannen (Abb. O), anschließend den vertikal verlaufenden Gurt auf
der Vorderseite (Abb. P).
10 Überprüfen, dass alle Gurte straff sitzen.
ABLEGEN DER ORTHESE
1 Den Spanngurt öffnen (dieser ist an dem großen gummiartigen Endstück erkennbar; Nummer [4]), jedoch nicht
herausziehen (Abb. R).
2 Den orangefarbenen Verschluss (Gurt Nummer [3]) aus dem Stift auf der Schulterkappe aushaken (Abb. S)
(gegebenenfalls zuvor den Klettverschluss mit dem gummiartigen Endstück lockern).
3 Das Handgelenkband öffnen (Abb. T).
4 Den weißen Steckschnallenverschluss (Abb. U) (Taillengurt) öffnen und die Orthese vorsichtig abnehmen; abrupte
Bewegungen sollten vermieden werden (Abb. V).
ANLEGEN FÜR DEN PATIENTEN
1 Sicherstellen, dass der Spanngurt (dieser ist an dem großen gummiartigen Endstück erkennbar; Nummer [4]) geöffnet ist.
2 Nur den weißen Steckschnallenverschluss (Abb. A) (Bauchgurt, Nummer [1]) und den orangefarbenen Hakenverschluss
(kontralateraler Gurt auf der Vorderseite, Nummer [3]) aushaken (Abb. B).
3 Die Armtasche mit der Unterarmauage so positionieren, dass sie sich auf der Höhe des Ellenbogens bendet (darauf
achten, dass sie nicht zu tief liegt). Die Armtasche muss außen mit dem Klettverschluss nach oben liegen.
4 Den Taillengurt mit dem weißen Steckschnallenverschluss schließen (Abb. C).
5 Die Ellenbogentasche so anlegen, dass sie mit dem luxierten Schlüsselbein eine Linie bildet; dann den Ellenbogen in
die Armtasche einführen (Abb. E).
6 Das Handgelenkband (Nummer [2]) um das Handgelenk schließen (Abb. G).
7 Die Schulterkappe greifen und auf das luxierte Schlüsselbein auegen (achten Sie darauf, dass sie sich nicht zu weit
lateral bendet) (Abb. H).
8 Den Gurt mit der orangefarbenen Schnalle unter der kontralateralen Achsel hindurchführen und in den Stift auf der
Schulterkappe einhaken (Abb. I). Den entsprechenden Klettverschluss schließen (Abb. K); so lange ziehen, bis das
gummiartige Endstück über der orangefarbenen Markierung liegt.
9 Dann den Spanngurt (Nummer [4]) festziehen und mit dem Klettverschluss verschließen (Abb. Q).
Brace for acromioclavicular joint subluxation
DECLARATION OF CONFORMITY
As the manufacturer, ORTHOSERVICE AG declares, under its sole responsibility, that this is a class I medical device that
has been manufactured and assessed, according to the EU Regulation 2017/745 (MDR). These instructions have been
drawn up in application of the aforementioned Regulation. They are intended to ensure an adequate and safe use of the
medcal device.
TRADEMARKS OF MATERIALS
Velcro® is a registered trademark of Velcro Industries B.V.
SAFETY PRECAUTIONS
We recommend that the pressure exerted by the device does not act on parts of the body with wounds, swelling, or welts.
It is advisable to not over tighten the device so as to avoid generating areas of excessive local pressure or the compression
of underlying nerves and/or blood vessels. Furthermore, we recommend wearing a garment to avoid direct contact with
the skin.
If in doubt on how to apply the device, contact a doctor, physiotherapist, or an orthopedic technician. Read the product
composition on the internal label carefully.
We recommend to not wear the device in the proximity of free ames or strong electromagnetic elds.
Do not apply in direct contact with open wounds.
WARNINGS
It is advisable that the device, designed for the specic indications as set out below, be prescribed by a doctor or a
physiotherapist and applied by an orthopedic technician, according to the specic needs of the patient.
To ensure effectiveness, tolerability, and proper functioning, the application must be carried out with the utmost care.
Never alter the adjustment made by the doctor/physiotherapist/ or orthopedic technician. The responsibilities of
the manufacturer shall lapse in case of inappropriate use or adaptation. The orthosis is made and to be used by only
one patient. Should the orthosis be inappropriately used, the manufacturer declines all responsibility, as provided by
the regulation for medical devices.In hypersensitive individuals, direct contact with the skin may cause redness and
irritation. In case of pain, swelling, welts, or any other adverse reaction, contact your doctor immediately, and in case of a
particularly severe adverse event, report the incident to the manufacturer and the competent authority of your country. The
effectiveness of the orthopedic product is only guaranteed when all the components are properly in use.
SELECTION/SIZE
MAINTENANCE
Do not bleach No chemical cleaning
Do not iron Do not tumble-dry
Washing instructions: hand wash at max. 30° C with neutral soap.
Dry away from heat sources.
Do not dispose of the product or any of its components into the environment.
INDICATIONS
• Conservative treatment for stabilization of the acromioclavicular joint after traumatic dislocations of rst-second-third
degrees (at the discretion of the physician)
• Conservative treatment after fracture of far distal clavicle
CONTRAINDICATIONS
Currently no known
FEATURES AND MATERIALS
• System designed to push clavicle downward and the humerus upward to align acromion and clavicle (exclusive)
• Anatomical, exible clavicle brace with polyethylene foam padding and rotating joints
• Lateral strap with buckle (orange) for a rapid removal
• Adjustable, comfortable elbow and forearm support, polyethylene foam semi-rigid padding for an easy application
• Adjustable xing belt snap (white) with Velcro® fastening system
• Rear straps with both constant and pre-set tensioning
• Velour straps, adaptable size
PUTTING ON THE APPLIANCE
ADAPTING FOR THE DOCTOR/TECHNICIAN
1 Ensure that all straps have been adjusted to maximum length; only open the white clip buckle closure (g. A) and the
orange-coloured hook closure (strap number [3]) (g. B).
2 Position the elbow pocket with forearm support at elbow height (make sure that it is not too low). The elbow pocket
must be on the outside with the Velcro® closure facing upwards.
3 Close the waist strap with the white clip buckle closure (g. C) and tighten using the appropriate Velcro® closure (g.
D). If the strap is too long, remove the Y-shaped Velcro® closure, cut the strap to length and replace the Y-shaped
Velcro® closure again.
4 Align the elbow pocket with the luxated clavicle so that they form a line and insert the elbow into the elbow pocket (g.
E). Regulate the size of the elbow pocket using the appropriate Velcro® closure (g. F).
5 The wrist strap (number [2]) is attached around the forearm and closed using the Velcro® closure at the wrist (g.
G). The wrist strap can be shortened if required. To do this, cut the protruding section. If necessary, the strap can be
passed from the wrist to the hand.
6 Grasp the shoulder cap and place on the luxated clavicle (make sure that it is not positioned too far laterally) (g. H).
7 Guide the strap with the orange-coloured hook closure under the contralateral armpit and hook to the pin on the
shoulder cap (g. I). Close the relevant Velcro® closure; (g. K); the rubberised end piece must be located precisely
over the orange-coloured marking (this acts as a reference for the patient).
8 Tighten the contralateral straps with the Y-shaped Velcro® closures (g. L, M, N). If the straps are too long, remove the
Y-shaped Velcro® closure, cut the straps to length and replace the Y-shaped Velcro® closure again.
9 Tension the vertical strap on the back (g. O), then the vertical strap on the front (g. P).
10 Check to make sure all straps are tensioned.
REMOVING THE ORTHOSIS
1 Open the tensioning strap (this can be recognised by the large rubberised end piece; number [4]), but do not pull it out
(g. R).
2 Unhook the orange-coloured closure (strap number [3]) from the pin on the shoulder cap (g. S) (if need be, rst loosen
the Velcro® closure with the rubberised end piece).
3 Open the wrist strap (g. T).
4 Open the white clip buckle closure (g. U) (waist strap) and carefully remove the orthosis; avoid sudden movements
(g. V).
PUTTING ON THE APPLIANCE FOR THE PATIENT
1 Make sure that the tensioning strap (this can be recognised by the large rubberised end piece; number [4]) is open.
2 Unhook only the white clip buckle closure (g. A) (stomach strap, number [1]) and the orange-coloured hook closure
(contralateral strap on the front, number [3]) (g. B).
3 Position the arm pocket with forearm support so that it is at the height of the elbow (make sure it is not too low). The
arm pocket must be on the outside with the Velcro® closure facing upwards.
4 Close the waist strap with the white clip buckle closure (g. C).
5 Align the elbow pocket in such a way that it forms a line with the luxated collarbone; then guide the elbow into the arm
pocket (g. E).
6 Close the wrist strap (number [2]) around the wrist (g. G).
7 Grasp the shoulder cap and place on the luxated collarbone (make sure that it is not positioned too far laterally) (g. H).
8 Guide the strap with the orange-coloured buckle under the contralateral armpit and hook into the pin on the shoulder
cap (g. I). Close the appropriate Velcro® closure (g. K); tighten until the rubberised end piece is positioned over the
orange-coloured marking.
9 Tighten the tensioning strap (number [4]) and secure with the Velcro® closure (g. Q).
Tutore per lussazione dell’articolazione acromion-claveare
DICHIARAZIONE DI CONFORMITÀ
Quale fabbricante, la ORTHOSERVICE AG dichiara, sotto la propria unica responsabilità, che il presente dispositivo
medico è di classe I ed è stato fabbricato secondo i requisiti richiesti dal Regolamento UE 2017/745 (MDR). Le presenti
istruzioni sono state redatte in applicazione del Regolamento sopra menzionato. Esse hanno lo scopo di garantire un
utilizzo adeguato e sicuro del dispositivo medico.
MARCHI COMMERCIALI DEI MATERIALI
Velcro® è un marchio di fabbrica registrato di Velcro Industries B.V.
PRECAUZIONI D’USO
Si raccomanda che le pressioni esercitate dal dispositivo non agiscano su parti del corpo che presentano ferite, gonori
o tumefazioni. È consigliabile non stringere eccessivamente il prodotto per non generare zone di pressione locale
eccessiva o la compressione di nervi e/o vasi sanguigni sottostanti. È consigliabile indossare un indumento, evitando il
contatto diretto con la pelle. In caso di dubbio sulle modalità di applicazione, rivolgersi ad un medico, un sioterapista
o un tecnico ortopedico. Leggere attentamente la composizione del prodotto sull’etichetta interna. È consigliabile non
indossare il dispositivo in vicinanza di amme libere o forti campi elettromagnetici. Non applicare a contatto diretto
con ferite aperte.
AVVERTENZE
E’ consigliabile che il prodotto, studiato per le speciche indicazioni sotto riportate, venga prescritto da un medico o da
un sioterapista e applicato da un tecnico ortopedico, in conformità alle esigenze individuali. Per garantirne l’ecacia, la
tollerabilità e il corretto funzionamento è necessario che l’applicazione venga effettuata con la massima cura.
Non alterare assolutamente la regolazione effettuata dal medico/sioterapista/tecnico ortopedico.
La responsabilità del fabbricante decade in caso di utilizzo o adattamento inappropriato.
L’ortesi è fatta per l’utilizzo da parte di un solo paziente; in caso contrario il fabbricante declina ogni responsabilità, in
base a quanto previsto dal regolamento per i dispositivi medici.
In soggetti ipersensibili il contatto diretto con la pelle potrebbe causare rossori o irritazioni. In caso di comparsa di
dolori, gonori, tumefazioni o qualsiasi altra reazione anomala, rivolgersi immediatamente al proprio medico e, in caso
di particolare gravità, segnalare il fatto al fabbricante e all’autorità competente del proprio Stato. L’ecacia ortopedica
del prodotto è garantita solo con l’utilizzo di tutte le sue componenti.
SCELTA/DIMENSIONI
MANUTENZIONE
Non candeggiare Pulizia chimica non consentita
Non stirare Non asciugare in asciugatrice
Istruzioni per il lavaggio: Lavaggio a mano no a 30°C con sapone neutro; lasciare asciugare lontano
da fonti di calore
Non disperdere nell’ambiente il dispositivo né alcuna sua componente.
INDICAZIONI
• Trattamento conservativo per la stabilizzazione dell’articolazione acromion-claveare dopo lussazione traumatica di
1°, 2° e 3° grado (a discrezione del medico)
• Trattamento conservativo dopo frattura dell’estremo distale della clavicola
CONTROINDICAZIONI
Al momento nessuna conosciuta
CARATTERISTICHE E MATERIALI
• Sistema di cinghie e tiranti concepito per spingere la clavicola verso il basso e l’omero verso l’alto, riallineando
acromion e clavicola (esclusivo)
• Spallina clavicolare anatomica, essibile, con imbottitura in polietilene espanso e con snodi rotanti
• Cinghia controlaterale di ancoraggio con bbia (arancione) ad aggancio/sgancio rapido
• Supporto gomito e avambraccio regolabile e confortevole, con imbottitura in polietilene espanso; semirigido per
facilitare l’applicazione
• Cinghia addominale chiudibile con una bbia a scatto (bianca) e regolabile a Velcro®
• Tiranti anteriori a tensionamento costante e pre-regolato
• Cinghie in velour, tagliabili a misura
APPLICAZIONE
PRIMA APPLICAZIONE PER IL MEDICO / TECNICO
1 Assicurarsi che tutte le cinghie siano al massimo della loro lunghezza; sganciare solo la bbia bianca a scatto
(g. A) e la bbia arancione a sgancio rapido (cinghia numero [3]) (g. B).
2 Posizionare il supporto gomito e avambraccio all’altezza del gomito (attenzione: non deve essere troppo basso). La
sacca per il gomito dev’essere esterna e con il Velcro® in alto.
3 Chiudere la cinghia girovita con la bbia bianca a scatto (g. C) e tenderla col Velcro® corrispondente (g. D). Se
troppo lunga: rimuovere il Velcro® a Y, tagliarla a misura e riposizionare il Velcro® a Y.
4 Fare in modo che la sacca per il gomito risulti allineata alla clavicola lussata e inlare il gomito nella sacca (g. E).
Regolare l’ampiezza della tasca mediante l’apposito Velcro® (g. F).
5 Applicare la presa polso (numero [2]) attorno al supporto avambraccio e chiuderla a Velcro® intorno al polso (g. G).
Se necessario accorciarla tagliando la parte in eccesso. Se necessario il cinturino può passare dal polso alla mano.
6 Afferrare la spallina e poggiarla sopra la clavicola lussata (attenzione: non deve essere troppo laterale) (g. H).
7 Far passare la cinghia con la bbia arancione sotto l’ascella controlaterale e agganciarla al fungo sulla spallina (g. I).
Chiudere il Velcro® corrispondente su se stesso (g. K) facendo coincidere il terminale gommoso con la tacca
arancione (questo farà da riferimento per le applicazioni successive).
8 Tendere saldamente le cinghie contro-laterali mediante gli appositi velcri ad Y (g. L, M, N). Se troppo lunghe:
rimuovere i velcri a Y, tagliarle a misura e riposizionare i velcri a Y.
9 Tendere la cinghia verticale posteriore (g. O) e quindi quella anteriore (g. P).
10 Vericare che tutte le cinghie siano ben tese.
COME SI TOGLIE IL TUTORE
1 Aprire il tirante di tensionamento (identicabile dal terminale gommoso grande; numero [4]) senza slarlo (g. R).
2 Sganciare la bbia arancione (cinghia numero [3]), slandola dal fungo sulla spallina (g. S) (se necessario allentare
precedentemente il Velcro® col terminale gommoso.
3 Aprire la presa polso (g. T).
4 Aprire la bbia bianca a scatto (g. U) (cinghia girovita) e rimuovere il tutore delicatamente, senza movimenti
bruschi (g. V)
APPLICAZIONI SUCCESSIVE
1 Assicurarsi che il tirante di tensionamento (identicabile dal terminale gommoso grande; numero [4]) sia aperto.
2 Sganciare solo la bbia bianca a scatto (cinghia addominale, numero [1]) (g. A) e la bbia arancione a sgancio
rapido (cinghia anteriore contro-laterale, numero [3]) (g. B).
3 Posizionare il supporto gomito e avambraccio all’altezza del gomito (attenzione: non deve essere troppo basso) La
sacca per il gomito dev’essere esterna e con il Velcro® in alto.
4 Chiudere la cinghia girovita con la bbia bianca a scatto (g. C).
5 Fare in modo che la sacca per il gomito risulti allineata alla clavicola lussata e inlare il gomito nella sacca (g. E).
6 Chiudere la presa polso (numero [2]) attorno al polso (g. G).
7 Afferrare la spallina e poggiarla sopra la clavicola lussata (attenzione: non deve essere troppo laterale) (g. H).
8 Far passare la cinghia con la bbia arancione sotto l’ascella controlaterale e agganciarla al fungo sulla spallina (g.
I). Chiudere il Velcro® corrispondente su se stesso (g. K) tendendolo nché il terminale gommoso coincide con la
tacca arancione.
9 Tendere il tirante di tensionamento (numero [4]) e chiuderlo
a Velcro® (g. Q)
Codice REF. S1063
Taglia universale
Colore: azzurro · indicare destro o sinistro
Code REF. S1063
Taille universelle
Couleur: bleu · préciser droit et gauche
Code REF. S1063
Size universal
Colour: blue · specify right or left
Artikelnummer REF. S1063
Größe Einheitsgröße
Farbe: blau · rechts oder links angeben
Orthèse pour luxation de l‘articulation acromio-claviculaire
DÉCLARATION DE CONFORMITÉ
En qualité de fabricant, ORTHOSERVICE AG déclare sous sa responsabilité exclusive que ce produit est un dispositif
médical de Classe I et qu’il a été réalisé conformément aux conditions requises par le Règlement UE 2017/745 (MDR).
Ces instructions ont été rédigées en accord avec ledit règlement et ont pour but de garantir l’utilisation correcte et sûre
du dispositif médical.
MARQUES COMMERCIALES DES MATÉRIAUX
Velcro® est une marque enregistrée de Velcro Industries B.V.
PRÉCAUTIONS D’UTILISATION
Veiller à ce que la pression exercée par le dispositif n’agisse pas sur les parties du corps présentant des lésions, enures ou
tuméfactions. Il est conseillé de ne pas trop serrer le produit, an de ne générer aucune zone de pression locale excessive et
d’éviter la compression des nerfs et/ou des vaisseaux sanguins. Il est préférable de porter l’orthèse sur un vêtement, en évitant
le contact direct avec la peau. En cas de doute sur les modes d’application, contacter un médecin, un kinésithérapeute ou un
technicien orthopédiste. Lire attentivement la composition du produit sur l’étiquette située à l’intérieur. Il est recommandé
de ne pas porter le dispositif à proximité de ammes nues ou à des champs magnétiques importants. Ne pas appliquer en
contact direct avec des plaies ouvertes.
AVERTISSEMENTS
Le produit étant spéciquement conçu pour les indications reportées ci-dessous, il est conseillé de l’utiliser sur
prescription d’un médecin ou d’un kinésithérapeute et de le faire appliquer par un technicien orthopédiste, conformément
aux exigences individuelles. An de garantir son ecacité, sa capacité à être toléré et son bon fonctionnement, le produit
doit absolument être appliqué avec le plus grand soin. Ne modier en aucun cas le réglage effectué par le médecin/
kinésithérapeute/technicien orthopédiste. En cas d’utilisation ou d’adaptation inappropriée, le fabricant ne sera pas
tenu responsable. L’utilisation de l’orthèse est prévue pour un seul patient à la fois; dans le cas contraire, le fabricant
décline toute responsabilité, conformément aux dispositions du règlement relatif aux dispositifs médicaux. Pour les sujets
hypersensibles, le contact direct avec la peau pourrait causer des rougeurs ou des irritations. En cas d’apparition de
douleurs, enures, tuméfactions ou en cas de toute autre réaction anormale, s’adresser immédiatement à son médecin et,
en cas de problème particulièrement grave, signaler le fait au fabricant et à l’autorité compétente de son pays. L’ecacité
orthopédique du produit n’est garantie que lorsqu’il est utilisé avec tous ses composants.
SÉLECTION/TAILLES
ENTRETIEN
Ne pas blanchir Pas de nettoyage chimique
Ne pas repasser Ne pas sécher en séchoir
Instructions de lavage : lavage à la main jusqu’à 30° C avec du savon neutre, ne pas sécher à
proximité de sources de chaleur.
L’orthèse et ses composants doivent être éliminés en respectant les normes environnementales.
INDICATIONS
• Traitement conservateur pour la stabilisation de l’articulation acromio claviculaire après luxation des degrés 1, 2 et 3
(selon le diagnostic médical)
• Traitement conservateur des fractures de l’extrémité distale de la clavicule
CONTRE-INDICATIONS
Aucune connue à ce jour
CARACTÉRISTIQUES ET MATÉRIAUX
• Système de sangles de soutien et de tension, conçu pour repousser la clavicule vers le bas et rehausser l’épaule, an
de réaligner l’acromion et la clavicule (exclusif)
• Capote d’épaule, souple et de forme anatomique avec rembourrage en mousse de polyéthylène et articulations rotatives
• Sangle contralatérale avec boucle (orange) que l’on peut mettre et enlever en toute rapidité au moyen d’une fermeture à
crochet
• Coudière confortable, réglable, avec support pour l’avant-bras, rembourré avec de la mousse en polyéthylène; le
rembourrage est semi-rigide an de faciliter la pose
• Ceinture ventrale avec fermeture à boucle enclipsable (blanche), réglable en longueur par fermeture Velcro®
• Tirants à tension constante préréglée à l’avant
• Sangles en velours, réglables à la taille requise
ENFILAGE
ADAPTATION POUR LE MÉDECIN / L’ORTHOPÉDISTE - ORTHÉSISTE
1 S’assurer que toutes les sangles sont ajustées sur leur longueur maximale; ouvrir uniquement la fermeture à boucle
enclipsable blanche (g. A) et la fermeture à crochet orange (numéro de sangle [3]) (g. B).
2 Positionner la coudière avec le support pour l’avant-bras au niveau du coude (veiller à ce qu’elle ne se trouve pas à un
niveau trop bas). Le sac pour le bras doit se situer vers le haut à l’extérieur avec la fermeture Velcro®.
3 Fermer la ceinture avec la fermeture à boucle enclipsable blanche (g. C) et serrer avec la fermeture Velcro®
correspondante (g. D). Si la sangle est trop longue, retirer la fermeture Velcro® en forme de Y, découper la sangle à la
bonne longueur et poser de nouveau la fermeture Velcro® en forme de Y.
4 Aligner le sac pour le bras sur la clavicule luxée de sorte qu’il forme une ligne avec celle-ci et introduire le coude dans
le sac pour le bras (g. E). Réguler l’étendue de la coudière avec la fermeture correspondante Velcro® (g. F).
5 Poser la bande de poignet (numéro [2]) autour du support pour l’avant-bras et fermer avec la fermeture Velcro®autour
du poignet (g. G). La bande de poignet peut être raccourcie en cas de besoin; à cet effet, il convient de découper la
partie débordante. Si nécessaire, la sangle peut être amenée du poignet à la main.
6 Saisir la capote d’épaule et la poser sur la clavicule luxée (veiller à ce qu’elle ne se trouve pas trop loin sur le côté) (g. H).
7 Faire passer la sangle avec la fermeture à crochet orange sous l’aisselle contralatérale et accrocher dans la tige sur la
capote d’épaule (g. I). Fermer la fermeture correspondante Velcro®; (g. K); la pièce d’extrémité caoutchoutée doit se
situer exactement au-dessus du marquage orange (cela sert de référence pour le patient).
8 Serrer les sangles contralatérales avec les fermetures Velcro® en forme de Y (g. L, M, N). Si les sangles sont trop
longues, retirer la fermeture Velcro® en forme de Y, découper les sangles à la bonne longueur et poser de nouveau la
fermeture Velcro® en forme de Y.
9 Tendre la sangle allant dans le sens vertical sur la face arrière (g. O), puis sur la face avant (g. P).
10 Vérier que toutes les sangles sont bien ajustées.
RETRAIT DE L‘ORTHÈSE
1 Ouvrir la sangle de serrage (on peut la reconnaître à la grande pièce d’extrémité caoutchoutée; numéro [4]) sans
toutefois la retirer (g. R).
2 Décrocher la fermeture orange (numéro de sangle [3]) de la tige sur la capote d’épaule (g. S) (desserrer, le cas
échéant, au préalable la fermeture Velcro® avec la pièce d’extrémité caoutchoutée).
3 Ouvrir la bande de poignet (g. T).
4 Ouvrir la fermeture à boucle enclipsable blanche (g. U) (ceinture) et retirer avec précaution l’orthèse; il convient
d’éviter les mouvements brusques (g. V).
ENFILAGE POUR LE PATIENT
1 S’assurer que la sangle de serrage (on peut la reconnaître à la grande pièce d’extrémité caoutchoutée; numéro[4]) est ouverte.
2 Décrocher uniquement la fermeture à boucle enclipsable blanche (ceinture ventrale, numéro [1]) (g. A) et la fermeture
à crochet orange (sangle contralatérale sur la face avant, numéro [3]) (g. B).
3 Positionner le sac pour le bras avec le support pour l’avant-bras de sorte qu’il se trouve au niveau du coude (veiller à ce qu’il
ne se trouve pas à un niveau trop bas). Le sac pour le bras doit se situer vers le haut à l’extérieur de la fermeture Velcro®.
4 Fermer la ceinture avec la fermeture à boucle enclipsable blanche (g. C).
5 Poser la coudière de sorte qu’elle forme une ligne avec la clavicule luxée ; introduire ensuite le coude dans le sac pour
le bras (g. E).
6 Fermer la bande de poignet (numéro [2]) autour du poignet (g. G).
7 Saisir la capote d’épaule et la poser sur la clavicule luxée (veiller à ce qu’elle ne se trouve pas trop loin sur le côté) (g.
H).
8 Faire passer la sangle avec la boucle orange sous l’aisselle contralatérale et l’accrocher dans la tige sur la capote
d’épaule (g. I). Fermer la fermeture correspondante Velcro® (g. K) ; tirer jusqu’à ce que la pièce d’extrémité
caoutchoutée se trouve au-dessus du marquage orange.
9 Serrer ensuite la sangle de serrage (numéro [4]) et la fermer avec la fermeture Velcro® (g. Q).
DIE VORLIEGENDEN ANWEISUNGEN BITTE DURCHLESEN UND AUFBEWAHREN PLEASE READ THESE INSTRUCTIONS CAREFULLY AND SAVE THEM VEUILLEZ LIRE CES INSTRUCTIONS AVEC ATTENTION ET LES CONSERVER LEGGERE ACCURATAMENTE LE PRESENTI ISTRUZIONI E CONSERVARLE
B
E
H
L
O
D
G
K
N
C
F
I
M
P
A
S
V
R
U
T
Q
RADIO
LUCENT
EASY
FASTENING
EASY
ADJUSTING
FIT
LOW
PROFILE
FIT
PATENTED
SINGLE PATIENT
MULTIPLE USE
1
