Pari LC SPRINT SPA User manual

of 1 13

Instructions for use
Information as of: December 2014. All rights reserved. Technical and design
changes and printing errors reserved. Principle shown in illustrations."
1 IMPORTANT INFORMATION #3"
1.1 General #3"............................................................................................................
1.2 Information about the instructions for use #3"......................................................
1.3 Structure of safety instructions #3".......................................................................
1.4 Treatment of babies, children and anyone who requires assistance #3"...............
1.5 Hygiene #4"............................................................................................................
2 PRODUCT DESCRIPTION #4"
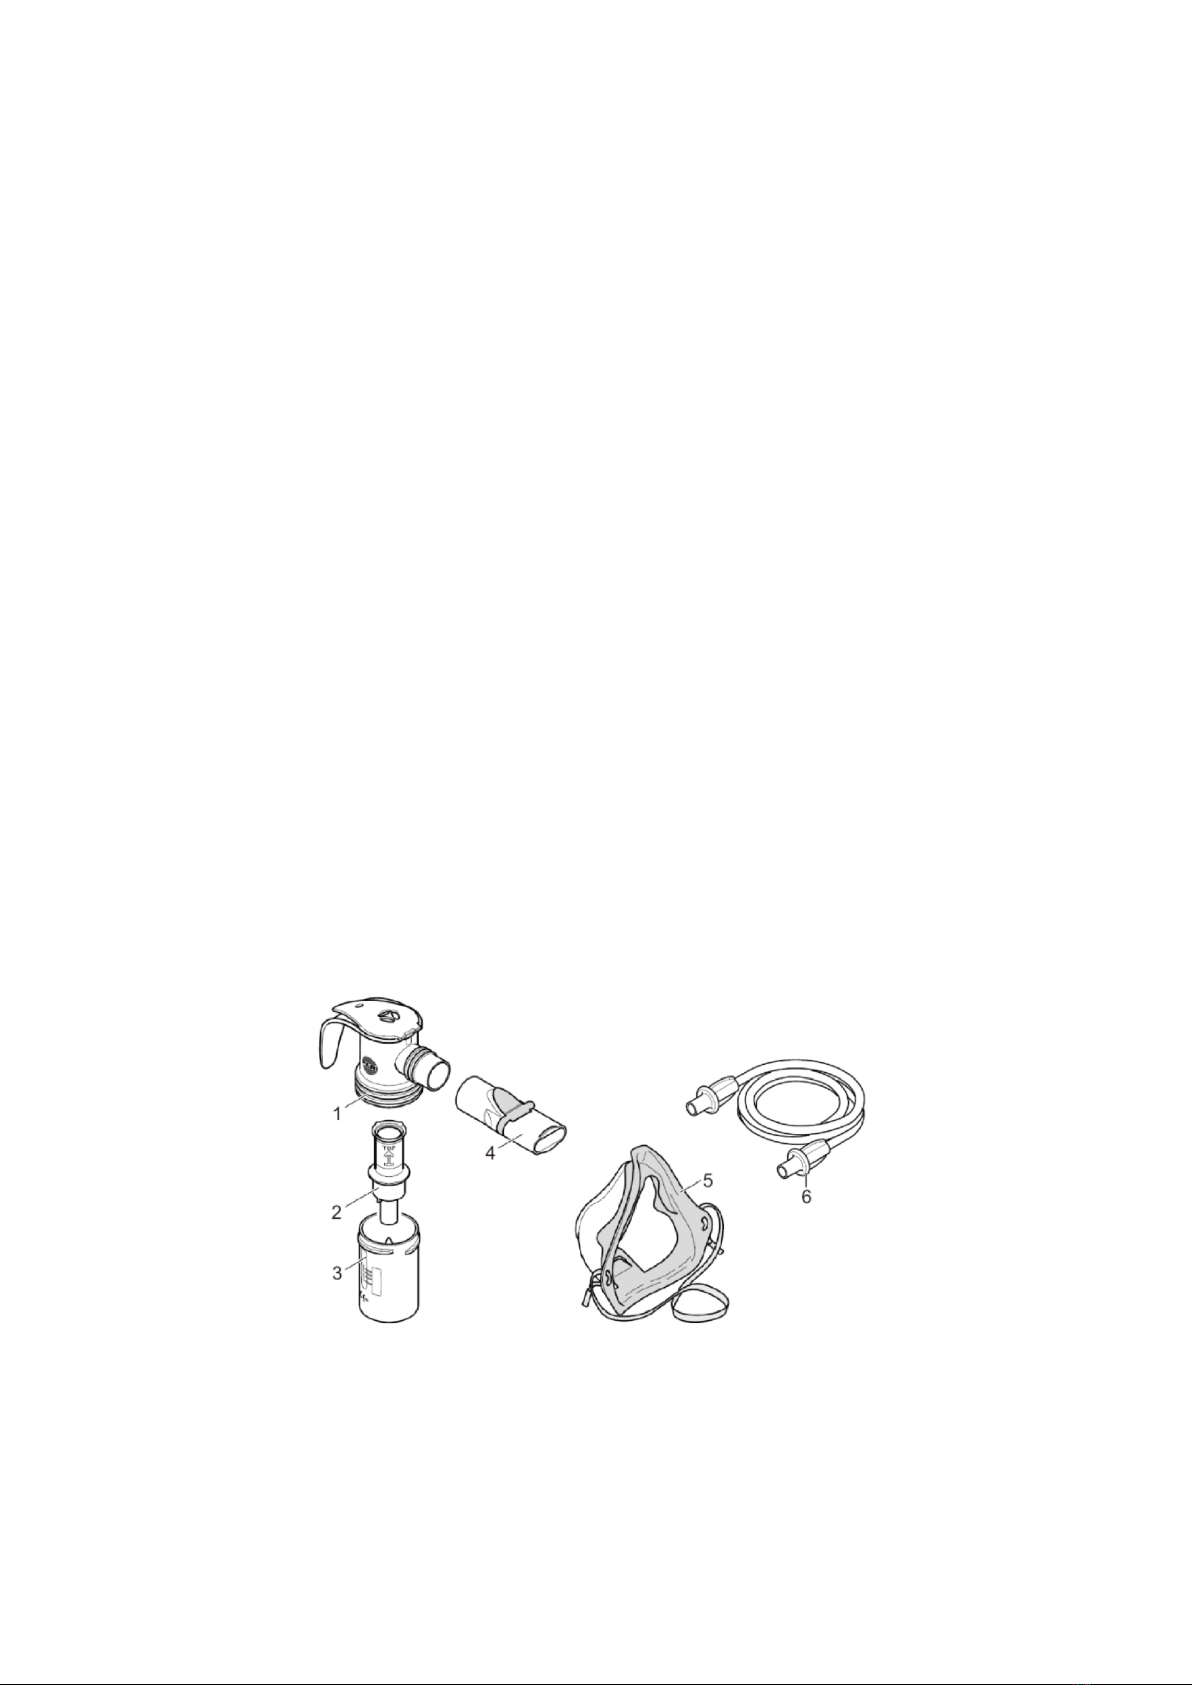
2.1 Components #4"....................................................................................................
2.2 Intended purpose #5"............................................................................................
2.3 Intended use #5"....................................................................................................
2.4 Contraindications #5"............................................................................................
2.5 Product variants and combinations #5".................................................................
2.6 Material information #5".........................................................................................
2.7 Operating life #6"...................................................................................................
3 INHALATION#6"
3.1 Assembling the nebuliser #6"..............................................................................
3.2 Filling with medication #7".....................................................................................
3.3 Performing the inhalation #8"................................................................................
4 CLEANING AND DISINFECTION AT HOME #9"
4.1 Preparation #9"......................................................................................................
4.2 Care of the connection tubing #9".........................................................................
4.3 Cleaning#9"............................................................................................................
4.4 Disinfection #10"....................................................................................................
4.5 Visual inspection #12"............................................................................................
4.6 Drying and storage #12"........................................................................................
5 MISCELLANEOUS #12"
5.1 Disposal #12".........................................................................................................
5.2 Technical data #12"................................................................................................
5.3 Explanation of symbols #13".................................................................................
5.4 Contact #13..........................................................................................................
of 2 13

1 IMPORTANT INFORMATION "
1.1 General
Please read these instructions for use carefully and completely. Do not
discard, so you can consult them at a later date. If you fail to comply with the
instructions for use, injury or damage to the device cannot be ruled out. "
If symptoms persist or if your condition worsens, discontinue the
application and contact your doctor immediately. "
1.2 Information about the instructions for use
These instructions for use are intended for the user at home. "
1.3 Structure of safety instructions
Safety-critical warnings are categorised according to hazard levels in these
instructions for use: "
– $The signal word CAUTION is used to indicate hazards which, without
precautionary measures, can result in minor to moderate injury or
impair treatment. "
– $The signal word NOTICE is used to indicate general pre-cautionary
measures which are to be observed to avoid damaging the product
during use. "
1.4 Treatment of babies, children and anyone who requires
assistance
Babies, children and anyone who requires assistance must be supervised
constantly by an adult during inhalation therapy. This is the only way to
ensure safe and effective treatment. Individuals in this group often
underestimate the hazards involved (e.g. strangulation with the power cord
or the connection tubing), thus resulting in a risk of injury. "
The product contains small parts. Small parts can block the airways and lead
to a choking hazard. Therefore, make sure that you always keep the
compressor, the nebuliser and the accessories out of the reach of babies
and infants. "
Special masks may be obtained for treating babies and infants who are not
yet able to inhale using the mouthpiece. "
The nebulisers are only designed for patients who are able to breathe by
themselves and are conscious. This is the only way to ensure effective
treatment and avoid a choking hazard. "
of 3 13

1.5 Hygiene
Observe the following hygiene instructions: "
-Do not use product components unless they have been &
thoroughly cleaned and dried. Contamination and residual moisture
encourage the growth of bacteria, which increases the risk of infection.
Before every use and cleaning, wash your hands thoroughly."
-Make absolutely sure you also carry out cleaning and drying before using
the device for the first time. "
-For cleaning and disinfection, always use fresh water with reduced
calcium content. "
-Make sure all components are dried properly whenever you have
performed cleaning or disinfection. "
-Do not keep the product and accessories in a damp environment or
together with damp objects. "
2 PRODUCT DESCRIPTION "
2.1 Components
To find out which components are included in your pack, refer to the following
table.
Check that all components of your PARI product are contained in your
package. If anything is missing, please notify the dealer from whom you
purchased the PARI product immediately. "
&
1. Nebuliser upper section"
2. Nozzle attachment "
3. Nebuliser lower section"
4. Mouthpiece"
of 4 13

5. Child mask soft"
6. Connection Tubing(f/f)"
2.2 Intended purpose
The nebuliser PARI LC SPRINT SPA is a medication nebuliser that is
designed to be used in conjunction with a compressor for inhalation therapy
of the lower and/or upper airways. "
Each application generally takes between 5 and 10 minutes (depending on
the quantity of medication), but in no case more than 20 minutes. "
2.3 Intended use
The nebuliser is intended exclusively for home use. "
For reasons of hygiene, the nebuliser, the mouthpiece and the masks must
only be used by a single patient. "
This product is only designed for patients who are able to breathe by
themselves and are conscious. "
Only medication that has been approved for inhalation treatment must be
used. Take note of any restrictions in the instructions for use of the
medication in question. "
2.4 Contraindications
None. "
2.5 Product variants and combinations
The PARI LC SPRINT SPA nebulisers can be operated with all PARI
compressors that are available on the market. "
There are several different versions of the PARI LC SPRINT nebuliser,
together with various accessories and nozzle attachments, designed for
different age groups and requirements.
2.6 Material information
Polypropylene
Nebuliser, mouthpiece, child mask soft
Thermoplastic
elastomer
Nebuliser, mouthpiece, child mask soft
Polyester
Rubber band
Synthetic rubber
Rubber band
of 5 13

2.7 Operating life
Replace the nebuliser after a year at the latest as changes can occur in the
material of the nebuliser over time. This might impair the effectiveness of the
treatment."
3 INHALATION"
3.1 Assembling the nebuliser
CAUTION
Check all nebuliser components and the accessories before each use.
Replace any broken, misshapen or seriously discoloured parts. Please also
follow the instructions for assembly given below. Damaged components and/
or an incorrectly assembled nebuliser may impair functioning of the nebuliser
and thus treatment as well.
• Press the nozzle attachment lightly onto
the nozzle in the nebuliser lower section.!
The arrow on the nozzle attachment
must point upwards.
• Place the nebuliser upper section on the
nebuliser lower section and turn it
clockwise to lock the two parts together. !
• Attach the connection tubing to the
nebuliser. !
of 6 13
!

"
Using with a mouthpiece
• Fit the mouthpiece onto the nebuliser.
"
Using with a child mask
•Attach the child mask to the nebuliser. "
When using a mask, make sure that the expiratory valve plate is pressed out
so you can exhale freely during an inhalation session. "
3.2 Filling with medication
NOTICE
Take care to ensure that the cap only moves in the direction allowed by the
hinge. Otherwise the nebuliser cap might snap off.
•Insert the nebuliser in the holder on the compressor intended for this
purpose. #"
•Open the nebuliser cap by pressing your thumb against the underside of the
cap.
•Pour the quantity of medication prescribed by your doctor into the nebuliser
nozzle attachment.
Be sure to follow the instructions regarding the minimum and maximum fill
volumes [see: Technical data, !
of 7 13

page 13]. If the nebuliser contains too little
or too much medication, nebulisation, and
thus also the treatment, will be greatly
impaired.
•Close the nebuliser cap.!
Make sure that the cap snaps into place. !
!
If you are to inhale several medications
one after the other in one application,
rinse out the nebuliser with tap water
between inhalations. Remove excess
water by shaking the nebuliser and then
fill with medication as described. !
3.3 Performing the inhalation
Before starting the treatment, ensure that all parts are firmly connected to
each other. "
Several drops of medication will remain in the nebuliser after the treatment
has ended.
•Connect the connection tubing to the compressor and switch the
compressor on. "
•Sit in an upright position and relax."
•Take the nebuliser out of its holder and hold it upright. "
•Take the mouthpiece between your teeth and close your lips around it or
press the mask lightly over the mouth and nose. "
•Breathe in through the mouthpiece or mask as slowly and deeply as
possible, and then breathe out in a relaxed manner. "
•Perform the treatment until the aerosol is used up (indicated by a change in
the sound of the nebuliser)"
of 8 13

•Replace the nebuliser in the holder as soon as you have finished inhaling."
•Switch the compressor off. "
4 CLEANING AND DISINFECTION AT HOME "
The nebuliser and the accessories used must be cleaned thoroughly after
each application and disinfected at least once a day. "
The connection tubing cannot be cleaned or disinfected. "
4.1 Preparation
#•#Detach the connection tubing from the nebuliser. "
# •# Make sure that all medication residues are removed from the nebuliser. "
# •# Dismantle the nebuliser into its individual parts. "
# •# Carefully pull the blue expiratory
valve out of the slot in the
mouthpiece. The valve must still be
attached to the mouthpiece. "
# •# Rinse all components of the
nebuliser under running tap water.
This must be done especially
thoroughly if cleaning and disinfection are not carried out straight
away. "
4.2 Care of the connection tubing
#•#Connect the connection tubing to the compressor. "
# •# Switch the compressor on. "
# •# Leave the compressor running until any condensation in the
connection tubing has been removed by the air flowing into it. "
"
4.3 Cleaning
"
# •# Place all disassembled components in
warm tap water with a little
dishwashing liquid for at least 5 min. If
necessary, use a clean brush to
remove loose dirt (the brush must be
reserved exclusively for this purpose). "
of 9 13

# •# Rinse all parts thoroughly in running water. "
# •# You can remove excess water more quickly by shaking all parts. "
4.4 Disinfection
&
After cleaning, disinfect the dismantled nebuliser and accessories used
(except for the connection tubing). Effective disinfection is only possible if
the nebuliser has been cleaned. "
Information when using masks with rubber bands: "
The rubber band can only be cleaned as it might be damaged by the high
temperatures used during disinfection.
!
CAUTION !
A damp environment may encourage the growth of bacteria. Therefore,
remove all parts from the pot or disinfector as soon as disinfection has
finished. Dry the parts. The risk of infection is reduced when the parts are
dried completely.
In boiling water "
# •# Place all the individual parts in boiling water for at least 5 minutes. &
Use a clean pot and fresh water with reduced calcium content, if
possible. "
Plastic will melt if it comes into contact with the hot base of the pot.
Therefore, make sure there is plenty of water in the pot. This way you
will avoid damaging the components. "
# •# You can remove excess water more quickly by shaking all parts. "
Using a standard thermal disinfector for baby bottles (not a microwave
oven)
For effective disinfection, use a disinfector with a runtime of at least 6
minutes. Regarding disinfection, the duration of the disinfection procedure
and the quantity of water required for this, follow the instructions for use of
the disinfector you are using."
"
CAUTION
of 10 13
!
!

Inadequate disinfection encourages the growth of bacteria and thus
increases the risk of infection. Thorough disinfection has not been
completed until the disinfector automatically switches itself off, or the
minimum disinfection time specified in the instructions for use of the
disinfector has elapsed. Therefore, do not switch the device off
prematurely. Also make sure that the disinfector is kept clean and regularly
check that it is in good working order."
With a microwave disinfector "
Microwave disinfectors ensure effective
disinfection of the product components in a
standard commercial microwave oven. "
Place the product components in the disinfector
with enough space between them to allow the
steam to reach all surfaces reliably. "
Maintain the following times when disinfecting: "
Information about the amount of water required and about the disinfection
process is included in the instructions for use of the devices in question
(disinfector and microwave). "
CAUTION "
The product components must not be exposed to microwave radiation
unless they are in a microwave disinfector. If they are heated in a microwave
oven without the protection of the disinfector, the individual parts will be
damaged. "
Do not use the grill function because this too will damage the individual
parts. "
At the end of the disinfection process, the parts may still be very hot.
Therefore, it is essential to wait for the cooling time to pass before taking the
parts out, otherwise there is a risk of burns. "
Inadequate or ineffective disinfection encourages the growth of bacteria and
thus increases the risk of infection. Disinfection is not completed properly
Wattage
Disinfection time
Cooling time
850 – 950
4 min.
2 min.
600 – 850
6 min.
2 min.
of 11 13
!

unless both the specified minimum disinfection time and the required power
output of the microwave are observed. The disinfector must also be perfectly
clean. Check regularly that the microwave and the disinfector are functioning
perfectly. "
Use only water for disinfection, never use chemicals. "
4.5 Visual inspection
Inspect all product components after each cleaning and disinfection.
Replace any broken, misshapen or seriously discoloured parts. "
4.6 Drying and storage
#•# Place all parts on a dry, clean and absorbent surface and let them dry
completely. "
# •# Wrap the nebuliser in a clean, lint-free cloth (e.g., a tea-towel) and keep
it in a dry, dust-free environment. "
5 MISCELLANEOUS "
5.1 Disposal
All product components can be disposed of with domestic waste unless this
is prohibited by the disposal regulations prevailing in the respective member
countries. "
5.2 Technical data
Aerosol data according to DIN EN 13544-1 is available on request from
INQUA GmbH."
Operating gases
Air, oxygen
Minimum flow
3.0 l/min.
Corresponding minimum operating pressure
0.5 bar / 50 kPa
Maximum flow
6.0 l/min.
Corresponding maximum operating pressure
2.0 bar / 200 kPa
Minimum fill volume
2 ml
Maximum fill volume
8 ml
of 12 13

5.3 Explanation of symbols
The following symbols can be found on the product and/or the packaging: "
5.4 Contact
For all product information and in the event of defects or questions about
usage, please contact: "
INQUA GmbH"
GERMANY"
Manufacturer
The product satisfies the basic requirements as set forth in Appendix I of
Directive 93/42/EEC concerning medical devices.
Please follow the instructions for use.
Order no.
Lot no.
of 13 13
Table of contents
Other Pari Respiratory Product manuals

Pari
Pari Dura-Neb 3000 User manual

Pari
Pari Vios PRO User manual

Pari
Pari PEP S Reference guide

Pari
Pari SMARTMASK 041G0730 User manual

Pari
Pari Vios User manual

Pari
Pari LC plus User manual

Pari
Pari LC Sprint User manual

Pari
Pari Trek S User manual

Pari
Pari KINDERMASKE SOFT User manual

Pari
Pari 041G0749 User manual

Pari
Pari SMARTMASK Kids User manual

Pari
Pari O-PEP System User manual

Pari
Pari Vortex User manual

Pari
Pari LC plus User manual

Pari
Pari Tolero 678G8208 User manual

Pari
Pari Lonhala Magnair User manual

Pari
Pari LC plus User manual

Pari
Pari LC Sprint User manual

Pari
Pari 178 G 1030 eRapid User manual

Pari
Pari LC plus User manual