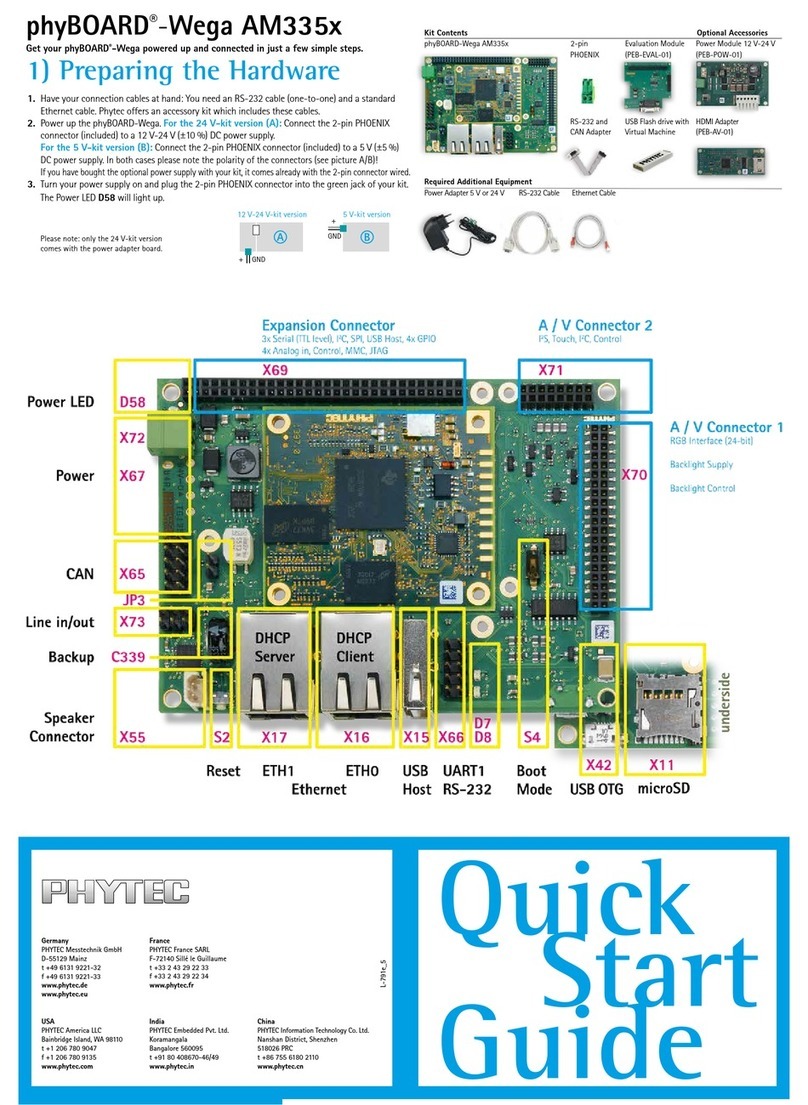
2) Starting the Live DVD
1. Verify the boot priorities of your PC-system to support booting from DVD.
2. Insert the Live DVD (part of the kit delivery) and restart your PC-system
The install / welcome-screen, shown on the right hand side, appears (A)
3. Choose your desired language
4. Click on Try PHYLiveDVD
The desktop from Ubuntu appears. (B)
Now you are ready to connect your PC with the phyBOARD-Subra.
Serial connection
1. Connect the RS232/Can adapter cable which comes with the phyBOARD-Subra to X56.
2. Connect one end of a standard male/male seriel cable to the female DB9 connector
of the RS232/CAN adapter cable.
3. Connect the other end to the first serial interface of your PC (or to an USB-to-DB9-
dongle, connected to your host).
4.
Click the Microcom_ttyS0 icon (C) on the Ubuntu desktop (for direct serial interface
connection) or click the Microcom_ttyUSB0 if you are using an USB-to-DB9-dongle.
5. Push the reset button (S2) on the phyBOARD-Subra (or cycle it‘s power).
A serial console has been started from your LiveDVD. You should see a boot message and
the login-prompt on this console. Congratulations! (D)
6. Use “root” as the log-in-name on the serial console (and press enter).
7. As a good example (and helpful for understanding the next step) you might enter the
command ifconfig. This shows you especially the configuration of the two Ethernet
interfaces of the phyBOARD-Subra. (E)
Ethernet connection
We recommend disconnecting your host-PC from any other network, because a peer-
to-peer connection from your PC to the phyBOARD-Subra module will be established.
1. Connect your preferred Ethernet-interface on your PC with ETH0 (X57) on the
phyBOARD-Subra using the Ethernet-cross-over cable.
2. Configure the IP-settings on your host platform in Ubuntu:
• In the Unity-panel (left side of your desktop) click on the Dash Home icon (F).
• A new window will open; enter System Settings in the search field (you will see
the corresponding icon showing up while typing the search string).
• Open System Settings (G) and Click on the Network icon.
• Select the physical interface to which you have connected the Ethernet (H) cable
(if you have more than one network in the list) and click on Options.
•
Select the IPv4Settings tab (I) and choose Manual (K) in the Method drop down box.
• Click Add (L) and enter the IP address 192.168.3.10, 255.255.255.0 as subnet
mask and 192.168.3.10 as Gateway.
• Last, click on Save (M) to save this connection settings and close the windows.
You are now ready to test the Ethernet network connection.
3. Click on the Telnet for Target icon (N) on your desktop. A console window will
open up and a login prompt will be shown (Remember: login-name is “root”). (O)
Congratulations.
HDMI Display connection
1. Connect a standard HDMI Cable with your preferred Monitor and the HDMI
Connector (X29) of the phyBOARD-Subra (The default resolution will be
1280x1024 @ 60Hz. Please note that some monitors might not be compatible
with this resolution. To change the resolution, please refer to the HDMI chapter of
the Applicationguide located on your DVD)
2. Optionally you may also connect a standard PC USB mouse and keyboard with the
USB Host interfaces (X35) of the phyBOARD-Subra.
3. After all connections are made, please reboot the phyBOARD-Subra by pressing
the reset Button (S2).
After a short booting period the Fluidlauncher QT Demo will show a gallery of QT
examples. You may navigate through the gallery and select your desired demo using
the mouse and keyboard.
Your possible next steps
• Read our in-depth documentation provided on the DVD
• Check out the FAQ pages on the PHYTEC web
(www.phytec.de/de/support/faq/faq-phyboard-wega)
• Contact our support team if you have any questions getting Wega up and running
Enjoy!
3) Getting Connected
