Planet VIP-361PE User manual

User’s Manual
VIP-361PE
Full Function PoE IP Phone

Copyright
Copyright (C) 2011 PLANET Technology Corp. All rights reserved.
The products and programs described in this User’s Manual are licensed products of PLANET Technology, This User’s
Manual contains proprietary information protected by copyright, and this User’s Manual and all accompanying hardware,
software, and documentation are copyrighted.
No part of this User’s Manual may be copied, photocopied, reproduced, translated, or reduced to any electronic medium or
machine-readable form by any means by electronic or mechanical. Including photocopying, recording, or information
storage and retrieval systems, for any purpose other than the purchaser's personal use, and without the prior express
written permission of PLANET Technology.
Disclaimer
PLANET Technology does not warrant that the hardware will work properly in all environments and applications, and
makes no warranty and representation, either implied or expressed, with respect to the quality, performance,
merchantability, or fitness for a particular purpose.
PLANET has made every effort to ensure that this User’s Manual is accurate; PLANET disclaims liability for any
inaccuracies or omissions that may have occurred.
Information in this User’s Manual is subject to change without notice and does not represent a commitment on the part of
PLANET. PLANET assumes no responsibility for any inaccuracies that may be contained in this User’s Manual. PLANET
makes no commitment to update or keep current the information in this User’s Manual, and reserves the right to make
improvements to this User’s Manual and/or to the products described in this User’s Manual, at any time without notice.
If you find information in this manual that is incorrect, misleading, or incomplete, we would appreciate your comments and
suggestions.
CE mark Warning
The is a class B device, In a domestic environment, this product may cause radio interference, in which case the user may
be required to take adequate measures.
Energy Saving Note of the Device
This power required device does not support Stand by mode operation.
For energy saving, please remove the DC-plug or push the hardware Power Switch to OFF position to disconnect the
device from the power circuit.
Without remove the DC-plug or switch off the device, the device wills still consuming power from the power circuit. In the
view of Saving the Energy and reduce the unnecessary power consuming, it is strongly suggested to switch off or remove
the DC-plug for the device if this device is not intended to be active.
WEEE Warning
2
parately.
To avoid the potential effects on the environment and human health as a result of the presence of hazardous
substances in electrical and electronic equipment, end users of electrical and electronic equipment should
understand the meaning of the crossed-out wheeled bin symbol. Do not dispose of WEEE as unsorted
municipal waste and have to collect such WEEE se

3
Trademarks
The PLANET logo is a trademark of PLANET Technology. This documentation may refer to numerous hardware and
software products by their trade names. In most, if not all cases, their respective companies claim these designations as
trademarks or registered trademarks.
Revision
User’s Manual for PLANET SIP PoE IP Phone:
Model: VIP-361PE
Rev: 1.0 (2011, August)
Part No. EM-VIP-361PE_v1.0

4
Table of Contents
Chapter 1 Introduction...................................................................................6
Overview.......................................................................................................................................6
Package Content...........................................................................................................................8
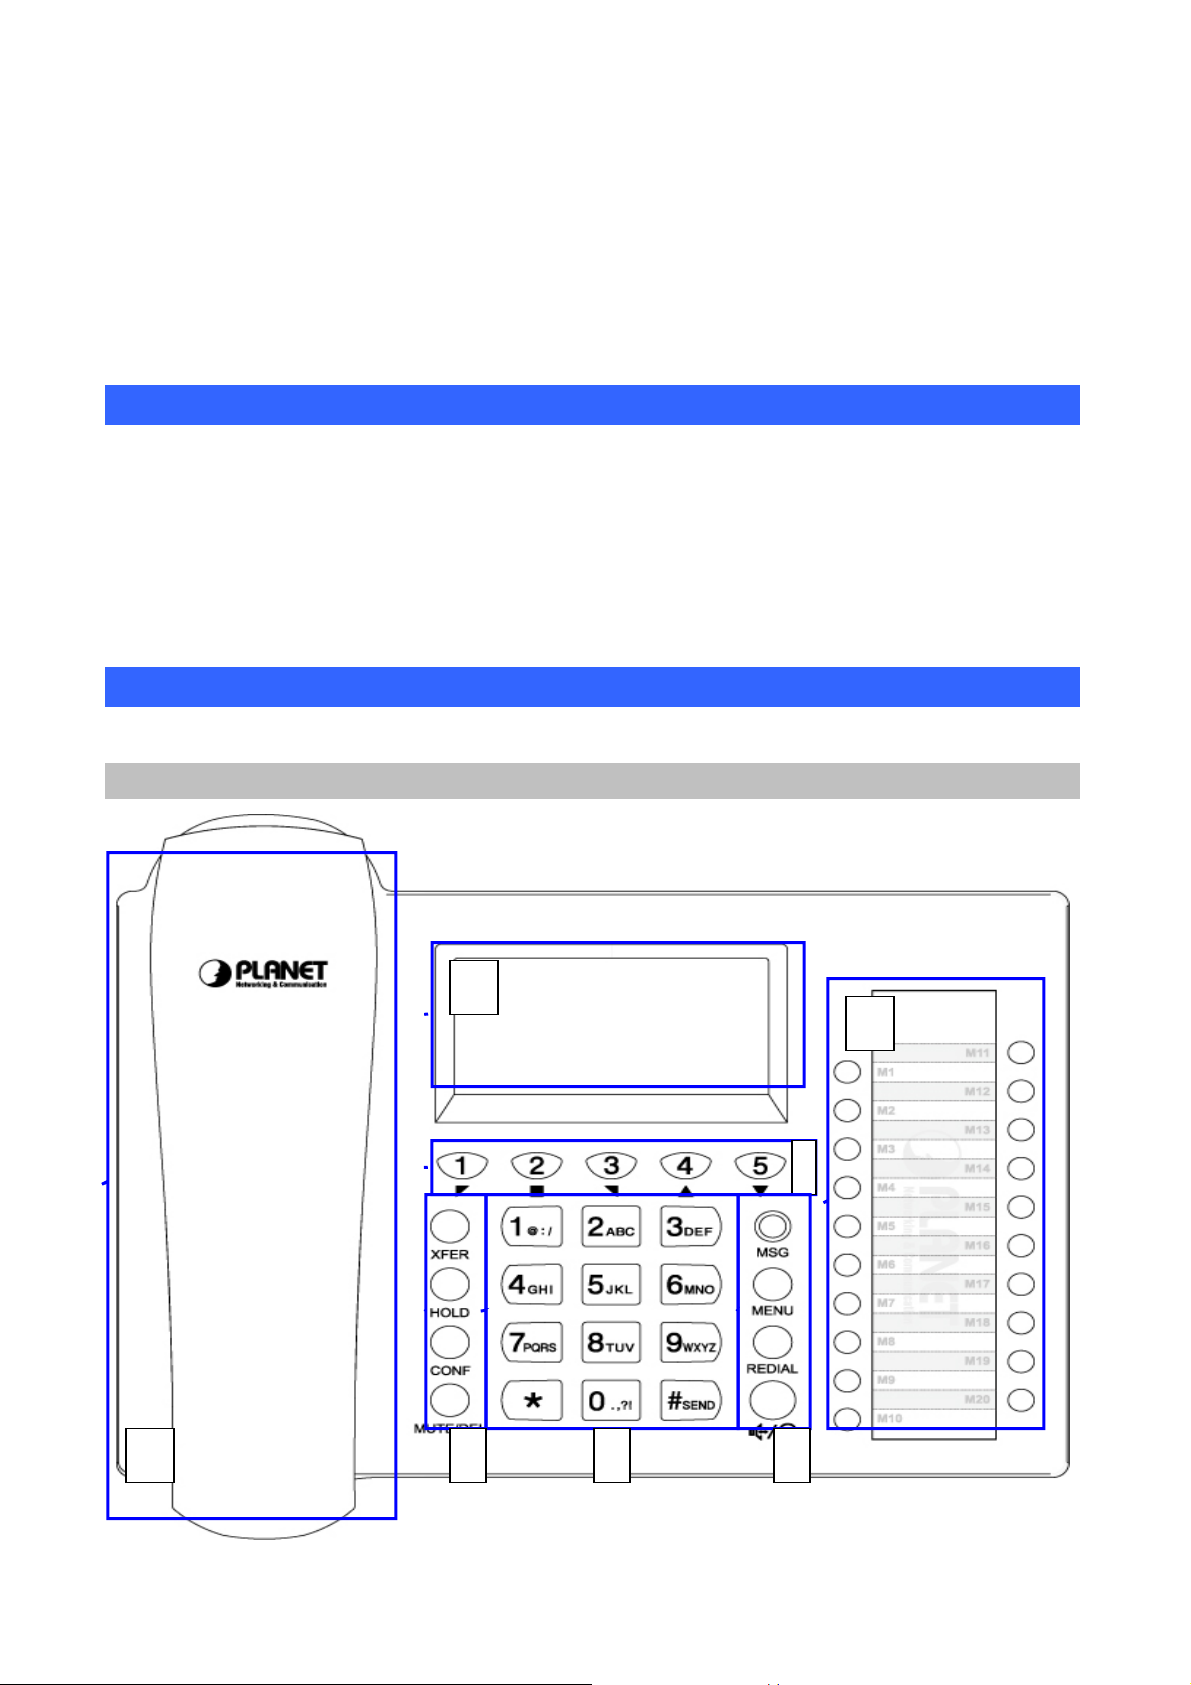
Physical Details.............................................................................................................................8
Front View and Keypad function...........................................................................................8
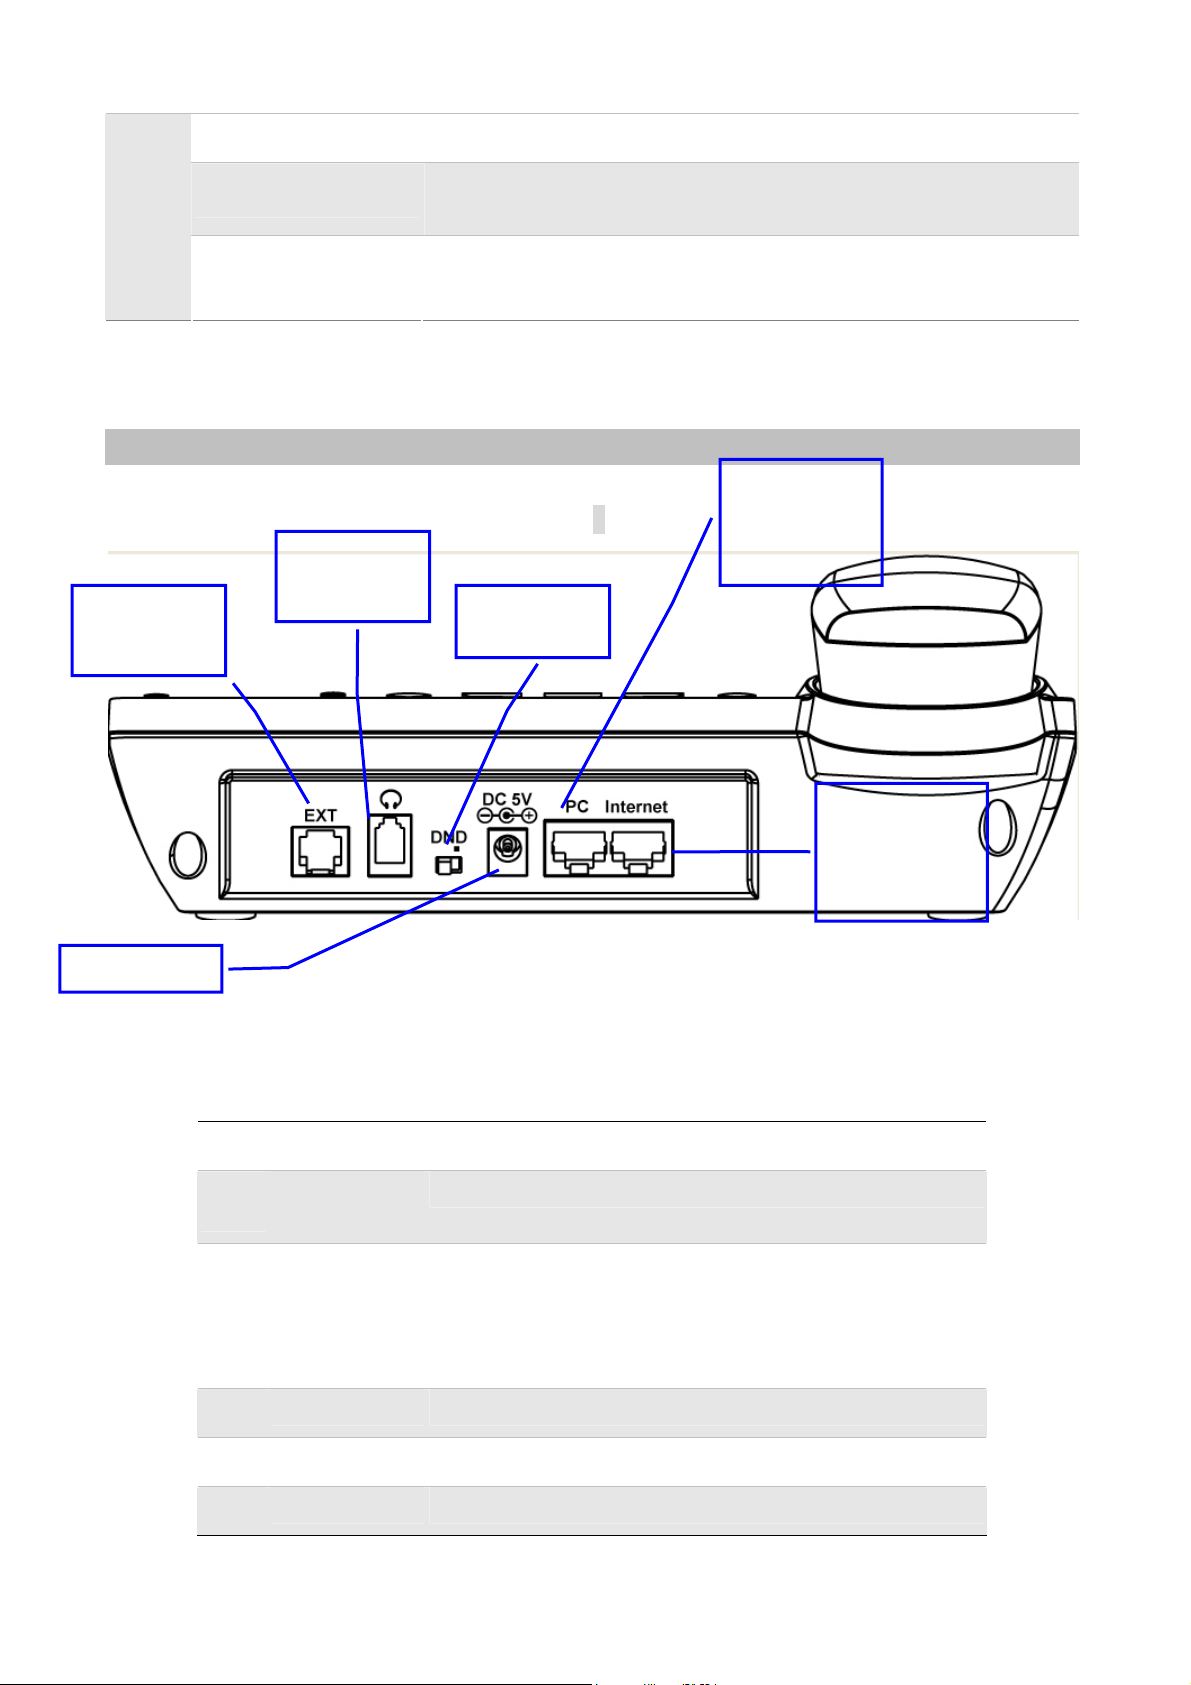
Rear View.............................................................................................................................10
Phone Screen Features.........................................................................................................11
Chapter 2 Preparations & Installation.........................................................12
Physical Installation...................................................................................................................12
Administration Interface...........................................................................................................14
Web configuration access.....................................................................................................14
Chapter 3 Network Service Configurations................................................15
Configuring and monitoring your IPPhone from web browser............................................15
Manipulation of IP Phone via web browser.........................................................................15
Chapter 4 VoIP IP Phone Status ..................................................................16
Status...........................................................................................................................................16
Basic.....................................................................................................................................16
DHCP...................................................................................................................................18
Syslog...................................................................................................................................18
Chapter 5 SIP Account Setting....................................................................19
SIPAccount ................................................................................................................................19
SIP setting............................................................................................................................19
NAT setting..........................................................................................................................20
Line settings................................................................................................................................21
Basic.....................................................................................................................................21
Audio Configuration............................................................................................................22
Supplementary Services Subscription..................................................................................22
Advanced .............................................................................................................................24
Chapter 6 Network Setting...........................................................................25
Basic ............................................................................................................................................25
Internet Port (WAN).............................................................................................................25
PC Port(LAN)......................................................................................................................27
Network Address Server Settings (DHCP)..........................................................................28
MAC Address Clone ..................................................................................................................29
VPN .............................................................................................................................................30
DMZ............................................................................................................................................31
QoS..............................................................................................................................................32
Chapter 7 Phone Configurations.................................................................33
Performance ...............................................................................................................................33

5
Volume .................................................................................................................................33
Regional...............................................................................................................................34
Call Forward ........................................................................................................................35
Miscellaneous ......................................................................................................................35
Multi-Functional Key................................................................................................................36
Dial Plan......................................................................................................................................38
Phonebook ..................................................................................................................................42
Phonebook............................................................................................................................42
Black List.............................................................................................................................43
Call Log ...............................................................................................................................45
Chapter 8 VoIP IP Phone Administration....................................................46
Management...............................................................................................................................46
Time/Date.............................................................................................................................46
Password Reset ....................................................................................................................48
Web Access..........................................................................................................................49
System Log Setting..............................................................................................................49
Factory Defaults...................................................................................................................50
Update Firmware.......................................................................................................................51
Security.......................................................................................................................................51
Provision .....................................................................................................................................52
SNMP..........................................................................................................................................55
TR 069.........................................................................................................................................56
Appendix A Expansion Module-VIP-36EXT Installation......................................................57
Appendix B FrequentlyAsked Questions List ........................................................................59
Appendix C Specifications ........................................................................................................61

6
Chapter 1
1
Introduction
Overview
Combining the cutting edge of Voice over IP and Internet telephony manufacturing experience, PLANET now
introduces the latest member of mainstream enterprise IP phone series: the VIP-361PE, a 5-line professional
PoE IP Phone.
The VIP-361PE is the ideal choice for a business to deploy VoIP network by using IP PBX service. It provides
5 voice lines; dual 10/100 switched Ethernet ports and integrated IEEE 802.3af Power over Ethernet circuitry
which offers benefit of reducing cabling expenses and cord clutter. To give users most flexibility , the
VIP-361PE contains a 128×64 Graphic LCD with white back light, 20 function keys /20-position navigation key.
The VIP-361PE Enterprise IP phone enables easy voice over IP communications and cost-effective VoIP
deployment. It offers self-contained, service-integrated, and intelligent phone features. The VIP-361PE
can effortlessly deliver toll voice quality equivalent to the regular VoIP/IP PBX connections utilizing
cutting-edge Quality of Service (QoS) capabilities that encompass IP-TOS/ DiffServ, 802.1 p/q VLAN tagging,
echo cancellation, comfort noise generation (CNG) and voice compensation technology. Meanwhile, the dual
Ethernet interfaces on the IP phone allow itself to be installed in an existing network location without interfering
with connections of desktop PC networks.
The VIP-361PE is also the streamlined wired IP telephone that provides standard features such as built-in
PPPoE / DHCP clients, password-protected machine management, call hold, forwarding, mute, transfer,
waiting, pickup, caller ID, speed-dial, 3-Way conference, last phone number redial, incoming message
indicator, multiple call appearances and user-intuitive web administration system.
Besides for office use, the VIP-361PE is the ideal solution for VoIP service offered by Internet Telephony
Service Provider (ITSP). It is a perfect delivery platform of IP voice services for business class communication
services.
Product Features
IEEE 802.3af (Power over Ethernet) compliant
Full-Featured enterprise SIP Desktop Phone
128×64 Graphic LCD with white back light
Support 20 multi-functional keys
VoIP Features

7
SIP 2.0 (RFC3261) compliant
Supports up to 5 service domains
Interoperability with leading PLANET IP PBX platforms
Supports BLF (Busy Lamp Field).
Voice codec support: G.711(A-Law, u-Law), G.723.1, G.722, G.729 A/AB
In-band, out-of-band DTMF Relay (RFC 2833) and SIP INFO
3-Way Conference / Caller ID / Speed Dial
Call Hold / Mute / Forward / Transfer / Waiting
Voice processing: VAD, CNG, AEC, Adaptive Jitter Buffer Management
Black list.
Management
Menu Configuration
SNTP Time Synchronization
Daylight Saving Time
Alarm Clock
Password Reset
Web access management
Local and Remote Syslog (RFC3164)
Factory Default
Firmware Upgradeable
Web Management Interface
Auto Provisioning: TFTP, HTTP and HTTPS
Multi User Level
SNMPv2
TR069
Phone Feature
Customization Ring Tone
SMS (100 records)
Call History ( 100 records )
Phone book ( 100 records )
Speed Dial (20 records )
Application
MAC: Address Cloning
VPN: PPTP and T2TP
DMZ
Layer 2 QoS: 802.1Q/VLAN ID and 802.1p PRI
Layer 3 QoS: SIP QoS, RTP QoS and Data QoS

SIP proxy redundancy: dynamic via DNS SRV, A records
Direct IP to IP calling
NAT Traversal: Static NAT Route and Traversal by STUN
Built-in NAT Router
DHCP Server and Client
IP conflict detection
Package Content
‧ SIP IP Phone unit
‧ Power Adapter
‧ Quick Installation Guide
‧ CD-ROM containing the on-line manual.
‧ RJ-45 cable x1
Physical Details
The following figure illustrates the front/rear panel of IP Phone.
Front View and Keypad function
1
2 3
7
5
6
4
8

9
Keypad Description
Handset top cradle For the placement of handset
(Receiver end)
Hook switch For hang-up and hang-off of handset
Cradle latch To prevent the handset from dropping when it is wall-mounted.
Handset bottom cradle For the placement of handset (Transmitter end)
Handset cord port RJ-11 jack on the left side of the IP phone
Headset wire port RJ-11 jack on the bottom of the handset
1
Headset To mount mouthpiece and earpiece on the single handle
2
LCD screen The LCD screen is for displaying
your settings, such as IP address of
Internet port, phone number, and call
status and so on.
3 Multi-Functional
Key
These keys can be used as speed dial, BLF, shortcut key, pick up and call
park.
4 Line Keys/ Soft keys
These keys are used as line keys; you can press the line button to select
the corresponding line, and then user can make call or do other functions.
The LEDs under the keys used to display the status of each extension,
please refer to 3 LCD indicator depends on their corresponding content
displayed on the LCD at that time.
MSG
The key can be used for voicemail selection, press it to access voicemail
(must be set up by your phone administrator) The LED is to indicate
voicemail status.
Menu Press it to access to menu items: such as phonebook, multi-functional
key, and call history and so on.
Redial The Redial key is used to redial the last dialed number automatically.
5
Handsfree / Headset
This button has two operating mode: Hands free and headset.
Change the value of Handsfree Key Mode parameters in
Phone/Preference webpage, Miscellaneous columns. The LED
associated is used to indicate its status
6 Numeric Keypad Enters numeric digits for initiating a call or for entering configuration
information
XFER The Transfer key is used to transfer a call to another IP phone
7
Hold The Hold key is used to hold the current call, press it again to release the

hold function.
CONF The Conference key is used to add the current multiple connected phones
into a conference. It performs a phone-bridging function.
Mute/Del
During an active call, press it to mute the current call. When input text,
press it to delete a digit or number.
Rear View
Keypad Description
1 EXT (RJ11) Attended console connect to expansion modules.
2 Headset Jack
(RJ22)
Headset console, connect to headset
3
DND Switch The Switch is used to turn on or turn off DND.
Under the character DND is a dot. When the switch near the
dot, DND is on; when away, DND is off. Taking the left picture
for example, DND is on.
4 DC 5V Power port
5 PC Connect to a PC
6 Internet Internet Connects to the Ethernet switch, router or Internet.
10/100 RJ-45
Ethernet Port
(Internet)
DND switch
10/100 RJ-45
Ethernet Port
(To PC)
EXT Port
(RJ11)
(RJ-22)
Headset Jack
Power Jack
10

Please don’t connect PoE injector and AC adapter to
VIP-361PE at the same time, this may make the effect of
current pulse and then cause device damage. Be noted to power
the SIP IP phone either from 802.3af PoE or AC adapter.
Note
Phone Screen Features
This is what your main phone screen might look like with an active call.
Graphic Icon Description
1 Date To display the current date.
Date format is mm/dd
2 Time To display the current time.
Time format is mm:ss (A or P)
3 Internet port IP
Address
To display the current IP address of Internet ports if the port
normally connect.
If the port not connected, it will display ‘WAN down’.
4 Phone Numbers
Indicator To display the phone number of lines.
5 Lines
To display the status of lines.
The icon means unregistered.
The icon mean registered.
11

12
Chapter 2
Preparations & Installation 2
Physical Installation
VIP-361PE: Enterprise PoE SIP IP Phone (2 x RJ-45, 1 x PoE for Internet interface)
Step 1. Handset Connection
Plug Handset Core with Handset and Handset Jack
Step 2a. Connecting Power Adapter and Network
Note Please don’t connect PoE injector and AC adapter to
VIP-361PE at the same time, this may make the effect
current pulse and then cause device damage. Be noted to power
the SIP IP phone either from 802.3af PoE or AC adapter.
of

13
tep 2b. Connecting Power via PoE interface and Network
.3af PSE
n, use of any non-standard
S
In the VIP-361PE can be configured without external power, if connecting to an IEEE802
devices such as 802.3af POE injector/hub or 802.3af POE Switch.
Note: Only internet port of the VIP-361PE support 802.3af power injectio
POE injector could damage the device
tep 3. Computer Network Setup
ere x is a number between 2 to 254 (except 1 where
tep 4. Login Prompt
rer 6.0 or above) to connect to 192.168.0.1 (type this address in the
r name and password: admin / 123
Note Only Internet port support IEEE802.3af(POE)
S
Set your computer’s IP address to 192.168.0.x, wh
is being used for the IP Phone by default). If you don’t know how to do this, please ask your network
administrator.
S
Use web browser (Internet Explo
address bar of web browser).
You’ll be prompted to input use

Administration Interface
The IP Phone provides GUI (Web based, Graphical User Interface) for machine management and
administration. Key pad administration also available for simple configuration.
Web configuration access
To start IP Phone web configuration, you must have one of these web browsers installed on computer
for management
Microsoft Internet Explorer 6.0.0 or higher with Java support
Default IP address of IP Phone is 192.168.0.1. You may now open your web browser, and insert
http://192.168.0.1 in the address bar of your web browser to logon IP Phone web configuration page.
IP Phone will prompt for logon username/password, please enter: admin / 123 to continue machine
administration.
In order to connect machine for administration, please
locate your PC in the same network segment (192.168.0.x)
of IP Phone. If you’re not familiar with TCP/IP, please refer
to related chapter on user’s manual CD or consult your
network administrator for proper network configurations.
Note
14

3
Chapter 3
Network Service Configurations
Configuring and monitoring your IP Phone from web browser
The IP Phone integrates a web-based graphical user interface that can cover most configurations
and machine status monitoring. Via standard, web browser, you can configure and check machine
status from anywhere around the world.
Manipulation of IP Phone via web browser
Log on IP Phone via web browser
After TCP/IP configurations on your PC, you may now open your web browser, and input
http://192.168.0.1 to logon IP Phone web configuration page.
IP Phone will prompt for logon username/password: admin / 123
When users login the web page, users can see the IP Phone system information like firmware version,
company…etc in this main page.
15

4
Chapter 4
VoIP IP Phone Status
Status
You can check the basic phone status to find out more information about the phone.
They include three parts Basic, DHCP and Syslog.
Basic
In this page include Product Information, Line Status, Network Status, and System Status.
16

Item Descriptions
Product Information It shows the basic information of the product.
Line Status It shows the registration state of each line.
Network Status It shows the information of Internet port, VPN and PC port.
System Status It shows the current time and the running time of the product.
Refresh Click Refresh button to refresh status of phone.
17

DHCP
This page displays the status about DHCP server enable/disable, start IP address, end IP address and
client lease time. Click Refresh button to refresh status of DHCP server.
Item Descriptions
DHCP Status It shows the information of the DHCP Server.
Syslog
It shows all the log information of system.
18

Chapter 5
SIP Account Setting
SIP Account
SIP is a request-response protocol, dealing with requests from clients and responses from servers.
Participants are identified by SIP URLs. Requests can be sent through any transport protocol. SIP
establishes call parameters at either end of the communication, and handles call transfer and
termination.
SIP setting
Set your SIP server in the following interface. These parameters are related to registration and call.
Item Descriptions
SIP T1 RFC 3261 T1 value (RTT estimate), which can range from 0 to 64 second.
Defaults to .5 seconds
Max forward SIP Max Forward value, which can range from 1 to 255. Defaults to 70.
SIP Reg User Agent User-Agent name to be used in a REGISTER request.
5
19

Name If this is not specified, the <SIP User Agent Name> is also used for the RE
GISTER request. Defaults to blank
Max Auth Maximum number of times (from 0 to 255) a request may be challenged.
Default is 2.
Make ALL AVT
Package
For second dial tone, enable this item package Mark position is 1, disable
this item will be 0.
RFC 254.3 Call Hold If set to yes, unit will include c=0.0.0.0 syntax in SDP when sending a SIP
re-INVITE to the peer to hold the call. If set to no, unit will not include the c
=0.0.0.0 syntax in the SDP.
The unit will always include a=sendonly syntax in the SDP in either case.
Defaults to yes
SRTP Enable/Disable SRTP(Secure Real-time Transport Protocol)
SRTP Prefer
Encrypt
SRTP encryption type.
NAT setting
Set your NAT Traversal parameters in the following interface. It is helpful for the device behind NAT
Item Descriptions
NAT Traversal
Enable/Disable NAT.
VIP-361PE supports STUN traversal, choose “STUN” in the “NAT
Traversal Mode” if you want traverse NAT/Firewall.
STUN Server IP STUN server IP address, default is stun.fwdnet.net
NAT Refresh Interval (sec) the interval to refresh
Port STUN port
20
Table of contents
Other Planet IP Phone manuals

Planet
Planet VIP-321 User manual

Planet
Planet VIP-255PT User manual

Planet
Planet VIP-6040PT User manual

Planet
Planet VIP-103PT User manual

Planet
Planet VIP-321 User manual

Planet
Planet VIP-351PT User manual

Planet
Planet VIP-254 Series User manual

Planet
Planet VIP-191 User manual

Planet
Planet VIP-150T User manual

Planet
Planet VIP-255PT User manual

Planet
Planet VIP-5060PT User manual

Planet
Planet VIP-2020PT User manual

Planet
Planet VIP-103PT User manual

Planet
Planet SIP IP PHONE VIP-154PT User manual

Planet
Planet VIP-1140PT User manual

Planet
Planet VIP-100PT User manual

Planet
Planet VIP-360PT User manual

Planet
Planet VIP-254NT User manual

Planet
Planet VIP-191 User manual

Planet
Planet VIP-351 PT User manual