Planet VIP-254NT User manual

1
SIP IP Phone with PSTN spport
VIP-254NT
User’s manual
Version 1.0

2
Copyright
Copyright (C) 2011 PLANET Technology Corp. All rights reserved.
The products and programs described in this User’s Manual are licensed products of PLANET Technology, This
User’s Manual contains proprietary information protected by copyright, and this User’s Manual and all
accompanying hardware, software, and documentation are copyrighted.
No part of this User’s Manual may be copied, photocopied, reproduced, translated, or reduced to any electronic
medium or machine-readable form by any means by electronic or mechanical. Including photocopying, recording,
or information storage and retrieval systems, for any purpose other than the purchaser's personal use, and without
the prior express written permission of PLANET Technology.
Disclaimer
PLANET Technology does not warrant that the hardware will work properly in all environments and applications,
and makes no warranty and representation, either implied or expressed, with respect to the quality, performance,
merchantability, or fitness for a particular purpose.
PLANET has made every effort to ensure that this User’s Manual is accurate; PLANET disclaims liability for any
inaccuracies or omissions that may have occurred.
Information in this User’s Manual is subject to change without notice and does not represent a commitment on the
part of PLANET. PLANET assumes no responsibility for any inaccuracies that may be contained in this User’s
Manual. PLANET makes no commitment to update or keep current the information in this User’s Manual, and
reserves the right to make improvements to this User’s Manual and/or to the products described in this User’s
Manual, at any time without notice.
If you find information in this manual that is incorrect, misleading, or incomplete, we would appreciate your
comments and suggestions.
CE mark Warning
The is a class B device, In a domestic environment, this product may cause radio interference, in which case the
user may be required to take adequate measures.
WEEE Warning
To avoid the potential effects on the environment and human health as a result of the presence of
hazardous substances in electrical and electronic equipment, end users of electrical and electronic
equipment should understand the meaning of the crossed-out wheeled bin symbol. Do not dispose of
WEEE as unsorted municipal waste and have to collect such WEEE separately.
Trademarks
The PLANET logo is a trademark of PLANET Technology. This documentation may refer to numerous hardware
and software products by their trade names. In most, if not all cases, their respective companies claim these
designations as trademarks or registered trademarks.

3
Revision
User’s Manual for PLANET SIP IP Phone:
Model: VIP-254NT
Rev: 1.0 (2010, December)
Part No. EM-VIP254NTV1.0

4
TABLE OF CONTENTS
Chapter 1Introduction........................................................................... 6
Overview............................................................................................................................6
Package Content...............................................................................................................7
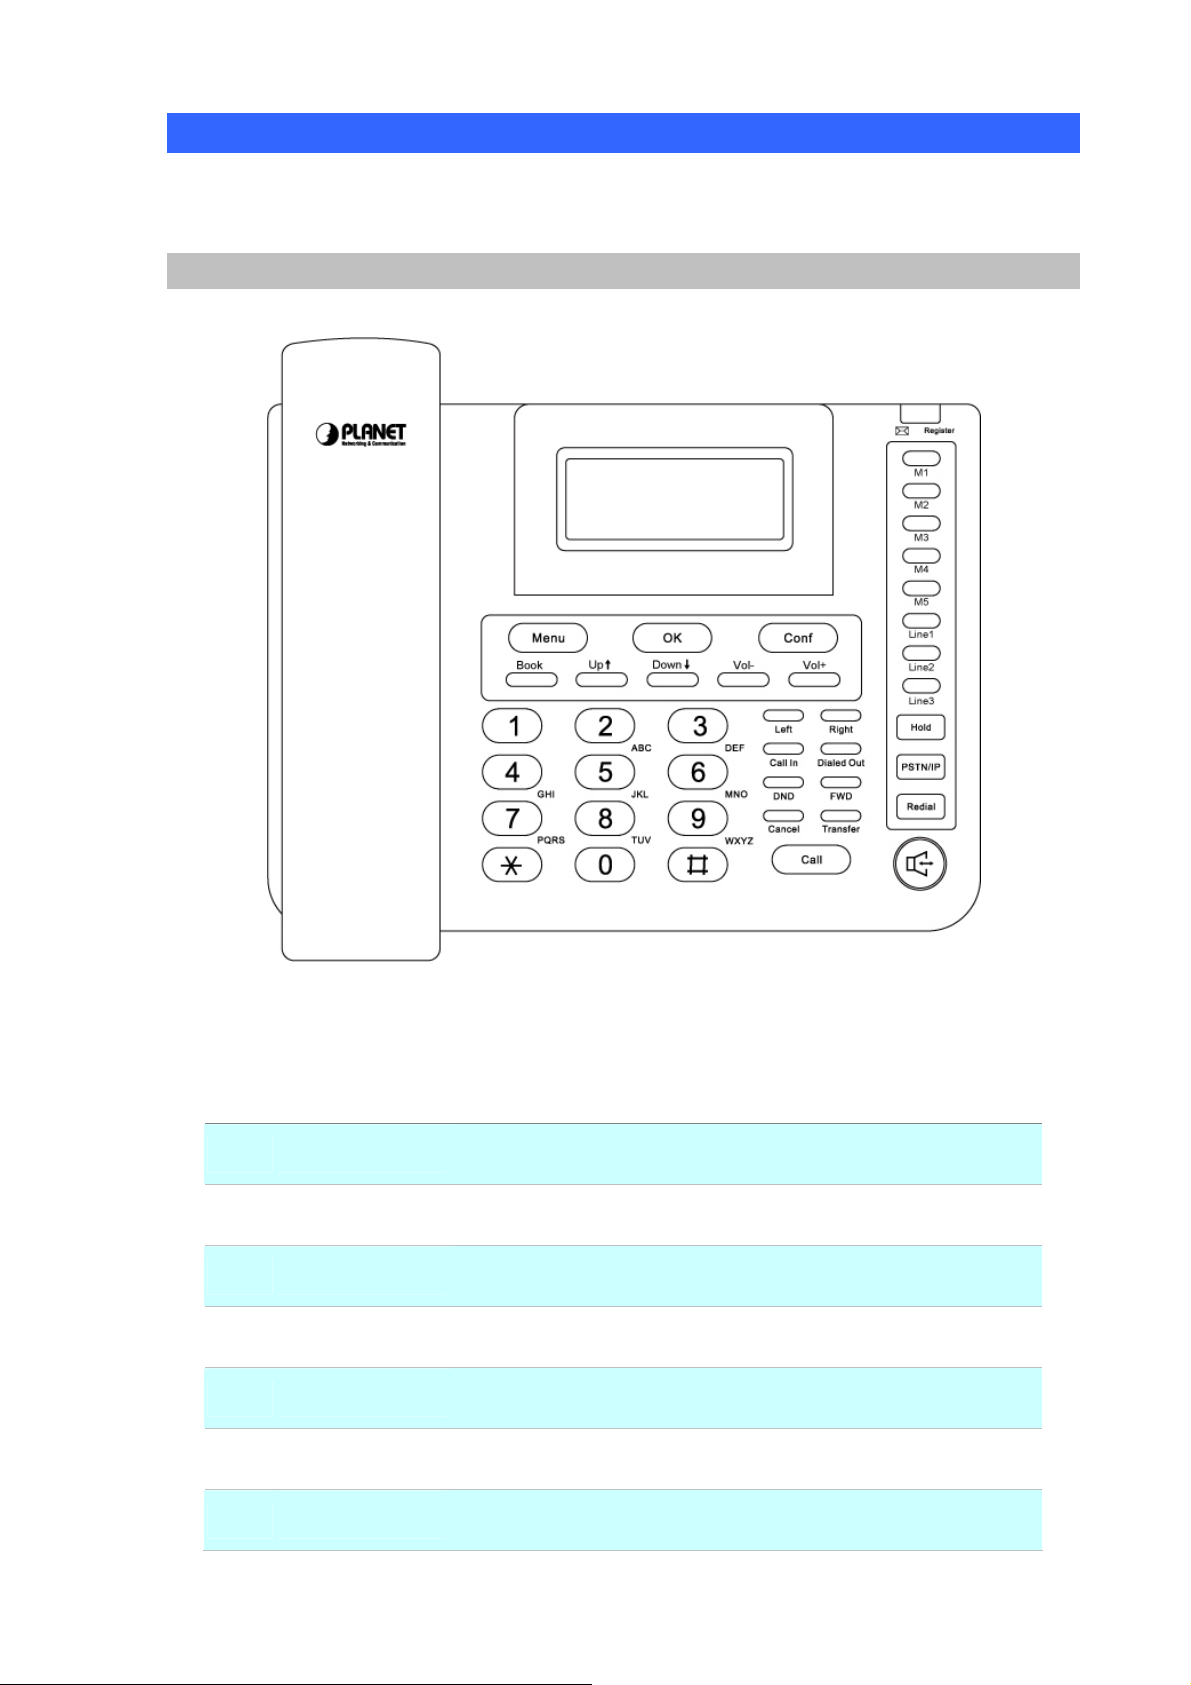
Physical Details.................................................................................................................8
Front View and Keypad function................................................................................8
Rear View ...................................................................................................................9
Chapter 2 Preparations & Installation.................................................11
Physical Installation Requirement................................................................................11
Administration Interface ...............................................................................................13
Web configuration access:........................................................................................13
Chapter 3 Network Service Configurations....................................... 14
Configuring and monitoring your IPPhone from web browser................................14
Overview on the web interface of IP Phone.............................................................14
Manipulation of IP Phone via web browser .............................................................14
LAN IP address configuration via web configuration interface...............................15
Chapter 4 VoIP IP Phone Configurations........................................... 17
Information.....................................................................................................................17
Phone Book settings .................................................................................................18
Speed Dial settings ...................................................................................................20
Dial Plan Settings.....................................................................................................21
Call Service Settings.................................................................................................24
General Setting.........................................................................................................25
WAN Settings...........................................................................................................26
DDNS Settings .........................................................................................................27
VLAN Settings.........................................................................................................28
VPN (PPTP & L2TP) Settings .................................................................................29
SNTP Settings...........................................................................................................29
NAT Settings.............................................................................................................30
DMZ Settings ...........................................................................................................31
Virtual Server............................................................................................................31
Service Domain Settings ..........................................................................................32
Codec Settings..........................................................................................................34
Advanced Settings....................................................................................................35
STUN settings ..........................................................................................................36
Auto Configuration Setting ......................................................................................37
Auto Update Setting .................................................................................................38

5
Update Firmware......................................................................................................39
Advanced Settings....................................................................................................40
Password Setting ......................................................................................................42
Tone Settings ............................................................................................................43
Restore Default Setting.............................................................................................43
Language Setting......................................................................................................43
Save & Reboot..........................................................................................................44
Logout.......................................................................................................................44
Appendix A Voice communications...............................................................................45
Case 1: Voice communication via SIP IP PBX _IPX-300........................................45
Case 2: Call Forward Feature_IP to IP Forward.......................................................46
Case 3: Call Forward Feature_All to PSTN.............................................................48
Case 4: Call Forward Feature_PSTN to IP Forward................................................49
Case 5: Call Forward Feature_Peer to Peer mode....................................................50
Case 6: Auto Answer Feature_IP to PSTN...............................................................50
Case 7: Auto Answer Feature_PSTN to IP...............................................................52
Appendix B The method of operation guide................................................................55
Call Transfer.............................................................................................................55
3-Way Conference....................................................................................................55
Call Waiting..............................................................................................................55
Switch the Realm (Registration Proxy Server) ........................................................55
Appendix C VIP-254NT Specifications ........................................................................57

6
Chapter 1
Introduction
Overview
For a cost-effective and high performance VoIP communications today, PLANET introduces the SIP IP
phone, VIP-254NT to fulfill the VoIP deployment needs from ITSP, enterprises to home use. The built-in
PSTN interface provides user more convenience between IP Phone and PSTN call selections. The
VIP-254NT features high-quality speakerphone technology, and various voice services including an
easy-to-use speaker on / off button and call hold / transfer / 3-way conference buttons.
The VIP-254NT has additional features such as built-in PPPoE / DHCP clients, password-protected
machine management, LCD menu display, speed-dial 3-way conference, hands-free speakerphone,
last number redial, incoming message indicator, and user-intuitive web administration system.
The VIP-254NT is the SIP IP phone featuring self-contained, service-integrated, intelligent phone
features, and powerful voice processing. It can effortlessly deliver toll voice quality equivalent to the
regular SIP protocol connections by utilizing cutting-edge Quality of Service, echo cancellation, comfort
noise generation (CNG) and voice compensation technology. Meanwhile, the dual Ethernet interfaces
on the IP Phone allow users to install in an existing network location without interfering with desktop PC
network connections.
The VIP-254NT is an ideal solution for office / home use as well as installation for Internet Telephony
Service Provider (ITSP). It's the delivery platform for IP voice services that brings benefits from the
VoIP technologies in your daily life.
Product Features
•Simple Installation and administration
Configuration of the IP Phone can be performed in minutes via the LCD menu keypad, or web
interfaces. Using the built-in LCD display, the IP Phone offers user-friendly configuration guidelines,
machine operation status, call status displays, and incoming call identification.
•Feature-rich keypad IP Phone
The IP Phone integrates a high-quality speakerphone with the Call Hold, Forward, Transfer and
Waiting functions and also provides advanced telephone features, such as 3-way conference key,
incoming call history indicator in a much more convenient and functional manner than traditional
telephone sets.
1

7
•Dynamic IP address assignment, and voice communication
The IP Phone can act as a PPPoE/DHCP client, automatically obtaining an IP address for Internet
access.
•Various field applications compliant
The IP Phone is capable of handling peer-to-peer and SIP proxy / IP PBX registration,
authentication to interact with major IP PBX/SIP gateway/IP Phone in the market. The IP Phone
offers the most flexibility and interoperability with PLANET and 3rd party VoIP vendors, allowing the
deployment of both simple and complex VoIP networks such as ITSP, PC-to-Phone/Phone-to-PC
or enterprise VoIP environments.
•Standards compliant
The IP Phone complies with SIP 2.0 (RFC3261), interoperates with 3rd party SIP voice
gateways/terminal/software as well as other PLANET VoIP products. Supported Voice codecs and
VoIP technologies are: G.723, G.729ab, G.711u-law/a-law; Voice Activity Detection (VAD), and the
Confort Noise Generation (CNG).
•Built-in PSTN
The built-in PSTN interface provides user more convenience between IP Phone and PSTN call
selections easily
VoIP Features
•SIP 2.0 (RFC3261) compliant
•Peer-to-Peer / SIP proxy calls
•Voice codec support: G.711, G.723.1, G.726, G.729A, G.729B
•Voice processing: Voice Active Detection, DTMF detection/ generation, G.168 echo cancellation
(16mSec.), Comfort noise generation
•In band and out-of-band DTMF support
Package Content
The contents of your product should contain the following items:
VoIP IP Phone
Power adapter
Quick Installation Guide
User’s Manual CD
RJ-11 cable x 1
RJ-45 cable x 1

8
Physical Details
The following figure illustrates the front/rear panel of IP Phone.
Front View and Keypad function
Front Panel of VIP-254NT
Keypad Description
1 LCD Display Menu and all status shall be displayed for users.
2 Menu
To bring out the menu selection while IP Phone is in idle state.
3 OK To be used as confirm configuration or enter sub-menu.
4 Conf
Press this button can make conference function.
5 Book Enter the phone book selection.
6 Up↑/ Down↓To move the sub-menu selection.
7 Vol + / - To adjust the volume.

9
8 Left / Right To be used as
9 Call In To check Incoming call
10 Dialed Out
To check dialed call
11 DND Enable/Disable the DND function.
12 FWD
To carry out forward function.
13 Cancel To delete the dialing digit
14 Transfer
To transfer an active call (incoming call answered or outgoing call
accepted) to another devices.
15 Call To sent out the dialing numbers.
16 M1~M5
Users could store their commonly used number in these keys, and
call them as speed dial
17 Line 1 ~ Line 3 To make 3 line accounts dial call by pressing the Line1 ~ Line 3.
18 Hold
To hold the conversation.
19 PSTN / IP To switch between IP and PSTN calls.
20 Redial
Press to dial the last dialed number when the IP Phone is
off-hooked.
21 Hand Free To switch between the usage of the handset and the speaker
devices.
Rear View
Rear Panel of VIP-254NT

10
1 DC 7.5~12V DC Power input outlet
2 PC
RJ-45 connector, to maintain the existing network structure,
connected directly to the PC through straight CAT-5 cable
3 LAN RJ-45 connector, for Internet access, connected directly to
Switch/Hub through straight CAT-5 cable.
4 PSTN
FXO interface, for connect with PSTN line. Press PSTN/IP button
to switch to PSTN mode.
L
Note
Use only the power adapter shipped with the unit to ensure
correct functionality

11
Chapter 2
Preparations & Installation
Physical Installation Requirement
Step 1: Handset Connection
Plug Handset Core with Handset and Handset Jack.
Step 2: Connecting Power Adapter and Network
Plug RJ-45 Cable with WAN port and Switch/Hub
2
Í
Note
Use only the power adapter shipped with the unit to ensure
correct functionality.

12
Step 3: Computer Network Setup
Plug RJ-45 Cable with LAN/PC port and Computer
Step 4: Connecting PSTN Line
If there is PSTN line, connect it with TEL IN port
Step 5: Login Prompt
Set your computer’s IP address to 192.168.0.x, where x is a number between 2 to 254 (except 1 where
is being used for the IP Phone by default). If you don’t know how to do this, please ask your network
administrator.Use web browser (Internet Explorer 6.0 or above) to connect to 192.168.0.1 (type this
address in the address bar of web browser). You’ll be prompted to input user name and password: root
/ null (without password).

13
Administration Interface
The IP Phone provides GUI (Web based, Graphical User Interface) for machine management and
administration. Key pad administration also available for simple configuration.
Web configuration access:
To start IP Phone web configuration, you must have one of these web browsers installed on computer
for management
•Microsoft Internet Explorer 6.0.0 or higher with Java support
Default IP address of IP Phone is 192.168.0.1. You may now open your web browser, and insert
http://192.168.0.1 in the address bar of your web browser to logon IP Phone web configuration page.
IP Phone will prompt for logon username/password, please enter: root / null (without password) to
continue machine administration.
Í
Note
In order to connect machine for administration, please
locate your PC in the same network segment (192.168.0.x)
of IP Phone. If you’re not familiar with TCP/IP, please refer
to related chapter on user’s manual CD or consult your
network administrator for proper network configurations.

14
Chapter 3
Network Service Configurations
Configuring and monitoring your IP Phone from web browser
The IP Phone integrates a web-based graphical user interface that can cover most configurations
and machine status monitoring. Via standard, web browser, you can configure and check machine
status from anywhere around the world.
Overview on the web interface of IP Phone
With web graphical user interface, you may have:
More comprehensive setting feels than traditional command line interface.
Provides user input data fields, check boxes, and for changing machine configuration settings
Displays machine running configuration
To start IP Phone web configuration, you must have one of these web browsers installed on computer
for management
Microsoft Internet Explorer 6.0.0 or higher with Java support
Manipulation of IP Phone via web browser
Log on IP Phone via web browser
After TCP/IP configurations on your PC, you may now open your web browser, and input
http://192.168.0.1 to logon IP Phone web configuration page.
IP Phone will prompt for logon username/password: root / null (without password)
IP Phone log in page
When users login the web page, users can see the IP Phone system information like firmware version,
company…etc in this main page.
3

15
IP Phone main page
LAN IP address configuration via web configuration interface
Execute your web browser, and insert the IP address (default: 192.168.0.1) of VIP in the address bar.
After logging on machine with username/password (default: root / without password), browse to
“Network” --> “LAN Settings” configuration menu:
Parameter Description
IP address LAN IP address of IP Phone

16
Default: 192.168.0.1
Subnet Mask LAN mask of IP Phone
Default: 255.255.255.0
Default Gateway Gateway of
IP Phone
Default: 192.168.0.254
After confirming the modification you’ve done, Please click on the Submit button to apply settings and
browse to “Save & Reboot” menu to reboot the machine to make the settings effective.
Connection Type Data required.
Fixed IP
In most circumstances, it is no need to configure the DHCP
settings.
DHCP client
The ISP will assign IPAddress, and related information.
PPPoE
The ISP will assign PPPoE username / password for Internet
access,
Save Modification to Flash Memory
Most of the IP Phone parameters will take effective after you modify, but it is just temporary stored on
RAM only, it will disappear after your reboot or power off the IP PHone, to save the parameters into
Flash ROM and let it take effective forever, please remember to press the Save & Reboot button after
you modify the parameters.
Please consult your ISP personnel to obtain proper PPPoE/IP
address related information, and input carefully.
If Internet connection cannot be established, please check
the physical connection or contact the ISP service staff
for support information.
L
Hint

17
Chapter 4
VoIP IP Phone Configurations
Information
This page shows the major system information; there are WAN Port, LAN Port, System Information and
Register Information. The user could know the network parameters, system firmware version and
register status at this page.
4

18
Phone Book settings
IP Phone can set up 140 records of Phone Book. User can make calls via Phone Book feature of IP
Phone.
Field Description
Phone Book Page The default is Page 1. It can select Page1 ~ Page 7 to
look round Phone Book records.
Index The record number from 0 ~ 139, it can set up 140
records in total.
Name The name of Phone Book records, it only can input
numerals.
Number Fill in the outgoing number (Line Number) or IP
address.
Action To delete this record.
If you need to add a phone number into the Phone Book list, you need to input the position, the name,
and the phone number (by URL type). When you finished a new phone list, just click the “Submit”
button.

19
If you want to delete a phone number, you can click the “Delete” button at this record.
For Example:
STEP 1:
IP Phone had added the above phone numbers. User press Phone Book button from keypad
then the LCD screen will show below:
STEP 2:
Press OK button to enter the Phone Book menu. The LCD screen will show the Phone Book
records pervious made.
STEP 3:
Selecting the recorder you want to dial and press OK button. It sill show the detail information as
below:
STEP 4:
Pick up the telephone handset or press Handfree button to dial to this telephone.
Search: [ 3]
000 301
001 Brian
202
192.168.0.20:5060
IP Dialing.. 1
192.168.0.20:5062

20
Speed Dial settings
In Speed Dial setting function you can add/delete Speed Dial number. The 1~5 records are available for
M1 ~ M5 Speed Dial buttons, and 6~10 records are reserved at present. You can press the M1 ~ M5
buttons to dial the numbers that set at Speed Dial Setting.
If you need to add a phone number into the Speed Dial list, you need to input the name and the phone
number (by URL type). When you finished a new phone list, just click the “Submit” button.
If you want to delete a phone number, you can click the “Delete” button at this record.
Field Description
Index The record number from 1 ~ 10 records.
Name The name of Speed Dial records.
Number Fill in the outgoing number (Line Number) or IP
address.
Action To delete this record.
Pick Up Fill in the pick-up service digits of SIP Server or IP
PBX. This field is reserved at present.
Voice Mail Fill in the voice mail number of SIP Server or IP PBX.
This field is reserved at present.
Table of contents
Other Planet IP Phone manuals

Planet
Planet VIP-1010PT User manual

Planet
Planet VIP-360PT User manual

Planet
Planet VIP-103PT User manual

Planet
Planet VIP-1000 Series User manual

Planet
Planet VIP-321 User manual

Planet
Planet VIP-152T User manual

Planet
Planet VIP-560PT User manual

Planet
Planet SIP IP Phone User manual

Planet
Planet VIP-321 User manual

Planet
Planet VIP-6040PT User manual

Planet
Planet ICF-1700 Operator's manual

Planet
Planet VIP-100T User manual

Planet
Planet VIP-193 User manual

Planet
Planet VIP-191 User manual

Planet
Planet VIP-362WT User manual

Planet
Planet VIP-150T User manual

Planet
Planet VIP-5060PT User manual

Planet
Planet VIP-351PT User manual

Planet
Planet VIP-8030NT User manual

Planet
Planet VIP-256PT User manual