Poly Studio X Series User manual

Poly Partner Mode
(G7500, Studio X Series, and
Studio E70)
User Guide
4.0.0 | March 2023 | 3725-86559-016A

Contents
Before You Begin ..............................................................................................................................................................................................4
Audience, Purpose, and Required Skills ............................................................................................................................................... 4
Related Poly and Partner Resources .....................................................................................................................................................4
Getting Started ................................................................................................................................................................................................. 5
Poly Partner Mode Overview ................................................................................................................................................................. 5
Navigating Your System ........................................................................................................................................................................... 5
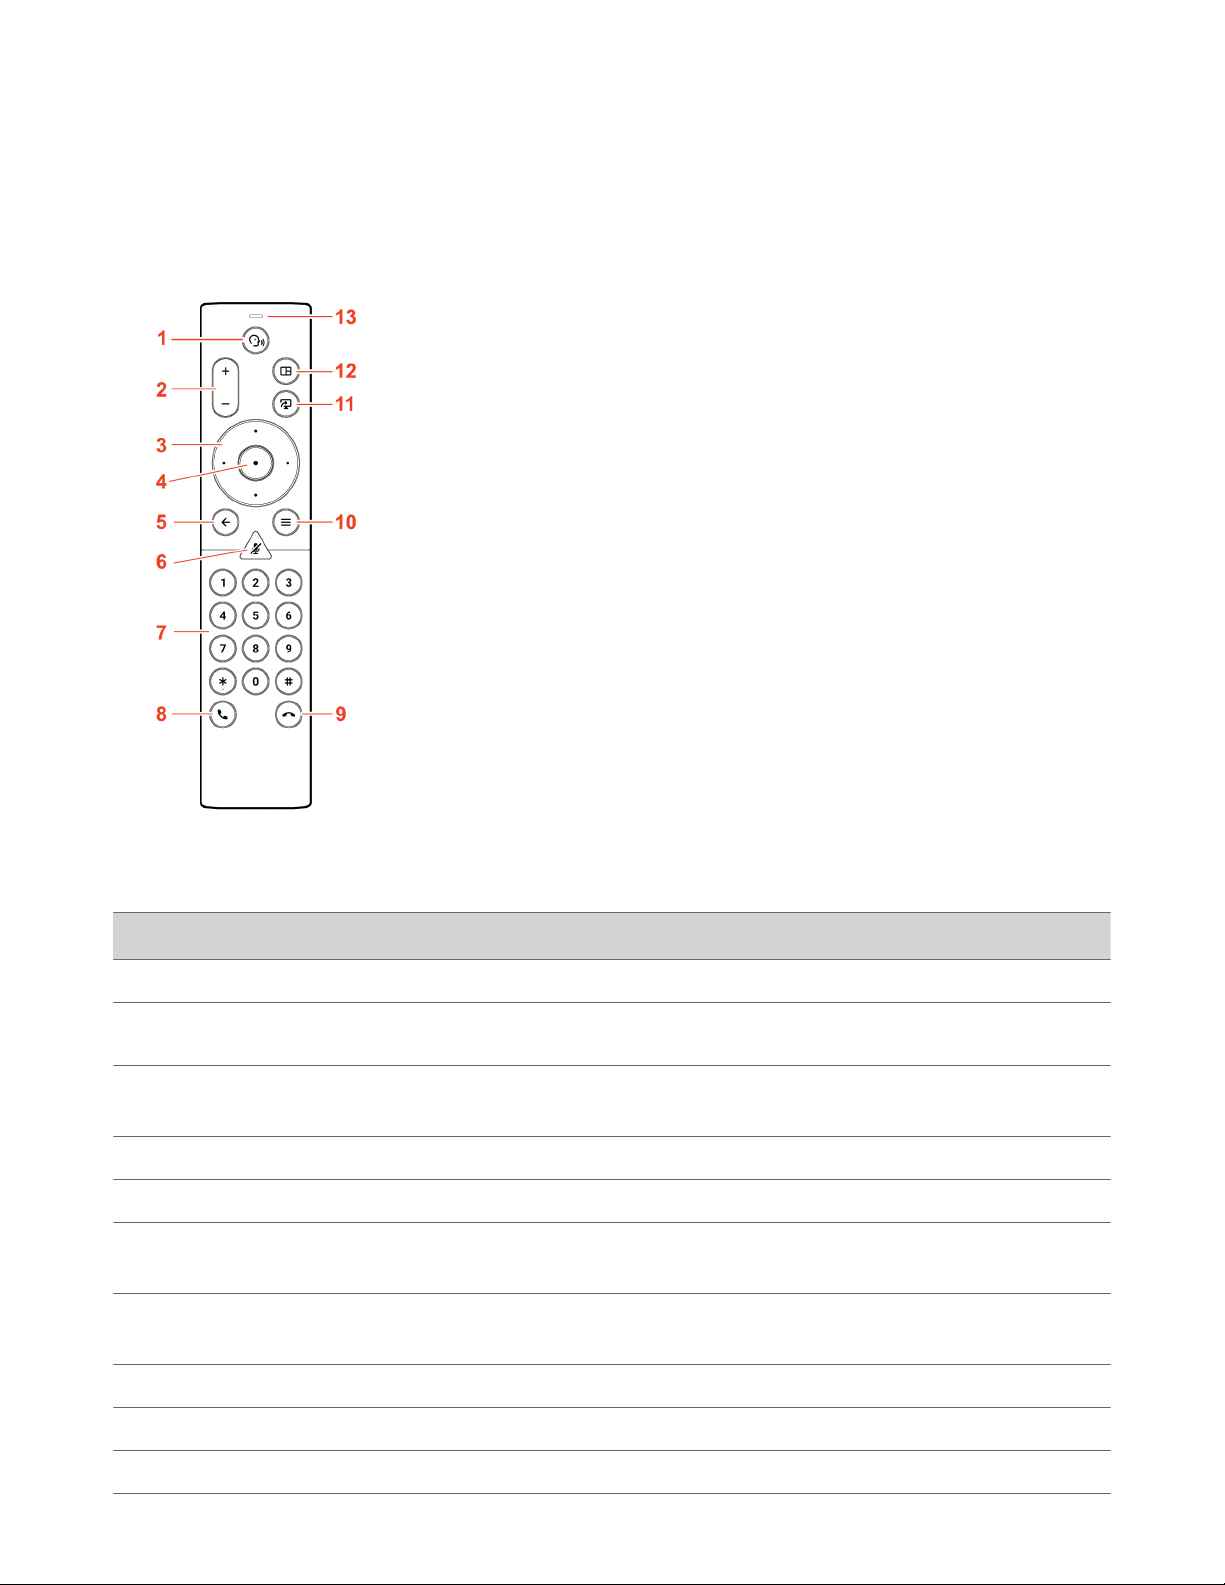
Poly IR Remote Control Button Functions .................................................................................................................................... 5
Bluetooth Remote Control Button Functions .............................................................................................................................. 6
Enable TalkBack in Microsoft Teams Rooms ................................................................................................................................ 8
Using a Connected Trio in a Microsoft Teams Rooms Environment ......................................................................................8
Product Overview of Poly Video Systems ...........................................................................................................................................9
Poly G7500 System Features and Capabilities ............................................................................................................................ 9
Poly Studio X70 Features and Capabilities ................................................................................................................................... 9
Poly Studio X50 Features and Capabilities .................................................................................................................................10
Poly Studio X30 Features and Capabilities .................................................................................................................................10
Poly Studio E70 Camera Overview ............................................................................................................................................... 10
Administrator Features and Capabilities .................................................................................................................................... 11
Overview of System Hardware ............................................................................................................................................................11
Poly G7500 Hardware ...................................................................................................................................................................... 11
Poly Studio X70 Hardware .............................................................................................................................................................. 11
Poly Studio X50 Hardware .............................................................................................................................................................. 13
Poly Studio X30 Hardware .............................................................................................................................................................. 13
Poly Studio X50 and Studio X30 Privacy Cover ........................................................................................................................ 14
Poly Studio E70 Camera Hardware ...............................................................................................................................................14
LED Status Indicators ..............................................................................................................................................................................15
LED Status Indicators for the G7500 System .............................................................................................................................16
LED Status Indicators for the Studio X70 System .....................................................................................................................16
LED Status Indicators for Studio X50 and Studio X30 Systems ............................................................................................17
LED Status Indicators for the Studio E70 Camera ....................................................................................................................17
Powering the System On and Off ........................................................................................................................................................ 18
Wake the System ......................................................................................................................................................................................18
Accessibility Features .............................................................................................................................................................................18
Users Who Are Deaf or Hard of Hearing .....................................................................................................................................18
Users Who Are Blind, Have Low Vision, or Have Limited Vision ..........................................................................................19
Users with Limited Mobility ............................................................................................................................................................ 19
Sharing Content ............................................................................................................................................................................................. 20
Share Content Using an HDMI Connection ..................................................................................................................................... 20
Using Device Mode ....................................................................................................................................................................................... 21
Computer and Cable Requirements for Device Mode ..................................................................................................................21
Access Device Mode ................................................................................................................................................................................21
Use Your System as a Computer Accessory .....................................................................................................................................21
Adjust the System Audio and Camera Settings in Device Mode ................................................................................................22
Managing Incoming Calls When in Device Mode ...........................................................................................................................22
Exit Device Mode and Disconnect Your Computer ....................................................................................................................... 22
Settings ............................................................................................................................................................................................................. 24
Cameras ...................................................................................................................................................................................................... 24
Adjust an In-Room Camera ..............................................................................................................................................................24
Turn Camera Tracking On or Off ................................................................................................................................................... 24
Audio Adjustments .................................................................................................................................................................................. 24
Adjust the Volume ..............................................................................................................................................................................24
Troubleshooting .............................................................................................................................................................................................25
Poly Device Mode .................................................................................................................................................................................... 25
Audio Levels are Too High or Low ................................................................................................................................................. 25
Conferencing Application Doesn’t Use System Camera or Audio ....................................................................................... 25
Can’t Use System’s Camera or Audio ........................................................................................................................................... 25
ii

Improve Audio Quality ......................................................................................................................................................................25
Improve Laptop Screen Mirroring ................................................................................................................................................. 26
iii

Before You Begin
The contains overview information, procedures, and references you can use to perform tasks with your video system.
The information in this guide applies to all the following Poly video systems and peripherals except where noted:
• Poly Bluetooth® Remote Control (model: P010)
• Poly IR Receiver (BW7650)
• Poly IR Remote (BW7600)
• Poly Microphone IP Adapter (model: P012)
• Poly IP Table Microphone (model: P013)
• Poly IP Ceiling Microphone (model: P014)
• Poly Studio X70 (model: P026)
• Poly Studio X50 (model: P017)
• Poly Studio X30 (model: P018)
• Poly Studio E70 (model: P025)
• Poly TC10 (P030)
• Poly TC8 (model: P020)
Audience, Purpose, and Required Skills
This guide is intended for beginning users, as well as intermediate and advanced users who want to learn how to use the
features available with system.
Related Poly and Partner Resources
See the following sites for information related to this product.
•Poly Support is the entry point to online product, service, and solution support information. Find product-specific
information such as Knowledge Base articles, Support Videos, Guide & Manuals, and Software Releases on the
Products page, download software for desktop and mobile platforms from Downloads & Apps, and access additional
services.
• The Poly Documentation Library provides support documentation for active products, services, and solutions. The
documentation displays in responsive HTML5 format so that you can easily access and view installation, configuration,
or administration content from any online device.
• The Poly Community provides access to the latest developer and support information. Create an account to access
Poly support personnel and participate in developer and support forums. You can find the latest information on
hardware, software, and partner solutions topics, share ideas, and solve problems with your colleagues.
• The Poly Partner Network is a program where resellers, distributors, solutions providers, and unified communications
providers deliver high-value business solutions that meet critical customer needs, making it easy for you to
communicate face-to-face using the applications and devices you use every day.
•Poly Services help your business succeed and get the most out of your investment through the benefits of
collaboration. Enhance collaboration for your employees by accessing Poly service solutions, including Support
Services, Managed Services, Professional Services, and Training Services.
• With Poly+ you get exclusive premium features, insights and management tools necessary to keep employee devices
up, running, and ready for action.
•Poly Lens enables better collaboration for every user in every workspace. It is designed to spotlight the health and
efficiency of your spaces and devices by providing actionable insights and simplifying device management.
4

Getting Started
Before you use your system, familiarize yourself with its features and local interface.
Poly Partner Mode Overview
Poly Partner Mode allows you to run third-party conferencing applications on supported Poly video systems. For example,
after powering on your system for the first time, you can select Zoom Rooms to place Zoom calls.
Refer to the supported partner documentation for information on using third-party applications:
•Microsoft Teams Rooms: https://support.office.com/en-us/teams
•Zoom Rooms: https://support.zoom.us/hc/en-us
•Google Meet: https://apps.google.com/meet/
•BlueJeans Rooms by Verizon: https://support.bluejeans.com/s/
•Dialpad: https://help.dialpad.com/
•GoToRoom by LogMeIn: https://support.goto.com/products
•RingCentral Rooms (RCV Rooms): https://support.ringcentral.com/
•Tencent: https://meeting.tencent.com/cloud-rooms.html
Navigating Your System
The system has icons and user screens to help you navigate and understand important information about your system.
When the system is running a partner application such as Teams Rooms or Zoom Rooms, the partner application provides
controls and a user interface specific to their application.
When you pair a Poly TC8 touch controller with your system, the partner application presents the system controls on the
TC8 touch controller.
Available system controls vary between partner applications.
Poly IR Remote Control Button Functions
When you connect a Poly IR receiver to your G7500 or Studio X system, you can use the Poly IR remote control to navigate
your system.
Note: The Poly IR Remote Control and Receiver are not a certified accessories for use in Microsoft Teams native mode.
Remote control functionality may be limited in other partner applications.
The following illustration and table show the buttons and functionality of the Poly IR remote control.
5

IR Remote Button Functions
Item Description Function
1 IR LED Sends IR signals to the IR receiver
2 Volume Increase or decrease the volume
3 Camera zoom Zoom the camera in or out
4 Navigation controls Navigate the user interface.
5 Select Select an item on the user interface or adjust a toggle
6 Back arrow Return to the previous screen
7 Menu In Poly Video mode only, show or hide the settings and camera
controls
8 Call Display the calls screen or answer an incoming call
9 End call End an active call or reject an incoming call
10 Dialpad Dial a number
11 Mute Mute or unmute the system microphones
Bluetooth Remote Control Button Functions
When you pair the Poly Bluetooth remote control with your G7500 or Studio X system, you can use the remote control to
navigate your system.
Note: The Poly Bluetooth remote control is not a certified accessory for use in Microsoft Teams native mode.
6

Remote control functionality may be limited in other partner applications.
The following illustration and table show the buttons and functionality of the Bluetooth remote control. The functionality
is specific to Poly Video mode.
IR Remote Button Functions
Item Description Function
1 Voice Assistant Feature planned for future use
2 Volume or zoom Adjust volume up and down or, in camera mode, zoom the camera
in or out
3 Navigation controls Navigate the screen
In camera mode, controls camera pan and tilt
4 Select Select an item on the user interface or adjust a toggle
5 Back arrow Return to the previous screen
6 Mute Mute the system microphones.
Long press to pair the remote control with the system
7 Keypad Dial a number.
Select camera presets while in a call in
8 Call button Display the calls screen or answer an incoming call
9 End call End an active call, reject an incoming call, or end a meeting
10 Menu Open the available system menu to access features
7

Item Description Function
11 Present content From the home screen, display the content help screen
In a meeting, open the content tray and select available content
to share
12 Layout Open the layout screen to choose how two or more participants
display on the screen
13 Voice Assistant Microphone Feature planned for future use
Enable TalkBack in Microsoft Teams Rooms
When you enable Talkback, you can navigate the Teams Rooms user interface using touch. As you navigate the interface,
the device announces the elements you navigate to or select.
Note: Talkback is disabled by default. If the device restarts, you'll need to reenable Talkback.
Task
1On the touch controller, select More > Settings > Device Settings > Accessibility.
2Enable Talkback.
Navigating Talkback in Microsoft Teams Rooms
Navigate the user interface by touch using a menu of available gestures. As you navigate the screen, the device announces
the item you select.
Note: Items in the Settings menu may appear below the screen. To access items below the screen, use two fingers to
scroll up or swipe right on the screen to go down the list.
Talkback Navigation
Touch Gesture Result
Swipe right Moves to the next user interface element and announces the
element name
Swipe left Moves to the previous user interface element and announces the
element name
Drag one finger around the screen Speaks the name of the user interface item or the onscreen text as
your finger moves over it
Double tap the screen Selects the user interface item currently in focus
Swipe down then left Returns to the main screen
Swipe up or down and right Opens the Talkback menu
Swipe up or down with two fingers Scrolls through menu items
Swipe down then left Return to the main screen
Using a Connected Trio in a Microsoft Teams Rooms Environment
Your Microsoft Teams Rooms solution may include one or two connected Poly Trio speakerphones. The Poly Trio
speakerphones are used as external speakers and microphones for your system.
8

From a connected Poly Trio in Microsoft Teams Rooms mode, you can:
• Mute or unmute the microphones
• Adjust the call volume
Product Overview of Poly Video Systems
Poly G7500, Studio X70, Studio X50, and Studio X30 systems in Partner Mode can seamlessly join meetings using third-
party conferencing applications.
Note: Exact features and capabilities can vary between partner applications. See the application’s documentation for
information.
Poly G7500 System Features and Capabilities on page 9
Poly Studio X70 Features and Capabilities on page 9
Poly Studio X50 Features and Capabilities on page 10
Poly Studio X30 Features and Capabilities on page 10
Poly Studio E70 Camera Overview on page 10
Administrator Features and Capabilities on page 11
Poly G7500 System Features and Capabilities
G7500 systems support the following features:
• Peripheral cameras and microphones make the system scalable for medium rooms and up to large integrated rooms
• Placing and joining video calls
• Sharing wireless and wired content
• Camera tracking technology that can automatically zoom in on the person talking or frame the group of people in the
room (depending on the paired camera and system configuration)
• Poly NoiseBlockAI, which eliminates background and extraneous sound during calls in common working environments
• Polycom Acoustic Fence technology, which enables video conferencing in open workspaces by capturing only the
voices in a defined area
• HDMI: Single input and dual output
• Using a wired or wireless USB mouse as an input device
Poly Studio X70 Features and Capabilities
Studio X70 systems support the following features:
• All-in-one collaboration system for medium-to-large rooms
• No need for a separate PC, laptop, or codec to run video-conferencing software
• Placing and joining video calls
• Sharing wireless and wired content
• Dual built-in 4K cameras
• Camera tracking technology that automatically frames the group of people in the room
• Hi-fidelity, built-in stereo microphones that pick up sound within 7.62 m (25 ft) and use spatial audio for life-like
presence and clarity
• Poly NoiseBlockAI, which eliminates background and extraneous sound during calls in common working environments
• HDMI: Single input and dual output
• Using a wired or wireless USB mouse as an input device
Poly Studio X70 Mounting Orientation
You can mount the Studio X70 above or below a display. The Studio X70 doesn't support inverted mounting. For
information on mounting the Studio X70, see the Studio X70 setup sheet.
9

Poly Studio X50 Features and Capabilities
Studio X50 systems support the following features:
• All-in-one collaboration system for huddle rooms and small-to-medium rooms
• No need for a separate PC, laptop, or codec to run video-conferencing software
• Placing and joining video calls
• Sharing wireless and wired content
• Built-in 4K camera with ultra-wide 120-degree field of view
• Camera tracking technology that automatically frames the group of people in the room
• Hi-fidelity, built-in stereo microphones that pick up sound within 7.62 m (25 ft) and use spatial audio for life-like
presence and clarity
• Poly NoiseBlockAI, which eliminates background and extraneous sound during calls in common working environments
• Dual stereo speakers
• HDMI: Single input and dual output
• Using a wired or wireless USB mouse as an input device
Poly Studio X50 Mounting Orientation
You can mount the Studio X50 above or below a display. The Studio X50 doesn't support inverted mounting. For
information on mounting the Studio X50, see the Studio X50 setup sheet.
Poly Studio X30 Features and Capabilities
Studio X30 systems support the following features:
• All-in-one collaboration system for huddle rooms and small-to-medium rooms
• No need for a separate PC, laptop, or codec to run video-conferencing software
• Placing and joining video calls
• Sharing wireless and wired content
• Built-in 4K camera with ultra-wide 120-degree field of view
• Camera tracking technology that automatically frames the group of people in the room
• High-fidelity, built-in stereo microphones that pick up sound within 4.57 m (15 ft) and use spatial audio for life-like
presence and clarity
• Poly NoiseBlockAI, which eliminates background and extraneous sound during calls in common working environments
• Single mono speaker
• HDMI: Single input and output
• Using a wired or wireless USB mouse as an input device
Poly Studio X30 Mounting Orientation
You can mount the Studio X30 above or below a display. The Studio X30 supports inverted mounting. For information on
mounting the Studio X30, see the Studio X30 setup sheet.
Poly Studio E70 Camera Overview
Poly Studio E70 is a dual-camera solution supported on Poly G7500 and Studio X50 systems running Poly VideoOS 3.6 or
later.
The Poly Studio E70 camera is a standalone USB 4K camera that with full tracking and framing capabilities. The Studio E70
camera provides coverage up to 7.6 m (25 ft).
Microphones in the Studio E70 camera provide accurate sound source location to support camera tracking.
10

Administrator Features and Capabilities
The G7500 and Studio X Family systems provide features for administrators to deploy, manage, and access systems.
These systems provide the following features and capabilities:
• Remote access for managing standalone systems
• Provisioning with Poly Clariti Manager to support single system, small business, and large multisite enterprise
deployments
• SNMP reporting and remote logging
• Industry-standard security techniques, including 802.1X authentication
Overview of System Hardware
The figures and tables in the following topics provide information about hardware features available on your system.
Poly G7500 Hardware
The following figure displays the hardware features on the Poly G7500 system. The table lists each feature numbered in
the figure.
Poly G7500 Feature Descriptions
Ref. Number Feature Feature Description
1 Reset button Resets the Poly G7500 to the factory software version
2 LED indicator Indicates the system status
3 Remote control pairing button Enables the Bluetooth remote control pairing mode
4 Restart button Restarts your system
Poly Studio X70 Hardware
The following figure displays the hardware features on the Poly Studio X70 system. The table lists each feature numbered
in the figure.
11

Ref. Number Feature Description
1 Screen Protective screen that covers the front of
the system
2 Microphone array Microphone array that captures audio
3 Speakers Stereo audio output
4 Dual cameras Camera array with a privacy shutter that
automatically opens or closes, depending
on the camera state
5 LED indicators Indicates the system status and
information on the tracked speaker
Poly Studio X70 Privacy Shutter Behavior
The privacy shutter automatically opens and closes depending on the state of the connected video system.
Note: Shutter behavior may vary depending on the partner application.
Poly Studio X70 Privacy Shutter Behavior
System Event Shutter Behavior
The system powers on Shutters open
The system powers off Shutters close
Note: If you remove power immediately, the shutters don't close.
The system enters sleep mode or digital signage starts and the
Camera Sleep Setting is set to Save Energy
Shutters close
The system enters sleep mode or digital signage starts and
Camera Sleep Setting is set to Fast Wake
Shutters remain open
Note: When Fast Wake is set, the shutters never close.
You wake the system Shutters open
You wake the system and the Studio X70 built-in camera isn’t the
primary camera
Shutters remain closed
12

System Event Shutter Behavior
You select the Studio X70 built-in camera as the primary camera Shutters open
The system receives an incoming call If the shutters are closed, they remain closed until the call is
answered
The system is sending video Shutters are open
The system is in an active call and the video is muted Shutters are open
Poly Studio X50 Hardware
The following figure displays the hardware features on the Poly Studio X50 system. The table lists each feature numbered
in the figure.
Poly Studio X50 Feature Descriptions
Ref. Number Feature Feature Description
1 Screen Protective screen that covers the front of your system
2 Microphone array Microphone array that captures audio
3 Camera Camera with a privacy cover that enables or disables the video
input as you choose
4 Speakers Stereo audio output
5 LED indicators Indicates the system status and information on the tracked
speaker
Poly Studio X30 Hardware
The following figure displays the hardware features on the Poly Studio X30 system. The table lists each feature numbered
in the figure.
13

Poly Studio X30 Feature Descriptions
Ref. Number Feature Feature Description
1 Microphone array Microphone array that captures audio
2 LED indicators Indicates the system status and information on the tracked
speaker
3 Camera Camera with a privacy cover that enables or disables the video
input as you choose
4 Speaker Mono audio output
Poly Studio X50 and Studio X30 Privacy Cover
The Poly Studio X50 and Studio X30 systems provide a physical cover that you can place over the camera lens to protect
your privacy.
Poly Studio E70 Camera Hardware
The following figure displays the hardware features on the Poly Studio E70 camera.
14

Poly Studio E70 Feature Descriptions
Reference Number Feature Description
1 Dual-cameras Camera array with a privacy shutter that
automatically opens or closes depending
on the camera state
2 LED indicators Front and right indicators that show the
status of the camera
Poly Studio E70 Privacy Shutter Behavior
The privacy shutter automatically opens and closes depending on the state of the connected video system.
Note: Shutter behavior may vary depending on the partner application.
System Event Shutter Behavior
The system powers on Shutters open
The system powers off Shutters close
Note: If you remove power immediately, the shutters don't close.
The system enters sleep mode or digital signage starts and the
Camera Sleep Setting is set to Save Energy
Shutters close
The system enters sleep mode or digital signage starts and
Camera Sleep Setting is set to Fast Wake
Shutters remain open
Note: When Fast Wake is set, the shutters never close.
You wake the system Shutters open
You wake the system and the Studio E70 isn’t the primary camera Shutters remain closed
You select the Studio E70 as the primary camera Shutters open
The Studio E70 isn't the primary camera and is idle for five
minutes
Shutters close
The system receives an incoming call If the shutters are closed, they remain closed until the call is
answered
The system is sending video Shutters are open
The system is in an active call and the video is muted Shutters are open
LED Status Indicators
The following topics list the LED behavior for your system. The tables list each LED indicator and its associated status.
LED Status Indicators for the G7500 System on page 16
LED Status Indicators for the Studio X70 System on page 16
LED Status Indicators for Studio X50 and Studio X30 Systems on page 17
LED Status Indicators for the Studio E70 Camera on page 17
15

LED Status Indicators for the G7500 System
Use the LED on the front right corner of the codec to get information on the state of your system.
G7500 System LED Status Indicators
Indicator Status
Blinking white Powering on
Solid white Working normally
Solid green In a call
Blinking amber Update in progress
Solid amber Sleeping
Blinking red Error preventing normal operation
Solid red Muted microphone
LED Status Indicators for the Studio X70 System
Use the LED on the right side of the system to help you understand the system's behaviors.
Basic Studio X70 LED Indicators and Status
Indicator Status
Solid white Device is idle and standing by
Pulsing white Boot initiation in progress
Pulsing amber Firmware update or factor restore in progress
Blinking blue and white Bluetooth pairing
Solid blue Bluetooth paired
16

Indicator Status
Solid green Active call in progress
Solid red Audio mute
LED Status Indicators for Studio X50 and Studio X30 Systems
The system provides an LED light bar above the camera to help you understand the system’s behaviors.
LED Status Indicators for Studio X50 and Studio X30 Systems
Indicator Position Status
Solid white All Boot initialization in progress
Blinking blue Twelve in the middle Bluetooth in discovery
Solid blue for 3 seconds All Bluetooth paired
Blinking green All Incoming call
Solid green All Outgoing call
Solid green Four to eight (when in the middle),
indicating the tracked speaker or the
direction of the camera
Working
The lights are green with supported
applications in the following cases:
• Tracking people in group framing and
speaker tracking mode
• Indicating the direction of the camera
that you customize in pan-tilt-zoom
(PTZ) mode
Solid amber Twelve in the middle Standing by
System in sleep mode with no active video
output
Pulsing red Twelve in the middle Call on hold
Pulsing green Twelve in the middle Call on hold (by far site)
Solid white for 3 seconds Twelve in the middle Saving a preset
Solid red All Muted microphone
Solid red Four in the middle Muted camera
Muted microphone LEDs take precedence
over camera mute LEDs
Pulsing amber All Firmware update in progress
Blinking red All Error preventing normal operation
LED Status Indicators for the Studio E70 Camera
The camera provides LED indicators on the front and right side of the camera to help you understand the camera’s
behaviors when connected to a G7500 or a Studio X50 video system.
17

Studio E70 Camera System LED Status Indicators
Indicator Status
Pulsing white Boot initialization is in progress
Solid white (50% brightness) Powered on but disconnected from video system
Sleep mode
Solid white (100% brightness) Powered on and connected to the video system
Solid green In a call or the camera is active
Pulsing amber Firmware update or factory reset in progress
Powering the System On and Off
The system powers on when you plug it in to a power source.
Note: Poly recommends the following when powering off or restarting your system:
• Don’t restart or power off the system during maintenance activities (for example, while a software update is in
progress).
• If a system restart is necessary, use the system web interface, RestAPI, Telnet, or SSH. If possible, avoid using the
power cable to restart the system.
Wake the System
After a period of no activity, the system enters sleep mode (if configured by your administrator). You can wake it using a
touch monitor or Poly TC8.
Task
»Do one of the following:
• If you’re using a touch monitor, tap the primary screen.
• If you’re using the TC8, tap the screen.
• If you’re using a Poly Trio, tap the screen.
Accessibility Features
Poly products include a number of features to accommodate users with disabilities.
Users Who Are Deaf or Hard of Hearing
Your system includes accessibility features so that users who are deaf or hard of hearing can use the system.
The following table lists the accessibility features for users who are deaf or hard of hearing.
Accessibility Features for Users Who Are Deaf or Hard of Hearing
Accessibility Feature Description
Visual notifications Status and icon indicators let you know when you have incoming, outgoing, active, or
held calls. Indicators also alert you of the device’s status and when features are
enabled.
Status indicator lights The system LEDs to indicate some statuses, including if your microphones are muted.
18

Accessibility Feature Description
Adjustable call volume While in a call, you can raise or lower the volume of the device.
Auto-answering You can enable the system to auto-answer calls.
Users Who Are Blind, Have Low Vision, or Have Limited Vision
Your system includes accessibility features so that users who are blind, have low vision, or have limited vision can use the
system.
The following table lists the accessibility features for users who are blind, have low vision, or have limited vision.
Accessibility Features for Users Who Are Blind, Have Low Vision, or Have Limited Vision
Accessibility Feature Description
Auto-answering You can enable the system to auto-answer calls.
Visual notifications Status and icon indicators let you know when you have incoming, outgoing, active, or
held calls. Indicators also alert you of the device’s status and when features are
enabled.
Users with Limited Mobility
Your system includes accessibility features so that users with limited mobility can use various system features.
The following table lists the accessibility features for users with limited mobility.
Accessibility Features for Users with Limited Mobility
Accessibility Feature Description
Auto-answering You can enable the system to auto-answer calls.
Calling from a personal device With administrator credentials, you can wirelessly access the system web interface
from your own device to make calls and manage contacts and favorites.
19

Sharing Content
To enhance the collaboration experience, you can share documents, graphics, and videos with other participants using a
computer.
Share Content Using an HDMI Connection
Share content from your device through an HDMI connection. This method doesn’t require you to connect using a wireless
service.
Task
»Connect your device to the video system’s HDMI input port.
20
Other manuals for Studio X Series
1
This manual suits for next models
5
Table of contents
Other Poly Conference System manuals
Popular Conference System manuals by other brands

Clear One
Clear One MAX IP Response Point Administrator's guide

Clear One
Clear One COLLABORATE Live 300 quick start guide

Clear One
Clear One XAP 800 Installation and operation manual

BZB Gear
BZB Gear BG-AIOE-KIT manual

Clear One
Clear One V-There 2000 Installation & operation manual

Comfort audio
Comfort audio DC20 Instructions for use