Ricoh Aficio FT4027 User manual

INTRODUCTION
This manual contains detailed instructions on the operation and mainte-
nance of this copier. To get maximum versatility from this copier, all
operators should carefully read and follow the instructions in this manual.
Please keep this manual in a handy place near the machine.
Please read the next section before using this copier. It contains important
information related to USER SAFETY and PREVENTING EQUIPMENT
PROBLEMS.
SAFETY INFORMATION
When using your copier, the following safety precautions should always be
followed.
Safety During Operation
In this manual, all safety messages are identified by the words "WARNING"
and "CAUTION". These words mean the following:
WARNING: Important information to alert you to a situation that might cause
serious injury and damage to your property if instructions are not
followed.
CAUTION: Important information that tells how to prevent damage to equipment,
or how to avoid a situation that might cause minor injury.
WARNINGS:
Since some parts of the copier are supplied with high electrical voltage, touch
only the parts specified in this manual.
Do not modify or replace any parts other than the ones specified in this manual.
Do not incinerate toner or toner containers. Toner dust might ignite when
exposed to open flames.
Do not store toner where it will be exposed to heat.
f-eu-1
i

Do not eat or swallow toner, and keep it out of reach of children.
The fusing section can be very hot. Be careful when handling it.
CAUTIONS:
While copying, do not turn off the main switch.
While copying, do not open the front cover.
While copying, do not lift the platen cover, or the optional document feeder.
While copying, do not unplug the power cord.
Do not lay anything weighing more than 10 kg on the exposure glass.
Do not place tools or other hard objects on the exposure glass.
Keep corrosive liquids, such as acid, off the machine.
Do not allow paper clips, staples, or other small metallic objects to fall inside the
machine.
General Safety Information
S
Always turn the copier off when you have finished copying for the day, but leave
it plugged in.
S
When the copier will not be used for a long period, disconnect the power cord.
S
If the copier must be transported by vehicle, please contact your service repre-
sentative.
S
When the main switch is in the Stand-by position, the optional anticondensation
heaters are on. In case of emergency, unplug the machine’s power cord.
S
To disconnect the power source, the main plug must be pulled.
f-eu-1
ii

WHERE IS IT
& WHAT IS IT
f-eu-2
1

MODELS
Basic
Two 250-sheet trays
With 1000-sheet large capacity tray
Two 250-sheet trays
A 1000-sheet large capacity tray
With 1000-sheet large capacity tray and unit for two-
sided copying
A 250-sheet tray
A 1000-sheet large capacity tray
A unit for two-sided copying
f-eu-2
250-sheet tray
250-sheet tray
250-sheet tray
unit for two-
sided copying
1000-sheet
large capacity
tray
250-sheet tray
250-sheet tray
1000-sheet
large capacity
tray
MODELS
2

OPTIONS
This copier can be provided with the following options:
S
Other options: Platen cover (in some areas), key counter
*These options require the optional sorter adapter.
f-eu-2
Document feeder
1000-sheet tray unit (two
500-sheet trays)
20-bin sorter*
20-bin sorter stapler*
10-bin sorter stapler*
500-sheet tray unit (two
250-sheet trays)
10-bin sorter
OPTIONS
3

COPIER EXTERIOR AND INTERIOR
f-eu-2
4
6
5
7
2
1
3
12
13 8
9
*10, *11
14
15
COPIER EXTERIOR AND INTERIOR
4

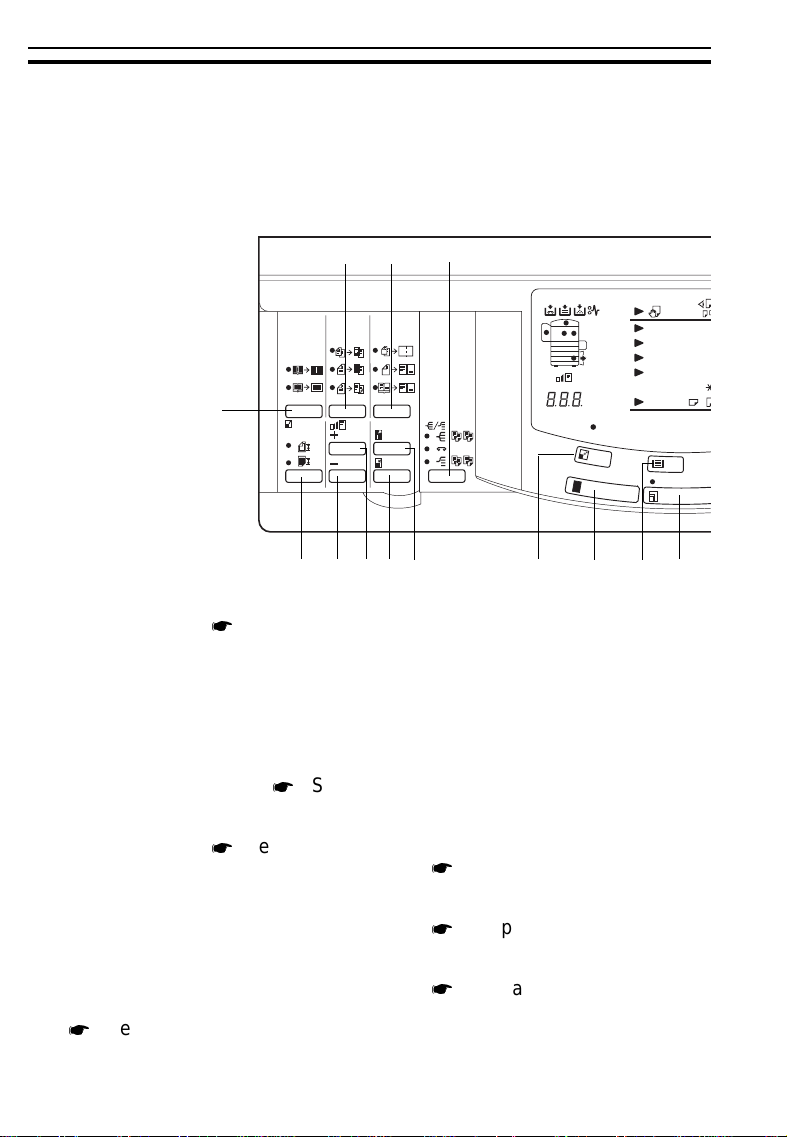
1. Operation panel Operator controls and indicators are located here.
2. Left scale Use to align originals on the exposure glass.
3. Platen cover
(option in some areas) Lower this cover over originals for copying.
4. Exposure glass Position originals here face down for copying.
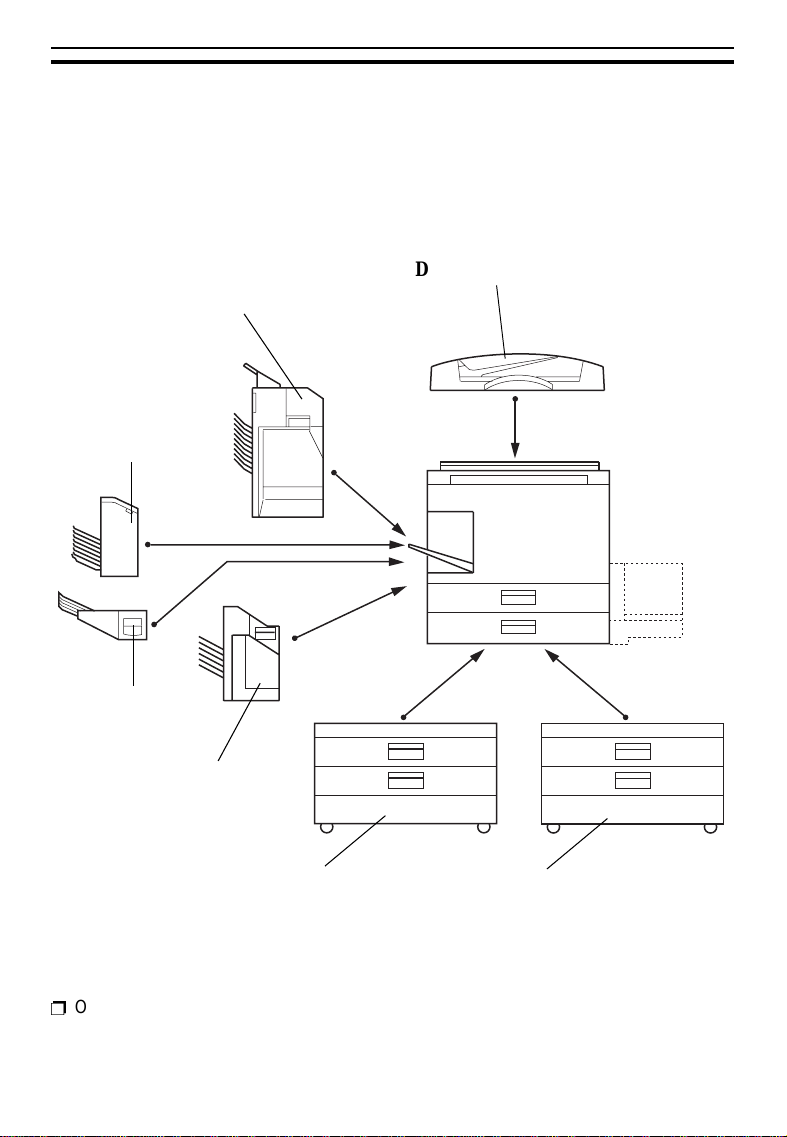
5. Bypass feed table Use to copy onto OHP sheets, adhesive labels,
translucent paper, and post cards.
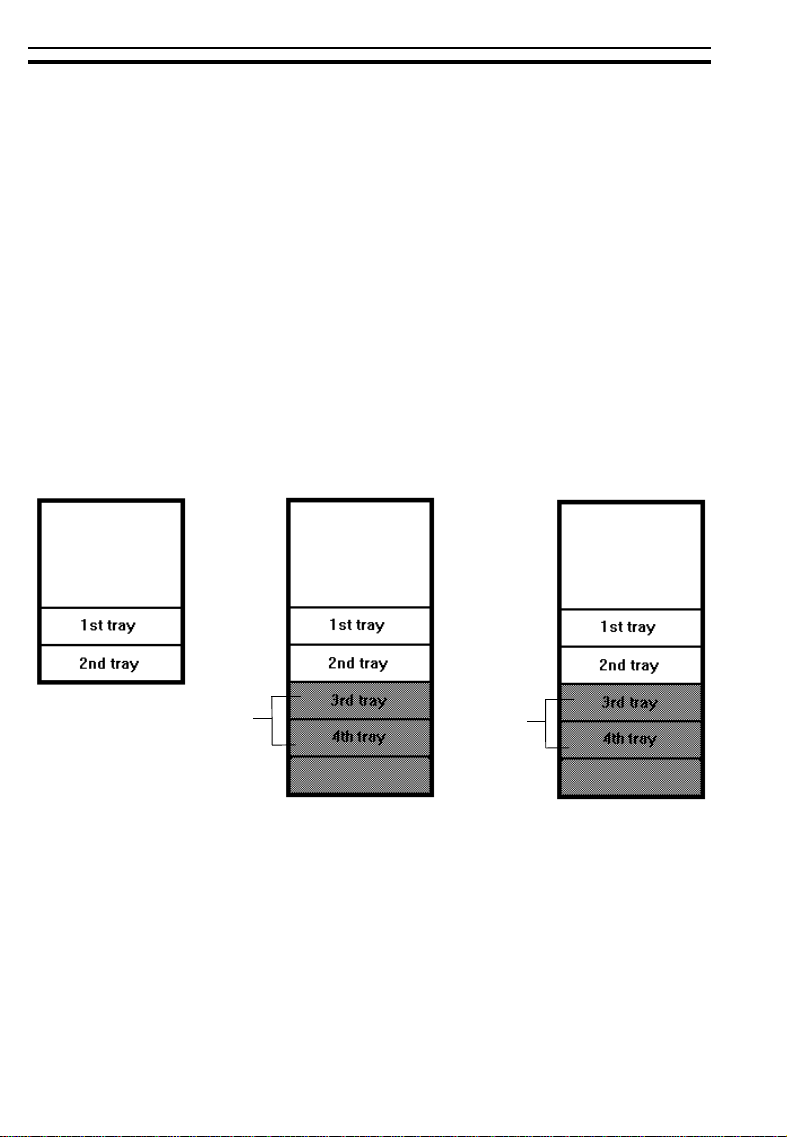
6. 1000-sheet large
capacity tray This tray can hold 1,000 sheets of copy paper.
Two of three models have this tray. (
See
page 2.)
7. Key counter holder Insert the optional key counter here.
8. Front cover Open to access the inside of the copier.
9. 250-sheet tray This tray can hold 250 sheets of copy paper.
*10. 250-sheet tray This tray can hold 250 sheets of copy paper. The
model with a unit for two-sided copying does not
have this tray. Instead, it has the unit for two-
sided copying (*11).
*11. Unit for two-sided
copying This unit is used to make two-sided copies.
12. Main switch Switches the copier between on and stand-by
conditions. ("stand-by" means that the anticon-
densation heaters are on.)
13. Copy tray Completed copies are delivered here.
14. Toner Bottle Replace the toner bottle when the Add Toner
indicator is lit or blinking.
15. Fusing Unit Fuses the copy image to the paper. When ac-
cessing the inside of the copier, use caution.
This unit may be very hot.
f-eu-2
COPIER EXTERIOR AND INTERIOR
5

PAPER TRAYS
Each 250-sheet or 500-sheet tray’s name changes depending on what kind
of copier and optional paper tray unit you have. Find your copier among the
illustrations below and on the next page. Then, when you find paper tray’s
name (ex. 1st tray) in this manual, confirm which paper tray is pointed in the
case of your copier.
f-eu-2
With optional 500-
sheet tray unit
Basic
250 sheets
for each
tray
With optional 1000-
sheet tray unit
500 sheets
for each
tray
PAPER TRAYS
6

f-eu-2
With large capac-
ity tray
large capacity tray
(LCT)
With large capac-
ity tray and op-
tional 500-sheet
tray unit
LCT
250 sheets
for each
tray
With large capac-
ity tray and op-
tional 1000-sheet
tray unit
LCT
500 sheets
for each
tray
With large capac-
ity tray and unit for
two-sided copying
LCT
With large capac-
ity tray, unit for two-
sided copying,
and optional 500-
sheet tray unit
LCT
250 sheets
for each
tray
With large capac-
ity tray, unit for two-
sided copying,
and optional 1000-
sheet tray unit
LCT
500 sheets
for each
tray
PAPER TRAYS
7

OPERATION PANEL
Keys 1
Basic & With 1000-sheet Large Capacity Tray
f-eu-2
1. Program key
See page
70.
2. Clear Modes/Energy Saver key
Press to clear the copier of
previously entered settings.
Press this key for more than 1
second to enter/exit the En-
ergy Saver mode.
See
pages 39 and 85.
3. Interrupt key
See pages
47 and 48.
4. Recall/Enter key
Use to enter data.
5. Start key
Press to start copying.
Use to set the Auto Start.
See page 53.
6. Clear/Stop key
Press to cancel the copy num-
ber entered. While copying,
press to stop copying. This key
is also used to clear data.
7. Number keys
Use to enter the desired num-
ber of copies. They are also
used to enter data.
8. Lighter and Darker keys
See page 41.
9. Auto Image Density key
See page 41.
10. Auto Paper Select key
See page 42.
mm
(10Key + #)
1
2
100
1
B
2
3
4
mm
%
A
P
R
Y
1
2
3
4
T
A3
B4
A4
F
A5
T
19
18 17 16 15 14 13 12 11 10
20 21 22
OPERATION PANEL
8

f-eu-2
11. Paper Selection key
See page 40.
12. Full Size key
See page 40.
13. Auto Reduce/Enlarge key
See page 44.
14. Enlarge key
See page 49.
15. Reduce key
See page 49.
16. Zoom Up key
Enlarges in 1% steps.
See
page 50.
17. Zoom Down key
Reduces in 1% steps.
See
page 50.
18. Size Magnification key
Copier sets the magnification
for your paper and original
sizes.
See page 51.
or
10 Key Zoom key
See
page 50.
19. Erase key
See page 66.
or
Margin Adjustment key
See page 68.
20. Cover/Slip Sheet key
See pages 59 ~ 65.
21. Single Copies key
See pages 54 ~ 58.
22. Sorter key (option)
See pages 77 ~ 83.
1
4
7
2
5
8
0
3
6
9
R/#
C
C
Max
A3
B4
A4
F
A5
1 2
9 8 7 6
3
4
5
OPERATION PANEL
9

Indicators 1
Basic & With 1000-sheet Large Capacity Tray
f-eu-2
1. Ready indicator
See page
38.
2. Wait indicator
See page
38.
3. Energy Saver indicator
See pages 39 and 85.
4. Copy Counter
Indicates the number of cop-
ies.
Data display.
See pages 91
and 118.
5. Max indicator
See page
93.
6. Manual Image Density indi-
cator
See pages 41 and 93.
7. Auto Reduce/Enlarge indica-
tor
See page 44.
8. Three Digit indicator
Data display.
9. Zoom indicator
Lights when you use the Zoom
function.
1
B
2
3
4
mm
%
A
P
R
Y
1
2
3
4
T
A3
B4
A4
F
A5
T
10
9
8
7
11 12 13 14 15 16
OPERATION PANEL
10

f-eu-2
10. Misfeed Location display
See page 101.
11. Add Staple indicator
See
pages 90 and 99.
12. Load Paper indicator
See pages 90 and 95.
13. Add Toner indicator
See
pages 90 and 98.
14. Check Paper Path indicator
See pages 90 and 101.
15. Paper Size indicators
Show the selected feed sta-
tion, copy paper size, and di-
rection.
16. Bypass Feed indicator
See page 46.
17. Check Paper Size/Direction
indicator
See page 93.
18. Check Paper Size indicator
See page 92.
Max
A3
B4
A4
F
A5
17 18
1
2
3
4
5
6
OPERATION PANEL
11

Keys 2
With 1000-sheet Large Capacity Tray And
Unit For Two-sided Copying
f-eu-2
1. Program key
See page 70.
2. Clear Modes/Energy Saver key
Press to clear the copier of
previously entered settings.
Press this key for more than 1
second to enter/exit the Energy
Saver mode.
See pages 39
and 85.
3. Interrupt key
See pages
47 and 48.
4. Recall/Enter key
Use to enter data in selected
mode.
5. Start key
Press to start copying.
Use to set the Auto Start.
See page 53.
6. Clear/Stop key
Press to cancel the copy num-
ber entered. While copying,
press to stop copying. This key
is also used to clear data.
7. Number keys
Use to enter the desired num-
ber of copies. They are also
used to enter data.
8. Lighter and Darker keys
See page 41.
9. Auto Image Density key
See page 41.
10. Auto Paper Select key
See page 42.
1
2
100
2
2
11
2
111
2
2
2
mm
(10Key + #)
1
B
2
3
T
mm
%
A
P
C
R
Z
Y
1
2
3
T
A3
B4
A4
F
A5
19
18 17 16 15 14 23 13 12 11 10
20 21 22
OPERATION PANEL
12

f-eu-2
11. Paper Selection key
See page 40.
12. Full Size key
See page 40.
13. Auto Reduce/Enlarge key
See page 44.
14. Enlarge key
See page 49.
15. Reduce key
See page 49.
16. Zoom Up key
Enlarges in 1% steps.
See
page 50.
17. Zoom Down key
Reduces in 1% steps.
See
page 50.
18. Size Magnification key
Copier sets the magnification
for your paper and original
sizes.
See page 51.
or
10 Key Zoom key
See
page 50.
19. Erase key
See page 66.
or
Margin Adjustment key
See page 68.
20. Cover/Slip Sheet key
See pages 59 ~ 65.
21. Single Copies key
See
pages 54 ~ 58.
22. Duplex key
See pages 73 ~ 76.
23. Sorter key (option)
See pages 77 ~ 83.
1
4
7
2
5
8
0
3
6
9
R/#
C
C
Max
A3
B4
A4
F
A5
2
1 2
9 8 7 6
3
4
5
OPERATION PANEL
13

Indicators 2
With 1000-sheet Large Capacity Tray And
Unit For Two-sided Copying
f-eu-2
1. Ready indicator
See page
38.
2. Wait indicator
See page
38.
3. Energy Saver indicator
See pages 39 and 85.
4. Copy Counter
Indicates the number of cop-
ies.
Data display.
See pages 91
and 118.
5. Max indicator
See page
93.
6. Manual Image Density indi-
cator
See pages 41 and 93.
7. Auto Reduce/Enlarge indica-
tor
See page 44.
8. Three Digit indicator
Data display.
9. Zoom indicator
Lights when you use the Zoom
function.
1
B2
3
T
mm
%
A
P
C
R
Z
Y
1
2
3
T
A3
B4
A4
F
A5
10
9
8
7
11 12 13 14 15 16
OPERATION PANEL
14

f-eu-2
10. Misfeed Location display
See page 101.
11. Add Staple indicator
See
pages 90 and 99.
12. Load Paper indicator
See pages 90 and 95.
13. Add Toner indicator
See
pages 90 and 98.
14. Check Paper Path indicator
See pages 90 and 101.
15. Paper Size indicators
Show the selected feed sta-
tion, copy paper size, and di-
rection.
16. Bypass Feed indicator
See page 46.
17. Check Paper Size/Direction
indicator
See page 93.
18. Check Paper Size indicator
See page 92.
19. Second Original indicator
See pages 93.
Max
A
3
B
4
A
4
F
A
5
2
17 18 19
1
2
3
4
5
6
OPERATION PANEL
15

f-eu-2
OPERATION PANEL
16

WHAT YOU CAN DO
WITH THIS COPIER
F-EU-3
17

FUNCTIONS
Auto image density
Manual image density
Having the copier choose the paper size
Having the copier choose the reproduction ratios
Copying from the bypass feed table
Temporarily stopping one job to copy something else
F-EU-3
See page 42.
See page 44.
See page 45.
See page 47.
See page 41.
See page 41.
FUNCTIONS
18
This manual suits for next models
67
Table of contents
Other Ricoh Copier manuals

Ricoh
Ricoh Pro 8100S User manual

Ricoh
Ricoh Aficio 2035 User manual

Ricoh
Ricoh D069 Quick start guide

Ricoh
Ricoh D037 User manual

Ricoh
Ricoh MP C4504 series Guide

Ricoh
Ricoh DSc535 User instructions

Ricoh
Ricoh Aficio MP 171 Quick start guide

Ricoh
Ricoh MP 1813L User manual

Ricoh
Ricoh 7650 User manual

Ricoh
Ricoh Pro C550EX User manual

Ricoh
Ricoh B125 User manual

Ricoh
Ricoh 5490 User manual

Ricoh
Ricoh Ml0 User manual

Ricoh
Ricoh FW740 User manual

Ricoh
Ricoh FT4220 Installation guide

Ricoh
Ricoh Aficio DSm616 User manual

Ricoh
Ricoh MP C2004 series Instruction sheet

Ricoh
Ricoh A220 User manual

Ricoh
Ricoh Pro C720s User manual

Ricoh
Ricoh B089 User manual