Ricoh D5510 User manual

D5510
Quick Start Guide

Contents
Screen Layout ................................................................................................................................................ 2
1. General .................................................................................................................................................... 3
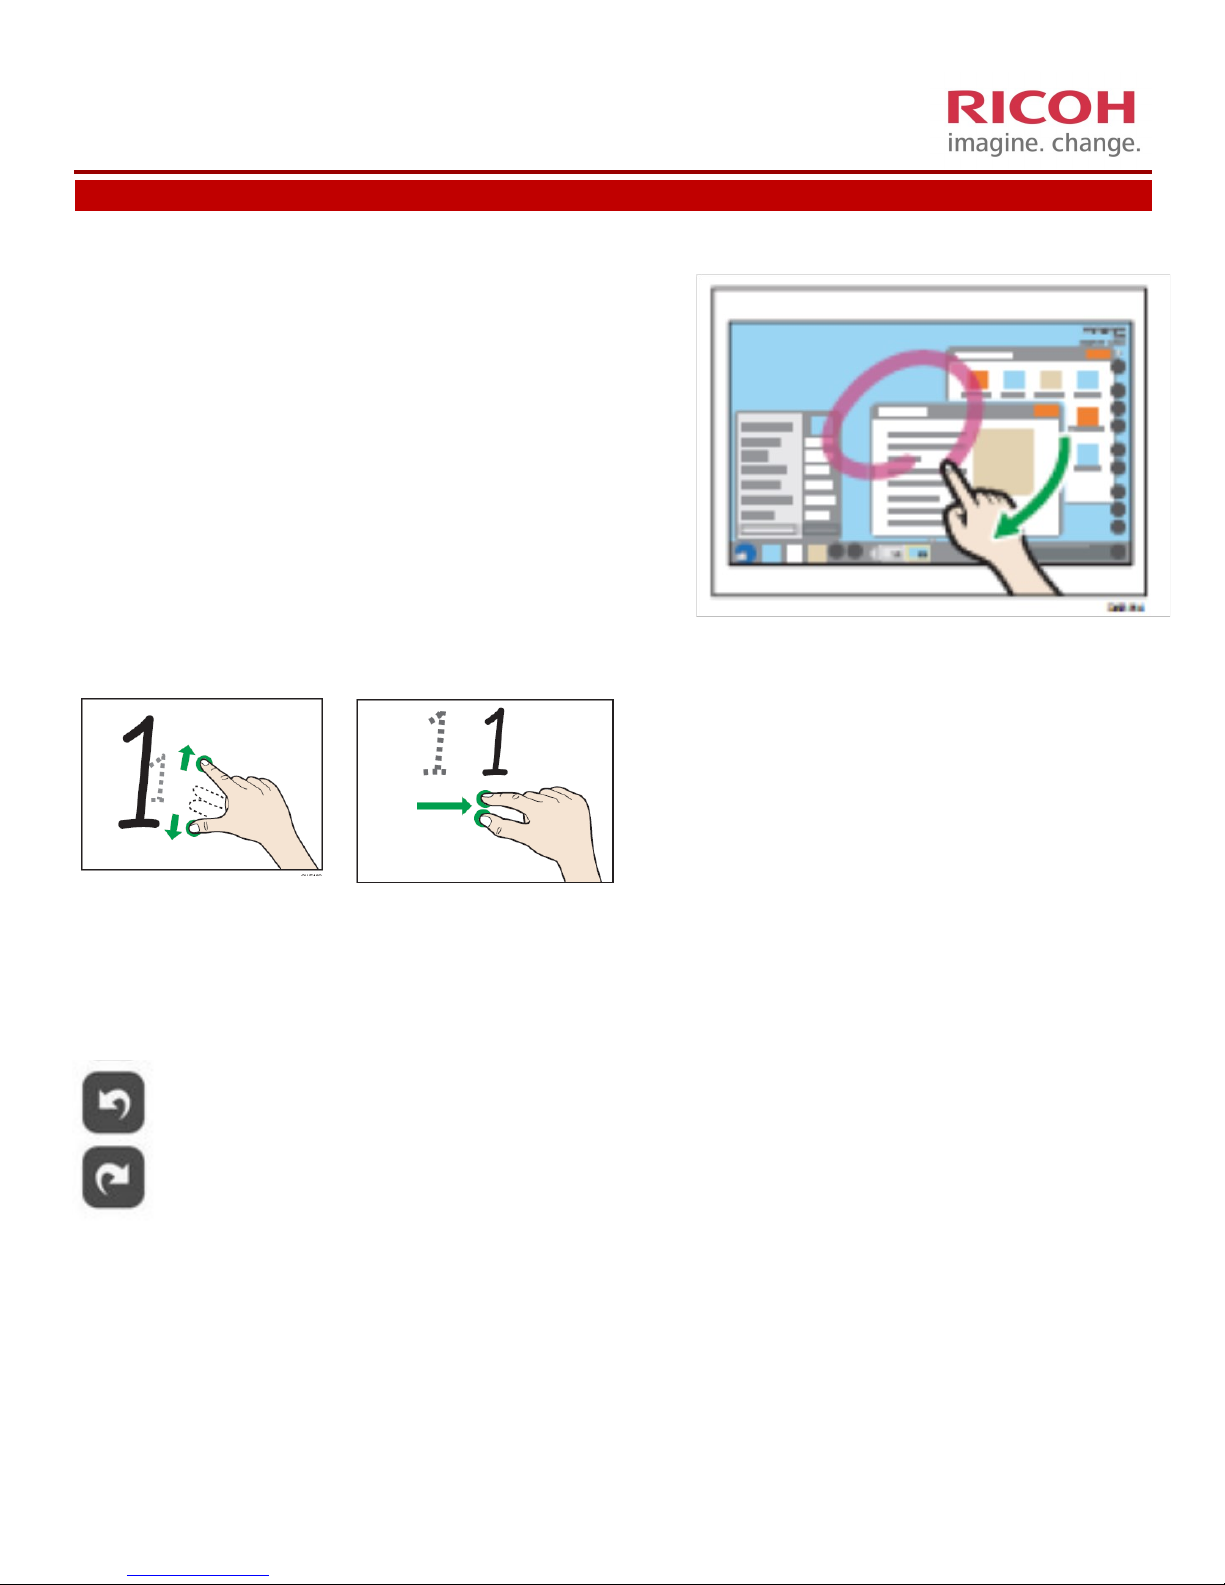
A. Using Finger to Highlight Screen ......................................................................................................... 4
B. Using Fingers to Zoom in or Move Image............................................................................................ 5
C. Undo / Redo......................................................................................................................................... 6
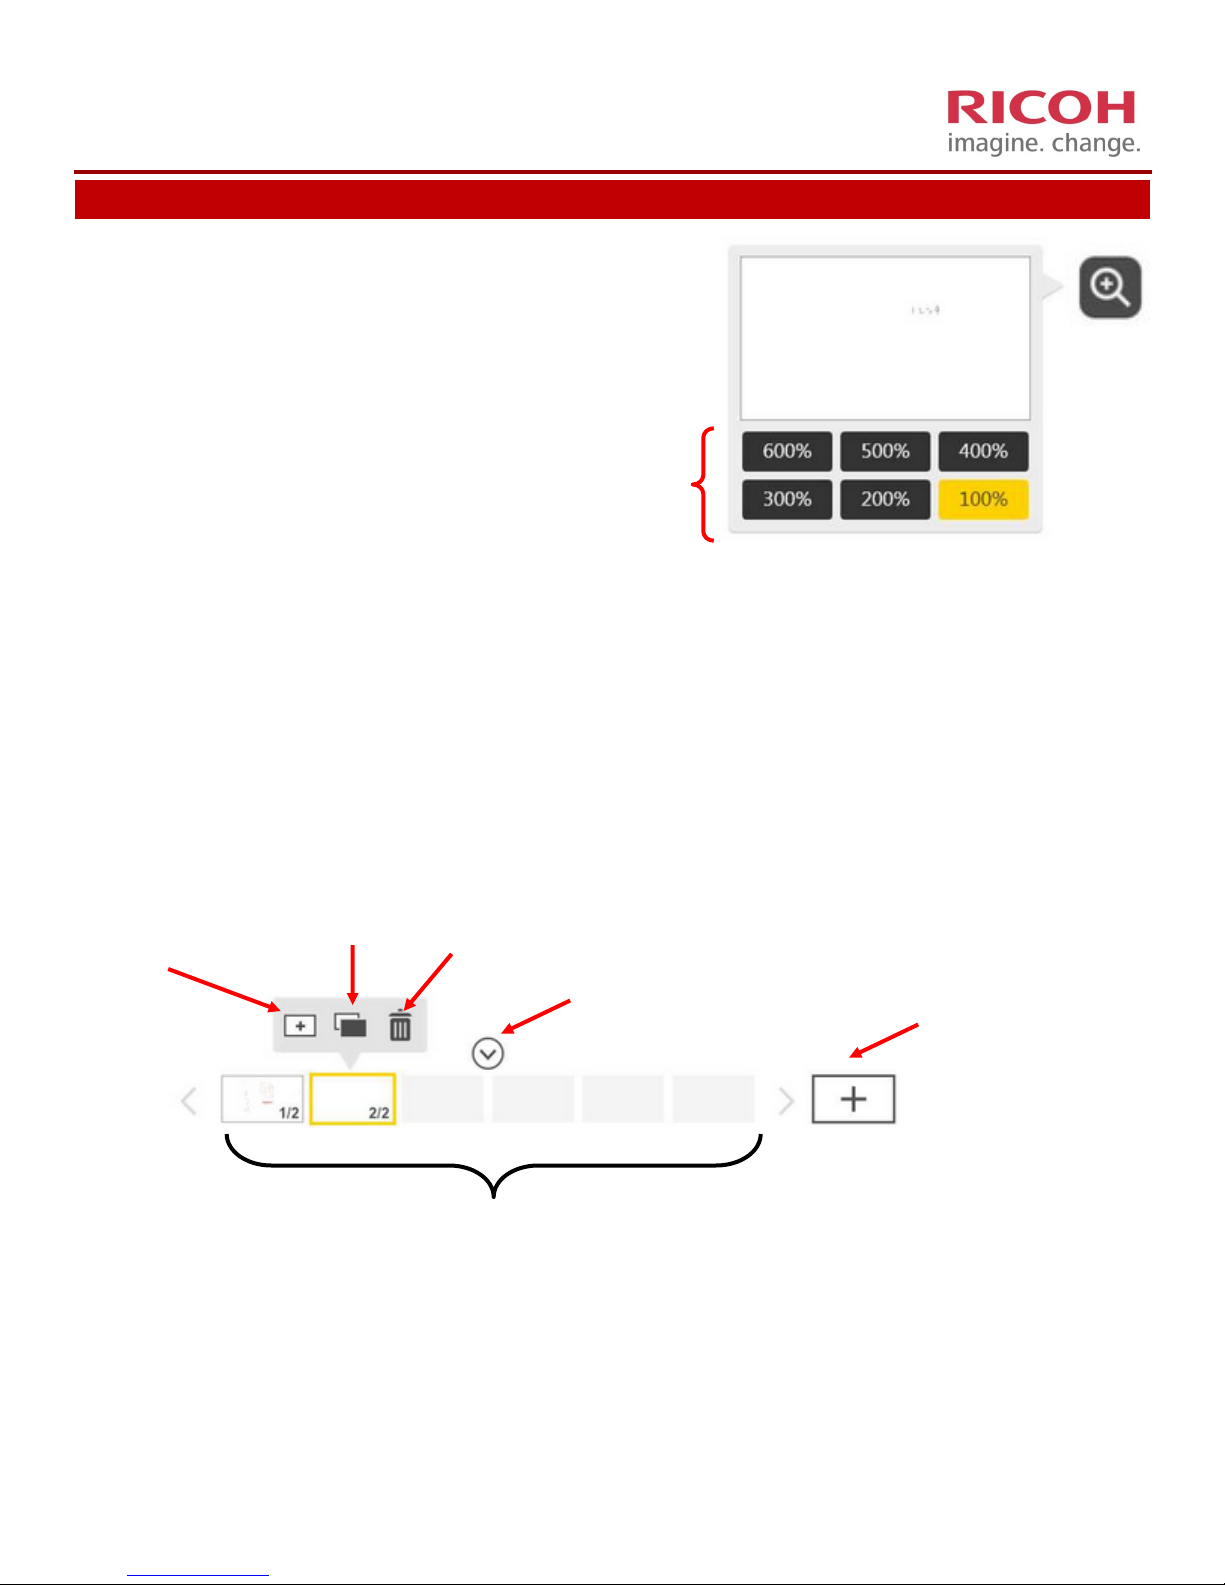
D. Magnify................................................................................................................................................ 5
E. Page management ............................................................................................................................... 5
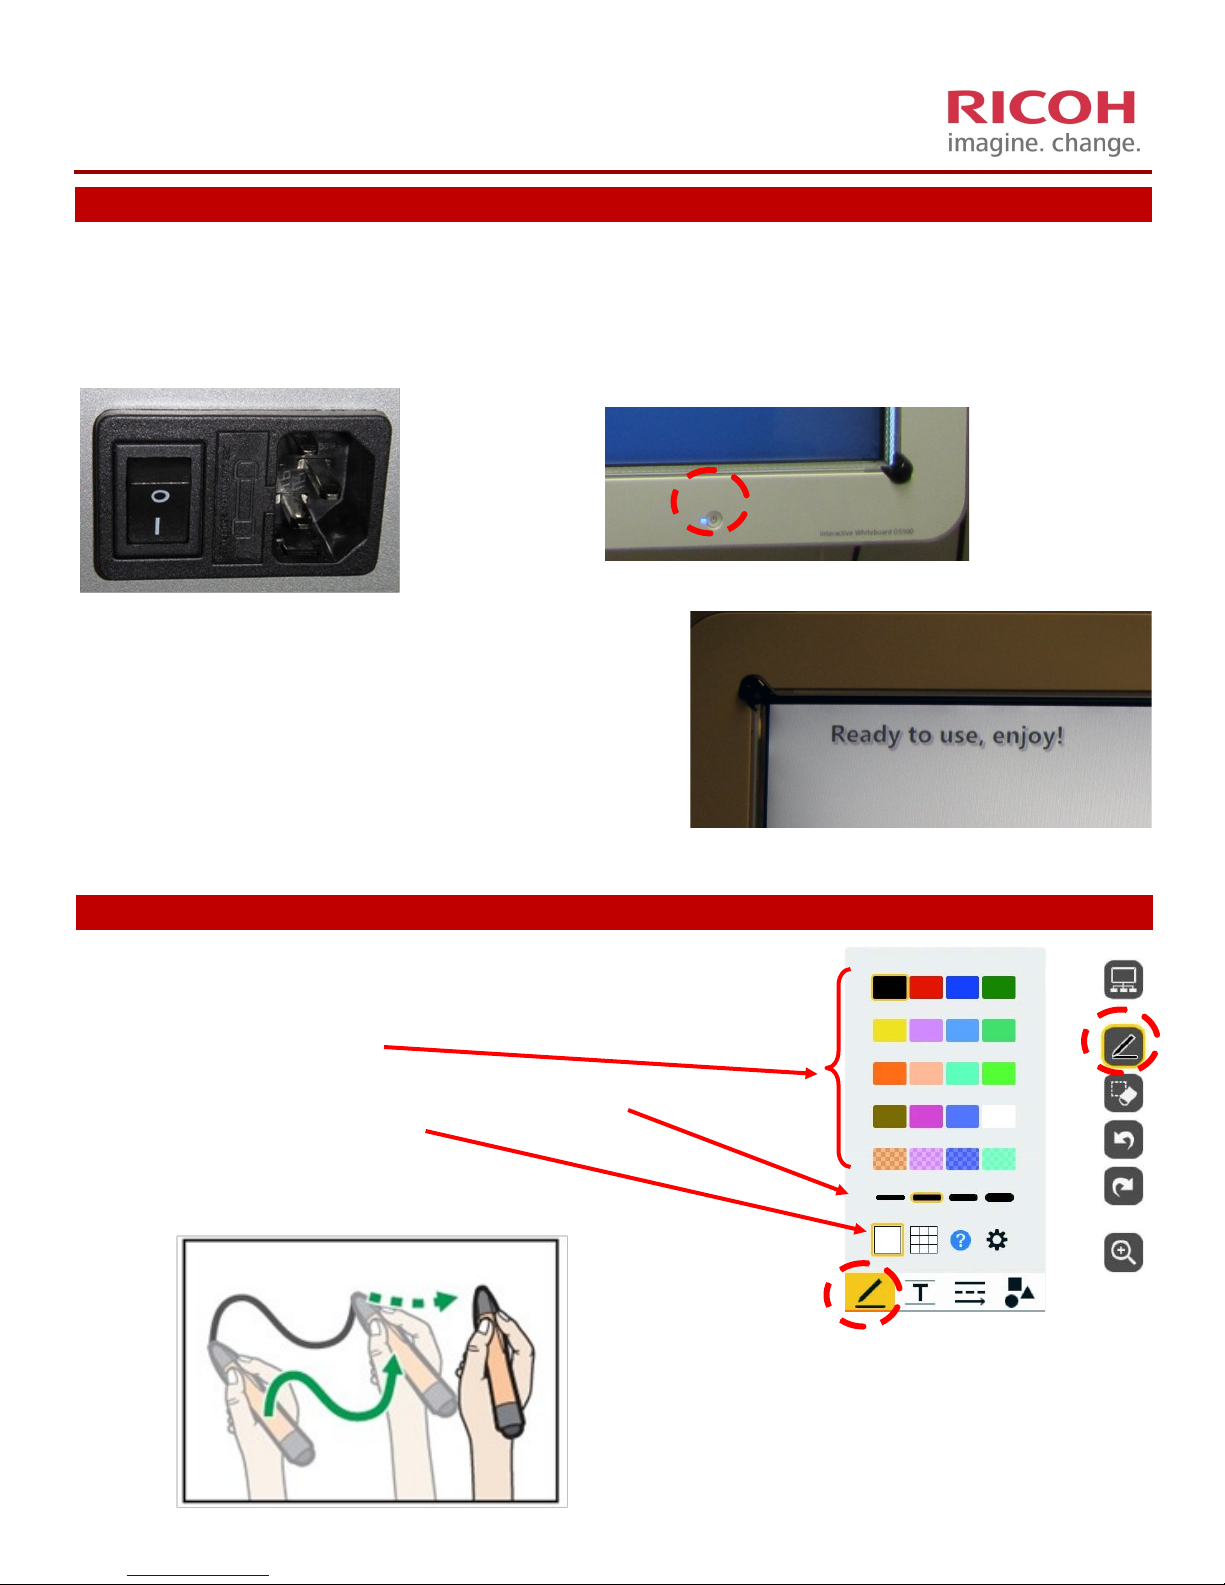
F. Turning on the D5510 .......................................................................................................................... 6
2. Basic Features............................................................................................................................................ 6
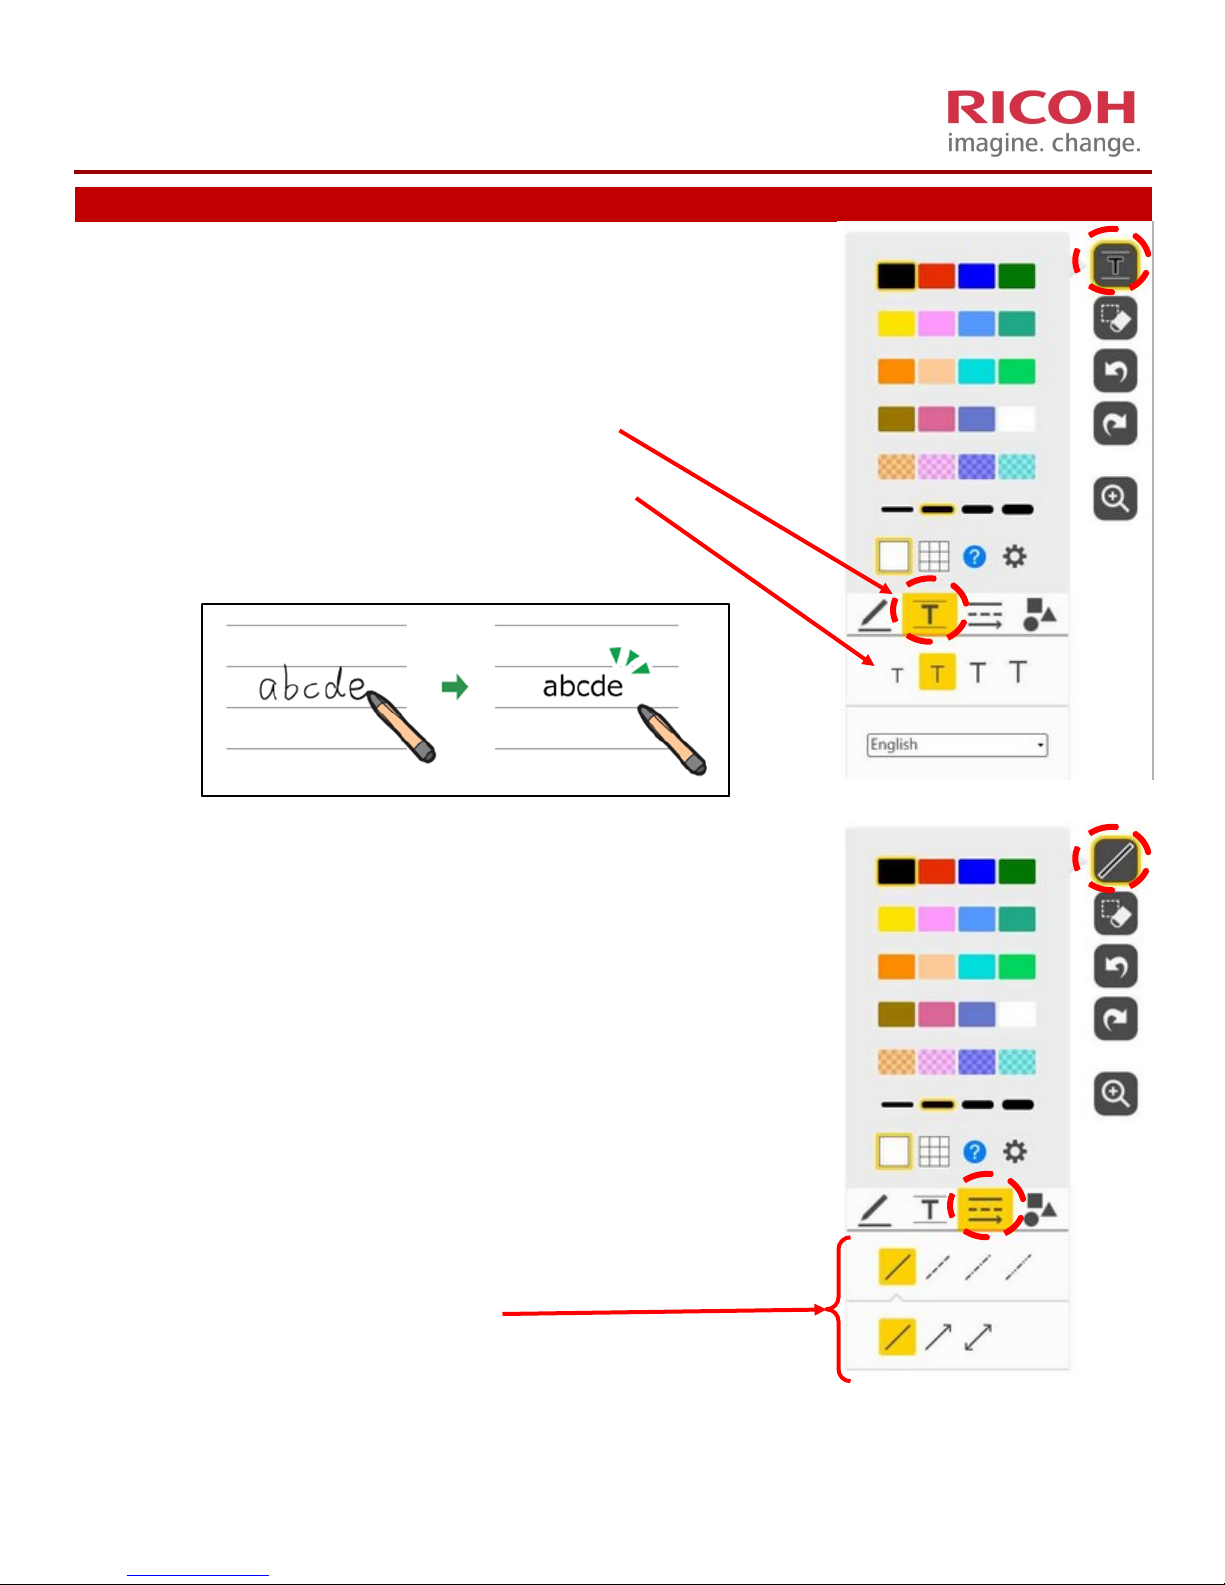
A. Handwring .......................................................................................................................................... 6
B. Free Copying of Handwring (ICR) ....................................................................................................... 7
C. Lines and Arrows .................................................................................................................................. 7
D. Shapes and Stamps............................................................................................................................... 8
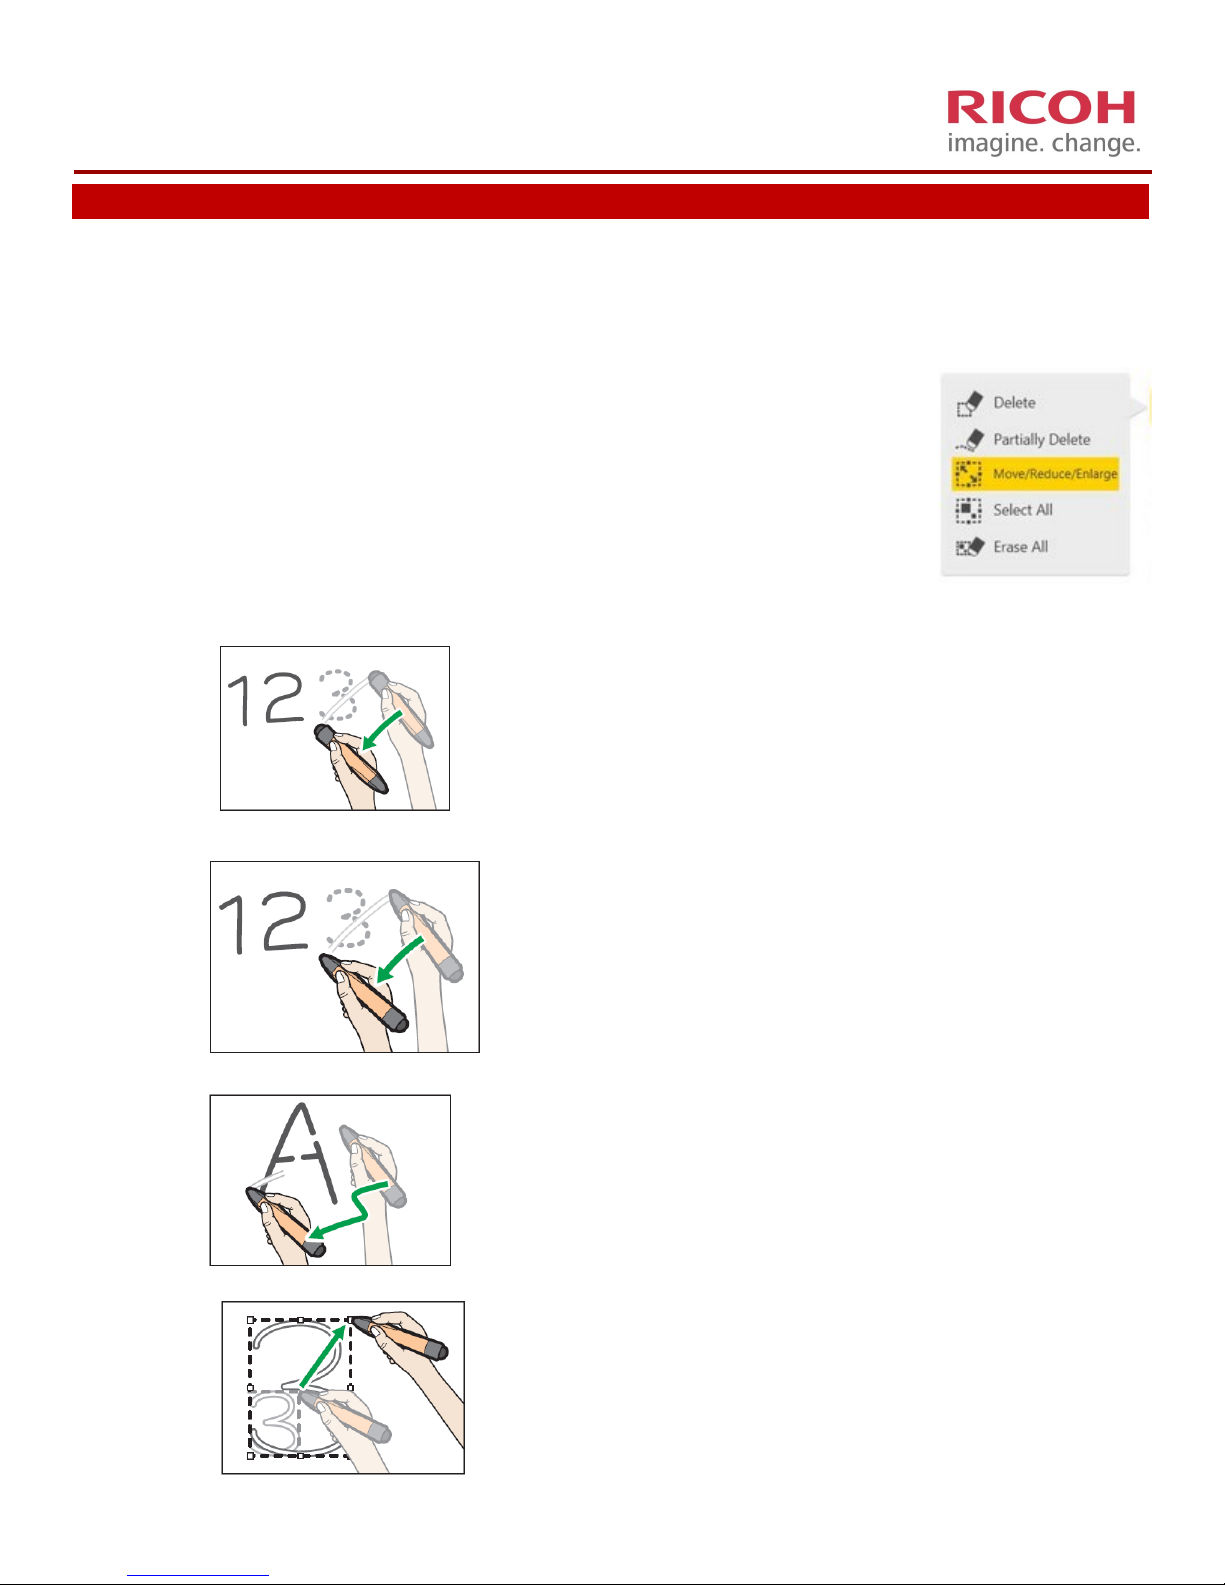
3. Eding / Modifying Wring....................................................................................................................... 9
A. Erasing or Modifying a Document........................................................................................................ 9
4. Document Management ........................................................................................................................... 10
A. Opening a File....................................................................................................................................... 10
B. Saving a File .......................................................................................................................................... 11
C. Emailing a File ....................................................................................................................................... 12
D. Prinng ................................................................................................................................................. 12
5. External Connecons................................................................................................................................. 13
A. Explanaon of Connecons.................................................................................................................. 13
B. Using The D5510 as a Monitor ............................................................................................................. 14
4/2015 V. Jacksier

Contents
6. Using the D5510 to Remotely Control A PC.............................................................................................. 15
A. System Requirements........................................................................................................................... 15
B. Installing the IWB Remote Desktop Soware ...................................................................................... 16
C. Using the IWB Remote Desktop Soware............................................................................................ 17
7. Collaboraon............................................................................................................................................. 18
A. Starng a remote Meeng ................................................................................................................... 19
B Joining a Remote Meng....................................................................................................................... 20
C. Viewing a Meeng from a Web Browser ............................................................................................. 22
8. Remotely Accessing les on the D5510 .................................................................................................... 23
A. Downloading Saved les....................................................................................................................... 23

Board Layout
2

1. General
A. Using Finger to highlight screen
You can drag your nger across any image on the screen to temporarily
highlight a key point.
B. Using Fingers to zoom in or move image
Touch the screen with your ngers to change the display magnicaon of a
displayed page or to move the display area of an enlarged page. The result
of the operaon you perform is applied to all the devices sharing the
remote whiteboard. When you change the display magnicaon or move
the display area with your ngers, a zoom navigator appears in the top center of the
screen.
C: Undo / Redo
You can either undo or redo past steps by tapping either the redo or undo
icons.
The last 100 operaons can be redone or undone.
Zoom Move
3

1. General
E. Page Management
At the boom of the page you will nd the page management tools.
You can navigate between all the pages, add, delete or duplicate pages in the presentaon.
Add a new page Delete page
Duplicate page
Minimize menu
Slide selecon
Add a new page
D. Magnify
By selecng the magnicaon icon you can select between six
magnicaon raos.
4

1. General
F. Turning on the D5510
1. Turn on the power switch by the line cord and then press the power buon on the front of the
D5510.
A. Handwring
1. Using the pen select the pen icon.
2. Choose your pen color by selecng one of the 20 available colors
3. Choose you line thickness by clicking on one of the 4 thicknesses
4. Select background grid
You are now able to free write on the D5510
2. Wait for Ready message to be displayed.
You are ready to begin!
2. Basic Features
5

2. Basic Features
B. Free Copying of Handwring (Intelligent Character Recognion (ICR))
This funcon, called "Fair Copy Mode" in the Operator Manual, automacally recognizes
freehand characters and converts them to editable text. This not only claries text drawn
on the screen, but when pages are converted to PDF les, users can extract data from the
le.
1. Using the pen select the pen icon.
2. Choose the [T] Icon
3. To select the text size, select from
one of the four text sizes below the [T]
C. Lines and Arrows
This funcon makes it easy to draw perfectly straight lines, doed lines, and arrows.
Touch the screen surface with the pen nib, and move the pen while maintaining contact
with the screen surface. A line or arrow that connects the start and end points is drawn in
the color, thickness, and type selected.
1. Using the pen select the Pen icon.
2. Choose the line tool
3. Select the line type and arrow heads desired
Use the pen to draw the line from start to nish points.
6

2. Basic Features
D. Shapes and Stamps
Insert perfectly round circles, sharp triangles, arrows, stars, and properly squared boxes
and rectangles onto pages.
Select the color of the stamp, tap the desired shape, and then touch the screen surface in
1. Using the pen select the Pen icon.
2. Choose the Shapes tool
3. Select the Shape or stamp desired
Using the pen, click the board at the locaon you want to place the shape.
You can resize or move the shape as required.
7

3. Eding / Modi Wring
A. Erasing or Modifying a Document
Once you have wrien on the D5510, you can erase, undo or redo, move and resize
and magnify all or parts of the page.
There are several ways you can erase your wring
1. Use the back of the pen as an eraser. This will erase the full line
2. Select Delete and you can use the pen point to erase full line
3. Select paral delete. This will allow you to trim or parally delete a line
4. Selecng Select All will allow you to select everng on the screen and move or resize it.
5. Selecng Erase All will prompt you to delete everything on the page
A. Use the back of the pen as an eraser. This will erase the full line
b. Select Delete and you can use the pen point to erase full line
c. Select paral delete. This will allow you to trim or parally delete a line
d. Selecng Select All will allow you to select everng on the screen and move or resize it.
e. Selecng Erase All will prompt you to delete everything on the page
8

4. Document Management
A. Opening a File
Using the pen, click on the Document Management Icon and then Import.
You can open PDF or PowerPoint les from this menu. All les must either be on a USB drive,
temporary storage in the D5510 or on a mapped network shared drive, These les can be used a
backgrounds, or working documents. They can not be edited.
Open from USB
Open from Temporary
Memory
Open from Network Map
When using Temporary Save, a
document password is required
9

4. Document Management
B. Saving a le
All pages can be saved together to a USB memory device, a network shared folder or temporarly
to the D5510. All documents are saved as a PDF le
Save to USB
Save to Temporary
Memory
Save to Network Map
When using Temporary Save, a
document password is required
The document can be named or Security can be added to the PDF
le by selecng Opon Sengs for Saved le
10

4. Document Management
C. Emailing a le
To use the email feature, your SMTP server must be setup in the D5510 administrator sengs.
When selected, the pages will be saved as a PDF le and then emailed.
Pre-congured email addresses are displayed.
For other email addresses, Select Manual Entry, a keyboard will be displayed and you can
enter the email address.
When nished, press send.
Open from Network Map
D. Prinng
To use the Print feature, your printer must be setup in the D5510 administrator sengs.
One or all pages can be printed on a precongured Ricoh printer or MFP.
Click on the print icon. Select if you want color or B&W output, paper size number of prints
and current or all pages. When complete, click print
11

5. External Connecons
A. Connecng external Video Sources
External Video inputs can be connected in either a full screen or picture in picture mode.
Input 2 (Picture-in Picture or full Screen)
VGA
Audio out RCA R/L
Audio Out 8Ω 10W
HDMI HDCP Compable - supports devices like BlueRay players. Will only
display. No D5510 features are available
DVI-D Output to connect to addional monitors/projectors
Network 10/100/100BaseT
2—USB 3.0 for le storage / rmware updates
2—USB 2..0 for le storage
Input 1
VGA
Display Port Input
HDMI HDCP Incompable - will only connect with devices that do not
support HDCP such as a computer.
HDCP is a form of digital copy protecon developed that prevents copying of
digital audio and video content as it travels across connecons.
12

5. External Connecons
B. Using The D5510 as a Monitor
Using a VGA or HDMI connecon from your computer to the D5510 will display your computer on the D5510.
While connected, images can be captured from your computer to a slide on the D5510.
Three new icons are added when an input is connected to the Input connecons.
Video input selector. Allows changing between video inputs
Screen Capture - When this icon is pressed, an image of what is currently on the screen is copied to a new page.
Mouse - This is used with the IWB Remote Desktop Soware, discussed later
13

6. Using the D5510 to Remotely Operate Your PC
With the D5510 connected to the network, you can connect your PC to the IWB using the “IWB Remote
Desktop Soware” to control your PC from the IWB.
Item Specicaon
Operang System Windows 8/Pro/Enterprise (32/64 bit)
Windows 8.1 /Pro/Enterprise (32/64 bit)
Windows 7 Home Premium / Professional / Ulmate / Enterprise SP 1
or later (32/64 bit)
CPU Recommended: Intel® Core TM 2 Duo 2 GHz or more
Minimum: Intel® Core TM Solo U1300
Memory Windows 7 (32 bit): 1GB or more
Windows 7 (64 bit) 2GB or more
Windows 8 (32 bit): 1GB or more
Windows 8 (64 bit) 2GB or more
Windows 8.1 (32 bit): 1GB or more
Windows 8.1 (64 bit) 2GB or more
HDD 100 MB or more free space
Network Minimum 200 Kbps when not using network services other than IWB
Remote Desktop Soware.
A. System Requirements
14

6. Using the D5510 to Remotely Operate Your PC
2. Click on Download and Run.
B. Installing the IWB Remote Desktop Soware (First Time User)
1. From the PC, use your Web browser to connect to the IWB’ s IP address and select “Download Soware”.
15

6. Using the D5510 to Remotely Operate Your PC
C. Using the IWB Remote Desktop Soware
5. Enter the D5510’s IP Address.
6. Enter the Passcode displayed on the board
7. Select desired image quality (Quality, Standard or speed)
8. Select auto disconnect me (o or 5 to 30 minutes in 5 minute increments)
9. Select connect
10. The PC Will no be displayed.
11. Click on the mouse on the IWB to control your PC
3. Aer the applicaon is downloaded, it will start the installaon process.
4. Aer the applicaon is installed, double click on the icon to launch the applicaon.
16

7. Collaboraon
As an opon, the D5510 can connect to up to a combinaon of 8 other D5500’s, D5510’s or Ricoh
interacve projectors. Each IWB in the meeng can have up to 20 devices viewing the meeng through the
boards web portal.
Please note that all IWBs in the meeng are required to be on the same network.
Windows PC
Mac PC
Tablet or phone
Interacve View Only
17

7. Collaboraon
From the Host D5510
1. Turn on the D5510 and conrm it is connected to the
network.
2. Using the Pen select the meeng icon and select “Open”
select opons to require password to be used.
3. Conrm meeng
4. Meeng opens
5. Click on the Meeng icon to display aendees and
highlighter color.
6. All features available in the D5510 are available across
the meeng.
7. To end meeng, Click on the Meeng icon and select
“Close Remote Whiteboard”.
A. Starng a Remote Meeng
18
Other manuals for D5510
3
Table of contents
Other Ricoh Interactive Whiteboard manuals

Ricoh
Ricoh Wing Option 2 User manual

Ricoh
Ricoh D6510 User manual

Ricoh
Ricoh D2200 Quick start guide

Ricoh
Ricoh D6500 User manual

Ricoh
Ricoh D3210 Instruction sheet

Ricoh
Ricoh D5510 User manual

Ricoh
Ricoh D5500 Instruction sheet

Ricoh
Ricoh D2200 User manual

Ricoh
Ricoh D5500 User manual

Ricoh
Ricoh D5500 User manual