Ricoh D5500 User manual

1
Quick Start Guide

2
Stand-alone Usage
Interacve Whiteboard Funconality Overview..........................................................................................................................4
Choosing Pen Style.......................................................................................................................................................................5
Erasing / Modifying Wring .........................................................................................................................................................6
Undo / Redo................................................................................................................................................................................. 6
Email ............................................................................................................................................................................................7
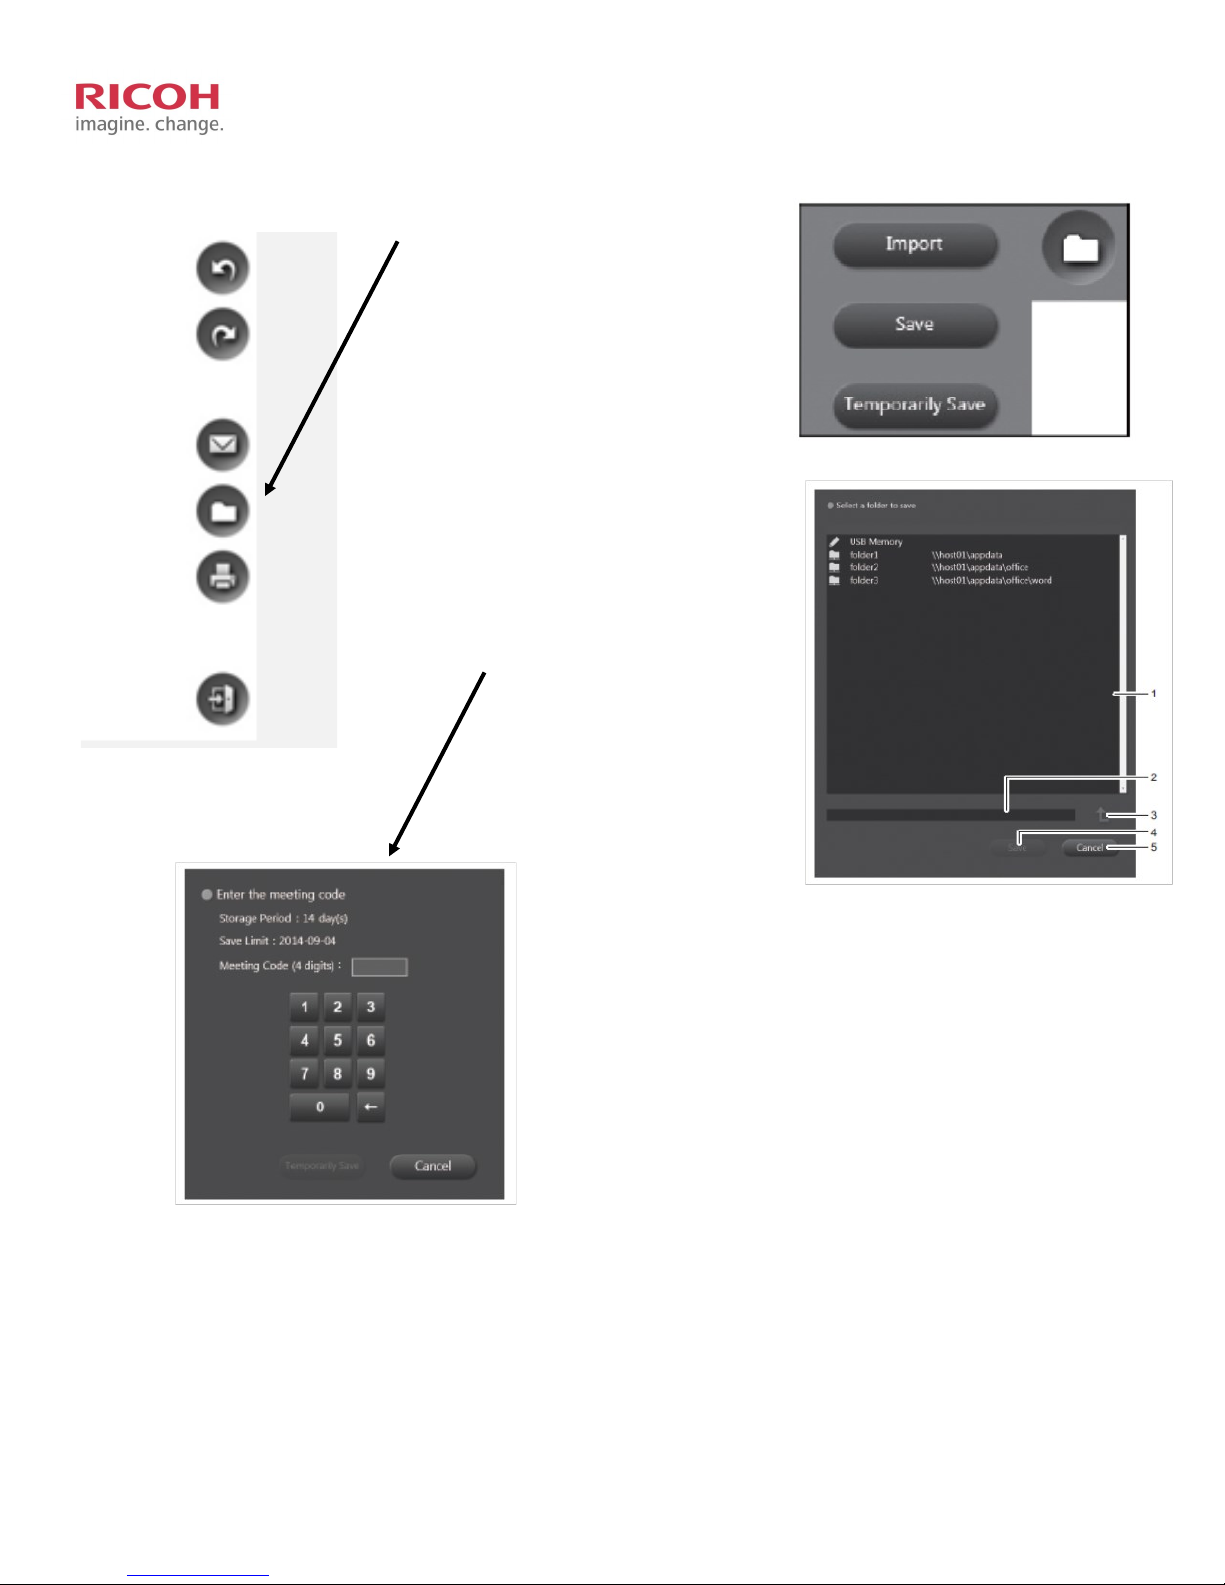
Import / Open le ........................................................................................................................................................................7
Saving a le .................................................................................................................................................................................. 8
Using Finger to highlight ..............................................................................................................................................................9
Using Fingers to zoom..................................................................................................................................................................9
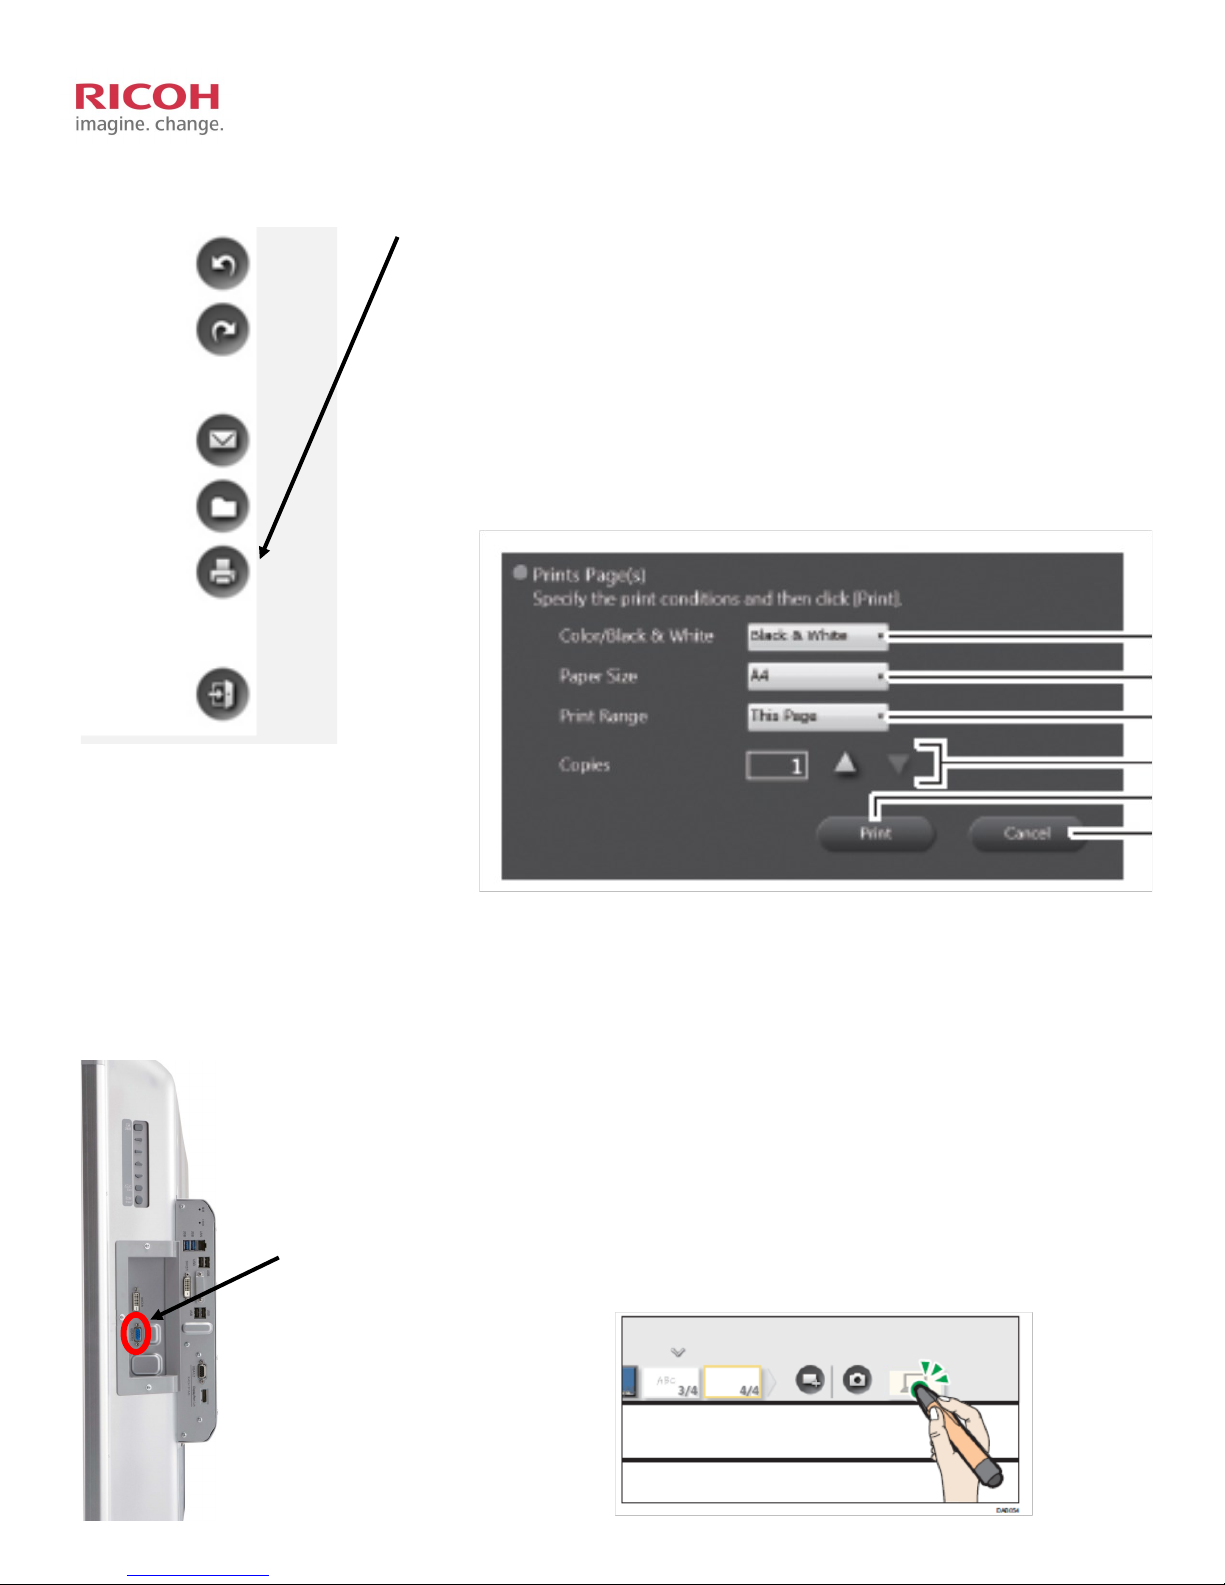
Prinng.......................................................................................................................................................................................10
Using D5500 as a monitor..........................................................................................................................................................10
Capturing acve screen to new page......................................................................................................................................... 11
Adding a new page ....................................................................................................................................................................11
Deleng pages ...........................................................................................................................................................................11
Duplicang pages.......................................................................................................................................................................11
Exing Meeng ..........................................................................................................................................................................11
Using the D5500 To Remotely Operate Your PC
Installing Soware..................................................................................................................................................................... 14
Iniang Connecon between PC and D5500 .......................................................................................................................... 15
Ending Connecon .................................................................................................................................................................... 15
Collaboraon
Starng Meeng from Host .......................................................................................................................................................18
Joining meeng from other D5500 ............................................................................................................................................19
Viewing a meeng from a web browser....................................................................................................................................20

3
Quick Start - Stand-alone Usage

4
16. Marker
Can write marker with nger
Marker colors are dierent by locaon,
And disappear within seconds
17. Auto Firmware Download
Check and Download new IWB rmware automacally
18. Informaon Display
Display IP address, and Pass code to
connect from other IWB, and PC
1
2
3
4
5
6
7
8
9
11 10
12
1. Remote Screen Share
Share screen with other IWB and PC
2. Remote PC Operaon
3. Pen Funcons
Select from 20 colors, line thicknesses
4. Select and Delete
Select to erase by stroke or by part.
5. Undo / Redo
Can redo, and undo of wring, eding, and delete acons (only
in a same page)
6. eMail
- e- mail or mail to print
- save e- mail data temporary
7. Save/ Import les
-Save/ Import from USB, and Network Folder
-Save/ Import to IWB temporary (10G)
-Saved PDF le which can edit handwring part
(PDF le for mail to print can not)
-Can read ppt le from USB and network folder)
13 14
15
10. Screen Page Select
Can select input from VGA, Display Port, or
remote
11. Capture Page
12. Add New Page
13. Captured page List
14. Delete Page
15. Copy Page
19. Loupe
Select screen magnicaon
100%, 200%, 300%, 400%, 500% or
19

5
1. Turn on the power switch by the line cord and then press the power buon on the front of the D5500
Main power Switch found by
power cord
So Power Switch found
2. Wait for Ready To use Message to be displayed
1. Choosing Pen Style
Click on the Pen Icon using the Pen
Using the pen,
•Select from 16 solid colors, and 4 highlighter
colors
•Select from 4 level of thickness
•Select background

6
2. Erasing / Modify Wring
Click on the Erase / Modify Icon using the
pen,
1. •Erase complete line
2. Erase Segment of line
3. Select area for moving / resizing
4. Use the rear side of the pen to erase
123
3. Undo / Redo
Using the Pen, click on the Undo / Redo icons
1. You can Undo or Redo wring that was done on the current page
2. You can not use these funcons on a captured page
3. If you write on a captured page, this funcon will be available
Undo
Redo

7
4. Email Whiteboard
Click on the eMail Icon using the pen,
To use email feature, SMTP server must be setup
in the Admin sengs. When selected, the pages
will be converted to a PDF le and emailed.
Pre-congured email addresses are displayed
For other email addresses, select Manual
entry, keyboard will be displayed and you can
enter the email address.
5. Open
Using the Pen, click on the File icon
You can open a PDF or PowerPoint le by se-
lecng Open from the File menu.
The PDF or PowerPoint le must reside on a
network share or USB drive
These les can be used as a background im-
age.
They can not be edited or saved as a Pow-
erPoint le.
If the le was saved as a temporary le,
you will need to enter the password that
was created when the le was saved.
Select locaon and le to open

8
6. Saving a le
Using the Pen, click on the le icon
All the pages can be saved together to a USB
memory device or in a shared folder. They
can also be saved temporarily on the ma-
chine. The pages are saved in PDF format.
Select locaon to save your le
If you select Temporary, you will be
required to create a password.

9
7 Using Finger to highlight screen
You can drag your nger across any image on the screen to temporarily highlight a key point.
8. Using Finger to zoom in or move image
Touch the screen with your ngers to change the display magnicaon of a displayed page or to move the display area of an en-
larged page. The result of the operaon you perform is applied to all the devices sharing the remote whiteboard. When you change
the display magnicaon or move the display area with your ngers, a zoom navigator appears in the top center of the screen.
Zoom Move

10
9. Prinng
Using the Pen, click on the Print icon
One or all pages can be printed using a precongured Ricoh printer or
MFP.
Click on the print icon and select if it is color or B&W, paper size, number
of prints and one or all pages.
Click print and your selecon will be printed.
10. Using the IWB as a Monitor
•Connect your computer to the IWB using the supplied VGA cable.
You can select inputs from VGA , DisplayPort, and PC connected with Remote Desktop so-
ware
Connect VGA Cable here for
Monitor usage

11
11. Capturing screen to new page
With the page / image on the screen, click on the capture icon and the
screen will be captured as a new page.
Add Page Capture
Duplicate Delete page
12. Adding new page
To add a new page, click on Add page icon on the boom of the page (up to 99 pages can be added.
13. Deleng pages
To delete pages, with the page displayed, click on the delete icon to remove the page.
14. Duplicate pages
To copy the exisng page to a new page, click on the duplicate icon and a copy will be added.
15. Exing your meeng
Use the Pen to select the Exit Icon
By closing your meeng, all data will be erased unless it was saved before exing.
•If you hold the pen on the exit icon for more than 3 seconds, IWB applicaon
turns o, and desktop screen is displayed. Admin, Seng, and Power o funcons
are available from this screen.

12
Quick Start -
Using the D5500 To Remotely Operate Your PC

13
Aer you install IWB Remote Desktop Soware on your computer, you can display your computer screen via a network. You can
also perform operaons on the computer screen from the display of the machine.

14
1. Install the IWB Remote Desktop Soware (First Time User)
A) From the PC, use your Web browser to connect to the IWB’ s IP address and select “Download
Soware”.
B) Click on download and Run
C) Aer the applicaon is downloaded, it will start the installaon process.

15
D) Aer the applicaon is installed, double click on the icon to launch the applicaon.
2. To connect the PC to the whiteboard, enter the IP address of the whiteboard and the password that is dis-
played in the informaon area. You can also set an auto disconnect me .
3. The PC will now be displayed on the IWB, and by choosing the
mouse icon on the IWB, the pen will be able to control the PC.
4. To exit the PC Share mode, click on the Close buon

16
Quick Start - Collaboraon

17
As an opon, the D5500 can connect to up to a combinaon of 4 other D5500’s or Ricoh interacve projec-
tors. Each D5500 in the meeng can have up to 20 devices viewing the meeng through the boards web
portal.
Please note that all D5500s in the meeng are required to be on the same network.
Windows PC
Mac PC
Tablet or phone
Interacve View Only

18
From the Host D5500
1. Turn on the D5500 and conrm it is connected to the
network.
2. Using the Pen select the meeng icon and select “Open”
select opons to require password to be used.
3. Conrm meeng
4. Meeng opens
5. Click on the Meeng icon to display aendees and high-
lighter color.
6. All features available in the “Standalone Quick Start” are
available across the meeng.
6. To end meeng, Click on the Meeng icon and select
“Close Remote Whiteboard”.
Starng a Remote Meeng
Host will need to provide IP Address and Password
to aendees.

19
From an addional D5500
1. Turn on the D5500 and conrm it is connected to the
network.
2. Using the Pen select the meeng icon and select “Join”
3. Aer connecng, you will be prompted on the me it
will take to download the exisng meeng pages. Select
“OK”.
4. Meeng opens
5. Click on the Meeng icon to display aendees and high-
lighter color.
6. All features available in the “Standalone Quick Start” are
available across the meeng.
6. To end meeng, Click on the Meeng icon and select
“Leave Remote Whiteboard”.
Joining a Remote Meeng

20
Viewing a meeng from a Web Browser
You can connect to a shared meeng as a viewer from any device with a web browser.
1. Aer the Host starts a meeng, using the devices web browser, navigate to the IP address of the D5500.
2. Select Parcipate in Remote Whiteboard
Enter Password and Click Join
Other manuals for D5500
9
Table of contents
Other Ricoh Interactive Whiteboard manuals

Ricoh
Ricoh D5500 User manual

Ricoh
Ricoh Wing Option 2 User manual

Ricoh
Ricoh D5500 User manual

Ricoh
Ricoh D3210 User manual

Ricoh
Ricoh D2200 Quick start guide

Ricoh
Ricoh D8600 User manual

Ricoh
Ricoh D5500 User manual

Ricoh
Ricoh D5510 User manual

Ricoh
Ricoh D5500 Instruction sheet

Ricoh
Ricoh D6510 User manual
Popular Interactive Whiteboard manuals by other brands

Smart Technologies
Smart Technologies SMART Board 3000i installation guide

SMART
SMART Board 800ix2 Configuration and user's guide

Bretford
Bretford EDUIMS Assembly instructions and user guide

Panasonic
Panasonic UB-5838C Service manual

SMART
SMART M680 user guide

promethean
promethean activboard 100 series installation guide