Sealey SCT09 User manual

ULTRASONIC 9LTR PARTS CLEANING TANK
MODEL NO: SCT09
Thank you for purchasing a Sealey product. Manufactured to a high standard, this product will, if used according to these
instructions, and properly maintained, give you years of trouble free performance.
IMPORTANT: PLEASE READ THESE INSTRUCTIONS CAREFULLY. NOTE THE SAFE OPERATIONAL REQUIREMENTS, WARNINGS & CAUTIONS. USE
THE PRODUCT CORRECTLY AND WITH CARE FOR THE PURPOSE FOR WHICH IT IS INTENDED. FAILURE TO DO SO MAY CAUSE DAMAGE AND/OR
PERSONAL INJURY AND WILL INVALIDATE THE WARRANTY. KEEP THESE INSTRUCTIONS SAFE FOR FUTURE USE.
1. SAFETY
1.1. ELECTRICAL SAFETY
WARNING! It is the user’s responsibility to check the following:
Check all electrical equipment and appliances to ensure that they are safe before using. Inspect power supply leads, plugs and
all electrical connections for wear and damage. Sealey recommend that an RCD (Residual Current Device) is used with all electrical
products. You may obtain an RCD by contacting your local Sealey Stockist.
If the product is used in the course of business duties, it must be maintained in a safe condition and routinely PAT (Portable
Appliance Test) tested.
Electrical safety information, it is important that the following information is read and understood.
1.1.1. Ensure that the insulation on all cables and on the appliance is safe before connecting it to the power supply.
1.1.2. Regularly inspect power supply cables and plugs for wear or damage and check all connections to ensure that they are secure.
1.1.3. Important: Ensure that the voltage rating on the appliance suits the power supply to be used and that the plug is tted with the
correct fuse - see fuse rating in these instructions.
8DO NOT pull or carry the appliance by the power cable.
8DO NOT pull the plug from the socket by the cable.
8DO NOT use worn or damaged cables, plugs or connectors. Ensure that any faulty item is repaired or is
replaced immediately by a qualied electrician.
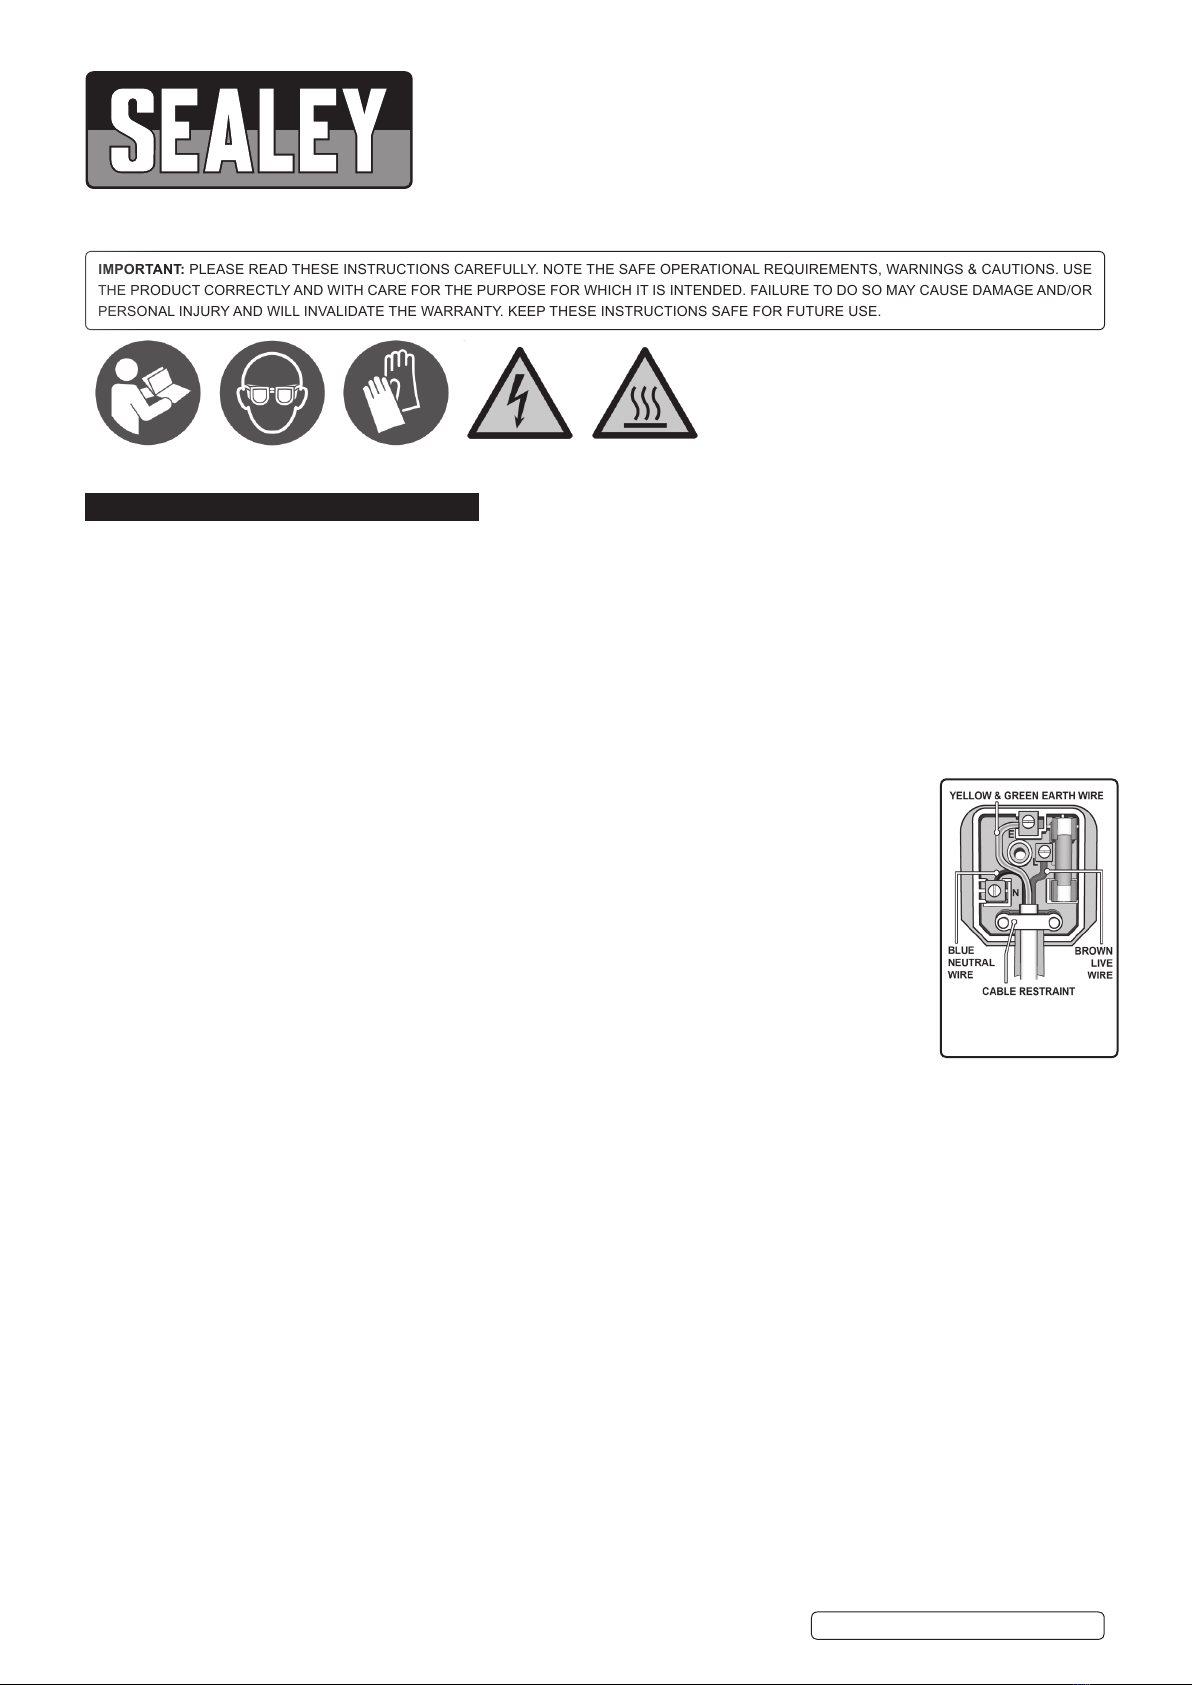
1.1.4. This product is tted with a BS1363/A 13 Amp 3 pin plug.
If the cable or plug is damaged during use, switch the electricity supply and remove from use.
Ensure that repairs are carried out by a qualied electrician.
Replace a damaged plug with a BS1363/A 13 Amp 3 pin plug. If in doubt contact a qualied electrician.
a) Connect the GREEN/YELLOW earth wire to the earth terminal ‘E’.
b) Connect the BROWN live wire to the live terminal ‘L’.
c) Connect the BLUE neutral wire to the neutral terminal ‘N’.
Ensure that the cable outer sheath extends inside the cable restraint and that the restraint is tight.
Sealey recommend that repairs are carried out by a qualied electrician.
1.2. GENERAL SAFETY
8DO NOT run the cleaner continuously for more than one hour at a time, as doing so can damage the internal components.
8DO NOT operate the unit without uid in the tank. Always ensure the uid is no higher than the max mark, Always ensure there is a
minimum depth of 7cm.
8DO NOT drop any item into the tank as this may cause damage to the transducer. Always place the items gently into the tank and
use the basket whenever possible.
9 The more items that you place in your cleaning bath the less eciently it will clean. It is not advised to overlap items. Always allow
plenty of clear space between the items.
9 Keep the lid on during use. This will prevent splashes and reduce evaporation of the uid.
8Never immerse the machine or power cord in water or other liquid.
8DO NOT touch the power plug with wet hands, especially when inserting or removing the plug.
8DO NOT touch the unit if the machine has fallen into water during operation. Remove the power plug from the socket rst.
8DO NOT disassemble the machine, except by professionals.
9UNPLUG the power source while lling or emptying the tank.
8DO NOT spray water or liquid over the device and the control panel.
8DO NOT operate the cleaner without proper grounding.
8DO NOT place the device on a soft surface, where the vents could be blocked.
9 Upon completion of the cleaning cycle, turn the heater knob o and isolate the machine from the electrical supply.
9 Take care when adding or removing items from the cleaning tank as the uid is likely to be hot and displaced uid can damage the
internal components. Any displaced uid must be dried up immediately.
9This device is not intended to use by individuals with restricted physical sensory or metal capacities or those with lack of experience
or knowledge, include children, unless they are supervised by an individual who is responsible for their safety or have received
training in operating the device.
9Keep it away from children!
Recommended fuse rating
5 Amp
SCT09 Issue 2(3) 12/03/19
Original Language Version
© Jack Sealey Limited
Refer to
instructions
Electrical shock
hazard
Hot surfaces
Wear eye
protection
Wear protective
gloves

2. INTRODUCTION
Professional quality and easy to use, ultrasonic cleaning with extremely eective
performance on delicate items such as watch parts, PCB boards and electrical
components, as well as mechanical items such as carburettors, spark plugs
and injectors. Using ultrasonic wave vibration, the intense cleaning action of the
microscopic bubbles can penetrate the most inaccessible parts to remove dirt and
grime. Achieve a pristine condition without any damage or wear to item. Made from
durable stainless steel and tted with a drain tap for easy emptying. Stainless steel
mesh basket to keep smaller components together. Adjustable temperature and time
settings, up to 99 minutes and 80°C.
3. SPECIFICATION
Model No: ................................................................... SCT09
Maximum Working Capacity:.......................................... 9.0ltr
Minimum Working Capacity:........................................... 5.0ltr
Motor Power:.................................................................200W
Nett Weight: ................................................................ 8.56kg
Overall Dimensions (W x D x H):.............410 x 270 x 310mm
Supply:...........................................................................230V
Tank Dimensions (W x D x H): ................300 x 240 x 150mm
4. APPLICATION
WARNING! Provided the product is non-porous and can normally be immersed in water almost anything can be thoroughly
cleaned. Here are some examples:
4.1. Gold-smithery and Silver-smithery: Non-porous jewellery, Necklaces, bracelets, rings, precious stones, watch casings and
straps, precision mechanical movements.
4.2. Manufacturing: Aerospace, Defence, Automotive, Marine, Filtration, Moulding, Plating & Surface Finishing, Semi-Conductors.
4.3. Optical: During edging and polishing, debris and abrasives can scratch lenses. Ultrasonic cleaning can eectively protect the
lenses.
4.4. Regeneration: For cleaning dot matrix printers and photocopier ink cartridges.
4.5. Maintenance: Bicycle gears, air puriers. It cleans out debris in tiny holes and crevices eectively.
5. PREPARATION
5.1. Carefully unpack the cleaner and remove all traces of packing materials from it. Visually inspect the cleaner for any parts that may
have become loose or damaged during transit.
5.2. Place the cleaner on a at, clean surface where the cooling fans will receive adequate ventilation and ensure all controls are set to
o. Also ensure the drain tap is in the closed position.
5.3. Ensure the power cord is securely plugged into the cleaner and that no part is likely to come into contact with moisture.
5.4. Carefully ll at least ½ of the tank with a solvent solution. For demanding cleaning we recommend a small amount of washing up
liquid, this will help increase the cleaning performance. The cleaner is now ready for use.
WARNING! Items Not Suitable For Ultrasonic Cleaning;
Soft Jewellery: Pearls, emerald, ivory, coral. Agate, sea turtle shells, etc. Welded, Plated and Glued Items: Welded or plated
metal items, glued items. Watches: Except diver’s watches with depth rating over 50m(150ft). Others: Ceramic, camera lters with
pre-existing cracks.
6. OPERATION
Noise Reducing Lid
Drain
Non Slip Feet
Temperature and
Mode Setting
Buttons
Time and
Temperature
Display
g.1
SCT09 Issue 2(3) 12/03/19
Original Language Version
© Jack Sealey Limited

6.1. SET UP
6.1.1. Select your cleaning solution, ll at least ½ of solution into the tank. DO NOT exceed the lling line.
▲DANGER! DO NOT use alcohol, gasoline or ammable solutions. Doing so could cause a re or explosion. Use only water-based
solvents.
6.1.2. Place the items into the basket, Slowly lower the basket into tank, DO NOT allow items to contact the tank bottom (solution should
cover the items).
6.1.3. A: Plug the cleaner into (earthed) mains supply.
B: Power on and turn on the power switch on back side of the machine.
NOTE: After the power on, the temperature you see on the machine is environment temperature. Time and temperature default to those last
used (3 minutes default time for initial use).
6.2. TIMER
6.2.1. Press to set the cleaning time. The timer will count down to 00:00, the tank will switch o.
NOTE: Device’s with memory function will remember your last setting.
6.3. HEATING
6.3.1. Press to start/stop heating. Press to set the temperature.
6.3.2. To get the best cleaning result, the solution’s temperature should be 40° to 60°C. Warm water and dish washing liquid can soften
grease and improve cleaning results.
6.3.3. When setting the temperature, if you want the temperature of the bath to be higher than the ambient temperature, press
‘Heating’ button. The heating will come on. If your required temperature is below the ambient temperature, the heating will not come
on. The light above the thermostat button will not illuminate.
6.3.4. Heating does shut o automatically, if timer is used, when it reaches zero
6.3.5. The device’s memory function will remember the last setting.
6.4. DEGAS MODE
6.4.1. After setting the timer and temperature, press , the light above this button will come on. The device will now be in degas mode:
working for 6 seconds, and stopping for 2 seconds, then working for 6 seconds. It will cycle like this with the display counting down.
6.4.2. Intermittent operation of ultrasonic power will degas the cleaning liquid.
6.4.3. If you want to transfer to another mode, press ‘normal’ or ‘soft’. Then the ‘degas’ indicator will turn o and indicator
button light for ‘normal’ or ‘soft’ turn on; to stop it working, press ‘Degas’ again, then both heating and ultrasonic will stop and
the corresponding indicator turn o.
6.5. NORMAL MODE
6.5.1. After timer and temperature setting, press ‘Normal’ button, the corresponding button light will turn on and the device will work in
‘normal mode’: continuously working with full ultrasonic power and countdown display.
6.5.2. To switch to other modes, press ‘Degas’ or ‘soft’. To stop, press ‘normal’ again, then both the heating and
ultrasonic mode will stop and the corresponding button light will turn o.
6.6. SOFT MODE
6.6.1. Set the timer and temperature, press , ‘soft mode’, the button light will turn on and the device will work in soft mode. To transfer
to another mode, press ‘Degas’ or ‘normal’, the ‘soft mode’ light will turn o and indicator light of ‘degas’ or ‘normal’ will
turn on; To stop working, press ‘soft’ again, then both heating and ultrasonic will stop and the corresponding button light will turn
o.
NOTE: Degas, Normal and Soft cannot be operated simultaneously.
6.7. In the event of failure/emergency, disconnect the mains supply.
Control Panel
SCT09 Issue 2(3) 12/03/19
Original Language Version
© Jack Sealey Limited

7. MAINTENANCE
7.1. When the cleaning is completed, unplug the power cord, open the lid and retrieve the basket and the items.
7.2. Empty the tank and clean both the outside and inside of the device with clean and dry cloth for next use. Keep the drainage valve
closed.
WARNING: Strong acid or alkaline cleaning solution will cause corrosion, rust and even puncture of tank or machine body. To
overcome this problem, dilute to mild PH solution.
Sealey Group, Kempson Way, Suffolk Business Park, Bury St Edmunds, Suffolk. IP32 7AR
01284 757500 01284 703534 sales@sealey.co.uk www.sealey.co.uk
ENVIRONMENT PROTECTION
Recycle unwanted materials instead of disposing of them as waste. All tools, accessories and packaging should be sorted, taken to
a recycling centre and disposed of in a manner which is compatible with the environment. When the product becomes completely
unserviceable and requires disposal, drain any fluids (if applicable) into approved containers and dispose of the product and fluids
according to local regulations.
WEEE REGULATIONS
Dispose of this product at the end of its working life in compliance with the EU Directive on Waste Electrical and Electronic Equipment
(WEEE). When the product is no longer required, it must be disposed of in an environmentally protective way. Contact your local solid
waste authority for recycling information.
Note: It is our policy to continually improve products and as such we reserve the right to alter data, specifications and component parts without prior
notice.
Important: No Liability is accepted for incorrect use of this product.
Warranty: Guarantee is 12 months from purchase date, proof of which is required for any claim.
Parts support is available for this product. To obtain parts, please log on to
www.sealey.co.uk, email sales@sealey.co.uk or telephone 01284 757500
SCT09 Issue 2(3) 12/03/19
Original Language Version
© Jack Sealey Limited
Table of contents
Other Sealey Cleaning Equipment manuals

Sealey
Sealey POWER PRODUCTS SM20.V3 User manual

Sealey
Sealey PC310 User manual

Sealey
Sealey SM20T User manual

Sealey
Sealey SM28.V2 User manual

Sealey
Sealey SM40D.V2 User manual

Sealey
Sealey SCT03 User manual

Sealey
Sealey APMS67 User manual

Sealey
Sealey SM21/C User manual

Sealey
Sealey AE900 User manual

Sealey
Sealey SM2399 User manual

Sealey
Sealey SM26 User manual

Sealey
Sealey SM22 User manual

Sealey
Sealey SM21.V4 User manual

Sealey
Sealey DPF1 User manual

Sealey
Sealey SM40D.V2 User manual

Sealey
Sealey SM22.V2 User manual

Sealey
Sealey SM20.V2 User manual

Sealey
Sealey POWER PRODUCTS SM19.V2 User manual

Sealey
Sealey SM19.V2 User manual

Sealey
Sealey SM19.V2 User manual