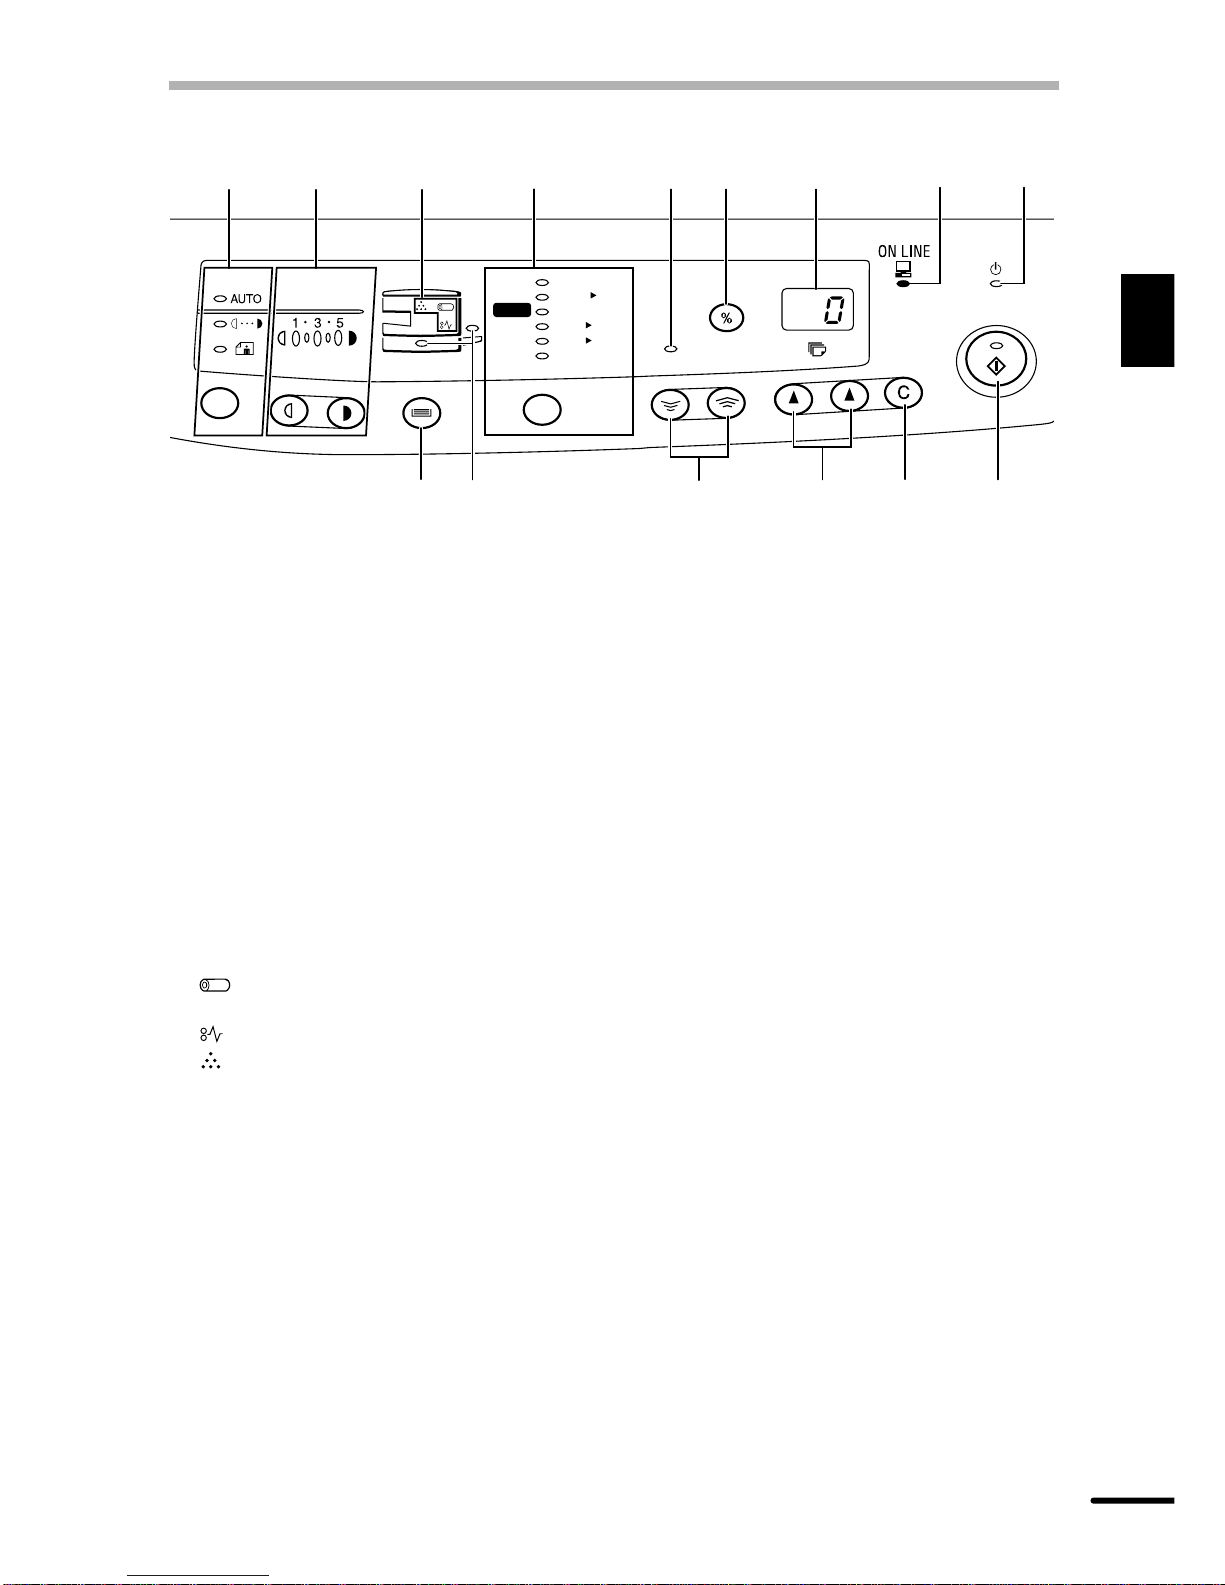
Sharp AL-1041 - B/W Laser Printer User manual

FOR YOUR PROTECTION...
To aid in reporting this compact copier in case of loss or theft, please record below the
model number and serial number located on the back of the unit. We also suggest you
record all the information listed and retain for future reference.
MODEL NUMBER SERIAL NUMBER
DATE OF PURCHASE
Dealer
Address City
State
Zip Telephone
Service Station
Address City
State Zip
Telephone
For location of the nearest Sharp Authorized Service, or to
obtain product literature, accessories, supplies or customer
assistance,
please call 1 - 800 - BE-SHARP
For product information or customer assistance, please visit
http://www.sharp-usa.com on the World Wide Web or call
1-800-BE-SHARP.

1
CONTENTS
1GETTING STARTED
INTRODUCTION 3
CAUTIONS 3
MAIN FEATURES 4
PART NAMES 6
OPERATION PANEL 7
2INSTALLATION
COPIER INSTALLATION 8
CAUTIONS ON HANDLING 9
CHECKING PACKED COMPONENTSAND ACCESSORIES 10
UNPACKING 10
REMOVING PROTECTIVE PACKING MATERIALS 11
INSTALLING THE TD CARTRIDGE 11
LOADING COPY PAPER (installing the paper tray) 13
POWER TO COPIER 15
POWER ON 16
– Initial settings of operation panel 16
3MAKING COPIES
PAPER 17
NORMAL COPYING 18
– Setting a large original 19
EXPOSUREADJUSTMENT/PHOTO COPYING 20
REDUCTION/ENLARGEMENT/ZOOM 20
BYPASS FEED (including special paper) 21
TWO-SIDED COPYING 22
4SPECIAL FUNCTIONS
DESCRIPTION OF SPECIAL FUNCTIONS 24
TONER SAVE MODE 24
USER PROGRAMS (power save modes, auto clear time) 25
– Setting the power save modes and auto clear time 25

2
5SUPPLIES AND USER MAINTENANCE
TD CARTRIDGE REPLACEMENT 27
DRUM CARTRIDGE REPLACEMENT 28
USER MAINTENANCE 29
– Cabinet 29
– Original table and original cover 29
– Transfer charger 30
– When copier is not in use 30
– Copier lens cleaning 31
6COPIER TROUBLE?
MISFEED REMOVAL 32
– A Misfeed in the paper feed area 32
– B Misfeed in the fusing area 33
– C Misfeed in the transport area 34
TROUBLESHOOTING 35
STATUS INDICATORS 36
DISPLAYING TOTALNUMBER OF COPIES 36
AUTOMATIC EXPOSUREADJUSTMENT 37
7APPENDIX
SPECIFICATIONS 38
OPTION AND SUPPLY PARTNUMBERS AND STORAGE 39
MOVING INSTRUCTIONS 40
INDEX
CONTENTS

3
1
Getting started
This chapter provides basic information for using the copier.
INTRODUCTION
This copier has been designed to provide intuitive operating ease while requiring a minimum
amount of space. To get full use of all copier features, be sure to familiarize yourself with this
manual and the copier.
For quick reference during copier use, keep this manual in a handy location.
The AL-1041 can be used as a laser printer. TheAL-1200 can also be used as
alaser printerifan optionalprinterupgradekitisinstalled.Thismanual describes
only the copier features. For description of the printer features, see the printer
manual.
Conventions used in this manual
Inthismanual,thefollowingiconsareusedtoprovidetheuserwithinformationpertinenttothe
use of the copier.
Warns the user that injury to the user or damage to the copier may result if the
contents of the warning are not properly followed.
Cautions the user that damage to the copier or one of its components may
result if the contents of the caution are not properly followed.
Notes provide information relevant to the copier regarding specifications,
functions, performance, operation and such, that may be useful to the user.
Indicates a letter displayed in the display.
CAUTIONS
Follow the cautions below when using this copier.
●Place the copier on a firm, level surface.
●Do not install the copier in a humid or dusty location.
●Whenthe copieris notusedforlongtime,forexampleforconsecutive holidays,
turn the power switch off and remove the power cord from the outlet.
●The fusing area is hot. Exercise care in this area when removing misfed
paper.
●When moving the copier, be sure to turn the power switch off and remove the
power cord from the outlet.
●Do not look directly at the light source. Doing so may damage your eyes.
●Do not cover the copier with a dust cover, cloth or plastic film while the power
is on. Doing so may prevent heat radiation, damaging the copier.
1
GETTING STARTED

4
1
Getting started
SAFETY PRECAUTIONS
This Digital Copier is rated Class 1 and complies with 21 CFR 1040.10 and 1040.11 of
the CDRH standards. This means that the copier does not produce hazardous laser
radiation. For your safety, observe the precautions below.
●Do not remove the cabinet, operation panel or any other covers.
●The copier’s exterior covers contain several safety interlock switches. Do not bypass
any safety interlock by inserting wedges or other items into switch slots.
Use of controls or adjustments or performance of procedures other than those
specified herein may result in hazardous radiation exposure.
CAUTIONS
MAIN FEATURES
qHigh-speed laser copying
●Since warm-up time is zero, copying can be started immediately after the power switch
is turned on.
●First-copy time is only 9.6 seconds (normal mode).
●Copying speed is 10 copies/min. (AL-1041) or 12 copies/min. (AL-1200), which adapts
to business use, allowing improvement of working efficiency.
wHigh-quality digital image
●High-quality image copying at 600 dpi can be performed.
●In addition to the automatic exposure mode, the manual exposure can be adjusted in
five steps.
●The photo mode copying function allows clear copying of delicate halftone original
images such as monochrome photos and color photos.
eSubstantial copying functions
●Zoom copying from 50% to 200% in 1% increments can be performed.
●Continuous copying of maximum 99 sheets can also be performed.
●Toner save mode reduces toner consumption by approximately 10%.
●User programs allow setting/modification of functions for customer’s needs.

5
1
Getting started
MAIN FEATURES
rScan once/ Print many (AL-1041 only)
●The AL-1041 is equipped with a 1-page memory buffer. This Memory allows the
AL-1041toscananoriginal1 timeonly andmakeup to99copies. This featureallows for
improved workflow, reduced operating noise from the copier and reduced wear and tear
on the scanning mechanism. This feature provides for a higher reliability.
tPrinter feature
●The AL-1041 copier can be used as a laser printer. TheAL-1200 copier can be used as
a laser printer by installing an optional printer upgrade kit.
yEnvironmentally friendly design
●Paper output tray is housed in the copier for space saving.
●Preheatmodeandautopower shut-offmodeareprovidedto reduce power consumption
in standby mode.
This copier does not have an internal calendar or clock.
This copier will not be affected by the year 2000.

6
1
Getting started
PART NAMES
Transfer charger
TD cartridge lock release
button
TD cartridge
Drum cartridge
Drum cartridge handle
Paper feed rollerFusing unit
release lever Charger cleaner
Original table
Operation
panel
Paper tray
Front cover Side cover
open button
Original cover
Side cover
Power cord socket
Power switch Handle
Handle Cover for optional
printer interface (AL-1200 only)*
* For the AL-1200,
a printer upgrade kit
is optional.
Bypass tray guides
Bypass tray
Paper output
tray
Paper output tray
extension
Parallel interface connector
(AL-1041 only)

7
1
Getting started
OPERATION PANEL
qExposure mode selector key and
indicators
Use to sequentially select the exposure
modes: AUTO, MANUAL or PHOTO.
Selected mode is shown by a lit indicator.
(p. 20)
wLight and dark keys and exposure
indicators
Use to adjust the MANUAL or PHOTO
exposurelevel. Selected exposure level is
shown by a lit indicator. (p.20)
Use to start and terminate user program
setting. (p. 25)
eAlarm indicators
: Drum replacement required
indicator (p. 28)
: Misfeed indicator (p. 32)
: TD cartridge replacement required
indicator (p. 27)
rCopy ratio selector key and copy ratio
indicators
Usetosequentiallyselectpreset reduction/
enlargement copy ratios.
Selected copy ratio is shown by a lit
indicator. (p. 20)
tZoom indicator (p. 20)
yCopy ratio display (%) key (p. 20)
uDisplay
Displaysthespecifiedcopy quantity,zoom
copy ratio, user program code, and error
code.
iON LINE indicator
Lights up when the machine is used as a
printer.To use theAL-1200asaprinter, an
optional printer upgrade kit is needed.
Lit: Indicates the machine is ready for
printing or data is being received or
printed.
oPower save indicator
Lights up when the copier is in a power
save mode. (p. 24, 25)
!0 Tray select key
Use to select a paper feed station (paper
tray or bypass tray). (p. 22)
!1 Paper feed location indicators
Light up to show the selected paper feed
station.
!2 Zoom keys
Usetoselect anyreductionor enlargement
copy ratio from 50 to 200% in 1%
increments. (p. 20)
!3 Copy quantity keys
●Use to select the desired copy quantity
(1 to 99). (p. 18)
●Use to make user program entries.
(p. 25)
!4 Clear key
●Presstoclear thedisplay, orpressduring
a copy run to terminate copying. (p. 18)
●Press and hold down during standby to
display the total number of copies made
to date. (p. 36)
!5 Print key and ready indicator
●Copying is possible when the indicator
is on.
●Use to set a user program.
ZOOM
100%
5
1
/
2
MAX.
8
1
/
2
x
5
1
/
2
8
1
/
2
x
8
1
/
2
11
x
8
1
/
2
11
x
8
1
/
2
14
x
8
1
/
2
MIN.
11
x
50%
64%
78%
100%
129%
200%
q w r
!3
!2
ety u
!5
!4!1!0
oi

8
2
Installation
2
INSTALLATION
Follow the installation procedure below to use the copier properly.
COPIER INSTALLATION
Improperinstallationmaydamage the copier.Pleasenotethefollowing during initial installation
and whenever the copier is moved.
If the copier is moved from a cool place to a warm place, condensation may
form inside the copier. Operation in this condition will cause poor copy quality
and malfunctions. Leave the copier at room temperature for at least 2 hours
before use.
Do not install your copier in areas that are:
●damp, humid, or very dusty
●exposed to direct sunlight
●poorly ventilated
●subject to extreme temperature or humidity
changes, e.g., near an air conditioner or
heater.

9
2
Installation
Be sure to allow the required space around
the machine for servicing and proper
ventilation.
A small amount of ozone is produced within the copier during operation. The emission
level is insufficient to cause any health hazard.
NOTE:
The present recommended long term exposure limit for ozone is 0.1 ppm (0.2 mg/m3)
calculated as an 8 hr. time-weighted average concentration.
However, since the small amount that is emitted may have an objectionable odor, it is
advisable to place the copier in a ventilated area.
CAUTIONS ON HANDLING
Be careful in handling the copier as follows to maintain the performance of this copier.
Do not drop the copier, subject it to shock
or strike it against any object.
Do not expose the drum cartridge to direct
sunlight.
Doing so will damage the surface (green portion)
ofthedrumcartridge,causingsmudges on copies.
Store spare supplies such as drum cartridges and TD cartridges in a dark place
without removing from the package before use.
If they are exposed to direct sunlight, smudges on copies may result.
Do not touch the surface (green portion) of the drum cartridge.
Doing so will damage the surface of the cartridge, causing smudges on copies.
8"(20cm
8"(20cm)
4"
(10cm) 4"
(10cm)
COPIER INSTALLATION

10
2
Installation
CHECKING PACKED COMPONENTS AND
ACCESSORIES
Open the carton and check if the following components and accessories are included.
Copier
Power cord
TD cartridge
Drum cartridge
(installed in copier)
Operation manual
Interface cable
(IBM PC/AT or compatible computer)
(AL-1041 only)
Printer driver (CD-ROM)
(AL-1041 only)
●If anything is not included or is damaged, contact your Sharp dealer.
●Savethecartonand packingmaterials. These canbe re-usedfor transporting
the machine, should it be necessary.
UNPACKING
Be sure to hold the handles on both sides of the copier to unpack the copier and carry it to the
installation location.

11
2
Installation
REMOVING PROTECTIVE PACKING MATERIALS
1
Remove pieces of tape , , , , and and protective cover . Then open
the original cover and remove protective materials and .
a
b
c
e
h
f
g
d
2
Use a coin (or suitable object) to remove the screw.
Store the screw in the paper tray because it will be used if the copier has to be
moved. (p. 14)
INSTALLING THE TD CARTRIDGE
1
Open the bypass tray and then open the side cover while pressing the side cover
open button.
Bypass tray

12
2
Installation
INSTALLING THE TD CARTRIDGE
2
Remove the CAUTION tape from the front cover and remove the two protective pins
from the fusing unit by pulling the strings upward one at a time.
CAUTION tape Protective pins
3
Push gently on both sides of the front cover to open the cover.
4
Removethe TD cartridgefromthebag.Remove theprotectivepaper.Hold thecartridge
on both sides and shake it horizontally four or five times.
4 or 5 times
5
Hold the tab of the protective cover and pull the tab to your side to remove the cover.

13
2
Installation
INSTALLING THE TD CARTRIDGE
6
Gently insert the TD cartridge until it locks in place.
7
Close the front cover and then the side cover by pressing the round projections near
the side cover open button.
When closing the covers, be sure to close the front cover securely and then
close the side cover. If the covers are closed in the wrong order, the covers
may be damaged.
LOADINGCOPYPAPER (installingthepapertray)
1
Raise the handle of the paper tray and pull the paper tray out until it stops.

14
2
Installation
LOADING COPY PAPER
2
Remove the pressure plate lock. Rotate the pressure plate lock in the direction of the
arrow to remove it while pressing down the pressure plate of the paper tray.
3
Store the pressure plate lock which has been removed in step 2 and the screw which
hasbeen removedwhenunpacking(see page11,step2of REMOVINGPROTECTIVE
PACKING MATERIALS) in the front of the paper tray. To store the pressure plate
lock, rotate the lock to fix it on the relevant location.
Screw
Pressure plate lock
4
Adjust the paper guides on the paper tray to the copy paper width and length.
Squeeze the lever of paper guide and slide the guide to match with the width of
the paper.
Move paper guide to the appropriate slot as marked on the tray.
Paper guide B
Paper guide A
5
Fan the copy paper and insert it into the tray. Make sure the edges go under the
corner hooks.
Do not load paper above the maximum height line ( ). Exceeding the line
will cause a paper misfeed.

15
2
Installation
LOADING COPY PAPER
6
Gently push the paper tray back into the copier.
After loading copy paper, to cancel the blinking “P” without restarting copying,
press the clear ( ) key. The “P” in the display will go out and the ready ( )
indicator will light up.
POWER TO COPIER
1
Ensure that the power switch of the copier is in the OFF position. Insert the attached
power cord into the power cord socket at the rear of the copier.
If you use the copier in a country other than the country where the copier was
purchased,you willneedto makesurethatyourlocalpowersupplyis compatible
with your model. If you plug the copier into an incompatible power supply,
irreparable damage to the copier will result.
2
Plug the other end of the power cord into the nearest outlet.
Only insert the power cord into a properly grounded wall socket.
Do not use extension cords or power strips.

16
2
Installation
POWER ON
Turn the power switch on the left side of the copier to the “ON” position. The ready ( )
indicator will light up and other indicators which show the initial settings of the operation panel
will also light up to indicate the ready condition. For the initial settings, see the “Initial settings
of operation panel” described below.
●The copier will enter a power save mode once the set time has elapsed
without any copier operation after the last copy of a run is made or power is
turned on.
The settings of the power save modes can be modified. See page 25, USER
PROGRAMS.
●The copier will return to the initial settings a preset amount of time after the
lastcopy ismade.Thepreset amountoftime(autoclear time)canbechanged.
See page 25, USER PROGRAMS.
Initial settings of operation panel
The copier assumes the initial settings when the copier is turned on or a preset time (auto
clear time) elapses after the last copy is made. The initial settings of the operation panel are
shown below.
“0” is displayed in the
display.
ZOOM
100%
5
1
/
2
8
1
/
2
x
5
1
/
2
8
1
/
2
x
8
1
/
2
11
x
8
1
/
2
11
x
8
1
/
2
14
x
8
1
/
2
11
x
50%
64%
78%
100%
129%
200% MAX.
MIN.

17
3
Making copies
3
MAKING COPIES
This chapter describes basic copying functions and some other copying functions using the
bypasstray.
PAPER
For best results, use only paper recommended by SHARP.
Type of paper Type of media Size Weight
feeding
Papertray Standard paper Letter (8-1/2" x 11") 15 lbs. to 21 lbs.
Legal (8-1/2" x 14")
Invoice (5-1/2" x 8-1/2")
A4 (210mm x 297mm)
B5 (182mm x 257mm)
Bypass tray Standard paper and Letter (8-1/2" x 11") 14 lbs. to 34.5
thick paper Legal (8-1/2" x 14") lbs.**
Invoice (5-1/2" x 8-1/2")
A4 (210mm x 297mm)
B5 (182mm x 257mm)
Special Transparency Letter (8-1/2" x 11")
media film A4 (210mm x 297mm)
Envelope* Commercial 10
(4-1/8" x 9-1/2")
Monarch
(3-7/8" x 7-1/2")
International DL
(110mm x 279.4mm)
International C5
(162mm x 229mm)
* Do not use envelopes that have metal clasps, plastic snappers, string closures, windows,
linings, self-adhesive, patches or synthetic materials. These will cause physical damage to
the copier.
** For paper weighing from 28 to 34.5 lbs., 8-1/2" x 11" is the maximum size that can be fed
through the bypass tray.
●Specialpaperssuchastransparency film and labels mustbefedonesheet at a time through
the bypass tray.

18
3
Making copies
NORMAL COPYING
1
Ensure that paper of the desired size is set in the paper tray. See page 13, LOADING
COPY PAPER. When copying onto 8-1/2" x 11" paper or a larger size, pull out the
paper output tray extension.
2
Turn the power switch on.
3
Open the original cover.
4
Place the original face down on the original table. Align it with the original scale and
the centering ( ) mark.
mark
Original scale
5
Gently close the original cover. When copying a book or an original which has been
foldedoracrumpledoriginal,press down the original cover lightly.Iftheoriginalcover
is not securely closed, the copies may be striped or blurred.
A book, an original which has been
folded, a crumpled original

19
3
Making copies
NORMAL COPYING
6
Set the number of copies using the two copy quantity ( , ) keys.
●Press the clear ( ) key to clear an entry if a mistake is made.
●A single copy can be made with the initial setting, i.e., when “0” is displayed.
●Press the right copy quantity key to set the unit
digitfrom0to9.Thiskeywillnotchange the tens
digit.
●Press the left copy quantity key to set the tens
digit from 1 to 9.
7
Press the print ( ) key.
●To display the number of copies made in a continuous run, press the left
copy quantity key.
●To stop copying in the middle of a run, press the clear ( ) key. Copying will
stop and the number in the display will be reset to “0”.
Setting a large original
The original cover can be removed to allow copying of bulky objects.
1
Simply lift the original cover straight up.
2
To reattach the original cover, reverse the above procedure.
ZOOM
Tens digit Unit digit
This manual suits for next models
1
Table of contents
Other Sharp Copier manuals

Sharp
Sharp SF-2314 User manual

Sharp
Sharp AR-FX7 User manual

Sharp
Sharp SF-780 User manual

Sharp
Sharp SF-755 User manual

Sharp
Sharp AL1215 - B/W Laser - Copier User manual

Sharp
Sharp AR-C260 User manual

Sharp
Sharp SF-2118 User manual

Sharp
Sharp AR-203E User manual

Sharp
Sharp AR-FX4 User manual

Sharp
Sharp AL-1043 User manual

Sharp
Sharp AR-285 User manual

Sharp
Sharp AR-122E N User manual

Sharp
Sharp AR-M250 series Online Setup guide

Sharp
Sharp SF-741 User manual

Sharp
Sharp MX-2300 G User manual

Sharp
Sharp AL-10PK User manual

Sharp
Sharp SF-1014 User manual

Sharp
Sharp AR-C330 Key operators User manual

Sharp
Sharp AL-1043 User manual

Sharp
Sharp AL-800 User manual