PINLOCK
®
EVO lensをご使用の場合は、付属の
PINLOCK
®
* EVO lens に同梱されている取扱説明書を
ご覧ください。
If you are using the PINLOCK
®
* EVO lens, read the
instruction manual that comes packed with it.
PINLOCK® EVO lens
日本語
PINLOCK®EVO lens
English
* PINLOCK
®
は、PINLOCK SYSTEMS B.V. の登録商標
です。 * PINLOCK
®
is a registered trademark of PINLOCK
SYSTEMS B.V.
QSV-1 サンバイザーの取り扱い
に関するご注意
日本語
Important Notice about
Handling the QSV-1 Sun Visor
English
クリア以外のシールドに PINLOCK
®
EVO
lens を装着した状態で、夜間走行はしな
いでください。
PINLOCK
®
EVO lens は、シールドよりも
傷つきやすい材質でできているので、取
り扱いには十分注意してください。
PINLOCK
®
EVO lens を使用すると、乗車
姿勢によっては視界が妨げられる可能性
があります。
PINLOCK
®
EVO lens は、保護フィルムを
はがして使用してください。
PINLOCK
®
EVO lens は、シート自体が湿
気を吸収することにより高い曇り止め効
果を発揮します。しかし、低温多湿など
の曇りやすい条件下でヘルメット内が密
閉された状態が続くと、水蒸気でシート
が飽和状態となり、にじみや曇りが発生
することがあります。にじみや曇りが発
生すると、視界が妨げられ大変危険です
ので、ロアエアインテークを開けたり、
シールドを開けたりしてヘルメット内を
よく換気し、にじみや曇りを取り除いて
ください。
CNS-3 の PINLOCK
®
EVO lens を交換され
る場合は、DKS301 をご購入ください。
Do not use PINLOCK
®
EVO lens with a
tinted shield/visor at night.
The PINLOCK
®
EVO lens is made of a
material that is easier to scratch than the
outer shield/visor. It should be treated with
great care.
The PINLOCK
®
EVO lens may obstruct
the rider’s view in some riding positions.
Remove the protective lm before using
the PINLOCK
®
EVO lens.
The PINLOCK
®
EVO lens demonstrates
high effectiveness in stopping fog by
absorbing moisture. However, if the
helmet is used continuously with the
lower vent in the closed position in low-
temperature, high-humidity conditions,
the lens can become saturated with water
vapor causing streaks and fog to appear.
If streaks or fog appears, it may obstruct
your view and be very dangerous! In this
case, open the lower air intake and/or
open the shield/visor to circulate air within
the helmet to remove the streaks and fog
from the helmet.
Purchase DKS301 for CNS-3 for
replacement of PINLOCK
®
EVO lens.
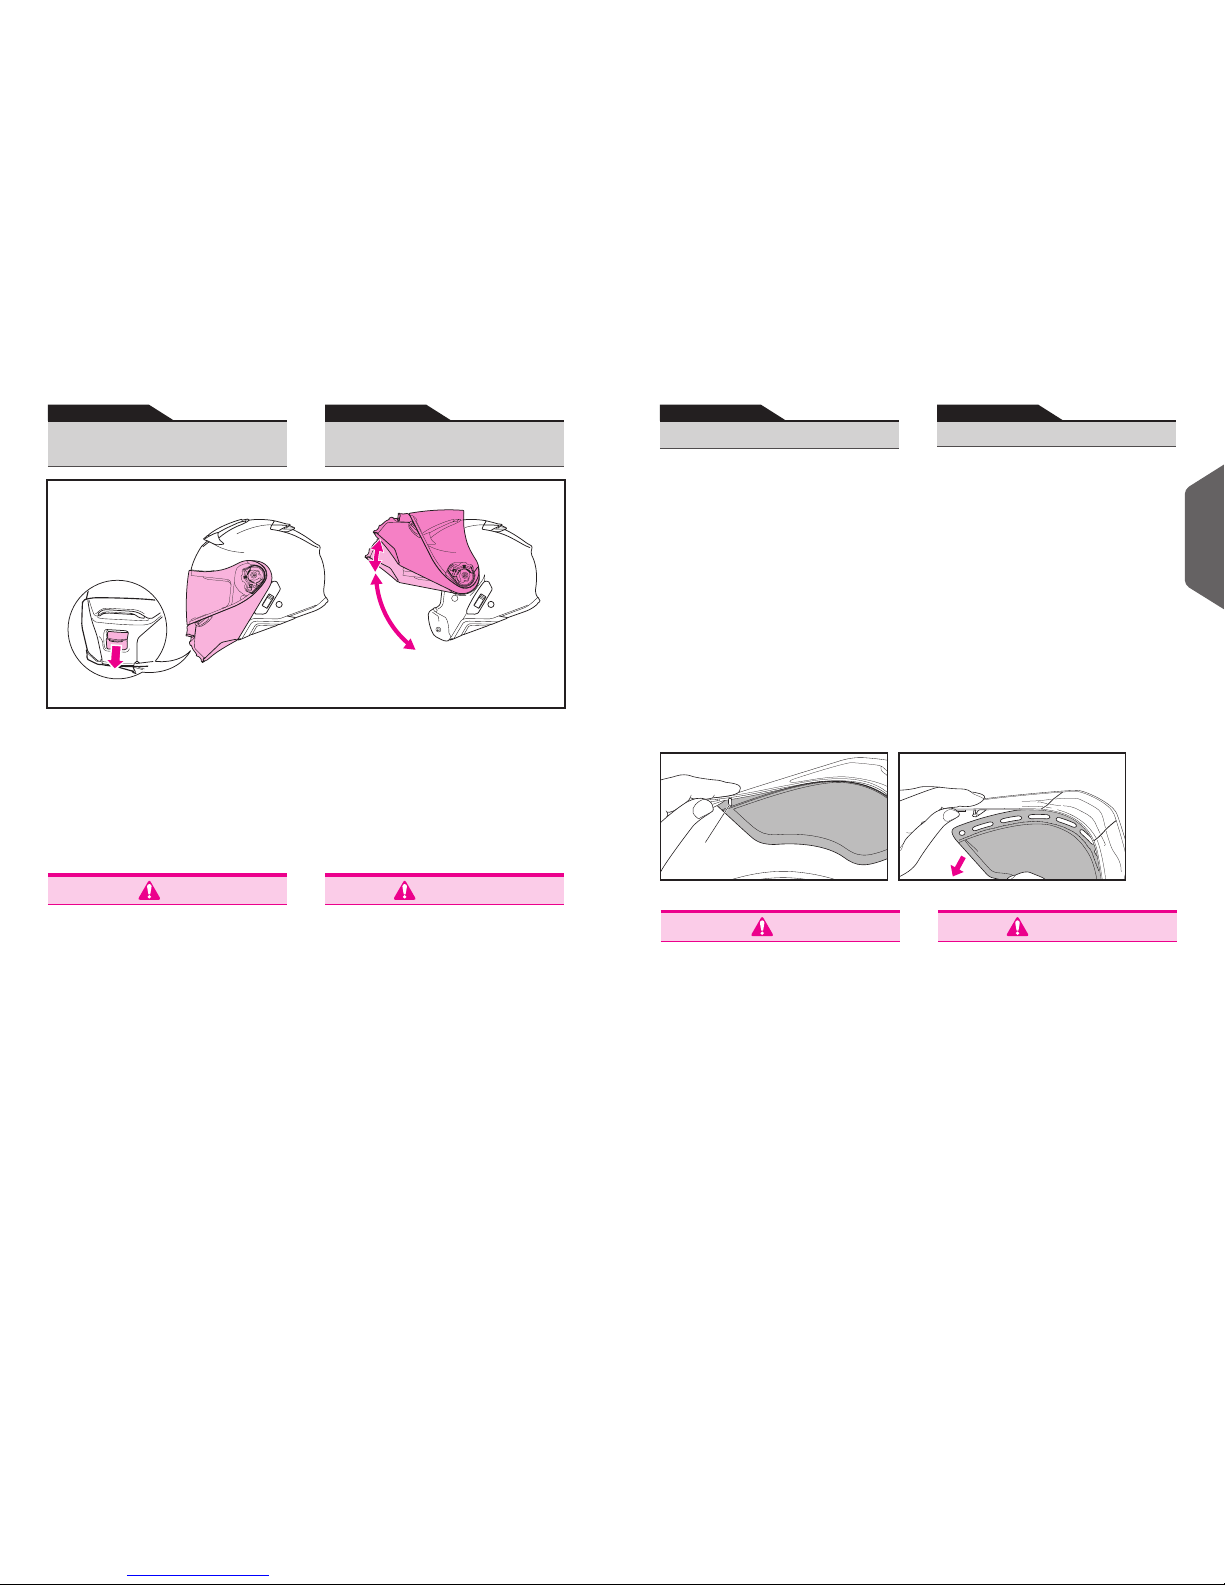
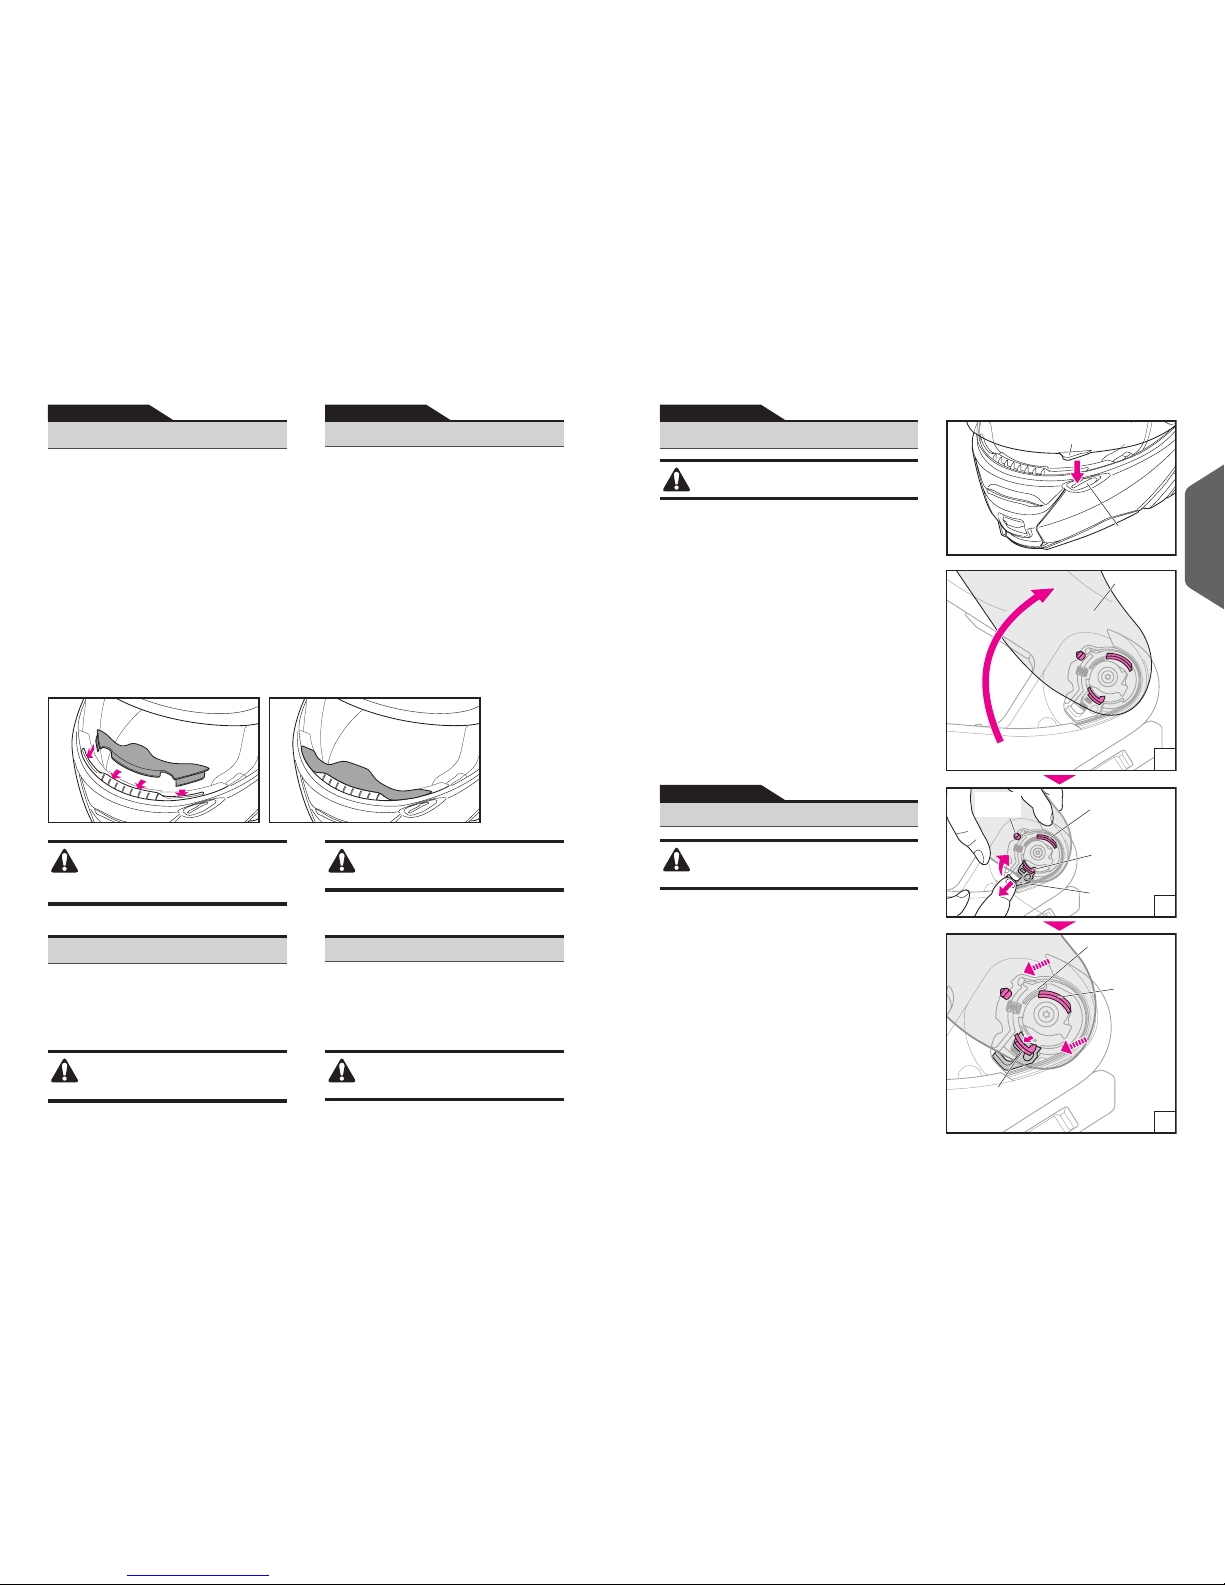
レバーを使用してサンバイザーのみ
を上下させてください。手で直接サ
ンバイザーを上下させないでくださ
い。サンバイザーの昇降機構を損傷する可
能性があります。
QSV-1 サンバイザーは日除けのための装備
であり、シールドとしての機能はありません。シー
ルドを開けてサンバイザーのみで走行はしないで
ください。
サングラスを併用すると、さらに視界が暗くなる
ため、絶対にしないでください。視界が妨げられ、
大変危険です。
夜間およびトンネル内や、視界が悪い状態のとき
は、QSV-1 サンバイザーは使用しないでください。
QSV-1 サンバイザーの汚れや傷は走行中の視界の
妨げとなり、大変危険です。QSV-1 サンバイザー
が汚れたり傷が付いたりしたら、直ちに使用を中
止し、取り外してふき取るか、交換してください。
QSV-1 サンバイザーの汚れは、乾いた柔らかい布
でふき取ってください。40℃を超える湯・塩水・
酸性またはアルカリ性の洗剤・ベンジン・シンナー・
ガソリン・その他の有機溶剤・ガラスクリーナー等、
有機溶剤を含むクリーナー類は使用しないでくだ
さい。これらが付着すると、サンバイザーが変質し、
安全性に支障をきたす可能性があります。.
QSV-1 サンバイザーは防曇加工が施されています
が、低温時や多湿時には曇る場合があります。そ
の際は、シールドを開けたり、ロアエアインテー
クを開けたりして換気をするか、サンバイザーを
上げて視界を確保してください。
保管状況によっては、湿度の影響で QSV-1 サンバ
イザーの表面が白くなることがあります。その場
合、メガネクロスのような、乾いた柔らかい布で
ふくと、元に戻ります。
視界を妨げる恐れがあるため、QSV-1 サンバイ
ザーに、ステッカーや粘着テープを貼らないでく
ださい。
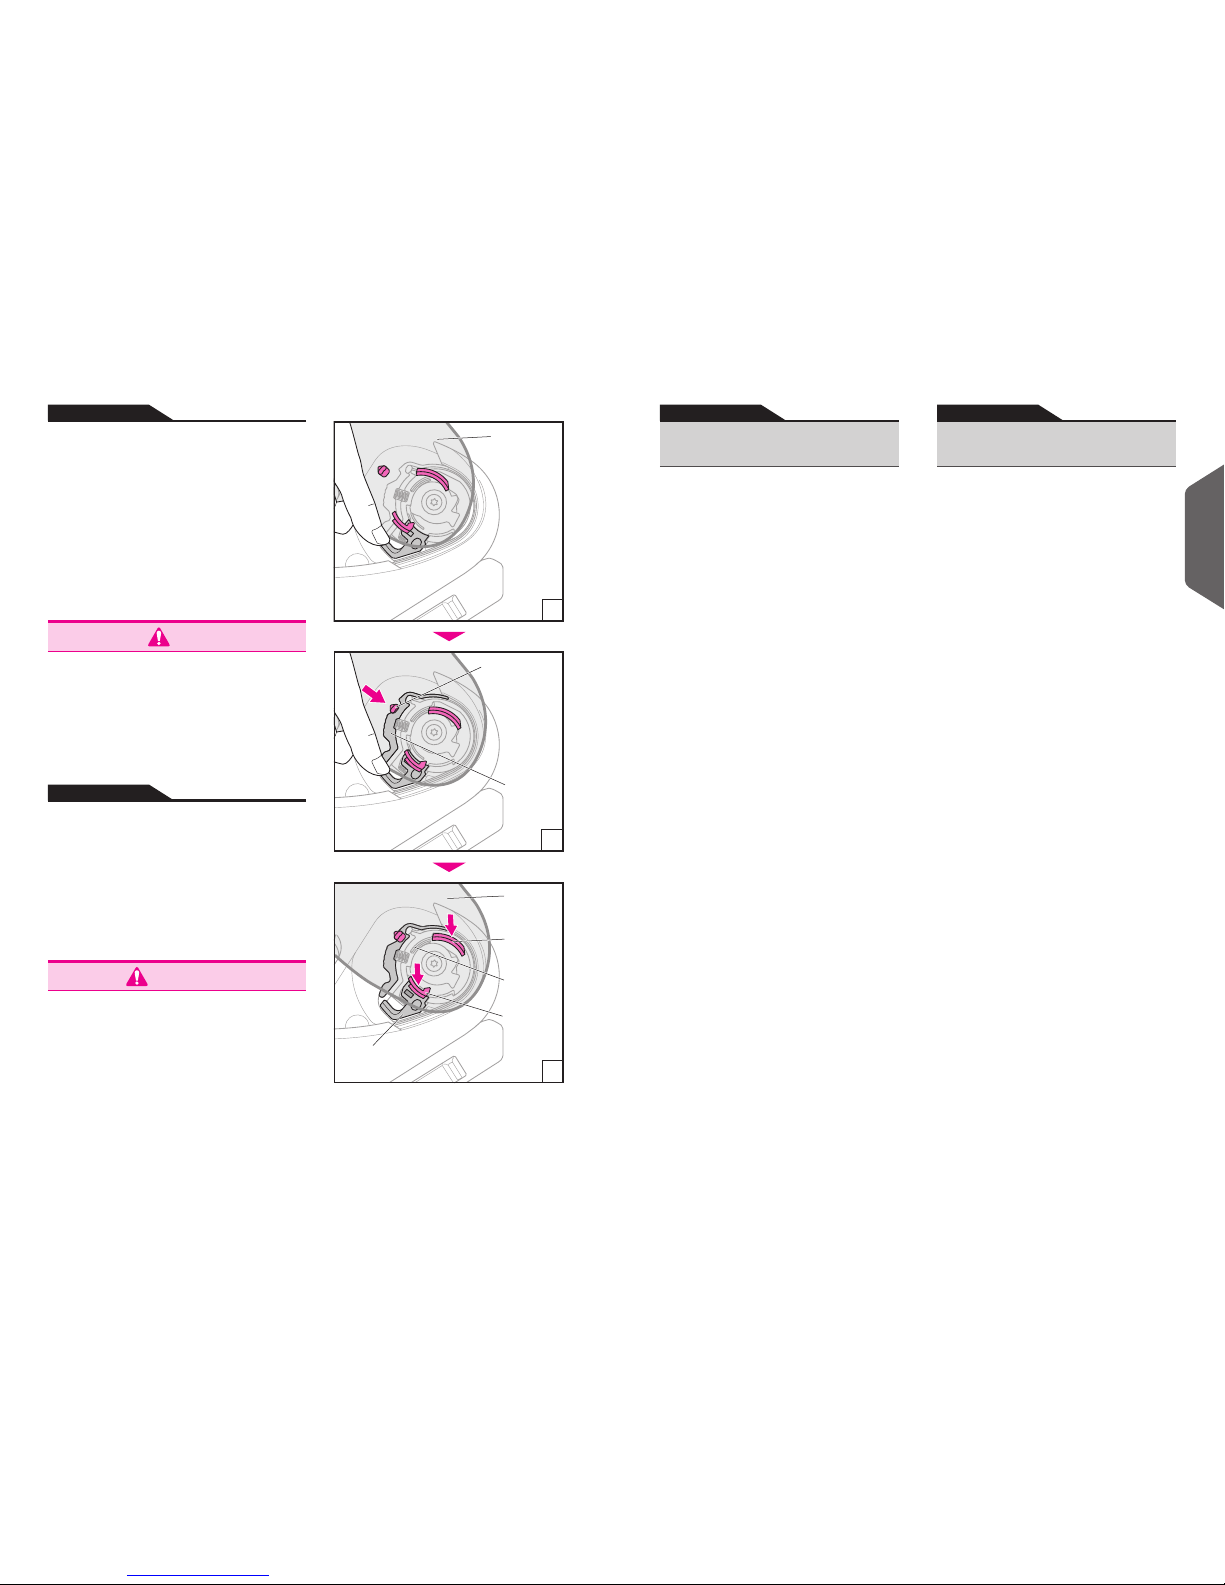
サンバイザーが正しく取り付けられていないと、
使用中に予期せず落下し、視界を妨げる可能性が
あります。QSV-1 サンバイザーを取り付けた後、
サンバイザーの突出部分がホルダーの開口部に
しっかりと収まっていることを確認するために、
サンバイザーを数回上下させてください。また、
サンバイザーとホルダーの間にスペースがないこ
とを確認してください。
Only raise or lower the sun visor
by using the lever. Never raise or
lower the sun visor directly with
your hands. This may damage the sun
visor’s raising and lowering mechanism.
The QSV-1 sun visor is designed to provide
shade only and cannot function as a shield. Do not
ride with the shield open and using only the sun
visor.
Do not use the sun visor together with sunglasses,
as this will dangerously darken your view!
Raise the sun visor while riding at night, through a
tunnel, or any other low-light condition.
Dirt and scratches on the sun visor may obstruct
your view while riding and can be very dangerous!
If the QSV-1 sun visor gets dirty or scratched, stop
using it immediately. Remove the sun visor and
clean or replace it.
The QSV-1 sun visor should be cleaned with a
solution of mild neutral soap and water. Rinse well
with pure water then wipe dry with a soft cloth. Do
not use any of the following cleaning materials:
hot water over 40ºC; salt water; any acidic or
alkali detergent; benzine, thinner, gasoline, or
other organic solvents; glass cleaner; or any
cleaner containing organic solvents. If any of
these cleaners are used, the sun visor’s chemical
nature may be altered and safety may be hindered.
The QSV-1 sun visor has undergone anti-fogging
treatment, but may develop fog in low temperatures
or high humidity. In this case, open the lower air
intake to circulate air or raise the sun visor.
Under certain storage conditions, humidity may
cause the outer surface of the sun visor to become
white. If this happens, take a soft, dry cloth like one
for cleaning eyeglasses and wipe the sun visor to
restore it to its original condition.
Do not attach any stickers or tape on the QSV-1 sun
visor. They may obstruct your view.
If the sun visor is not installed properly, it may drop
unexpectedly during riding and obstruct the rider’s
vision. After installing the QSV-1 sun visor, raise
and lower the sun visor several times to conrm
that the protruding section of the sun visor is t
securely in the holder’s opening. Conrm that there
is no space between the sun visor and the holder.