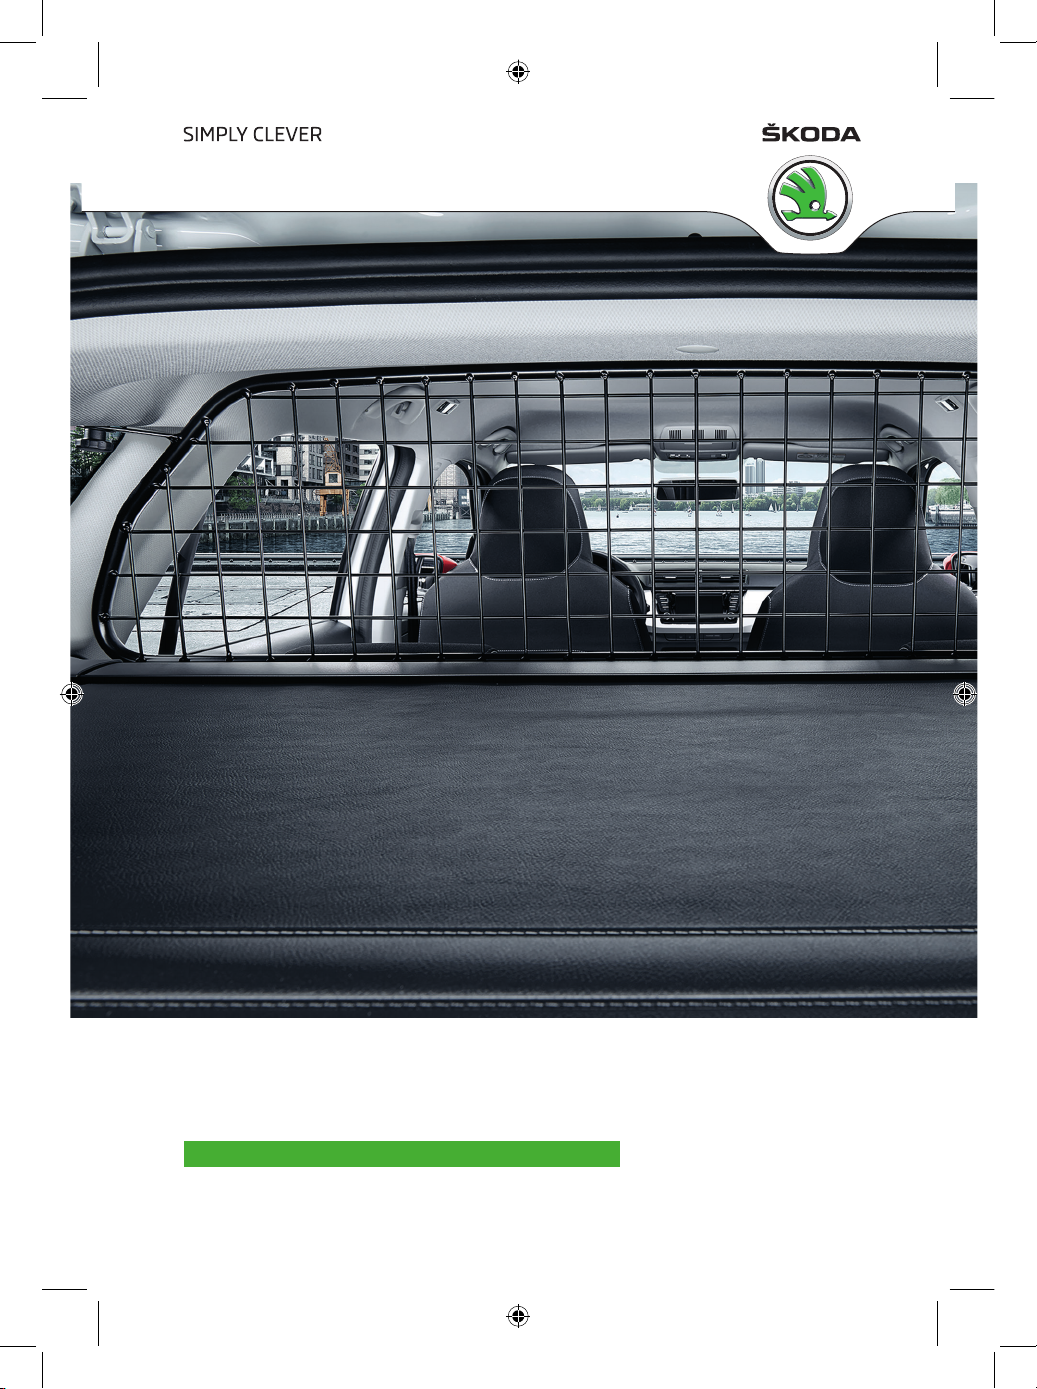
Skoda 6V9 017 221 User manual

Fitting instructions/ Montážní návod/ Montageanleitung
Dělicí mříž
Gitter, das Raum für Fahrgäste und Kofferraum trennt
Fabia Combi (NJ5)
Order Number/ Objednací číslo/ Bestellnummer
6V9 017 221
TRUNK GRILLE
TRUNK GRILLE

Notes to the text/ Poznámky k textu/ Anmerkungen zum Text
Caution.
Texts with this symbol warn against the risk of injury of the person performing the
assembly, or to potential risk of damage to the vehicle if the operation is performed
improperly.
Pozor.
Texty s tímto symbolem upozorňují na možnost poranění osoby provádějící montáž
popř. možnost poškození vozu při neopatrném provedení operace.
Achtung.
Texte mit diesem Symbol weisen auf Verletzungsgefahren bei Personen oder auf
eventuelle Beschädigungen des Wagens bei unachtsamer Durchführung der Operation
hin.
Attention.
Texts with this symbol contain instructions emphasizing accuracy of performance of
particular operation.
Upozornění.
Texty s tímto symbolem obsahují pokyny s důrazem na přesnost provedení dané
operace.
Hinweis.
Texte mit diesem Symbol enthalten Hinweise auf die Ausführungsgenauigkeit der
jeweiligen Operation.

window/ okno/ Fensterscheibe
C-pillar
C-sloupek
C-Säule
D-pillar
D-sloupek
D-Säule
forward/ dopředu/ nach vorne
6V9 017 221
A
B
J
G
H
F
C
D
E
Přípravu pro uchycení dělicí mříže
(vyvrtání otvorů a nanýtování matic)
-šipky- proveďte na obou stranách vozu
stejným způsobem.
Die Vorbereitung für die Befestigung des
Gitters (Herstellen von Bohrungen
und Einnieten der Muttern) -Pfeile- auf
beiden Fahrzeugseiten auf die gleiche
Weise durchführen.
Make preparations for attaching the grille
partition (drilling holes and riveting nuts)
(see arrow) in the same way on both sides
of the vehicle.
1
2

J
1.
2.
see text
viz text
siehe Text
MTX 9-193/B
ø 26 mm
see text
viz text
siehe Text
3
4

MTX 9-193/A
B
D
Schraube M8
Screw M8
Šroub M8
Mutter M8 mit Unterlage
Nut M8 with washer
Matice M8 s podložkou
5
6

E
see text
viz text
siehe Text
Označené místo pro vyvrtání otvorů
do bočního panelu obložení
zavazadlového prostoru.
Gekennzeichnete Stelle für die
Herstellung von Bohrungen in der
seitlichen Kofferraumverkleidung.
Marked point for drilling holes in the
side luggage compartment lining.
7
8

Vrtejte pouze do bočního panelu
obložení zavazadlového prostoru!
Nur in die seitliche Kofferraum-
verkleidung bohren!
Only drill the side luggage
compartment lining.
ø 32 mm
ø 32 mm
ø 32 mm
siehe Text
viz text
see text
9
10

C
A
F
11
12
13

G
H
siehe Text
viz text
see text
14
15


EN
11
Trunk grille
The accessories are intended for professional fitting. ŠKODA AUTO recommends that they are
fitted by a contractual partner.
Component index for the trunk grille set (Fig. 1)
Component Quantity Item
Trunk grille 1 A
M8 rivet nut 2 B
M8 rivet nut (hex head) 2 C
Adapter 2 D
Panel (in the roof lining) 2 E
Panel (in the side luggage compartment lining) 2 F
M8 screw, short 2 G
M8 screw, long 2 H
Template (for marking the drilling hole
in the roof lining) 1 J
Mounting instructions 1
Note
If the rivet nuts are ever lost, you can order more from the ŠKODA Original Accessories
catalogue using part number 3T9 071 754.
List of special tools
Drilling tool (diameter 26 mm) for drilling holes in the roof lining on the vehicle’s D-pillars
– MTX 9-193/B.
Riveting tool for riveting rivet nuts (B) (in the holes in the roof side panel below the roof lining
– MTX 9-193/A), open-end wrench SW 21, Allen key no. 10.
Tool for inserting adapters (D)
- M8 x 50 bolt, M8 nut with washer, open-end wrench SW 13.
Blade hole sawing bit (diameter 32 mm) for drilling holes in the side luggage compartment
lining.
Riveting tongs for M8 rivet nuts, e.g. V.A.G. 1765B order no. ASE 451 499 00 000 – for riveting
rivet nuts (C) in the holes in the wheel cover panel under the luggage compartment lining.
Pins, suction device.
Important mounting notes
Remove the luggage compartment lining from the vehicle and fold down the rear seat
backs.
Insert the trunk grille in accordance with the figures in the instructions (locations for
positioning the attachment points see arrows in fig. 2).

EN
12
Carry out all the instructions for mounting the trunk grille in the same way on both sides
of the vehicle.
Caution. When drilling, remove the swarf using the suction device in
order to avoid damaging the interior luggage compartment lining.
Cut out the enclosed templates (J).
Mounting procedure
Creating the attachment points for attaching the trunk grille to the roof lining
on the vehicle’s D-pillars.
Fig. 3, 4, 5, 6, 7
› Carefully position the template (J) to mark the drilling hole in the roof lining on the D-pil-
lars, as described on the template.
› Mark the point where you will drill with the pin.
Note. Use the pin to check that the template is positioned correctly
(the point where you will drill). To do this, use the pin to pierce the
roof lining in several places within the marked area, to make sure
that there is a hole underneath the marked point in the side roof
panel.
› Remove the template and put it to one side. It can be used later to mark the position for the
hole on the other side of the vehicle.
Note. Check that the position where you will drill the hole is correct
using a pendular motion for the pin inserted into the roof side panel.
› At the marked point, drill a hole with a diameter of 26 mm in the roof lining (to do this, use
the MTX 9-193/B drilling tool).
Rivet the rivet nut (B) in the hole in the roof side panel underneath the roof lining using
the MTX 9-193/A riveting tool as follows:
› Fix the rivet nut (B) into the riveting tool.
› Insert the riveting tool with the rivet nut into the hole in the roof side panel.
› Rivet the rivet nut by gradually tightening the nut on the tool.
› Fully tighten the nut on the tool, otherwise the rivet nut will be loose.
› Release the nut and remove the tool.
Insert the adapter (D) using the M8 x 50 bolt and M8 nut as follows:
› Screw the adapter using the washer onto the nut on the M8 bolt.
› Tighten the nut to the adapter.
› Insert the tool with the adapter into the hole in the riveted nut and screw in the adapter.
› Release the nut and remove the bolt.
Place the panel (E) on the protruding shaft of the adapter and then press in.

EN
13
Note. Position the panel so that the recess on the panel (see arrow)
points slightly forwards from the vehicle. When connecting the panel,
ensure that the roof lining is not deformed. If the roof lining around
the panel is uneven, remove it and flatten using the pin.
Create the attachment point for the trunk grille in the roof lining on the other
side of the vehicle in the same way.
Creating the attachment points for attaching the trunk grille to the side
luggage compartment lining (hereafter referred to as “lining”).
Fig. 8, 9, 10, 11, 12
› The point for drilling the hole in the lining is already marked ex factory by a small dot (arrow).
› Use the blade hold sawing bit to drill holes with a diameter of 32 mm.
Caution. Only drill the lining. A correctly drilled hole in the lining
should match up to the hole in the metal body under the lining.
If the metal body’s protective layer is damaged, the affected area
must be protected against corrosion by an appropriate primer,
e.g. Permacron 3255.
› Rivet the rivet nut (C) in the hole in the wheel cover panel.
› To do this, use riveting tongs, e.g. 1765B, order no. ASE 451 499 00 000.
› Clip the panel (F) into the square holes (in the wheel cover panel).
Create the attachment point for the trunk grille on the other side of the
luggage compartment in the same way.
Fig. 13, 14
› Insert the trunk grille (A) into the vehicle’s luggage compartment and position it on the
prepared attachment points.
Caution. Ensure that the roof lining, the luggage compartment lining
and the D-pillar trim panels are not damaged.
› Attach the trunk grille using the bolts with plastic heads (G, H).
› Fully tighten the bolts manually.
Visually check that the grille is attached correctly. Place the luggage compart-
ment lining in the vehicle (fig. 15) – the procedure can be found in the operating
instructions for the grille. Fold the rear seat backs back into place.

CZ
14
Dělicí mříž
Produkty příslušenství jsou určeny k odborné montáži. ŠKODA AUTO doporučuje provádět
montáž u smluvních partnerů.
Sada dělicí mříže obsahuje (obr. 1)
Název dílu Kusů Pozice
Dělicí mříž 1 A
Nýtovací matice M8 2 B
Nýtovací matice M8 (šestihranná) 2 C
Mezikus 2 D
Krytka (do panelu stropu) 2 E
Krytka (do bočního obložení zavazadlového prostoru) 2 F
Šroub M8 krátký 2 G
Šroub M8 dlouhý 2 H
Šablona (pro označení otvoru do panelu stropu) 1 J
Montážní návod 1
Poznámka
Pokud dojde ke ztrátě nýtovacích matic, je možné je doobjednat z katalogu ŠKODA Origi-
nálního příslušenství pod číslem dílu 3T9 071 754.
Seznam speciálního nářadí
Vrtací přípravek (průměr 26 mm) pro vyvrtání otvorů do panelu stropu u D-sloupku vozu
- MTX 9-193/B.
Přípravek pro nanýtování nýtovacích matic (B) (do otvorů v postranici střechy pod panelem
stropu - MTX 9-193/A, stranový klíč OK 21, imbus klíč č. 10.
Přípravek pro našroubování mezikusů (D)
- šroub M8 x 50, matice M8 s podložkou, stranový klíč OK 13.
Vykružovací vrták (průměr 32 mm) pro vyvrtání otvorů do panelů bočního obložení zavazadlo-
vého prostoru.
Nýtovací kleště pro nýtovací matice M8 např. V.A.G. 1765B objed. číslo ASE 451 499 00 000
- pro nanýtování nýtovacích matic (C) do otvorů v plechu krytu kola vozu pod obložením
zavazadlového prostoru.
Čalounický špendlík, vysavač.
Důležité pokyny k montáži
Vyjměte kryt zavazadlového prostoru z vozu a sklopte opěradla zadních sedadel.
Dělicí mříž namontujte dle obrázků v návodu (místa pro umístění upevňovacích bodů
viz -šipky- obr. 2).

CZ
15
Všechny pokyny pro namontování dělicí mříže provádějte na obou stranách vozu stejným
způsobem.
Pozor. Při operacích vrtání vysávejte vzniklé špony, aby nedošlo k
poškození vnitřního obložení zavazadlového prostoru.
Vystřihněte přiloženou šablonu (J).
Postup montáže
Provedení upevňovacích bodů pro uchycení dělicí mříže v panelu stropu u
D-sloupku vozu.
Obr. 3, 4, 5, 6, 7
› Šablonu (J) pro označení otvoru do panelu stropu u D-sloupku vozu ustavte pečlivě dle
popisu na šabloně.
› Čalounickým špendlíkem označte místo pro budoucí otvor.
Upozornění. Špendlíkem ověřte správnost ustavení šablony (polohu
budoucího otvoru). Tzn. v označeném místě čalounickým špendlíkem
několikrát propíchněte panel stropu, abyste se přesvědčili, že je pod
označeným místem otvor v postranici střechy vozu.
› Šablonu odstraňte a odložte na vhodné místo. Použijte ji pak k označení umístění otvoru na
druhé straně vozu.
Upozornění. Kývavým pohybem špendlíku zasunutého až do otvoru v
postranici střechy ověřte správnou polohu budoucího otvoru.
› V označeném místě vyvrtejte do panelu stropu otvor o průměru 26 mm (použijte vrtací
přípravek MTX 9-193/B).
Nýtovací matici (B) nanýtujte do otvoru v postranici střechy pod panelem stropu pomocí
nýtovacího přípravku MTX 9-193/A následovně:
› nýtovací matici (B) našroubujte na nýtovací přípravek,
› přípravek s nýtovací maticí vložte do otvoru v postranici střechy,
› postupným utahováním matice na přípravku nýtovací matici nanýtujte,
› matici na přípravku dotáhněte na doraz, jinak bude nýtovací matice volná,
› povolte matici a přípravek vyšroubujte.
Mezikus (D) našroubujte pomocí šroubu M8 x 50 a matice M8 následujícím způsobem:
› mezikus našroubujte přes plochou podložku k matici na šroubu M8,
› matici dotáhněte k mezikusu,
› přípravek s mezikusem vložte do otvoru v nanýtované matici a mezikus zašroubujte.
› povolte matici a šroub vyšroubujte.
Na vyčnívající dřík mezikusu ustavte a potom namáčkněte krytku (E).

CZ
16
Upozornění. Krytku ustavte tak, aby prolis na krytce –šipka- směřoval
šikmo, dopředu ven z vozu. Při nasazení krytky dbejte na to, aby
nedošlo k deformaci panelu stropu. Je-li u krytky panel stropu
nerovný, vytáhněte a srovnejte jej pomocí čalounického špendlíku.
Stejným způsobem vytvořte upevňovací bod dělicí mříže v panelu stropu na
druhé straně vozu.
Provedení upevňovacích bodů pro uchycení dělicí mříže v panelu bočního oblo-
žení zavazadlového prostoru (dále jen panelu).
Obr. 8, 9, 10, 11, 12
› Místo pro vrtání otvoru do panelu je označeno již z výroby malým bodem -šipka-.
› K vyvrtání otvorů o průměru 32 mm použijte vykružovací vrták.
Pozor. Vrtejte pouze do panelu. Správně vyvrtaný otvor v panelu by
měl být soustředný s otvorem v plechu karoserie pod panelem.
Pokud dojde k poškození ochranné vrstvy plechu karoserie, ošetřete
místo proti korozi vhodnou základní barvou např. Permacron 3255.
› Nýtovací matici (C) nanýtujte do otvoru v plechu krytu kola vozu.
› K nanýtování použijte nýtovací kleště např. V.A.G. 1765B objednací číslo ASE 451 499 00 000.
› Do hranatých otvorů (v plechu krytu kola vozu) nacvakněte krytku (F).
Stejným způsobem vytvořte upevňovací bod dělicí mříže na druhé straně zava-
zadlového prostoru vozu.
Obr. 13, 14
› Vložte dělicí mříž (A) do zavazadlového prostoru vozu a ustavte ji k připraveným upevňova-
cím bodům.
Pozor. Dbejte na to, aby nedošlo k poškození panelu stropu, obložení
zavazadlového prostoru nebo panelu D-sloupku.
› Pomocí šroubů s plastovou hlavou (G, H) mříž upevněte.
› Šrouby rukou dotáhněte na doraz.
Zkontrolujte vizuálně správné uchycení dělicí mříže. Vložte do vozu kryt zava-
zadlového prostoru (obr. 15) - postup je popsán v návodu k použití dělicí mříže.
Opěradla zadních sedadel sklopte zpět do standardní polohy.

DE
17
Gitter, das Raum für Fahrgäste und
Kofferraum trennt
Die Zubehörprodukte sind für eine fachgerechte Montage vorgesehen. ŠKODA AUTO
empfiehlt es, die Montage durch Vertragspartner durchzuführen.
Teileverzeichnis des Gittersets (Abb. 1)
Teil Stückzahl Position
Gitter 1 A
Einnietmutter M8 2 B
Einnietmutter M8 (Sechskant) 2 C
Zwischenstück 2 D
Blende (in die Dachverkleidung) 2 E
Blende (in die seitliche Kofferraumverkleidung) 2 F
Schraube M8 kurz 2 G
Schraube M8 lang 2 H
Schablone (zur Kennzeichnung der Bohrung
in der Dachverkleidung) 1 J
Montageanleitung 1
Hinweis
Sollten die Einnietmuttern einmal abhandenkommen, dann können diese aus dem Kata-
log ŠKODA Original Zubehör unter der Teilenummer 3T9 071 754 nachbestellt werden.
Liste der Spezialwerkzeuge
Bohrwerkzeug (Durchmesser 26 mm) für die Herstellung von Bohrungen in der Dachverklei-
dung an der D-Säule des Fahrzeugs - MTX 9-193/B.
Nietwerkzeug für das Einnieten von Einnietmuttern (B) (in die Bohrungen im Dach-Seitenteil
unterhalb der Dachverkleidung - MTX 9-193/A, Maulschlüssel SW 21, Inbusschlüssel Nr. 10.
Werkzeug für das Einschrauben von Zwischenstücken (D)
- Schraube M8 x 50, Mutter M8 mit Scheibe, Maulschlüssel SW 13.
Schweifbohrer (Durchmesser 32 mm) für die Herstellung von Bohrungen in den seitlichen
Kofferraumverkleidungen.
Nietzange für Einnietmuttern M8 z. B. V.A.G. 1765B Bestell-Nr. ASE 451 499 00 000 - für das
Einnieten von Einnietmuttern (C) in die Bohrungen im Blech der Radabdeckung unterhalb der
Kofferraumverkleidung.
Stecknadel, Staubsauger.
Wichtige Montagehinweise
Die Kofferraumabdeckung aus dem Fahrzeug herausnehmen und die Rücksitzlehnen
vorklappen.

DE
18
Das Gitter laut Abbildungen in der Anleitung einbauen (Stellen zum Positionieren der
Befestigungspunkte siehe -Pfeile- Abb. 2).
Alle Anweisungen zum Einbauen des Gitters auf beiden Fahrzeugseiten auf die gleiche
Weise ausführen.
Achtung. Bei Bohrarbeiten die entstandenen Späne absaugen, um
Schäden an der inneren Kofferraumverkleidung zu vermeiden.
Die beiliegende Schablone (J) herausschneiden.
Montageablauf
Die Ausführung der Befestigungspunkte für die Befestigung des Gitters in der
Dachverkleidung an der D-Säule des Fahrzeugs.
Abb. 3, 4, 5, 6, 7
› Die Schablone (J) zur Kennzeichnung der Bohrung in der Dachverkleidung an der D-Säule
sorgfältig laut Beschreibung auf der Schablone positionieren.
› Die Stelle für die zukünftige Bohrung mit der Stecknadel kennzeichnen.
Hinweis. Die richtige Position der Schablone (Position der zukünfti-
gen Bohrung) mit der Stecknadel überprüfen. D. h., im gekennzeich-
neten Bereich die Dachverkleidung mit der Stecknadel an mehreren
Stellen durchstechen, um sich zu vergewissern, dass sich unterhalb
der gekennzeichneten Stelle eine Bohrung im Dach-Seitenteil
befindet.
› Die Schablone entfernen und an einer geeigneten Stelle ablegen. Diese dann zum Kenn-
zeichnen der Position für die Bohrung auf der anderen Fahrzeugseite verwenden.
Hinweis. Durch eine Pendelbewegung der bis in die Bohrung im
Dach-Seitenteil eingesteckten Stecknadel die richtige Position der
zukünftigen Bohrung überprüfen.
› An der gekennzeichneten Stelle eine Bohrung mit einem Durchmesser von 26 mm in der
Dachverkleidung herstellen (dazu das Bohrwerkzeug MTX 9-193/B verwenden).
Die Einnietmutter (B) in die Bohrung im Dach-Seitenteil unterhalb der Dachverkleidung
mit dem Nietwerkzeug MTX 9-193/A wie folgt einnieten:
› Einnietmutter (B) in das Nietwerkzeug einschrauben,
› Nietwerkezug mit der Einnietmutter in die Bohrung im Dach-Seitenteil einsetzen,
› durch allmähliches Festziehen der Mutter am Werkzeug die Einnietmutter einnieten,
› Mutter am Werkzeug bis zum Anschlag festziehen, sonst bleibt die Einniertmutter lose,
› Mutter lösen und das Werkzeug herausschrauben.
Das Zwischenstück (D) mittels der Schraube M8 x 50 und der Mutter M8 wie folgt ein-
schrauben:

DE
19
› Zwischenstück über die Flachscheibe zur Mutter an der Schraube M8 schrauben,
› Mutter bis zum Zwischenstück festziehen,
› Werkzeug mit dem Zwischenstück in die Bohrung in der eingenieteten Mutter einsetzen
und das Zwischenstück einschrauben.
› Mutter lösen und die Schraube herausschrauben.
Auf den herausragenden Schaft des Zwischenstücks die Blende (E) setzen und dann
eindrücken.
Hinweis. Die Blende so positionieren, dass die Vertiefung auf der
Blende -Pfeil- schräg nach vorn aus dem Fahrzeug zeigt. Beim
Aufstecken der Blende darauf achten, dass die Dachverkleidung nicht
verformt wird. Ist die Dachverkleidung im Bereich der Blende uneben,
dann diese herausziehen und mittels der Stecknadel glätten.
Auf die gleiche Weise den Befestigungspunkt für das Gitter in der Dachver-
kleidung auf der anderen Fahrzeugseite herstellen.
Die Ausführung der Befestigungspunkte für die Befestigung des Gitters in der
seitlichen Kofferraumverkleidung (nachstehend nur als Verkleidung).
Abb. 8, 9, 10, 11, 12
› Die Stelle zur Herstellung der Bohrung in der Verkleidung ist bereist ab Werk durch einen
kleinen Punkt gekennzeichnet -Pfeil-.
› Zur Herstellung von Bohrungen mit einem Durchmesser von 32 mm den Schweifbohrer
verwenden.
Achtung. Nur in die Verkleidung bohren. Eine richtig hergestellte
Bohrung in der Verkleidung sollte gleichmittig zur Bohrung im
Karosserieblech unterhalb der Verkleidung stehen.
Bei Beschädigung der Schutzschicht des Karosserieblechs ist die
betroffene Stelle durch eine geeignete Grundierung,
z. B. Permacron 3255, vor Korrosion zu schützen.
› Die Einnietmutter (C) in die Bohrung im Blech der Radabdeckung einnieten.
› Zum Einnieten eine Nietzange, z. B. 1765B, Bestell-Nr. ASE 451 499 00 000, verwenden.
› In die eckigen Bohrungen (im Blech der Radabdeckung) die Blende (F) einclipsen.
Auf die gleiche Weise den Befestigungspunkt für das Gitter auf der anderen
Kofferraumseite herstellen.
Abb. 13, 14
› Das Gitter (A) in den Kofferraum des Fahrzeugs einsetzen und an den vorbereiteten Befesti-
gungspunkten positionieren.

DE
20
Achtung. Darauf achten, dass die Dachverkleidung, die Kofferraum-
verkleidung oder die D-Säulenverkleidung nicht beschädigt wird.
› Das Gitter mittels der Kunststoffkopfschrauben(G, H) befestigen.
› Die Schrauben von Hand bis zum Anschlag festziehen.
Eine Sichtprüfung der richtigen Befestigung des Gitters durchführen. Die
Kofferraumabdeckung in das Fahrzeug einsetzen (Abb. 15) - die Vorgehenswei-
se ist der Bedienungsanleitung des Gitters zu entnehmen. Die Rücksitzlehnen
wieder zurückklappen.
Table of contents
Languages:
Other Skoda Automobile Accessories manuals

Skoda
Skoda 3V5 071 126 User manual

Skoda
Skoda 1ST 071 126 User manual

Skoda
Skoda 3V9 017 221 User manual

Skoda
Skoda SmartLink WLAN User manual

Skoda
Skoda 5E5 064 711 User manual

Skoda
Skoda EEA 309 001 User manual

Skoda
Skoda iV Charger User manual

Skoda
Skoda MASTER User manual

Skoda
Skoda 5E1 064 209 User manual

Skoda
Skoda 565 075 111 User manual

Skoda
Skoda FABIA 1999 User manual

Skoda
Skoda 5JA 071 126 User manual

Skoda
Skoda Octavia A7 User manual

Skoda
Skoda TMB PS 010.01 User manual

Skoda
Skoda 000 071 175C User manual

Skoda
Skoda 565 017 221 User manual

Skoda
Skoda 5JA 071 126 User manual

Skoda
Skoda 5E9 071 151 User manual

Skoda
Skoda 57A 061 163 User manual

Skoda
Skoda iV Charger User manual