stabo PMR 446 User manual

13
stabo freecomm 450
Set
Owners Manual
Art.-Nr. 20455
PMR 446 radio handheld
Important
Before your installation please
read this manual carefully and
keep it for further information.

2
Table of contents
General notes...............................................................................................................................3
Safety warnings............................................................................................................................3
Important information....................................................................................................................4
Scope of delivery..........................................................................................................................5
Control elements and connections ...............................................................................................6
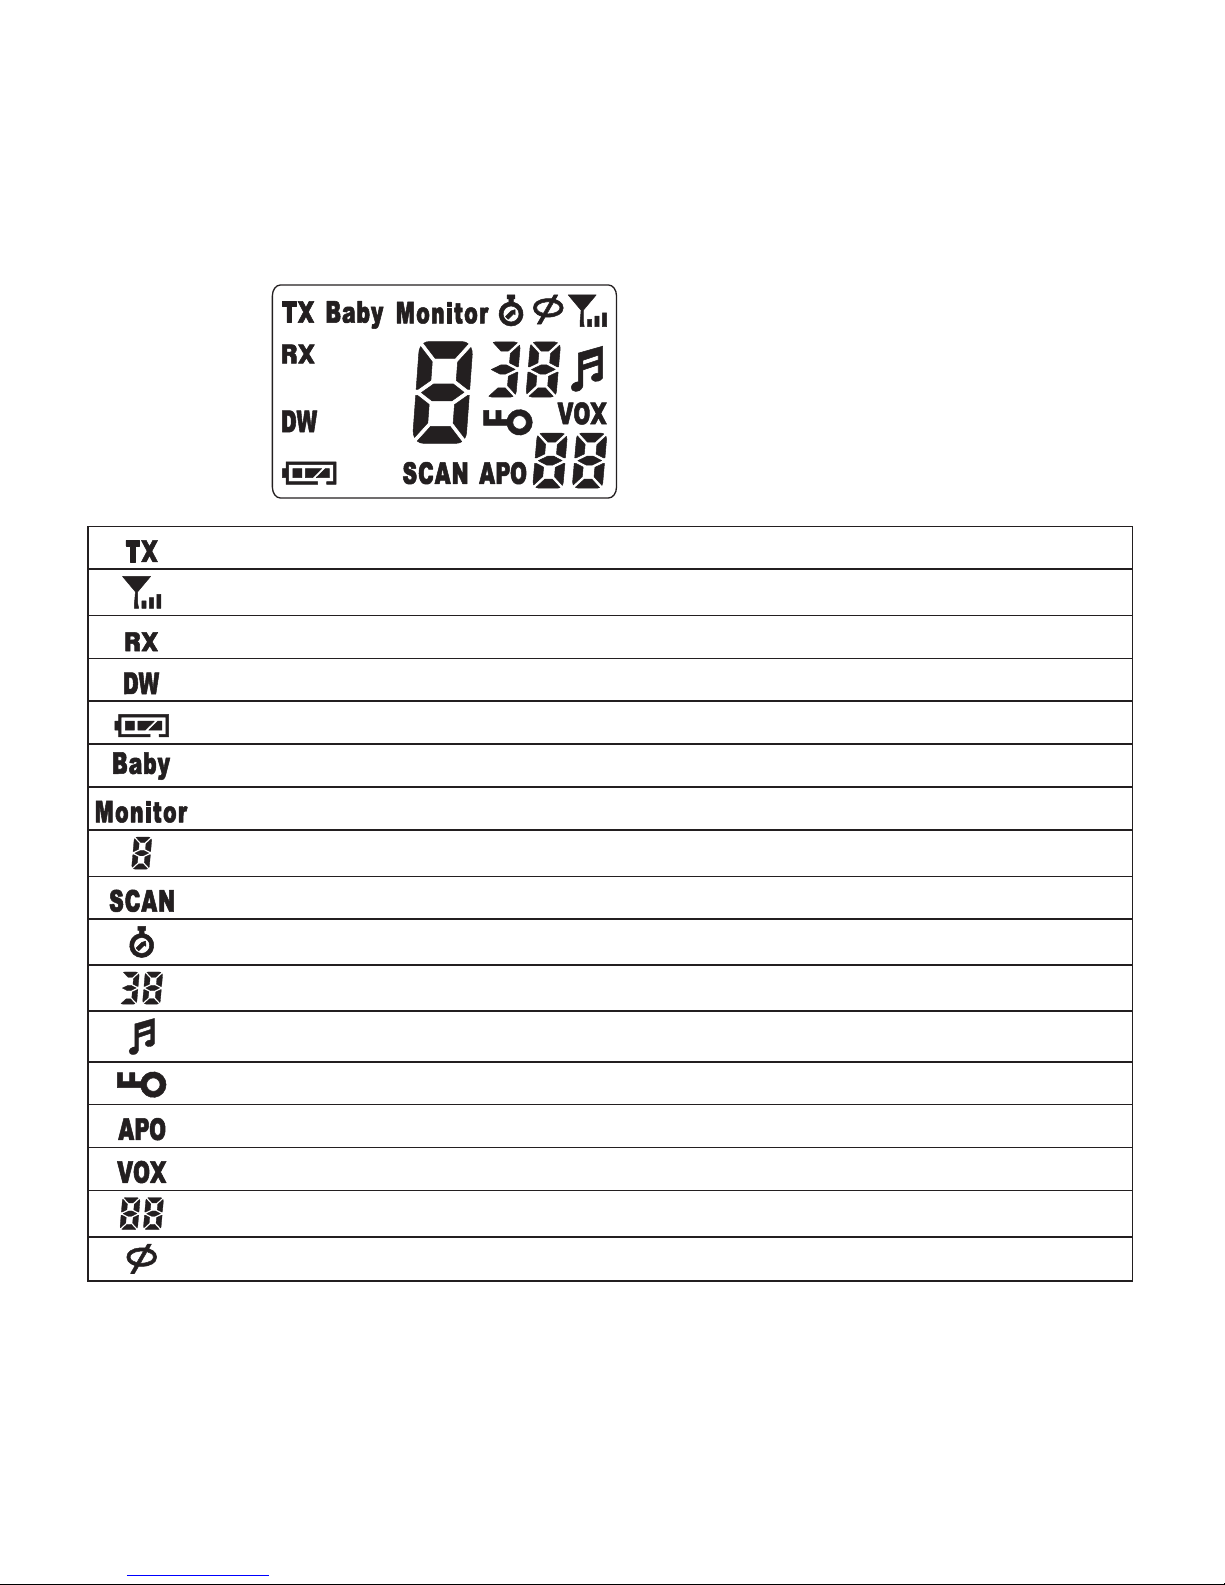
On the display...............................................................................................................................8
Important provisions for the operation..........................................................................................9
Charging of the battery packs .................................................................................................9
Safety instructions for the charger ...........................................................................................9
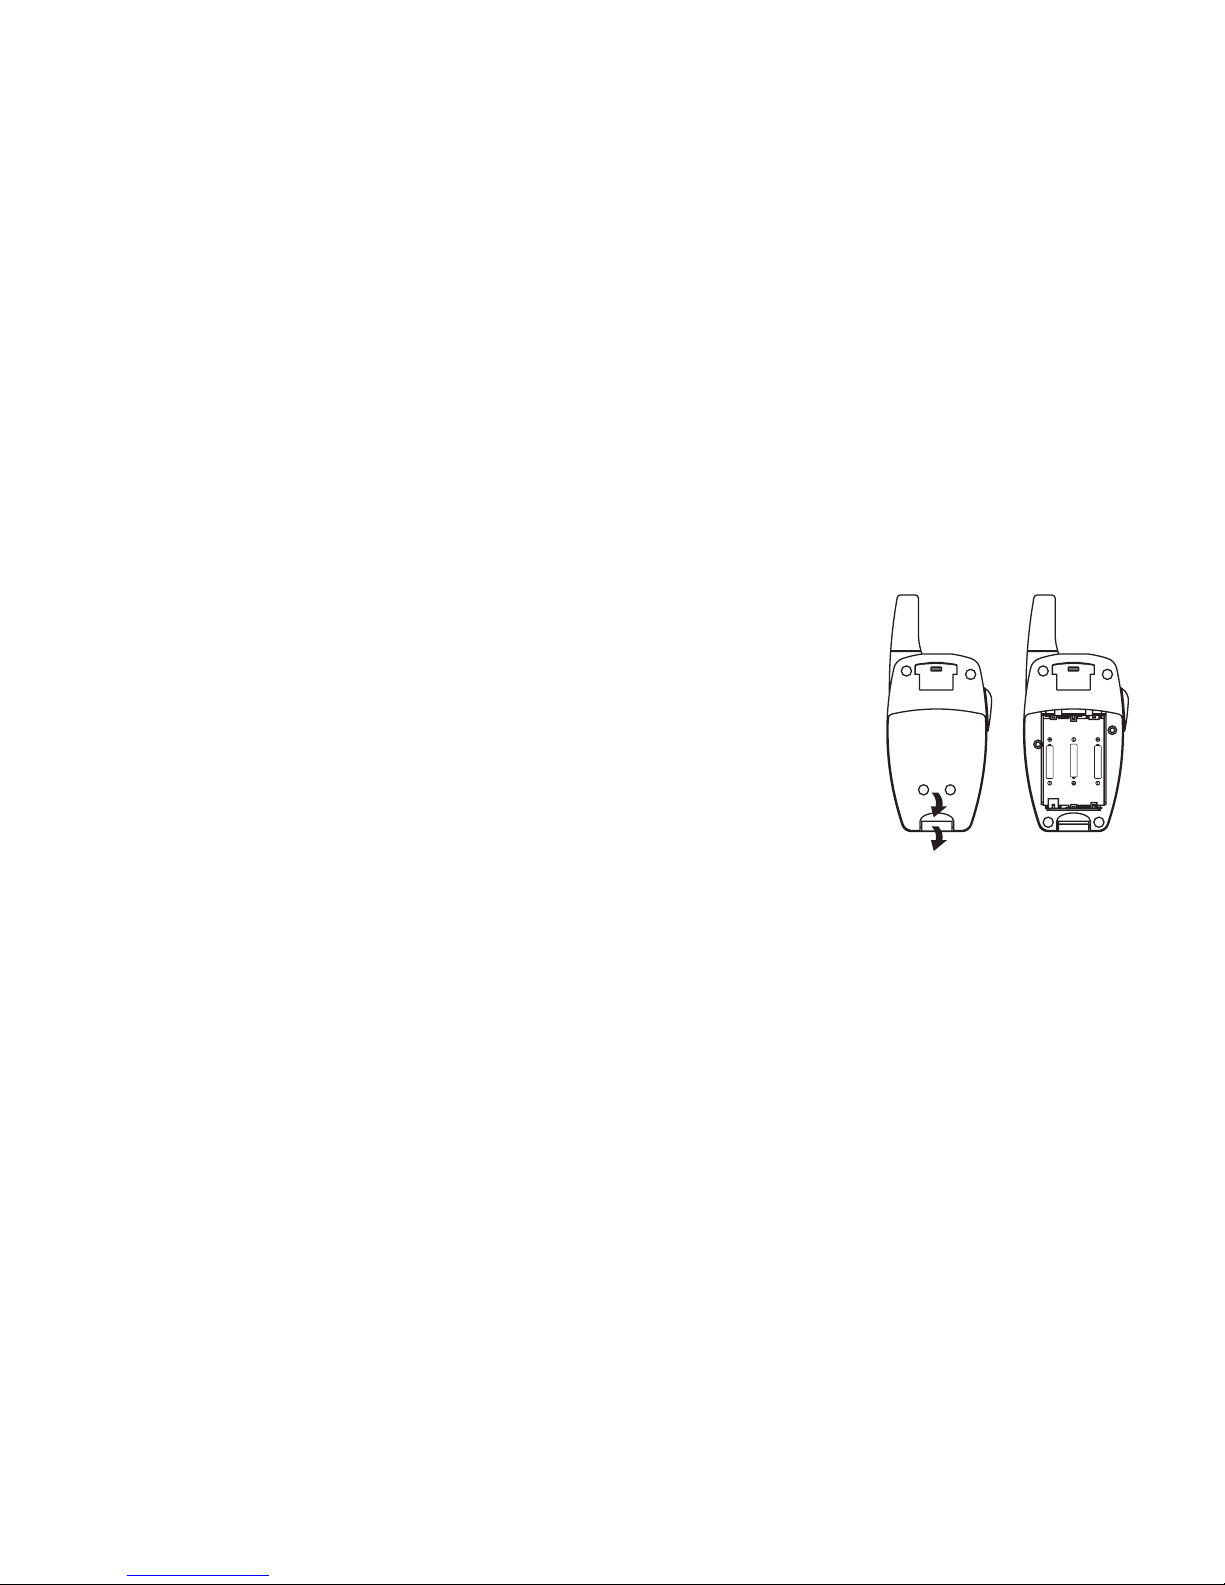
Removing/inserting the battery pack......................................................................................10
Operation with batteries .........................................................................................................10
Energy management.............................................................................................................. 11
Belt clip .................................................................................................................................. 11
Operation/functions .................................................................................................................... 11
Switching on/off the radio set................................................................................................. 11
Adjusting the volume.............................................................................................................. 11
Select channel ....................................................................................................................... 11
Transmitting/receiving ............................................................................................................12
Automatic squelch..................................................................................................................12
Pilot tone process CTCSS .....................................................................................................12
Speech scrambling ................................................................................................................12
Call tone ................................................................................................................................13
Monitor key ............................................................................................................................13
Key lock and display lighting..................................................................................................13
Automatic scan ......................................................................................................................14
Dual watch function................................................................................................................14
Stop watch function................................................................................................................14
VOX function..........................................................................................................................15
Baby sitting ............................................................................................................................15
Baby sitter function ................................................................................................................16
Automatic power OFF ............................................................................................................16
Care instructions.........................................................................................................................17
Disposal instruction ....................................................................................................................17
Technical data.............................................................................................................................17
Troubleshooting..........................................................................................................................18
Channel-frequency table ............................................................................................................18
Pilot tone-CTCSS frequency table..............................................................................................18
Manufacturer warranty................................................................................................................19

3
General notes
Please read this manual carefully and completely to make yourself familiar with the vari-
ous functions of your radio set. Make sure to observe the safety instructions to avoid any
danger for you and other persons as well as damage to the radio set. Keep the operating
instructions in a safe place. Be sure to hand over the instructions in case you lend out or
sell the radio sets.
The manufacturer disclaims any liability for damage and consequential damage caused
by the nonobservance of these instructions!
Safety warnings
Persons with cardiac pacemakers are generally advised not to use radio sets! No transmission in
immediate proximity to persons with cardiac pacemakers.
Do not touch the antenna during the transmission; do not hold it close to your body, especially not
close to the face or the eyes. When using a headset be sure not to turn the volume of your radio
set too high: otherwise the noise might damage your hearing.
Do not operate the radio sets neither in an aircraft nor in a hospital or in comparable facilities.
Switch off the radio sets, if you are in explosive-prone environment (e.g. petrol station). Make sure
not to change the battery pack/the battery in those places.
When using the radio set in a vehicle be sure to comply with the national regulations! In some
countries it is forbidden to use a radio set while driving a vehicle! In a vehicle equipped with an
airbag you must not operate or store the radio sets neither directly above the airbag nor in the
ination zone of the airbag.
Never open the housing of a radio set or its accessories and do not carry out any modication.
Ensure that any repair is carried out by qualied personnel only. Modications of or interventions
in the radio set automatically lead to an expiry of the type approval, moreover it voids all warranty
claims!
Prevent children from playing with the radio sets, accessories, batteries or the packing material.
If you state the odour emissions or the formation of smoke, immediately switch off the radio set
and remove the battery pack/the batteries. Do not operate the radio set, if you detect any damage
of the housing or the antenna. Contact a qualied workshop.

4
Protect your radio sets and the accessories against moistness, heat, dust and strong vibrations.
Avoid operating temperatures below -10°C or above +50°C. Do not expose the radio sets to direct
sunlight for a prolonged period (e.g. rear window shelf in the vehicle). Do not employ the radio
sets in the rain: however, if the radio set has become wet, switch it off immediately, take out the
battery pack/the batteries and dry it by means of a soft, lint-free cloth. Only employ the radio set, if
it is completely dry.
Never throw the battery packs/batteries into the re! Never short-out the contacts of the battery
pack!
Important information
stabo freecomm 450 is a PMR 446-radio set for voice radio over short distances.
The radio standard PMR 446 is assigned in AT, BE, CH, DE, DK, ES, FI, FR, GB, GR, IE,
HR, HU, NL, NO, PL, PT, SE, SI (free of charge and without any registration).
There is obligatory registration in IT: Italian residents have to pay a nonrecurring charge
upon registration of the radio set! (Tourists may use their radio sets free of charge for the
duration of their stay in Italy.)
For information on national regulations concerning the use of radio sets on travels abroad
please contact the embassies/consulates of the corresponding countries or you may get the
information from the corresponding telecoms and postal regulator.
PMR 446-radio sets transmit/receive on 8 specied channels (446 MHz). Within the radius of
reach (max. 5 km) you can communicate via an optional number of radio sets, however, only
one person can talk and the other/s listen. Uncoded voice radio links are not condential!
The range is a function of many factors. Apart from the statutory transmitting power other fac-
tors are relevant: e.g. the position of the antenna (it should be installed at right angle and send
freely), the energy supply (fully charged battery packs fully exploit the reach) and above all the
environment where you transmit. Each “obstacle” (hills, buildings, trees) reduces the range;
some materials (e.g. reinforced concrete, pieces of rock) give rise for considerable screening
effects. Under optimum conditions (i.e. unobstructed view, e.g. in the open country, during sail-
ing or paragliding) PMR 446 radio sets have a maximum reach of 5 km. In housing areas a
range of 1–2 km is realistic, in strongly screened environment (e.g. in the mountains or inside
buildings made of reinforced concrete) the reach may drop to a few hundred metres or less.

5
Scope of delivery
2 PMR 446 hand voice radio sets
2 belt clips
1 design double tabletop charger
1 power supply unit 230 V/50 Hz
2 NiMH battery packs 700 mAh/3.6 V *
* Important information:
Both NiMH-battery packs have already been inserted correctly into the radio sets!
Before you can use the radio sets the battery packs have to be charged for 12 to
14hours.Beforetherstchargingyouhavetopullthecontactprotectionstripoutofthe
housing in direction of the arrow!
Do not remove the green foil of the battery pack!

6
1
2
3
4
5
6
7
8
9
10
18
17
16
15
14
13
12
11
Control elements
and connections
1. Antenna The antenna is xed to the housing; do not try to unscrew it!
2. LC display
3. Monitor key MA short keystroke bypasses the squelch (the display shows “RX“) for
15 sec. or until renewed short keystroke.
4. Scan key SStart/stop of the scan.
5. Enter key
Short keystroke: Switching on the display light for 5 sec.
Longer keystroke (approx. 2 sec.): Switching on the key lock
In the menu: Conrmation of a setting.
6. UP key sStepwise or continuous boosting of the volume
In the menu: Stepping forward through the individual settings
7. Speaker
8. Contact protection strip (to be pulled out before the rst loading!)

7
9. Battery lock
10. Battery cover
11. DOWN key tStepwise or continuous turning down the volume
In the Set menu: Stepping forward through the individual settings
12. Microphone
13. Menu key Switching over to the Set menu and stepping forward to the individual
functions
14. Call key CSending out a call tone
15. PTT key Transmission key
16. Transmission/reception LED red light during transmission, green light during reception
and red light in intervals of 2 sec. with activated battery stand-by mode.
17. On/off switch
18. MIC/SPK socket: Connection socket for an optional headset

8
The display:
Shows whether you are transmitting
Shows when your radio set is receiving a signal
Dual Watch is activated
Battery charge indicator (3 steps)
Baby sitting: Radio set is activated as baby sitter
Baby sitting: Radio set is activated as listening set for parents
Shows the adjusted channel number
SCAN is activated
Stop watch is activated
Shows the number adjusted for the CTCSS-process
Display for the setting and transmission of a call tone
Key lock is activated
Auto-Power-Off is activated
VOX is activated
Display of the volume
Scrambler is activated
Note: The symbols SQ and ALC that are displayed after switching on do not have any function.

9
Important provisions for the operation!
The battery packs included in the scope of delivery have already been inserted correctly into the
radio sets!
Before the commissioning of the radio sets the battery packs have to be charged (charging time
approx. 12to 14hours).
Note:Beforetherstchargingyouhavetopullthecontactprotectionstripoutofthe
radio sets in direction of the arrow!
Charging of the battery packs
The charging current of this battery charger is adjusted to approx. 50 mA to 100 mA, the
charging time thus depends on whether you want to charge one or two battery packs and on
the state of charge and the capacity of the battery pack. Recharging of partly discharged battery
packs is basically possible; however, it reduces their lifetime.
The tabletop charger does not switch off automatically. Be sure to terminate the charging in time
in order to avoid overcharging of the battery pack, as repeated overcharging also reduces their
lifetime.
Maximum charging times:
With completely discharged battery packs with a capacity of 700 mAh the two battery packs are
fully charged after 12–14hours. If you want to recharge two half-full battery packs, the charging
time is only 6–7hours. If you only put one radio set into the charger for charging, the charging
current doubles from approx. 50 mA to approx. 100 mA; thus the charging times are reduced by
half!
Charging of the battery pack in the radio set:
1. Plug the power supply unit into a 230 V socket.
2. Connect the power supply unit to the charger.
3. Switch off the radio sets.
4. Place the radio sets into the charging shaft.
The control lamps on the charger emit red light, the battery packs are now being charged
(charging times please see above).
Safety instructions for the charger
The double tabletop charger must only be used for the charging of the NiMH battery packs that
are included in the scope of delivery!
Do not place radio sets that are equipped with batteries (not rechargeable), into the charger!

10
There is explosion hazard!
The charger must only be operated with the delivered power supply unit. Do not abuse it as DC
voltage source for other applications.
Prevent small metal parts from penetrating into the charger.
Do not disassemble neither the power supply unit nor the charger.
Disconnect the device from the mains if you do not use it.
Never short-out the contacts of the battery pack!
Make sure that the radio sets are switched off during charging.
Only use the charger in closed rooms. Protect it from humidity, dust, heat and strong vibrations.
Removing/inserting the battery pack
Remove the battery packs, if you do not use your radio sets for
a prolonged period! Ensure the correct polarity when reinserting
the battery packs (the white indicating label is visible, the arrow
points upwards)!
Opening/closing the battery case
Take off the belt clip! Unlock the safety catch at the notch (see gure 1),
slightly lift the battery cover and pull it downwards.
Slide the cover on the housing and lock the safety catch.
Operation with batteries
Your radio sets can also be operated with three micro-batteries each (type: AAA, LR03).
It is essential to ensure the indicated polarity when inserting them into the battery case
(see gure 2)!
In case of a battery change you always have to exchange all batteries. Do not mix different
battery types, batteries with different capacities or batteries and rechargeable battery cells!
Do not try to charge a radio set that is equipped with batteries in the charger! There is explosion
hazard!
Remove the batteries, if you do not use your devices for a prolonged period!
Information on disposal of battery packs/batteries
Used up battery packs and batteries are not to be thrown into the domestic waste. Be sure to
observe the national disposal regulations and dispose used up battery packs/batteries (only if
completely discharged) with the corresponding collecting points.
Fig. 1 Fig. 2

11
Energy management
The power consumption of this radio set is very small. If no signal is received, the electronic
battery stand-by mode is activated. If the capacity of the battery pack is too low or if the
batteries are empty, the radio set will emit an audio warning that is repeated every 15 sec.
Now you have to charge the battery pack or replace the batteries.
If the battery stand-by mode is activated the transmission/
reception LED emits red light in intervals of 2 sec.
Attach/take off belt clip
Place the grooves of the belt clip on the guide rails on the upper
part of the housing and slide the clip downwards until the safety
catch snaps in (see gure 3).
Push the safety catch (on top of the belt clip) away from the
housing in order to remove it from the radio set (see gure 4).
Operation/functions
Note: If a setting is not activated within 10 seconds the radio set will automatically
adopt the last setting. As conrmation there is a double beep sound.
Switching on/off the radio set
Pushing the on/off key permits to switch the radio set on (the radio set is thus ready-to-
receive) and off. Switching on/off is accompanied by a beep sound.
Adjusting the volume
Pushing the s(loud) or t(mute) keys permits to change the volume in 8 steps.
Select channel
This function permits to select one of the eight channels.
Always adjust both radio sets to the same channel!
1. One push on the key until the channel number is ashing.
2. Select a free channel by means of the sor tkey.
3. Validate by means of the PTT or
key.
Fig. 3 Fig. 4

12
Transmitting/receiving
Hold the PTT button pressed and speak with normal voice level and a distance of approx.
5 cm into the microphone. If your message is nished, release the PTT key, thus you free the
channel and your radio partner can reply. If you receive a signal, RX will be displayed.
Automatic squelch
Your radio set is equipped with an automatic squelch that prevents that an annoying noise can
be heard on free radio channels. However, under certain conditions – and depending on the
distance – computers, electric or electronic devices might interfere with this squelch, so that you
hear noises.
Due to the supersensitive receiver of the radio set, such interferences in immediate proximity
are normal and unavoidable.
In case of such interferences you should change the distance to the source of interference and
hold the radio set in such a manner that the antenna could send freely.
Pilot tone process CTCSS
Your radio set is equipped with a pilot tone process that permits to address specic individual
partner stations or groups or to receive only calls from the latter. For this, the radio sets are
switched to mute and only the transmission or reception of the corresponding pilot tone “opens”
the channel, so that only desired messages are exchanged (key/lock principle).
Note: Make sure that you and your partner use the same channel and the same pilot
tone. 38 different tones are available (see table).
Activate pilot tone process CTCSS
1. Push the key twice until the pilot tone number is ashing.
2. Select the pilot tone number by means of the sor tkey.
3. Validate by means of the PTT or
key.
Deactivate the pilot tone process CTCSS
1. Push the key twice until the pilot tone number is ashing.
2. Select the 00 by means of the sor tkey.
3. Validate by means of the PTT or
key.
Speech scrambling
Speech scrambling prevents that your transmission can be tapped without further auxiliaries by
unauthorized persons.

13
Note: You and your partner have to adjust the same speech scrambling code!
Your radio set is equipped with 4 speech scrambling codes that are designated as 1, 2, 3, and
4 in the menu. The display OF means: no scrambling.
Activate speech scrambling
1. Push the key three times until OF is indicated on the right side of the display.
2. Select the desired speech scrambling code (1, 2, 3, or 4) by means of the keys sor t
3. Validate by means of the PTT or
key, the symbol is now displayed.
Deactivate speech scrambling
1. Push the key three times until 1, 2, 3 or 4 is indicated on the right side of the display.
2. Select the OF by means of the sor tkey.
3. Validate by means of the PTT or
key, the symbol is no longer displayed.
Call tone
Push the call key Cto send out a tone call that is received by the partner station. You also hear
the call tone in your own speaker and the transmission LED is lit.
Selection of the call tone
1. Push the key four times, the symbol is displayed and a number between 1 and 10 is
ashing down right.
2. Select one of 10 different call tones by means of the sor tkey.
3. Validate by means of the PTT or
key, the symbol is no longer displayed.
Monitor key M
A short stroke on this key permits to bypass the squelch, thus you can also hear weak signals.
Pushing the key once again (or automatically after 15 sec.) permits to switch on the squelch
once again.
Key lock and display lighting
As a protection against faulty operation you can lock the keyboard (with the exception of the
PTT and call tone key).
Activate key lock
Push the
key for 2 sec., the symbol is displayed.
Deactivate key lock
Push the
key for 2 sec., the symbol is no longer displayed.

14
Display lighting
A short stroke on the
key activates the display lighting for approx. 5 sec.
Automatic scan
The automatic scan permits to nd active channels quickly. It scans independently all of the
8 channels and stops as soon as a signal exceeds the squelch threshold. After having found a
signal scanning will stop. It will start anew, if no signal is available. You can also restart scanning
by pushing the sor tkey.
Activate scanning
1. Push the S key for 2 sec., SCAN is displayed.
2. The direction of scanning can be changed by means of the sor tkey.
Deactivate scanning
To deactivate scanning you push the
key or the S key, SCAN is no longer displayed.
Dual watch function
If you wish to be ready-to-receive on both channels instead of only one channel, you require the
dual watch function. With this function the radio set automatically changes every 0.5 sec.
From the actual channel to any second channel (preferred channel).
Activate Dual Watch
1. Push the key seven times until DW is displayed and the channel number is ashing.
2. Select the preferred channel by means of the sor tkey.
Monitoring can be interrupted and restarted by means of the monitor key M.
Deactivate Dual Watch
To deactivate the dual watch function you push the PTT key or the
key, DW is no longer
displayed.
Stop watch function
The radio set is equipped with an integrated stop watch with a time measuring range of 1 sec.
to 9 hrs 59 min. 59 sec. If the watch is not stopped during this time, the time measurement will
start anew.
Activate the stop watch
1. Push the key ten times until 0:00:00 is displayed.
2. The skey starts the time measurement.
3. The tkey stops the time measurement or resets the stop watch.

15
Deactivate the stop watch
Push the
or the key, the channel number is displayed.
VOX function (phonetic transmission)
This function permits to send without activating the transmit key: Voices/noises that hit the
microphone thus switch on the transmitter of the radio set.
In order to avoid a permanent accidental activation of the radio set by environmental noises, the
VOX function is only activated in a distance of up to approx. 30 cm. For this reason you should
use an optional headset, if your hands are busy (e.g. during installation work/during cycling), but
if you want to wear the radio set on the belt. If you want to employ the radio set for baby sitting,
fix the headset near the child’s bed and position the radio set in appropriate distance (see below).
Adjust the sensitivity according to the environmental noises, so that the set switches from
reception to transmission if your voice volume is appropriate. You can select between 4 sensi-
tivity levels (step 4 = highest sensitivity).
Activate VOX
1. Push the key eight times until VOX is displayed and OF is ashing.
2. Select the desired sensitivity level 1, 2, 3 or 4 by means of the keys sor t
3. Validate by means of the PTT or
key, the VOX is displayed.
Deactivate VOX
1. Push the key eight times until the adjusted sensitivity level is ashing.
2. Select the OF by means of the sor tkey.
3. Validate by means of the PTT or
key, the VOX is no longer displayed.
Baby sitting
Radio sets with VOX function can also be used for baby sitting. The baby set is activated by
crying/calling and then transmits to the parents’ set.
Be sure to observe that the acoustic monitoring via radio set permits to ease the
supervision of a child, however it can by no means substitute the personal supervision!
Activate the VOX function on the baby set (please see above) and adjust the highest sensitivity
level (level 4). Fasten the headset (out of reaching area of the child) near the crib, ensure that it
is not covered (e.g. by the blanket). Connect the headset to the radio set (MIC/SPK socket) and
place the radio set in an upright position and a distance of approx. 1 m.

16
Note: Check (with an assistant or for instance with a portable radio as sound source),
whetherthereissufcientradioreceptionbetweenthechildren’sroomandtheroom
where you stay! Optimise the position of the radio set, if required.
Baby sitter function
This additional function assures that the sleep of your child is not disturbed by accidental
transmission (possibly from the neighbourhood). In this case the two radio sets have different
settings: For the baby set you have to switch off the receiver and activate the key lock and for
the parents’ set your have to lock the transmission and the call key.
Note: First you activate the VOX function on the baby set (please see above) and ad-
just the highest sensitivity level (4). Then you activate the additional baby sitter function:
Activate baby sitter
1. Push the key ve times until BABY is displayed and OF is ashing.
2. Select the ON by means of the sor tkey.
3. Validate by means of the PTT or
key.
Deactivate baby sitter
Push the
key to deactivate the function, BABY is no longer displayed.
Activateparents’listeningset
1. Push the key six times until MONITOR is displayed and OF is ashing.
2. Select the ON by means of the sor tkey.
3. Validate by means of the PTT or
key.
Deactivateparents’listeningset
1. Push the key six times until MONITOR is displayed and ON is ashing.
2. Select the OF by means of the sor tkey.
3. Validate by means of the PTT or
key, the MONITOR is no longer displayed.
Automatic power OFF
The radio set is equipped with an automatic power OFF function. Thus the radio set switches
off automatically after the time you have set (1 hour, 2 hours, 3 hours or 6 hours). Shortly before
the radio set switches off an audio warning is emitted for approx. 15 sec. and OF is ashing in
the display. If you push any key during this time, the timer will be restarted. If no key is pushed,
the radio set will switch off.

17
Activate APO
1. Push the key nine times until APO is displayed and 0 is ashing.
2. Select 1, 2, 3 or 6 by means of the keys sor t.
3. Validate by means of the PTT or
key, APO is displayed.
Deactivate APO
1. Push the key nine times until 1, 2, 3, or 6 is ashing in the display.
2. Select the number 0 by means of the sor tkey.
3. Validate by means of the PTT or
key, APO is no longer displayed.
Care instructions
Protect your radio sets and the accessories against humidity/moistness, dust/contamination,
strong vibrations and extreme temperatures.
Do not dip the radio sets and the accessories into water or other liquids. Clean the housings
of the radio sets by means of a slightly damp, lint-free cloth, do not at all use detergents or
solvents. Keep the battery contacts clean by means of a dry cloth.
Remove the battery packs/batteries, if you do not use your devices for a prolonged period.
Disposal instruction
Electric and electronic devices are not to be thrown into the domestic waste.
Deliver devices that are out of order/used with a corresponding collecting point.
Please contact your local authorities for corresponding information.
Technical data
Frequency range: 446.00625 MHz-446.09375 MHz
Number of channels: 8
Number of subchannels (CTCSS): 38
Range: max. 5 km (with unobstructed view)
Output power: <500 mW
Operating pressure: 3.6 V/700 mAh NiMH battery pack or
3x micro-batteries type AAA or LR03
Dimensions (WxHxD): 136 x 51 x 30 mm (incl. antenna)
Weight: 116 g with batteries

18
Troubleshooting
Fault Your radio set cannot be switched on.
Remedy Charge the battery pack or renew the batteries.
Fault You can neither speak nor hear your radio partner.
Remedy Adjust the same channel and possibly the same CTCSS-tone for all radio sets.
If you are out of reach, reduce the distance to your radio partner.
Fault You do hear your radio partner and your partner does not hear you (Micky-Mouse-
effect).
Remedy Make sure that the scrambler is either activated or deactivated for both radio sets.
With an active scrambler both radio sets must be adjusted to the same speech
scrambling code.
Fault No key function
Remedy The key lock is switched on. Deactivate the key lock.
Fault The channel is permanently busy
Remedy The VOX sensitivity of a partner set is adjusted too high, for this reason the radio set
transmits continuously. Reduce the VOX-sensitivity of the device.
Other parties in your environment occupy the channel. Switch to another channel.
Channel-frequency
table
CTCSS (Continuous Tone Coded Squelch System)
Pilot tone-frequency table
Channel
no.
Frequency
(MHz)
Sub
Chan.
Freq.
(Hz)
Sub
Chan.
Freq.
(Hz)
Sub
Chan.
Freq.
(Hz)
Sub
Chan.
Freq.
(Hz)
Sub
Chan.
Freq.
(Hz)
1
2
3
4
5
6
7
8
446.00625
446.01875
446.03125
446.04375
446.05625
446.06875
446.08125
446.09375
1
2
3
4
5
6
7
8
67.0
71.9
74.4
77.0
79.7
82.5
85.4
88.5
9
10
11
12
13
14
15
16
91.5
94.8
97.4
100.0
103.5
107.2
110.9
114.8
17
18
19
20
21
22
23
24
118.8
123.0
127.3
131.8
136.5
141.3
146.2
151.4
25
26
27
28
29
30
31
32
156.7
162.2
167.9
173.8
179.9
186.2
192.8
203.5
33
34
35
36
37
38
0
210.7
218.1
225.7
233.6
241.8
250.3
—

19
Manufacturer warranty
We offer a 2-year warranty for the product stabo freecomm 450 Set.
The warranty period starts with the day you have bought the product (please keep the receipt
as proof of purchase in a safe place!); the validity period of the warranty is not extended, if the
product is exchanged or repaired.
The warranty shall extend to the repair free of charge of all manufacturing and material defects
on the date of purchase of this product, the warranty does not apply for
– Transport damages,
– Radio sets that have been opened or modied without authorisation,
– Damages caused by inappropriate handling, wilful damage or non-observance of the
operating instructions,
– Damages caused by the use of accessories other than those included in the scope of supply,
– Functions that are not described in the operating instructions,
– Faults due to mechanical overstressing, the impact of heat or humidity, leaking batteries or
incorrect voltage supply.
– Consumables (battery packs)
– Freight or transport charges.
The manufacturer will comply with the guarantee claims according to his best judgement either
by repair or by exchange of the product or product parts. In case of an exchange the product
may possibly differ from the model that has been bought originally.

Errors and technical modifications reserved.
Copyright © 08/2008 stabo Elektronik GmbH
stabo Elektronik GmbH .Münchewiese 14 –16 . 31137 Hildesheim/Germany
Tel. +49 (0) 5121-76 20 - 0 .Fax: +49 (0) 5121- 51 29 79
Other manuals for PMR 446
2
Table of contents
Other stabo Radio manuals

stabo
stabo xm 4060e User manual

stabo
stabo 30056 User manual

stabo
stabo voxmic 100 User manual

stabo
stabo PMR 446 User manual

stabo
stabo xm 4006e User manual

stabo
stabo freecomm 700 User manual

stabo
stabo xh 9006e User manual

stabo
stabo xm 3082 User manual

stabo
stabo xm 3004e VOX 12/24 User manual

stabo
stabo xm 3006e VOX 12/24 User manual

stabo
stabo xm 5008e-R VOX 12/24 User manual

stabo
stabo Magnum multi Technical manual

stabo
stabo Freecomm 400 User manual

stabo
stabo xm 3200 II User manual

stabo
stabo xm 3003e User manual

stabo
stabo stabo xm 3008e VOX 12/24 User manual

stabo
stabo freecomm 600 PMR 446 User manual

stabo
stabo xm 3003 User manual

stabo
stabo freecomm 400 II User manual