48,&.6(77,1*)81&7,21
10
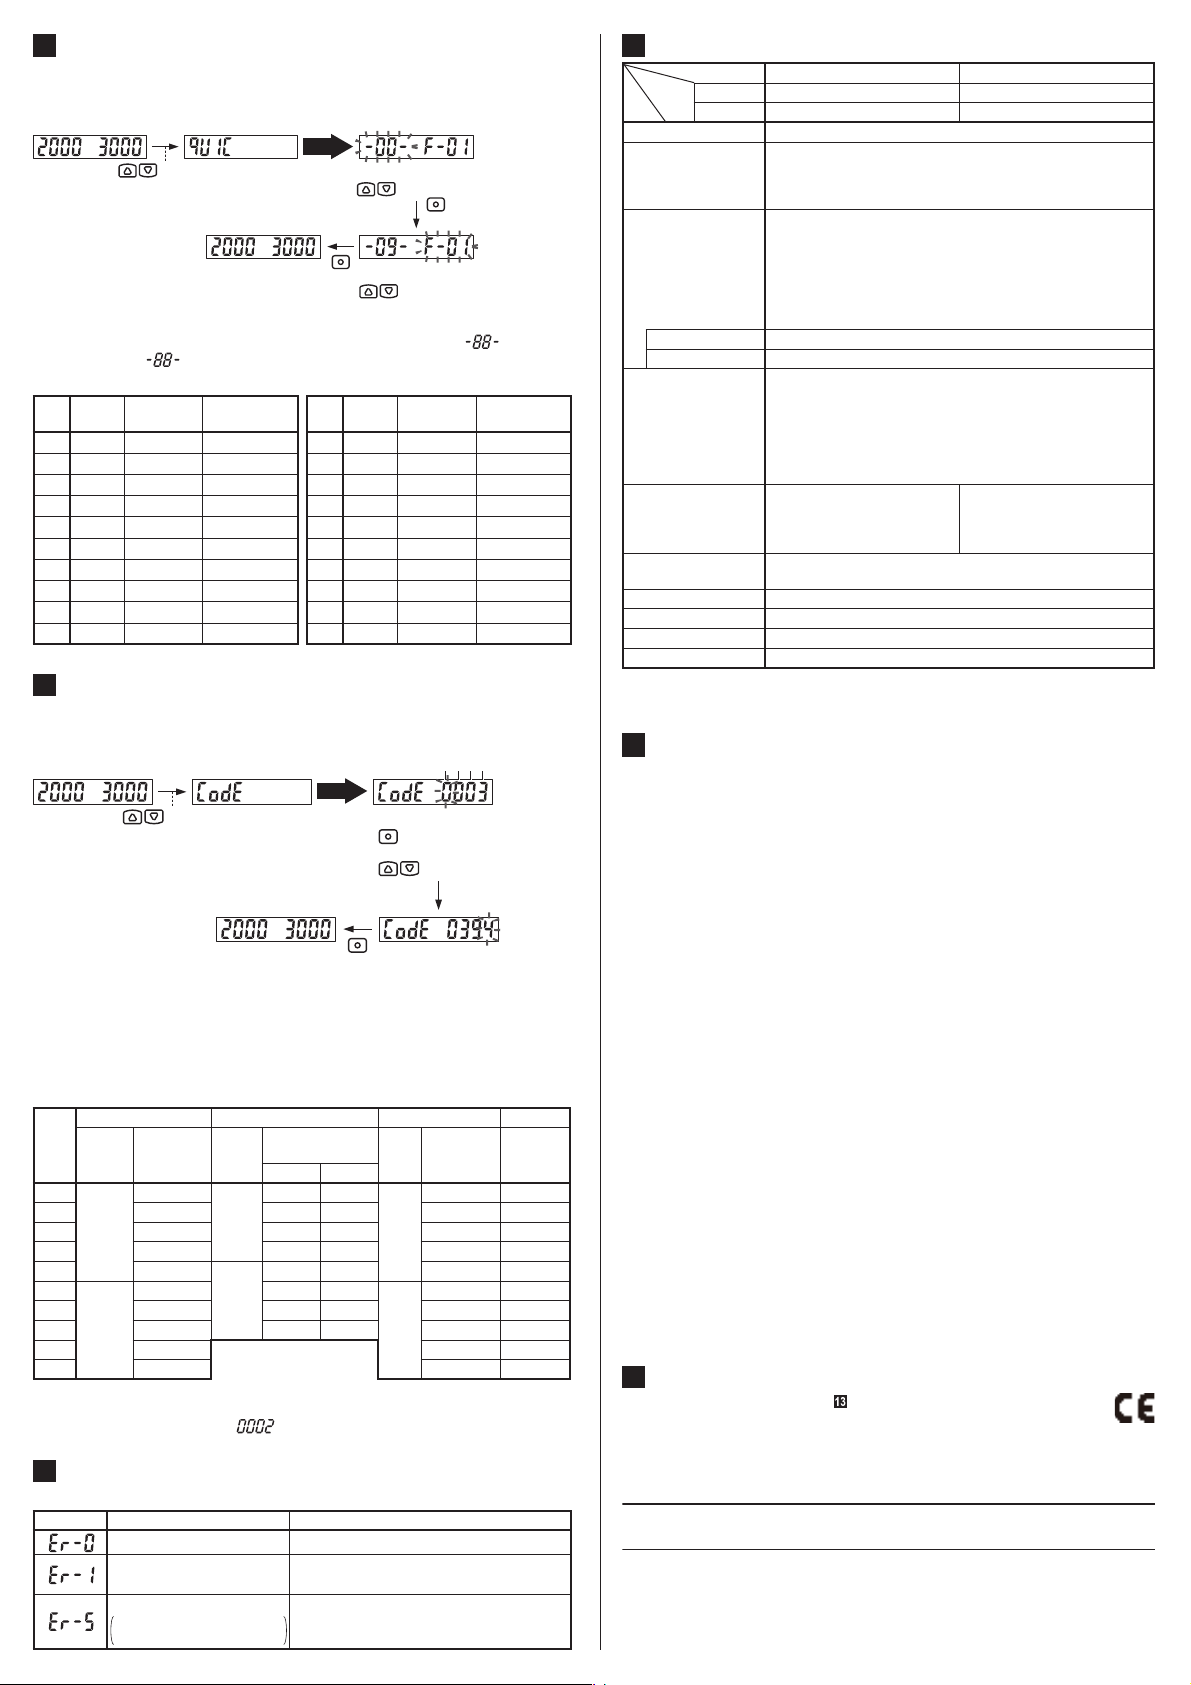
7DEOHRITXLFNVHWWLQJQXPEHUV!
Settings for output operation, emission amount, timer, and emission fre-
TXHQF\DUHSRVVLEOHVLPSO\E\VHOHFWLQJDVHWWLQJQXPEHU
)RUWKHVHWWLQJQXPEHUVUHIHUWR7DEOHRITXLFNVHWWLQJQXPEHUV!.
Ɣ
Ɣ
<When in RUN mode>
Press for 2 sec.
(Note 1)
: Select a quick setting number
(Quick setting)
: Select emission frequency
(Emission frequency setting)
(Note 1)
Automatic
Notes: 1) &DQFHOODWLRQLVSRVVLEOHZKHQ02'(NH\LVSUHVVHGIRUVHFRUPRUHEH-
IRUH¿QDOL]LQJWKHQUHWXUQWR581PRGH.
2) When the present setting is out of the quick setting range, “ ” is shown.
When “ ” is selected, the set content is not changed.
No. Output
operation
Emission amount
setting
Timer
'21 OFF non
'21 ON non
'21 OFF RIGPV
'21 ON RIGPV
'21 OFF RIGPV
'21 ON RIGPV
'21 OFF RQGPV
'21 ON RQGPV
'21 OFF RQGPV
'21 ON RQGPV
No. Output
operation
Emission amount
setting
Timer
L-ON ON RQGPV
-11- L-ON OFF RQGPV
-12- L-ON ON RQGPV
-13- L-ON OFF RQGPV
-14- L-ON ON RIGPV
L-ON OFF RIGPV
L-ON ON RIGPV
-17- L-ON OFF RIGPV
-18- L-ON ON non
L-ON OFF non
<When in RUN mode>
Press for 4 sec.
(Note 1)
: Select of codes
: After finalizing,
the digit shifts
(Code setting) (Note 2) (Note 3)
(Note 4)
Automatic
1 432
Settings for output operation, timer, emission amount, emission frequency, ECO,
H[WHUQDOLQSXWDQGVKLIWDPRXQWDUHSRVVLEOHE\VHOHFWLQJFRGHVGLVFUHWLRQDU\
For the codes, refer to &RGHWDEOH!.
Ɣ
Ɣ
Notes: 1) Although the quick setting function appears 2 sec. after the set value UP key
DQGVHWYDOXH'2:1NH\DUHSUHVVHGNHHSSUHVVLQJWKHNH\
2) &DQFHOODWLRQLVSRVVLEOH ZKHQ02'(NH\LV SUHVVHGIRUVHFRUPRUHEH-
IRUHWKHGLJLWEOLQNVWKHQUHWXUQWR581PRGH
3)&DQFHOODWLRQRIVHWYDOXHLVSRVVLEOHZKHQ02'(NH\LVSUHVVHGIRUVHFRU
PRUHZKLOHWKHGLJLWLVEOLQNLQJ
:KHQWKHIRXUWKGLJLWLVGHWHUPLQHGWKHVHWWLQJVDUHUHÀHFWHG
Code
1st digit 2nd digit 3rd digit 4th digit
Output
operation
Timer
1RWH
Emission
amount
setting
Emission
frequency ECO ([WHUQDO
input
Shift
1RWH
);Ƒ= );Ƒ=
'RQ
non
OFF
1
OFF
E_oF
1RQGPV 1 2 Limit [+]
2RQGPV 2 3 Limit [–]
3RIGPV
34
Auto
4RIGPV
ON
1 Eco
L-on
non 1 2
ON
E_oF
RQGPV 2 3 Limit [+]
7RQGPV
34
Limit [–]
8RIGPV Auto
RIGPV Eco
&RGHWDEOH!
1RWHV :KHQWKHSUHVHQWVHWWLQJLVRXW RIWKHFRGHVHWWLQJUDQJH³±´ LVVKRZQ
When “–” is selected, the set content of the digit is not changed.
7KHIDFWRU\VHWWLQJLV³ .”
&2'(6(77,1*)81&7,21
11
(5525,1',&$7,21
12
In case of errors, attempt the following measures.Ɣ
'LVSOD\ Error description Measures
EEPROM writing error &RQWDFWRXURI¿FH
The load has short-circuited
DQGH[FHVVFXUUHQWLVÀRZLQJ
Turn off the power, then check the load.
Communication error
'LVFRQQHFWLRQFRQQHFWLRQ
failure, etc.
&KHFNWKHZLULQJEHIRUH XVLQJWKHVHWWLQJ
copy function.
PRINTED IN JAPAN
Overseas Sales Dept. (Head Office)
2431-1 Ushiyama-cho, Kasugai-shi, Aichi, 486-0901, Japan
Phone: +81-(0)568-33-7861 FAX: +81-(0)568-33-8591
Europe Headquarter: Panasonic Electric Works Europe AG
Rudolf-Diesel-Ring 2, D-83607 Holzkirchen, Germany
Phone: +49-8024-648-0
US Headquarter: Panasonic Electric Works Corporation of America
629 Central Avenue New Providence, New Jersey 07974 USA
Phone: +1-908-464-3550
URL : sunx.jp
SUNX Limited
7KLVSURGXFWKDVEHHQGHYHORSHGSURGXFHGIRULQGXVWULDOXVHRQO\
Make sure that the power supply is off while wiring.
7DNHFDUHWKDWLIDYROWDJHH[FHHGLQJWKHUDWHGUDQJHLVDSSOLHGRULIDQ$&
SRZHUVXSSO\LVGLUHFWO\FRQQHFWHGWKHSURGXFWPD\JHWEXUQWRUGDPDJHG
7DNHFDUHWKDWVKRUWFLUFXLWRIWKHORDGRUZURQJZLULQJPD\EXUQRUGDP-
age the product.
'RQRWUXQWKHZLUHVWRJHWKHUZLWKKLJKYROWDJHOLQHVRUSRZHUOLQHVRUSXW
them in the same raceway. This can cause malfunction due to induction.
Verify that the supply voltage variation is within the rating.
If power is supplied from a commercial switching regulator, ensure that the frame
ground (F.G.) terminal of the power supply is connected to an actual ground.
In case noise generating equipment (switching regulator, inverter mo-
tor, etc.) is used in the vicinity of this product, connect the frame ground
(F.G.) terminal of the equipment to an actual ground.
'RQRWXVHGXULQJWKHLQLWLDOWUDQVLHQWWLPHVHFDIWHUWKHSRZHU
supply is switched on.
([WHQVLRQXSWRWRWDOPLVSRVVLEOHZLWKPP2RUPRUHFDEOH
+RZHYHULQRUGHUWRUHGXFHQRLVHPDNHWKHZLULQJDVVKRUWDVSRVVLEOH
0DNHVXUHWKDWVWUHVVE\IRUFLEOHEHQGRUSXOOLQJLVQRWDSSOLHGWRWKH
VHQVRUFDEOHMRLQW
7DNHFDUHWKDWWKHSURGXFWLVQRWGLUHFWO\H[SRVHGWRÀXRUHVFHQWODPS
from a rapid-starter lamp, a high frequency lighting device or sunlight
etc., as it may affect the sensing performance.
7KLVSURGXFWLVVXLWDEOHIRULQGRRUXVHRQO\
Avoid dust, dirt, and steam.
Take care that the product does not come in contact with oil, grease,
organic solvents, such as thinner, etc., strong acid or alkaline.
7KLVSURGXFWFDQQRWEHXVHGLQDQHQYLURQPHQWFRQWDLQLQJLQÀDPPDEOH
RUH[SORVLYHJDVHV
1HYHUGLVDVVHPEOHRUPRGLI\WKHSURGXFW
((3520LVDGRSWHGWRWKLVSURGXFW,WLVQRWSRVVLEOHWRFRQGXFWWHDFK-
LQJWKRXVDQGWLPHVRUPRUHEHFDXVHRIWKH((3520VOLIHWLPH
Ɣ
Ɣ
Ɣ
Ɣ
Ɣ
Ɣ
Ɣ
Ɣ
Ɣ
Ɣ
Ɣ
Ɣ
Ɣ
Ɣ
Ɣ
Ɣ
Ɣ
Ɣ
&$87,216
1RWH :KHQXVLQJWKHSURGXFWVLQSDUDOOHOWKHDPELHQWWHPSHUDWXUHLVDVIROORZV
WRXQLWVWRÛ&WRXQLWVWRÛ&
63(&,),&$7,216
13
Type Standard Long sensing range
NPN output
);= );=
Item
PNP output
);3= );3=
Supply voltage
WR9'&5LSSOH33RUOHVVZLWKLQWKHUDWHGUDQJH
Power consumption
Normal operation:P:RUOHVV
&XUUHQWFRQVXPSWLRQP$RUOHVVDW9VXSSO\YROWDJH
(&2PRGHP:RUOHVV
&XUUHQWFRQVXPSWLRQP$RUOHVVDW9VXSSO\YROWDJH
Output
131RXWSXWW\SH!
NPN open-collector transistor
Â0D[LPXPVLQNFXUUHQWP$
Â
$SSOLHGYROWDJH9'&RUOHVV
EHWZHHQRXWSXWDQG9
Â
5HVLGXDOYROWDJH9RUOHVV
DWP$VLQNFXUUHQW
313RXWSXWW\SH!
PNP open-collector transisto
r
Â
0D[LPXPVRXUFHFXUUHQWP$
Â
$SSOLHGYROWDJH9'&RUOHVV
EHWZHHQRXWSXWDQG9
Â
5HVLGXDOYROWDJH9RUOHVV
DWP$VRXUFHFXUUHQW
Output operation /LJKW21RU'DUN21VHOHFWDEOH
Short-circuit protection
Incorporated
([WHUQDOLQSXW
131RXWSXWW\SH!
NPN non-contact input
Â6LJQDOFRQGLWLRQ
High: +
9WR9'&RU2SHQ
/RZWR9'&
6RXUFHFXUUHQWP$RUOHVV
Â
,QSXWLPSHGDQFH$SSUR[Nȍ
313RXWSXWW\SH!
PNP non-contact input
Â6LJQDOFRQGLWLRQ
High: +4
V
WR9'&
6LQNFXUUHQWWRP$RUOHVV
Low:
WR9'&RU2SHQ
Â
,QSXWLPSHGDQFH$SSUR[Nȍ
Response time
(PLVVLRQIUHTXHQF\ȝVRUOHVV
(PLVVLRQIUHTXHQF\ȝVRUOHVV
(PLVVLRQIUHTXHQF\ȝVRUOHVV
(PLVVLRQIUHTXHQF\ȝVRUOHVV
(PLVVLRQIUHTXHQF\PVRUOHVV
Emission frequency 2: 2.8ms or less
Emission frequency 3: 3.2ms or less
(PLVVLRQIUHTXHQF\PVRUOHVV
$PELHQWWHPSHUDWXUH WRÛ&1RGHZFRQGHQVDWLRQRULFLQJDOORZHG1RWH
6WRUDJHWRÛ&
$PELHQWKXPLGLW\ WR5+6WRUDJHWR5+
Emitting element 5HG/('(SHDNZDYHOHQJWK QP
Material (QFORVXUH3RO\FDUERQDWH)LEHUORFNOHYHU3%7
Weight $SSUR[J0DLQERG\RQO\
Model
No.
,17(1'('352'8&76)25&(0$5.,1*
15
The models listed under “ 63(&,),&$7,216” come with CE
Marking.
$VIRUDOORWKHUPRGHOVSOHDVHFRQWDFWRXURI¿FH
Ɣ