TFA 60.2027.01 User manual

Bedienungsanleitung
Instruction manual
Mode d’emploi
Instrucciones de uso
Gebruiksaanwijzing
Istruzioni per l'uso
Kat. Nr. 60.2027.01
TFA_No. 60.2027_Anleitung 07.06.2020 9:16 Uhr Seite 1

32
Fig. 1 Fig. 2
A 3
A 2
A 1 C 1C 2
B 2 B 5
B 6
B 7 B 3
B 1 B 4
TFA_No. 60.2027_Anleitung 07.06.2020 9:16 Uhr Seite 2

45
Digitaler Wecker mit Leuchtziffern
4. Zu Ihrer Sicherheit
• Das Produkt ist ausschließlich für den oben beschriebenen Einsatzbereich geeignet. Verwenden
Sie das Produkt nicht anders, als in dieser Anleitung dargestellt wird.
• Das eigenmächtige Reparieren, Umbauen oder Verändern des Gerätes ist nicht gestattet.
Vorsicht!
Lebensgefahr durch Stromschlag!
• Schließen Sie das Gerät über das USB-Kabel und das mitgelieferte Netzteil an eine vorschrifts-
mäßig installierte Steckdose mit einer geeigneten Netzspannung an (siehe Typenschild).
• Die Steckdose muss nahe der Einrichtung angebracht und leicht zugänglich sein.
• Ziehen Sie sofort den Stecker aus der Steckdose, wenn eine Störung auftritt.
• Das Gerät und das Netzteil dürfen nicht mit Wasser oder Feuchtigkeit in Kontakt kommen. Nur
für den Betrieb in trockenen Innenräumen geeignet.
• Benutzen Sie das Gerät nicht, wenn Gehäuse, USB-Kabel oder Netzteil beschädigt sind.
• Betreiben Sie das Gerät außerhalb der Reichweite von Personen (auch Kindern), die mögliche
Gefahren im Umgang mit elektrischen Geräten nicht richtig einschätzen können.
• Verbinden Sie erst das USB-Kabel mit Gerät und Netzteil und stecken Sie dann den Netzstecker
in die Steckdose.
Digitaler Wecker mit Leuchtziffern
Vielen Dank, dass Sie sich für dieses Gerät aus dem Hause TFA entschieden haben.
1. Bevor Sie mit dem Gerät arbeiten
•Lesen Sie sich bitte die Bedienungsanleitung genau durch.
•Durch die Beachtung der Bedienungsanleitung vermeiden Sie auch Beschädigungen des
Gerätes und die Gefährdung Ihrer gesetzlichen Mängelrechte durch Fehlgebrauch.
•Für Schäden, die aus Nichtbeachtung dieser Bedienungsanleitung verursacht werden, über-
nehmen wir keine Haftung.
•Beachten Sie besonders die Sicherheitshinweise!
•Bewahren Sie diese Anleitung gut auf!
2. Lieferumfang
• Digitalwecker
• DC 5V USB-Kabel und Netzteil
• Bedienungsanleitung
3. Einsatzbereich und alle Vorteile Ihres neuen Gerätes auf einen Blick
• Anzeige von Uhrzeit oder Innentemperatur, automatischer Wechsel des Displays einstellbar
• Weckalarm mit Schlummerfunktion
• Leuchtziffern mit 3 Helligkeitsstufen
• Dimmfunktion mit Zeitschaltautomatik
TFA_No. 60.2027_Anleitung 07.06.2020 9:16 Uhr Seite 3

76
Digitaler Wecker mit Leuchtziffern
• Verlegen Sie das USB-Kabel so, dass es nicht mit scharfkantigen oder heißen Gegenständen in
Berührung kommt.
• Verwenden Sie ausschließlich das mitgelieferte Netzteil oder schließen Sie das Gerät über das
USB-Kabel an eine geeignete USB-Spannungsquelle (PC, Notebook etc.) an.
Vorsicht!
Verletzungsgefahr:
• Bewahren Sie die Batterien und das Gerät außerhalb der Reichweite von Kindern auf.
• Batterien enthalten gesundheitsschädliche Säuren und können bei Verschlucken lebensgefähr-
lich sein. Wurde eine Batterie verschluckt, kann dies innerhalb von 2 Stunden zu schweren inne-
ren Verätzungen und zum Tode führen. Wenn Sie vermuten, eine Batterie könnte verschluckt
oder anderweitig in den Körper gelangt sein, nehmen Sie sofort medizinische Hilfe in Anspruch.
• Batterien nicht ins Feuer werfen, kurzschließen, auseinandernehmen oder aufladen. Explosions-
gefahr!
• Um ein Auslaufen der Batterien zu vermeiden, sollten schwache Batterien möglichst schnell aus-
getauscht werden. Verwenden Sie nie gleichzeitig alte und neue Batterien oder Batterien unter-
schiedlichen Typs.
• Beim Hantieren mit ausgelaufenen Batterien chemikalienbeständige Schutzhandschuhe und
Schutzbrille tragen!
Digitaler Wecker mit Leuchtziffern
Wichtige Hinweise zur Produktsicherheit!
• Setzen Sie das Gerät keinen extremen Temperaturen, Vibrationen und Erschütterungen aus.
5. Bestandteile
A: Display (Fig. 1):
A 1: Alarmsymbol A 2: Snoozesymbol
A 3: Uhrzeit/Innentemperatur/Alarmzeit
B: Tasten (Fig. 2):
B 1: TIME Taste B 2: ALARM Taste
B 3: SNOOZE Sensortaste B 4: + Taste
B 5: – Taste B 6: ALARM ON/OFF Schiebeschalter
B 7: RESET Knopf
C: Gehäuse (Fig. 2):
C 1: Batteriefach C 2: DC 5V-Anschluss
TFA_No. 60.2027_Anleitung 07.06.2020 9:16 Uhr Seite 4

98
Digitaler Wecker mit Leuchtziffern
6. Inbetriebnahme
• Der Wecker kann mit 3 x 1,5 V AAA Batterien (nicht inklusive) betrieben werden. Die Batterien
erhalten bei Stromausfall die Funktion der Uhrzeit aufrecht, damit keine Neueinstellung vor-
genommen werden muss. Im reinen Batteriebetrieb wird die Anzeige bei jedem Tastendruck für
10 Sekunden aktiviert. Die Displaybeleuchtung im Dauerbetrieb funktioniert nur mit USB-/Netz-
anschluss.
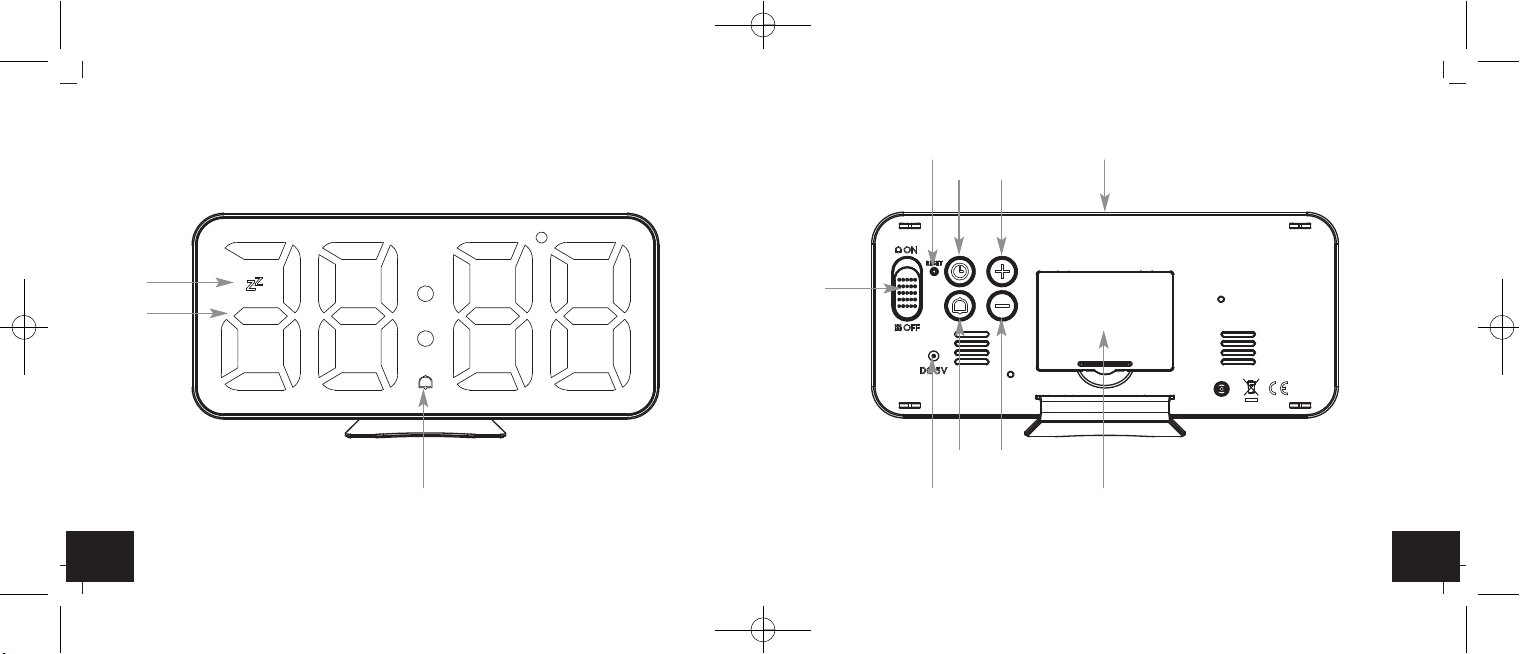
• Öffnen Sie das Batteriefach des Weckers. Legen Sie drei neue Batterien 1,5 V AAA polrichtig ein.
Schließen Sie das Batteriefach wieder.
• Für eine dauerhafte Displaybeleuchtung und um die Leistungsdauer der Batterien zu verlängern,
verwenden Sie zur Stromversorgung bitte das mitgelieferte DC 5V USB-Kabel.
• Schließen Sie den Wecker mit dem beigefügten Netzteil an. Wichtig! Stellen Sie sicher, dass
Ihre Netzspannung nicht mehr als 240 V beträgt! Andere Netzspannungen können zur Beschädi-
gung des Gerätes führen.
• Ein kurzer Signalton ertönt und 0:00 erscheint im Display.
• Das Gerät ist nun betriebsbereit.
7. Einstellungen
• Halten Sie die +oder –Taste im Einstellmodus gedrückt, gelangen Sie in den Schnelllauf.
• Das Gerät verlässt automatisch den Einstellmodus, wenn länger als 10 Sekunden keine Taste
gedrückt wird.
Digitaler Wecker mit Leuchtziffern
7.1 Einstellung der Uhrzeit
• Halten Sie die TIME Taste im Normalmodus für drei Sekunden gedrückt.
• Die Stundenanzeige fängt an zu blinken und Sie können mit der +oder –Taste die Stunden ein-
stellen.
• Bestätigen Sie die Eingabe mit der TIME Taste.
• Geben Sie auf gleiche Weise die Minuten ein.
• Bestätigen Sie mit der TIME Taste.
7.2 Einstellung der Alarmzeit
• Drücken Sie die ALARM Taste im Normalmodus, um die Alarmzeit aufzurufen. Das Alarmsymbol
blinkt.
• Halten Sie die ALARM Taste für drei Sekunden gedrückt.
• 6:00 Uhr (Voreinstellung) bzw. die zuletzt eingestellte Weckzeit wird auf dem Display angezeigt.
• Das Alarmsymbol und die Stundenanzeige blinken. Stellen Sie mit der +oder –Taste die Stun-
den ein.
• Bestätigen Sie mit der ALARM Taste.
• Geben Sie auf gleiche Weise die Minuten ein.
• Bestätigen Sie mit der ALARM Taste. Die aktuelle Uhrzeit erscheint.
• Um die Alarm-Funktion zu aktivieren und zu deaktivieren, schieben Sie den ALARM ON/OFF
Schiebeschalter auf ON oder OFF.
TFA_No. 60.2027_Anleitung 07.06.2020 9:16 Uhr Seite 5

1110
Digitaler Wecker mit Leuchtziffern
• Das Alarmsymbol erscheint oder verschwindet im Display.
• Bei aktiviertem Alarm beginnt der Wecker zu klingeln, wenn die eingestellte Weckzeit erreicht ist.
• Drücken Sie auf eine beliebige Taste (außer der SNOOZE Sensortaste) und der Alarm wird been-
det.
• Wird der Alarm nicht unterbrochen, schaltet sich der Alarmton nach einer Minute aus und akti-
viert sich erneut zur gleichen Weckzeit wieder.
• Das Alarmsymbol bleibt im Display stehen.
• Wenn der Wecker klingelt, drücken Sie die SNOOZE Sensortaste, um die Snooze-Funktion zu
aktivieren. Das Snoozesymbol blinkt auf dem Display.
• Der Alarm wird für 5 Minuten unterbrochen.
• Drücken Sie auf eine beliebige Taste (außer der SNOOZE Sensortaste) und die Snooze-Funktion
wird beendet.
8. Displaymodus
• Schalten Sie im Normalmodus mit der TIME Taste zwischen folgenden Anzeigen um: Uhrzeit,
Innentemperatur oder automatische Dimmfunktion OFF/ON.
8.1 Automatischer Displaywechsel
• Wählen Sie mit der TIME Taste die Uhrzeit oder Temperaturanzeige aus.
• Drücken Sie die +Taste für 3 Sekunden. lOOP erscheint auf dem Display.
Digitaler Wecker mit Leuchtziffern
• Es erscheint die Temperatur und Zeit im Wechsel (Temperatur 5 s -> Zeit 10 s).
• Drücken und halten Sie die +Taste für 3 Sekunden, um wieder zur Anzeige der Zeit zu gelangen.
8.2 Modus automatische Dimmfunktion
• Wählen Sie mit der TIME Taste die automatische Dimmfunktion OFF/ON aus.
• Standardgemäß ist die automatische Dimmfunktion deaktiviert (OFF).
• Drücken Sie die +oder –Taste, um die Funktion zu aktivieren (ON) und wieder zu deaktivieren
(OFF).
• Ist die automatische Dimmfunktion aktiviert (ON), schaltet sich von 18 bis 6 Uhr (Voreinstel-
lung) automatisch die schwache Beleuchtung an.
8.2.1 Einstellung Zeitintervall
• Drücken und halten Sie die TIME Taste (Anzeige ON) um in den Einstellmodus für die Zeitschalt-
automatik zu gelangen.
• Die Startzeit blinkt. Stellen Sie mit der +oder –Taste die Stunden ein.
• Bestätigen Sie die Eingabe mit der TIME Taste und stellen Sie mit der +oder –die Minuten ein.
• Bestätigen Sie die Eingabe mit der TIME Taste und stellen Sie auf gleiche Weise die Endzeit ein.
• Bestätigen Sie die Eingaben mit der TIME Taste.
TFA_No. 60.2027_Anleitung 07.06.2020 9:16 Uhr Seite 6

1312
Digitaler Wecker mit Leuchtziffern
• Ist die automatische Dimmfunktion aktiviert (ON), schaltet sich für die eingestellte Dauer auto-
matisch die schwache Beleuchtung an.
9. Displaybeleuchtung
•USB-/Netzanschluss:
Die Displaybeleuchtung funktioniert im Dauerbetrieb. Sie können mit der +Taste die Helligkeit in
3 Stufen einstellen oder ausschalten.
•Bei Batteriebetrieb und ausgeschalteter Beleuchtung im Netzbetrieb:
Drücken Sie eine beliebige Taste. Die Displaybeleuchtung wird für 10 Sekunden aktiviert.
10. Pflege und Wartung
• Reinigen Sie das Gerät mit einem weichen, leicht feuchten Tuch. Keine Scheuer- oder Lösungs-
mittel verwenden!
• Unterbrechen Sie die Stromversorgung und entfernen Sie die Batterien, wenn Sie das Gerät län-
gere Zeit nicht verwenden.
• Bewahren Sie das Gerät an einem trockenen Platz auf.
10.1 Batteriewechsel
• Tauschen Sie die 3 AAA Batterien aus, wenn die Beleuchtung ohne USB-/Netzbetrieb schwächer
wird.
Digitaler Wecker mit Leuchtziffern
11. Fehlerbeseitigung
Problem Lösung
Keine Anzeige USB-/Netzbetrieb:
➜ Gerät mit USB-Kabel an eine geeignete Spannungsquelle
anschließen
➜ Anschluss überprüfen
➜ Displaybeleuchtung mit beliebiger Taste kurzzeitig aktivieren
➜ Helligkeit mit +Taste einstellen
Batteriebetrieb:
➜ Batterien polrichtig einlegen
➜ Batterien wechseln
➜ Displaybeleuchtung mit beliebiger Taste kurzzeitig aktivieren
Unkorrekte Anzeige ➜ Drücken Sie den RESET Knopf mit einem spitzen Gegenstand
Batteriebetrieb:
➜ Batterien wechseln
Wenn Ihr Gerät trotz dieser Maßnahmen immer noch nicht funktioniert, wenden Sie sich an den
Händler, bei dem Sie das Produkt gekauft haben.
TFA_No. 60.2027_Anleitung 07.06.2020 9:16 Uhr Seite 7

1514
Digitaler Wecker mit Leuchtziffern
12. Entsorgung
Dieses Produkt wurde unter Verwendung hochwertiger Materialien und Bestandteile hergestellt,
die recycelt und wiederverwendet werden können.
Batterien und Akkus dürfen keinesfalls in den Hausmüll!
Als Verbraucher sind Sie gesetzlich verpflichtet, gebrauchte Batterien und Akkus zur
umweltgerechten Entsorgung beim Handel oder entsprechenden Sammelstellen
gemäß nationalen oder lokalen Bestimmungen abzugeben.
Die Bezeichnungen für enthaltene Schwermetalle sind:
Cd=Cadmium, Hg=Quecksilber, Pb=Blei
Dieses Gerät ist entsprechend der EU-Richtlinie über die Entsorgung von Elektro- und
Elektronik-Altgeräten (WEEE) gekennzeichnet.
Dieses Produkt darf nicht mit dem Hausmüll entsorgt werden. Der Nutzer ist ver-
pflichtet, das Altgerät zur umweltgerechten Entsorgung bei einer ausgewiesenen
Annahmestelle für die Entsorgung von Elektro- und Elektronikgeräten abzugeben.
13. Technische Daten
Messbereich Temperatur 0 °C… +50 °C
Digitaler Wecker mit Leuchtziffern
Spannungsversorgung DC 5V USB-Kabel mit Netzteil (inklusive)
Input: 100-240V AC 50/60Hz 0,3A Max
Output: 5,0V DC 0,6A, 3,0W
Ø Effizienz im Betrieb: ≥69,64%
Leistungsaufnahme bei Nulllast: ≤0,10 W
Batterien 3 x 1,5 V AAA (nicht inklusive)
Verwenden Sie Alkaline Batterien
Größe 178 x 36 x 84 mm
Gewicht 214 g (nur das Gerät)
Diese Anleitung oder Auszüge daraus dürfen nur mit Zustimmung von TFA Dostmann veröffentlicht werden. Die techni-
schen Daten entsprechen dem Stand bei Drucklegung und können ohne vorherige Benachrichtigung geändert werden.
Die neuesten technischen Daten und Informationen zu Ihrem Produkt finden Sie auf unserer Homepage unter Eingabe der
Artikel-Nummer in das Suchfeld.
www.tfa-dostmann.de
E-Mail: [email protected]
TFA Dostmann GmbH & Co.KG, Zum Ottersberg 12, D-97877 Wertheim, Deutschland
Handelsregister-Nummer: Reg. Gericht Mannheim HRA 570186 06/20
TFA_No. 60.2027_Anleitung 07.06.2020 9:16 Uhr Seite 8

1716
Digital alarm clock with LED digits
Thank you for choosing this instrument from TFA.
1. Before you use this product
•Please make sure you read the instruction manual carefully.
•Following and respecting the instructions in your manual will prevent damage to your instru-
ment and loss of your statutory rights arising from defects due to incorrect use.
•We shall not be liable for any damage occurring as a result of non-following of these instruc-
tions.
•Please take particular note of the safety advice!
•Please keep this instruction manual safe for future reference.
2. Delivery contents
• Digital alarm clock
• DC 5V USB cable and power adaptor
• Instruction manual
3. Range of application and all the benefits of your new instrument at a glance
• Display of time or indoor temperature, automatic change is adjustable
• Alarm with snooze function
• LED digits with 3 brightness levels
• Dimming function with automatic timer
Digital alarm clock with LED digits
4. For your safety
• This product is exclusively intended for the range of application described above. It should only
be used as described within these instructions.
• Unauthorized repairs, alterations or changes to the product are prohibited.
Caution!
Risk of electrocution!
• Connect the device using the USB cable and the supplied power supply to a mains socket
installed within your country’s electrical safety regulations and with a correct mains voltage (see
nameplate).
• The mains socket must be located near the equipment and it must be easily accessible.
• Unplug the device immediately if any fault occurs.
• The device and the power adapter must not come into contact with water or moisture. Only suit-
able for indoor use.
• Do not use the device if the housing, the USB cable or the power adaptor are damaged.
• Operate the device out of reach of persons (including children) who cannot fully appreciate the
potential risks of handling electrical equipment.
• Connect the USB cable to the device and the power adaptor first and then plug the power
adapter into the socket.
TFA_No. 60.2027_Anleitung 07.06.2020 9:16 Uhr Seite 9

1918
Digital alarm clock with LED digits
• Route the USB cable lead so that it does not come into contact with sharp-edged or hot objects.
• Only use the supplied power adapter or connect the device via the USB cable to a suitable USB
power source such as a computer, notebook.
Caution!
Risk of injury!
• Keep this instrument and the batteries out of reach of children.
• Batteries contain harmful acids and may be hazardous if swallowed. If a battery is swallowed,
this can lead to serious internal burns and death within two hours. If you suspect a battery
could have been swallowed or otherwise caught in the body, seek medical help immediately.
• Batteries must not be thrown into a fire, short-circuited, taken apart or recharged. Risk of explo-
sion!
• Low batteries should be changed as soon as possible to prevent damage caused by leaking.
Never use a combination of old and new batteries together, nor batteries of different types.
• Wear chemical-resistant protective gloves and safety glasses when handling leaking batteries.
Important information on product safety!
• Do not expose the device to extreme temperatures, vibrations or shocks.
Digital alarm clock with LED digits
5. Elements
A: Display (Fig. 1):
A 1: Alarm symbol A 2: Snooze symbol
A 3: Time/indoor temperature/alarm time
B: Buttons (Fig. 2):
B 1: TIME button B 2: ALARM button
B 3: SNOOZE sensor button B 4: + button
B 5: – button B 6: ALARM ON/OFF switch
B 7: RESET button
C: Housing (Fig. 2):
C 1: Battery compartment C 2: DC 5V jack
6. Getting started
• The alarm clock can be operated with 3 x 1,5 V AAA batteries (not included). The batteries main-
tain the clock operation in the event of blackout or other power failure. In pure battery opera-
tion, the display is activated for 10 seconds each time a button is pressed. Continuous illumina-
tion of the display only works with USB-/mains connection.
TFA_No. 60.2027_Anleitung 07.06.2020 9:16 Uhr Seite 10

2120
Digital alarm clock with LED digits
• Open the alarm clock's battery compartment. Insert three new AAA 1.5 V batteries, polarity as
illustrated. Close the battery compartment.
• For a permanent display light and to save battery life, use the supplied DC 5V USB cable.
• Connect the attached power adapter to the alarm clock. Important! Make sure that your house-
hold voltage is no more than 240V! Otherwise your device may be damaged.
• A beep tone is heard and 00:00 appears on the display.
• The device is ready for use.
7. Settings
• Press and hold the +or –button in setting mode for fast mode.
• The device will automatically quit the setting mode if no button is pressed for 10 seconds.
7.1 Time setting
• Press and hold the TIME button in normal mode for three seconds.
• The hour digit will be flashing. Press the +or –button to adjust hours.
• Confirm the setting with the TIME button.
• Set the minutes in the same way.
• Confirm with the TIME button.
Digital alarm clock with LED digits
7.2 Alarm time setting
• Press the ALARM button in normal mode, to show the alarm time. The alarm symbol flashes.
• Press and hold the ALARM button for 3 seconds.
• 6:00 (default) or the last adjusted alarm time appear on the display.
• The alarm symbol and the hour digit are flashing. Press the +or –button to set the hours.
• Confirm the setting with the ALARM button.
• Set the minutes in the same way.
• Confirm the setting with the ALARM button. The display shows the current time.
• To activate/deactivate the alarm function, move the ALARM ON/OFF switch to ON or OFF.
• The alarm symbol appears/disappears on the display.
• When the alarm is activated, the alarm starts to ring when the set alarm time is reached.
• Press any button (except SNOOZE) and the alarm will stop.
• If the alarm is not stopped manually, the alarm tone automatically turns off after one minute and
will be reactivated at the same set time in the following day.
• The alarm symbol remains on the display.
• When the alarm rings, press the SNOOZE sensor button briefly and the snooze function is acti-
vated. The snooze symbol flashes on the display.
• The alarm will be interrupted for 5 minutes.
• Press any button (except SNOOZE) and the snooze function will stop.
TFA_No. 60.2027_Anleitung 07.06.2020 9:16 Uhr Seite 11

2322
Digital alarm clock with LED digits
8. Display mode
• Each press on the TIME button in normal mode will change the display between: Time, indoor
temperature and automatic dimming function OFF/ON.
8.1 Automatic display change
• Use the TIME button to select the time or temperature display.
• Press the +button for 3 seconds. lOOP appears on the display.
• Time and date appear in sequence (temperature 5 s -> time 10 s).
• Press and hold the +button for 3 seconds to return to the time display.
8.2 Automatic dimming mode
• Select the automatic dimming function OFF/ON by pressing the TIME button.
• By default, the automatic dimming function is disabled (OFF).
• To activate (ON) or deactivate (OFF) the function press the +or – button.
• If the auto dimming mode is activated (ON), the weak backlight turns on automatically at 6 pm
and switches off again at 6 am (default setting).
8.2.1 Setting time interval
• Press and hold the TIME button (display ON) to enter the setting mode for the automatic timer.
• The start time flashes. Press the +or –button to set the hours.
Digital alarm clock with LED digits
• Confirm the setting with the TIME button and press the +or –button to set minutes.
• Confirm the setting with the TIME button and set the end time in the same way.
• Confirm the setting with the TIME button.
• If the auto dimming mode is activated (ON), the weak backlight turns on automatically for the
set time.
9. Display light
•USB-/mains connection:
The display illumination works in continuous operation. Press the +button to adjust the bright-
ness in 3 levels or to switch it off.
•Battery operation and backlight switched off with USB-/mains connection:
Press any button. The display turns on for 10 seconds.
10. Care and maintenance
• Clean the instrument with a soft damp cloth. Do not use solvents or scouring agents.
• Unplug the device and remove the batteries if the device will not be used for an extended period
of time.
• Store the device in a dry place.
TFA_No. 60.2027_Anleitung 07.06.2020 9:16 Uhr Seite 12

2524
Digital alarm clock with LED digits
10.1 Battery replacement
• Change the batteries 3 x 1.5 V AAA when the illumination without USB-/mains connection gets
weak.
11. Trouble shooting
Problem Solution
No display Operation with USB-/mains connection:
➜ Connect the device with the USB cable to a suitable power
source
➜ Check the connection
➜ Press any button to activate the display briefly
➜ Set the brightness with the +button
Battery operation:
➜ Ensure the batteries' polarities are correct
➜ Change the batteries
➜ Press any button to activate the display briefly
Digital alarm clock with LED digits
Incorrect indication Press the RESET button using a pin
Battery operation:
➜ Change the batteries
If your device fails to work despite these measures, contact the retailer where you purchased the
product.
12. Waste disposal
This product has been manufactured using high-grade materials and components which can be
recycled and reused.
Never dispose of empty batteries and rechargeable batteries with ordinary household
waste.
As a consumer, you are required by law to take them to your retail store or to an
appropriate collection site depending on national or local regulations in order to pro-
tect the environment.
The symbols for the contained heavy metals are:
Cd = cadmium, Hg = mercury, Pb = lead
This product is labelled in accordance with the EU Waste Electrical and Electronic
Equipment Directive (WEEE).
TFA_No. 60.2027_Anleitung 07.06.2020 9:16 Uhr Seite 13

2726
Digital alarm clock with LED digits
Please do not dispose of this product in ordinary household waste. As a consumer,
you are required to take end-of-life devices to a designated collection point for the
disposal of electrical and electronic equipment, in order to ensure environmentally-
compatible disposal.
13. Specifications
Measuring range
Temperature 0 °C…+50°C
Power consumption DC 5V USB cable with power supply (included)
Input: 100-240V AC 50/60Hz 0.3A Max
Output: 5.0V DC 0.6A, 3.0W
Average active efficiency: ≥69.64%
No-load power consumption: ≤0.10 W
3 x AAA 1.5 V batteries (not included)
Use alkaline batteries
Dimensions 178 x 36 x 84 mm
Weight 214 g (device only)
Digital alarm clock with LED digits
No part of this manual may be reproduced without written consent of TFA Dostmann. The technical data are correct at the
time of going to print and may change without prior notice.
The latest technical data and information about this product can be found in our homepage by simply entering the prod-
uct number in the search box.
www.tfa-dostmann.de
E-Mail: [email protected]
TFA Dostmann GmbH & Co.KG, Zum Ottersberg 12, D-97877 Wertheim, Germany
Commercial registration number: Reg. Gericht Mannheim HRA 570186 06/20
TFA_No. 60.2027_Anleitung 07.06.2020 9:16 Uhr Seite 14

2928
Réveil digital avec chiffres à LED
Nous vous remercions d'avoir choisi l'appareil de la société TFA.
1. Avant d'utiliser votre appareil
•Veuillez lire attentivement le mode d'emploi.
•En respectant ce mode d'emploi, vous éviterez d'endommager votre appareil et de perdre
vos droits légaux en cas de défaut si celui-ci résulte d’une utilisation non-conforme.
•Nous n'assumons aucune responsabilité pour des dommages qui auraient été causés par le
non-respect du présent mode d'emploi.
•Suivez bien toutes les consignes de sécurité !
•Conservez soigneusement le mode d'emploi !
2. Contenu de la livraison
• Réveil digital
• Câble DC 5V USB et adaptateur secteur
• Mode d'emploi
3. Aperçu du domaine d'utilisation et de tous les avantages de votre nouvel appareil
• Affichage de l'heure ou de la température, changement automatique réglable
• Réveil avec fonction snooze
• Chiffres à LED avec 3 niveaux d’éclairage
• Ajustement de la luminosité avec minuteur automatique
Réveil digital avec chiffres à LED
4. Pour votre sécurité
• Le produit est destiné uniquement à l'utilisation décrite ci-dessus. N'utilisez jamais l’appareil à
d'autres fins que celles décrites dans le présent mode d'emploi.
• Vous ne devez en aucun cas réparer, démonter ou modifier l'appareil par vous-même.
Attention !
Danger de choc électrique !
• Utilisez le câble USB et l'adaptateur secteur fourni pour brancher l'appareil sur une prise de
courant réglementaire ayant une tension de secteur appropriée (voir la plaque signalétique).
• La prise de courant doit être proche de l'équipement et facilement accessible.
• Retirez immédiatement la fiche de la prise en cas de défaut.
• L'appareil et l'adaptateur secteur ne doivent pas entrer en contact avec de l'eau ou de l'humidité.
Ils ne peuvent être utilisés que dans des locaux secs.
• N'utilisez pas l'appareil si le boîtier, le câble USB ou l'adaptateur secteur sont endommagés.
• Opérez le produit hors de la portée de personnes (enfants compris) inaptes à évaluer les risques
possibles liés au maniement d'appareils électriques.
• Commencez par brancher le câble USB à l'appareil et l'adaptateur secteur, branchez ensuite la
fiche dans la prise secteur.
• Placez le câble USB qu'il n'entre pas en contact avec des objets tranchants ou brûlants.
TFA_No. 60.2027_Anleitung 07.06.2020 9:16 Uhr Seite 15

3130
Réveil digital avec chiffres à LED
• Utilisez uniquement l'adaptateur secteur fournie ou connectez l'appareil à une source d'alimen-
tation USB appropriée (PC, ordinateur portable, etc.) à l'aide du câble USB.
Attention !
Danger de blessure :
• Gardez votre appareil et les piles hors de la portée des enfants.
• Les piles contiennent des acides nocifs pour la santé et peuvent être mortelles dans le cas d’une
ingestion. Si une pile a été avalée, elle peut entraîner des brûlures internes graves ainsi que la
mort dans l’espace de 2 heures. Si vous craignez qu’une pile ait pu être avalée ou ingérée d’une
autre manière, quelle qu’elle soit, contactez immédiatement un médecin d’urgence.
• Ne jetez jamais de piles dans le feu, ne les court-circuitez pas, ne les démontez pas et ne les
rechargez pas. Risque d'explosion !
• Une pile faible doit être remplacée le plus rapidement possible afin d'éviter toute fuite. N'utilisez
jamais simultanément de piles anciennes avec des piles neuves ou des piles de types différents.
• Pour manipuler des piles qui ont coulé, utilisez des gants de protection chimique spécialement
adaptés et portez des lunettes de protection !
Conseils importants de sécurité du produit !
• Évitez d’exposer l’appareil à des températures extrêmes, à des vibrations ou à des chocs.
Réveil digital avec chiffres à LED
5. Composants
A : Affichage (Fig. 1) :
A 1 : Symbole de réveil A 2 : Symbole « snooze »
A 3 : Heure/température intérieure/heure de réveil
B : Touches (Fig. 2) :
B 1 : Touche TIME B 2 : Touche ALARM
B 3 : Touche sensitive SNOOZE B 4 : Touche + Taste
B 5 : Touche – B 6 : Interrupteur réveil ALARM ON/OFF
B 7 : Bouton RESET
C : Boîtier (Fig. 2):
C 1 : Compartiment à piles C 2 : Prise DC 5V
6. Mise en service
• Le réveil peut être alimenté par piles 3 x 1,5 V AAA (non inclues). Les piles servent à maintenir
le fonctionnement du réveil lors de l’éteinte soudaine ou d'une panne de courant. Pendant le
fonctionnement seulement avec piles l'éclairage est activé pour 10 secondes après chaque pres-
sion sur une touche. L'éclairage d'écran permanent fonctionne seulement avec branchement
USB/secteur.
TFA_No. 60.2027_Anleitung 07.06.2020 9:16 Uhr Seite 16

3332
Réveil digital avec chiffres à LED
• Ouvrez le compartiment à piles du réveil. Insérez trois piles neuves de type 1,5 V AAA en res-
pectant la polarité +/-. Refermez le compartiment à piles.
• Pour utiliser l'éclairage en permanence et pour économiser les piles, utilisez le câble USB DC
5V fourni pour l’alimentation.
• Raccordez le réveil avec l’adaptateur secteur fourni. Important ! Assurez-vous que la tension de
réseau ne dépasse pas 240V. Une autre tension de réseau pourrait endommager votre appareil.
• Un signal sonore retentit et 0:00 apparaît sur l’écran.
• Votre appareil est maintenant prêt à fonctionner.
7. Réglages
• Si vous maintenez la touche +ou –appuyée au cours d'un mode de réglage, vous passez en
déroulement rapide.
• L'appareil quitte automatiquement le mode de réglage si aucune touche n’est pressée pendant
10 secondes.
7.1 Réglage de l'heure
• Maintenez la touche TIME appuyée pendant trois secondes en mode normal.
• L’indicateur de l’heure clignote. Réglez l’heure à l'aide de la touche +ou –.
• Validez au moyen de la touche TIME.
Réveil digital avec chiffres à LED
• Procédez de même pour régler les minutes.
• Validez au moyen de la touche TIME.
7.2 Réglage de l'heure de réveil
• Appuyez sur la touche ALARM en mode normal pour afficher l'heure de réveil. Le symbole de
réveil clignote.
• Appuyez sur la touche ALARM pendant trois secondes.
• 6:00 (par défaut) ou l'heure de réveil réglée précédemment est affiché à l'écran.
• Le symbole de réveil et l'indication de l'heure clignotent. Réglez l'heure avec la touche +ou –.
• Validez le réglage au moyen de la touche ALARM.
• Procédez de même pour régler les minutes.
• Validez le réglage au moyen de la touche ALARM. L'heure actuelle apparaît sur l’écran.
• Pour activer/désactiver la fonction de réveil, poussez l'interrupteur ALARM ON/OFF sur ON ou
OFF.
• Le symbole de réveil apparaît ou disparaît sur l'écran.
• Lorsque l'heure de réveil fixée est atteinte, le réveil se met à sonner (si la fonction de réveil est
activée).
• Appuyez sur une touche de votre choix (sauf sur la touche SNOOZE) pour éteindre le réveil.
• Si le réveil n'est pas coupé, il s'arrêtera automatiquement après une minute et sera de nouveau
activé pour l'heure de réveil suivante.
TFA_No. 60.2027_Anleitung 07.06.2020 9:16 Uhr Seite 17

3534
Réveil digital avec chiffres à LED
• Le symbole de réveil reste à l'écran.
• Lorsque le réveil sonne, appuyez sur la touche sensitive SNOOZE pour activer la fonction de
répétition snooze. Le symbole « snooze » clignote.
• L'alarme s'interrompt pendant 5 minutes.
• Appuyez sur une touche de votre choix (sauf la touche SNOOZE) pour terminer la fonction snooze.
8. Mode d'affichage
• En appuyant sur la touche TIME en mode normal vous pouvez choisir entre les indications sui-
vantes : heure, température intérieure et ajustement automatique de la luminosité (OFF/ON).
8.1 Changement automatique d’affichage
• Choisissez l'affichage de l'heure ou de la température avec la touche TIME.
• Appuyez sur la touche +pour 3 secondes. lOOP apparaît sur l'écran.
• La température et l'heure sont affichées à l’écran en alternance (température 5 s -> heure 10 s).
• Maintenez appuyée la touche +pour 3 secondes pour revenir à l'affichage de l'heure.
8.2 Mode ajustement automatique de la luminosité
• Sélectionnez l'ajustement automatique de la luminosité OFF/ON à l'aide de touche TIME.
• Par défaut, l'ajustement automatique de la luminosité est désactivé (OFF).
Réveil digital avec chiffres à LED
• Appuyez sur la touche +ou –pour activer (ON) ou désactiver (OFF) la fonction.
• Si l'ajustement automatique de la luminosité est activé (ON), l'éclairage faible s'allume automa-
tiquement de 18 à 6 heures (par défaut).
8.2.1 Réglage intervalle de temps
• Maintenez appuyée la touche TIME (affichage ON) pour accéder au mode de réglage du minu-
teur automatique.
• L’horaire de début clignote. Réglez l'heure avec la touche +ou –.
• Validez le réglage au moyen de la touche TIME et réglez les minutes avec la touche +ou –.
• Validez le réglage au moyen de la touche TIME et réglez de la même façon l’horaire de fin.
• Validez au moyen de la touche TIME.
• Si l'ajustement automatique de la luminosité est activé (ON), l'éclairage faible s'allume automa-
tiquement pendant l’intervalle réglé.
9. Éclairage de l’écran
•Branchement USB/secteur :
L'éclairage de l'écran travaille en continu. Vous pouvez ajuster la luminosité avec la touche +
sur 3 niveaux ou l'éteindre.
•Fonctionnement avec piles et éclairage de fond éteint avec branchement USB/secteur :
Appuyez sur une touche de votre choix. L'éclairage de fond est activé pendant 10 secondes.
TFA_No. 60.2027_Anleitung 07.06.2020 9:16 Uhr Seite 18

3736
Réveil digital avec chiffres à LED
10. Entretien et maintenance
• Pour le nettoyage de votre appareil, utilisez un chiffon doux et humide. N’utilisez pas de sol-
vants ou d'agents abrasifs !
• Débranchez l'appareil de la source d’électricité et retirez les piles si vous n'utilisez pas votre
appareil pendant une durée prolongée.
• Conservez votre appareil dans un endroit sec.
10.1 Remplacement des piles
• Remplacez les piles 3 x 1,5 V AAA, si l'éclairage sans branchement USB/secteur devient faible.
11. Dépannage
Problème Solution
Aucun affichage Fonctionnement branchement USB/secteur :
➜ Branchez l’appareil par son câble USB à une source d'alimenta-
tion appropriée
➜ Vérifiez le branchement
➜ Appuyez sur une touche de votre choix pour activer temporaire-
ment l'éclairage de l’écran
➜ Ajustez la luminosité avec la touche +
Réveil digital avec chiffres à LED
Fonctionnement avec piles :
➜ Contrôlez la bonne polarité des piles
➜ Changez les piles
➜ Appuyez sur une touche de votre choix pour activer temporaire-
ment l'éclairage de l’écran
Affichage incorrect ➜ Appuyez sur le bouton RESET à l'aide d'un objet pointu
Fonctionnement avec piles :
➜ Changez les piles
Si votre appareil ne fonctionne toujours pas malgré ces mesures, adressez-vous au vendeur chez
qui vous l'avez acheté.
12. Traitement des déchets
Ce produit a été fabriqué avec des matériaux de haute qualité qui peuvent être recyclés et réutilisés.
Les piles usagées ne doivent pas être jetées dans les détritus ménagers.
En tant qu'utilisateur, vous avez l'obligation légale de rapporter les piles et piles
rechargeables usagées à votre revendeur ou de les déposer dans une déchetterie
proche de votre domicile conformément à la réglementation nationale et locale.
TFA_No. 60.2027_Anleitung 07.06.2020 9:16 Uhr Seite 19

3938
Réveil digital avec chiffres à LED
Les métaux lourds sont désignés comme suit :
Cd=cadmium, Hg=mercure, Pb=plomb
Cet appareil est conforme aux normes de l'UE relatives au traitement des déchets élec-
triques et électroniques (WEEE).
L'appareil usagé ne doit pas être jeté dans les ordures ménagères. L’utilisateur s’en-
gage, pour le respect de l’environnement, à déposer l’appareil usagé dans un centre
de traitement agréé pour les déchets électriques et électroniques.
13. Caractéristiques techniques
Plage de mesure
Température 0 °C … +50 °C
Alimentation Câble DC 5V USB avec adaptateur secteur (incluses)
Entrée : 100-240V AC 50/60Hz 0,3A Max
Sortie : 5,0V DC 0,6A, 3,0W
Rendement moyen en mode actif : ≥69,64%
Consommation électrique hors charge : ≤0,10 W
Piles 3 x 1,5 V AAA (non incluses)
Utilisez des piles alcalines
Réveil digital avec chiffres à LED
Dimensions du boîtier 178 x 36 x 84 mm
Poids 214 g (appareil seulement)
La reproduction, même partielle, du présent mode d'emploi est strictement interdite sans l'accord explicite de TFA Dost-
mann. Les caractéristiques techniques de ce produit ont été actualisées au moment de l'impression et peuvent être modi-
fiées sans avis préalable.
Les dernières données techniques et les informations concernant votre produit peuvent être consultées en entrant le
numéro de l'article sur notre site Internet.
www.tfa-dostmann.de
TFA Dostmann GmbH & Co.KG, Zum Ottersberg 12, D-97877 Wertheim, Allemagne
Numéro d’enregistrement au registre du commerce : Reg. Gericht Mannheim HRA 570186 06/20
TFA_No. 60.2027_Anleitung 07.06.2020 9:16 Uhr Seite 20
This manual suits for next models
1
Table of contents
Languages:
Other TFA Clock manuals
Popular Clock manuals by other brands

AIC
AIC 11101 quick start guide

Oregon Scientific
Oregon Scientific RMR329P user manual

La Crosse Technology
La Crosse Technology 83193-BHG quick start guide

La Crosse Technology
La Crosse Technology BBB87733 Instructional manual

SkyScan
SkyScan 86722 instruction manual

Sapling
Sapling SBD 3000 Series Installation and programming manual