TOORX TRX POWER COMPACT User manual

Ed : 03/17 Rev : 00
INSTRUCTION

1
How to assemble?
STEP 1:
Take the machine and tool set
from the carton and put them
on flat ground.
PARTS LIST: FIG 1
1.Wrench
1PC
2.Silicon oil
1PC
STEP 2:
Hold the MIDDLE part of the
foldable bar with one
hand,and pull it upward as
FIG 2.
Meanwhile,hold the upright
tube with the other hand and
pull it upward as the
arrowhead direction.
FIG 2
STEP 3:
Uplift the handle bars with
both hands.It will be ok when
the sound “Kaka”is
heard.Then turn the switch
button in clockwise direction
and lift up the console in the
correct position.After
finishing,tighten the switch
button.
Assembly is finished.
Note: For advoiding from
injury,please pay attention to
the joint parts.
Upright tube
Foldable bar
Switch button
Handle bar
FIG 1
FIG 3

2
Product Intro
Structure
Parameter
Voltage
AC-220~240V 50~60Hz
Max load
130kg/290lbs
Size
Foldable: L1775*W800*H360mm
Assembly:
L1775*W800*H1385mm
Running area
1350*450mm
Max power
3.5HP
Incline
0~15%
Speed
1.0-18.0Km/h
FIG 4
Handle cover
Running belt
Cushion pad
Main frame
Incline weldment
Upright tube
Console
Odds and ends rack
Safety switch
Rear cover
Handle bar
Handle pulse sensor
Side rail
Motor cover
Foldable bar
Supporting wheel
Cylinder

3
Exploded drawing
1
2
3
4
5
67
8
9
10
11
12
13
14 13
14
15
15
16
16
17
17
18
19
19
20
21
22
23
24
25
26
27
28
29
30
31
32
33
34
35
35
36
36
37
38
37
38
39
40
39
40
41
42
43
44
44
45
45 46
47
48
48
50
51
52
53
53
54
54
55
55
56
57
58
59
60
61
62
63
63
64
64
65
65
66
66
67
67
66
66
68
68
69
69
69
69
69
69
70
70
122
71
71
72
73
73
74
75
75
76
77
77
78
79
79
80
81
82
82
82
82
83
83
83
84
85
85
85
86
87
87
88
88
88
88
89
85
89
89
124
90
90
90
90
90
91
91
91
91
92 92 92
92
92
92
92
92
93
93
94
94
94
94
94
94
94
94
95
95
95
95
95
95
95
95
95
95
95
95
95
95
95
95
95
96
96
96 96
97
97
99
98
100
100
100
101
102
102
103
103
103
103
104
104
104
104
104
104
104
104
105
105
105
105
103
103
103
103
105
105
106
106
106
107
92
108
109
92
96
96
96
96
96
110
111
112
113
113
114
115
116
117
118
119
119
119
119
120 65
49
49
121
88
88
122
123
124
95
95
95
95
FIG 5

4
Itemized list
S/N Name Qty S/N Name Qty S/N Name Qty S/N Name Qty S/N Name Qty
1 Incline bracket 1 26 Incline motor 1 51 Right decoration part 1 76 Hexscrew M10*45 1 101 Lock nut M8 2
2 Main frame 1 27 Upper console cover 1 52 Plastic cover 2 77 Hexscrew M8*50 2 102 Lock nut M6 2
3 upright tube 1 28 Under console cover 1 53 Cylinder 2 78 Hexscrew M8*15 2 103 Flat washer Φ10 8
4 Left handle bar 1 29 Left cross tube 1 54 Below Wire 2 79 Hexscrew M8*65 2 104 Flat washer Φ8 12
5 Right handle bar 1 30 Middle cross tube 1 55 Upper Wire 2 80 Hexscrew M8*45 1 105 Flat washer Φ6 6
6 Console bracket 1 31 Right cross tube 1 56 Controller 1 81 HexscrewM8*30 2 106 Flat washer Φ4 6
7 console tube 1 32 Cross bar board 1 57 Transformer 1 82 Hexscrew M8*25 4 107 Lock washers for external teeth Φ4 1
8 foldable bar 1 33 Left console spindle cover 1 58 switch 1 83 Hexscrew M8*20 8 108 Plastic sheet for wire fix 2
9 Left grounding tube 1 34 Right console spindle cover 1 59 Restoration switch 1 84 Hexscrew M8*15 2 109 Line nip 1
10 Right grounding tube 1 35 Handle pulse 2 60 Power cable 1 85 Hexscrew M6*15 4 110 Filter 1
11 Cross tube 1 36 Handle cover 2 61 Plug 1 86 Hexagonal screw M8*50 2 111 Inductor 1
12 U grip ring 2 37 Left foldable bar cover 2 62 Switch button 1 87 Cross screw M6*20 2 112 Magnet ring 2
13 Lock 2 38 Right foldable bar cover 2 63 Wheel 2 88 Cross screw M6*15 8 113 Cross screw ST4*20 2
14 Wire line hitch 2 39 Left urpright tube cover 2 64 Wheel base 2 89 Cross screw M5*15 4 114 Console wire 1 1
15 Wire connector 2 40 Right urpright tube cover 2 65 Small cushion pad 4 90 Cross screw M5*10 8 115 Console wire 2 1
16 Spindle ring 2 41 Left motor cover 1 66 Cushion pad 4 91 Cross screw M4*15 6 116 Optical sensor 1
17 Cylinder connector 2 42 Middle motor cover 1 67 Cover 4 92 Cross screw M4*8 19 117 Optical sensor bracket 1
18 Motor base 1 43 Right motor cover 1 68 Foam 2 93 Cross screw M4*12 2 118 Square cushipn 4
19 Cylinder switch 2 44 Upper cylinder cover 2 69 Sator for Side rail 6 94 Cross screw M6*25 8 119 Running board cushion 8
20 Vbelt 1 45 Under cylinder cover 2 70 Lock spring 4 95 Cross screw ST4*15 42 120 Cross screw M4*8 2
21 Running belt 1 46 Left rear cover 1 71 Screw 2 96 Cross screw ST4*10 15 121 Safetykey 1
22 Running board 1 47 Right rear cover 1 72 Flat washer Φ35*Φ8.5*2.5 297 Cross screw ST4*10 4 122 Cylinder spring 2
23 Front roller 1 48 Side rail 2 73 Lubrication cover 2 98 Cross screw ST3*10 2 123 Cross screw ST4*15 8
24 Rear roller 1 49 Insertion strip 2 74 Hexscrew M10*65 1 99 Cross screw ST2.9*6.5 2 124 Cross screw M5*15 4
25 Motor 1 50 Left decoration part 1 75 Hexscrew M10*55 2 100 Lock nut M10 4

5
Before use
STARTING THE TREADMILL
LOCATION
Place the treadmill on flat floor before use.
MAINS SUPPLY
Ensure that the power lead is plugged into a suitable, live, mains socket.
PULSE SENSOR
There are two ways to measure your heart rate. One is using the handle pulse sensor .
The other is using a chest belt.The handle pulse is setting for the priority. For HR training,
the use of a chest belt to measure pulse rate is strongly recommended.
START/ STOP
1、Ensure that the SAFETY KEY is attached to the console.
2、To start the treadmill, press START button.
3、To start using the treadmill, stand on each side rail with your feet.
4、Attach the SAFETY KEY to your clothing at your waist.
5、Follow the user manual to start using the treadmill.
ADJUSTMENTS
BELT ADJUSTMENT INSTRUCTION
1、Belt adjustment bolts are located at the rear of the
treadmill, as show on the right.
2、Belt moving (tracking) to the right :
Start the treadmill and set at 4 kph. Using an allen key
wrench, turn the right adjustment bolt clockwise 1/4 of a
turn. Continue adjustments at 1/4 of a turn untill belt
returns to the center. Continue to run the treadmill for a
short period of time monitoring the belt movement to
ensure you have not made an over adjustment.
3、Belt moving (tracking ) to the left :
Start the treadmill and set at 4 kph. Using an allen key
wrench, turn the right adjustment bolt clockwise 1/4 of a
turn. Continue adjustments at 1/4 of a turn untill the belt
returns to the center. Continue to run the treadmill for a
short period of time monitoring the belt movement to
ensure you have not made over adjustment.
4、Ifthebeltappearstobeloose,tightenboth boltsevenly
bya1/4turn.Ifitappears tight,loosenbothboltsevenlya
1/4turn.
5、To reduce the friction (sticking) of the walking belt and
min wear, silicone lubricant may be applied directly to the
walking board and the underside of the belt.
Note: The lubricant may be applied whenever sticking
Left tension bolt
Right tension bolt
FIG 6

6
occurs. To apply, simply lift up the running board and
spray the lubricant onto the running board and the
underneath of the running belt.
MOTOR BELT ADJUSTMENT
All treadmills‟ motor belts have been adjusted before they
are sent out from factory. But it must be adjusted for
second time after building up . Also maybe after a long
time using, the occasion, slipping/ looseness may occur.
User can adjust the motor belt as below:
a. Turn the adjusting screw counter-clockwise with
the wrench.
b. When the motor strap recovers to be
tight/non-slipping, it is OK.
NOTE:Fly wheel should be cleaned regularly.
ATTACHING THE SAFETY KEY
USING THE TREADMILL
Console
Motor belt
FIG 7
a. Attach the SAFETY KEY to the console before turning the machine on. Attach the clip to
your clothing at your waist before beginning your workout. If the SAFETY KEY disconnects
during use in case of emergency, the treadmill will slow down and stop. Also, an intermittent
beep will occur and the display will show „--- --- ---„
START
Incline ”+”
Program
LCD window
Incline”-”
Speed”-”
STOP
Quick incline button
Quick speed button
MODE
Speed”+”

7
QUICK START
1、Attachthesafetykeytothe consoleandyourclothing.
2、Connect thetreadmilltothepowersupplyand switch on.
3、Pressthe STARTbutton.The treadmillwillcount downfrom5and thenstart at1.0km/h.
4、Moveontotherunningsurface.
5、Press the SPEED UP or SPEED DOWN button to increase or decrease the SPEED.
6、Press the INCLINE UP or INCLINE DOWN button to increase or decrease the INCLINE.
7、Pressthe STOPbuttonto stopthetreadmillandresetall values.
PRESET PROGRAM SELECT
1、Connectthe treadmillto thepowersupply.After program selected, press START button.
2、RepeatedlypressthePROGRAM KEY untilthe requiredprogramhasbeen selected.The
table as belowshoweachprogramwiththeirspeedsinkm/h and their inclines in %.The
treadmill willstayat eachsectionfora tenth ofthetimeselectedforthe workout.
Program
P01
P02
P03
P04
P05
P06
P07
S/N
speed
in-cline
speed
in-cline
speed
in-cline
speed
in-cline
speed
in-cline
speed
in-cline
speed
in-cline
1
3.0
0
1.0
0
5.0
0
3.0
0
2.0
0
4.0
0
4.0
0
2
5.0
0
7.0
1
9.0
1
6.0
1
12.0
2
5.0
1
7.0
1
3
5.0
1
1.0
2
4.0
2
12.0
2
12.0
4
6.0
3
9.0
1
4
10.0
1
7.0
2
8.0
3
12.0
3
12.0
6
8.0
4
4.0
3
5
5.0
1
12.0
3
10.0
4
12.0
4
3.0
4
6.0
4
4.0
3
6
2.0
1
4.0
3
12.0
5
3.0
5
3.0
2
8.0
3
12.0
5
7
3.0
2
12.0
2
4.0
4
3.0
6
3.0
1
6.0
3
4.0
5
8
2.0
2
4.0
2
8.0
5
3.0
7
3.0
0
9.0
1
8.0
7
9
5.0
2
12.0
3
4.0
4
5.0
6
12.0
1
6.0
2
4.0
7
10
3.0
0
2.0
0
4.0
0
2.0
0
2.0
0
3.0
0
2.0
0
FIG 8

8
P08
P09
P010
P011
P012
P13
P14
1
2.0
0
2.0
0
4.0
0
4.0
0
4.0
0
5.0
0
5.0
0
2
6.0
2
12.0
1
5.0
1
5.0
1
7.0
4
5.0
1
7.0
1
3
6.0
3
2.0
3
6.0
2
7.0
2
10.0
8
7.0
1
9.0
2
4
6.0
4
12.0
5
8.0
4
9.0
3
8.0
4
7.0
3
12.0
4
5
12.0
4
2.0
7
6.0
6
6.0
4
12.0
8
5.0
2
5.0
1
6
5.0
6
2.0
9
8.0
8
9.0
5
6.0
4
12.0
3
7.0
1
7
5.0
6
12.0
7
6.0
6
6.0
6
6.0
8
12.0
3
9.0
1
8
5.0
8
2.0
5
9.0
4
10.0
7
12.0
4
7.0
4
5.0
2
9
3.0
8
2.0
3
3.0
2
7.0
8
12.0
8
10.0
4
7.0
2
10
3.0
0
3.0
0
3.0
0
3.0
0
6.0
0
5.0
0
5.0
0
3、Press the SPEED UP orSPEED DOWNbutton toadjust the length of the workout.
4、Pressthe INCLINEUP or INCLINE DOWN button to adjust the INCLINE of the treadmill.
5、PressSTARTtobeginthedistance.
6.、PresstheSTOPbuttonatanytimeto stoptheworkout.
MANUAL MODE:
1、Connectthetreadmilltothepowersupplyand switchon.
2.、Attachthesafetykeytotheconsoleandyourclothing.
3、PresstheMODEbuttontochoose TIME,DISTANCEorCALORIELIMITS foryourexercise
routine.Alternatively,if youwish to set a TIME,DISTANCEorCALORIE limit, press the
SPEED UP/DOWN button until the appropriate option isselected.
Thedefaultsettingfortheaboveare:Time:30 minutes
Distance:1.0 kilometre Calorie
Limits:50 kilocalories
4、Press the SPEED UP or SPEED DOWN button to adjust the speed.
Press the INCLINE UP or INCLINE DOWN button to adjust the incline.
5、Whentherequiredlimithasbeenset,presstheSTARTbutton.
6、Thetreadmillwillstartat1 km/h.
7、Thespeedcanbeadjustedbyeither:
a) Using the SPEED UP/ DOWNbutton to adjust speed with intervals of 0.1kph;
b)PressingtheQUICK SPEED button ontheconsole(4~16kph);
c)Using the speed control button on the handle bar to adjust speed with intervals of
0.1kph;
8、The inclinecanbeadjustedbyeither:
a) Using the INCLINE UP/ DOWN button to adjust incline with intervals of 1%;
b) PressingtheQUICK INCLINE button ontheconsole(3~12%);
c) Using the incline control button on the handle bar to adjust incline with intervals of
1%;
9、PresstheSTOPbuttonatanytimetopausethe workout;
10、PresstheSTARTbuttontocontinuetheworkout;

9
To reset all values, disconnect and reconnect the SAFETY KEY.
HRC PROGRAMS
HRC Function Instruction
A. HRC setting values
1、Age: 15 to 80 .
2、Target heart rate: 80-(220-AGE)X0.9.
3、The max heart rate of user: 220-AGE.
4、Heart rate difference =(target heart rate –actual heart rate) .
5、HRC is only useful for wireless transmitter, which is not suitable for handle pulse.
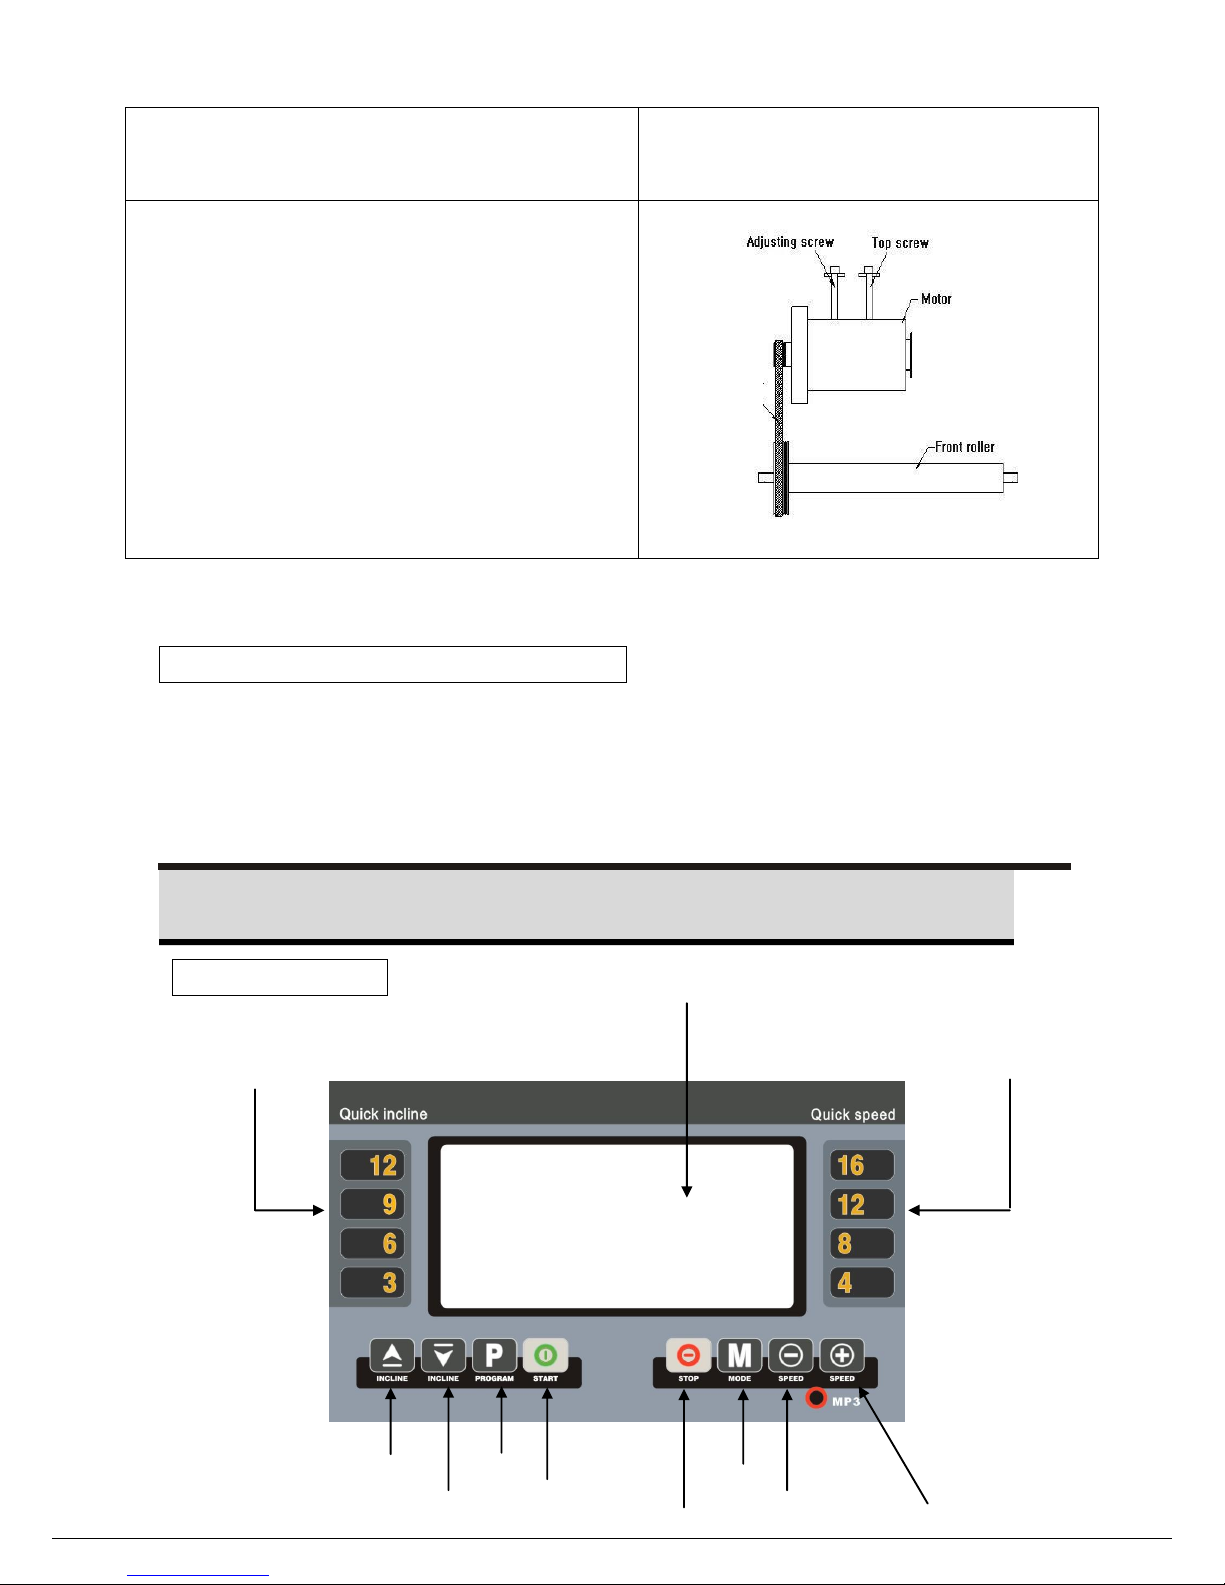
B. Operation instructions
1、Press PROGRAM KEY to select HRC program. The LCD window will display HRC. It is
not functional to press “Start” key. You must enter “Mode” key to enter and confirm AGE
SETTING,TARGET HEART RATE SETTING,TIME SETTING.
2、Press Mode key to enter AGE SETTING firstly, it can be set from 15 to 80 by SPEED or
INCLINE UP/DOWN KEY.
3、Press Mode key to enter TARGET HEART RATE SETTING, it can be set: 80-
(220-AGE)X0.9 by SPEED or INCLINE UP/DOWN KEY.
4、Press Mode key to enter TIME SETTING, it can be set by SPEED or INCLINE
UP/DOWN KEY.
Note: If actual heart rate is over (220-AGE), speed and incline value decrease to the default
value till 0, with alarm every 15 seconds.
If there is no heart rate signal or the user is using the handle pulse, the speed will
keep unchanged. If there is still no heart rate signal from the chest belt for two 30 seconds,
the speed will reduce to 1.0KM/H and the incline fall to 0. The machine alarms every 15
seconds and then stop automatically.
HRC Programs (chest belt transmitter compulsory)
P15: HR1 - weight loss:
After enter into HR1, set values of age , THR (TARGET HEART RATE) and Time well.
Press START: the treadmill will run at 1 kph for 1 minute as warm-up. After this timeframe
the computer will adjust speed with 1 km every 30 seconds till THR (+/- 5 BPM) is reached.
In case the THR is exceeded, the computer will automatically reduce speed till THR is
reached again.
P16: HR2- cardio:
After enter into HR2,set values of age , THR (TARGET HEART RATE) and Time well.
Press START: the treadmill will run at 1 kph for 1 minute as warm-up,adjust speed
manually.. After this timeframe the computer will adjust incline with 1% every 30 seconds till
THR (+/- 5 BPM) is reached. In case the THR is exceeded, the computer will automatically
reduce incline till THR is reached again.

10
P17: HR3- interval fat burn:
After enter into HR3,set values of age , THR (TARGET HEART RATE) and Time well.
Press START: the treadmill will run at 1 kph for 1 minute as warm-up. After this timeframe
the computer will adjust inclination with 1% and speed with 1 km every 30 seconds till THR
(+/- 5 BPM) is reached. In case the THR is exceeded, the computer will automatically
reduce inclination and speed till THR is reached again.
HANDLE PULSE/BODY FAT SENSORS
As shown in FIG 4, the treadmill‟handle sensors are interegrated with the function of
HANDLE PULSE / BODY FAT SENSORS.
A、The HANDLE PULSE SENSORS can be used as an exercise aid to determine general
heart rate trends. And it can not be taken as a medical data.
To display your pulse, firmly grip the handle, placing your hands over the HANDLE PULSE
SENSORS. Your pulse will be displayed on the PULSE display within seconds.
B、The BODY FAT SENSORS can be used as an exercise aid to determine general BODY
FAT rate trends. And it can not be taken as a medical data.
To display your BODY FAT rate, please do as followings:
1) When the treadmill stops, press PROGRAM KEY to enter into body fat analyzer
program.
2) In the CALORIE window, it shows the data for gender, age, stature, weight and body fat.
And in the PULSE window, it shows the code for gender, age, stature, weight and body fat
respectively.
3) In the PULSE window, 01 stands for gender. User can press “Speed“+”“-”key” to choose
male or female. And in the CALORIE window, 01 stands for male, 02 stands for female.
4) In order to enter to 02 which stands for age in the PULSE window, press “Mode key” to
shift. And in the CALORIE window, it shows 25. At this time, user can press
“Speed“+”“-”key” to choose the data from 10-99.
5) In order to enter to 03 which stands for stature in the PULSE window, press “Mode key”
to shift. And in the CALORIE window, it shows 170cm. At this time, User can press
“Speed“+”“-”key” to choose the data from 100-199cm.
6) In order to enter to 04 which stands for weight in the PULSE window, press “Mode key”.
And in the CALORIE window, it shows 70kg. At this time, User can press “Speed“+”“-”key”
to choose the data from 20-150kg.
7) In order to enter to 05 which stands for body fat in the PULSE window, press “Mode key”.
Put User‟s two hands on the handgrip sensor for 8 seconds, and the data will show in the
CALORIE window.

11
Note: This is a guide only and performance will depend on the fitness and
condition (health) of the person using the treadmill.
Folding & Moving
Folding
Your treadmill can be folded up in 2 ways, to save space when not in use. The step for
folding is oppiste to the step of unfolding as shown in the following:
STEP 1:
A、Turn the switch button in
clockwise direction and fold up the
console in the correct position.After
finishing,tighten the switch button.
B、Hold the wire line hitch with both
hands and uplift both handle bars a
little as arrowhead direction.After
uplifting, press the wire line hitch as
arrowhead direction. And then fold
up the handle bar slowly till it is
close to the upright tube.
STEP 2:
Hold the MIDDLE part of the
foldable bar with one hand,and pull
it upward.
Meanwhile,hold the upright tube
with other hand and pull it downward
till it is close to running platform.
Handle bar
Switch button
Upright tube
Foldable bar
Wire line hitch
FIG 10
FIG 11

12
STEP 3:
Turn the grounding tube in opposite
direction to the vertical position.
STEP 4:
Hold the tube and lift the main frame
to vertical position.
Note: The machine must lean on the
wall when not using in case that the
machine fall down.
NOTE:Keep the children and old
people away from the machine. If
necessary, they should be under
guardian.
tube
FIG 12
FIG 13

13
Moving
While moving it, user must make sure that:
a:The power is turned off;
b:It is at the lowest position and has been unplugged, and line is off the machine;
c:Treadmill has been folded up,as the following figure.
When the above 3 points are finished, User should hold the end tube and uplift the
machine to incline the treadmill upwards by 30°~40°to let the supporting wheels on
ground,as the following figure.
FIG 14

15
Maintenance
Advice of Lubrication
After using the running belt for a period of time, the running belt must be
lubricated by silicon oil.
Less than 3 times per week: once every 5 months
From 4 to 7 times per week: once every 2 months
More than 7 times per week: once every month
NOTE: Moderate volume of lubrication is needed to increase the life
sspan of the treadmill, but not too much.
How to add lubrication?
a. Check the lubrication: Stop the treadmill and fold it up, user could check the
underneath center of the running board. If it‟s a little wet, showing that is OK.
Otherwise it should be added some lubrication.
b. Add the lubrication: Simply lift up the running board and spray the lubricant onto
the running belt and the underneath the running board.
c. After adding, put down the running board and start the treadmill with the speed
1Km/h. Then with one foot tramples the running belt slightly for several minutes,
to let the running belt absorb the lubrication well.

GARLANDO SPA
Via Regione Piemonte, 32 - Zona Industriale D1
15068 - Pozzolo Formigaro (AL) - Italy
Table of contents
Other TOORX Treadmill manuals

TOORX
TOORX TRX SMART COMPACT User manual

TOORX
TOORX MIRAGE C60 User manual

TOORX
TOORX CHRONO PRO TRX 3000 User manual

TOORX
TOORX TRX GRAND CRUISER User manual

TOORX
TOORX TRX FORCE CROSS User manual

TOORX
TOORX TRX 3500 User manual

TOORX
TOORX CHRONO PRO TRX 2500 TFT User manual

TOORX
TOORX MIRAGE S70 User manual

TOORX
TOORX TRX 3500 TFT User manual

TOORX
TOORX TRX46S User manual

TOORX
TOORX POWER MAG User manual

TOORX
TOORX TRX 50 S EVO User manual

TOORX
TOORX TRX Endurance User manual

TOORX
TOORX TRX WALKER PRO User manual

TOORX
TOORX TRX 40 S EVO User manual

TOORX
TOORX TRX 9000 User manual

TOORX
TOORX TRX 100 User manual

TOORX
TOORX ERX60 User manual

TOORX
TOORX EXPERIENCE PLUS User manual

TOORX
TOORX RACE CROSS User manual