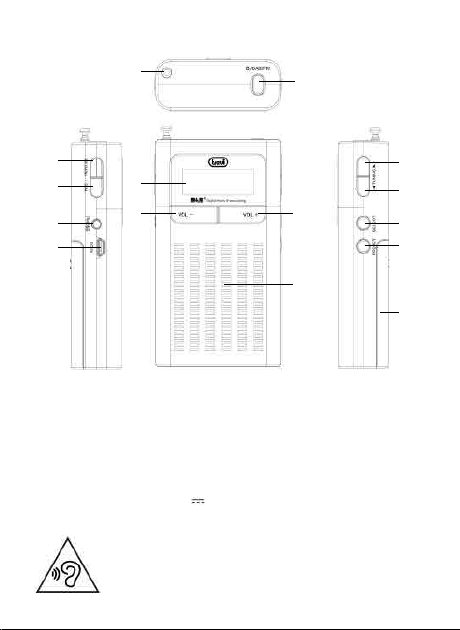
• Premere il tasto SELECT (13) per confermare.
Nota: Si possono salvare 10 stazioni in funzione DAB/DAB+ e 10
stazioni in Radio FM. Una frequenza memorizzata può essere cancellata
dalla memoria memorizzando un’altra frequenza al suo posto.
INFORMAZIONI TRASMISSIONE DAB/DAB+
In modalità DAB, sul display verranno visualizzate una serie di informazioni
relative alla stazione in ascolto.
1. PremereripetutamenteiltastoMENU/INFO(3)percambiareleinformazioni
visualizzate.
Nota: non tutte le stazioni DAB forniscono informazioni visualizzabili
dall’apparecchio.
DLS: visualizza informazioni relative al brano musicale trasmesso (artista,
titolo brano, ecc...).
Tipo programma: visualizza le informazioni relative al tipo di programma
trasmesso.
Nome trasmittente: visualizza le informazioni relative al trasmittente del
servizio.
Numero/Frequenza trasmittente: visualizza le informazioni relative a
numero e frequenza della stazione DAB/DAB+ trasmessa.
Bit Rate: visualizza informazioni relative al rapporto di compressione
della trasmissione corrente. Più è alto il valore, migliore è la qualità della
trasmissione.
Potenzasegnale: visualizza le informazioni relative alla potenza del segnale
tramiteunabarrasuldisplay,più ilsegnale èforte,più labarrarisulteràpiena.
Ora/Data: visualizza informazioni relative all’orario e alla data della tra-
smissione corrente.
MENU RADIO DAB/DAB
+
1. In modalità DAB o Radio, tenere premuto per qualche secondo il tasto
INFO/MENU (3);
2. Premere i tasti TUNING > (11) o TUNING < (12) e selezionare la voce
desiderata tra:
In modalità DAB: Full Scan, Manual tune, DRC, Prune, System;
In modalità FM: Scan Setting, Audio Setting, System;
3. Premere il tasto SELECT (13) per entrare nelle impostazioni della voce
selezionata.
Full scan (Ricerca completa): permette di scansionare l’intera banda DAB/
DAB+ e memorizzare automaticamente le stazioni trovate.
Manual tune (Sintonizzazione manuale): permette di scansionare manual-
mente una singola frequenza DAB/DAB+. Premere il tasto TUNING > (11) o
TUNING < (12) per selezionare il numero del canale relativo alla frequenza
dascansionaree successivamente premere il tasto SELECT (13) per avviare
lascansione.Lestazionitrovate verrannoautomaticamentememorizzate. Al
termine premere a lungo il tasto MENU/INFO (3) per tornare al menu DAB.
DRC:permette di abilitare/disabilitare lafunzioneDRCper migliorare il suono
durante l’ascolto in ambienti rumorosi. È possibile impostare il livello di DRC
in alto (high), basso (low) o OFF (spento).
Prune (Elimina): permette di eliminare dalle lista delle stazioni memorizzate
tuttele radio trovatemanon disponibili (scarso segnale).Spostarsicon i tasti
TUNING > (11) o TUNING < (12) su Y(YES) e confermare l’eliminazione
con il tasto SELECT (13).
System (Sistema): permette di accedere al sottomenù di sistema:
Sleep: Per impostare l’autospegnimento (Sleep off, 15min, 30min,
45min, 60min e 90min).
Alarm: è possibile impostare fino a 2 allarmi:
- Con i tasti TUNING > (11) o TUNING < (12) selezionare Alarm 1 o
Alarm 2 e confermare con il tasto SELECT (13);
- Impostare l’attivazione (Alarm ON) o la disattivazione (Alarm OFF)
tramite i tasti TUNING > (11) o TUNING < (12) e confermare con il
tasto SELECT (13);
- Se attivato (Alarm ON) impostare l’ora utilizzando i tasti TUNING >
(11) o TUNING < (12) e confermare con il tasto SELECT (13);
- Impostare la durata (15, 30, 45, 60, 90);
- Impostare la sorgente (se utilizzare il suono standard, oppure la radio
FM o DAB);
- Impostare la ripetizione: una volta, giornaliero, settimanale o solo nel
ITALIANO