Volvo 2003 XC90 User manual

XC90
Section
Group
Weight(Kg/Pounds)
Year
Month
3
39
2002
08
XC90 2003, XC90 2004
Replaces issue: 2002 05
B3602146
XC90
Section
Group
Weight(Kg/Pounds)
Year
Month
3
39
2002
08
XC90 2003, XC90 2004
Replaces issue: 2002 05
B3602146
Installation instructions, accessories
-
Handsfree
Volvo Car Corporation G
öteborg, Sweden
Installation instructions, accessories
-
Handsfree
Volvo Car Corporation G
öteborg, Sweden
©
VolvoCar Corporation, 2002 Printed in Sweden
8682160
©
VolvoCar Corporation, 2002 Printed in Sweden
8682160
Page 1 of 26

Required tools
A0000162
A0000163
A0801450
R8802817
R3903808
R3904093
Installation instructions, accessories
-
Handsfree
Volvo Car Corporation G
öteborg, Sweden
Installation instructions, accessories
-
Handsfree
Volvo Car Corporation G
öteborg, Sweden
©
VolvoCar Corporation, 2002 Printed in Sweden
8682160
©
VolvoCar Corporation, 2002 Printed in Sweden
8682160
Page 2 of 26

R3903810
R3904094
R3903812
M3903606
Installation instructions, accessories
-
Handsfree
Volvo Car Corporation G
öteborg, Sweden
Installation instructions, accessories
-
Handsfree
Volvo Car Corporation G
öteborg, Sweden
©
VolvoCar Corporation, 2002 Printed in Sweden
8682160
©
VolvoCar Corporation, 2002 Printed in Sweden
8682160
Page 3 of 26

Any comments on this publication? Please contact your nearest dealer. Thank you!
A3903163
Publication no: MA 8682160, Issue: 2002
-08
Comments:..........................................................................................................
............................................................................................................................
............................................................................................................................
............................................................................................................................
............................................................................................................................
.............................................................................................................................
From:...................................................................................................................
Address:.............................................................................................................
Telephone no:................................................................................................... .
Telefax:...............................................................................................................
Installation instructions, accessories
-
Handsfree
Volvo Car Corporation G
öteborg, Sweden
Installation instructions, accessories
-
Handsfree
Volvo Car Corporation G
öteborg, Sweden
©
VolvoCar Corporation, 2002 Printed in Sweden
8682160
©
VolvoCar Corporation, 2002 Printed in Sweden
8682160
Page 4 of 26

INTRODUCTION
●NOTE! Read through the entire text before carrying out
any work.
●The front page gives the date of this edition and the edition it
replaces
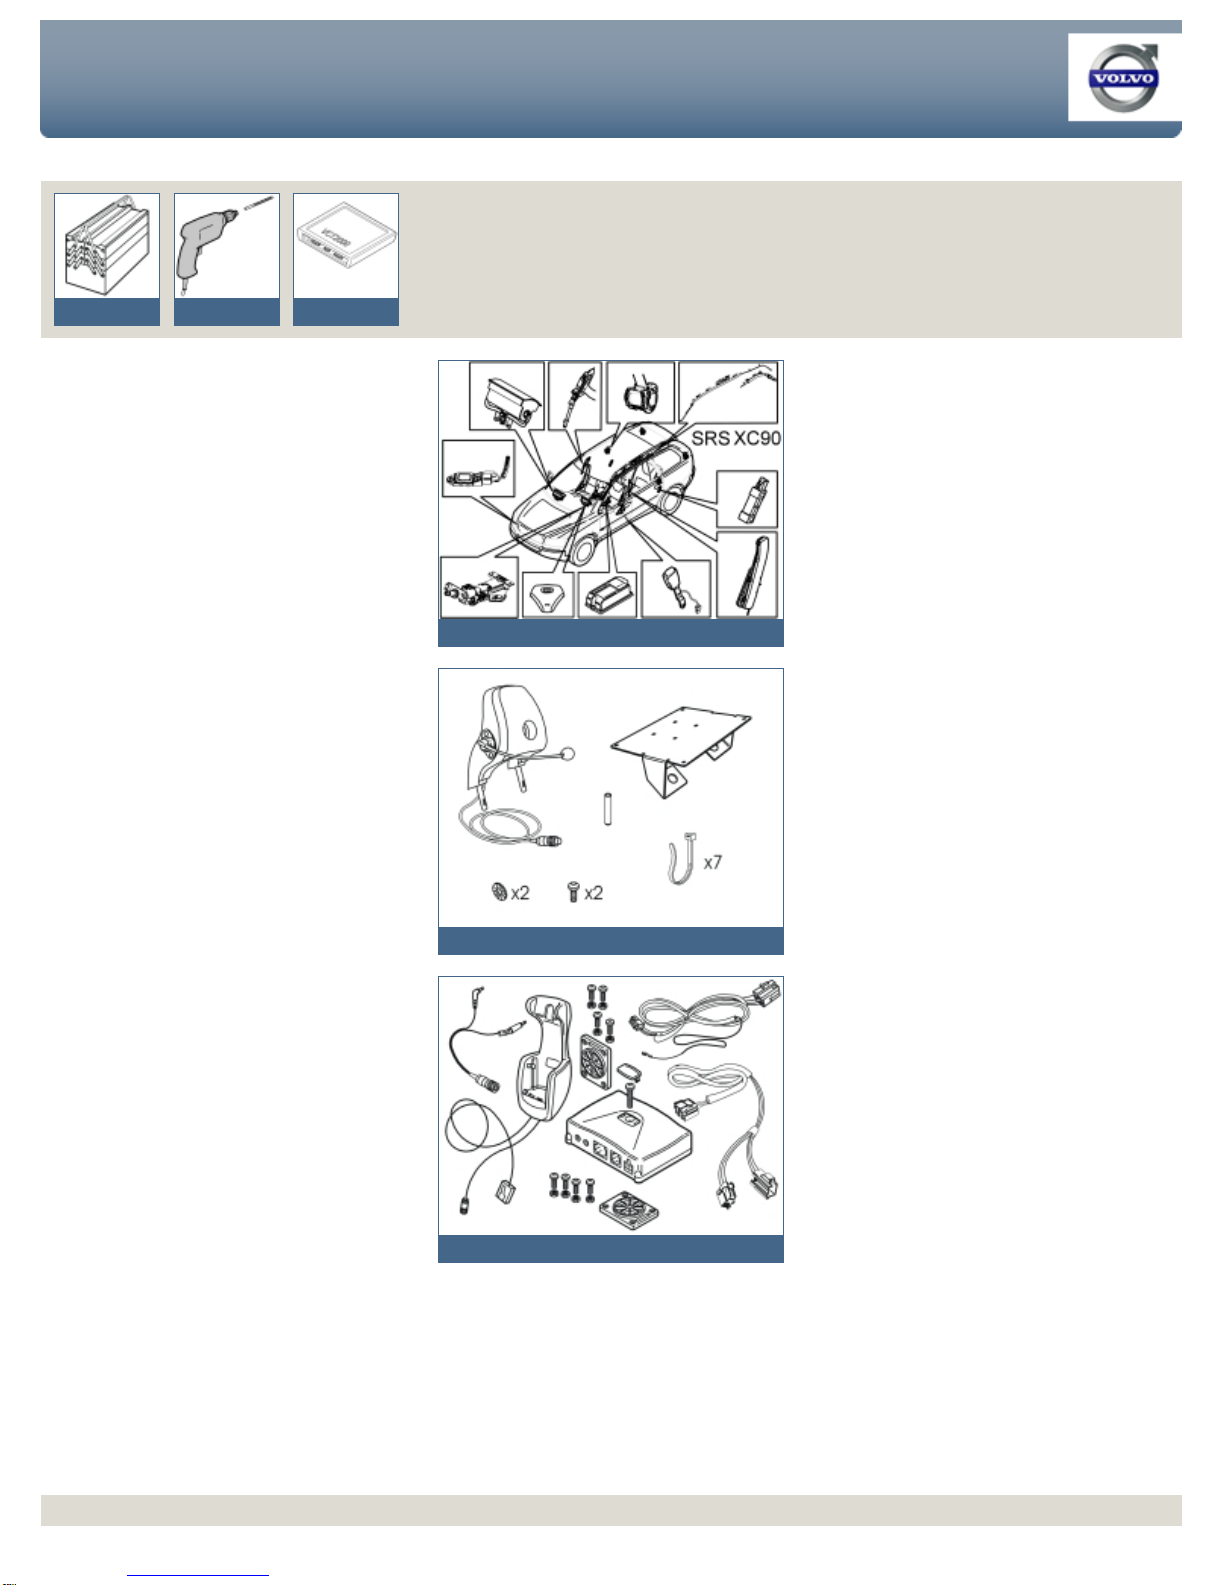
●The second page shows the tools needed for the installation and
the contents of the installation kit
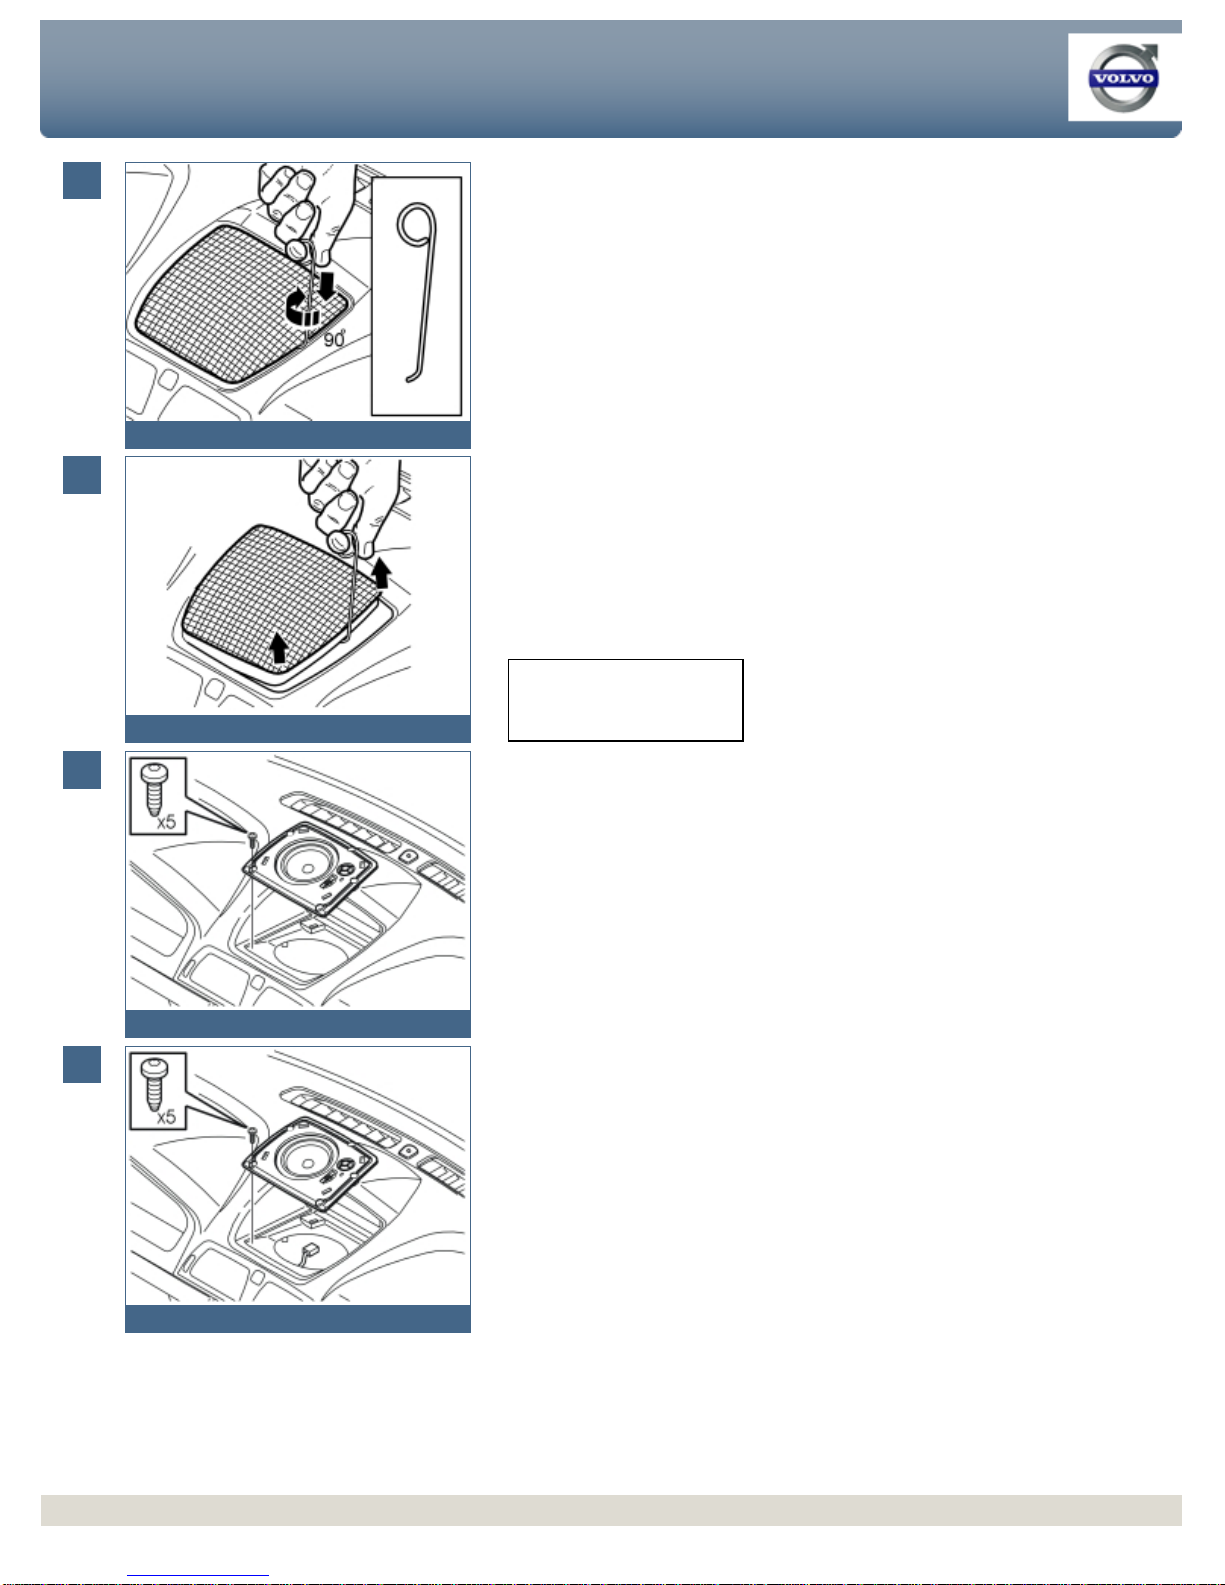
●The illustrations display the procedure in order of operation. The
order of operation is repeated in the text section
●Cut out the text page in order to follow the illustrations and text at
the same time.
Cars equipped with SRS/SIPS (Airbag)
Warning!
Extra care must be taken when working on cars equipped with SRS/SIPS
air bags. This is important to prevent:
1. Personal injury
2. Damage to or malfunction of the SRS/SIPS system.
Work on the SRS/SIPS systems or related components must always be
carried out by an authorised Volvo workshop.
Is the car equipped with SRS (supplemental restraint system)?
Cars equipped with a driver's airbag have the letters "SRS" imprinted on
the centre panel of the steering wheel. Cars equipped with driver's and
passenger airbags are marked with "SRS" on both the steering wheel
centre panel and also on the dashboard close to the airbag.
If the car is equipped with SIPS (side impact protection system ) a "SIPS"
decal is marked on both the front seats.
Cars equipped with inflatable curtains have the marking "SRS" on one of
the panels along the posts on the inside of the car.
Cars equipped with SRS (supplemental restraint system) also have a
"SRS" decal on the front windscreen.
Do not damage the SRS wiring!
Do not trap, fray, pierce or damage the SRS wiring. SRS wiring has
orange casing and/or is plaited.
Steering and front suspension
The contact reel in the SRS system can easily be damaged when
working on the steering wheel, steering shaft or steering gear. Refer to
the SRS (supplemental restraint system) Service Manual or service
instructions in VIDA for information on carrying out such work. This is to
prevent damage.
SRS warning lamp
If the SRS warning lamp lights after repairs have been carried out, take
the car to an authorised Volvo workshop.
SRS collision sensor control module
S60 / V70 (00-) /
S80 / XC90
The collision sensor control module is located on the transmission tunnel
Installation instructions, accessories
-
Handsfree
Volvo Car Corporation G
öteborg, Sweden
Installation instructions, accessories
-
Handsfree
Volvo Car Corporation G
öteborg, Sweden
©
VolvoCar Corporation, 2002 Printed in Sweden
8682160
©
VolvoCar Corporation, 2002 Printed in Sweden
8682160
Page 5 of 26

in the centre console, in front of the parking brake.
WARNING!
The air bag inflation areas must not be obstructed. Never place
any objects, such as upholstery or accessories, within these
areas. The panels must be able to deploy in the correct manner
at the right time otherwise there is a risk of personal injury in
the event of a collision.
WARNING!
The ignition must be in position "0" and the key removed from
the ignition if any connector in the SRS system is to be
disassembled. Then wait at least one minute. Then disconnect
the battery negative lead before disassembling any of the
connectors. When work is completed the ignition key must be
turned to position "II" before reconnecting the battery negative
lead.
Handsfree
Note!
This accessory is connected to the electrical system of the car. It
requires software unique to the car.
Installation instructions, accessories
-
Handsfree
Volvo Car Corporation G
öteborg, Sweden
Installation instructions, accessories
-
Handsfree
Volvo Car Corporation G
öteborg, Sweden
©
VolvoCar Corporation, 2002 Printed in Sweden
8682160
©
VolvoCar Corporation, 2002 Printed in Sweden
8682160
Page 6 of 26

1
R8504165
Preparations
●
Remove the left and right
-hand side panels from the centre console. Pull the
panels free at the front edge and then backwards until all the clips have
released.
2
A8800136
Preparations
Applies to cars with power front seats
●
Position the right
-hand front seat so that the panels over the front and right rear
seat mountings, and the small panel at the lower edge of the right-
hand B
-post
are not obstructed. They will be removed later after disconnecting the battery
negative lead
●Also position the left-hand front seat in a suitable position so that the hands free
kit can be installed.
Applies to all models
●
Turn the ignition key to position 0
●Disconnect the battery negative lead.
Note!
Wait at least five minutes before disassembling the connectors or removing other
electrical equipment.
Installation instructions, accessories
-
Handsfree
Volvo Car Corporation G
öteborg, Sweden
Installation instructions, accessories
-
Handsfree
Volvo Car Corporation G
öteborg, Sweden
©
VolvoCar Corporation, 2002 Printed in Sweden
8682160
©
VolvoCar Corporation, 2002 Printed in Sweden
8682160
Page 7 of 26

3A
R8504166
3B
R8504167
3C
R3904127
3D
R3904128
Preparations
Illustration A
Remove the loudspeaker grille as follows:
●
Take a length of
1.5 mm (1/16”)diameter welding rod. Bend one end to 90
°
(
L=5 mm (13/64
”)). The other end is bent to form a handle
●Insert the first bent end down into the joint between the loudspeaker grille and
the dashboard as illustrated, until it engages
●Twist the welding rod 90
°
so that the bent section engages with the underneath
of the loudspeaker grille. It may be necessary to move the welding rod along the
joint to twist the rod around.
Illustration B
●Pull upwards until the loudspeaker grille detaches. The loudspeaker grille is
securely fastened by four clips.
●
Place the loudspeaker grille to one side.
Illustration C applies to cars without a centrally-mounted loudspeaker
●Remove the bracket for the loudspeaker grille by removing the five screws and
pulling it up out of the dashboard.
Illustration D applies to cars with a centrally-mounted loudspeaker
●Remove the five screws in the loudspeaker. Pull up the loudspeaker slightly from
the dashboard. Disconnect the connector.
Illustration E applies to cars with RTI (road traffic information)
●Remove the five screws in the display for RTI (road traffic information). Pull up
the display slightly from the dashboard. Disconnect the connectors. Disconnect
the centrally-mounted loudspeaker connector if installed.
Note!
Do not damage the dashboard.
Installation instructions, accessories
-
Handsfree
Volvo Car Corporation G
öteborg, Sweden
Installation instructions, accessories
-
Handsfree
Volvo Car Corporation G
öteborg, Sweden
©
VolvoCar Corporation, 2002 Printed in Sweden
8682160
©
VolvoCar Corporation, 2002 Printed in Sweden
8682160
Page 8 of 26

3E
R3904129
4
R3800878
Preparations
●Lower the steering wheel to the lowermost position. Pull the steering wheel to
the rearmost position
●Remove the two screws at the top edge of the combined instrument panel
surround
●Carefully pry off the rubber seal from the upper steering column cover. Use a
weatherstrip tool. It is secured with five clips
●Remove the surround by carefully pulling it backwards, first at the lower edge
and then at the top edge until all the clips have released.
5
R3800876
Preparations
●Remove the four screws for the combined instrument panel
●Pull out the combined instrument panel. Disconnect the connector on the reverse
of the combined instrument panel.
6
R8504113
Preparations
Applies to cars with automatic gearboxes
●
Turn the ignition key to position II.
Applies to all models
●Move the gear selector lever to its rearmost position
●Carefully pry off the gear selector lever panel at the lower edge using a
weatherstrip tool. Pull the panel backwards to access the screws for the
dashboard environment panel.
Installation instructions, accessories
-
Handsfree
Volvo Car Corporation G
öteborg, Sweden
Installation instructions, accessories
-
Handsfree
Volvo Car Corporation G
öteborg, Sweden
©
VolvoCar Corporation, 2002 Printed in Sweden
8682160
©
VolvoCar Corporation, 2002 Printed in Sweden
8682160
Page 9 of 26

7
R8504051
Preparations
●Remove the screws holding the bracket for the dashboard environment panel
and the control module
●Pull out the bracket at the lower edge. Pull downwards from the top edge of the
centre console
●Disconnect the connectors from the dashboard environment panel, control
module. If applicable disconnect the CD player and/or Mini disc player
connectors.
8
R3904206
Installing the carphone holder
●Take the carphone holder bracket, the reinforcement panel, the cover and
screws from the kit
●Install the reinforcement panel (1) and the cover (2) in the bracket (3) using the
screws (4).
9A
R3904204
9B
R3904205
Installing the carphone holder
Illustration A
●Position the entire unit (1) in the dashboard to mark out holes for the bracket.
Adjust to achieve the optimum position. Do not press the unit hard against the
dashboard, however, ensure that there are no gaps at the sides between the
panel and the dashboard (2).
Illustration B
●Hold the unit securely and mark out the holes through the bracket
●Drill out the two holes using a 5 mm (13/64”)
diameter drill bit. Use a 25 mm (1
”)
drill stop
●Remove any swarf
●Remove the cover and the reinforcement panel from the bracket.
Installation instructions, accessories
-
Handsfree
Volvo Car Corporation G
öteborg, Sweden
Installation instructions, accessories
-
Handsfree
Volvo Car Corporation G
öteborg, Sweden
©
VolvoCar Corporation, 2002 Printed in Sweden
8682160
©
VolvoCar Corporation, 2002 Printed in Sweden
8682160
Page 10 of 26

10
M8902743
Installing the carphone holder
●Take the reinforcement panel (1) and the two screws from the kit
●Position the carphone holder wiring so that it is routed on the reverse of the
bracket as illustrated
●Insert the reinforcement panel through the hole for the centre loudspeaker
●Install the bracket (2). Use the two screws (3). Tighten the bracket against the
dashboard.
11
R8504494
Installing the carphone holder
●Press the surround for the combined instrument panel into place
●Mark out the surround, following the sketch, where the cut-outs will be made for
the wiring and the bracket for the handset holder
●Remove the surround. File out the groove (1) for the wiring for the handset. File
the hole so that it is large enough for any excess wiring to be routed through the
hole and hidden on the inside of the dashboard
●File out a groove (2) for the bracket for the handset holder
●Smooth off the edges of the groove.
12
R3903766
Installing the carphone holder
●Route the wiring to the carphone holder from the hole for combined instrument
panel. Position the wiring at the left air duct in the centre console. Do not route
more wiring than is required to secure the carphone holder
●
Connect the combined instrument panel. Reinstall the combined instrument panel
●
Reinstall the surround for the combined instrument panel. Tighten.
13
R3903763
Installing the carphone holder
●Install the bracing plate (1) and the cover (2) in the bracket (3). Use the screw
(4) (from the kit). Do not tighten fully yet
●Remove the mounting plate (5) for the carphone holder from the carphone holder.
Tighten the mounting plate using the screws (6) from the kit
●Tighten the screw (4).
Installation instructions, accessories
-
Handsfree
Volvo Car Corporation G
öteborg, Sweden
Installation instructions, accessories
-
Handsfree
Volvo Car Corporation G
öteborg, Sweden
©
VolvoCar Corporation, 2002 Printed in Sweden
8682160
©
VolvoCar Corporation, 2002 Printed in Sweden
8682160
Page 11 of 26

14A
M3903001
14B
M3903171
14C
M3903607
Installing the carphone holder
Illustration A applies to Nokia
●Tighten the carphone holder (1) onto the mounting plate (2) using the screw (3)
●Install the cover (4).
Illustration B applies to the Ericsson T28, T29 and T39
●Tighten the upper section of the carphone holder (1) onto the mounting plate (2)
using the screw and washer (3)
●Press the lower section (4) of the carphone holder onto the upper section.
Illustration C applies to the Ericsson T20
●
Tighten the carphone holder mounting (1) onto the mounting plate (2) using the
screw and washer (3)
●Press the carphone holder (4) onto the mounting.
15
R3903813
Installing the carphone holder
Applies to Nokia
●Install the mounting plate (1) on the bracket. Use the screws and nuts from the
kit.
Installation instructions, accessories
-
Handsfree
Volvo Car Corporation G
öteborg, Sweden
Installation instructions, accessories
-
Handsfree
Volvo Car Corporation G
öteborg, Sweden
©
VolvoCar Corporation, 2002 Printed in Sweden
8682160
©
VolvoCar Corporation, 2002 Printed in Sweden
8682160
Page 12 of 26

16
R3703022
Installing the carphone holder
Applies to all models
●Take the two large cable harnesses from the kit. Connect them to each other.
17A
R3904095
17B
R3904096
Installing the handsfree box
Illustration A applies to Ericsson
●Take four screws and nuts from the kit. Tighten the handsfree box to the bracket
●Connect the wiring to the handsfree box as illustrated:
the wiring to the head restraint (1)
the wiring to the carphone holder (2)
the cable to the accessory electronic module (AEM) (3)
the joint cable (4) to the short cable for the handsfree box.
Illustration B applies to Nokia
●Tighten the handsfree box to the mounting plate (1) using the screw (2) from the
kit
●Install the cover (3) over the screw
●Connect the wiring to the handsfree box as illustrated:
the wiring to the head restraint (4)
the cable to the carphone holder (5)
the cable to the accessory electronic module (AEM) (6).
Applies to all models
●The remaining cable from the carphone holder, (5) in illustration A and (7) in
illustration (B), is connected to the car aerial.
Installation instructions, accessories
-
Handsfree
Volvo Car Corporation G
öteborg, Sweden
Installation instructions, accessories
-
Handsfree
Volvo Car Corporation G
öteborg, Sweden
©
VolvoCar Corporation, 2002 Printed in Sweden
8682160
©
VolvoCar Corporation, 2002 Printed in Sweden
8682160
Page 13 of 26

18A
R3904318
18B
R8504495
Installing the handsfree box
Applies to all models:
●Take two screws and nuts from the kit. Install the bracket with the handsfree
box on the existing bracket at the lower edge of the centre console.
●Locate the grey (GR) pre-routed connector (1) for power supply. This comes
from the heavy duty cable harness -either under the dashboard on the right-
hand side of the steering column, immediately above the accelerator pedal (AP),
or in the cut-out for the radio in the centre console.
The connector may be separate on the cable harness, or if the car has a
MiniDisc player and / or CD player / changer, the connector may be on the
junction cable for these components.
Cars which do not have a pre-routed connector in the cut-out for the
radio:
●Remove the soundproofing panel on the left-hand side. First remove the two
screws, then pry off the soundproofing panel at the top edge (see illustration B).
Applies to all models:
●Take the cable harness with the two grey (GR) connectors which was
previously connected to the handsfree box. Pull it out through the left-hand side
of the centre console to the existing connector
●Connect the pre-routed connector to the corresponding connector (2) on the
routed cable harness
●Secure the excess connector (3). Also clamp the cable harness so that it is not
in contact with any sharp edges and is not at risk of any other damage.
Note!
Ensure that the none of the wiring is trapped.
19
S3900558
Head restraint preparations
●Remove the driver's seat head restraint. Press in the catches while pulling the
head restraint up.
Installation instructions, accessories
-
Handsfree
Volvo Car Corporation G
öteborg, Sweden
Installation instructions, accessories
-
Handsfree
Volvo Car Corporation G
öteborg, Sweden
©
VolvoCar Corporation, 2002 Printed in Sweden
8682160
©
VolvoCar Corporation, 2002 Printed in Sweden
8682160
Page 14 of 26

20
A3601074
Head restraint preparations
Does not apply to cars with leather upholstery
●Remove the upholstery from the head restraint. If the zip fastener catch is
missing: Disconnect the clamps at the ends of the zip fastener. Pull the zip
fastener apart.
21
A3602219
Head restraint preparations
Does not apply to cars with leather upholstery
●Turn the head restraint upholstery inside out
●Mark up for holes on the right hand side of the head restraint. Mark from the
underside (1) of the side 120 mm (4 23/32”) upwards and mark out between the
two seams (2) and (3).
22
A3601076
Head restraint preparations
Does not apply to cars with leather upholstery
●Punch out the hole using the hole punch from the kit. Use a wooden or cork
underlay
●Turn the upholstery the correct way
●Carefully pull the upholstery over the new head restraint with the microphone.
Applies to cars with leather upholstery
●Take the new leather upholstery from the kit
●Carefully pull the upholstery over the new head restraint with the microphone.
23
A3602218
Head restraint preparations
●Close the zip fastener. If the zip fastener catch is missing, use a suitable zip
fastener catch from the kit. Close the zip fastener again. Lock the ends using
staples for example
●Push the ends of the zip fastener inside the upholstery.
Installation instructions, accessories
-
Handsfree
Volvo Car Corporation G
öteborg, Sweden
Installation instructions, accessories
-
Handsfree
Volvo Car Corporation G
öteborg, Sweden
©
VolvoCar Corporation, 2002 Printed in Sweden
8682160
©
VolvoCar Corporation, 2002 Printed in Sweden
8682160
Page 15 of 26

24
R3603009
Installing the head restraint
●Insert a curtain wire from the bottom and upwards on the reverse of the
backrest between the upholstery and the padding
●Tape the switch from the microphone cable to the curtain wire. Pull down
through the seat
●Install the new head restraint.
25
R3904099
Installing the head restraint
●
Pull up the cable from the head restraint. Position it under the upholstery and
route it to the front of the backrest
●Lower the cable between the seat cushion and its panel and up to the joint in the
carpet on the left-hand side of the centre console.
Note!
Ensure that the cable does not come into contact with loose components or sharp
edges.
26
R3904098
Installing the head restraint
●
Pull the cable from the head restraint into the carpet join inside the carpet. Pull it
along the inside of the left-hand side of the tunnel console up to the centre
console, along the air duct and up to the handsfree box that was installed earlier.
●Connect the connector (1) from the newly routed cable to the corresponding
connector (2) for the handsfree box.
Note!
Pull enough of the cable out of the carpet join so that the seat can move between its
limit positions without stretching or rubbing.
27
R8504419
Cable routing to the accessory electronic module (AEM)
●
Remove the right
-hand side soundproofing panel. First remove the two screws.
Then pry off the panel at the top edge.
Installation instructions, accessories
-
Handsfree
Volvo Car Corporation G
öteborg, Sweden
Installation instructions, accessories
-
Handsfree
Volvo Car Corporation G
öteborg, Sweden
©
VolvoCar Corporation, 2002 Printed in Sweden
8682160
©
VolvoCar Corporation, 2002 Printed in Sweden
8682160
Page 16 of 26

28
R8504168
Cable routing to the accessory electronic module (AEM)
●Remove the cover (1) on the left front mounting on the right-hand front seat by
prying off the front edge
●Pry off the front edge of the right panel (2). Remove the panel.
29
R8504241
Cable routing to the accessory electronic module (AEM)
●
Remove the panel on the right rear mounting on the right
-hand front seat. Pry it
up slightly at the rear edge and then pull it back / upwards.
30
R8504169
Cable routing to the accessory electronic module (AEM)
●Remove the panel over the joint between the door sills on the right-hand side.
Carefully pry off the panel at the lower edge using a weatherstrip tool.
31
R8504170
Cable routing to the accessory electronic module (AEM)
●
Detach the sill trim panel for the right
-hand front door. Pull off the panel starting at
the front edge until the clip releases. Continue backwards until the remaining
clips have released
●
Unhook the sill trim panel from the B
-post panel.
Installation instructions, accessories
-
Handsfree
Volvo Car Corporation G
öteborg, Sweden
Installation instructions, accessories
-
Handsfree
Volvo Car Corporation G
öteborg, Sweden
©
VolvoCar Corporation, 2002 Printed in Sweden
8682160
©
VolvoCar Corporation, 2002 Printed in Sweden
8682160
Page 17 of 26

32
R8504171
Cable routing to the accessory electronic module (AEM)
●
Remove the panel in the right
-hand front seat mounting on the right-hand seat in
the second row. Push up the catch (1) on the top. Pull the panel forward.
33
R8504172
Cable routing to the accessory electronic module (AEM)
●Fold the backrest on the right-hand seat in the second row forward as far as
possible. Slide the front seat forward as far as possible. (On cars with two
rows of seats, the second row is secured.)
●Remove the cover (1) for the right rear seat mounting by prying off the rear
edge.
34A
R8504173
34B
R8504174
Cable routing to the accessory electronic module (AEM)
Illustration A
●
Remove the sill trim panel for the right
-
hand rear door. Pull the rear edge until the
clips release. Continue forwards until the remaining clips have released.
Applies to cars with two rows of seats
●On cars with two rows of seats the seat cannot be slid forwards. To remove
the sill trim panel; Start by folding the backrest forward when pulling the rear
edge of sill trim panel loose. Then reposition the backrest to raise the seat
cushion and provide more room for removing the sill trim panel. It is securely
positioned. Do not damage the panel and surrounding components.
Illustration B
●
Unhook the sill trim panel from the B
-
post panel. Position the panel in the
second/third row of seats.
Installation instructions, accessories
-
Handsfree
Volvo Car Corporation G
öteborg, Sweden
Installation instructions, accessories
-
Handsfree
Volvo Car Corporation G
öteborg, Sweden
©
VolvoCar Corporation, 2002 Printed in Sweden
8682160
©
VolvoCar Corporation, 2002 Printed in Sweden
8682160
Page 18 of 26

35
R8503999
Cable routing to the accessory electronic module (AEM)
Applies to cars with three rows of seats and integrated carrier bag
holder on the underside of the centre floor hatch
●Fold the rear centre floor hatch up
●Detach the two straps from the panel underneath. Lift up the rear edge of the
panel. Fold the floor hatch back towards the panel and lift out the floor hatch and
the panel.
Applies to cars with three rows of seats without integrated carrier bag
holders
●Lift up the centre rear floor hatch at the rear edge and lift it out.
Applies to cars with two rows of seats
●Remove the two centre floor hatches. First lift up slightly and then pull them loose
from the mountings at the front edge. If the rear centre floor hatch has a carrier
bag holder on the lower side, the floor hatch is secured by a strap on each of
the shorter sides of the storage box. These must be removed.
●Remove the two storage boxes from underneath.
36
R8504158
Cable routing to the accessory electronic module (AEM)
Applies to all models
●
Remove the right
-hand side floor hatch (1).
37
R8504159
Cable routing to the accessory electronic module (AEM)
●
Remove the folding side panel from the right
-hand side in the cargo compartment.
Installation instructions, accessories
-
Handsfree
Volvo Car Corporation G
öteborg, Sweden
Installation instructions, accessories
-
Handsfree
Volvo Car Corporation G
öteborg, Sweden
©
VolvoCar Corporation, 2002 Printed in Sweden
8682160
©
VolvoCar Corporation, 2002 Printed in Sweden
8682160
Page 19 of 26

38
R3702905
Cable routing to the accessory electronic module (AEM)
●Pull up the left and right sides of the carpet at the right-hand front seat slightly.
Insert a wire (1) under the carpet at the front edge of the air ducts on the right-
hand side of the centre console, and route it out at the right-hand door sill as
illustrated
●Take the long cable harness (2) in the cable harness for the handsfree box.
Route it up to the newly positioned wire. Tape the long cable harness to the wire
●Pull the cable harness out of the carpet at the right-
hand door sill.
39
R3702904
Cable routing to the accessory electronic module (AEM)
●Insert the cable harness between the carpet and the door sill towards the carpet
as far as it will go. Route it along the right-hand side of the car up to the rear
edge of the door opening for the right-hand rear door
●Pull the cable harness up to the right-hand front seat mounting on the right-hand
seat in the second row of seats
●Pull away the carpet from the front edge of the right-hand side panel in the cargo
compartment
●Route the cable harness along the right-hand side of the right-hand seat in the
second row of seats towards the front edge of the rear wheel arch. Route it
onwards on the left-hand side of the lower mounting for the seat belt, between
the support bracket for the right-hand seat and wheel arch, and out at the left-
hand side of the wheel arch
●
Clamp the cable harness in the hole in the front member for the seat mounting
and in the rear hole in the horizontal panel at the right
-hand side of the seat. Use
the tie straps (1) (from the kit).
40A
R3702907
Cable routing to the accessory electronic module (AEM)
Applies to cars with three rows of seats Illustration A
●Insert a cable (1) at the rear edge of the right-
hand side panel and along the
inside of the panel, above the mountings for the load securing eyelets and to the
front edge of the side panel.
Illustration B
●Tape the cable harness (2) to the wire and pull it out of the rear edge of the side
panel.
Installation instructions, accessories
-
Handsfree
Volvo Car Corporation G
öteborg, Sweden
Installation instructions, accessories
-
Handsfree
Volvo Car Corporation G
öteborg, Sweden
©
VolvoCar Corporation, 2002 Printed in Sweden
8682160
©
VolvoCar Corporation, 2002 Printed in Sweden
8682160
Page 20 of 26
Other manuals for 2003 XC90
2
This manual suits for next models
1
Other Volvo Automobile Accessories manuals

Volvo
Volvo Guard Alarm II User manual

Volvo
Volvo 30739998 User manual

Volvo
Volvo 31265663 User manual

Volvo
Volvo 31260792 User manual

Volvo
Volvo 1324 User manual

Volvo
Volvo 31269367 User manual

Volvo
Volvo VIDA User manual

Volvo
Volvo 8613309 User manual

Volvo
Volvo 31269619 User manual

Volvo
Volvo Handsfree User manual

Volvo
Volvo 31269496 User manual

Volvo
Volvo 8637377 User manual

Volvo
Volvo 30754484 User manual

Volvo
Volvo 30660998 User manual

Volvo
Volvo TRM User manual

Volvo
Volvo 912-D User manual

Volvo
Volvo C30 2007 User manual

Volvo
Volvo BICYCLE HOLDER User manual

Volvo
Volvo 10 CD User manual

Volvo
Volvo 31339704 User manual