WMF Lumero User manual

WMF Lumero
Gebrauchsanweisung 4
Milchaufschäumer
Operating Manual 10
Milk Frother
Mode d’emploi 16
Moussoir à lait
Instrucciones de uso 22
Espumador de leche
Istruzioni per l’uso 28
Schiumatore
DE
EN
FR
ES
IT
NL
DA
SV
FI
NO
Gebruiksaanwijzing 34
Melkopschuimer
Brugsanvisning 40
Mælkeskummer
Användarguide 46
Mjölkskummaren
Käyttöohje 52
Maidonvaahdotin
Bruksanvisning 58
Melkskummer

Aufbau Milchaufschäumer
1. Deckel
2. Dichtungsring
3. Rührarm
4. WMF Milchschaum-DISC
5. Krug
6. Start-/Stopptaste mit Kontrollleuchte
7. LED-Leuchtring
8. Gerätesockel mit Kabelaufwicklung
Milk frother components
1. Lid
2. Sealing ring
3. Mixing arm
4. WMF milk froth DISC
5. Jug
6. Start/Stop button with control lamp
7. LED light ring
8. Appliance base with cable wrap
Montage du moussoir à lait
1. Couvercle
2. Joint d’étanchéité
3. Bras mixeur
4. Disque moussoir à lait WMF
5. Pot
6. Touche marche/arrêt avec témoin de contrôle
7. Anneau lumineux à DEL
8. Socle de l’appareil avec cordon d’alimentation
Componenti schiumatore
1. Coperchio
2. Anello guarnizione
3. Brazo mezclador
4. DISCO per la formazione di schiuma di latte
WMF
5. Bricco
6. Tasto di avvio/arresto con spia
7. Anillo luminoso LED
8. Base del dispositivo con avvolgicavo
Montaje del espumador de leche
1. Tapa
2. Anillo de junta
3. Braccio miscelatore
4. Espumador de leche DISC de WMF
5. Jarra
6. Tecla inicio/parada con luz de control
7. Anello luce LED
8. Zócalo del aparato con bobinado de cable
Onderdelen melkopschuimer
1. Deksel
2. Afdichtring
3. Mixarm
4. WMF melkschuim-DISC
5. Kan
6. Start/stop-knop met controlelampje
7. Led-lichtring
8. Apparaatvoet met kabelvak
Opbygning af mælkeskummer
1. Låg
2. Plombering
3. Blandearm
4. WMF Mælkeskummer-DISC
5. Kande
6. Start-/Stoptast med kontrollampe
7. LED-lysring
8. Apparatsokkel med kabelopvikling
Mjölkskummarens konstruktion
1. Lock
2. Tätningsring
3. Blandningsarm
4. WMF-mjölkskums-DISC
5. Kanna
6. Start- och stoppknapp med kontrollampa
7. LED-ljusring
8. Apparatsockel med sladdförvaring
Maidonvaahdottimen osat
1. Kansi
2. Tiivisterengas
3. Sekoitusvarsi
4. WMF-vaahdotuslevy
5. Kannu
6. Käynnistys-/pysäytysnäppäin merkkivalolla
7. LED-valorengas
8. Laitteen jalusta, johon laitteen johdon voi
keriä
Oppbygging melkeskummer
1. Lokk
2. Tetningsring
3. Blandearm
4. WMF-melkeskum-DISC
5. Kanne
6. Start-/stoppknapp med indikatorlampe
7. LED-lysring
8. Apparatsokkel med kabeloppbevaring
1
2
3
6
5
8
7
4

4 5
DEDE
Gebrauchsanweisung
Vor dem Benutzen
Die Gebrauchsanweisung aufmerksam lesen. Sie enthält wichtige Hinweise für den Gebrauch, die
Sicherheit und die Wartung des Gerätes.
Sie soll sorgfältig aufbewahrt und gegebenenfalls an Nachbenutzer weitergegeben werden.
Das Gerät darf nur für den vorgesehenen Zweck, gemäß dieser Gebrauchsanweisung, verwendet
werden.
Dieses Gerät ist dafür bestimmt, im Haushalt und ähnlichen Anwendungen verwendet zu werden, wie
beispielsweise:
⋅in Küchen für Mitarbeiter in Läden, Büros und anderen gewerblichen Bereichen;
⋅in landwirtschaftlichen Anwesen;
⋅von Kunden in Hotels, Motels und anderen Wohneinrichtungen;
⋅in Frühstückspensionen.
Das Gerät ist nicht für den rein gewerblichen Gebrauch bestimmt.
Beim Gebrauch die Sicherheitshinweise beachten.
Technische Daten
Nennspannung: 220-240 V~ 50-60 Hz
Leistungsaufnahme: 420-500 W
Schutzklasse: I
Sicherheitshinweise
▪ Gerät nur an eine vorschriftsmäßig installierte Schutzkontaktsteckdose anschließen. Zuleitung und
Stecker müssen trocken sein.
▪ Die Anschlussleitung nicht über scharfe Kanten ziehen oder einklemmen, nicht herunterhängen
lassen sowie vor Hitze und Öl schützen.
▪ Den Netzstecker nicht an der Leitung oder mit nassen Händen aus der Steckdose ziehen.
▪ Das Gerät nicht in Betrieb nehmen bzw. sofort Netzstecker ziehen, wenn:
⋅Gerät oder Netzkabel beschädigt ist;
⋅das Gerät undicht ist;
⋅der Verdacht auf einen Defekt nach einem Sturz o. Ä. besteht.
In diesen Fällen das Gerät zur Reparatur geben.
▪ Das Gerät nicht auf heiße Oberflächen z. B. Herdplatten o. Ä. oder in der Nähe der offenen Gas-
flamme abstellen, er könnte dabei anschmelzen.
▪ Das Gerät nicht auf wasserempfindliche Oberflächen abstellen. Spritzer könnten diese beschädigen.
▪ Das Gerät niemals ohne Aufsicht betreiben.
▪ Das Gerät nicht ohne Milch einschalten.
▪ Den Krug zum Füllen vom Sockel nehmen.
▪ Verwenden Sie das Gerät nur zum Erhitzen oder Aufschäumen von Milch. Verwenden Sie es nicht
für andere Zutaten.
▪ Das Gerät während des Betriebes nicht verrücken und nicht am Netzkabel ziehen.
▪ Die Unterseite des Krugs muss trocken sein, bevor das Gerät genutzt wird.
▪ Vorsicht, das Gerät wird heiß.
▪ Der Netzstecker ist zu ziehen:
⋅bei Störungen während des Betriebes,
⋅vor jeder Reinigung und Pflege,
⋅nach dem Gebrauch.
Wichtige Sicherheitshinweise
▪ Diese Geräte können von Kindern ab 8 Jahren sowie von Personen
mit reduzierten physischen, sensorischen oder mentalen Fähigkeiten
oder Mangel an Erfahrung und/oder Wissen benutzt werden, wenn
sie beaufsichtigt oder bezüglich des sicheren Gebrauchs des Gerätes
unterwiesen wurden und die daraus resultierenden Gefahren
verstanden haben. Kinder dürfen nicht mit dem Gerät spielen.
Reinigung und Benutzer-Wartung dürfen nicht durch Kinder durch-
geführt werden, es sei denn, sie sind älter als 8 Jahre und beaufsich-
tigt.
▪ Bewahren Sie das Gerät und seine Zuleitung außerhalb der Reich-
weite von Kindern unter 8 Jahren auf.
▪ Den Milchaufschäumer nur mit dem dazugehörigen Sockel betrei-
ben.
▪ Das Gerät nicht in Wasser tauchen.
▪ Achten Sie darauf, kein Wasser auf den Sockel zu verschütten.
▪ Vorsicht, Verbrennungsgefahr: Die Temperatur der berührbaren
Oberflächen kann sehr heiß werden. Auch nach dem Ausschalten
des Gerätes bleiben diese noch einige Zeit heiß.
▪ Der Rührarm der Milchaufschäumer-DISC kann ebenfalls heiß sein.
▪ Das Gerät nur gemäß dieser Anleitung verwenden. Unsachgemäßer
Gebrauch kann Stromschlag oder andere Gefahrenmomente zur
Folge haben.
▪ Wenn die Anschlussleitung dieses Gerätes beschädigt wird, muss sie
durch den zentralen Kundendienst des Herstellers oder eine ähnlich
qualifizierte Person ersetzt werden. Durch unsachgemäße Repara-
turen können erhebliche Gefahren für den Benutzer entstehen.
▪ Reinigen Sie nach dem Gebrauch alle Oberflächen, die mit Lebens-
mitteln in Kontakt gekommen sind.
Beachten Sie die Hinweise im Kapitel „Reinigung und Pflege“.
Milchaufschäumer

6 7
DE
Bedienung und Betrieb
1. Füllen Sie die benötigte Menge Milch in den Krug (5) und verschließen Sie diesen mit dem Deckel (1).
2. Setzen Sie erst jetzt den Krug (5) auf den Gerätesockel (8).
Achtung:
Setzen Sie immer erst den Deckel (1) auf das Gerät bevor Sie es einschalten.
Nehmen Sie niemals den Deckel (1) ab, während das Gerät eingeschaltet ist.
Hinweis:
Die Zubereitung kann jederzeit durch das Abheben des Krugs (5) von dem Gerätesockel (8) unterbro-
chen werden.
Lassen Sie zwischen zwei Verwendungen das Gerät abkühlen.
Beschaffenheit und Volumen des Milchschaums hängen von der jeweiligen verwendeten Milch (u. a.
Fett-, Proteingehalt, Temperatur) ab.
Warmer Milchschaum
Wählen Sie dieses Programm, um warmen, cremigen, feinporigen Milchschaum zu erhalten. Dieser
eignet sich besonders für Cappuccino oder Latte Art.
▪ Füllen Sie den Krug (5) mit 100 bis 150 ml gekühlter Milch (Ausnahme: Bei
heißer Milch können bis zu 250 ml eingefüllt werden).
Die Füllmarkierungen finden Sie im Krug (5), alternativ können Sie sich auch
am Rührarm (3) orientieren:
100 ml MIN, so dass die WMF Milchschaum-DISC (4) bedeckt ist.
150 ml MAX , alternativ bis zur unteren Markierung am Rührarm.
Füllen Sie keinesfalls mehr ein, da ansonsten Milchschaum überläuft und das
Gerät verunreinigt wird.
▪ Setzen Sie den Deckel (1) auf den Krug (5) und drücken Sie diesen leicht an,
damit dieser abdichtet.
▪ Drücken Sie nun die Start-/Stopptaste (6) so oft, bis das entsprechende Sym-
bol aufleuchtet. Nach ca. 3 Sekunden startet die Zubereitung automatisch,
die Kontrollleuchte der Start-/Stopptaste (6) leuchtet.
▪ Nach Programmende schaltet sich das Gerät automatisch ab, die Kontroll-
leuchte erlischt. Öffnen Sie den Deckel (1) und schöpfen Sie den Milchschaum
separat ab oder gießen Sie diesen mit der verbliebenen Milch aus.
Cremig weicher Milchschaum
Wählen Sie dieses Programm, um warmen, cremigen, feinporigen Milchschaum zu
erhalten. Dieser eignet sich besonders für Cappuccino oder Latte Art.
Fester Milchschaum
Wählen Sie dieses Programm, um warmen, in der Konsistenz festen Milchschaum zu
erhalten. Dieser eignet sich besonders für Cappuccino oder Latte Macchiatto.
Kalter Milchschaum
Wählen Sie dieses Programm, um kalten, cremigen Milchschaum zu erhalten. Dieser
eignet sich besonders für Frappé, Cocktails, Eiskaffee oder Desserts.
Heiße Milch
Wählen Sie dieses Programm, um Milch zu erhitzen und diese leicht aufzuschäumen.
Die heiße Milch eignet sich besonders für Milchkaffee, heiße Schokolade oder Kakao.
▪ Bei Zweckentfremdung, falscher Bedienung oder nicht fachgerechter Reparatur wird keine Haftung
für eventuelle Schäden übernommen.
Ebenso sind Garantieleistungen in solchen Fällen ausgeschlossen.
▪ Verpackungsmaterial, wie z. B. Folienbeutel gehören nicht in Kinderhände.
WMF Milchschaum-DISC
Die WMF Milchschaum-DISC (4) kann zur leichteren Reinigung von der Aufnahme herausgenommen
werden. Schieben Sie hierzu die WMF Milchschaum-DISC (4) seitlich mit leichtem Druck von der
Aufnahme heraus.
Zur Montage gehen Sie wie folgt vor:
Schieben Sie die WMF Milchschaum-DISC (4) einfach seitlich in die Aufnahme.
LED-Beleuchtung
Die LED-Beleuchtung (7) am Gerätesockel (8) dient zur Anzeige der Inbetriebnahme des Geräts bzw.
wenn ein Programm ausgewählt ist.
Inbetriebnahme
Reinigen Sie das Gerät vor der ersten Verwendung wie im Kapitel „Reinigung und Pflege“ beschrieben.
Die nicht benötigte Länge der Anschlussleitung kann am Boden des Gerätesockels (8) aufgewickelt
werden. Schließen Sie den Netzstecker an eine Schutzkontaktsteckdose an.

8 9
DE
Reinigung und Pflege
▪ Reinigen Sie das Gerät nach jedem Gebrauch.
▪ Netzstecker ziehen und das Gerät abkühlen lassen.
▪ Deckel (1) und Rührarm (3) genauso wie die WMF Milchschaum-DISC (4) sind spülmaschinengeeig-
net. Zur leichteren Reinigung kann der sich am Deckel (1) befindende Dichtungsring (2) abgenom-
men werden.
Hinweis: Krug (5) und Gerätesockel (8) dürfen nicht in Spülmaschine gegeben werden. Den Krug
(5) niemals in Wasser tauchen oder unter fließendem Wasser abspülen.
▪ Das Innere des Krugs (5) kann unter fließendem Wasser ausgespült werden.
Der Krug (5) ist innen mit einer Antihaftbeschichtung ausgestattet, diese keinesfalls mit scharfen
oder spitzen Gegenständen bearbeiten. Benutzen Sie keine aggressiven oder scheuernden Reini-
gungsmittel und Lösungsmittel. Den Krug (5) mit einem weichem Tuch abtrocknen.
Achtung: Die Unterseite des Krugs (5) muss trocken sein, bevor das Gerät genutzt wird.
▪ Den Gerätesockel (8) nur mit einem leicht feuchtem Tuch abwischen.
spülmaschinen-
geeignet unter laufendem
Wasser abspülbar mit einem feuchten
Tuch abwischen
Deckel (1)
Dichtungsring (2)
WMF Milchschaum-DISC (4)
Innere des Krugs (5)
Gerätesockel (8)
Hilfe bei Störungen
Die folgenden Hinweise sollen Ihnen helfen, Störungen zu beseitigen. Sollte dies nicht gelingen,
wenden Sie sich an unseren zentralen Kundendienst. Beachten Sie die Garantiehinweise.
Problem Mögliche Ursache Behebung
Die Kontrollleuchte leuchtet
nicht, das Gerät startet nicht
Stecker nicht eingesteckt Stecker einstecken
Überhitzungsschutz aktiv Gerät abkühlen lassen
Milch tritt am Deckel aus Füllmenge zu groß Füllmenge reduzieren
Deckel nicht richtig aufgesetzt Deckel mit leichtem Druck
aufsetzen
Dichtungsring fehlt oder ist
verschmutz
Dichtungsring reinigen und
einsetzen
Das Gerät entspricht den Europäischen Richtlinien 2014/35/EU, 2014/30/EU und
2009/125/EU.
Dieses Produkt darf am Ende seiner Lebensdauer nicht über den normalen
Haushaltsabfall entsorgt werden, sondern muss an einem Sammelpunkt für das
Recycling von elektrischen und elektronischen Geräten abgegeben werden.
Die Werkstoffe sind gemäß ihrer Kennzeichnung wiederverwertbar. Mit der
Wiederverwendung, der stofflichen Verwertung oder anderen Formen der
Verwertung von Altgeräten leisten Sie einen wichtigen Beitrag zum Schutze
unserer Umwelt.
Bitte erfragen Sie bei der Gemeindeverwaltung die zuständige Entsorgungsstelle.
Die Löschung von eventuell vorhandenen personenbezogener Daten auf den zu
entsorgenden Altgeräten muss vom Endnutzer eigenverantwortlich vorgenommen
werden.
Änderungen vorbehalten

10 11
ENEN
Operating Manual
Prior to use
Read the operating manual carefully. It contains important information about the use, safety and
maintenance of the appliance.
It should be kept in a safe place and passed on to further users if appropriate.
The device may only be used for the intended purpose according to these operating instructions.
This device is meant to be used in the household and for similar applications, such as:
⋅in kitchens, for employees in shops, offices and other
commercial areas;
⋅on agricultural property;
⋅from customers in hotels, motels and other residential facilities;
⋅in bed and breakfasts establishments.
The appliance is not designed for sole commercial use.
Observe the safety instructions during use.
Technical Data
Rated voltage: 220 - 240 V~ 50-60 Hz
Power consumption: 420 - 500 W
Protection class: I
Safety instructions
▪ Only connect the device to properly installed earthed sockets. The wire and plug must be dry.
▪ Do not pull the connecting cable over sharp edges or clamp it. Do not let it hang down and protect
it from heat and oil.
▪ Never disconnect the mains plug from the socket by the cord or with wet hands.
▪ Stop using the appliance and/or connect it from the mains plug immediately if:
⋅The appliance or mains cable is damaged;
⋅the device is not leak-proof;
⋅there is any suspicion of a fault after dropping the appliance or similar.
In such cases, send the appliance to be repaired.
▪ Do not place the appliance on hot surfaces, such as hot plates or similar, or near open flames. It
could melt.
▪ Do not place the device on water-sensitive surfaces. Spray may damage them.
▪ Never operate the appliance unattended.
▪ Do not switch on the device without milk.
▪ Take the pot for filling from the base.
▪ Only use the appliance to heat up or froth milk. Do not use it to process any other ingredients.
▪ Do not move the device during operation and do not pull on the mains cable.
▪ Underside of the jug must be dry before using the appliance.
▪ Caution: the device is hot.
▪ The mains plug is to be pulled:
⋅if malfunctions occur during use,
⋅before cleaning and care,
⋅after use.
▪ No liability is accepted for any damages resulting from misuse, incorrect operation or improper
repairs.
Claims under warranty are likewise excluded in such cases.
▪ Packaging material, such as plastic film bags, do not belong in the hands of children.
Important safety instructions
▪ These devices can be used by children older than eight years old as
well as by persons with limited physical, sensory or mental capabili-
ties, persons lacking experience and/or lacking knowledge if they
are supervised or have received instructions regarding how the
device is to be used safely and have understood the resulting risks.
Children must not play with the device. Children must not perform
the cleaning and user maintenance, unless they are older than eight
years old and are supervised.
▪ Keep the device and its cable out of the reach of children under
eight years old.
▪ Only operate the appliance with the appropriate base.
▪ Never immerse the appliance in water.
▪ Take care not to spill water on the base.
▪ Caution! Risk of burns! The temperature of accessible surfaces can
become very hot. They also remain hot for some time after the
appliance has been switched off.
▪ The mixing arm on the milk frother DISC can also get hot.
▪ Always use the appliance in accordance with these instructions.
Improper use can result in electric shocks and other hazards.
▪ If the appliance’s connection cable is damaged then it must be
replaced by the manufacturer’s central customer service department
or by a similarly qualified person. Improper repairs may constitute a
serious threat for users.
▪ Clean after use all surfaces, which have got in contact with food.
Follow the notes in chapter „Cleaning and care“.
Milk Frother

12 13
EN
Operation and use
1. Add the required amount of milk to the jug (5) and close it with the lid (1).
2. Place the jug (5) on the base (8).
Warning:
Always place the lid (1) securely on the jug before switching it on.
Never remove the lid (1) while the appliance is running.
Note:
Preparation can be stopped at any time by lifting the jug (5) off the base (8).
Allow the appliance to cool down before reuse.
The quality and volume of the milk froth depends on the milk used (e.g. the fat and protein content,
temperature, etc.).
Hot milk froth
Select this programme for hot, creamy, fine milk froth. This is particularly suitable for cappuccino or
latte.
▪ Add 100 to150 ml of cooled milk to the jug (5) (exception: you can fill up to
250 ml of hot milk).
The fill markings are located inside the jug (5), alternatively you can also use
the mixing arm (3) for guidance:
100 ml MIN, so that the WMF milk froth DISC (4) is covered.
150 ml MAX , alternatively up to the lower marking on the mixing arm.
Do not add more than that, otherwise the milk froth will overflow and soil
the appliance.
▪ Place the lid (1) on the jug (5) and apply slight pressure to ensure a good seal.
Press the Start/Stop button (6) repeatedly until the corresponding symbol
lights up. Approx. 3 seconds later, the control light on the Start/Stop button
(6) lights up and preparation begins automatically.
▪ After the programme ends, the appliance switches off automatically and
the indicator light turns off. Remove the lid (1) and skim off the milk froth
separately, or pour it out with the remaining milk.
Creamy, soft milk froth
Select this programme to get warm, creamy, fine-pored milk froth. This is particularly
suitable for cappuccino or latte art.
Strong milk froth
Select this programme to get warm, consistency milk froth. This is particularly suitable
for cappuccino or latte macchiatto.
Cold milk froth
Select this programme for cold, creamy, milk froth. This is particularly suitable for
frappé drinks, cocktails, iced coffee and desserts.
Hot milk
Select this programme to heat milk and slightly froth it. Hot milk is particularly suitable
for milky coffee, hot chocolate and cocoa.
WMF milk froth DISC
The WMF milk froth DISC (4) can be removed from the appliance for easy cleaning. To do this, gently
push down the WMF milk froth DISC (4) and slide it to one side.
To assemble the appliance, proceed as follows:
Simply slide the WMF milk froth DISC (4) sideways into the appliance, an internal magnet holds the
DISC firmly in place.
LED lighting
The LED lighting (7) on the appliance base (8) is used to indicate that the appliance is in operation and
when a programme is selected.
Using the appliance
Before using for the first time, ensure the appliance is thoroughly cleaned, as detailed in the “cleaning
and care” section.
Any surplus cable can be wound into the bottom of the base unit (8). Connect the mains plug to an
earthed socket.

14 15
EN
Cleaning and care
▪ Clean the appliance after each use.
▪ Unplug at the mains and allow the device to cool down.
▪ The lid (1) and WMF milk froth DISC (4) are dishwasher-safe. for easy cleaning, the sealing ring (2)
in the lid (1) can be removed.
Note: the jug (5) and base unit (8) should not be placed in the dishwasher.
Never immerse the jug (5) in water or rinse it under running water.
▪ The jug (5) can be rinsed under running water.
The inside of the jug (5) is lined with a non-stick coating. Do not use any harsh or abrasive deter-
gents or solvents. Dry the jug (5) with a soft cloth.
Attention: before using the appliance, ensure that the jug (5) is dry underneath.
▪ Only use a soft, damp cloth to wipe the base unit (8).
Dishwasher safe Can be rinsed
under running
water
Wipe with a
damp cloth
Lid (1)
Sealing ring (2)
WMF milk froth DISC (4)
The inside of the jug (5)
Base unit (8)
Troubleshooting
The following tips should help you to solve any problems. If the problem persists, please contact our
central customer service department. Please note the warranty information.
Problem Possible cause Action
The control lamp is not
illuminated, the appliance
does not start
The plug is not plugged in. Connect the plug
Overheating protection active Allow the appliance to cool
Milk is leaking from the lid Too much milk in the appliance Pour out some of the milk
The lid is not fitted properly Gently push the lid down
The sealing ring is missing or is
dirty
Clean and insert the sealing ring
For UK use only
▪ This product is supplied with a 13 A plug conforming to BS 1363 fitted to the mains lead. If the
plug is unsuitable for your socket outlets or needs to be replaced, please note the following. If the
plug is a non-rewireable one, cut it from the mains lead and immediately dispose of it. Never insert
it into a socket outlet as there is a very great risk of an electric shock.
▪ The replacement of the plug at the mains lead has to be done according to the following instruc-
tions:
Important: The wires in this mains lead are coloured in accordance with the following code:
blue Neutral
brown Live
As the colours of the wires in the mains lead of this
appliance may not correspond with the coloured markings
identifying the terminals in your plug, proceed as follows:
⋅the wire which is coloured blue must be connected to the terminal which is marked with the
letter N or coloured black,
⋅the wire which is coloured brown must be connected to the terminal which is marked with
the letter L or coloured red.
Do not connect any wire to the terminal which is marked
with the letter E or by the earth symbol , or coloured green or green and yellow.
▪ If a 13 A (BS 1363) plug is used it must be fitted with a 13 A fuse conforming to BS 1362 and be
ASTA approved. If any other type of plug is used, the appliance must be protected by a 10 A fuse
either in the plug or adapter or at the distribution board.
If in doubt - consult a qualified electrician.
▪ Never use the plug without closing the fuse cover.
The appliance complies with European directives 2014/35/EU, 2014/30/EU and
2009/125/EU.
At the end of its life, this product may not be disposed of in normal household
waste, but must instead be taken to a collection point for recycling electrical and
electronic appliances.
The materials are recyclable in accordance with their labelling. Reuse, recycling
and other ways of reutilising old appliances make an important contribution to
protecting our environment.
Please ask your local authorities for information about the appropriate disposal
point.
End users are personally responsible for deleting any personal data that may be
stored on appliances they are disposing of.

16 17
FRFR
Mode d’emploi
Avant l’utilisation
Lire attentivement le mode d’emploi. Il contient des consignes importants pour l’utilisation, la sécurité
et l’entretien de l’appareil.
Il doit être conservé soigneusement et transmis en cas de remise à une tierce personne.
L’appareil ne doit être utilisé que pour l’usage prévu conformément à ce mode d’emploi.
L’appareil est conçu pour un usage domestique ou pour des applications similaires telles que :
⋅dans des cuisines pour le personnel dans des boutiques, des bureaux ou d’autres
secteurs professionnels;
⋅dans des exploitations agricoles;
⋅par des clients dans des hôtels, des motels et d’autres établissements;
⋅dans des chambres d’hôtes.
L’appareil n’est pas conçu pour un usage purement commercial.
Respecter les consignes de sécurité lors de l’utilisation.
Caractéristiques techniques
Tension du secteur : 220 - 240 V~ 50-60 Hz
Puissance : 420 - 500 W
Catégorie de protection : I
Consignes de sécurité
▪ Branchez l’appareil uniquement à une prise électrique sécurisée. Le câble d’alimentation et la prise
doivent être secs.
▪ Ne pas tirer le cordon d’alimentation sur des bords tranchants, ne pas le coincer, ne pas le laisser
pendre et le protéger de la chaleur et d’huile.
▪ Ne pas débrancher l’appareil en tirant sur le câble ou avec de mains mouillées.
▪ Ne pas mettre l’appareil en service ou débrancher immédiatement la fiche secteur si :
⋅l’appareil ou le câble d’alimentation sont endommagés;
⋅l’appareil fuit;
⋅une défaillance est soupçonnée suite à une chute ou équivalent.
Dans ces cas emmener l’appareil en réparation.
▪ Ne pas poser l’appareil sur des surfaces chaudes, p. ex. plaques de cuisson ou équivalent ou à
proximité d’une flamme de gaz ouverte, elle pourrait fondre.
▪ Ne pas déposer l’appareil sur des surfaces sensibles à l’eau. Des projections pourraient les
endommager.
▪ Ne jamais faire fonctionner l’appareil sans surveillance.
▪ Ne pas mettre l’appareil en service sans lait.
▪ Retirer le réservoir du socle avant de le remplir.
▪ Vous pouvez utiliser l’appareil pour faire de la mousse de lait chaud ou froid, ou réchauffer du lait
sans le faire mousser.
▪ Ne pas déplacer l’appareil durant le fonctionnement et ne pas tirer sur le câble d’alimentation.
▪ La douille située en dessous du pot à lait doit être sèche avant utilisation.
▪ Attention, l’appareil chauffe.
▪ Il faut débrancher la fiche secteur :
⋅en cas de dysfonctionnements durant l’utilisation,
⋅avant chaque nettoyage et entretien,
⋅après l’utilisation.
▪ Nous déclinons toute responsabilité pour des dommages éventuels en cas d’utilisation détournée,
de mauvaise utilisation, de réparation inappropriée.
Des réparations sous garantie sont également exclues dans des tels cas.
▪ Le matériel d’emballage, comme p.ex. les sachets en plastiques ne sont pas destinés aux enfants.
Consignes de sécurité importantes
▪ Des enfants à partir de 8 ans ainsi des personnes ayant des
capacités physiques, sensorielles ou mentales restreintes ou ayant
un manque d’expérience et/ou de connaissance peuvent utiliser ces
appareils, s’ils sont surveillés et s’ils ont été instruits pour utiliser cet
appareil en toute sécurité et s’ils ont compris les dangers pouvant
résulter de l’usage de l’appareil. Les enfants n’ont pas le droit de
jouer avec cet appareil. Les enfants n’ont pas le droit d’effectuer le
nettoyage et la maintenance sauf s’ils sont âgés de plus de 8 ans et
sous surveillance.
▪ Conservez l’appareil et son câble d’alimentation en dehors de la
portée des enfants de moins de 8 ans.
▪ Ne faire fonctionner l’appareil qu’uniquement sur le socle
correspondant.
▪ Ne jamais plonger l’appareil dans l’eau.
▪ Veillez à éviter toute projection d’eau sur le socle.
▪ Attention, risque de brûlure : La température des surfaces de
contact peut devenir extrêmement brûlante. Même après la mise hors
tension de l’appareil, celui-ci reste brûlant pendant un certain temps.
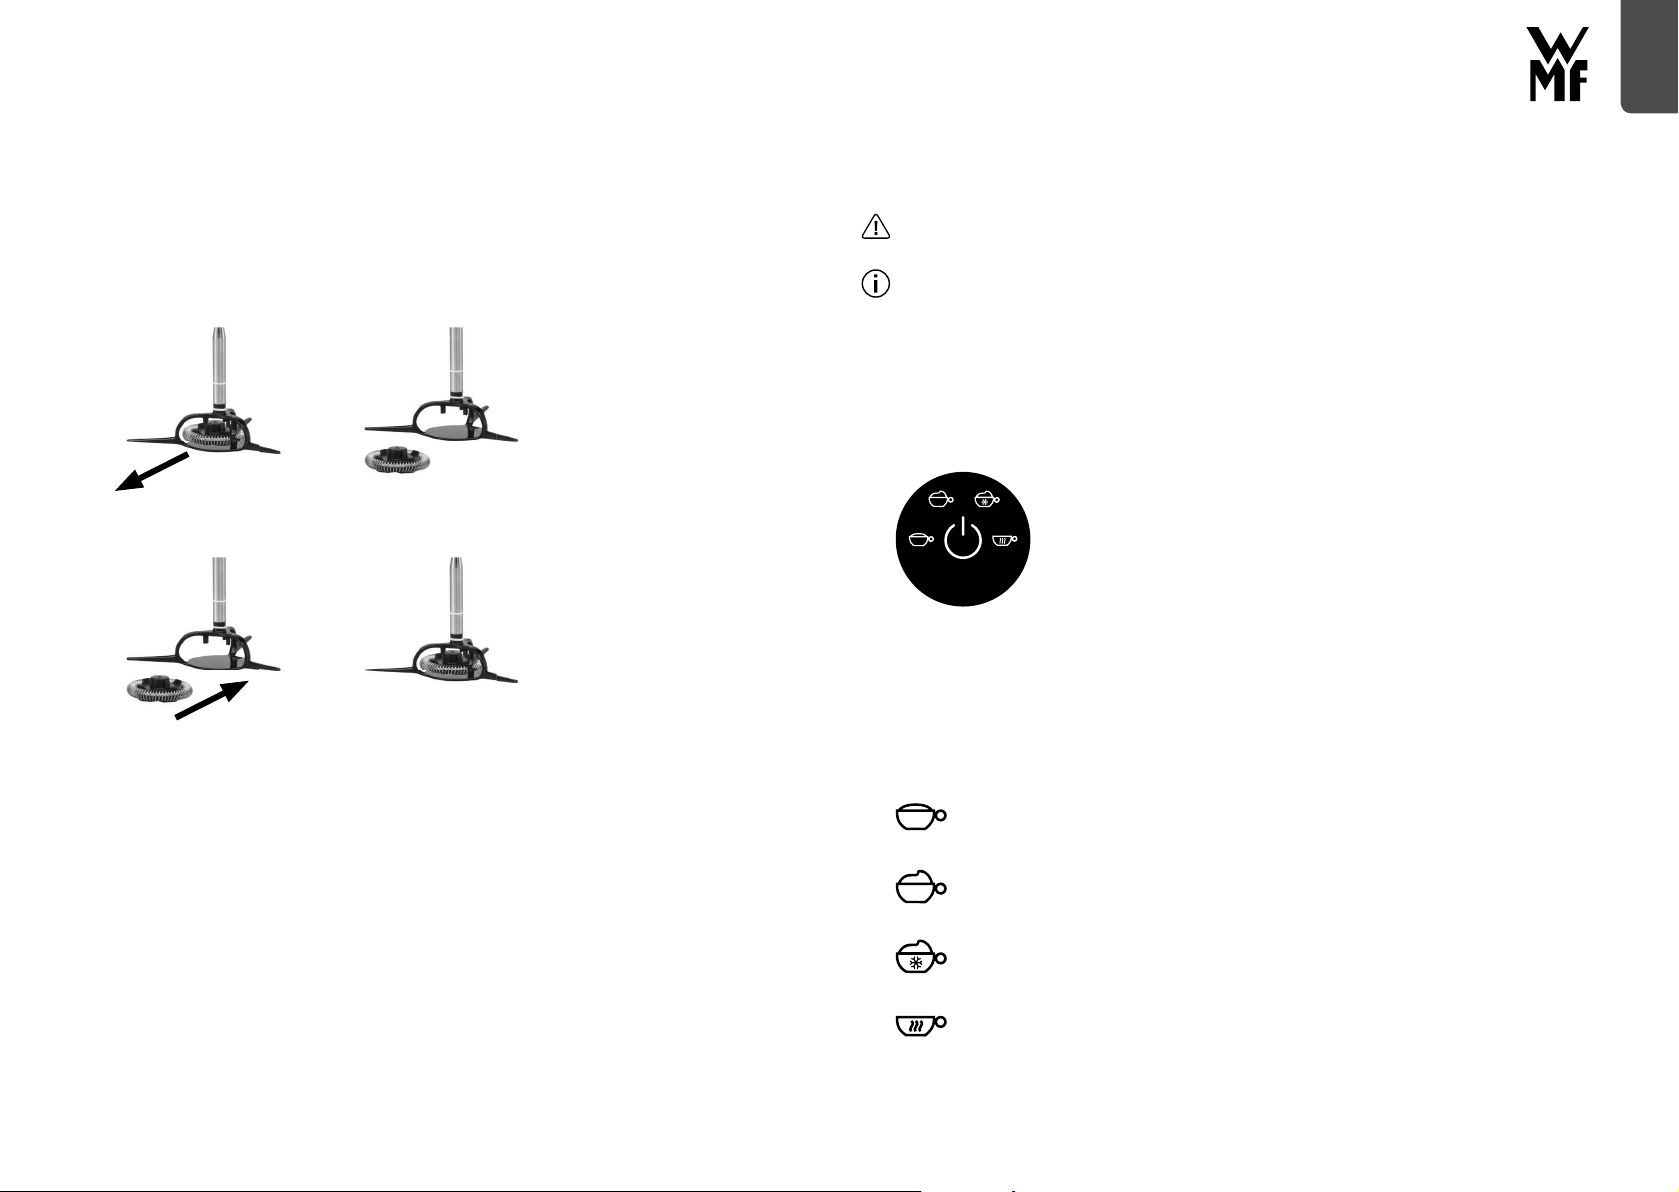
▪ Le bras mixeur sur le DISC du mousseur à lait peut devenir brûlant.
▪ N’utilisez l’appareil que conformément à cette instruction. Une
utilisation non conforme peut entrainer une décharge électrique ou
d’autres dangers.
▪ Si le câble d’alimentation de l’appareil est endommagé, il doit être
remplacé par le SAV central du fabricant ou par une personne
qualifiée. Des réparations non conformes peuvent engendrer de
graves dangers pour l’utilisateur.
▪ Après utilisation, nettoyez toutes les surfaces qui sont entrées
en contact avec des aliments. Veillez aux remarques du chapitre
«Nettoyage et entretien».
Moussoir à lait

18 19
FR
Utilisation et fonctionnement
1. Versez la quantité de lait nécessaire dans le broc(5), puis fermez-le avec le couvercle(1).
2. Posez alors le broc(5) sur le socle de l’appareil(8).
Attention:
Mettez toujours le couvercle(1) en place tant que l’appareil n’est pas encore sous tension.
Ne retirez jamais le couvercle(1) lorsque l’appareil est sous tension.
Remarque:
La préparation peut être interrompue à tout moment en retirant le broc(5) du socle de l’appareil(8).
Laissez l’appareil refroidir entre deux utilisations.
La consistance et le volume de la mousse de lait dépendent du lait utilisé (entre autres, teneur en
matière grasse et protéine et température).
Mousseur à lait chaud
Sélectionner ce programme pour obtenir une mousse de lait chaude fine et onctueuse.
Particulièrement adapté au cappuccino ou au latte.
▪ Verser de 100 à 150 ml de lait froid dans le pichet (5) (exception: vous
pouvez verser jusqu’à 250 ml de lait chaud).
Les marques de niveau sont situées à l’intérieur du pichet (5), vous pouvez
également utiliser le bras mixeur (3) pour vous repérer:
100 ml MIN, de manière à recouvrir le DISC du mousseur à lait (4).
150 ml MAX , ou bien jusqu’au repère inférieur sur le bras du mélangeur.
Ne pas en verser plus afin d’éviter que la mousse de lait ne déborde et ne
salisse l’appareil.
▪ Placer le couvercle (1) sur le pichet (5) et exercer une légère pression pour
assurer une bonne étanchéité.
Appuyer plusieurs fois sur le bouton Marche/Arrêt (6) jusqu’à ce que le
symbole correspondant s’allume. 3 secondes environ plus tard, le voyant de
contrôle du bouton Marche/Arrêt (6) s’allume et la préparation commence
automatiquement.
▪ À la fin du programme, l’appareil s’éteint automatiquement et le témoin
lumineux s’éteint. Retirer le couvercle (1) et écumer la mousse de lait
séparément ou la verser avec le reste du lait.
Mousse de lait onctueuse et légère
Sélectionner le programme pour obtenir une mousse de lait chaude, onctueuse, fine.
Particulièrement adapté à l’art du cappuccino ou du latte.
Mousse de lait forte
Sélectionner ce programme pour obtenir une mousse de lait chaude et consistante.
Particulièrement adapté au cappuccino ou au latte macchiato.
Mousse de lait froide
Sélectionner ce programme pour obtenir une mousse de lait froide et onctueuse.
Particulièrement adapté aux boissons frappées, cocktails, cafés glacés et desserts.
Lait chaud
Sélectionner ce programme pour obtenir du lait chaud et légèrement mousseux. Le lait
chaud est particulièrement adapté au café au lait, au chocolat et au cacao chauds.
Disque du moussoir à lait WMF
Pour un nettoyage plus facile, il est possible de retirer le disque du moussoir à lait WMF (4) de son
logement. Pour cela, faites glisser latéralement le disque du moussoir à lait WMF (4) hors de son
logement à l’aide d’une légère pression vers le bas.
Pour le montage, procédez comme suit:
Faites simplement glisser latéralement le disque du moussoir à lait WMF (4) dans son logement, un
aimant intégré assure son maintien en place.
Indicateur lumineux à DEL
L’indicateur lumineux à DEL (7) sur la base de l’appareil (8) indique que l’appareil est en marche et
qu’un programme est sélectionné.
Mise en service
Avant la première utilisation, nettoyez l’appareil comme décrit dans le chapitre «Nettoyage et
entretien».
La surlongueur du câble peut être enroulée au fond du socle de l’appareil (8). Branchez l’appareil dans
une prise électrique sécurisée.

20 21
FR
Nettoyage et entretien
▪ Nettoyez l’appareil après chaque utilisation.
▪ Débrancher l’appareil et le laisser refroidir.
▪ Le couvercle (1) et le DISC du mousseur à lait (5) sont lavables au lave-vaisselle. Pour faciliter le
nettoyage, il est possible de retirer le joint d’étanchéité (2) du couvercle (1).
Consigne: le pot (5) et le socle de l’appareil (8) ne sont pas lavables au lave-vaisselle.
▪ L’intérieur du pichet (5) peut être rincé à l’eau courante.
Le pot (5) comprend un revêtement antiadhésif à l‘intérieur. N‘utilisez pas de nettoyants ou
solvants agressifs ou abrasifs. Sécher le pot (5) à l‘aide d‘un chiffon doux.
Attention: le dessous du pot (5) doit être sec avant toute utilisation de l’appareil.
▪ Essuyer le socle de l’appareil (8) à l’aide d’un chiffon légèrement humide.
Lavable au lave-
vaisselle Rincer sous l’eau
courante Essuyer avec un
chiffon humide
Couvercle (1)
Joint d’étanchéité (2)
Disque moussoir à lait WMF
(4)
L’intérieur du pichet (5)
Socle de l’appareil (8)
Aide en cas de dysfonctionnements
Les consignes suivantes devraient vous aider à résoudre les problèmes de dysfonctionnement. Si ce
n’était pas le cas, adressez-vous à notre SAV central. Veuillez consulter les informations de garantie.
Problème Cause probable Correction
Le voyant de contrôle ne
s’allume pas, l’appareil ne
démarre pas.
Prise non branchée Brancher la prise
Protection de surchauffe activée Laisser refroidir l’appareil
Le lait déborde du couvercle. Quantité de remplissage trop
élevée
Réduire la quantité de
remplissage
Couvercle mal positionné Enclencher le couvercle avec
une légère pression
Joint d’étanchéité manquant
ou sale
Nettoyer et replacer le joint
d’étanchéité
L’appareil est conforme aux Directives européennes 2014/35/CE, 2014/30/CE et
2009/125/CE.
Au terme de son utilisation, ce produit ne doit pas être éliminé avec les déchets
ménagers habituels, mais il doit être déposé dans un point de collecte pour le
recyclage d’appareils électriques et électroniques.
Les matériaux sont recyclables conformément à leur marquage. Grâce à la
réutilisation, au recyclage de matériaux ou à d’autres formes de recyclage des
vieux appareils, vous contribuez de manière significative à la protection de notre
environnement.
Veuillez contacter votre municipalité pour connaître le centre de recyclage
compétent.
Le cas échéant, les utilisateurs finaux sont responsables de la suppression de
toutes données personnelles présentes sur les anciens appareils mis au rebut.
Sous réserve de modifications.

22 23
ESES
Instrucciones de uso
Antes de usar
Lea detenidamente las instrucciones de funcionamiento. Contienen información importante sobre el
uso, la seguridad y el mantenimiento del aparato.
Guárdelas en un lugar seguro y déselas a futuros usuarios cuando corresponda.
Utilice el aparato solo para el fin para el que se ha diseñado y siempre siguiendo las instrucciones de
uso de este manual.
Este aparato está diseñado para uso doméstico u otras aplicaciones similares, tales como:
⋅en cocinas para el personal de tiendas, oficinas y otros
ámbitos comerciales;
⋅en fincas agrícolas;
⋅por clientes de hoteles, moteles y otros establecimientos;
⋅en pensiones con desayuno.
No está diseñado para uso comercial.
Respete siempre las precauciones de seguridad.
Datos técnicos
Tensión nominal: 220 - 240 V~ 50-60 Hz
Consumo de energía: 420 - 500 W
Clase de protección: I
Advertencias de seguridad
▪ Conecte el aparato solamente en una caja de enchufe con puesta a tierra que esté instalada
correctamente y según las normativas al respecto. El cable y el enchufe deben estar secos.
▪ No coloque ni pegue el cable de conexión sobre bordes afilados, ni lo deje colgando. Protéjalo del
calor y el aceite.
▪ No desenchufe nunca el aparato tirando del cable o con las manos mojadas.
▪ Deje de usar inmediatamente el aparato y/o desconéctelo a la red si:
⋅El aparato o cable de red esté dañado
⋅El aparato no es hermético
⋅Tiene la sospecha de que se haya podido producir algún fallo después de una caída del aparato
o similar.
En estos casos, envíe el aparato para que sea reparado.
▪ No coloque el aparato sobre superficies calientes, como fuegos de cocina y similares, ni cerca de
llamas de gas abierto, podría derretirse.
▪ No lo ponga sobre superficies sensibles al agua. Las salpicaduras podrían dañarlo.
▪ No ponga jamás a funcionar el aparato sin vigilancia.
▪ Nunca lo ponga en funcionamiento sin leche.
▪ Para llenar el recipiente, retire la tapa.
▪ Puede utilizar el aparato para preparar espuma de leche caliente o fría, o para calentar leche sin
preparar espuma.
▪ No mueva el aparato mientras esté funcionando ni tire del cable de red.
▪ La parte de debajo de la jarra debe estar seca antes de la utilización del aparato.
▪ Cuidado: el aparato se calienta.
▪ Retire el cable de red:
⋅Si se ha producido un fallo durante su uso
⋅Antes de su limpieza y cuidados.
⋅Después de usarlo
▪ No nos responsabilizamos de posibles daños ocasionados por un uso indebido, erróneo o una
reparación no realizada por el técnico.
En esos casos, la garantía también queda excluida.
▪ El material de embalaje, como las bolsas de plástico, no debe caer en manos de los niños.
Advertencias de seguridad importantes
▪ Este aparato no deben utilizarlo niños menores de 8 años, ni
personas con alguna discapacidad física, psíquica o sensorial
ni aquellas que carezcan de la experiencia y/o conocimientos
necesarios para usarlo si no cuentan con la instrucción necesaria
para una utilización segura del aparato, ya que podría representar
un peligro para su seguridad. Los niños no deben jugar con el
aparato. Asimismo, los niños no deben realizar su limpieza ni
mantenimiento, a no ser que sean mayores de 8 años y lo hagan
vigilados.
▪ Mantenga el aparato y el cable de alimentación lejos del alcance de
los niños menores de 8 años.
▪ Utilice únicamente el aparato con su base correspondiente.
▪ No sumerja el aparato en agua.
▪ Tenga cuidado de no derramar agua sobre la base.
▪ Cuidado, peligro de quemaduras: Las superficies de contacto
pueden calentarse mucho. Mantienen su temperatura durante algún
tiempo incluso después de apagarse el aparato.
▪ El brazo mezclador y el DISCO espumador de leche también se
calientan.
▪ Utilice el aparato solo de conformidad con estas instrucciones de
uso. El uso incorrecto puede tener como consecuencia una descarga
eléctrica u otro tipo de peligros.
▪ Si el cable de conexión del aparato está dañado deberá ser
sustituido por el departamento de atención al cliente central
del fabricante o por una persona cualificada. Las reparaciones
inadecuadas podrían suponer un serio peligro para el usuario.
▪ Limpie todas las superficies que hayan estado en contacto con
alimentos después de su uso. Tenga en cuenta las advertencias
contenidas en el capítulo “Limpieza y cuidados”.
Espumador de leche

24 25
ES
Manejo y funcionamiento
1. Llene la jarra con la cantidad de leche que necesite (5) y ciérrela con la tapa (1).
2. Coloque primero la jarra (5) en el zócalo del aparato (8).
Atención: Coloque la tapa (1) en el aparato antes de encenderlo.
No retire nunca la tapa (1) mientras el aparato esté encendido.
Indicación: Puede parar la preparación cuando lo desee, simplemente extrayendo la jarra (5) del
zócalo (8).
Si lo va a utilizar dos veces, deje que el aparato se enfríe antes.
La calidad y el volumen de la espuma de leche depende de la clase de leche utilizada (contenido de
grasa, de proteína, o temperatura, entre otras cosas).
Espuma de leche caliente
Seleccione este programa para una espuma de leche caliente, cremosa y fina. Esto es especialmente
adecuado para cappuccino o latte.
▪ Añada 100 a150 ml de leche fría a la jarra (5) (excepción: puede añadir hasta
250 ml de leche caliente).
Las marcas de llenado se encuentran en la jarra (5), como alternativa se puede
orientar por el brazo mezclador (3):
100 ml MIN, para que el DISCO espumador WMF (4) esté cubierto.
150 ml MAX, como alternativa hasta la marca inferior del brazo mezclador.
No añada más cantidad, pues de lo contrario la espuma rebosará y dañará el
aparato.
▪Coloque la tapa (1) sobre la jarra (5) y aplique una presión ligera para cerrarla.
Presione la tecla Start/Stop (6) varias veces hasta que el símbolo
correspondiente se encienda. Unos 3 segundos después se enciende la tecla
Start/Stop y la preparación empieza automáticamente.
▪ Una vez finalizado el programa, el aparato se apaga automáticamente y la
luz indicadora se apaga. Quite la tapa (1) y recoja la espuma por separado o
viértala con la leche restante.
Espuma de leche cremosa y suave
Seleccione este programa para una espuma de leche caliente, cremosa y fina. Esto es
especialmente adecuado para el tipo cappuccino o latte.
Espuma de leche firme
Seleccione este programa para una espuma de leche caliente y firme. Esto es
especialmente adecuado para cappuccino o latte macchiatto.
Espuma de leche fría
Seleccione este programa para una espuma de leche fría y cremosa. Esto es
especialmente adecuado para frappé, cócteles, café helado y postres.
Leche caliente
Seleccione este programa para calentar leche y espumarla un poco. Esto es
especialmente adecuado para café con leche, chocolate caliente o cocoa.
Espumador de leche DISC de WMF
El espumador de leche DISC (4) de WMF puede extraerse para limpiarlo antes de su colocación. Para
ello, presione ligeramente hacia abajo el espumador DISC (4) de WMF antes de la colocación.
Para su montaje proceda como sigue:
Desplace sencillamente el espumador DISC (4) de WMF lateralmente hacia la colocación. Su imán
interior se proporciona una fijación segura.
Iluminación LED
La iluminación LED (7) en la base del aparato (8) sirve para indicar la puesta en servicio del aparato y
que se ha seleccionado un programa.
Puesta en marcha
Limpie el aparato antes del primer uso tal y como se describe en el capítulo „Limpieza y cuidados“.
El cable sobrante puede guardarse enrollado en el suelo del zócalo del aparato (8). Conecte el enchufe
de red a una caja de enchufe con toma de puesta a tierra.

26 27
ES
Limpieza y cuidados
▪ Limpie el aparato después de cada uso.
▪ Desconecte el enchufe de red y deje enfriar el aparato.
▪ La tapa (1) y el DISCO espumador de WMF (4) son aptos para el lavavajillas. Para una fácil limpieza,
puede extraerse el anillo de junta (2) que se halla en la tapa (1).
Advertencia: la jarra (5) y el zócalo (8) no son aptos para el lavavajillas.
▪ Puede lavar la jarra (5) bajo el chorro de agua.
El interior de la jarra (5) se puede lavar con agua corriente del grifo. No utilice detergentes o
disolventes agresivos ni abrasivos. Seque la jarra (5) con un paño suave.
Atención: la parte inferior de la jarra (5) debe estar bien seca antes de utilizar el aparato.
▪ Limpie el zócalo (8) solo con un paño ligeramente húmedo.
apto para
lavavajillas se puede limpiar
con agua
corriente
limpieza con paño
húmedo
Tapa (1)
Anillo de junta (2)
Espumador de leche DISC (4) de WMF
El interior de la jarra (5)
Zócalo del aparato (8)
Ayuda en caso de fallos
Las siguientes indicaciones le ayudarán a solventar los fallos. Si aún así persistieran, póngase en
contacto con nuestro servicio central de ayuda al cliente. Tenga en cuenta las advertencias de la
garantía.
Problema Posible causa Solución
La luz de control no se
ilumina, el aparato no arranca
El enchufe no está conectado Stecker einstecken
La protección contra un
sobrecalentamiento está activa
Deje enfriar el aparato
La leche sale por la tapa Demasiada cantidad introducida Reduzca la cantidad de llenado
La tapa no está bien colocada Coloque la tapa ejerciendo una
ligera presión
Falta el anillo de junta o está
sucio
Limpie y coloque bien el anillo
de junta
El aparato cumple las directivas europeas 2014/35/UE, 2014/30/UE y 2009/125/CE.
Al finalizar su ciclo de vida, el producto no debe desecharse con la basura
doméstica, sino que debe llevarse a un punto de recogida y reciclaje para aparatos
eléctricos y electrónicos.
Los materiales se reutilizan conforme a su etiquetado. Volver a usar, reciclar o
utilizar con otro fin aparatos viejos ayuda a proteger el medio ambiente.
Pregunte a las autoridades locales por el lugar específico donde debe entregar o
tirar el producto para su eliminación.
La eliminación de cualquier dato personal sobre el equipo de desecho que se va a
eliminar debe ser llevado a cabo por el usuario final bajo su propia responsabili-
dad.
Sujeto a modificaciones..

28 29
ITIT
Istruzioni per l’uso
Prima dell’uso
Leggere attentamente le istruzioni per l’uso. Danno indicazioni importanti riguardanti l’uso, la
sicurezza e la manutenzione dell’apparecchio.
Vanno conservate con cura ed eventualmente trasmesse all’utente successivo.
L’apparecchio va adoperato per l’uso previsto, seguendo le istruzioni per l’uso.
Questo apparecchio può essere utilizzato solo in ambito domestico e in applicazioni simili, come ad
esempio:
⋅in cucine per i dipendenti di negozi, uffici e altri
settori commerciali;
⋅in tenute agricole;
⋅da clienti in hotel, motel e altri impianti di soggiorno;
⋅in bed & breakfast.
Questo apparecchio non è destinato ad un uso puramente commerciale.
Le istruzioni di sicurezza vanno seguite durante l’uso.
Dati tecnici
Tensione nominale: 220 - 240 V~ 50-60 Hz
Potenza assorbita: 420 - 500 W
Classe di protezione: I
Istruzioni di sicurezza
▪ Collegare l’apparecchio soltanto a una presa schuko installata a norma. Il cavo di alimentazione e il
connettore devono essere asciutti.
▪ Non tirare o incastrare il cavo di collegamento sopra spigoli acuminati, non lasciarlo sospeso e
proteggerlo dal calore e dall’olio.
▪ Non staccare la spina dalla presa tenendola per il cavo o con mani bagnate.
▪ Non usare l’apparecchio e staccare subito la spina, se:
⋅l’apparecchio o il cavo d’alimentazione sono guasti;
⋅l’apparecchio non è ermetico;
⋅si sospetta un difetto dopo una caduta o un evento simile.
In questi casi far riparare l’apparecchio.
▪ Non disporre l’apparecchio su superfici calde, ad esempio su copri piastra o simili o in prossimità di
fiamme di gas aperte, in tal caso potrebbe fondersi.
▪ Non disporre l’apparecchio su superfici sensibili all’acqua. Gli spruzzi potrebbero danneggiarlo.
▪ Non far funzionare l’apparecchio incustodito.
▪ Non accendere l’apparecchio senza latte.
▪ Staccare la pentola dalla base per il riempimento.
▪ Potete usare l’apparecchio per ottenere una schiuma di latte calda o fredda oppure per riscaldare il
latte senza montarlo.
▪ Non spostare l’apparecchio durante il funzionamento e non tirare il cavo di rete.
▪ La base del bricco deve essere asciutta prima dell’utilizzo.
▪ Attenzione, l’apparecchio diventa caldo.
▪ Il connettore di rete deve essere estratto:
⋅in caso di guasti nel funzionamento,
⋅prima di ogni pulizia e manutenzione,
⋅dopo l’uso.
▪ Si declina qualsiasi responsabilità in caso di uso improprio o di riparazione non fatta da un
professionista.
In questi casi sono escluse anche le richieste di garanzia.
▪ Tenere fuori dalla portata dei bambini il materiale da imballaggio, come ad esempio i sacchetti di
pellicola.
Importanti istruzioni di sicurezza
▪ Questi apparecchi possono essere utilizzati da bambini a partire
dagli 8 anni di età e da persone con ridotte capacità fisiche,
sensoriali o mentali o che mancano di esperienza e/o di conoscenza,
solo se sono sorvegliate o se sono state istruite riguardo all’utilizzo
sicuro dell’apparecchio e se ne hanno compreso i pericoli risultanti.
I bambini non devono giocare con l’apparecchio. La pulizia e la
manutenzione a carico dell’utente non devono essere eseguiti da
bambini, eccetto nel caso in cui essi abbiano più di 8 anni e siano
sorvegliati.
▪ Conservare l’apparecchio e il suo cavo di alimentazione al di fuori
della portata di bambini di età inferiore a 8 anni.
▪ Azionare l’apparecchio soltanto con la relativa base.
▪ Non immergere l’apparecchio nell’acqua.
▪ Fare attenzione a non versare acqua sulla base.
▪ Attenzione, rischio di ustioni: la temperatura delle superfici che si
possono toccare può essere molto alta. Anche dopo lo spegnimento
dell’apparecchio, la temperatura può restare calda ancora per un po’
di tempo.
▪ Il braccio miscelatore sul DISCO dello schiumatore può surriscaldarsi.
▪ Usare il dispositivo solo conformemente a queste istruzioni. L’uso
inadeguato può provocare shock elettrici o altri rischi.
▪ Se il cavo di collegamento di questo apparecchio è guasto, bisogna
farlo sostituire dal servizio clientela centrale del fabbricante o da
un’altra persona competente del settore. Le riparazioni improprie
recano un grande pericolo per l’utente.
▪ Dopo l’uso lavare tutte le superfici, che sono venute a contatto
con gli alimenti. Seguire i consigli presenti nel Capitolo “Pulizia e
manutenzione”.
Schiumatore

30 31
IT
Utilizzo e funzionamento
1. Aggiungere la necessaria quantità di latte nel bricco (5) e chiuderlo con il suo coperchio (1).
2. A questo punto per prima cosa mettere il bricco (5) sulla base del dispositivo (8).
Attenzione: Mettere sempre il coperchio (1) sull’apparecchio prima di accenderlo.
Non togliere mai il coperchio (1) mentre l’apparecchio è acceso.
Attenzione: È possibile interrompere il funzionamento in qualsiasi momento sollevando il bricco (5)
dalla base del dispositivo (8).
Fra un utilizzo e l’altro far raffreddare l’apparecchio.
La qualità e il volume della schiuma di latte dipendono dal tipo di latte usato (tra l’altro dal contenuto
di grassi, proteine, temperatura).
Schiuma di latte calda
Selezionare questo programma per una schiuma di latte calda, cremosa, a pori fini. Particolarmente
indicata per cappuccino o latte macchiato.
▪ Versare 100 - 150 ml di latte freddo nella caraffa (5) (eccezione: si possono
versare fino a 250 ml per la funzione Latte caldo).
Le tacche di riempimento si trovano all’interno della caraffa (5), in alternativa
si può usare anche il braccio miscelatore (3) come riferimento:
100 ml MIN, in modo da coprire il DISCO dello schiumatore WMF (4).
150 ml MAX , in alternativa fino alla tacca inferiore sul braccio miscelatore.
Non aggiungere quantità maggiori, altrimenti la schiuma di latte fuoriesce e
sporca l’apparecchio.
▪ Mettere il coperchio (1) sulla caraffa (5) e premere leggermente per assicurare
una buona tenuta.
Premere più volte il pulsante di accensione/spegnimento (6) fino a quando
si illumina il simbolo corrispondente. Circa 3 secondi dopo, la spia di
controllo del pulsante di accensione/spegnimento (6) si accende e comincia
automaticamente la preparazione.
▪ Al termine del programma, l’apparecchio si spegne automaticamente e
la spia si spegne. Togliere il coperchio (1) e scremare la schiuma di latte
separatamente oppure versarla insieme al latte rimanente.
Schiuma di latte morbida e cremosa
Selezionare questo programma per una schiuma di latte calda, cremosa e a pori fini
Particolarmente indicata per creare decorazioni di schiuma su cappuccino o latte
macchiato.
Schiuma di latte forte
Selezionare questo programma per una schiuma di latte calda e consistente.
Particolarmente indicata per cappuccino o latte macchiato.
Schiuma di latte fredda
Selezionare questo programma per una schiuma di latte fredda e cremosa.
Particolarmente indicata per frappè, cocktail, caffè ghiacciato e dessert.
Latte caldo
Selezionare questo programma per scaldare il latte e schiumarlo leggermente. Il latte
caldo è particolarmente adatto per caffè macchiato, latte e cacao, cioccolata calda.
DISCO per la formazione di schiuma di latte WMF
Per poterlo pulire con maggiore facilità, il DISCO (4) per la formazione di schiuma di latte WMF può
essere estratto dal corpo. Per farlo, spingere il DISCO WMF (4) lateralmente con una leggera pressione
verso il basso.
Per il montaggio fare come segue:
Far semplicemente scorrere lateralmente il DISCO WMF (4) nel corpo. C’è un magnete all’interno che
rende il tutto molto stabile.
Luce LED
La luce LED (7) sulla base del dispositivo (8) indica che l’apparecchio è in funzione ed
è stato selezionato un programma.
Messa in servizio
Pulire l’apparecchio prima del primo utilizzo come descritto nel capitolo “Pulizia e manutenzione”.
La lunghezza non necessaria del cavo di collegamento può essere avvolta alla base del dispositivo (8).
Collegare il connettore di rete ad una presa schuko.

32 33
IT
Pulizia e manutenzione
▪ Pulire il dispositivo dopo ogni uso.
▪ Estrarre il connettore di rete e far raffreddare l’apparecchio.
▪ Il coperchio (1) e il DISCO dello schiumatore WMF (4) sono lavabili in lavastoviglie. Per poter pulire
più facilmente si può togliere l’anello di guarnizione (2) che si trova sul coperchio (1).
Nota: Il bricco (5) e la base del dispositivo (8) non sono lavabili in lavastoviglie.
▪ L’interno della caraffa (5) è lavabile con acqua corrente.
Il bricco (5) è dotato all‘interno di un rivestimento antiaderente. Non usare detergenti o solventi
aggressivi o corrosivi. Asciugare il bricco (5) con un panno morbido.
Attenzione: La base del bricco (5) deve essere asciutta prima di usare il dispositivo.
▪ Pulire la base del dispositivo (8) solo con un panno leggermente umido.
adatto per il
lavaggio in
lavastoviglie
sciacquabile con
acqua corrente pulire con un
panno umido
Coperchio (1)
Anello di guarnizione (2)
DISCO per la formazione di schiuma
di latte WMF (4)
L’interno della caraffa (5)
Base del dispositivo (8)
Risoluzione problemi
Le seguenti note dovrebbero aiutare a risolvere i problemi. Se non dovessero funzionare, contattare il
Servizio Clienti centrale. Seguire le istruzioni per la garanzia.
Problema Possibile causa Risoluzione
La spia non si accende ed il
dispositivo non si avvia
Spina non inserita Inserire la spina
Protezione da surriscaldamento
attiva
Lasciar raffreddare il dispositivo
Il latte fuoriesce dal coperchio Quantità eccessiva Ridurre la quantità
Il coperchio non si alloggia bene
in posizione
Alloggiare il coperchio
esercitando una leggera
pressione
Manca l’anello di guarnizione
oppure è sporco
Pulire l’anello di guarnizione e
montarlo
L’apparecchio è conforme alle direttive europee 2014/35/UE, 2014/30/UE e
2009/125/CE.
Alla fine del suo ciclo di vita il prodotto non deve essere smaltito con i rifiuti
domestici, ma deve essere consegnato a un centro di riciclaggio di apparecchi
elettrici ed elettronici.
I materiali possono essere riciclati in conformità alla loro etichettatura. Grazie al
riciclaggio, al recupero dei materiali e ad altre forme di riutilizzo di vecchi appa-
recchi, si riesce a contribuire in modo significativo alla protezione dell’ambiente.
Per informazioni relative al centro di smaltimento, si prega di contattare l’ammi-
nistrazione comunale.
La cancellazione di dati personali eventualmente presenti sull‘apparecchio da
smaltire è nella responsabilità dell‘utente finale e deve essere effettuata da questi.
Con riserva di modifiche.

34 35
NLNL
Gebruiksaanwijzing
Voordat u het gebruikt
Lees de gebruiksaanwijzing zorgvuldig door. Deze bevat belangrijke aanwijzingen voor het gebruik, de
veiligheid en het onderhoud van het apparaat.
U moet hem zorgvuldig bewaren en eventueel aan een volgende gebruiker doorgeven.
Het apparaat mag alleen voor het beoogde doel en overeenkomstig deze gebruiksaanwijzing worden
gebruikt.
Dit apparaat is bedoeld voor huishoudelijk en vergelijkbaar gebruik, zoals bijvoorbeeld:
⋅in de keuken door medewerkers van winkels, kantoren en andere
zakelijke omgevingen;
⋅bij agrarische bedrijven;
⋅door klanten van hotels, motels en andere verblijfsomgevingen;
⋅in pensions.
Het apparaat is niet bedoeld voor puur zakelijk gebruik.
Neem bij gebruik de veiligheidsinstructies in acht.
Technische gegevens
Nominale spanning: 220 - 240 V~ 50-60 Hz
Vermogen: 420 - 500 W
Veiligheidsklasse: I
Veiligheidsinstructies
▪ U mag het apparaat alleen op een correct geplaatst en geaard stopcontact aansluiten. Kabel en
stekker moeten droog zijn.
▪ Zorg ervoor dat de stroomkabel niet langs scherpen randen loopt of verklemd raakt, laat hem niet
naar beneden hangen en bescherm hem tegen hitte en olie.
▪ U mag de stekker niet aan de kabel en niet met natte handen uit het stopcontact trekken.
▪ Neem het apparaat niet in gebruik of trek direct de stekker uit het stopcontact wanneer:
⋅het apparaat of de stroomkabel is beschadigd;
⋅het apparaat lekt;
⋅na een val etc. het vermoeden bestaat dat het apparaat defect is.
In dat geval moet u het apparaat ter reparatie afgeven.
▪ Plaats het apparaat niet op hete oppervlakken zoals bijv. fornuizen of in de buurt van een open
gasvlam, het kan daardoor smelten.
▪ Plaats het apparaat niet op oppervlakken die niet tegen water bestand zijn. Spatten kan deze
oppervlakken beschadigen.
▪ Laat het apparaat nooit onbeheerd achter.
▪ U mag het apparaat niet zonder melk aanzetten.
▪ Haal de pot van de voet voordat u hem vult.
▪ U kunt het apparaat gebruiken om warm of koud melkschuim te maken of om melk op te warmen
zonder de melk op te schuimen.
▪ Trek tijdens het gebruik niet aan het apparaat en niet aan de stroomkabel.
▪ De onderzijde van het reservoir dient droog te zijn voor gebruik van het apparaat.
▪ Voorzichtig, het apparaat wordt heet.
▪ U moet de stekker uit het stopcontact trekken wanneer:
⋅er tijdens gebruik storingen optreden,
⋅u het apparaat reinigt of onderhoud pleegt,
⋅na gebruik.
▪ Bij onjuist gebruik, verkeerde bediening of onvakkundige reparaties stellen wij ons niet
aansprakelijk voor eventuele schade.
Ook komt in dergelijke gevallen de garantie te vervallen.
▪ Verpakkingsmaterialen, zoals bijv. plastic zakken, horen niet in kinderhanden.
Belangrijke veiligheidsinstructie
▪ Deze apparaten mogen door kinderen vanaf 8 jaar en door personen
met verminderde fysieke, sensorische of mentale vaardigheden
of gebruik en ervaring en/of kennis worden gebruikt, wanneer ze
onder toezicht staan of over het veilige gebruik van het apparaat
zijn geïnstrueerd en de daaruit resulterende risico’s hebben
begrepen. Kinderen mogen niet met het apparaat spelen. Reiniging
en gebruikersonderhoud mogen niet door kinderen worden
uitgevoerd, behalve wanneer ze ouder zijn dan 8 jaar en onder
toezicht staan.
▪ Bewaar het apparaat en de stroomkabel buiten bereik van kinderen
onder de 8 jaar.
▪ U mag het apparaat alleen gebruiken met de bijbehorende voet.
▪ Het apparaat mag niet onder water worden gedompeld.
▪ Let erop dat u geen water op de sokkel morst.
▪ Opgelet, gevaar voor brandwonden: De contactvlakken kunnen
zeer heet worden. Ook na het uitschakelen van het apparaat, blijven
de verwarmingsvlakken nog enige tijd heet.
▪ De mixarm van de melkopschuim-DISC kan ook heet worden.
▪ Het apparaat mag uitsluitend in navolging van deze aanwijzing
worden gebruikt. Ondeskundig gebruik kan een elektrische schok of
andere risicovolle momenten tot gevolg hebben.
▪ Wanneer de stroomkabel van dit apparaat beschadigd is, mag deze
alleen door de centrale klantenservice van de fabrikant of door
een vergelijkbaar gekwalificeerde persoon worden vervangen. Door
onvakkundige reparaties kunnen aanzienlijke gevaren ontstaan voor
de gebruiker.
▪ Reinig na gebruik alle oppervlakken die in contact zijn gekomen
met levensmiddelen. Neem daarbij de aanwijzingen in het
hoofdstuk „Reiniging en onderhoud“ in acht.
Melkopschuimer

36 37
NL
Bediening en gebruik
1. Doe de benodigde hoeveelheid melk in de kan (5) en sluit de kan met het deksel (1).
2. Zet de kan (5) dan pas op de apparaatvoet (8).
Opgelet:
Plaats het deksel (1) altijd eerst op het apparaat voordat u het inschakelt.
Verwijder het deksel (1) nooit terwijl het apparaat is ingeschakeld.
Opmerking:
De bereiding kan op ieder moment worden onderbroken door de kan (5) van de apparaatvoet (8) te
tillen.
Laat het apparaat wanneer u het twee keer achter elkaar gebruikt eerst afkoelen.
De consistentie en het volume van het melkschuim hangen af van de gebruikte melk (o.a. vet- en
eiwitgehalte, temperatuur).
Heet melkschuim
Selecteer dit programma voor heet, romig, fijn melkschuim. Dit programma is met name geschikt voor
cappuccino en latte. ▪ Vul de kan (5) met 100 tot 150 ml gekoelde melk (uitzondering: tot 250 ml
voor hete melk).
De vulmarkeringen vindt u aan de binnenzijde van de kan (5). U kunt de maat
echter ook bepalen met behulp van de mixarm:
100 ml MIN: de WMF Milk Froth DISC (4) bevindt zich net onder het
melkoppervlak.
150 ml MAX: tot de onderste markering op de mixarm.
Voeg niet meer melk toe, omdat het melkschuim dan uit de kan loopt en het
apparaat vuil wordt.
▪ Plaats het deksel (1) op de kan (5) en druk er licht op, zodat de kan goed
wordt afgesloten.
Druk herhaaldelijk op de start/stop-knop (6) tot het gewenste symbool
oplicht. Na ongeveer 3 seconden gaat het controlelampje van de start/stop-
knop (6) branden en gaat het melkschuimprogramma automatisch van start.
▪ Als het programma is afgelopen, wordt het apparaat automatisch
uitgeschakeld en gaat het indicatorlampje uit. Haal het deksel (1) eraf en
schep het melkschuim eruit, of schenk het melkschuim uit samen met de
resterende melk.
Romig, zacht melkschuim
Selecteer dit programma voor warm, romig en lobbig melkschuim. Dit programma is
met name geschikt voor cappuccino en latte art.
Stevig melkschuim
Selecteer dit programma voor warm, samenhangend melkschuim. Dit programma is met
name geschikt voor cappuccino en latte macchiatto.
Koud melkschuim
Selecteer dit programma voor koud, romig melkschuim. Dit programma is met name
geschikt voor frappés, cocktails, ijskoffie en desserts.
Hete melk
Selecteer dit programma om melk op te warmen en licht op te kloppen. Hete melk is
met name geschikt voor koffie verkeerd, warme chocolademelk en hete cacaodranken.
WMF melkschuim-DISC
De WMF melkschuim-DISC (4) kan uit de houder genomen worden en gemakkelijk worden
schoongemaakt. Schuif daarvoor de WMF melkschuim-DISC (4) vanaf de zijkant met lichte druk naar
onderen uit de houder.
Voor de montage gaat u als volgt te werk:
Schuif de WMF melkschuim-DISC (4) vanaf de zijkant in de houder, een magneet aan de binnenkant
zorgt ervoor dat hij stevig vast zit.
Led-verlichting
De led-verlichting (7) aan de onderrand van het apparaat (8) geeft aan dat het apparaat in gebruik is
en dat een programma is geselecteerd.
Ingebruikname
Reinig het apparaat voor het eerste gebruik zoals is beschreven in het hoofdstuk „Reiniging en
onderhoud“.
Het niet benodigde gedeelte van de stroomkabel kan in de bodem van de apparaatvoet (8) worden
gewikkeld. Sluit de stekker aan op een stopcontact.

38 39
NL
Reiniging en onderhoud
▪ Maak het apparaat na ieder gebruik schoon.
▪ Trek de stekker uit het stopcontact en laat het apparaat afkoelen.
▪ Het deksel (1) en de WMF Milk Froth DISC (4) zijn vaatwasmachinebestendig. Voor eenvoudige
reiniging kan de afdichtring (2) uit het deksel (1) worden genomen.
Aanwijzing: kan (5) en apparaatvoet (8) mogen niet in de vaatwasmachine worden afgewassen.
▪ De binnenzijde van de kan (5) kan onder stromend water worden schoongespoeld.
De kan (5) is aan de binnenkant voorzien van een antikleeflaag. Gebruik geen agressieve of
schurende schoonmaakmiddelen en oplosmiddelen. Droog de kan (5) af met een zachte doek.
Let op: de onderkant van de kan (5) moet droog zijn voordat het apparaat kan worden gebruikt.
▪ De apparaatvoet (8) alleen afvegen met een licht vochtige doek.
geschikt voor de
vaatwasmachine onder stromend
water afspoelen vochtig afvegen
Deksel (1)
Afdichtring (2)
WMF melkschuim-DISC (4)
De binnenzijde van de kan (5)
Apparaatvoet (8)
Hulp bij storingen
De volgende aanwijzingen kunnen u helpen bij het verhelpen van storingen. Wanneer dit niet lukt,
kunt u contact opnemen met onze centrale klantenservice. Neem de garantie-instructies in acht.
Probleem Mogelijke oorzaak Oplossing
Het controlelampje brandt
niet, het apparaat start niet
Stekker zit niet in het
stopcontact
Steek de stekker in het
stopcontact
De oververhittingsbeveiliging is
geactiveerd
Apparaat laten afkoelen
Er komt melk uit het deksel Teveel melk in de kan Doe minder melk in de kan
Deksel is niet goed dicht Druk het deksel licht aan
De afdichtring ontbreekt of is
vuil
Afdichtring schoonmaken en
plaatsen
Het apparaat voldoet aan de Europese richtlijnen 2014/35/EG, 2014/30/EG en
2009/125/EG.
Dit product mag aan het einde van zijn levensduur niet met het gewone huishou-
delijke afval worden afgevoerd, maar moet in een verzamelpunt voor recycling
van elektrische en elektronische apparaten worden afgegeven.
De materialen zijn geschikt voor hergebruik naargelang hun markering. Door
het aanbieden voor hergebruik, de verwerking van materialen of andere vormen
van verwerking van oude apparaten, levert u een belangrijke bijdrage aan de
bescherming van ons milieu.
Vraag informatie aan uw gemeentelijke instantie over het verzamelpunt voor
afval.
De verwijdering van eventueel aanwezige persoonlijke gegevens op de af te
voeren oude apparaten moet door de eindgebruiker onder eigen verantwoorde-
lijkheid worden uitgevoerd.
Wijzigingen voorbehouden.
Other manuals for Lumero
8
This manual suits for next models
1
Table of contents
Languages:
Other WMF Kitchen Appliance manuals

WMF
WMF Pfanne ProfiResist Assembly instructions

WMF
WMF Profi Plus Vegetable slicer User manual

WMF
WMF KULT S User manual

WMF
WMF Skyline User manual

WMF
WMF LONO User manual

WMF
WMF KULT X User manual

WMF
WMF LINEO User manual

WMF
WMF SELECTit! MultiPot Assembly instructions

WMF
WMF STELIO User manual

WMF
WMF MILKBOX 9159 SERIES User manual