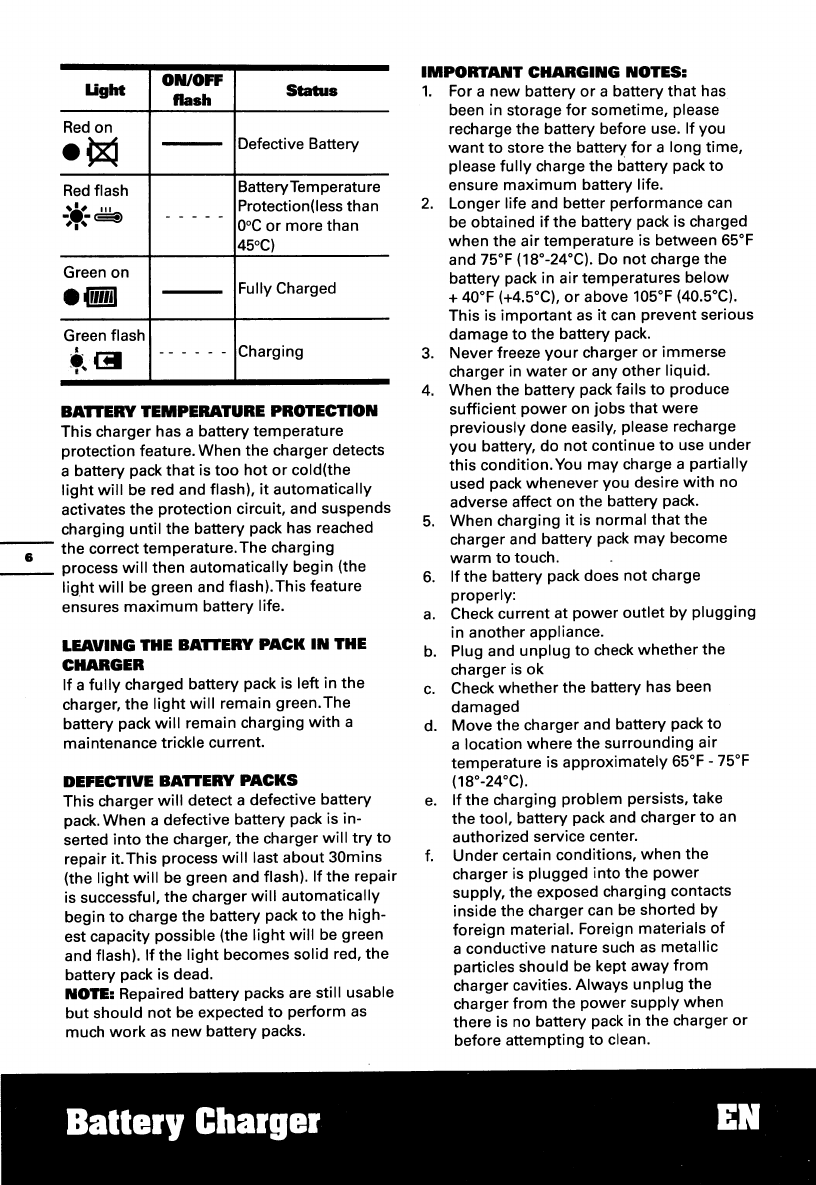
Worx WA3742 User manual

o
Battery
Charger
Chargeur
Cargador
.,
HELPUNE NUMBER
=
IIU
SERVICE
D'ASSI5IlINCE
RO DE
liNEA
DE AYUDA
1-866-354-WORX
(9679)
EN
P04
F
poe
ES
P12
WA3742

.l
t


4
1.
CHARGE INDICATOR LIGHT
2.
CHARGER BASE
3.
BATTERY PACK RELEASE BUTI'ON
4.
BATTERY PACK·
5.
ADAPTER
• Optional
acce
••
orie
•
•
Not
all
the
acce._rie.
illu.trated
or
described
are
included
in standard delivery.
We
recommend that you purchase
your
accessories from the same store that sold you the tool.
Use good quality accessories marked
with
a well-known brand name. Choose the type according
to
the
work
you intend
to
undertake. Refer
to
the accessory packaging
for
further details. Store
personnel can assist you and offer advice.
TECHNICAL
DATA
Charger voltage
120V-60Hz
Output
20V
Charging current
O.4A
Rated power
12W
Charging
time
(approx.) 5
hr
Battery type Lithium battery
Machine
weight
O.371bs
Ballery Charger
EN

Ii' WARNING: This product can expose
LDyou
to
chemicals including lead,
phthalate
or
bisphenol A which are known
to
the State
of
California
to
cause cancer, birth
defects
or
other reproductive harm.Wash
your
hands after use. For
more
information
go
to
www.P65Warnings.ca.gov.
INFORMATION FOR RADIATED
EMISSION
This device complies
with
Canadian
ICES-001.
This device complies
with
Part
15
of
the
FCC
Rules.
Operation is subject
to
the
following
two
conditions:
1)
This device may
not
cause harmful
interference, and
2)
This device must accept any interference
received, including interference
that
may
cause undesired operation.
Ii' WARNING: Changes
or
modifications
LDto
this
unit
not expressly approved
by
the
party responsible
for
compliance could
void the user's authority
to
operate the
equipment.
NOTE:
This
equipment
has been tested and
found
to
comply
with
the
limits
for
a Class B
digital device, pursuant
to
Part
15
of
the
FCC
Rules.
These limits are designed
to
provide
reasonable protection against harmful
interference
in
a residential installation.This
equipment
generates, uses and can radiate
radio frequency energy and,
if
not
installed
and used in accordance
with
the instructions,
may
cause harmful interference to radio
communications.
However, there is no guarantee that
interference
will
not
occur in a particular
installation. Ifthis
equipment
does cause
harmful interference
to
radio
or
television
reception, which can
be
determined by
turning the
equipment
off
and on, the user is
encouraged
to
try
to correct the interference
by one
or
more
of
the
following
measures:
• Reorient
or
relocate the receiving antenna.
• Increase the separation between the
equipment
and receiver.
Connect
the
equipment into
an
outlet
on
a circuit different
from
that
to
which
the
receiver is connected.
• Consult the dealer
or
an experienced radio/
TV technician
for
help.
CHARGING
PROCEDURE
riITlI1
NOTE: Before using the
tool,
read the
I1b!dIJ
instruction
book
carefully.
CHARGING INSTRUCTIONS
1.
CHARGING YOUR BATTERY PACK
Ii' WARNING: The charger and battery
LD
pack are specifically designed
to
work
together
so
do
not
attempt
to
use any
other
devices. Never insert
or
allow
metallic objects
into
your
charger
or
battery pack connections
because an electrical failure and hazard
will
occur.
2.
BEFORE
USING
YOUR CORDLESS
TOOL
Your battery pack is UNCHARGED and you
must
charge once before use.
3.
HOW
TO
CHARGE YOUR BATTERY
CHARGING PROCEDURE
1)
Plug
the
charger
into
an
appropriate
outlet.
2) Slide the battery pack
into
the
charger,The
__
_
LIGHT
(1)
will
become green and flash
to
&
show
charging has started.
3)
After
charging
approx
5 hours,
the
light
will
stay green
without
flashing, which
means
the
battery is full, and charging is
completed.
Ii' WARNING:
LD
When
battery
charge
runs
out
after
continuous
use
or
exposure
to
direct
sunlight
or
heat.
allow
time
for
the
battery
to
cool
down
before
re-charging
to
achieve
the
full
charge.
CHARGING INDICATOR
This charger is designed
to
detect
some
problems
that
can arise
with
battery packs.
Indicator lights indicate
problems
(see table
below).
If
this occurs, insert a
new
battery
pack
to
determine
if
the
charger is OK. If
the
new
battery charges correctly, then the
original pack is defective and should be
returned
to
a service center
or
recycling
service center.
If
the
new
battery pack
displays
the
same
problem
as
the
original
Battery
Pack,
have
the
charger tested at
an
authorized service center.
Battery
Charger
EN

Light
ONIOFF Status
flash
Red
on
.~
-Defective Battery
Red
flash BatteryTemperature
.w.~
~
- - - - Protection(less than
#.'
O°C
or
more than
4S
o
C)
Green on
••
---
Fully Charged
Green flash
ilGi
-- - -- - Charging
',"
BAnERY
TEMPERATURE PROTECTION
This charger has a battery temperature
protection feature. When the charger detects
a battery pack
that
is
too
hot
or
cold(the
light
will
be red and flash),
it
automatically
activates
the
protection circuit, and suspends
charging
until
the
battery pack has reached
--.-
the
correct temperature.The charging
___
process
will
then automatically begin (the
light
will
be green and flash).This feature
ensures
maximum
battery life.
LEAVING THE
BAnERY
PACK
IN
THE
CHARGER
If
a
fully
charged battery pack is left in
the
charger,
the
light
will
remain green.The
battery pack
will
remain charging
with
a
maintenance trickle current.
DEFECTIVE
BAnERY
PACKS
This charger
will
detect a defective battery
pack. When a defective battery pack is in-
serted
into
the
charger,
the
charger
will
try
to
repair it.This process
will
last about 30mins
(the
light
will
be green and flash).
If
the repair
is successful, the charger
will
automatically
begin
to
charge the battery pack to
the
high-
est capacity possible (the
light
will
be green
and flash).
If
the
light
becomes solid red,
the
battery pack is dead.
NOTE: Repaired battery packs are still usable
but
should
not
be expected
to
perform
as
much
work
as
new
battery packs.
Battery Charger
IMPORTANT CHARGING NOTES:
1.
For a
new
battery
or
a battery
that
has
been in storage
for
sometime, please
recharge the battery before use.
If
you
want
to
store the battery
for
a long time,
please
fully
charge
the
battery pack
to
ensure
maximum
battery life.
2.
Longer life and better performance can
be obtained
if
the battery pack is charged
when
the air temperature is between
6soF
and
7soF
(18°-24°C). Do
not
charge the
battery pack in airtemperatures
below
+ 40°F
(+4.S0C),
or
above
10soF
(40.S0C).
This is
important
as
it
can prevent serious
damage
to
the battery pack.
3. Never freeze
your
charger
or
immerse
charger in
water
or
any
other
liquid.
4.
When the battery pack fails
to
produce
sufficient
power
on
jobs
that
were
previously done easily, please recharge
you
battery, do
not
continue
to
use under
this condition.You
may
charge a partially
used pack
whenever
you desire
with
no
adverse affect on the battery pack.
S.
When charging
it
is normal
that
the
charger and battery pack
may
become
warm
to
touch.
6.
If
the battery pack does
not
charge
properly:
a.
Check current at
power
outlet
by
plugging
in another appliance.
b. Plug and unplug
to
check
whether
the
charger is
ok
c.
Check
whether
the
battery has been
damaged
d.
Move
the charger and battery pack to
a location
where
the surrounding air
temperature is approximately
6soF
-
7SoF
(18°-24°C).
e.
If the charging problem persists, take
the
tool,
battery pack and charger
to
an
authorized service center.
f.
Under certain conditions,
when
the
charger is plugged into the
power
supply, the exposed charging contacts
inside the charger can be shorted
by
foreign material. Foreign materials
of
a conductive nature such
as
metallic
particles should be kept away
from
charger cavities. Always unplug
the
charger
from
the
power
supply
when
there is no battery pack in the charger
or
before attempting
to
clean.
EN

4.
TO
REMOVE OR INSTALL BATTERY
PACK
Depress
the
Battery
Pack
Release Button
to
remove
the
Battery
Pack
from
your
tool.
After
recharging,
insert
the
battery pack
into
the
battery port. A
simple
push and
slight
pres-
sure
will
be sufficient.
PROBLEM
SOLU,.ION
I
CANNOT
FIT THE BATTERY INTO THE
BATTERY CHARGER. WHY?
a)
Check
if
the
charger and
the
battery pack
are specifically designed
for
working
together.
b) The
battery
pack can be inserted
into
the charger
only
in
one direction.Turn
the
battery
pack
around
until
it
can be
inserted
into
the
slot,
the
indicator
light
should
be green and flash
when
the
battery pack is charging.
REASONS
FOR DIFFERENT CHARGING
TIMES
The charging
time
can be affected
by
many
reasons which are
not
defects in
your
product.
a)
Ifthe
battery
pack is
only
partly
discharged
it
may
be re-charged in less
than rated charging
time.
(approx. 5
hours).
b)
If
the
battery pack and
ambient
temperature
are
very
cold!
hot,
it
may
take
longer
to
re-charge. Please
find
an
appropriate
environment
with
proper
air
temperature
to
start charging.
c)
If
the
battery
pack is
very
hot,
remove
battery pack
from
the
charger and
allow
battery pack
to
cool
to
ambient
temperature
and
then
recharging can be
started.
MAIN,.AIN
,.OOLS
WI,.a
CARE
Remove
the
plug
from
the
socket
before
carrying
out
any
adjustment.
servicing
or
maintenance.
Your
tool
requires no additional lubrication
or
maintenance. Never use
water
or
chemical
cleaners
to
clean
your
power
tool.
Wipe
clean
with
a
dry
cloth.
Always
store
your
power
tool
in
a
dry
place.
If
the
supply
cord is damaged,
it
must
be
replaced
by
the manufacturer, its service
agent
or
similarly
qualified
persons in
order
to
avoid a hazard.
Ballery
Charger
EN
7


Other manuals for WA3742
1
Table of contents
Other Worx Batteries Charger manuals

Worx
Worx WA3765 Installation manual

Worx
Worx WA3739 User manual

Worx
Worx PowerShare WA3772 User manual

Worx
Worx WA3847 User manual

Worx
Worx PowerShare WA3772 Installation manual

Worx
Worx WA3884 User manual

Worx
Worx WA3742 User manual

Worx
Worx WA3867 User manual

Worx
Worx WA3868 User manual

Worx
Worx WA3880 User manual