Legend
1Adjustment knob
2Handle stems
3Jaw part mounting (on handle)
4Jaw part with notched rod
Intended use
The micro-instruments are intended for use in neurosurgery, and
are specially designed for use in tight spaces. They can be applied
to the cutting, grasping, dissecting, etc. of vessels and tissues.
Available sizes
The micro-instruments are available as complete instruments or as
separate, combinable components. Various jaw parts (e.g., straight
scissors, curved scissors, and forceps) can be used with the suitable
handles.
Complete information about products currently available can be
found in AESCULAP brochure C 74511.
Safe handling and preparation
CAUTION
Federal law restricts this device to sell by or on order of a phy-
sician!
ØRead the instructions for use and keep them in a safe place.
ØUse the instrument only in accordance with professional stan-
dards and practices, see Applications.
ØClean the new instrument either manually or mechanically
prior to the initial sterilization.
ØStore the new or unused instrument in a dry, clean and safe
place.
ØInspect the instrument after each cleaning and disinfecting
cycle to be sure it is clean, functioning properly, not damaged,
has e.g. intact insulation and does not have any loose, bent,
broken, cracked, worn, or fractured components.
ØDo not use the instrument if it is damaged or defective. Re-
place damaged parts immediately with original spare parts.
ØSet aside the instrument immediately if it is damaged.
ØPrior to each use, inspect the instrument for: loose, bent, bro-
ken, cracked, worn, or fractured components.
Safe operation
Disassembling
ØTurn the adjustment knob 1at 180° until it engages (i.e., clicks
into place).
ØHold the handle stems 2in one hand and at the same hold the
jaw part with notched rod 4in the other hand.
ØPull the jaw part mounting 3and jaw part with notched rod 4
apart.
ØTurn the adjustment knob 1back to its original position.
Assembling
ØEnsure that the bridge of the jaw part with notched rod 4and
the groove in the jaw part mounting 3are in the same axis
when the handle stems are in closed position.
ØPush the jaw part mounting 3and jaw part with notched rod 4
together until the notched rod engages with an audible click.
Check functionality:
ØPush the handle stems 2all the way together.
Check to ensure that the jaw part functions properly.
Care and handling
ØClean the entire handle with the cleaning brush provided (see
Manual cleaning/Disinfecting).
ØThe jaw part with notched rod can be cleaned either manually
or mechanically.
After each use
ØClean the contaminated instrument as soon as possible.
ØLeave hinged instruments open at a 90° angle.
ØWhen carrying out mechanical cleaning, avoid watermarks by
placing instruments in wire baskets suitable for cleaning.
ØDisassemble the instrument, see Disassembling.
ØRemove debris from the instrument while it is dry.
ØIf the instrument is cleaned while wet, use an active cleaning
disinfectant. Prior to mechanical cleaning and disinfecting,
rinse the instrument thoroughly in clear running water.
ØIf ultrasound is needed, carry out the procedure according to
the user instructions provided by the manufacturer of the de-
vice:
– as an effective mechanical supplement to manual cleaning.
– for initial cleaning of instruments with dried debris on
them prior to mechanical cleaning.
ØPerform manual or mechanical cleaning. Follow the manufac-
turer's instructions.
Manual cleaning, disinfecting
ØPlace the instrument in a suitable active cleaning and disin-
fectant solution in such a way that all surfaces, interior sur-
faces, lumen, and openings are covered. Follow the
disinfectant manufacturer's instructions.
ØAfter disinfecting chemically, always rinse the items thor-
oughly in plenty of clear running water. Follow the disinfec-
tant manufacturer's instructions.
ØRemove encrusted material with a soft nylon brush. Do not use
harsh cleaning agents or metal brushes.
ØClean lumina and channels with a soft round nylon brush.
Note
Use brushes that are an appropriate diameter for the lumen they
are being used to clean.
ØCarry out the final rinse in distilled or fully demineralized wa-
ter.
ØDry the instrument with a soft, absorbent, lint-free cloth.
ØDry lumen and channels with compressed air.
Mechanical cleaning, disinfecting
ØWhen choosing a program for mechanical cleaning, take into
account the materials in the instruments to be cleaned (e.g.
stainless instrument-grade steel, aluminum). Follow the in-
structions provided by the manufacturer of the device.
ØCarry out the final rinse in distilled or fully demineralized water.
ØBe sure the drying phase is sufficiently long.
ØRemove the instrument from the apparatus as soon as the pro-
gram is completed.
Control
ØAllow instruments to cool down to room temperature.
ØMoving parts such as hinges and latches should be sprayed
with a sterilizable and moisture-permeable lightweight ma-
chine oil (such as AESCULAP STERILIT Spray JG 600 or mainte-
nance oil JG 598).
ØInspect the instrument after each cleaning and disinfecting
cycle to be sure it is: clean, functioning properly, not damaged,
has intact insulation and does not have any loose, bent, bro-
ken, cracked, worn, or fractured components.
ØSet aside and replace the instrument if it is damaged or defec-
tive.
Storage
ØKeep instruments with fine working tips and/or microsurgical
instruments in appropriate storage units.
Sterilization method and parameters
ØSterilize with steam, taking note of the following:
The sterilization has to be done according to a validated steam
sterilization procedure (e.g. in a sterilizer in conformance with
EN 285/ANSI/AAMI/ISO 11134-1993, ANSI/AAMI ST46-1993,
and validated in conformance with EN 554/ISO 13683). In case
of application of the fractionated vacuum procedure the ste-
rilization has to be carried out for a minimum of 5 minutes at
134 °C and at 2 bar pressure.
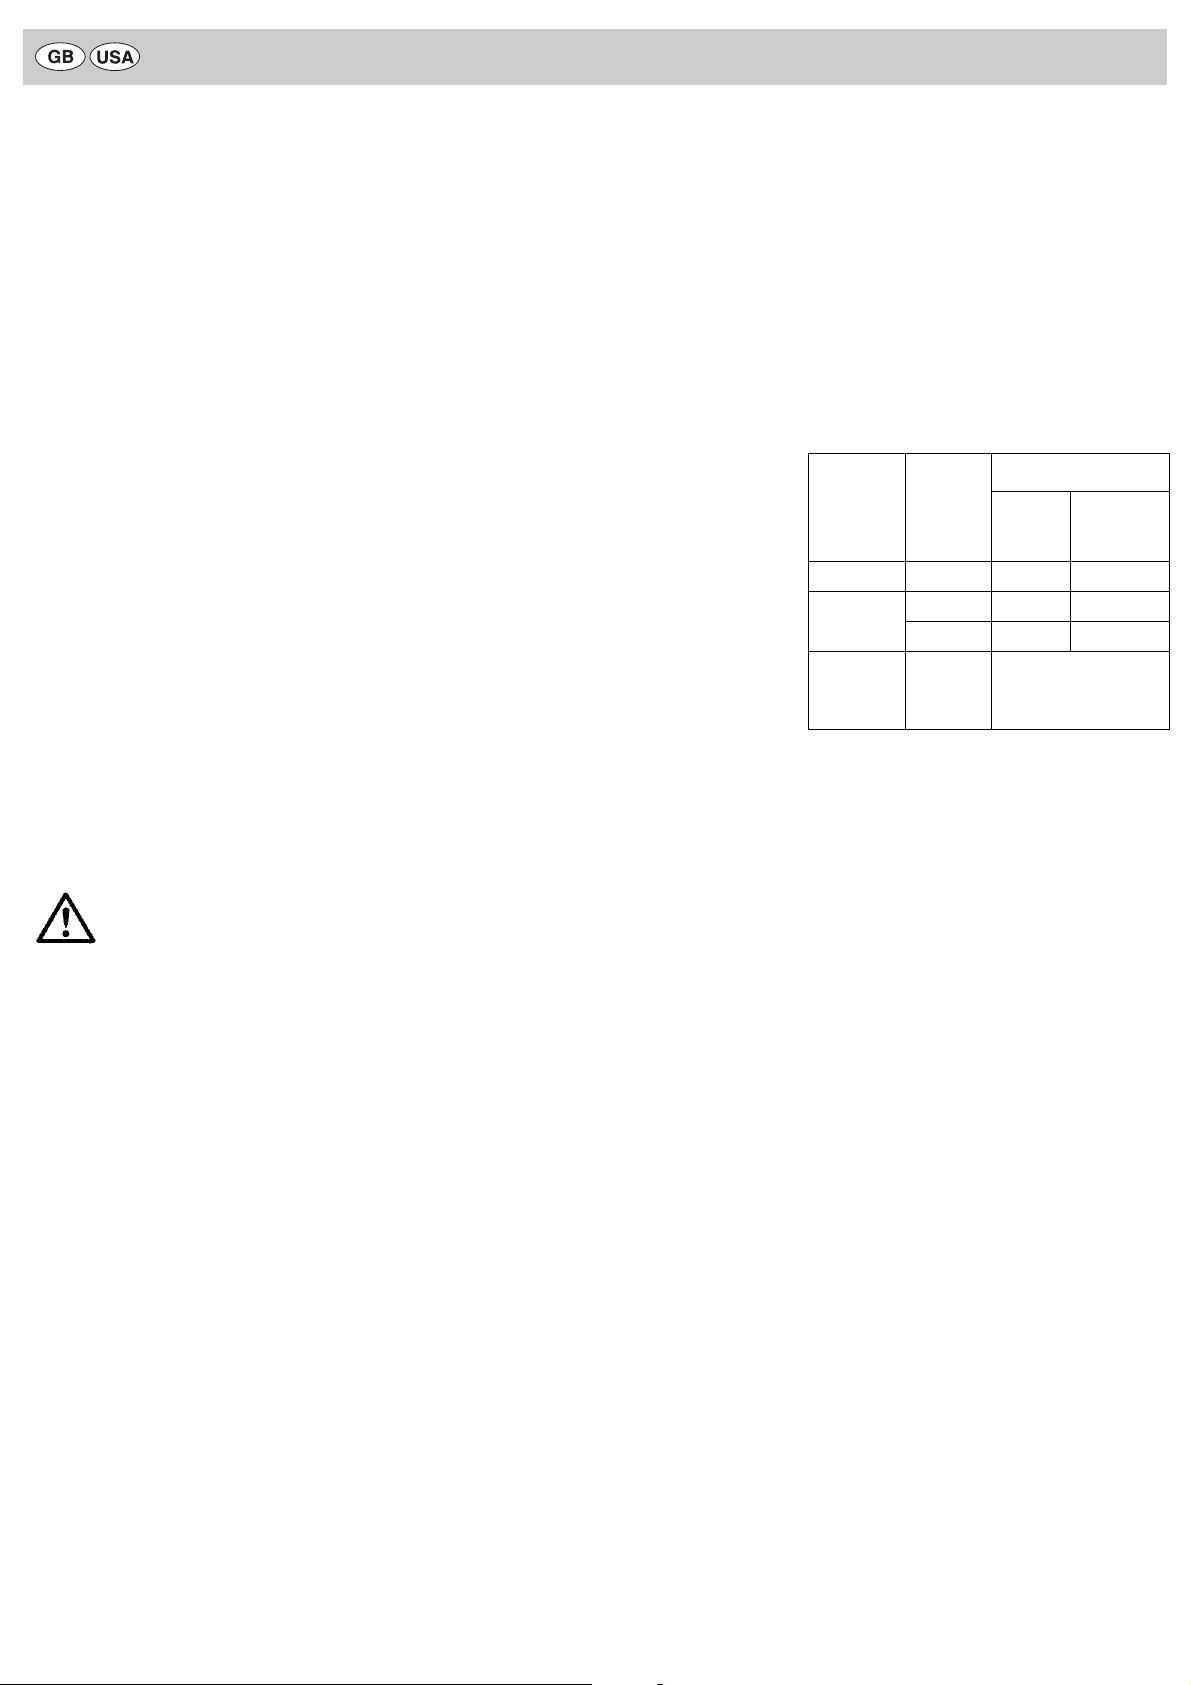
Sterilization for the US-market:
• Sterilization of the device may be accomplished by steam or
ethylene oxide (EtO) gas.
• AESCULAP does not recommend the device be sterilized by
“Flash” or chemical sterilization.
• Surgical instruments may also be placed within an AESCULAP
rigid sterilization container (sterile container) for processing
under generally accepted hospital in-use conditions.
The recommended sterilization parameters are as follows:
Repairs
Repairs may be carried out only by persons authorized to do so by
AESCULAP. Only in this way will warranties and guarantees remain
valid.
ØIf any repairs are needed, please send the device to:
AESCULAP Technischer Service
Am Aesculap-Platz
78532 Tuttlingen/Germany
Phone: +49 (7461) 95 27 00
Fax: +49 (7461) 16 28 87
Or in the US:
AESCULAP Inc.
Attn. AESCULAP Technical Services
615 Lambert Pointe Drive
Hazelwood
MO, 63042-2609
AESCULAP Repair Hotline
Phone: +1 (800) 214-3392
Fax: +1 (314) 895-4420
Other service addresses can be obtained from the address indica-
ted above.
Distributor in the US
AESCULAP Inc.
3773 Corporate Parkway
Center Valley, PA, 18034
Sharp cutting edges and tips on the
instruments can cause injury to user and
patient!
ØHandle instruments with care.
WARNING
Sterilization
method Temp.
Minimum exposure time
Wrapped
In a sterile
container
system
Pre-vacuum 270—275 °F 4 min 4 min
Gravity 250—254 °F 15 min 40 min
270—275 °F 10 min 30 min
Ethylene
Oxide (EtO)
125—130 °F 105 min with 12 % EO,
88 % FREON;
45—75 % chamber humidity,
reaction of 6 hours
Micro-instruments


