manuals.online logo
Brands
  1. Home
  2. •
  3. Brands
  4. •
  5. BEA
  6. •
  7. Accessories
  8. •
  9. BEA SPARROW User manual

BEA SPARROW User manual

SPARROW
2
1
3
4
5
Specifications are subject to changes without prior notice.
* Other use of the device is outside the permitted purpose and can not be guaranteed by the manufacturer.
TECHNICAL SPECIFICATIONS
DESCRIPTION
ENGLISH
UNIDIRECTIONAL OPENING SENSOR
FOR AUTOMATIC INDUSTRIAL
DOORS*
1. cover
2. main connector
3. radar antenna
4. DIP-switch
5. push buttons
Technology:
Transmitted frequency:
Transmitted radiated power:
Transmitted power density:
Detection mode:
Min. detection speed:
Supply voltage:
Mains frequency:
Max power consumption:
Output:
Max. contact voltage:
Max. contact current:
Max. switching power:
Mounting height:
Degree of protection:
Temperature range:
Dimensions:
Tilt angles:
Material:
Weight:
Cable lenght:
Conformity:
microwave
24.150 GHz
< 20 dBm EIRP
< 5 mW/cm²
motion
5 cm/s (measured in the sensor axis)
12V to 24V AC ±10%; 12V to 24V DC +30% / -10%
50 to 60 Hz
< 2 W
relay (free of potential change-over contact)
42V AC - 60V DC
1A (resistive)
30W (DC) / 60VA (AC)
from 2 m to 6 m
IP64
from -30 °C to + 60 °C
140 mm (L) x 55 mm (H) x 57 mm (W)
0° to 90° vertical; -120° to +120° lateral
ABS
165 g
10 m
RED 2014/53/EU; 2011/65/EU
This user’s guide is an informative document and
can not be seen as a commitment of result.
1
2
1
3 4 5
2
OPENING & CLOSING
MOUNTING & WIRING
The sensor can be
installed in various
positions. But always
verify the antenna
position.
The sensor can easily
replace an EAGLE
thanks to the retrofit
clip.
1. Remove the clip.
2. Fix it with the
existing screw.
3. Slide the sensor on
the clip.
Before xing: After xing:
Drill 2 holes using
the mounting template.
Fix the sensor firmly to avoid
vibrations.
TIPS
Drill a hole for the cable
and pull tinned through
towards the sensor
Connect the wires accordingly.
Pass the cable through the
opening.
180°
... or use one of the cable
conduits. Avoid using the one at
the top to ensure waterproofness.
Avoid proximity to neon
lamps or moving objects.
Do not cover the sensor.
3
4
P
A
0
1
2
1
2
0
1
2
33
3
0
1
2
1
2
0
1
2
33
3
XXS XS S < < > > L XL XXL
1 2 3
DETECTION FIELD
SETTINGS (by remote control or push buttons)
FIELD SIZE
FIELD SIZE
IMMUNITY FILTER
DETECTION MODE
OUTPUT
CONFIGURATION
bi = two-way detection
uni = one-way detection towards sensor
uni AWAY = one-way detection away from sensor
A = active output (NO-contact)
P = passive output (NC-contact)
bi uni uni
AWAY
FACTORY
VALUES
normal high
Adjust the lateral antenna
angle.
Adjust the vertical antenna
angle.
If mounting height > 4.5 m,
activate BOOST function by
DIP-switch.
Mounting height: 4 m
Boost function: OFF
Factory values
Mounting height: 6 m
Boost function: ON
Factory values
OR
RESETTING TO FACTORY VALUES:
BEA SA | LIEGE Science Park | ALLÉE DES NOISETIERS 5 - 4031 ANGLEUR [BELGIUM] | T +32 4 361 65 65 | F +32 4 361 28 58 | [email protected] | WWW.BEA-SENSORS.COM
1
1
2
3
4
5
1
2
3
1
1
1
1
2
2
1
©BEA | Original instructions | 42.7108 / V2 - 07.18
BEA hereby declares that the SPARROW is in conformity with the basic requirements and the other
relevant provisions of the standards 2014/53/EU and 2011/65/EU.
TROUBLESHOOTING
The door will not
open.
The LED is OFF.
The sensor power is off. Check the wiring and the power supply.
The complete declaration of conformity is available on our website.
This product should be disposed of separately from unsorted municipal waste
The door will not
close.
The LED is OFF.
The door opens
and closes
constantly.
The sensor detects
objects outside its
detection field.
The LED
flashes quickly
after unlocking.
The sensor does
not respond to the
remote control.
Improper output
configuration on the sensor.
Improper wiring
The sensor is disturbed
by the door motion or
vibrations caused by the
door motion.
The sensor needs an access
code to unlock.
Batteries in the remote
control are weak or
installed improperly.
It rains and the
sensor detects for
no apparent reason.
The sensor detects the
motion of the rain drops.
Remote control badly
pointed.
Check the output configuration setting on each
sensor connected to the door operator.
Verify wiring
Make sure the sensor is fixed properly.
Make sure the detection mode is unidirectional.
Increase the tilt angle.
Reduce the field size.
Increase the immunity filter.
Decrease the field size.
Enter an access code.
Cut and restore the power supply to access the
sensor. Change or delete the access code.
Check and change the batteries if necessary.
Point the remote control towards the sensor.
Make sure the detection mode is unidirectional.
Increase the immunity filter.
Install the ORA (rain accessory).
Metallic environment
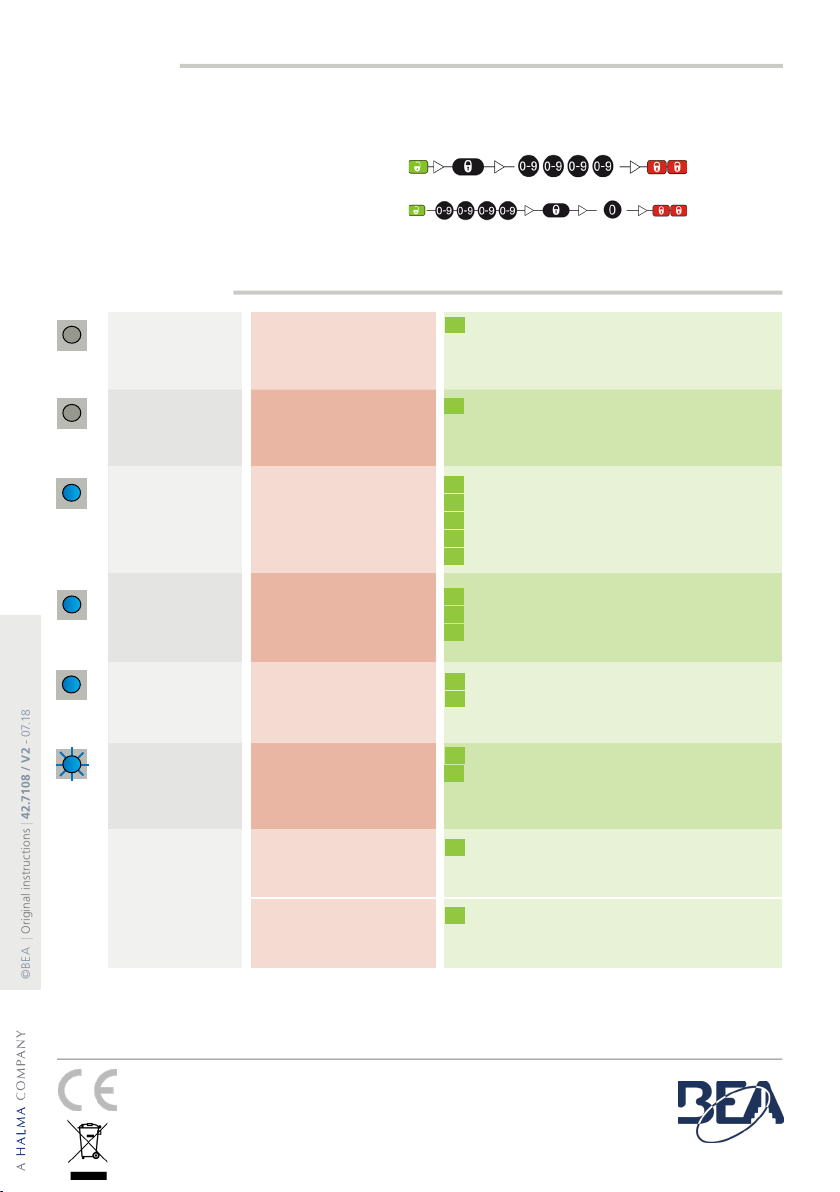
ACCESS CODE
The access code (1 to 4 digits) is recommended to set sensors installed close to each other.
If you forget the access code, cut and restore the power supply.
During 1 minute, you can access the sensor without introducing any access code.
SAVING OR CHANGING AN ACCESS CODE:
DELETING AN ACCESS CODE:

Other BEA Accessories manuals

BEA LZR SIGMA User manual

BEA

BEA LZR SIGMA User manual

BEA IRIS User manual

BEA

BEA IRIS User manual

BEA Superscan User manual

BEA

BEA Superscan User manual

BEA IXIO-ST User manual

BEA

BEA IXIO-ST User manual

BEA Eagle Operator's manual

BEA

BEA Eagle Operator's manual

BEA 1SAFE User manual

BEA

BEA 1SAFE User manual

BEA IS40P User manual

BEA

BEA IS40P User manual

BEA COLIBRI ONE DRO User manual

BEA

BEA COLIBRI ONE DRO User manual

BEA FOCUS User manual

BEA

BEA FOCUS User manual

BEA FALCON DR User manual

BEA

BEA FALCON DR User manual

BEA VIO-M1 User manual

BEA

BEA VIO-M1 User manual

BEA Falcon User manual

BEA

BEA Falcon User manual

BEA IS40 User manual

BEA

BEA IS40 User manual

BEA Eagle HM User manual

BEA

BEA Eagle HM User manual

BEA Halma PBS45 Series User manual

BEA

BEA Halma PBS45 Series User manual

BEA Jamb Style PBJ Series User manual

BEA

BEA Jamb Style PBJ Series User manual

BEA IXIO-DP1 User manual

BEA

BEA IXIO-DP1 User manual

BEA IS40 User manual

BEA

BEA IS40 User manual

BEA FALCON EX User manual

BEA

BEA FALCON EX User manual

BEA SUPERSCAN-T User manual

BEA

BEA SUPERSCAN-T User manual

BEA Smart Focus User manual

BEA

BEA Smart Focus User manual

BEA MS08 RETROFIT User manual

BEA

BEA MS08 RETROFIT User manual

BEA MAGIC SWITCH MS21H User manual

BEA

BEA MAGIC SWITCH MS21H User manual

BEA FALCON User manual

BEA

BEA FALCON User manual

Popular Accessories manuals by other brands

Hygiena INCUBATOR2 Operation manual

Hygiena

Hygiena INCUBATOR2 Operation manual

Pioneer CNDV-80MT Operation manual addendum

Pioneer

Pioneer CNDV-80MT Operation manual addendum

SICK WTF4F operating instructions

SICK

SICK WTF4F operating instructions

Panasonic MA4SD05X Specification sheet

Panasonic

Panasonic MA4SD05X Specification sheet

Kayoba 779-014 User instructions

Kayoba

Kayoba 779-014 User instructions

Sure Electronics CPL-312C24 quick guide

Sure Electronics

Sure Electronics CPL-312C24 quick guide

Pyxis ST-730 Series user manual

Pyxis

Pyxis ST-730 Series user manual

Energeeks EG-EW003MC Quick installation guide

Energeeks

Energeeks EG-EW003MC Quick installation guide

ST VL53L1X API user manual

ST

ST VL53L1X API user manual

Stack TPMS Lite installation guide

Stack

Stack TPMS Lite installation guide

Oregon Scientific THN122N user manual

Oregon Scientific

Oregon Scientific THN122N user manual

Frontpoint Smart Chime user guide

Frontpoint

Frontpoint Smart Chime user guide

Double Fish Super One instruction manual

Double Fish

Double Fish Super One instruction manual

Awarepoint S2 installation manual

Awarepoint

Awarepoint S2 installation manual

Baumer FVDK 10P65Y0/KS35A manual

Baumer

Baumer FVDK 10P65Y0/KS35A manual

Ruck Aroma Lamp operating instructions

Ruck

Ruck Aroma Lamp operating instructions

Brauniger IQ-ONE operating instructions

Brauniger

Brauniger IQ-ONE operating instructions

Eshine ES960S Use manual

Eshine

Eshine ES960S Use manual

manuals.online logo
manuals.online logoBrands
  • About & Mission
  • Contact us
  • Privacy Policy
  • Terms and Conditions

Copyright 2025 Manuals.Online. All Rights Reserved.