Beta 1498/40A User manual

1498/40A
ISTRUZIONI PER L’USOI
INSTRUCTIONS FOR USEEN
MODE D’EMPLOIF
GEBRAUCHSANWEISUNGD
INSTRUCCIONESE
INSTRUÇÕES DE USOPT
GEBRUIKSAANWIJZINGNL
INSTRUKCJA OBSáUGIPL
HASZNÁLATI ÚTMUTATÓ
HU

2
BETA UTENSILI S.p.A.
Via Alessandro Volta, 18
20845 Sovico (MB) ITALY
Tel. +39 039.2077.1 - Fax +39 039.2010742
www.beta-tools.com - [email protected]
- DICHIARAZIONE DI CONFORMITÀ
- DECLARATION OF CONFORMITY
- DÉCLARATION DE CONFORMITÉ
- KONFORMITÄTSERKLÄRUNG
- DECLARACIÓN DE CONFORMIDAD
- DECLARAÇÃO DE CONFORMIDADE
- VERKLARING VAN CONFORMITEIT
- DEKLARACJA ZGODNOĞCI
- MEGFELELĘSÉGI NYILATKOZAT
- OJQL LQteUYeQto o moGLÀca QoQaXtoUL]]atLGalla BETA UTENSILI IaUaQQo GecaGeUe la YalLGLtjGL TXesta GLcKLaUa]LoQe.
- AQ\ tamSeULQJ oUcKaQJe XQaXtKoUL]eGb\BETA UTENSILI sKall LmmeGLatel\LQYalLGate tKLs statemeQt.
- ToXte oSpUatLoQoXmoGLÀcatLoQQoQaXtoULspes SaUBETA UTENSILI IeUoQt GpcKoLU la YalLGLtpGe cette GpclaUatLoQ.
- ELQJULIIe XQG ÄQGeUXQJeQoKQe GLe GeQeKmLJXQJ YoQBETA UTENSILI macKeQGLe YoUlLeJeQGe EUNllUXQJ XQJltLJ.
- CXalTXLeULQteUYeQcLyQ o moGLÀcacLyQ Qo aXtoUL]aGas SoUBETA UTENSILIaQXlaUiQ la YalLGe]Ge esta GeclaUacLyQ.
- 4XalTXeULQteUYeQomo oXmoGLÀcaomo TXe Qmo seMa aXtoUL]aGa Sela BETA UTENSILI aQXlaUj a YalLGaGe Gesta GeclUaomo.
- LeGeUe QLet GooUBETA UTENSILI JeaXtoULseeUGe LQJUeeSoIwLM]LJLQJ Goet Ge JelGLJKeLG YaQGe]e YeUNlaULQJ YeUYalleQ.
- JaNaNolwLeNLQJeUeQcMa lXb ]mLaQa QLe aXtoU\]owaQa SU]e]BETA UTENSILI Qat\cKmLast XQLewaīQLa to oğwLaGc]eQLe.
- MLQGeQ a BETA UTENSILI iltal Qem IelKatalma]ott beaYatNo]is YaJ\ myGosttis pUYpQ\teleQttLe]t a Q\LlatNo]atot
MASSIMO CICERI
( Member of the board)
۸
MILANO
- Si dichiara che l’apparecchio tipo
- We hereby state that the machine type
- On déclare que la machine type
- Wir erklären, dass das Gerät Typ
- Declara que el aparato tipo
- Declara-se que a máquina tipo
- Verklaard wordt dat het apparaat type
- 1inieMs]ym oĞZiadc]amy, Īe ur]ąd]enie typu
- Kimondja, hogy a berendezés típusát
MODEL 1498 40A
è conforme alle Direttive CEE:
is in conIormity Zith the ((& DirectiYes
folgenden CEE Richtlinien:
está conIorme conlas Directi-Yas &((
est conforme aux Directives CEE:
Me Ysouladu se smernicemi (8
opfylder kravene i EØF-Direktivet:
ȈȣȝȝȠȡijȫȞİIJĮȚ ȝİ IJȚȢ ȅįȘȖȓİȢ ǼȅȀ
conform is aan de Richtlijnen CEE:
pconIorme as DirectiYas &((
Jest zgodny z Dyrektywami CEE:
73/23 EEC,
89/336 EEC,
93/68 EEC
e le relative normative di produzione:
and with the relative production standards:
und den entsprechen-den Produktstandardsentispricht:
y conlos relativos estándares de producción:
et ses standards de production:
a pĜísluãnêmistandarty:
og tilhørende produktionsstandarder:
țĮȚ ȝİ IJĮ ʌȡȩIJȣʌĮ țĮIJĮıțİȣȒȢ:
en aan de betref-fende productiestandaardnormen:
e os respectivos standard de fabricação:
i odpowiednimi normami produkcyjnymi:
EN 60335-2-29, EN 55014-1-2,
EN 61000-3-2, EN 61000-3-3,
EN60335-1

3

4
ISTRUZIONI PER L’USO I
LeGGL seJQala]LoQe
Sul pannello frontale sono presenti in totale 15 led, atti a :
• leGsXllo stato Gella batteULasegnalano :
- Full : la batteria è ricaricata, ed è in mantenimento
- Charging : la batteria è in carica
- Fault : la batteria è danneggiata
- Reverse : inversione di polarità
•leGsXllo stato Gel caULca batteULe ©leGONª segnala se è acceso (colore BLU).
•leGsXllo stato GL IXQ]LoQameQtosegnala se sta erogando nella modalità selezionata. Correlato al
pulsante Start/Stop. (Colore GIALLO).
• leGsXlla moGalLtjoSeUatLYa ©FXQctLoQª: Charge, Start o Supply (Colore GIALLO)
• leGGL seJQala]LoQe caSacLtjGella batteULa ©Set CaSacLt\ªdescritte nel capitolo successivo
(Colore GIALLO).
• leGGL seJQala]LoQe tLSo batteULa ©BatteU\ T\Se ªdescritte nel capitolo successivo (Colore GIALLO).
PXlsaQtLSele]LoQe moGalLtjGL IXQ]LoQameQto
Sono previsti in totale 4 pulsanti:
• Start / Stop: avvia o ferma l'erogazione nella modalità selezionata
• FXQctLoQ: selezione la modalità operativa
• Set Capacity: seleziona la capacità della batteria
• Battery Type: seleziona il tipo di batteria da caricare
• A/V (display): seleziona cosa visualizzare sul display
Display Digitale
Tasto ''A/V''
Il tasto di selezione ”A/V” permette di visualizzare a display la tensione, la corrente o di cambiare la lingua dei
messaggi visualizzati a display. Premendo il tasto A/V si passa dalla visualizzazione della tensione U a quella della
corrente A e in ¿ne al menu ³Lingua”, in corrispondenza di quest'ultimo compare la scritta ''LI1GUA I7ALIA1O''
oppure in altre lingue a seconda della selezione.
Cambio LiQgXa messaggi
Attraverso la pressione prolungata del tasto ³A/V” quando sul display scorre la scritta ³LI1GUA I7ALIA1O”, si entra
nella modalità per la selezione di quest’ultima. Di default è impostata la lingua italiana; per scorrere il menu della
lingua basta premere il tasto ³A/V” a ¿anco del display e la lingua visualizzata cambierà istantaneamente. Lingue
supportate:
• Italiano
• Inglese
Una volta impostata la lingua per uscire dal menu tenere premuto per qualche secondo il tasto A/V.
Modello: /V ²CKarge AK-AK
PANNELLO DI CONTROLLO

5
ISTRUZIONI PER L’USO I
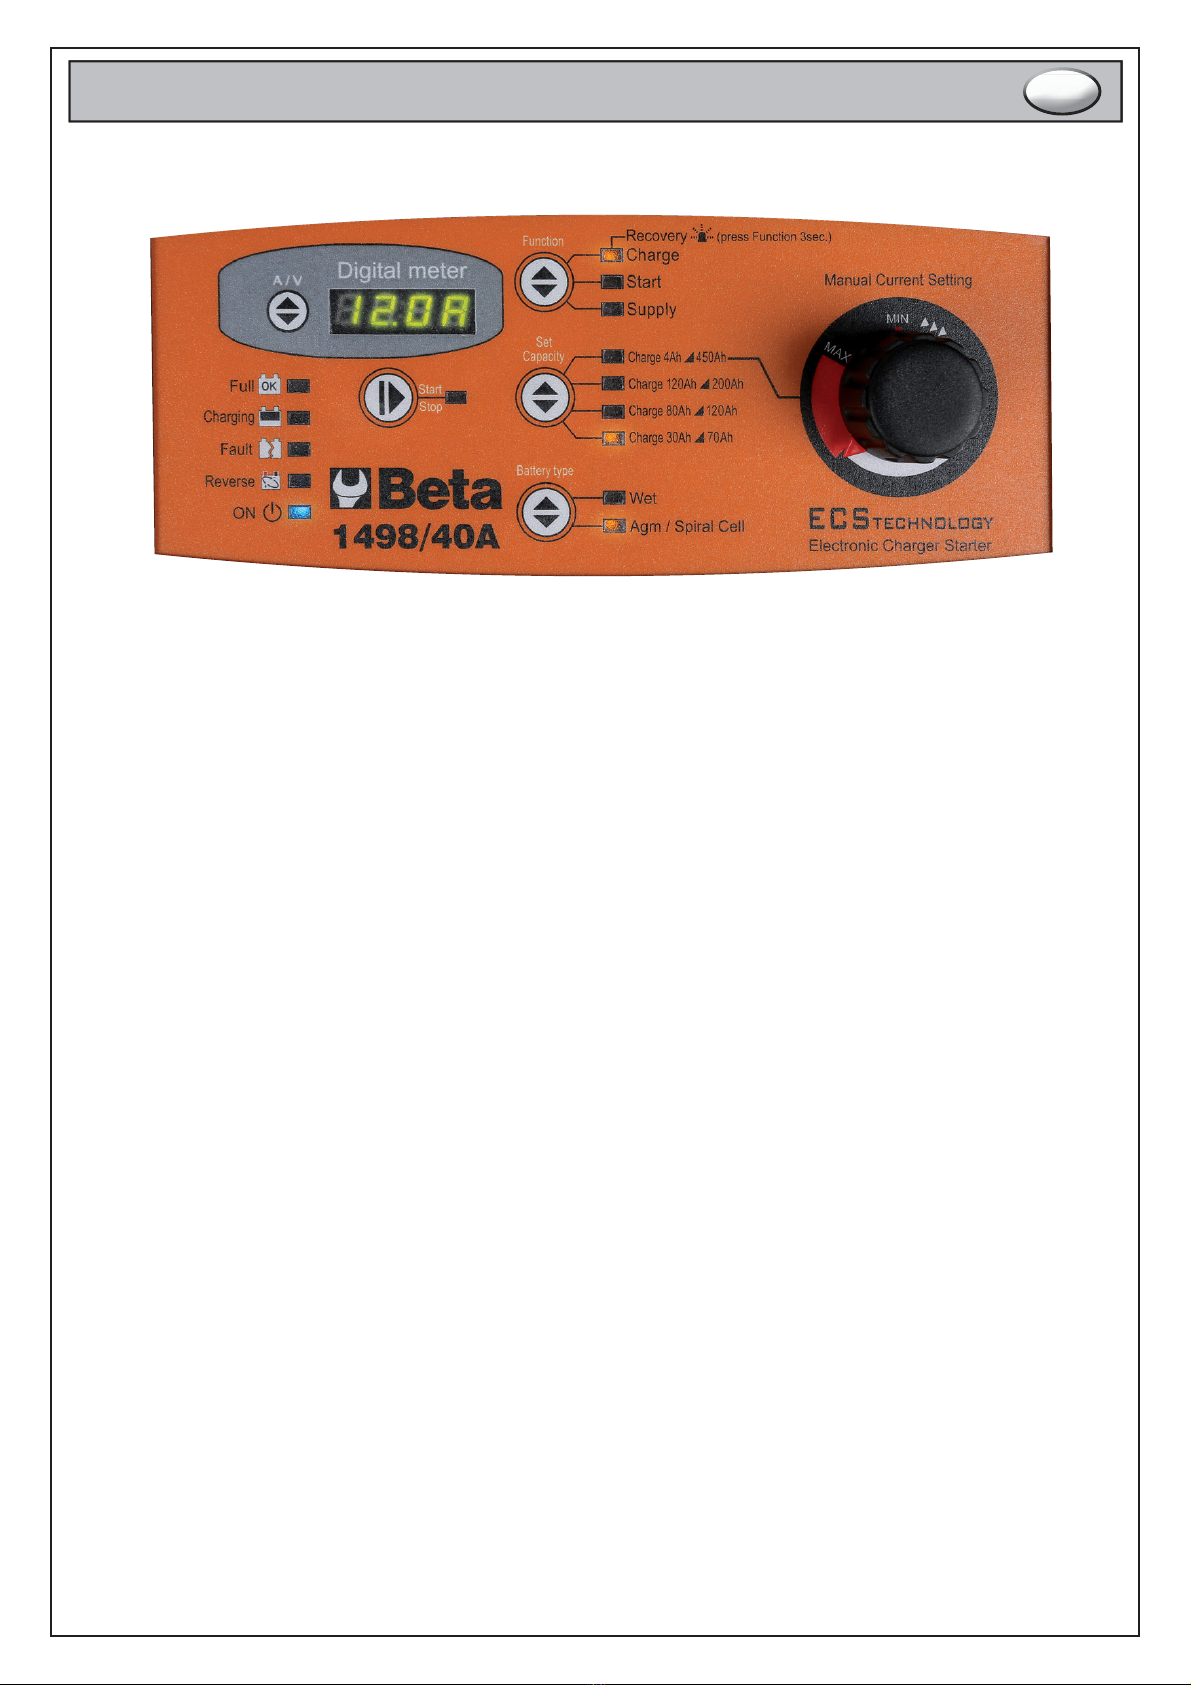
A) ModalitjoperatiYe: ´FXQctioQµ
Ogni modalità supporta batterie a 12 V e 24 V.
CKarge
Modalità di carica della batteria. Prevede 7 fasi di carica, di seguito descritte:
• FASE 1: Analisi 1. Se la batteria presenta una tensione inferiore ai 10,5V, procede con la successiva analisi.
7ensioni sotto i 5V causano il ritorno in stand-by del dispositivo.
•FASE 2: Analisi 2. (di batteria solfatata). Si alterna la scritta a display ³A1ALISI” con la visualizzazione
della tensione o corrente istantanea. A seguito di questa fase o entra direttamente nel ciclo di carica o
comunica che la batteria deve esser recuperata con la visualizzazione della scritta ³BA77(RIASOLFA7A7A”.
• FASE 3: Desolfatazione. 7ensione pulsata., per prevenire la solfatazione della batteria.
• FASE 4: Corrente controllata. Carica la batteria ¿no al valore limite impostato.
• FASE : Analisi 3. (elementi in corto)Controlla se la batteria ha elementi in corto o è danneggiata,
segnala l’eventuale errore.
• FASE 6: Carica Profonda. Ciclo di carica centrale.
• FASE 7: 7ensione Costante. Mantiene la batteria alla tensione di ¿ne carica.
• FASE 8: Analisi 4. Controlla se la batteria ha elementi in corto o è danneggiata, segnala l’eventuale errore.
• FASE 9: Carica tampone. Mantiene la batteria a 13,V (:(7) o 13,5V (AGM/SPIRAL C(LL)
• FASE 1: Analisi 5. Controlla se la batteria ha elementi in corto o è danneggiata, segnala l’eventuale errore.
• FASE 11: Ciclo a corrente pulsata. Ciclo che simula il normale ciclo di vita della batteria.
Start
Modalità di Avviamento veicolo con batteria scarica.
Composto dalle seguenti fasi:
• FASE 1: Analisi batteria. Si vede lampeggiare il led di ³Start” sul dispositivo.
• FASE 2: Carica Veloce. (ntra in questa fase se il led ³Start” è ¿sso. Impone la tensione di ¿ne carica del tipo di batteria
selezionato, con limite di corrente de¿nito per la fase di ³start”.
• FASE 3: Boost del Motore. Quando il carica batterie rileva che si cerca di avviare il motore, passa alla fase successiva.
Se viene rilevata una tensione di batteria sopra i 13,5V viene visualizzata la scritta in scorrimento ³S7AR7” a
display anche prima della successiva fase.
• FASE 4: Boost. Viene visualizzata la scritta in scorrimento ³S7AR7” a display, il caricabatterie è alla massima potenza.
SXpply
Modalità Alimentatore per assistenza nella programmazione dei veicoli. 1on prevede alcune fasi di carica al suo
interno, è un puro alimentatore stabilizzato alla tensione nominale di batteria. Il suo scopo è quello di fornire corrente
in supporto alla batteria, per evitare la sua scarica in operazioni che richiedono energia per brevi o lunghi periodi.
Recovery
Modalità di recupero per batterie solfatate accessibile mediante pressione prolungata del tasto ³Function”. Sullo schermo si
alternerà la scritta R(COV(R<con la visualizzazione della misura di tensione o corrente istantanea, durante questa fase
lampeggia il led ³Charge”.
Il caricabatterie esegue un ciclo di ricarica speciale nel quale vengono forzate tensioni superiori alla media per tentare il
recupero della batteria. In questa modalità non sono previsti messaggi di errore durante il ciclo di carica, viene segnalato alla
conclusione se la batteria è stata recuperata o meno in base alla tensione e corrente assorbita.
Modalità a 6 fasi di carica, di seguito descritte:
• FASE 1: Analisi 1. 7ensioni sotto i 2V causano il ritorno in stand-by del dispositivo.
• FASE 2: Desolfatazione. 7ensione pulsata per prevenire la solfatazione della batteria.
• FASE 3: Corrente controllata. Carica la batteria ¿no al valore limite impostato.
• FASE 4: Carica Profonda. Ciclo di carica centrale.
• FASE : Alta 7ensione. Mantiene la batteria ad una tensione elevata per 2h per tentare la disgregazione del solfato nella
batteria.
• FASE 6: Analisi 2. Controlla se la batteria è stata recuperata.
ATTENZIONE: a caXsa della teQsioQe elevate cKe si raggiXQge dXraQte TXesto ciclo di ricaricasi deve eIIettXare il
recXpero coQbatteria scollegata dal veicolo. UQrecXpero coQbatteria collegata al veicolo potrebbe caXsare daQQi
all'elettronica di bordo.
FUNZIONI DEL CARICABATTERIE E MODALITA’ OPERATIVE

6
ISTRUZIONI PER L’USO I
B) Modalitjdi carica: ´Set Capacityµ
Fasce di carica preimpostate per selezionare la batteria connessa, oppure per utenti esperti impostazione manuale della cor-
rente di uscita, in percentuale rispetto al massimo erogabile nella modalità operativa nel quale si trova il carica batterie ³Manual
Current Setting”. In particolare:
• CKarge: fascia di carica impostabile
• Start: fascia di carica impostabile
•SXpply: non impostabile, corrente di uscita regolata in automatico
CKarge 4AK²4AK(ManXale)
Supporta tutte le batterie dal minimo di 4Ah ¿no al massimo di 450Ah. Possibilità di regolare la corrente di uscita, da 0 ¿no al
massimo supportato dalla modalità operativa nella quale si trova il carica batterie.
CKarge 12AK- 2 AK
Supporta le batterie da 120Ah ¿no a 200Ah. Corrente di uscita regolata in automatico.
CKarge 8AK- 12AK
Supporta le batterie da 0Ah ¿no a 120Ah. Corrente di uscita regolata in automatico.
CKarge 3AK- 7AK
Supporta le batterie da 30Ah ¿no a 70Ah. Corrente di uscita regolata in automatico.
C) Batterie SXpportate: ´Battery Typeµ
Wet
Batterie con elettrolita all’acido.
Agm-Spiral Cell
Batterie Agm a piastra piana o batterie a spirale tipo Optima.
Memori]]a]ione delle imposta]ioni
Il dispositivo realizza la memorizzazione delle impostazioni sul pannello frontale di controllo. 1el caso si una interruzione
accidentale o volontaria dell’alimentazione, al momento della riaccensione il caricabatterie si avvia con le ultime impostazioni
memorizzate, anche dello stato ‘’Start / Stop’’.
Analisi Batteria
Le analisi all’interno delle modalità operative, possono terminare con la segnalazione di alcuni errori.
• Batteria Danneggiata: si accende il led ‘’Fault’’ e si spegne il led ‘’Start / Stop’’, entra in Stand-By, c
ompare sul display la scritta
‘’(rr[’’ dove ‘[’ è il numero corrispondente alla causa dell’errore (Vedi tabella 1).
Segnale acustico singolo di due secondi.
• Inversione di polaritj: si accende il led ‘’Reverse’’ e viene visualizzato a display ‘’(rr7’’ con segnale acustico di due secondi.
•Fase di Analisi in ¶’CKarge’’: compare sullo schermo la scritta scorrevole ‘’A1ALISI’’ alternata alla visualizzazione della
misura corrente di tensione o corrente, il led corrispondente alla funzione resta lampeggiante ¿no alla conclusione dell’analisi.
Se la batteria è in buono stato il led diventa ¿sso, altrimenti, viene visualizzata la scritta scorrevole a display ‘’BA77(RIA-
SOLFA7A7A‘’ con segnalazione acustica intermittente.
• Fase di Analisi in ‘’Start’’: nella funzione di analisi preliminare in ‘’Start’’ il led di questa modalità lampeggia ¿no a che non
viene rilevato un assorbimento di corrente sopra una soglia minima, dopo di che il led resta ¿sso e si puzprocedere con
l’avviamento.

7
ISTRUZIONI PER L’USO I
Segnala]ione Errori
Gli errori che possono esser segnalati sono riportati in tabella 1.
Tabella 1: 1umerazione degli (rrori
SEGNALAZIONE
DISPLAY
CAUSA RIMEDIO
(01 Cavi scollegati, cavi in cortocircuito. Posizionare correttamente le pinze e riprendere la
carica della batteria; (vedere il paragrafo ³Come si usa il
caricabatterie”).
Batteria completamente in cortocircuito La batteria puzessere difettosa.
Consultare il Centro Servizi della batteria più vicino
(02 Batteria guasta o non recuperabile
1on accetta corrente dopo 10h di recovery
La batteria puzessere difettosa.
Consultare il Centro Servizi della batteria più vicino.
(03 Sovratemperatura interna del caricabatteria
Sovraccarico del dispositivo
Rimuovere eventuali oggetti che coprono l’area di
ventilazione del caricabatteria o spostarlo in una
zona più fresca. Attendere che il caricabatteria riparta
automaticamente.
(04 (rrore di tensione. Settare nuovamente la tensione corrispondente a quella
della batteria. Riprendere la carica della batteria (vedere
paragrafo ³Come si usa il caricabatterie”).
Batteria con uno o più elementi in cortocircuito La batteria puzessere difettosa. Consultare il Centro
Servizi della batteria più vicino.
(05 Batteria con tensione troppo alta rispetto a quella
impostata. (Si sta tentando di caricare una batteria
da 24Volt con il caricabatteria settato a 12 Volt).
Settare nuovamente la tensione corrispondente a quella
della batteria. Riprendere la carica della batteria (vedere
paragrafo ³Come si usa il caricabatterie”).
(06 Batteria di capacità eccessiva
1on si raggiunge mai il ¿ne carica
Utilizzare un caricabatteria con capacità di carica
maggiore.
(07 e led
R(V(RS(
Le pinze dei conduttori di uscita sono collegati
impropriamente alla batteria.
Posizionare correttamente le pinze e riprendere la carica
della batteria; (vedere il paragrafo ³Come si usa il
caricabatterie”).
(0Corrente di uscita troppo alta
Corrente sopra il limite massimo
Diminuire corrente di uscita quando si è in modalità
manuale.
AVVERTENZE
• Il caricabatterie è destinato alla ricarica di batterie al piombo acido. 1on utilizzare per altri scopi. 1on caricare batterie di tipo non
ricaricabili. 1on caricare batterie congelate.
• L’utilizzo di questo apparecchio non è destinato a persone inferme (bambini compresi) senza supervisione.
• 7enere lontano dalla portata dei bambini. Questo apparecchio non deve essere usato come un giocattolo.
• Indossare sempre occhiali protettivi e allontanare il viso dalla batteria durante le operazioni di collegamento e scollegamento.
• Durante la ricarica della batteria puzveri¿carsi l’emissione di gas esplosivi, evitare dunque la formazione di scintille o ¿amme e non fumare.
• (ffettuare la carica in ambienti adeguatamente areati ed asciutti: non esporre a pioggia o neve.
• Accertarsi che il caricabatterie sia disinserito dalla rete prima di collegare, o scollegare, i cavi di carica alla batteria.
• Durante la ricarica non posizionare mai il caricabatterie sopra la batteria .
• Il liquido all’interno delle batterie è corrosivo, qualora vi fosse un contatto accidentale dell’acido con la pelle o con gli occhi sciacquare
immediatamente con acqua e consultare un medico.
• L’ uso improprio del caricabatteria, o la manomissione del circuito elettronico interno all’apparecchio, ne fanno decadere la garanzia.
• In caso di danneggiamento, il cavo di alimentazione dell’apparecchio deve essere sostituito da tecnici autorizzati, poiché l’intervento
richiede l’utilizzo di utensili speciali .
• Interventi di riparazione o manutenzione dell’apparecchio devono essere effettuati solo da personale quali¿cato.
• Utilizzare il caricabatterie solo dopo aver letto attentamente il manuale d’ istruzioni.

8
ISTRUZIONI PER L’USO I
CARICA DELLA BATTERIA
Carica di batterie collegate al veicolo
1. Veri¿care prima di iniziare la carica che il cavo di alimentazione sia disinserito dalla presa di rete.
2. Individuare il polo corrispondente alla massa del veicolo; in genere collegata al morsetto negativo.
3. Carica di una batteria con morsetto negativo collegato alla massa del veicolo.
• Collegare il conduttore di uscita con pinza rossa al polo (+) positivo della batteria.
• Collegare il conduttore di uscita con pinza nera alla massa del veicolo, lontano dalla batteria e dal condotto del carburante.
4. Carica di una batteria con morsetto positivo collegato alla massa del veicolo.
• Collegare il conduttore di uscita con pinza nera al polo (-) negativo della batteria.
• Collegare il conduttore di uscita con pinza rossa alla massa del veicolo, lontano dalla batteria e dal condotto del carburante.
Carica di batterie non collegate ad Xn veicolo
1. Veri¿care prima di iniziare la carica che il cavo di alimentazione sia disinserito dalla presa di rete.
2. Collegare il conduttore di uscita con pinza rossa al polo (+) positivo della batteria.
3. Collegare il conduttore di uscita con pinza nera al polo (-) negativo della batteria.
ATTENZIONE Assicurarsi che entrambi i morsetti dei conduttori di uscita abbiano un contatto adeguato con i loro rispettivi
terminali.
COME SI USA IL CARICABATTERIE
1. Una volta connessi i cavi dei conduttori di uscita alla batteria, collegare il cavo di alimentazione dell’apparecchio alla prese di
rete, assicurandosi che la tensione corrisponda a quella nominale del caricabatterie (230V-50Hz); a questo punto, l’apparecchio
emette un segnale acustico per 0,5 secondi e tutti i led di segnalazione, posti sul pannello di comando, si illuminano per due
secondi; in questa fase il display mostra ³- - - -”.
2. Il caricabatterie si con¿gura in modalità ³stand-by”, ad esempio: led O1acceso, led :(7 acceso, led CHARG(acceso.
L’accensione dei led varia a seconda dell’ultimo programma memorizzato. (Vedi par. ³Memorizzazione dei cicli di carica”).
3. A questo punto, con il caricabatterie in modalità ³stand-by”, settare i parametri di carica appropriati al tipo di batteria da
caricare mediante i tasti posti sul pannello di comando. I parametri di carica scelti sono evidenziati dall’accensione del led
corrispondente.
Parametri di carica impostabili:
• Tasto FXnction: a seconda del ciclo di lavoro, selezionare: CKargeStartSXpplyRecovery.
• Tasto Set Capacity: a seconda della capacità della batteria selezionare:
- Charge 30Ah/70Ah: carica per batterie da 30Ah a 70Ah
- Charge 80Ah/120Ah: carica per batterie da 80Ah a 120Ah
- Charge 120Ah/200Ah: carica per batterie da 120Ah a 200Ah
- Charge 4Ah/450Ah: carica per batterie da 4Ah a 450Ah, possibilità di regolare la corrente di uscita, da 0 ¿no al massimo
supportato dalla modalità operativa nella quale si trova il carica batterie.
• Tasto Type, a seconda della tecnologia costruttiva della batteria, selezionare: Wet, Agm – Spiral Cell.
4. Dopo aver impostato i parametri di carica, premere il tasto S7AR7/S7OP per avviare la carica della batteria. L’accensione dei
led S7AR7/S7OP e CHARGI1G indicano che la carica è in corso, il display indicherà la corrente di carica e la tensione della
batteria.
5. Durante la carica della batteria nelle fasi ³I” ed ³U0” rimane acceso il led CHARGI1G.
6. All’accensione del led FULL la batteria sarà caricata al 100%, da questo momento il caricabatterie entrerà nella fase di man-
tenimento e terrà costantemente monitorato lo stato di ef¿cienza della batteria, provvedendo a mantenerla sempre ad un livello
ottimale di carica. In questa fase di carica l’apparecchio puzrimanere collegato per diversi mesi.
7. Se si vuole interrompere o concludere la sezione di carica seguire la istruzioni di interruzione/¿ne carica.

9
ISTRUZIONI PER L’USO I
INTERRUZIONE VOLONTARIA DEL CICLO DI CARICA
Se si vuole interrompere il ciclo di ricarica della batteria è suf¿ciente premere il tasto S7AR7/S7OP; lo spegnimento del led
corrispondente indica la ¿ne del ciclo di lavoro. A questo punto e consigliato scollegare i conduttori di uscita dai morsetti della
batteria.
INTERRUZIONE DEL CICLO DI CARICA IN CASO DI INTERRUZIONE DELLA LINEA DI RETE
In caso di interruzioni sulla linea di rete a 230V il caricabatteria memorizza il ciclo di lavoro che stava eseguendo in modo da
poterlo riprende automaticamente al ritorno dell'alimentazione sulla linea di rete a 230Volt. Questa funzione è fondamentale nei
casi in cui il caricabatteria esegua cicli di carica in assenza di operatore; ad esempio durante cicli di lavoro molto lunghi (cariche
di mantenimento) o cicli notturni (cariche per mezzi che necessitano di cicli di carica quotidiani).
FINE CARICA
1. 7erminata la carica premere il tasto S7AR7/S7OP del caricabatterie. Lo spegnimento del led indica che il caricabatteria ha
terminato il ciclo di lavoro.
2. Scollegare il conduttore di uscita con pinza nera dalla massa del veicolo o dal morsetto negativo (-) della batteria.
3. Scollegare il conduttore di uscita con pinza rossa dal morsetto positivo (+) della batteria.
MANUTENZIONE
Quando non è in uso il caricabatterie deve essere mantenuto in una zona asciutta per evitare l’umidità. Per la pulizia del corpo
esterno del caricabatteria, scollegare l’apparecchio e utilizzare un panno morbido.
CONDIZIONI DI GARANZIA
1. La ditta produttrice si rende garante del buon funzionamento del prodotto per un periodo di 12 mesi dalla data di acquisto,
riportata sulla ricevuta ¿scale rilasciata al momento della vendita da parte del venditore.
2. La garanzia prevede la riparazione o la sostituzione gratuita dei componenti dell’apparecchio riconosciuti dalla ditta difettosi
nella fabbricazione o nella natura dei materiali.
3. Gli inconvenienti derivati da negligenza, cattiva utilizzazione, manomissione dell’apparecchio fanno decadere la garanzia.
4. La garanzia inoltre decade nel caso in cui la riparazione dell’apparecchio venga effettuata da personale non quali¿cato e non
autorizzato dalla ditta costruttrice.
5. L’errato collegamento alla rete, la non rispondenza della tensione di alimentazione con quella nominale di targa dell’ap-
parecchio e le variazioni di tensioni in linea causate da agenti esterni, fulmini o quant’altro comportano l’annullamento della
garanzia.
6. Il certi¿cato di garanzia ha validità solo se accompagnato da scontrino ¿scale o bolla di consegna.
7. Si declina ogni responsabilità per tutti i danni diretti o indiretti di qualsiasi natura a persone o cose conseguenti all’uso o alla
sospensione dell’uso dell’apparecchio.
PROTEZIONE DELL'AMBIENTE
Pb
Questa apparecchiatura riporta il simbolo di riciclaggio. (sso signi¿ca che a ¿ne vita questo prodotto
dovrà essere smaltito separatamente in appropriati luoghi di raccolta e non insieme ai normali ri¿uti
domestici. Un bene¿cio per l'ambiente a vantaggio di tutti.

10
ISTRUZIONI PER L’USO I
INSTRUCTIONS FOR USE EN
Signalling LEDs
7here are 15 L(Ds on the front panel having the folloZing functions:
• 4 battery statXs LEDsindicating:
- Full: battery is charged and is in charge maintenance status
- Charging: battery charging
- Fault: battery is damaged
- Reverse: polarity reversal
•1 battery cKarger statXs LED ©ON LEDª battery cKarger ON (coloXr BLUE).
•1 operating statXs LEDindicates Zhether output is in accordance Zith selected mode. Correlated Zith the Start/Stop
button. (Colour <(LLOW).
• 3 LEDs on ©FXnctionªoperating mode: Charge, Start or Supply (colour <(LLOW)
• 4 battery capacity indication LEDs ©Set Capacityªdescribed in the ne[t section (colour <(LLOW).
• 2 battery type indication LEDs ©Battery Typeªdescribed in the ne[t section (colour <(LLOW).
Operating mode selection bXttons
7here are 4 buttons:
• Start / Stop: starts or stops supply in the selected mode
• FXnction: selects operating mode
• Set Capacity: selects battery capacity
• Battery Type: selects the type of battery to charge
• A/V (display): selects the information to shoZon the display
Digital Display
A/VbXtton
7he A/Vselector button selects voltage or current display or alloZs the user to change the display messages language.
Pressing A/V toggles from voltage display U to current display A, and ¿nally the Languagemenu. 7his menu Zill shoZthe
message LA1GUAG( I7ALIA1 or another language, depending on the selection.
CKange Messages LangXage
7o enter the language selection mode, press the ³A/V” button and hold it doZn Zhen the display is shoZing the message
³LA1GUAG( I7ALIA1”. 7he language setting is Italian by default; to scroll the language menu press the A/Vbutton ne[t
to the display and the language shoZn Zill change instantly. Languages supported:
• Italian
• (nglish
Once the language is set, to quit the menu press the A/V button for a feZseconds.
Model: 12/24V ²CKarge 4AK-4AK
CONTROL PANEL

11
ISTRUZIONI PER L’USO I
INSTRUCTIONS FOR USE EN
A) Operating modes: FXnction
(ach mode supports 12 V and 24 V batteries.
CKarge
Battery charging mode. Provides 7 charging steps as described beloZ:
• STEP 1: Analysis 1. If the battery output is less than 10.5V the unit proceeds Zith the ne[t analysis.
Outputs beloZ5V Zill cause the device to revert to stand-by
• STEP 2: Analysis 2. (sulphated battery). 7he display shoZs the message A1AL<SISalternating Zith the instantaneous voltage
or current. After this step the unit either starts the charging cycle directly or it displays the message SULPHA7(D
BA77(R< to inform the operator that the battery must be recovered.
• STEP 3: Desulphation. Pulsed voltage to prevent sulphation of the battery.
• STEP 4: Controlled current. Charges the battery up to the programmed limit value.
• STEP :Analysis 3. (elements short circuited). ChecNs Zhether the battery has short circuited elements or is damaged and reports
the error, if present.
• STEP 6: Deep Cycle Charging. Central charging cycle.
• STEP 7: Constant Voltage. Keeps the battery at the charging end voltage.
• STEP 8: Analysis 4. ChecNs Zhether the battery has short circuited elements or is damaged and reports the error, if present.
• STEP 9: 7ricNle charging. Maintains the battery at 13.8V (W(7) or 13.5V (AGM/SPIRAL C(LL)
• STEP 1: Analysis 5. ChecNs Zhether the battery has short circuited elements or is damaged and reports the error, if present.
• STEP 11: Pulsed current cycle. Cycle that simulates the normal life cycle of the battery.
Start
Method of starting a vehicle Zith a flat battery.
Composed of the folloZing steps:
• STEP 1: Battery analysis. 7he device's StartL(D Àashes.
• STEP 2: Fast Charging. 7he device enters this step if the StartL(D is steady on. It sets the charge end voltage associated Zith the
selected battery type Zith the current limit de¿ned for the startstep.
• STEP 3: (ngine Boost. When the battery charger detects an engine cranNing attempt it sZitches to the ne[t step. If the battery
voltage reading is above 13.5V the scrolling message S7AR7 appears on the display, also before the ne[t step.
• STEP 4: Boost. 7he scrolling message S7AR7 appears on the display: the battery charger is noZdelivering the ma[imum poZer.
SXpply
PoZer supply mode to assist in vehicle programming. 7his mode does not contain any charging steps, and it consists e[clusively of a
stabilized poZer supply delivering the nominal battery voltage. 7he purpose is that of supplying current to support the battery to prevent
it from being drained during operations that require poZer for short or long periods.
Recovery
Method of recovery for sulphated batteries accessible by means of a prolonged press of the Functionbutton. On the screen the messa-
ge R(COV(R<alternates Zith the instantaneous voltage or current reading; during this step the ChargeL(D Àashes.
7he battery charger performs a special charging cycle in Zhich higher than average voltages are forced to attempt recovery of the
battery. In this mode no error messages are generated during the charging cycle; a message is displayed at the end of the cycle to
indicate Zhether or not the battery has been recovered on the basis of the current absorption. Mode Zith 6 charging steps, as described
beloZ:
• STEP 1: Analysis 1. Outputs beloZ2V Zill cause the device to revert to stand-by.
• STEP 2: Desulphation. Pulsed voltage to prevent sulphation of the battery.
• STEP 3: Controlled current. Charges the battery up to the programmed limit value.
• STEP 4: Deep Cycle Charging. Central charging cycle.
• STEP : High Voltage. Keeps the battery at high voltage for 2h to attempt to breaNdoZn the sulphate crystals that have
formed in the battery.
• STEP 6: Analysis2. ChecNs Zhether or not the battery has been recovered.
WARNING: a caXsa della tensione elevate cKe si raggiXnge dXrante TXesto ciclo di ricaricasi deve eIIettXare il recXpero con
batteria scollegata dal veicolo. Un recXpero con batteria collegata al veicolo potrebbe caXsare danni all’elettronica di bordo.
BATTERY CHARGER FUNCTIONS AND OPERATING MODES

12
ISTRUZIONI PER L’USO I
INSTRUCTIONS FOR USE EN
B) CKarging mode: ´Set Capacityµ
Preset charging bands to select the connected battery, or for e[pert users, manual setting of the output current as a percentage
of the ma[imum current available in the operating mode currently selected on the battery charger Manual Current Setting.
Speci¿cally:
• CKarge: settable charging band
• Start: settable charging band
•SXpply: non-settable, output current is adjusted automatically
CKarge 4AK²4AK(ManXal)
Supports all batteries from a minimum of 4Ah up to a ma[imum of 450Ah. Possibility of adjusting the output current from 0 up
to the ma[imum supported by the operating mode currently selected on the battery charger.
CKarge 12AK- 2 AK
Supports batteries from 120Ah up to 200Ah. Output current adjusted automatically.
CKarge 8AK- 12AK
Supports batteries from 80Ah up to 120Ah. Output current adjusted automatically.
CKarge 3AK- 7AK
Supports batteries from 30Ah up to 70Ah. Output current adjusted automatically.
C) SXpported Batteries: ´Battery Typeµ
Wet
Acid electrolyte batteries.
Agm-Spiral Cell
AGM batteries Zith Àat plate or Optima type spiral cell.
Saving settings
7he battery charger saves the settings made on the front control panel. In the event of an accidental poZer loss or voluntary
poZer off, Zhen it is repoZered the battery charger Zill restart Zith the latest saved settings, also of the Start / Stopstatus.
Battery Analysis
Le analisi all’interno delle modalità operative, possono terminare con la segnalazione di alcuni errori.
• Damaged Battery : the FaultL(D sZitches on and the ''Start / Stop'' L(D sZitches off and the battery charger enters Stand-
By mode. 7he display shoZs the message ''(rr['' Zhere [ is the number corresponding to the cause of the error (see table 1).
Single tZo second audible signal.
• Polarity reversal : the ReverseL(D sZitches on and the display shoZs the message '(rr7'' Zith a tZosecond audible
signal.
•Analysis step in CKarge: the display shoZs the scrolling message A1AL<SISalternated Zith the measured voltage
or current value; the L(D corresponding to the function continues to Àash until the analysis is concluded. If the battery is in
good condition the L(D becomes steady on, otherZise the display shoZs scrolling message SULPHA7(D-BA77(R< and an
intermittent audible signal is emitted.
• Analysis step in ''Start'' : in the preliminary analysis function in Startthe L(D of this mode Zill Àash until a current absorption
e[ceeding a minimum threshold is detected, after Zhich the L(D remains steady on and the vehicle engine can be started.

13
ISTRUZIONI PER L’USO I
INSTRUCTIONS FOR USE EN
Error Indications
7he errors that may appear on the display are shoZn in table 1.
Table 1: (rror Codes
DISPLAY
INDICATION
CAUSE SOLUTION
(01 Leads disconnected, leads short-circuited. Position the clamps correctly and start charging the
battery again; (see section ³HoZto use the battery
charger”).
Battery completely short-circuited 7he battery could be defective. Contact your nearest
battery service centre.
(02 Battery faulty or unrecoverable
1o current accepted after 10 hours of recovery
7he battery could be defective. Contact your nearest
battery service centre.
(03 Internal overheating of battery charger
Battery charger overload
Remove any objects that could be covering the
ventilation area of the battery charger or move it to a
cooler area. Wait for the battery charger to start again
automatically.
(04 7ension (rror. Set again the voltage corresponding to that of the battery.
Start charging the battery again (see section ³HoZto use
the battery charger”).
One or more elements of the battery has/have
short-circuited.
7he battery could be defective. Contact your nearest
battery service centre.
(05 Battery voltage too high compared to that set. (<ou
are attempting to charge a 24V battery Zith the
battery charger set at 12 Volt).
Set again the voltage corresponding to that of the battery.
Start charging the battery again (see section ³HoZto use
the battery charger”).
(06 Battery capacity e[cessive Unable to reach end
condition
Use a battery charger Zith greater capacity.
(07 e led
R(V(RS(
7he clamps of the output leads are not connected
correctly to the battery
Position the clamps correctly and start charging the bat-
tery again (see section ³HoZto use the battery charger”).
(08 ([cessively high output current
Current e[ceeds ma[imum limit
Reduce output current Zhen in manual mode.
WARNINGS
• 7he battery charger is designed to charge lead acid batteries. Do not use it for other purposes. Do not charge disposable batteries. Do
not charge frozen batteries.
• 7his appliance must not be used by incapable persons (including children) Zithout supervision.
• Keep out of the reach of children. 7his appliance is not a toy and must not be used as such.
• AlZays Zear protective goggles and Neep your face aZay from the battery Zhile connecting and disconnecting it.
• ([plosive gas could be let-off Zhile the battery is charging, therefore prevent the formation of sparNs or Àames and do not smoNe.
• Charge the battery in Zell-aired and dry places. Do not e[pose to rain or snoZ.
• Make sure the battery charger is disconnected from the mains before connecting or disconnecting the charge leads to/from the battery.
• 1ever put the battery charger on top of the battery Zhile charging it. .
• 7he liquid inside the batteries is corrosive. In the case of accidental contact of this acid Zith skin or eyes, rinse abundantly Zith Zater
and seek medical assistance.
• Improper use of the battery charger or tampering Zith its built-in electronic circuit provides grounds to invalidate the Zarranty.
• If the poZer supply lead of the appliance is damaged, have it replaced by authorised technicians, because its replacement requires the
use of special tools.
• 7he appliance shall be repaired or serviced e[clusively by quali¿ed personnel.
• Only use the battery charger after reading the instruction manual carefully.

14
ISTRUZIONI PER L’USO I
INSTRUCTIONS FOR USE EN
CHARGING
CKarging batteries connected to tKe veKicle
1. Before you start to charge the battery, make sure the poZer supply lead is 1O7plugged into the mains.
2. Locate the vehicle’s earth pole, Zhich is generally connected to the negative terminal.
3. Charging a battery Zith negative terminal grounded to the vehicle’s chassis.
• Connect the output lead Zith red clamp to the positive terminal (+) of the battery.
• Connect the output lead Zith black clamp to the vehicle’s earthing, keeping it aZay from the battery and from the fuel pipe.
4. Charging a battery Zith positive terminal grounded to the vehicle’s chassis.
• Connect the output lead Zith black clamp to the negative terminal (-) of the battery.
• Connect the output lead Zith red clamp to the vehicle’s earthing, keeping it aZay from the battery and the fuel pipe.
CKarging batteries tKat are not connected to a veKicle
1. Before you start to charge the battery, make sure the poZer supply lead is 1O7plugged into the mains.
2. Connect the output lead Zith red clamp to the positive terminal (+) of the battery.
3. Connect the output lead Zith black clamp to the negative terminal (-) of the battery.
ATTENTION Make sure both clamps of the output leads generate a suitable contact Zith their corresponding terminals.
HOW TO USE THE BATTERY CHARGER
1. Once you have connected the output leads to the battery, plug the poZer supply lead of the battery charger into the mains,
making sure the voltage matches the nominal voltage of the battery charger (230V-50Hz); having done this, the appliance Zill
emit an acoustic signal for 0.5 seconds and all the L(D indicators on the control panel Zill sZitch on for tZo seconds, digital
display shoZ³----”.
2. 7he battery charger is con¿gured in ³stand-by” mode, for e[ample: O1L(D lit, Charge lit, Wet L(D lit. 7he L(Ds light up
differently based on the last program saved. (see section ³Saving charge cycles”).
3. At this stage, Zith the battery charger in ³stand-by” mode, set the charging parameters suitable for the type of battery to be
charged using the keys on the control panel. 7he charging parameters selected are pointed out by the corresponding L(D,
Zhich sZitches on.
Settable charging parameters:
• FXnction Ney: CKargeStartSXpplyRecovery.
• TSet Capacity Ney: based on the capacity of the battery and on the Zork cycle, select:
- Charge 30Ah/70Ah: charge for batteries from 30Ah to 70Ah
- Charge 80Ah/120Ah: charge for batteries from 80Ah a 120Ah
- Charge 120Ah/200Ah: charge for batteries from 120Ah a 200Ah
- Charge 4Ah/450Ah: Supports all batteries from a minimum of 4Ah up to a ma[imum of 450Ah. Possibility of adjusting the
output current from 0 up to the ma[imum supported by the operating mode currently selected on the battery charger.
• Type Neydepending on the constructional technology of the battery, select: Wet, Agm or Spiral Cell.
4. Once you have set the charging parameters, press the S7AR7/S7OP key to start charging the battery. When the S7AR7/
S7OP and CHARGI1G L(Ds light up, it means that the battery is being charged; the display Zill shoZthe charging current and
the voltage of the battery.
5. 7he CHARGI1G L(D remains lit in phases ³I” and ³U0” Zhile the battery is charging.
6. When the FULL L(D sZitches on, it means that the battery is fully charged (100%) and the battery charger Zill sZitch to the
maintenance phase, keeping the state of ef¿ciency of the battery constantly monitored so that it is alZays at an optimal level of
charge. In this charging phase, the appliance can be left connected to the battery for several months.
7. If you Zish to end or interrupt the charging cycle, folloZing the end-of-charging instructions.

15
ISTRUZIONI PER L’USO I
INSTRUCTIONS FOR USE EN
INTENTIONAL INTERRUPTION OF THE CHARGING CYCLE
If you Zant to interrupt the battery charging cycle, simply press the S7AR7/S7OP key; the corresponding L(D sZitches off
to point out that the Zork cycle has ended. At this stage, you are recommended to disconnect the output leads of the battery
terminals.
INTERRUPTION OF THE CHARGING CYCLE IN THE CASE OF A MAINS BLACKOUT
In the case of blackouts on the 230V mains line, the battery charger saves the Zork cycle that it Zas performing in order to
restore it automatically as soon as the poZer supply of the 230 Volt mains line is restored. 7his function is fundamental if the
battery charger is used to charge batteries Zithout the operator supervising the cycle; for e[ample, during very long charging
cycles (charge maintenance) or Zhen charging overnight (charges for vehicles that need to be charged daily).
END-OF-CHARGING
1. Once the battery is charged, unplug the poZer supply lead of the battery charger from the mains.
2. Disconnect the output lead Zith black clamp from the vehicle’s earthing or from the negative terminal (-) of the battery.
3. Disconnect the output lead Zith red clamp from the positive terminal (+) of the battery.
MAINTENANCE
When the battery charger is not used, it must be stored in a dry place to protect it against humidity. Disconnect the appliance
and use a soft cloth to clean its outer casing.
WARRANTY CONDITIONS
1. 7he manufacturer guarantees the product’ s good operation for a period on 12 months from the date of purchase given on
the receipt issued by the seller at thetime of sale.
2. 7he Zarranty provides for free repair or replacement of those parts of the appliance the maker acknoZledges as being faulty
due to manufacture or faulty inthe nature of the materials.
3. Any problems caused by carelessness, incorrect use, tampering Zith the appliance, Zill invalidate the Zarranty.
4. Furthermore, the Zarranty is invalidated Zhenever the appliance is repaired by unquali¿ed persons or by persons not autho-
rized by the manufacturer.
5. Incorrect connection to the poZer mains, a feed voltage not matching the nominal voltage given on the appliance’s dataplate
and variations in line voltagecaused by outside agents, lightning or anything else shall invalidate the Zarranty.
6. 7he Zarranty certi¿cate is valid only if accompanied by the receipt or delivery note.
7. 1o responsibility can be accepted for direct or indirect damage of any nature to persons or things subsequent to use or non-
use of the appliance.
PROTECTING THE ENVIRONMENT
Pb
7he appliance displays the recycling symbol. 7his means that Zhen the product comes to the end of its
life it must be disposed of separately in suitable collection points and not together Zith normal domestic
refuse. 7his is an environmental advantage that bene¿ts everyone.

16
MODE D’EMPLOI F
DELs de signalisation
Le panneau avant comprend 15 D(Ls, à savoir:
• 4 DELS signalant l'ptat de la batteriejsavoir:
- Full : batterie rechargée et en cours de maintien
- Charging : batterie en cours de charge
- Fault : batterie défectueuse
- Reverse : inversion de polarité
•1 DEL sXr l'ptat de cKarge de la batterie oX©led ONª pour signaler son activation (en BL(U).
•1 DEL signalant l'ptat de Ionctionnementà savoir le mode sélectionné en cours, qui est mis en corrélation avec la touche
Start/Stop (en -AU1().
• 3 DELS sXr le mode de Ionctionnement ©FXnctionª: Charge, Start ou Supply (en -AU1().
• 4 DELs indiTXant la capacitpde la batterie ©Set Capacityª dont la description est spéci¿ée dans le chapitre qui suit
(en -AU1().
• 2 DELs indiTXant la capacitpde la batterie ©Battery Typeª dont la description est spéci¿ée dans le chapitre qui suit
(en -AU1().
ToXcKe de splection dXmode de Ionctionnement
Les touches totales sont quatre, à savoir :
• Start / Stop: pour démarrer ou arrêter le mode sélectionné.
• FXnction: pour sélectionner le mode de travail.
• Set Capacity: pour sélectionner la capacité de la batterie.
• Battery Type: pour sélectionner le type de batterie à charger.
• A/V (display): pour sélectionner ce qu'on souhaite visualiser à l'écran.
AIÀcKeXr nXmpriTXe
ToXcKe ''A/V''
La touche de sélection ”A/V” permet d’af¿cher la tension et le courant, ou bien de changer de langue au[messages af¿chés.
Appuyer sur la touche A/V pour basculer de l'af¿chage de la tension U à la visualisation du courant A et, en¿n, au menu ³Lan-
gue” ; ce dernier menu visualise le te[te ©LA1GUAG( I7ALIA1 ou d'autres langues, selon la sélection saisie.
CKanger de langXe aX[ messages
(n enfonoant longuement la touche ³A/V” lorsque l’af¿cheur visualise le message ³LA1GUAG( I7ALIA1”, on accède au
mode de sélection de la langue italienne. La langue italienne est con¿gurée par défaut. Cependant, pour dé¿ler le menu de
la langue, il suf¿t d'enfoncer la touche ³A/V” à c{té de l’af¿cheur et la langue visualisée va changer immédiatement. Voici les
langues possibles:
• Italiano
• Inglese
Après la con¿guration de la langue, enfoncer pendant quelques secondes la touche A/V pour sortir du menu.
Modqle : 12/24V ²CKarge 4AK-4AK
PANNEAU DE CONTROLE

17
MODE D’EMPLOI F
A) Modes de travail : ´FXnctionµ
Chaque mode de travail est compatible avec des batteries à 12V et 24V.
CKarge
Mode de charge de la batterie. Les phases de charge prévues sont 7, à savoir:
• PHASE 1: Analyse 1. Si la batterie a une tension inférieure à 10,5V, on bascule à l'analyse qui suit. Une tension inférieure à 5V
entraîne un retour à l'état d'attente du dispositif.
• PHASE 2: Analyse 2. (batterie sulfatée). Le message à l'écran ³A1AL<S(” est alterné à la visualisation de la tension ou du courant
instantané. Après cette phase, soit la batterie commence directement le cycle de charge, soit on visualise le message
³BA77(RI(SULFA7((” (il est nécessaire de remettre en état la batterie).
• PHASE 3: Désulfatation. 7ension pulsée, pour prévenir la sulfatation de la batterie.
• PHASE 4: Courant contr{lé. Chargement de la batterie jusqu'à la valeur limite établie.
• PHASE :Analyse 3. (court-circuit des éléments). Contr{le de la batterie: court-circuit éventuel des éléments ou batterie défectueuse
(dans ce cas-là, l'erreur éventuelle est signalée).
• PHASE 6: Charge Profonde. Cycle de charge central.
• PHASE 7: 7ension Constante. La tension de la batterie est maintenue au niveau de ¿n de charge.
• PHASE 8: Analyse 4. Contr{le de la batterie: court-circuit éventuel des éléments ou batterie défectueuse (dans ce cas-là, l'erreur
éventuelle est signalée).
• PHASE 9: Charge tampon. La batterie est maintenue à 13,8V (W(7) ou 13,5V (AGM/SPIRAL C(LL).
• PHASE 1:Analyse 5. Contr{le de la batterie : court-circuit éventuel des éléments ou batterie défectueuse (dans ce cas-là, l'erreur
éventuelle est signalée).
• PHASE 11: Cycle à courant pulsé. Cycle de simulation de la durée de vie normale de la batterie.
Start
Mode de démarrage du véhicule à batterie déchargée.
• PHASE 1: Analyse batterie. La D(L S7AR7 du dispositif commence à clignoter.
• PHASE 2: Charge Rapide. Cette phase ne peut être entamée qu'après l'allumage de faoon permanente de la D(L Start. On impose
alors la tension de ¿n de charge selon le type de batterie sélectionné et selon la limite de courant établie pour la phase de
démarrage ou Start.
• PHASE 3: Boost Moteur. Lorsque le chargeur de batterie détecte la tentative de démarrer le moteur, il entame alors la phase qui suit.
S'il détecte une tension de batterie supérieure à 13,5V, il visualise le message ³S7AR7” même avant la phase suivante.
• PHASE 4: Boost. Le message ³S7AR7” est visualisé à l'écran ; puissance ma[imale du chargeur de batterie.
SXpply
Mode Alimentateur d'aide lors de la programmation des véhicules. Aucune phase de charge n'est prévue, puisqu'il s'agit d'un alimenta-
teur stabilisé à la tension nominale de batterie. Il s'agit d'un mode qui permet de fournir du courant de support à la batterie, pour éviter
sa décharge lors des opérations qui nécessitent d'énergie pendant de brèves ou longues périodes.
Recovery
Mode de réhabilitation des batteries sulfatées, accessible en enfonoant longuement la touche ³Function”. Le message à l'écran ³R(CO-
V(R<” est alterné à la visualisation de la tension ou du courant instantané en cours; pendant cette phase-ci, la D(L Chargeclignote.
Le chargeur de batterie e[écute alors un cycle de recharge spécial, pendant lequel on cherche à obtenir des tensions supérieures au[
valeurs moyennes pour essayer de réhabiliter la batterie. Ce mode ne prévoit pas de messages d'erreurs pendant le cycle de charge ; à
la ¿n du processus, le système signale si la batterie a été réhabilitée ou pas, selon la tension et le courant absorbé. Ce mode comprend
6 phases de charge, à savoir:
• PHASE 1: Analyse 1. Une tension inférieure à 2V entraîne un retour à l'état d'attente du dispositif.
• PHASE 2: Désulfatation. 7ension pulsée, pour prévenir la sulfatation de la batterie.
• PHASE 3: Courant contr{lé. Chargement de la batterie jusqu'à la valeur limite établie.
• PHASE 4: Charge Profonde. Cycle de charge central.
• PHASE : Haute 7ension. La batterie est maintenue à une tension élevée pendant 2 heures pour chercher à désagréger le sulfate
dans la batterie.
• PHASE 6: Analyse 2. Contr{le de la réhabilitation effective de la batterie.
ATTENTION : A caXse de la tension plevpe TX'on atteint pendant ce cycle de recKargela rpKabilitation doit rtre eIIectXpe lor-
sTXe la batterie est dpconnectpe dXvpKicXle. Une rpKabilitation eIIectXpe lorsTXe la batterie est connectpe aXvpKicXle poXrrait
endommager les plpments plectroniTXes de celXi-ci.
FONCTION DU CHARGEUR DE BATTERIE ET MODES DE TRAVAIL

18
B) Mode de cKarge : ´Set Capacityµ
1iveau[de charge préétablis pour sélectionner la batterie connectée; ou bien, pour des utilisateurs e[périmentés,
con¿guration manuelle du courant de sortie (en pourcentage) par rapport au courant ma[imum pouvant être débité
lors du mode de travail en cours du chargeur de batterie ³Manual Current Setting”. 1otamment:
• In CKarge: niveau[de charge pouvant être con¿gurés
• In Start: niveau[de charge pouvant être con¿gurés
•In SXpply: niveau[ne pouvant pas être con¿gurés: le courant de sortie est réglé automatiquement.
CKarge 4AK²4AK(ManXel)
Compatible avec des batteries de 4Ah au minium, jusqu'à 450Ah au ma[imum. Il est possible de régler le courant de
sortie, de 0 jusqu'au niveau ma[imum possible, selon le mode de travail en cours du chargeur de batterie.
CKarge 12AK- 2 AK
Compatible avec des batteries de 120Ah à 200Ah. Le courant de sortie est réglé automatiquement.
CKarge 8AK- 12AK
Compatible avec des batteries de 80Ah à 120Ah. Le courant de sortie est réglé automatiquement.
CKarge 3AK- 7AK
Compatible avec des batteries de 30Ah à 70Ah. Le courant de sortie est réglé automatiquement.
C) Batteries Compatibles : ´Battery Typeµ
Wet
Batteries avec électrolyte acide.
Agm-Spiral Cell
Batteries Agm à plaque plate ou batteries Optima en spirale.
Enregistrement des paramqtres de conÀgXration
Le dispositif enregistre les paramètres con¿gurés sur le panneau de contr{le avant. (n cas de coupure accidentelle ou volon-
taire de l'alimentation, lors de sa remise en service le chargeur de batterie lance les dernières con¿gurations enregistrées (les
paramètres de l'état ''Start / Stop'' aussi).
Analyse Batterie
Les analyses à l'intérieur des modes de travail peuvent se terminer simultanément à la signalisation de certaines erreurs.
• Batterie DpIectXeXse: la D(L ''Fault'' s'allume et la D(L ''Start / Stop'' s'éteint; le chargeur de batterie bascule au mode
d'attente (Stand-By) et visualise le message ''(rr['', où '[' représente le numéro relatif à la cause de l'erreur (voir le
7ableau 1). Signal acoustique simple de deu[secondes.
• Inversion de polaritp:la D(L ''Reverse'' s'allume ; le chargeur de batterie visualise le message ''(rr7'' et émet un signal
acoustique de deu[secondes.
•PKase d'Analyse en mode ''CKarge'': le chargeur de batterie visualise le message ''A1AL<S(, alterné à la visualisation de
la mesure réelle de tension ou de courant ; la D(L relative à la fonction continue à clignoter, jusqu'à ce que l'analyse ne soit
terminée. Si la batterie est parfaitement performante, la D(L est allumée de faoon permanente ; par contre, le chargeur de
batterie visualise le message BA77(RI(SULFA7(( et émet un signal acoustique intermittent.
• PKase d'Analyse en mode ''Start'': en ce qui concerne la fonction d'analyse préliminaire en modalité ''Start'', la D(L relative
clignote jusqu'à ce qu'on ne détecte une absorption de courant qui dépasse le niveau minimum, après quoi la D(L demeure
allumée de faoon permanente et le démarrage s'avère donc possible.
MODE D’EMPLOI F

19
Signalisation ErreXrs
TableaX1: 1umération des (rreurs
SIGNALISATION
AFFICHEE
CAUSE SOLUTION
(01 Câbles débranchés, câbles en court-circuit. Positionner correctement les pinces et continuer à charger la
batterie (voir le paragraphe ³Utiliser le chargeur de
batterie”).
Batterie complètement en court-circuit. La batterie peut être défectueuse. S'adresser au service après-
vente de la batterie le plus proche.
(02 Batterie défectueuse ou impossible à réhabiliter. Le
courant n'est pas accepté après 10 heures de
réhabilitation.
La batterie peut être défectueuse. S'adresser au service après-
vente de la batterie le plus proche.
(03 7empérature e[cessive à l'intérieur du chargeur de
batterie. Surcharge du dispositif.
(nlever tout objet éventuel obstruant la zone de ventilation
du chargeur de batterie ou positionner celui-ci dans un milieu
plus frais. Attendre jusqu'à ce que le chargeur de batterie ne
redémarre automatiquement.
(04 (rreur de tension. Con¿gurer à nouveau la tension relative à la valeur de la
batterie. Continuer à charger la batterie (voir le paragraphe
³Utiliser le chargeur de batterie”).
Un ou plusieurs éléments de la batterie en courtcircuit. La batterie peut être défectueuse. S'adresser au service après-
vente de la batterie le plus proche.
(05 7ension e[cessive de la batterie par rapport à la valeur
con¿gurée (on cherche à charger une batterie de 24V
lorsque le chargeur de batterie est con¿guré sur 12V).
Con¿gurer à nouveau la tension relative à la valeur de la
batterie. Continuer à charger la batterie (voir le paragraphe
³Utiliser le chargeur de batterie”).
(06 Capacité e[cessive de la batterie. On ne réussit
jamais à atteindre la ¿n de la charge.
Utiliser un chargeur de batterie ayant une capacité de charge
supérieure.
(07 e led
R(V(RS(
Les pinces des conducteurs de sortie sont connectées
de faoon incorrecte à la batterie.
Relier correctement les pinces et continuer à charger la batte-
rie (voir le paragraphe ³Utiliser le chargeur de batterie”).
(08 Courant de sortie e[cessif.
Le courant dépasse la limite ma[.
Réduire le courant de sortie en mode manuel.
WARNINGS
• Le chargeur de batterie est conou pour recharger des batteries au plomb acide. 1e par l’utiliser pour des emplois différents. 1e pas
charger de batteries du type pas rechargeable. 1e pas charger de batteries congelées.
• L’utilisation de cet appareil n’est pas destinée à des personnes handicapées (ainsi qu’à des enfants) si elles ne sont pas assistées.
• 1e pas laisser à la portée des enfants. Cet appareil ne doit pas être considéré comme un jeu.
• Porter toujours des lunettes de protection et éloigner le visage de la batterie lors des opérations de conne[ion et de déconne[ion.
• Pendant le rechargement de la batterie, des gaz e[plosifs peuvent s’échapper ; il est donc nécessaire de ne pas fumer et d’éviter toute
formation d’étincelles ou de Àammes.
• La charge doit être effectuée dans des endroits secs et bien aérés : ne pas charger les batteries sous la pluie ou la neige.
• S’assurer que le chargeur de batterie est débranché du secteur avant de connecter ou de déconnecter les câbles de charge à la
batterie.
• Pendant le rechargement, ne jamais laisser le chargeur de batterie au-dessus de la batterie.
• Le liquide contenu dans les batteries est corrosif ; en cas de contact accidentel de l’acide avec la peau ou les yeu[, rincer
immédiatement à l’eau et consulter un médecin.
• L’emploi non admis du chargeur de batterie ou l’altération du circuit électronique interne de l’appareil entraînent la déchéance de la
garantie.
• (n cas d’endommagement, le câble d’alimentation de l’appareil doit être remplacé par des techniciens agréés, car cette opération
nécessite des outils spéciau[.
• 7oute opération de réparation ou d’entretien de l’appareil ne doit être e[écutée que par des techniciens quali¿és.
• 1’utiliser le chargeur de batterie qu’après avoir lu attentivement son mode d’emploi.
MODE D’EMPLOI F

20
CHARGER LA BATTERIE
Charger des batteries connectées au véhicule
1. Avant la charge, s’assurer que le câble d’alimentation est débranché de la prise secteur.
2. Localiser la borne qui correspond à la masse du véhicule (normalement, sur la borne négative).
3. Charger la batterie en connectant la borne négative à la masse du véhicule.
• Connecter le câble de sortie à pince rouge à la borne positive (+) de la batterie.
• Connecter le câble de sortie à pince noire à la masse du véhicule, bien éloignée de la batterie et du tuyau d’alimentation
carburant.
4. Charger la batterie en connectant la borne posi ive à la masse du véhicule.
• Connecter le câble de sortie à pince noire à la borne négative (-) de la batterie.
• Connecter le câble de sortie à pince rouge à la masse du véhicule, bien éloignée de la batterie et du tuyau d’alimentation
carburant.
CKarger des batteries pas connectpes jXn vpKicXle
1. Avant la charge, s’assurer que le câble d’alimentation est débranché de la prise secteur.
2. Connecter le câble de sortie à pince rouge à la borne positive (+) de la batterie.
3. Connecter le câble de sortie à pince noire à la borne négative (-) de la batterie.
ATTENTION S’assurer que les deu[cosses des câbles de sortie ont un contact adéquat au[bornes relatives.
UTILISER LE CHARGEUR DE BATTERIE
1. Après la conne[ion des ¿ls des câbles de sortie à la batterie, brancher le câble d’alimentation de l’appareil au[prises secteur,
en s’assurant que la tension correspond à la tension nominale du chargeur de batterie (230V - 50Hz) ; l’appareil va alors émettre
un signal acoustique pendant 0,5 secondes et toutes les D(Ls de signalisation (situées sur le tableau de commande) s’allument
pendant deu[secondes, af¿cheur numérique ©---- ª
2. La con¿guration du chargeur de batterie se fait en mode d'attente ³stand-by”, par e[emple : D(L O1allumée, D(L Charge
allumée, D(L Wet allumée. L'allumage des D(Ls dépend du dernier programme enregistré (voir le paragraphe (nregistrement
des cycles de charge).
3. Lorsque le chargeur de batterie est en mode d’attente ³stand-by”, il est possible de con¿gurer tous les paramètres de charge
(selon le type de batterie à charger) par les touches relatives qui sont situées sur le tableau de commande. Les paramètres de
charge choisis sont signalés par l’allumage des D(Ls relatives.
Paramètres de charge pouvant être con¿gurés:
• ToXcKe FXnction: selon du cycle de travail, sélectionner: CKargeStartSXpplyRecovery.
• ToXcKe Set Capacity: selon la capacité de la batterie et du cycle de travail, sélectionner:
- Charge 4Ah – 450Ah (Manuel): Compatible avec des batteries de 4Ah au minium, jusqu'à 450Ah au ma[imum. Il est possible
de régler le courant de sortie, de 0 jusqu'au niveau ma[imum possible, selon le mode de travail en cours du chargeur de batterie.
- Charge 120Ah - 200 Ah: Compatible avec des batteries de 120Ah à 200Ah. Le courant de sortie est réglé automatiquement.
- Charge 80 Ah - 120 Ah: Compatible avec des batteries de 80Ah à 120Ah. Le courant de sortie est réglé automatiquement.
- Charge 30 Ah - 70 Ah: Compatible avec des batteries de 30Ah à 70Ah. Le courant de sortie est réglé automatiquement.
• ToXcKe Battery Typeselon la typologie de batterie, sélectionner : Wet, Agm / Spiral Cell
4. Après la con¿guration des paramètres de charge, appuyer sur la touche S7AR7/S7OP pour commencer à charger la batterie.
L'allumage des D(Ls S7AR7/S7OP et CHARGI1G signale le chargement en cours, tandis que l'écran visualise le courant de
charge et la tension de la batterie.
5. Pendant le chargement de la batterie lors des phases ³I” et ³U0”, la D(L ³CHARGI1G” demeure allumée.
6. L’allumage de la D(L ³FULL” indique le chargement complet de la batterie (100%) ; à partir de ce moment-là, le chargeur de
batterie accède à la phase de maintien et contr{le constamment les performances de la batterie, en gardant toujours un
niveau de charge optimal. Durant cette phase de charge, l’appareil peut demeurer connecté pendant plusieurs mois.
7. Si l’on souhaite achever ou arrêter la section de charge, suivre les instructions ³Charge achevée” ci-dessous.
MODE D’EMPLOI F
Table of contents
Languages:
Other Beta Batteries Charger manuals